Transcript
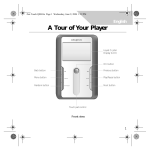
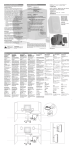
MuVo_Value_Lft_Nordic.pdf
09/11/2004
11:21:58 AM
Setup
1
2
Connecting USB Flash Drive to your
computer
a
Formatting your player
Your player supports the FAT16/32 (16/32-bit File
Allocation Table) file system. Format your player with the
FAT file system only.
Before unplugging your player from your computer, use the Windows Eject or Safely Remove Hardware function
to safely disconnect your player.
Transferring Music Tracks
Transferring Files
1. On your desktop, right-click the My Computer icon,
and then click Explore. The USB Flash drive appears as a
removable disk icon (Figure 1).
1. On your desktop, right-click the My Computer icon,
and then click Explore.
If you need to format your player, backup the files in your player
first. When you format your player, all songs and files will be
deleted. By default, your player is already formatted.
1. Connect your player to your computer's USB port.
2. Drag and drop files or folders into your player. The LED
on the USB Flash Drive blinks red during data transfer.
2. Launch Windows Explorer on your computer. Your player is
recognized as a Removable Disk in Windows Explorer.
3. Right-click the Removable Disk icon and click the Format
option. The Format F:\dialog box appears (replace F:\ with the
drive letter of your player).
USB Flash Drive
Troubleshooting
The player's LED does not light up.
Do the following:
q Insert a new battery into your player.
q Format your player as described above in "Formatting your player".
File transfers to the player are very slow
(less than 100kb/sec).
Do the following:
q Format your player as described above in "Formatting your player".
After playing the first few music tracks, the player
skips a music track.
Do the following:
q Format your player as described above in "Formatting your player".
Battery module
The player's LED is red and there is no playback.
b
BUSY
Do the following:
q Make sure that there are music tracks stored
in your player.
Figure 1
VOL
2. Drag and drop .MP3 or .WMA files only into your player.
The LED on the MuVo Memory blinks red during data transfer.
4. Follow the instructions on the screen to format your player.
5. After the formatting is complete, make sure you stop your
player before disconnecting it from your computer.
Files/music tracks are corrupted when transferred
to the player.
For more information about using Windows Explorer, refer to its
online Help.
q Before unplugging your player from your computer, use the
Windows Eject or Safely Remove Hardware function to safely
disconnect your player.
RESET
You can use other applications such as Creative MediaSource,
Windows Media player or RealOne to manage the music tracks
in your player.
USB port
A-B
C
M
The player's LED turns from green to red instantly
when a music track is played.
Do not press the buttons on your USB Flash Drive while connecting it
to your computer.
Y
CM
q Using Windows Explorer, delete the SETTINGS.DAT file from
your player.
MY
How To Use Your Player
CY
Product Registration
Inserting the battery
Enjoy a host of benefits by registering your
product during installation, or at
www.creative.com\register.
Benefits include:
- Service and Product Support from Creative
- Exclusive updates on promotions and events!
a
Remember to unplug the USB Flash Drive from your computer
and insert it into the battery module before turning on the player.
b
+
-
Other Information
For the latest information on your player, go to
http://www.creative.com
Overview
c
Pausing a music track
Press the Play/Pause button
q Using Windows Explorer, delete the SETTINGS.DAT file from
your player.
Headphones
connector
Turning on the player
Press and hold the Play/Pause button
for a few seconds.
The LED turns green and there is music playback. If, however,
there are no music tracks in your player, the LED turns red.
Turning off the player
Press and hold the Play/Pause button
until after the LED turns off.
The player turns off immediately after it is
turned on.
A-B
K
AAA battery
CMY
Repeat A-B
Track
A-B
/
Play/Pause/Power
for a few seconds
Dual color LED
Volume Increase
Creative Knowledge Base
Next Track/
Fast Forward
. The LED turns red.
Volume Decrease
Repeating a music track
Press and hold the Repeat A-B / Track
button for a few
seconds. The LED blinks green. To resume normal playback,
press the Repeat A-B / Track
button again.
Previous Track/
Rewind
A-B
Proper Handling
Repeating a portion of a music track
Press the Repeat A-B / Track button to mark the beginning
of the portion you wish to repeat. The LED blinks green. Press the
Repeat A-B / Track
button again to mark the end of the
portion. The LED blinks green at a slower speed, and the marked
portion is played back repeatedly. To resume normal playback,
press the Repeat A-B / Track
button again.
A-B
A-B
If the LED on the player blinks red, the battery power is low. If the LED on
the player is a steady red, there are no tracks in your player.
Copyright © 2004 Creative Technology Ltd. All rights reserved. The Creative logo is a registered
trademark and MuVo is a trademark of Creative Technology Ltd. NOMAD is a registered
trademark of Aonix and is used by Creative Technology Ltd. and/or its affiliates under license.
Mircosoft, Windows Media, and Windows are trademarks or registered trademarks of Microsoft
Corporation in the United States and/or other countries. All other brand and product names
listed are trademarks or registered trademarks of their respective holders and are hereby
recognized as such. Actual contents may differ slightly from those pictured. MPEG Layer-3
audio compression technology licensed by Fraunhofer IIS and Thomson Multimedia.
The battery life depends on the type of battery used. It is recommended
that you use alkaline batteries. Playing .WMA files with a high bass level
may also reduce your battery's life significantly.
A-B
Front view
Resolve and troubleshoot technical queries at Creative's
24-hour self-help Knowledge Base. Go to
http://www.creative.com and select your region.
For more information on Customer Support Services and
Warranty details please go to www.creative.com and select
your country.
A-B
45 C
113 F
Customer Support Services
and Warranty
Side view
You can use stickers (included) to label your player. Place the stickers on the space provided at the back of the USB Flash Drive.