1
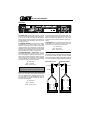
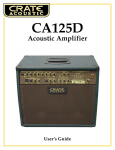
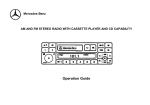
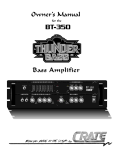
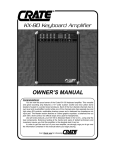
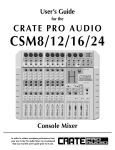
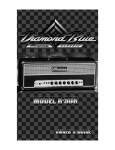
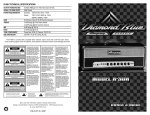
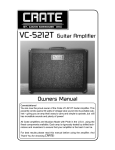
AMPLIFIER ÀÀÀÀÀÀÀÀÀÀÀÀÀÀÀÀÀÀÀÀÀÀÀÀÀÀÀÀÀÀÀÀÀÀ ;;;;;;;;;;;;;;;;;;;;;;;;;;;;;;;;;; @@@@@@@@@@@@@@@@@@@@@@@@@@@@@@@@@@ ;;;;;;;;;;;;;;;;;;;;;;;;;;;;;;;;;; @@@@@@@@@@@@@@@@@@@@@@@@@@@@@@@@@@ ÀÀÀÀÀÀÀÀÀÀÀÀÀÀÀÀÀÀÀÀÀÀÀÀÀÀÀÀÀÀÀÀÀÀ ;;;;;;;;;;;;;;;;;;;;;;;;;;;;;;;;;; @@@@@@@@@@@@@@@@@@@@@@@@@@@@@@@@@@ ÀÀÀÀÀÀÀÀÀÀÀÀÀÀÀÀÀÀÀÀÀÀÀÀÀÀÀÀÀÀÀÀÀÀ ;;;;;;;;;;;;;;;;;;;;;;;;;;;;;;;;;; @@@@@@@@@@@@@@@@@@@@@@@@@@@@@@@@@@ ÀÀÀÀÀÀÀÀÀÀÀÀÀÀÀÀÀÀÀÀÀÀÀÀÀÀÀÀÀÀÀÀÀÀ ;;;;;;;;;;;;;;;;;;;;;;;;;;;;;;;;;; @@@@@@@@@@@@@@@@@@@@@@@@@@@@@@@@@@ ÀÀÀÀÀÀÀÀÀÀÀÀÀÀÀÀÀÀÀÀÀÀÀÀÀÀÀÀÀÀÀÀÀÀ ;;;;;;;;;;;;;;;;;;;;;;;;;;;;;;;;;; @@@@@@@@@@@@@@@@@@@@@@@@@@@@@@@@@@ ÀÀÀÀÀÀÀÀÀÀÀÀÀÀÀÀÀÀÀÀÀÀÀÀÀÀÀÀÀÀÀÀÀÀ ;;;;;;;;;;;;;;;;;;;;;;;;;;;;;;;;;; @@@@@@@@@@@@@@@@@@@@@@@@@@@@@@@@@@ ÀÀÀÀÀÀÀÀÀÀÀÀÀÀÀÀÀÀÀÀÀÀÀÀÀÀÀÀÀÀÀÀÀÀ ;;;;;;;;;;;;;;;;;;;;;;;;;;;;;;;;;; @@@@@@@@@@@@@@@@@@@@@@@@@@@@@@@@@@ ÀÀÀÀÀÀÀÀÀÀÀÀÀÀÀÀÀÀÀÀÀÀÀÀÀÀÀÀÀÀÀÀÀÀ ;;;;;;;;;;;;;;;;;;;;;;;;;;;;;;;;;; @@@@@@@@@@@@@@@@@@@@@@@@@@@@@@@@@@ ÀÀÀÀÀÀÀÀÀÀÀÀÀÀÀÀÀÀÀÀÀÀÀÀÀÀÀÀÀÀÀÀÀÀ ;;;;;;;;;;;;;;;;;;;;;;;;;;;;;;;;;; @@@@@@@@@@@@@@@@@@@@@@@@@@@@@@@@@@ ÀÀÀÀÀÀÀÀÀÀÀÀÀÀÀÀÀÀÀÀÀÀÀÀÀÀÀÀÀÀÀÀÀÀ ;;;;;;;;;;;;;;;;;;;;;;;;;;;;;;;;;; @@@@@@@@@@@@@@@@@@@@@@@@@@@@@@@@@@ ÀÀÀÀÀÀÀÀÀÀÀÀÀÀÀÀÀÀÀÀÀÀÀÀÀÀÀÀÀÀÀÀÀÀ ;;;;;;;;;;;;;;;;;;;;;;;;;;;;;;;;;; @@@@@@@@@@@@@@@@@@@@@@@@@@@@@@@@@@ ÀÀÀÀÀÀÀÀÀÀÀÀÀÀÀÀÀÀÀÀÀÀÀÀÀÀÀÀÀÀÀÀÀÀ ;;;;;;;;;;;;;;;;;;;;;;;;;;;;;;;;;; @@@@@@@@@@@@@@@@@@@@@@@@@@@@@@@@@@ ÀÀÀÀÀÀÀÀÀÀÀÀÀÀÀÀÀÀÀÀÀÀÀÀÀÀÀÀÀÀÀÀÀÀ ;;;;;;;;;;;;;;;;;;;;;;;;;;;;;;;;;; @@@@@@@@@@@@@@@@@@@@@@@@@@@@@@@@@@ ÀÀÀÀÀÀÀÀÀÀÀÀÀÀÀÀÀÀÀÀÀÀÀÀÀÀÀÀÀÀÀÀÀÀ ;;;;;;;;;;;;;;;;;;;;;;;;;;;;;;;;;; @@@@@@@@@@@@@@@@@@@@@@@@@@@@@@@@@@ ÀÀÀÀÀÀÀÀÀÀÀÀÀÀÀÀÀÀÀÀÀÀÀÀÀÀÀÀÀÀÀÀÀÀ ;;;;;;;;;;;;;;;;;;;;;;;;;;;;;;;;;; @@@@@@@@@@@@@@@@@@@@@@@@@@@@@@@@@@ ÀÀÀÀÀÀÀÀÀÀÀÀÀÀÀÀÀÀÀÀÀÀÀÀÀÀÀÀÀÀÀÀÀÀ ;;;;;;;;;;;;;;;;;;;;;;;;;;;;;;;;;; @@@@@@@@@@@@@@@@@@@@@@@@@@@@@@@@@@ ÀÀÀÀÀÀÀÀÀÀÀÀÀÀÀÀÀÀÀÀÀÀÀÀÀÀÀÀÀÀÀÀÀÀ ;;;;;;;;;;;;;;;;;;;;;;;;;;;;;;;;;; @@@@@@@@@@@@@@@@@@@@@@@@@@@@@@@@@@ ÀÀÀÀÀÀÀÀÀÀÀÀÀÀÀÀÀÀÀÀÀÀÀÀÀÀÀÀÀÀÀÀÀÀ ;;;;;;;;;;;;;;;;;;;;;;;;;;;;;;;;;; @@@@@@@@@@@@@@@@@@@@@@@@@@@@@@@@@@ ÀÀÀÀÀÀÀÀÀÀÀÀÀÀÀÀÀÀÀÀÀÀÀÀÀÀÀÀÀÀÀÀÀÀ ;;;;;;;;;;;;;;;;;;;;;;;;;;;;;;;;;; @@@@@@@@@@@@@@@@@@@@@@@@@@@@@@@@@@ ÀÀÀÀÀÀÀÀÀÀÀÀÀÀÀÀÀÀÀÀÀÀÀÀÀÀÀÀÀÀÀÀÀÀ ;;;;;;;;;;;;;;;;;;;;;;;;;;;;;;;;;; @@@@@@@@@@@@@@@@@@@@@@@@@@@@@@@@@@ ÀÀÀÀÀÀÀÀÀÀÀÀÀÀÀÀÀÀÀÀÀÀÀÀÀÀÀÀÀÀÀÀÀÀ ;;;;;;;;;;;;;;;;;;;;;;;;;;;;;;;;;; @@@@@@@@@@@@@@@@@@@@@@@@@@@@@@@@@@ ÀÀÀÀÀÀÀÀÀÀÀÀÀÀÀÀÀÀÀÀÀÀÀÀÀÀÀÀÀÀÀÀÀÀ OWNER’S MANUAL Congratulations! You are now the proud owner of the versatile and powerful Crate GX-40C+/40D amplifier with Stereo Chorus and Digital Sound Processing (GX-40D only). This amplifier offers you more features and better sound than virtually any amp in its class: True Stereo Chorus. A Stereo Effects Loop. Stereo Headphones / Line Out jack. Stereo External Speaker jacks. A front-panel insert jack to add even more effects. Each of the two extraordinary channels have their own Level controls and tones: the Overdrive channel features separate Gain and Level controls along with Crate’s exclusive Shape control for quick and precise tone setting, plus a Mid Shift switch for even more control over your sound. Switch over to the Clean channel, with its own separate Gain and Level controls plus three-band EQ for dialing in just the right sounds. Like all Crate products, your GX-40C+/40D is Musician Made in the U.S.A., using only the best components. Extensive testing at the hands (and ears) of skilled technicians and musicians insures you that this amplifier is the absolute best it can be. In order to get the most out of your new amplifier, we strongly urge you to go over the information contained in this manual before you begin playing. And thank you for choosing GX-40C+/40D Amplifier FRONT PANEL: 1 2 3 4 5 6 7 8 9 10 11 12 1: INPUT: Connect your guitar here using a shielded instrument cable. OVERDRIVE CHANNEL: A high gain channel giving you sounds from a slight edge to serious overdrive. 2: GAIN: Sets the amount of compression and distortion for the Overdrive channel with this control. Rotating the control towards the right increases the intensity of overdrive distortion.Crate’s exclusive “Flex-Wave” circuitry uses Sequential Cascading Gains to deliver distortion which is rich in harmonics and responsive to your touch. Use the Gain control along with the Shape and Level (#3 and 5) to create a wide variety of lead sounds. 3: SHAPE: Quickly “dial in” just right lead sounds with this control which adjusts the “shape” of the distortion wave, producing a wide variety of tone combinations. Basically, rotating the control towards the left enhances the mid frequencies; rotating it towards the right enhances more of the low and high frequencies simultaneously, with a myriad of tonal variations in between. 4: MID SHIFT: Engaging this switch deepens the notch at the clockwise position of the Shape control (#3). 5: LEVEL: Sets the output volume for the Overdrive channel with this control: in the far-left position there is no output; as you rotate the control to the right the output level increases. 6. OVERDRIVE CHANNEL LED: This LED glows red when the Overdrive channel is selected. 7: CHANNEL SELECT: Press this switch IN to activate the Overdrive channel; press it again to the OUT position for the Clean channel. This switch can also be used in conjunction with the DSP section (#14 and 15, GX-40D only) to change your digital reverb mode (see “The DSP Section” on the far right panel). A footswitch (see #26) overrides this control. 8. CLEAN CHANNEL LED: This LED glows green when the Clean channel is selected. CLEAN CHANNEL: A normal gain channel designed to give you crystal clear sounds to medium distortion. 9: GAIN: Set the amount of overdrive to the Clean channel with this control. At lower settings the sound will be crystal clear. Rotate towards the right to increase the amount of distortion, with a fat, bluesy sound in the full clockwise position. Use the Gain control along with the Tone and Level controls (#10 thru 13) to create a wide variety of rhythm sounds. 10: LOW: Adjust the low frequency output level of the Clean channel with this control: turning the control to the left reduces the low frequency output; turning it to the right increase the low frequency output. The Low control allows a total range of ±22dB of boost or cut at 80Hz. Due to the large amounts of low end available, you may want to roll off the bass at high volume levels. 11: MID: Adjust the mid frequency output level of the Clean channel with this control: the center position is “flat” (no boost or cut). Turning the control to the left reduces the midrange output; 13 14 15 16 17 18 19 20 21 turning it to the right increases the midrange output. The Mid control allows a total range of ±14dB of boost or cut at 800Hz. 12: HIGH: Adjust the high frequency output level of the Clean channel with this control: the center position is “flat” (no boost or cut). Turning the control to the left reduces the high frequency output; turning it to the right increases the high frequency output. The High control allows a total range of ±20dB of boost or cut at 8kHz. 13. LEVEL: Set the output volume for the Rhythm channel with this control: in the far-left position there will be no output; as you rotate the control to the right the output level increases. GX-40C+ (shown above): 14, 15: REVERB, OVERDRIVE / REVERB, CLEAN: Set the amount of reverberation for the appropriate channel with these controls: in the far left position the signal will be “dry” (without any reverb). As you rotate the control to the right the amount of reverberation increases. GX-40D (not shown): 14: DSP MODE: Select the type of digital sound processing effect with this control. Each channel and chorus setting will “remember” its effect, allowing you to switch between channels and chorus on/off without having to reset the Mode control. 15: DSP LEVEL: Adjust the amount of digital signal processing effect with this control: in the full-left position the signal is “dry” (no reverb/effect); rotating the control to the right increases the amount of effect. 16: INSERT: This jack allows you to add a footpedal or mono effect into the amp loop, after the tone controls, prior to the chorus and amplifier sections. The jack is a stereo 1/4” phone jack, wired as follows: Tip = signal out, ring = signal in, sleeve = common ground. (Refer to the illustration on the panel to the right.) 17: CHORUS ON: Activate the Stereo Chorus section by pressing this switch IN; press it again to release it to the OUT position to turn the Chorus effect off. This switch can also be used in conjunction with the DSP section (GX-40D only) to change your digital reverb mode (see “The DSP Section” on the far right panel). A footswitch (see #26) overrides this control. 18: DEPTH: Set the intensity of the Stereo Chorus effect with this control: in the far left position there will be almost no chorus; as you rotate the control to the right the amount of effect increases. 19: RATE: Set the speed of the Stereo Chorus effect with this control: to the left for slow, smooth “phasing” sounds, to the right for faster “vibrato” sounds. 20: ON LED: The word “ON” glows red when you turn the amplifier on, showing you that it is powered up and ready to play. 21: POWER SWITCH: This heavy-duty rocker-type switch turns the amplifier ON in the left position, OFF in the right position. The ON LED (#20) works with this switch as a visual indicator. GX-40C+/40D Amplifier REAR PANEL: EXTERNAL SPEAKERS STEREO HEADPHONES/ LINE OUT 20W RMS PER CHANNEL 2 OHM MIN. LOAD PATENT #5,032,796 MADE IN THE U.S.A. BY SLM ELECTRONICS 1400 FERGUSON AVE. ST. LOUIS, MO 63133 22 MODEL: GX-40C+ SERIAL: GX40C12006902 LINE: 120 V ~ 60 Hz WATTS: MAX CAUTION RISK OF ELECTRIC SHOCK - DO NOT OPEN LEFT RIGHT DE CHOC ELECTRIQUE. AVIS: RISQUE NE PAS OUVRIR. TO REDUCE THE RISK OF FIRE OR ELECTRIC SHOCK, DO NOT EXPOSE THIS EQUIPMENT TO RAIN OR MOISTURE. 23 22: POWER CORD: This heavy-duty, grounded, three wire power cord is to be plugged into ONLY a safely-wired, grounded 120 volt 60 cycle AC power outlet. DO NOT attempt to defeat the ground connection of this cable! If your amplifier was purchased outside of the United States, see its rear panel for the proper power rating. 23: EXTERNAL SPEAKERS: You may connect the outputs of the GX-40C+/D to your external speakers having a rated impedance of at least 2 ohms each, using these jacks. When connecting speakers, use a matched pair: two with the same impedances, to insure optimum performance from the amplifier. Since these are series conenctions, there is no chance of damaging the amplifier with too small of an inpedacne load. 24: STEREO HEADPHONE / LINE OUT JACK: This dualfunction stereo jack provides you with a means to connect a pair of stereo headphones for private practice sessions, or to obtain a stereo line-level output signal to send to a recording console, mixing board or to another pair of power amplifiers. The internal speakers are muted whenever a plug is inserted into this jack. The wiring for the jack is as follows: Tip: Right channel Ring: Left channel Sleeve: Common ground WARNING: DO NOT attempt to use headphones in the Speaker jacks! Permanent hearing damage could result! 25: STEREO EFFECTS LOOP: Connect the SEND jack to the inputs of your stereo effects device to send a post-EQ, postchorus, pre-amplified signal for processing. Connect the outputs of the effects device to the RETURN jack to return the processed signal to the amplifier. The jacks are stereo 1/4” phone jacks, wired as follows: Tip: Right channel Ring: Left channel Sleeve: Common ground STEREO EFFECTS LOOP RETURN 24 SEND 25 FOOTSWITCH CHANNEL SELECT/ CHORUS 26 If your effects device has stereo input and output jacks, use a pair of three-conductor stereo patch cords to connect it. If the device has separate left and right jacks, use a pair of onestereo-male to two-mono-female Y-adapters to make the connections. 26: FOOTSWITCH: Plug a dual footswitch (such as the Crate model FS-60) here to control channel selection and chorus on/off. This stereo 1/4” phone jack is wired as follows: Tip: Channel select Ring: Chorus on/off Sleeve: Common ground Connecting to the Insert jack: The Insert jack (#16) lets you patch external effects into the amplifier just prior to its power amp stage. Use Crate’s CYC6MS stereo-to-mono Y-cord or an adapter such as Crate’s CA11Y and 2 1/4” mono signal cables to connect to the effect as shown below. Stereo-to-mono Y-cord: to Insert jack TIP RING SLEEVE (CYC6MS) Y-adapter and 2 cables: SEND RETURN GROUND TIP RING SLEEVE (CA11Y) Ring = "Return" "Return" "Send" plug: plug: from to effect effect "OUT" "IN" External Effect to Insert jack from effect "OUT" Tip = "Send" to effect "IN" External Effect GX-40C+/40D Amplifier THE DSP SECTION (GX-40D only): The DSP’s 32 position Mode control allows you to instantly access the exact type of effect you want – from classic reverberation to radical “backwards sounds – for any of the Channel/Chorus combinations. The setting of the Mode control will determine the type of effect for whatever Channel/Chorus combination the amp is set to at the time you adjust the Mode control. Once set, the GX-40D’s non-volitale memory retains the setting until you reset it. EXAMPLE: Plug in your guitar and turn on the amplifier. Set Channel Select to the Clean channel. Now set the Mode control to “12” (gated reverb, medium). Strike a chord on your guitar and listen to the sound of the effect. Press in the Channel switch to choose the Overdrive channel, then set the Mode control to “27” (large hard surface echo). Strike a chord and listen to the results. Now press the Channel switch again to get back to the Clean channel and strike a chord – even though you haven’t changed the setting of the mode control, the amplifier “remembered” that you had programmed in setting “12” and kept the effect as you left it. THERE’S MORE: With the Channel Select and Chorus being switchable, you can program each of the four Channel/Chorus combinations with their own Mode settings. If you want to control Reverb on/off with the Chorus footswitch, for example, set the Mode to “0” (bypass), hit the footswitch and set Mode to “5” (large hall, bright). Now you have the ability to switch the reverb on and off with the footswitch. With the footswitch you have a choice of two reverb settings for each of the channel selections, for the most flexibility and versatility possible! THE DSP SETTINGS: # 0 1 2 3 4 5 6 7 8 9 10 11 12 13 14 15 16 17 18 19 20 21 22 23 24 25 26 27 28 29 30 31 Name Off Sm Rm, Bright Sm Rm, Dark Sm Hall, Bright Sm Hall, Dark Lg Hall, Bright Lg Hall, Dark Avg Club, Bright Avg Club, Dark Cncrt Hall, Brt Cncrt Hall, Dark Stadium Gated Rev, Med Gated Rev, Long Plate Reverb Traditional Rev Slapback, Short Slapback, Med Slapback, Long Sh Md Surf Echo Sh Hd Surf Echo Sh/Med Md Surf Md Sft Surf Echo Md Hd Surf Echo Md Glass Echo Lg Sft Surf Echo Lg Md Surf Echo Lg Hd Surf Echo Infinite Delay Thickener Multi-Tap Reverse Type None Small Reverb Small Reverb Small Reverb Small Reverb Large Reverb Large Reverb Large Reverb Large Reverb Large Reverb Large Reverb Large Reverb Special Reverb Special Reverb Special Reverb Special Reverb Delay Delay Delay Echo Echo Echo Echo Echo Echo Echo Echo Echo Special Effect Special Effect Special Effect Special Effect Description Bypass—no signal processing occurs. 8’ x 8’ empty room with hardwood floors. 8’ x 8’ carpeted room with up to four people. 20’ x 40’ Rehearsal Hall, wood floors, hard walls. 20’ x 40’ carpeted Rehearsal Hall with draped walls and up to 30 people. 50’ x 100’ empty Rehearsal Hall, 20’ ceilings. 50’ x 100’ Rehearsal Hall with up to 50 friends and crew. 500 capacity empty club, wood floors, afternoon sound check. 500 capacity club, wood floors, stuffed with people. 5,000-seat Concert hall, hard back wall, afternoon sound check. 5,000-seat Concert hall, SRO at back wall, sold out show. 40,000-seat round Stadium, afternoon sound check, 100 crew & VIPs only. Studio Effect–Engineer cuts off reverb slightly after each note. (220ms Gate) Studio Effect—Engineer lets note ring, then cuts it off. (350ms Gate) Studio Effect—Simulates Steel Plate Reverb. Studio Effect—Simulates old-fashioned multi-spring tube reverb unit. 125ms delay + small reverb; Elvis’ favorite. 350ms delay + small reverb; Rockabilly special. 557ms delay only, 630’ travel time of sound. 85ms delay with 14.2% regen. & small reverb. 85ms delay with 27.3% regeneration. 280ms delay with 21.8% regen & small reverb. 335ms delay with 12.5% regeneration. 335ms delay with 26.5% regen. & small reverb. 335ms delay with 43.7% regeneration. 485ms delay with 7.8% regeneration. 485ms delay with 20.3% regeneration. 485ms delay with 39.2% regen & small reverb. 506ms delay with over 90% regeneration. 33ms-based sound fattener @ selected freqs. Multi-thickener with some subtle delays added. “Backwards masking” effect (number nine, number nine,...) GX-40C+/40D Amplifier SUGGESTED STARTING SETTINGS: METAL CRUNCH SPARKLING CLEAN IN out DSP MODE AT "30" FOR OVERDRIVE, "23" FOR CLEAN HOT SRV WARBLE SRV WARBLE OUT IN DSP MODE AT "13", LEVEL AT "8" ROCK RHYTHM BLUESY ATTACK OUT IN DSP MODE AT "15", LEVEL AT "8" SMOOTH LEAD WARM CLEAN IN IN DSP MODE AT "27" , LEVEL AT "8" SYSTEM BLOCK DIAGRAM: INPUT BUFFER BUFFER GX-40C+: SEND RETURN POWER AMP CLEAN CHANNEL RIGHT SPEAKER CHANNEL SELECT CLEAN CHORUS GAIN LOW MID HIGH LEVEL EXTERNAL SPKR JACK STEREO EFFECTS LOOP FLEX WAVE STAGE OVERDRIVE CHANNEL BUFFER OVERDRIVE SEND RETURN POWER AMP LEFT SPEAKER GAIN SHAPE LEVEL GX-40D: INSERT EXTERNAL SPKR JACK CHANNEL SELECT DSP HEADPHONE/ LINE OUT LEVEL SPKR COMP MODE The GX-40C+/40D is covered with a durable black Tolex material: wipe it clean with a lint-free cloth. Never spray cleaning agents onto the cabinet. Avoid abrasive cleansers which would damage the finish. GX-40C+/40D Amplifier GX-40C+/40D TECHNICAL SPECIFICATIONS Output Power Rating Gain, Lead Channel Gain, Rhythm Channel Equalization, Overdrive Channel Equalization, Clean Channel >20 watts/channel, 4 ohms, 120VAC 88dB @ 1kHz 60dB @ 1kHz Crate’s exclusive Shape control, Mid Shift switch Low: ±22dB range @ 80Hz Mid: ±14dB range @ 800Hz High: ±20dB range @ 8kHz Input Impedance 1M ohms Signal To Noise Ratio, Overdrive Channel 64dB (Gain, Shape @ “0”, Level @ “10”) Signal To Noise Ratio, Clean Channel 54dB (Gain, Level @ “10”, Tones @ “5”) Maximum Input Signal Level Accepted 3 volts, peak-to-peak Internal Speakers 2 - 8” Crate Custom Design, 4 ohm Power Requirements Domestic: 120 VAC, 60Hz, 55VA Export: 100/115VAC, 50/60Hz, 55VA 230VAC, 50/60Hz, 55VA Cabinet Size and Weight 15.5” H x 20.75” W x 8.75” D, 32 lbs. CAUTION RISK OF ELECTRIC SHOCK DO NOT OPEN CAUTION: TO REDUCE THE RISK OF ELECTRIC SHOCK, DO NOT REMOVE COVER. NO USER-SERVICEABLE PARTS INSIDE. REFER SERVICING TO QUALIFIED SERVICE PERSONNEL. PRECAUCION RIESGO DE CORRIENTAZO NO ABRA PRECAUCION PARA DISMINUOIR EL RIESGO DE CORRIENTAZO NO ABRA LA CUBIERTA NO HAY PIEZAS ADENTRO QUE EL USARIO PUEDO REPARAR DEJE TODO MANTENIMIENTO A LOS TECHNICOS CALIFICADOS ATTENTION RISQUE D'ELECTROCUTION NE PAS OUVRIR ATTENTION: POUR REDUIRE D'ELECTROCUTION NE PAS ENLEVER LE COUVERCLE. AUCUNE PIECE INTERNE N'EST REPRABLE PAR L'UTILISATEUR. POUR TOUTE REPARATION, S'ADRESSER A UN TECHNICIEN QUALIFIE. VORSICHT ELEKTRISCHE SCHLAGGEFAHR NICHT OFFENEN VORSICHT: ZUR MINIMIERUNG ELEKTRISCHER SCHLAGGEFAHR NICHT DEN DECKEL ABENHMEN. INTERNE TEILE KONNEN NICHT VOM BENUTZER GEWARTET WERDEN. DIE WARTUNG IS QUALIFIZIERTEM WARTUNGSPERSONAL ZU UBERLASSEN. THIS EQUIPMENT HAS BEEN DESIGNED AND ENGINEERED TO PROVIDE SAFE AND RELIABLE OPERATION. IN ORDER TO PROLONG THE LIFE OF THE UNIT AND PREVENT ACCIDENTAL DAMAGES OR INJURY, PLEASE FOLLOW THESE PRECAUTIONARY GUIDELINES: CAUTION: TO REDUCE THE RISK OF ELECTRIC SHOCK, DO NOT OPEN CHASSIS; DO NOT DEFEAT OR REMOVE THE GROUND PIN OF THE POWER CORD; CONNECT ONLY TO A PROPERLY GROUNDED AC POWER OUTLET. WARNING: TO REDUCE THE RISK OF FIRE OR ELECTRIC SHOCK, DO NOT EXPOSE THIS EQUIPMENT TO RAIN OR MOISTURE. CAUTION: NO USER-SERVICEABLE PARTS INSIDE. REFER SERVICING TO QUALIFIED SERVICE PERSONNEL. CAUTION: OUR AMPLIFIERS ARE CAPABLE OF PRODUCING HIGH SOUND PRESSURE LEVELS. CONTINUED EXPOSURE TO HIGH SOUND PRESSURE LEVELS CAN CAUSE PERMANENT HEARING IMPAIRMENT OR LOSS. USER CAUTION IS ADVISED AND EAR PROTECTION IS RECOMMENDED IF UNIT IS OPERATED AT HIGH VOLUME. EXPLANATION OF GRAPHICAL SYMBOLS: EXPLICACION DE SIMBOLOS GRAFICOS: EXPLICATION DES SYMBÔLES GRAPHIQUES: = "DANGEROUS VOLTAGE" “VOLTAJE PELIGROSO” "DANGER HAUTE TENSION" "GEFAHLICHE SPANNUNG" ESTE APARATO HA SIDO DISENADO Y CONSTRUIDO PARA PROVEER ANOS DE OPERACION SEGURA Y CONFIABLE. PARA PROLONGAR LA VIDA DE ESTA UNIDAD E IMPEDIR DANOS ACCIDENTALES POR FAVOR SIGA ESTAS INSTRUCCIONES PREVENTIVAS: PRECAUCION: PARA DISMINUIR EL RIESGO DE DESCARGAS ELECTRICAS: (1) NO ABRA LA CUBIERTA, (2) NO ES RECOMENDABLE REMOVER O DESACTIVAR LA PATA DEL POLO A TIERRA DEL CABLE DE CORRIENTE, CONECTE CORRECTAMENTE A UNA TOMA DE CORRIENTE A TIERRA. ADVERTENCIA: PARA EVITAR DESCARGAS EL ECTRICAS O PELIGRO DE INCENDIO, NO DEJE ESTE APARATO EXPUESTO A LA LLUVIA O HUMEDAD. PRECAUCION: NO HAY PIEZAS ADENTRO QUE EL USUARIO PUEDE REPARAR. DEJE TODO MANTENIMIENTO A LOS TÉCNICOS CALIFICADOS. PRECAUCION: NUESTROS AMPLIFICADORES PUEDEN PRODUCIR NIVELES DE PRESION DE SONIDO ALTO. EXPOSICION CONTINUADA A LOS NIVELES DE PRESION DE SONIDO ALTO PUEDE CAUSA DANO PERMANENTE A SU OIDO. ES ACONSEJADO QUE USE PRECAUCION AL USUARIO Y ES RECOMENDADO PROTECCION PARA LOS OIDOS SI LA UNIDAD ES OPERADA A VOLUMEN ALTO. = CET ÉQUIPEMENT AVAIT ÉTÉ INVENTÉ ET ARRANGÉ POUR POURVOIR DES ANNÉES D'USAGE SAUF ET SÛR. POUR PROLONGER LA VIE DE CET APPAREIL ET POUR EMPÊCHER LES DOMMAGES ET LES TORTS ACCIDENTELS, SUIVEZ LES INSTRUCTIONS DE PRÉCAUTION. AVERTISSEMENT: POUR RÉDUIRE LES RISQUES D'ÉLECTROCUTION: (1) N’OUVREZ PAS LE CHÂSSIS, (2) NE PAS ESSAYER DE SUPPRIMER LA BROCHE CORRESPONDANT À LA TERRE. ATTENTION: POUR RÉDUIRE LES RISQUES D'UN FEU OU D'ÉLECTROCUTION, N’EXPOSEZ PAS L'APPAREIL À LA PLUIE OU À LA MOITEUR. ATTENTION: IL N'Y A PAS D’ÉLÉMENTS RÉPARABLES DANS L'APPAREIL. CONSULTER UN TECHNICIEN QUALIFIÉ POUR LES RÉPARATIONS. ATTENTION: NOS AMPLIFICATEURS SONT CAPABLES DE LA PRODUCTION DES NIVEAUX DE SON D'UNE HAUTE PRESSION. L'EXPOSITION CONTINUE AUX CES NIVEAUX PEUT CAUSER LA SURDITÉ PERMANENTE. LA PRUDENCE EST ADVISÉ À UTILISATEUR ET LA PROTECTION DES OREILLES EST RECOMMANDÉ SI L'APPAREIL EST UTILISÉ À UN HAUT NIVEAU DE VOLUME. "IT IS NECESSARY FOR THE USER TO REFER TO THE INSTRUCTION MANUAL" “ES NECESARIO QUE EL USUARIO SE REFIERA AL MANUAL DE INSTRUCCIONES.” "REFERREZ-VOUS AU MANUAL D'UTILISATION" "UNBEDINGT IN DER BEDIENUNGSANLEITUNG NACHSCHLAGEN" Crate continually develops new products, as well as improves existing ones. For this reason, the specifications and information in this Crate manual are subject to change without notice. ©1997 SLM ELECTRONICS, A DIVISION OF ST. LOUIS MUSIC, 1400 FERGUSON, ST. LOUIS, MO. 63133 P/N 47-574-03 • 04/97