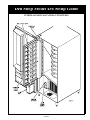
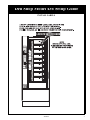
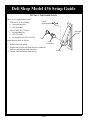
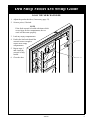
1
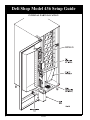
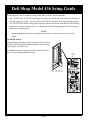
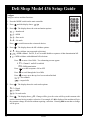
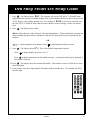
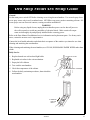
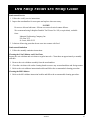
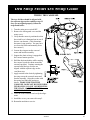
Deli Shop Model 436 Setup Guide
SPECIFICATIONS ..................................................................................................................................1
INTERNAL PARTS LOCATION ..........................................................................................................2
INTERNAL PARTS LOCATION (CONTINUED) ..............................................................................3
INITIAL SET UP ......................................................................................................................................4
Unpack and Inspect ..................................................................................................................................4
Electrical Requirements ...........................................................................................................................4
INSTALLATION ......................................................................................................................................5
INSTALL THE COIN MECHANISM ...................................................................................................6
INSTALL LABELS ..................................................................................................................................7
INSTALL THE DOOR LOCK ...............................................................................................................8
LOAD THE MERCHANDISER .............................................................................................................9
PROGRAMMING ..................................................................................................................................10
Getting Around ......................................................................................................................................10
The Selection Switch Panel ................................................................................................................10
Special Programming Keys ................................................................................................................10
The Displays ..........................................................................................................................................11
Standby Messages ..................................................................................................................................11
Temperature and Health Control Display ..............................................................................................11
The MODE Switch ................................................................................................................................12
DATA ....................................................................................................................................................13
PAY OUT (Does not apply to machines with exec coin mechanisms.) ...............................................13
PRICE ....................................................................................................................................................14
TEST ......................................................................................................................................................14
Faults ......................................................................................................................................................15
Configure ...............................................................................................................................................16
ROUTINE SERVICE AND SANITATION .........................................................................................18
General ...................................................................................................................................................19
Daily Service ..........................................................................................................................................19
Daily Sanitation .....................................................................................................................................20
Weekly Service ......................................................................................................................................20
Weekly Sanitation ..................................................................................................................................20
Monthly Service .....................................................................................................................................20
Monthly Sanitation ................................................................................................................................20
Semi-annual Service ..............................................................................................................................21
Semi-annual Sanitation ..........................................................................................................................21
Cleaning the Coin Validator and Coin Chute ........................................................................................21
Cleaning the Bill Validator ....................................................................................................................21
ADJUSTING THE PRODUCT DIVIDERS ........................................................................................23
CLEARING A CAROUSEL JAM ........................................................................................................24
TIMING THE CAROUSEL ..................................................................................................................25
4360001
i
Deli Shop Model 436 Setup Guide
Notes . . .
ii
4360001
Deli Shop Model 436 Setup Guide
SPECIFICATIONS
DIMENSIONS:
WEIGHT:
ELECTRICAL
(U.S.):
(INTERNATIONAL):
REFRIGERATION:
MISCELLANEOUS:
Height - 183 cm (72 in.)
Width - 73.6 cm (29 in.)
Depth - 88.3 cm (34 3/4 in.)
266.3 kg (587 lbs.)
115 Volts AC, 60 Hertz, 12 Amps, Single Phase
230 Volts AC, 50 Hertz, 6 Amps, Single Phase
Refrigerant - 134a
Charge - 213 g (7.5 oz.)
Minimum ambient temperature 5° C (41° F)
Maximum ambient temperature 32° C (90° F)
FOR INDOOR USE ONLY
SPECIAL OPERATING NOTES
•
Once the customer makes a selection and the selection door is unlocked, that door can be closed
and reopened for up to 30 seconds (with no additional money required). This condition is contingent on the turrent not being moved, or another selection made.
•
The turret will automatically move approximately 1/3 of a revolution every 30 minutes while the
machine is idle. Any keypress will reset the 30 minute delay time.
4360001
1
Deli Shop Model 436 Setup Guide
INTERNAL PARTS LOCATION
2
4360001
Deli Shop Model 436 Setup Guide
INTERNAL PARTS LOCATION (CONTINUED)
4360001
3
Deli Shop Model 436 Setup Guide
INITIAL SET UP
Unpack and Inspect
1. Carefully remove the merchandiser from its shipping carton and place it on a level surface.
2. Inspect the outside of the merchandiser for dents, scratches, or any damage resulting from improper
handling.
3. If the merchandiser has the optional door lock, the key will be in the coin return receptacle.
4. Inspect the inside of the cabinet. Observe the location and position of the packing material should
you need to reuse it. Carefully remove all packing material.
IMPORTANT
If you see any damage when you unpack the merchandiser, file a claim immediately with
the carrier.
5. Instructions for installing the optional Base Plate are included with the Base Plate Assembly when
shipped.
6. Inspect the merchandiser’s electrical connectors and components.
Electrical Requirements
The merchandiser is supplied with a service cord for the country of use and is terminated in a grounding
type plug. The wall receptacle used for this merchandiser must be properly polarized, grounded, and of
the correct voltage. Operating the merchandiser from a source of low voltage will VOID YOUR WARRANTY. Each merchandiser should have its own electrical circuit and that circuit should be protected
with a circuit breaker or fuse conforming to local regulations.
Voltage Check - Place the test leads of a voltmeter across the LINE (LIVE) and NEUTRAL terminals of the wall receptacle. The meter should indicate 110 - 130 volts ac for 120 volt, 60 Hz
locations, or 220 - 240 volts ac for 230 volt, 50 Hz locations.
Polarity Check - Place the test leads of a voltmeter across the LINE (LIVE) and GROUND terminals of the wall receptacle. The meter should indicate 110 - 130 volts ac for 120 volt, 60 Hz
locations, or 220 - 240 volts ac for 230 volt, 50 Hz locations.
Noise Potential Check - Place the test leads of a voltmeter across the NEUTRAL and GROUND
terminals of the wall receptacle. The meter should indicate 0 volts ac. A measurement greater
than 1.5 – 2.0 volts ac could result in problems for the merchandiser's electronic circuitry caused
by electrical noise.
Any deviation from these requirements could result in unreliable performance from your merchandiser.
4
4360001
Deli Shop Model 436 Setup Guide
INSTALLATION
NOTE
This merchandiser is intended for INDOOR use only.
CAUTION
Make sure the merchandiser is properly leveled on a flat, solid, stable floor or base
foundation. IF THIS IS NOT DONE, PERSONAL INJURY AND/OR DAMAGE
TO EQUIPMENT MAY RESULT!
1. Move the merchandiser to the desired location.
2. Position the merchandiser at least 6 inches (15 cm) from any wall.
3. Using a spirit level, level the machine front to back and side to side.
NOTE
You may need to use pliers or channel locks to loosen the leg levelers.
4. For “bank style” installations of multiple merchandisers:
a. Position the first machine in the location, or at the highest spot if the floor is not level. Extend the
leg levelers only as required to level the machine.
b. Position and level the remaining machines.
5. Set the main power switch to OFF.
IMPORTANT
Do not apply power to the merchandiser until you have done the power source checks outlined (page 4). Possible equipment damage could result from improper supply voltage.
6. Plug in the merchandiser.
7. Turn the main power switch ON and close the cabinet door. The display lamp will light, and the
shadow box fan motor will run.
4360001
5
Deli Shop Model 436 Setup Guide
INSTALL THE COIN MECHANISM
CAUTION
Make sure the main power switch is turned OFF before you work on the merchandiser.
Failure to do so could result in damage to electronic components.
1. Turn OFF the main power switch. Refer to the instructions provided with the coin mechanism and
remove the coin validator assembly.
2. Loosen the coin mechanism mounting screws on the merchandiser so they stand off about 1/8" (0.3
cm).
3. Position the coin mechanism so the three keyed holes fit over the mounting screws. Pull down on the
coin mechanism to seat the screws in the keyways.
4. Tighten the mounting screws and reinstall the coin validator.
5. Turn ON the main power switch. Select the correct type of coin mechanism in the CONFIGURE
procedure.
6. The coins may be loaded into the tubes using either of the following procedures:
a. High accuracy coin counting method (recommended): Enter the TEST procedure. Insert
enough coins through the coin slot to cover the empty sensor. The amount of coins inserted will
be internally recorded.
b. Quick fill method: Insert enough coins through the coin slot to COMPLETELY FILL the
tubes. OR For coin mechs with removable tube cassettes, remove the cassette and fill the tubes
directly. Replace the casette.
7. Enter the TEST procedure. Using one coin of each tube denomination, insert all the coins through
the front panel coin insert slot. Press the coin return and verify that the same coin denomiations are
returned.
8. Visually check the coin tubes to make sure coins are lying flat.
6
4360001
Deli Shop Model 436 Setup Guide
INSTALL LABELS
4360001
7
Deli Shop Model 436 Setup Guide
INSTALL THE DOOR LOCK
There are two optional door locks:
FLEX-ACE (P/N 9992000)
a. Corresponding key
b. (P/N 9994000)
LOCK
SPRING
VAN LOCK (P/N 3112163)
a. Coresponding key
b. (P/N 3112164)
c. Lock and key kit (P/N 3122165)
SQUARE
HOLE
KEY
Install the door lock as follows:
LOCK
CYLINDER
1. Remove the lock spring.
2. Depress the lock pin and push the lock cylinder in
the lever until the pin snaps into place.
LEVER
3. Test the lock mechanism with the key.
8
4360001
Deli Shop Model 436 Setup Guide
LOAD THE MERCHANDISER
1. Adjust the product dividers, if necessary (page 23).
2. Set new prices, if desired.
NOTE
If the food carousel is loaded with items which
are too large for the compartments, the carousel will not rotate properly.
3. Load any empty compartments.
4. Push in the load switch until the
carousel rotates enough to
expose more empty
compartments.
SWITCH
5. Repeat steps 3
and 4 until the
carousel is fully
loaded.
VEND DOO
6. Close the door.
436p0032
4360001
9
Deli Shop Model 436 Setup Guide
PROGRAMMING
Getting Around
Getting around the Deli Shop software is pretty easy once you know the features that are available to you,
and how to use them. The three main parts you will use are the SELECTION SWITCH PANEL, the
DISPLAY, and the MODE switch.
The Selection Switch Panel
The selection switch panel is located on the monetary panel. These are the keys customers use to make
selections, but you will use these keys during programming procedures.
Special Programming Keys
Some keys on the panel have jobs that only show up during programming. Three of them do not even
appear on the panel, but they are active during programming, so the keypad shown at right is what you
will be using. To help you remember the keys, this panel will be shown on each page in the programming
section.
Press this key to move from one function to another.
From within a function, press once to return to the beginning of the function; press and hold to return to the standby message.
4
5
9
This key moves you around inside of a function.
0
This key allows you to switch between two or more choices.
D
C
F
This is the "action" key. It will start tests, etc.
This key is used to clear certain data or errors.
10
4360001
427P0014
Deli Shop Model 436 Setup Guide
The Displays
The display group consists of a 4-character digital display which performs two functions, and is referred to in this book as "the display":
1. It shows the customer's selection and how much credit is in the
machine, as well as the standby message.
ES
USE EXACT CHANGE
SELECTION PRICE
2. It provides information and feedback to the service person during
maintenance.
427P0011
Standby Messages
Several standard messages (called “standby messages”) are displayed under certain circumstances:
= This is the normal display. The numbers will change when credit is added.
.
= This is a fatal error - the machine will not run. See the error list.
=
A vend door is not closed all the way. This will not appear until several seconds
after a vend.
= Shown in the display (zero credit and no errors), if this option is chosen.
Temperature and Health Control Display
Pressing
displays the temperature from any standby message. Some of the following conditions may
appear::
.
= The trailing decimal point means that the compressor is running.
= The question mark represents an invalid temperature (temperature sensor error).
= This means that the health control grace period has 28 minutes remaining. The
machine must be able to reach an internal temperature of 41°F (7.2°C) within 30
minutes of door closure. The grace period can be reset to 30 minutes by opening
and closing the cold food door. To test the health control, open the door and hold
the temperature sensor. The machine should go out of order.
NOTE
All displays shown in degrees Fahrenheit (°F) may be replaced by their equivalents in
degrees Celsius (°C), depending upon how you have configured your machine.
4360001
11
Deli Shop Model 436 Setup Guide
The display group also contains two lamps which light up under certain conditions:
1. The "USE EXACT CHANGE" lamp lights when there are insufficient coins in the merchandiser to
provide change for a vend. You can set the criteria for this condition in the programming section.
2. The "SELECTION PRICE" lamp lights when the customer has inserted insufficient credit into the
machine to vend the selected product. In conjunction with this lamp lighting, the selection’s price
flashes in the digital display.
NOTE
During programming modes, these lights blink whenever a key is pressed as a test of the
lamps.
The MODE Switch
All programming procedures begin with this switch. Until you
push the switch, the special programming keys will not work,
especially the "invisible" keys.
The MODE switch is a large square white button located on
the rear of the controller board as shown.
MODE
SWITCH
25 c
5c
10 c
25 c
5c
10 c
VIEW LOOKING INTO THE
BACK OF THE VEND DOOR
427P0012
MAIN CONTROLLER
12
4360001
Deli Shop Model 436 Setup Guide
DATA
View several types of sales data:
NOTE
All data is not resettable.
1. Press the MODE switch on the main controller.
2. Press
until the display shows
. The display will flash the total cash sales:
. . . XXXX . . . XX.XX
3. If you have the DEX option, press
to transfer data into your DEX device.
4. Press
. The display shows - -, then flashes 4 to 8 digits. This is the dollar and cents amount of
door 1 sales.
5. Press
to view cash sales for doors 2 through 9.
6. Press
. The display shows
. The display will flash the total vend count:
. . . XXXX . . . XXXX
7. Press
. The display shows - -, then flashes 4 to 8 digits. This is the number of door 1 vends.
8. Press
to view vends for doors 2 through 9.
9. Press
to exit.
PAY OUT (Does not apply to machines with exec coin mechanisms.)
Pay out coins:
1. Press the MODE switch on the main controller.
2. Press
and press
until the display shows
. Press
to pay out quarters. Press
to pay out nickels, press
to pay out dimes,
to pay out from the 4th MDB tubes.
3. Press the appropriate key once to pay out one coin.
4. Press and hold the appropriate key to pay out coins continuously.
5. Press and hold
to return to the standby message.
4
5
9
0
D
C
F
427P0014
4360001
13
Deli Shop Model 436 Setup Guide
PRICE
Set prices for all the selections in your merchandiser:
4
5
9
The price display:
0
- -... changes to ... .
Door number
D
C
F
Selection price
1. Press the MODE switch on the main controller.
427P0014
2. Press
until the display shows
.
3. Press
, and the display shows - - , then .XX. "XX" is the price for door number 1.
4. Press
until the selection you want to price is displayed.
5. Enter a new price with the number keys.
6. Repeat steps 4 and 5 until you have priced all the selections.
OR
7. Press
to return to the
display, or hold
to exit.
TEST
View machine status and test certain functions:
1. Press the MODE switch on the main controller.
2. Press
until the display shows
.
3. Make a selection and open the door (if you deposit money, the credit is shown in the display). The
selection number flashes momentarily in the display to indicate the door solenoid activates. This is
followed by the number with two dashes: Example, - - for selection #1. The dashes indicate that
the door switch is made.
4. Do not close the door yet. You can either wait 12 seconds. The display shows -
- , indicating that
the vend timer has timed out. OR, you can press
rather than wait the 12 seconds. The display
will still indicate that the machine recognizes that the door has not closed. In this condition, the carousel will not rotate.
5. The display returns to
when the door is closed.
6. Repeat steps 3 and 4 for the remaining doors.
7. Press and hold
14
to return to the standby message.
4360001
Deli Shop Model 436 Setup Guide
Faults
Display all the active faults on your merchandiser:
1. Press the MODE switch on the main controller.
2. Press until the display shows
3. If errors are present, press
. Note: If no faults are present, this will not be displayed.
to see the list of faults:
The EPROM is bad.
RAM is not initialized or is not compatible with the currently loaded software. If
this message appears, initialize your RAM by performing the following procedure:
NOTE: Initializing RAM will erase all your data. Be sure you have written this
information down before continuing.
Press AND HOLD
...XX
. You will see
in the display. Continue holding until the
display shows
.
The health control has been set. "XX°F" is the maximum temperature reached.
.
The temperature reference on the main PCB cannot be read.
.
The temperature sensor cannot be read.
.
The temperature sensor is out of range.
.
Problem with the bill validator.
.
Problem with the card reader.
.
Problem with the coin mechanism.
...
All selections are out of service.
Illegal price is detected. Clear by checking prices.
.
.
. X
Cannot read switch inputs. Disconnect J58 at the main controller and scroll through
the error list. If the error persists, replace the main controller. Otherwise, check the
switch harnesses.
Did not read the vend door lock switch when door solenoid X was energized.
When the first fault item (if any) repeats, you have seen all the faults.
4. Press
to see more faults or
to exit.
4
5
9
0
D
C
F
427P0014
4360001
15
Deli Shop Model 436 Setup Guide
Configure
Configure various machine functions:
1. Press the MODE switch on the main controller.
5
9
2. Press
until the display shows
3. Press
. The display shows the coin mechanism options:
.
4
.
= dumb mech
0
D
C
F
. = MDB
. = Exec mech
. = No mech
427P0014
Press
4. Press
.
to switch between the coin mech choices.
. The display shows the bill validator options:
= Pulse validator (not supported at this time)
. . . = MDB validator. Press 1, 2, or 5 to enable/disable acceptance of that denomination bill.
. . = MDB validator with additional bill selections
Press
to enter a list of bills. Two alternating screens appear:
.
.
= Channel 1 and bill is enabled
= Bill denomination
Press
to set bill acceptance ON or OFF
Press
to scroll through the list of bills
Press
to move up to the top level screen when finished
.
= No validator
= coupon bills
5. Press
. The display shows the card reader options:
. = Dumb
. = MDB
. = No card reader
6. Press
. The display shows .XX. Change will be given for coins or bills up to this amount without the customer having to make a selection. For example, if 1.00 is displayed, the machine will give
the customer change for a dollar without requiring a selection. Entering 0.00 means that no change
will be given.
16
4360001
Deli Shop Model 436 Setup Guide
7. Press
. The display shows: X.XX. The customer will see the USE EXACT CHANGE lamp
lighted when the amount of available change in the coin mechanism falls below the level you set for
X.XX. Enter a value with the number keys. For example, if .
is selected, the customer sees
the USE EXACT CHANGE lamp when less than a dollar’s worth of change is in the coin mechanism.
8. Press
. The display shows either:
.
= More than one vend is allowed, with a declining balance. This means that the customer can
choose multiple products until the amount of credit is lower than the lowest priced product in the
machine.
OR
.
9. Press
Press
= A declining balance is not allowed. Press
to switch between these two choices.
. The display shows XXO . This is the machine temperature setpoint.
to change display units from °F to °C.
Press
to display temperature in the standby message. A trailing decimal point is displayed if
this option is selected.
10. Press
. The display shows the machine ID number. This number is sent to a DEX device when
transferring data.
11. If not present, enter the 6-digit machine ID number with the number keys. The number will fill in
from the right.
4
5
9
0
D
C
F
427P0014
4360001
17
Deli Shop Model 436 Setup Guide
ROUTINE SERVICE AND SANITATION
Sanitation is an important phase of merchandiser operation. The lack of proper cleaning and sanitation
can cause merchandiser malfunction and loss of sales.
The periods and suggested procedures for cleaning and sanitation are given as guides only, and are not to
be construed as absolute or invariable. Local conditions must always be taken into consideration. Certain installations require that some or all of the steps under Monthly Service and Sanitation be performed
weekly. Each merchandiser must be maintained individually in accordance with its particular requirements. We, however, stress "A CLEAN MERCHANDISER IS THE MOST PROFITABLE MERCHANDISER".
Cleaning means “free of visible soil”.
Sanitizing means effective bactericidal treatment of clean surfaces of equipment and utensils by a process
which has been approved by the health authority as being effective in destroying microorganisms, including pathogens. When you sanitize you create a healthy and hygenic condition.
Sanitizing processes generally accepted by the health authority are as follows:
1. Heat: Immersion of the object for at least 30 seconds in clean hot water of at least 170oF (77oC). Hot
water at 170oF (77oC) and above can cause burns to the skin. Exercise caution when working with
hot water at this temperature.
2. Chemical: Treat the object to be sanitized with a bactericidal compound. Follow the instructions on
the bactericide's label. A chlorine sanitizer can be made by adding one teaspoon of household chlorine bleach to one gallon of water having a temperature of no lower than 75oF (24oC). Air dry do not
wipe dry. The following cautions are applicable to the service and sanitation procedures given in this
section:
IMPORTANT
All loose food particles or spillage, whether wet or dry, must be removed from the inside
and outside of the merchandiser.
CAUTION
Do not get electrical connections or electrical components damp or wet.
NOTICE
Do not use waxes or lubricants which contain silicone on or in the merchandiser. Silicone
or silicone vapors can cause electrical failure.
18
4360001
Deli Shop Model 436 Setup Guide
General
Set the main power switch OFF before cleaning or servicing the merchandiser. Use aerosol spray cleaners or spray waxes only in well-ventilated areas. NEVER use any spray product containing silicone. Silicone sprays can coat electrical contacts, causing a machine malfunction.
WARNING
Before using any liquid cleaner, unplug the merchandiser power cord or shut off power to
the wall receptacle to avoid any possibility of electrical shock. Make certain all components are thoroughly dry and properly installed before restoring power.
Refer to the Parts Manual for additional service information and replacement parts. For factory assistance, contact the nearest service representative.
Contact the local health authorities and obtain their acceptance of the sanitizer you intend to use when
cleaning and sanitizing the merchandiser.
When cleaning and sanitizing the merchandiser, use CLEAN, DISPOSABLE PAPER WIPES rather than
cloths.
Daily Service
1. Replace burned-out or discolored light bulbs.
1. PUSH UP LATCH
2. Replenish coin tubes in the coin mechanism.
3. Empty the bill validator.
4. Test vend the merchandiser.
5. Check the temperature of the cabinet.
2. PULL DOWN BILL STACKER
6. Follow the daily sanitation procedures, then reload the
merchandiser.
3. REMOVE
DOLLAR
BILLS
4360001
19
Deli Shop Model 436 Setup Guide
Daily Sanitation
1. Remove all past-date merchandise from the merchandiser.
2. Check for liquid spillage on the merchandiser modules. If there is spillage, remove the module
shelves and dividers affected. Wash and sanitize the shelves and dividers with a clean, damp disposable paper wiper or a clean soft-bristle brush. Rinse with clean hot water and dry thoroughly.
3. Wipe the exterior of the merchandiser with a damp disposable paper wiper and dry thoroughly.
4. Fill in the appropriate columns on the record of cleaning form.
Weekly Service
1. Follow the daily service instructions.
2. Brush the vent screens.
3. Inspect the refrigeration screen. Remove any accumulated dust.
4. Inspect the coin mechanism, coin validator, and bill validator. Clean if necessary.
Weekly Sanitation
1. Follow the daily sanitation instructions.
2. Inspect the merchandiser for overall cleanliness, especially the corners.
3. Fill in the appropriate columns on the record of cleaning form.
Monthly Service
1. Follow the weekly service instructions.
WARNING
Be sure the area is well ventilated and no open flames are present before using any aerosol
spray can.
WARNING
Use protective glasses or a protective shield if an air hose is used for drying.
2. Clean the coin chute and coin validator.
3. Clean the bill validator.
4. Remove the screen asemblies. Clean the screens with a dry cloth, then wash with a warm detergent
solution. Rinse, dry, and reassemble.
Monthly Sanitation
1. Follow the weekly sanitation procedures.
2. Fill in the appropriate columns on the record of cleaning form (page 22).
20
4360001
Deli Shop Model 436 Setup Guide
Semi-annual Service
1. Follow the weekly service instructions.
2. Inspect the merchandiser for worn parts and replace where necessary.
NOTICE
Do not use silicone lubricants. Silicone can cause electrical contact failures.
We recommend using Lubriplate Portable Tool Grease No. 905 (or equivalent), available
from:
Industrial Lubricating Company, Inc.
P.O. Box 3871
St. Louis, MO 63122
3. Lubricate all moving parts that do not come into contact with food.
Semi-annual Sanitation
1. Follow the monthly sanitation instructions.
Cleaning the Coin Validator and Coin Chute
Inspect the coin validator and coin chute at regular intervals. Clean them on approximately a monthly
schedule.
1. Remove the coin validator assembly from the merchandiser.
2. Clean the coin chute with a tube cleaning brush to remove any accumulated dust and foreign matter.
3. Refer to the coin validator instruction booklet and follow the recommended cleaning procedure.
Cleaning the Bill Validator
1. Refer to the bill validator instruction booklet and follow the recommended cleaning procedure.
4360001
21
Deli Shop Model 436 Setup Guide
Make copies of this record of cleaning form, cut it out, and keep it in a safe place. It will be your record
of cleaning your merchandiser.
RECORD OF CLEANING
22
4360001
MONTHLY SANITATION
MONTHLY SERVICE
WEEKLY SANITATION
WEEKLY SERVICE
DAILY SANITATION
PERFORMED BY
DATE
CHECK OR INITIAL WORK PERFORMED
Deli Shop Model 436 Setup Guide
ADJUSTING THE PRODUCT DIVIDERS
Add or remove product dividers to accomodate various size
products. Each tray segment can be left alone or divided into
as many as 6 compartments, allowing the machine to vend up to
12 products per level.
Proceed as follows:
1. Remove tray segment:
a. Align the carousel as shown.
b. Pull down on the spring clip to release the pin.
c. Pull the tray segment directly out from the center.
SPRING CLIP
427P0015
PIN
RETAINER
2. Adjust tray divider:
a. Loosen all the retainer screws.
b. Remove all of the metal retainers.
c. Remove the plate holder.
d. Remove, add, or move tray dividers as needed.
e. Reassemble the tray segment in the reverse order of
disassembly.
PLATE HOLDER
TRAY DIVIDER
SCREW
427P0002
4360001
23
Deli Shop Model 436 Setup Guide
ADJUSTING THE PRODUCT DIVIDERS (CONTINUED)
3. Install tray segment:
a. Make sure the carousel is still aligned as
shown.
b. Carefully move the tray segment into position.
Make sure the tabs on the ends of the tray segment line up with the tabs on the mating tray
segment.
c. Pull down the spring clip in order to allow the
pin to seat into the hole in the spring clip.
d. Push the tray segment the rest of the way home.
e. Check to be sure that the tray segment is secure
and will not come out.
TAB
TRAY
SEGMENT
TAB
427P0016
CLEARING A CAROUSEL JAM
1. Turn the main power switch OFF.
2. Manually push in the brake. Manually turn the carousel until you can remove the cause of the jam.
3. Close the door and move the carousel and ensure that all tray dividers will align with the right side of
the vend doors.
24
4360001
Deli Shop Model 436 Setup Guide
TIMING THE CAROUSEL
The tray dividers should be aligned with
the adjacent edge on the vend door stop. If
they are not aligned properly, follow the
steps listed below:
1. Turn the main power switch OFF.
2. Remove the chain guard cover and the
motor cover.
3. Verify that the motor is positioned so that
the switch lever is bottomed out in one of
the two cam detents. (This determines
the motor’s stop position. You may have
to release the brake and manually move
the carousel.)
4. Loosen the wing nut on the carousel
motor and bracket assembly.
5. Support the chain to keep it engaged on
the carousel motor sprocket.
6. Hold the chain motionless while rotating
the carousel (work the chain around the
carousel sprocket). Continue rotating the
carousel until the tray dividers are
aligned with the adjacent edge on the
vend door stop.
7. Apply tension to the chain by tightening
the wing nut on the carousel motor and
bracket assembly. Align the washer with
the spring load indicator bracket as
shown. MAKE SURE THAT THE
CAROUSEL DOES NOT ROTATE WHILE
TENSIONING. DO NOT OVERTIGHTEN
THE CHAIN, OR THE CAROUSEL
MOTOR MAY BIND.
8. Close the cold food door and verify the alignment.
9. Install the covers you removed in step 2.
10. Return the machine to service.
4360001
25