1
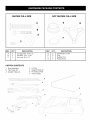
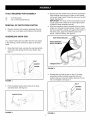
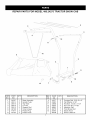
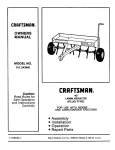
Owner's Manual
CRRFTSMRN
TRACTOR
SNOW CAB
Model No. 486.24275
CAUTION:
•
•
•
•
•
Before using this product, read
this manual and follow all
Safety Rules and
Operating
Instructions.
IMPORTANT-
READ THIS FIRST???
For Missing Parts or Assembly
Please Call 866-576-8388
Questions
Mon.-Fri. 7 am - 5 pm CST.
FAX 217-728-2032
or e-mail [email protected]
Missing parts will be sent UPS in 24 hours directly
Sears, Roebuck
Safety
Assembly
Operation
Maintenance
Parts
and Co., Hoffman
Estates,
to your home.
IL 60179 U.S.A.
www.sears.com/craftsman
PRINTED
IN U.S.A.
FORM NO. 48739 (REV. 7/04)
SAFETY RULES ........................................................
FULL SlZE HARDWARE CHART .............................
CARTON CONTENTS ...............................................
ASSEMBLY ................................................................
OPERATION ..............................................................
LIMITED ONE YEAR WARRANTY
2
3
3
4
6
MAINTENANCE/STORAGE
...................................... 6
REPAIR PARTS ILLUSTRATION ............................ 7
REPAIR PARTS LIST ................................................
7
PARTS ORDERING/SERVICE
................ Back Page
ON
For one year from the date of purchase, when this Tractor Snow Cab is maintained and lubricated according to the
operating and maintenance
instructions in the owner's manual, Sears will repair any defect in material or
workmanship free of charge. If this Tractor Snow Cab is used for commercial or rental purposes, this warranty applies
for only 90 days from the date of purchase.
This warranty does not cover repairs necessary because of operator negligence or abuse, including
maintain the equipment according to instructions contained in the owner's manual.
WARRANTY SERVICE IS AVAILABLE
MENT IN THE UNITED STATES.
This warranty
applies only
BY CONTACTING
THE NEAREST
the failure to
SEARS SERVICE CENTER/DEPART-
while this product is in the United States.
This warranty gives you specific legal rights, and you may also have other rights which vary from state to state.
Sears, Roebuck and Co. D/817 WA. Hoffman Estates, Chicago, IL 60179
The model number and serial numbers will be found on
MODEL NUMBER:
a decal attached to the base assembly.
486.24275
SERIAL NUMBER:
You should record both the serial number and the date of
purchase and keep in a safe place for future reference.
DATE OF PURCHASE:
Any power equipment can cause injury if operated improperly or if the user does not understand
the equipment.
Exercise caution at all times, when using power equipment.
•
•
•
This cab provides foul weather protection only. tt
does not provide protection against exhaust fumes,
collision, rollover or other accidents.
Read the snow cab and vehicle owner's manuals
•
•
and know how to operate your vehicle before using
the snow cab attachment.
Be sure there is adequate ventilation when using
the tractor and snow cab in confined areas.
•
_,
Look for this symbol to point out important
Become alert!! Your safety is involved.
2
how to operate
The snow cab will restrict your field of vision in
some directions. Use extra caution when operating
your tractor with the snow cab attached.
Watch out for low tree limbs or other overhead
obstructions that may not previously have interfered with operation of the tractor. The extra height
of the snow cab may cause these objects to
become obstacles.
Check the area of operation thoroughly before
using the tractor.
safety precautions.
It mean--Attention!!
SHOWN
FULL SIZE
NOT SHOWN FULL SIZE
E
A
G
B
y-_*:,;_'(_
,--
,...........
_7'
iA ..............
D
\ ...........
F
\
/
........
\
\
\\\\
REF.
QTY.
A
B
C
2
4
4
DESCRIPTION
Carriage Bolt, 5/16 x 2"
Hex Bolt, 1/4 x 1-1/2"
Hex Lock Nut, 1/4"
CARTON
REF.
QTY.
D
E
F
G
2
2
4
2
DESCRIPTION
Flat Washer, 5/16"
Plug
Rubber Pad
Plastic Knob
CONTENTS
1. Base Assembly
2. Top Tubes (2)
3. Upright Tubes (2)
4.
5.
6.
7.
U-Tube
Support Rods (3)
Front Brace Rod
Vinyl Canopy
J-
j.J--
4
6
J
3
j--
2
jJ
J
/
/
t
/
,f-
TOOLS
(2)
(1)
REQUIRED
•
7/16" Wrenches
1/2" or 9/16" Socket Wrench
REMOVAL
•
FOR ASSEMBLY
OF PARTS
FROM CARTON
•
Remove all parts and hardware packages from the
carton. Lay out all parts and hardware and identify.
ASSEMBLING
SNOW CAB
Spread apart the slotted ends of the base assembly's
front brackets just enough to fit them on the outside
of the seat hinge bracket. Slide the slots over the bolt
heads. See figure 3.
IMPORTANT: The ends of the front brackets must fit
snugly against the outside of the seat hinge bracket
to keep the base assembly secured.
Align the assembly's bottom brackets over the holes
where you removed the seat springs. Check to see if
the base assembly's tubing rubs against the fender. If
the tubing rubs, apply the adhesive pads to the
fender, under the tubing. See figure 3.
SEAT HINGE BRACKET
Your tractor fender style may differ from the one shown
in the drawings. These instructions apply to all fender
styles.
FRONT BRACKET
_-(BASE ASSEMBLY)
Raise the tractor seat, unscrew the seat spring bolts
and remove the springs from the rear fender. See
figure 1.
\
'1
\'1 \1
BOLT
/WASHER
SPRING
FIGURE 3
Reassemble the seat springs on top of the base
assembly's bottom brackets using the bolts and
washers that you removed. Tighten securely, but do
not to overtighten. See figure 4.
FIGURE 1
BOLT
•
Push the plastic plugs into the ends of the base
assembly tubes. See figure 2.
WASHER
_/SPRING
PLASTIC PLUG
(
FIGURE 2
FIGURE 4
4
Assembletheuprighttubestothebaseassembly
usingtwo5/16-18x 2"carriagebolts(onoutside)and
two5/16"flatwashersandplasticknobs(oninside).
Seefigure5.
,/-J
/' /
/ /
\
J
J
i J
i
i
PLASTIC
KNOB
i
J
5/16" x 2"
CARRIAGE BOLT
/
FRONT BRACE ROD
FLAT
WASHER
FIGURE 5
FIGURE 7
•
•
•
Assemble the top tubes to the upright tubes using two
1/4" x 1-1/2" hex bolts (from outside) and two 1/4" hex
lock nuts (inside). Do not tighten yet. See figure 6.
Fit the front U-tube onto the top tubes. Fasten the
tubes together using two 1/4" x 1-1/2" hex bolts (on
outside) and two 1/4" hex lock nuts (on inside).
Tighten all loose bolts. See figure 6.
Fit the three support rods into the holes in the top
tubes, with the rods arching upward. Do not over
bend the rods when installing. See figure 6.
1/4" x 1-1/2"
Raise the tractor's hood. Place the snow cab canopy
onto the tubing frame, draping the front flap down in
front of the tractor's dash panel. Lower the hood,
trapping the front flap under the hood. Secure the
sides of the canopy by fastening the elastic hooks to
the bottom edge of the footrest and fender. Any
levers or handles on snowthrowers or snow blades
should be located outside of the cab. See figure 8.
SUPPORT ROD
FRONT FLAP
FIGURE 6
Insert the ends of the front brace rod into the holes in
the U-tube and then swing the bottom of the rod
down to rest on top of the dash panel. On newer "GT"
tractors, use the holes at each end of the U-tube. On
older "GT" tractors and on "LT" tractors, the alternate
holes in the front section of the U-tube may provide
the best fit. See figure 7.
ELASTIC HOOK
FIGURE 8
5
Readthis owner's manualandsafety rules beforeoperatingyour tractor with the SnowCab.
&
&
&
CAUTION:
This cab provides foul
weather protection only. It does not
provide protection against exhaust
fumes, collision, rollover or other accidents.
CAUTION:
Never transport the tractor in
an open truck or open trailer while the
snow cab is attached.
CUSTOMER
•
MAINTENANCE
Check for loose fasteners
cab to get on or off the tractor.
•
Operate outside controls on a snowthrower or
snow blade through the access flaps in the sides of
the canopy.
•
Remove the upper snow cab frame and canopy
before you transport the tractor in an open truck or
open trailer.
schedule and the maintenance
procedures
__z,_
listed in this section.
FOR LOOSE
Service Dates
X
X
Cleaning
X
FASTENERS
Before each use make a thorough visual check of
the snow cab for any bolts and nuts which may
have loosened. Retighten any loose bolts and nuts.
CLEANING
•
Unfasten the elastic hooks on one side of the snow
SCHEDULE
Fill in dates as you
complete regular service.
•
•
RESPONSIBILITIES
Read and follow the maintenance
CHECK
Check the area of operation thoroughly before
using the tractor with the snow cab. The added
height of the snow cab and a reduced field of
vision require extra caution during operation.
CAUTION:
Watch out for low tree
limbs and other overhead objects which
may interfere with the snow cab.
The vinyl portion of the canopy can be washed
using water only, or a mild liquid soap and water.
• The plastic windows should only be washed using
running water, or a mild liquid soap and water.
Wash the windows with your bare hands only. A
cloth, sponge or brush will scratch the clear plastic.
IMPORTANT:
Never clean the windows when the
plastic is dry. The clear plastic will scratch.
STORAGE
•
Clean the vinyl canopy thoroughly with mild liquid
soap and water. Allow to dry before storing. Refer
to the Cleaning section.
•
Store the snow cab in a clean, dry area away from
direct sun light.
REPAIR
PARTS
FOR MODEL
486.24275
TRACTOR
SNOW
CAB
f
3
//
//
/
/
//
//
11
ii
\
ii
\
\
f?
",
//
/ /
//
/i
',,
,,,
iI
i/
//
,,,
/'
//
14
6
,/
\\\\\
2
I
/
/
/
,//
/
/
J
lO
8
/
13
REF.
NO.
1
2
3
4
5
6
7
8
PART
NO.
QTY.
64567
25014
25013
25012
25015
48738
47674
43720
1
2
2
1
3
1
2
2
DESCRIPTION
Base Assembly
Upright Tube
Top Tube
U-Tube
Support Rod
Vinyl Canopy
Plastic Plug
Plastic Knob
REF.
NO.
PART
NO.
QTY.
9
10
11
12
13
14
15
44977
43081
43648
43013
48661
48773
25040
48739
2
2
4
4
4
1
4
1
DESCRIPTION
Carriage Bolt, 5/16-18 x 2"
Flat Washer, 5/16"
Hex Bolt, 1/4-20 x 1-1/2"
Hex Lock Nut, 1/4-20
Adhesive Pad
Front Brace Rod
Elastic Hook
Owner's Manual
For repair of major brand appliances in your own home...
no matter who made it, no matter who sold it!
1-800-4-MY-HOM ESMAnytime,
day or night
(1-800-469-4663)
www.sears.com
To bring in products such as vacuums, lawn equipment and electronics
for repair, call for the location of your nearest Sears Parts & Repair Center.
1-800-488-1222
Anytime,
day or night
www.sears.com
For the replacement parts, accessories and owner's manuals
that you need to do-it-yourself, call Sears PartsDirectSM !
1-800-366-PART
(1-800-366-7278)
6 a.m. - 11 p.m. CST,
7 days a week
www.sears.com/partsdirect
To purchase or inquire about a Sears Service Agreement:
1-800-827-6655
7 a.m. - 5 p.m. CST, Mon. - Sat.
Para pedir servicio de reparaci6n a domicilio,
y para ordenar piezas con entrega a domicilio:
1-888-SU-HOGAR
sM
Au Canada pour service
1-877-LE-FOYER
(1-877-533-6937)
(1-888-784-6427)
® Registered
© Sears,
Roebuck
and
Co.
Trademark / T_ Trademark
® Marca Registrada
en fran£ais:
SM
of Sears, Roebuck
/ T_ Marca de Fabrica de Sears. Roebuck
and Co.
and Co.