1
OPERATOR'S
iPR
OFESS
MANUAL
I
ONAL
I
1/4 SHEET SANDER
DOUBLE INSULATED
Model No.
315.279840
_k
WARNING: Toreduce tho risk of injury,
the user must read and understandthe
operator'smanual before using this product.
Customer
Help Line: 1-800-932-3188
Sears, Roebuck and Co., 3333 Bevedy Rd., Hoffman Estates, IL 60179 USA
Visit the Craftsman web page: www.sears.com/cmflsman
983000-513
7-04
Save this manual
for future
reference
• Warranty ..........................................................................................................................................................................
• Infroduction.....................................................................................................................................................................
• General Safety Rules....................................................................................................................................................
•
2
2
3-4
Specific Safety Rules......................................................................................................................................................
4
• Symbols........................................................................................................................................................................ 5-6
• Electrical..........................................................................................................................................................................
7
• Features...........................................................................................................................................................................
8
• Assembly.........................................................................................................................................................................
9
• Operation....................................................................................................................................................................
9-12
• Maintenance.............................................................................................................................................................
12-13
• AcceSSories ...................................................................................................................................................................
• ExplodedView and Parts List...................................................................................................................................
• Parts Ordering/Service.....................................................................................................................................
13
14-15
Back Page
ONE YEAR FULL WARRANTY ON CRAFTSMAN PROFESSIONAL TOOL
If the Craftsman Professionaltool fails to give completesatisfactionwithin one year from date o1purchase, RETURN IT
TO THE NEAREST SEARS STORE IN THE UNITED STATES, and Searswill replace it, free of charge.
This warranty gives you specific legalrights,and you may also have other rightswhich varyfrom state to state.
Sears, Roebuck and Co., DopL 817 WA, Hoffman Estates, IL 60179
This tool has many features for making its use more pleasantand enjoyable.Safety, performance,and dependability
have been given top priority in the design of this product making it easy to maintain and operate.
WARNING:
Readand understand all Instructions. Failureto follow a]] instructions listed below,
may result in eisctric shock, tim and/or serious
personalinjury.
SAVE THESE
WORK
INSTRUCTIONS
AREA
• Keep your work area clean and well lit, Cluttered
benches and dark areas invite _cc;dents.
• Do not operate power tools in explosive stmospheres, such as in the presence of flammable liquids, gases, or dust. Power tools create sparks which
may ignite the dust or fumes,
• Keep bystanders, children, andvbltore eweywblls
operating a power tool. Distractionscan cause you to
lose control.
ELECTRICAL SAFETY
• Double Insulated tools are equipped with a polarized plug (one blade is wider than the other). This
plug wi(I fit in a polarized out(st only one way. If the
plug does not fit fully in the outlet, reverse the plug.
If it still does not fit, contact • qualified eleoVldan
to install e polarized out(eL Do nat change the plug
in any way. Double insulation[] eliminatesthe need
for the three-wire grounded power cord and grounded
power supply system.
• Avoid body contact wlth grounded surfaces such
as pipes, radiators, range_, and rstrlperatore. There
Is an Increasedrisk of electricshock Ifyour body Is
grounded.
• Don't expose power tools to rein or wet conditions`
Water enteringa power tool will Increase the risk of
erectricshock.
• Do nat abuse the cord. Never use the cord to carry
the tools or pull the plug from an outlet. Keep cord
away from heat, oil, sharp edges, or moving parts.
Replace damaged cords immediately. Damaged
cords increasethe risk of electricshock.
• When operating s power tool outside, use an outdoor
exterBIon cord marked '=W-A" or =If_. These cords
are ratedfor outdooruseand reducethe riskof electric
shock.
PERSONAL SAFETY
• Stay alert, watch what you are doing and use commen sense when operating s power tool. Do not
use tool white tired or under the influence of drugs,
alcohol, or medication. A moment of inattentionwhite
operatingpower tools m.ayresultin serious personal
injury.
• Dress properly. Do notweer loose clothing or
jewelry. Contain long hair. Keep your heir, clothing,
end gloves away from moving parts. Loose clothes,
jewelry, or long hair can be caught in moving parts.
• Avoid accidental etarUng. Be sure switch le off
before plugging In. Carryingtoolswith yourfinger on
the switchor pluggingin toolsthat havethe switchon
invitesaccidents.
• Remove adjusting keys or wrenches before tuming
the tool on. A wrench or a key that is left attached to a
rotating part of the toolmay resultin persocaJiniury.
• Do not overreach. Keep proper footing end balance
at all times. Proper footing and balance en_b[as better
con_olofthetooSin unexpectedsituations.
• Use sefetyequipment. Nwsyewear eye protection.
Dust mask, nonskidsafety shoes, hard hat, or hearing
protection must be used for appropriate conditions.
• Do not wear loose clothing or jewelry. Contain long
hair. Loose clothes, jewelry, or long hair can be drawn
intoair vents.
• Do not use on a ladder or un_d_ablesupport. Stable
footing on a solid surface enab)esbetter con_ol ofthe
tool in unexpectedsituations.
TOOL USE AND CARE
• Use clamps or other practical way to secure and
support the workplece to a stable platform. Holding
the work by hand or against your body is unstableand
may lead to loss of centroL
• Do not force too/. Use the correct tool for your application. The correct too( will do the job better and
setar at the rate tor which it is designed.
• Do not cee tool if =witch does not turn it on or off.
Any tool that cannot be controlledwith the switch is
dangerous and must be repaired.
• Disconnect the plug from power source before
making any adjustments, changing accessories,
or storing the tool. Such preventivesafety measures
reduce the risk of startingthe tool accidentally.
• Store idle tools out of the reach of children and
other untrained persona. Tootsare dangerous in the
hands of untrained users.
• Mdntsln tools wtth cars. Keep cuffing tools sharp
and clean. Properlymaintainedtoolswith sharp cutting edges are less likelyto bind and are easier to
control
• Check for misaitgnment or binding of moving parts,
brsekags of parts, and any othe_ condition that
may effect the tool's operation. If damaged, have
the tool serviced before using. Many accidents are
caused by poorly maintained tools.
• Use only accessories that are recommended by the
manufacturer for your model. Accessoriesthat may
be su[tab(efor one too{, may become hazardouswhen
used on another tool.
• Keep the tool end its handle dry, clean end free
from oil end grease. ANvsys use a clean cloth when
cleaning. Never use brake fluids, gasoline, petToioumbased products, or any strong solventsto clean your
tool. Following this ruJewJflreduce the risk of loss of
control and deteriorationof the enctos6ve plastic.
SERVICE
• When servicing • tool, use only Identical replacement parts, Follow ins;:ructions
in the Maintenance
section of thLs manual. Use of unauthorizedparts or
failure to follow Maintenance Instructionsmay create a
risk of shock or injury.
• Tool service must be performed only by qualified
repair personnel. Service or maintenance performed
by unqualifiedpersonnelmay re,suitin a risk of injury.
•
Hold tool by Insulated gripping surhlcse when
performing an operation where the cutting tool may
contact hidden wiring or Its own cord. Contact with
e "live"wire will make exposedmetal parts of the cutting tool "live"and shock the operator.
I
Never use this or any power sander for wet sanding
or (io,uid polishing. Failureto comptywill increasethe
risk o#electrical shock.
Know your power tool. Read operator's manual
carefully. Learn Its applications end limitations, as
well as the specific potential hazards related to this
tool. Followingthis ruts will reduce ths risk of electric
shock, firs, or serious Injury.
• Always wear safety glasses. Everyday eyeglasses
have only _mpsct-re=dstsnt lenses; they ere NOT
safety glasses. Followingthis rulewil( reduce the risk
of sedous personalinlury.
• Proteof your lungs. Wear e face or dust meek if the
operation Is dusty. Fallowingthis rule wi[I reduce the
risk of serious perser_l injury.
• Check damaged parts. Before further use of the
tool, • guard or other pert that is damaged should
be carefully checked to determine that It will operate properly and perform its intended function.
Check for alignment of moving parts, binding of
moving parts, breakage of parts, recur=ling,and
any other conditions that may effect It_ opera.
Uon. A guard or other part that is damaged should
be propEwlyrepaired or replaced by an authorized
service center. Followingthis rulewfffreduce the risk
of shock, fire, or serious injury.
• Make sure your extension cord is In good oondltia_'LWhen using an extsns_oncord, be sure to use
one heavy enough to carry the current your product
will draw. Awlre gauge size {A,W.G.) of at least 16
is recommended for an extension cord I00 feet
or tess In leagth. A cord exceeding 100 feat is not
reoon'mnondod. If in doubt, use the next heavier
gaul. The =-nailer the gauge number, the he=vler
the cord. An undersized cord wJJJ
cause s drop in line
vol_tgs resultingIn loss of power end overheating.
•
•
•
Protect your hearing, Wear hearing protection durIng extended Periods of operation. Followingthis rule
wilt reduce the risk of serious personal injury.
• Inspect tool cords lc_icxliceHy end, ffdamaged,
have repaired at your nearest Authorized ServJca
Center. Constantly stay aware of cord location. Following this rule wJilreduce the risk of eisctrJc shock or
fire.
Inspect for end remove all nails from lumber before
using this tool. Followingthis rulewill reducethe risk
of serious persePalInjury.
• Save these Instructions. Refer to them frequentlyand
use _
to instruct othe_swho may use this tool. If
you loan someone this tool, loan them these instructionsa/so.
WARNING: Soma dust crsatad by power sanding, sawing, grinding, drilling,end other constructionactivities
contains chemicalsknown to cause cancer,birth defects or other reproductiveharm. Some examples of these
chemicalsare:
• lead from lead-based, palms,
. crystallines_t(cafrom bricks and cement and othermasonry produc_s,and
• arsenicand chromiumit'om chemically-treated{umber.
Your risk from these exposuresvaries, depending on how often you do this type of work. To reduce your sxposum
to these chemicals:work in a well ventilated area, and work with approved Safety equipment,such as those dust
masks tha_ are specially designedto filter out microscopic particles.
4
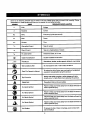
Some of the following symbols may be used on this tool. Please study them and learn their meaning. Proper
interpretationof these symbolswill allow you to operate the tool batter and safer.
SYMBOL
NAME
DESIGNATION/EXPLANATION
V
Volts
Voltage
A
Amperes
Current
Hz
Hertz
Frequency(cyclesper second)
W
Watt
Power
Minutes
"i3me
'%,
AlternatingCurrent
Type of current
,=
Direct Current
Type or a chsracterLsticof current
no
No Load Speed
Rotationalspeed, at no load
_]
Class II Consb'uctJon
Doub]e-]nsu)_tedconstruction
..Jm]n
Per Minute
Revolutions,strokes,surface speed, orb_setc., per minute
(_
Wet ConditionsAlert
Do not expose to rain or use in damp locations.
Read The Operator'sManual
operator'smanual
beforeusing
product.
To
reducethe risk of
injury, userthis
must
read and understand
Eye Protection
shields
and asafety
fun face
shield when
operatingthis
Atwaysweer
gogglesor
safety
glasseswithproduct.
aide
Safety Alert
Precautionsthat involveyour safety.
(_
No Hands Symbol
serious
personalinjury.
Failureto
keep your hands away from the blade will resultin
(_)
No Hands Symbol
seriouspersonal
injury.
Failureto keep yourhands
away horn the blade wil) result in
O
No Hands Symbol
seriouspersonalinjury.
Failureto keep your handsaway fromthe blade wi_ resuttin
,/_
No Hands Symbol
Faitureto
serious
personalinjury.
keep yourhands away from the blade wil! resutt in
_)
Hot Sur/ace
To
any
reduce
hot surface.
the risk of _n[uryor damage, avoid contact wlth
rain
O
A
5
The following
signal words and meanings are intended to explain the levels of risk associated with this product.
SYMBOL
SIGNAL
MEANING
A
DANGER:
indicates an imminentlyi-_g.ardoussitL_tion,which, if not avoided, will
rssultin death or serious injury.
A
WARNING:
|nd}catesa potentially hazardoussituation,which, if not avoided, could
resultin death or seriousinjury.
A
CAUTION:
Indicat_ a potentially hazardous situation, which, {f not avoided, may
result in minor or moderate injury,
CAUTION:
(Without Safety Alert Symbol) Indicates a situation that may result in
propertydamage.
SERVICE
A
Servicingrequiresextreme care and knowledgeand
should be performed only by a qualilted service technician.For service we suggest you return the product to
your nearsst AUTHORIZED SERVICE CENTER for repair.
When servicing, use onlyidentical replacement parts.
,_
WARNING: To avoid serious personalLnjury,do
not attempt to usa this product until you read
thoroughlyand understand completelythe
operator'smanual. Save this operator'smanual
and review frequently for continuingsafe operation and instructingothers who may use this
product.
WARNING:
The operationof any power tool can resultin foreign objects being thrown into your eyes,which
O
goggles or safaty glasses with side shields and a fun face sh'leldwhen needed. We recommend
can result
in Safety
saverseye
Before
beginningpower
toolsafety
operation,
always wear
eafaty
Wide
Vision
Maskdamage.
for usa over
eyeglassesor
standard
glasseswith
side shields.
Always use eye protectionwhich is marked to comply with ANSI Z87.1.
SAVE THESE INSTRUCTIONS
6
DOUBLE INSULATION
EXTENSION CORDS
Double insulationis a concept in safety in electricpower
tools, which eliminates the need for the usualthres-wlre
grounded power cord. AJiexposed metal parts are
isolatedfrom the internalmetal motor componentswith
protectinginsulation.Double insulatedtools do not need
to be grounded.
When using a power tool at a considerabledistance from
a power soume, be sure to use an extensioncord that has
the capacity to handle the currentthe toot will draw. An
undersizedcordwill cause a drop in tinsvoltage, resulting
in overheatingand lose of power, Use the ohartto determine the minimumwire size required in an extensioncord.
Only roundjacketed cords listed by Undsrwriter'sLaboratories (UL) shouk_be used.
WARNING: The double insulated system is
intended to pmteot the user from shook resulting
from a break in the tool's internalinsulation.Observe
ell norm_ safety presautio_s to evo{daIeotl'tce,
I
shook.
NOTE: Servicingof a tool with double insulationrequires
extreme care and knowledge of the system and should
be performedonly by a qualified servicetechnician. For
service,we suggestyou return the tool to your nearest
authorrzed service center for repair.A_vaysuse original
faotory replacement parts when servicing.
ELECTRICAL
CONNECTION
This tool has a precLsion-builtslectYicmotor,Itshould be
connected to a power supply that Is 120 volts, 60 Hz,
AC only (normal household current). Do not operate
this tool on directcurrent (DC). A substantialvoltage drop
will cause a loss of power and the motor will overheat. If
yourtool does not operate when plugged into an outlet,
double-check the power suppry.
When working outdoorswith a tool, use an extension
cord that is designed for outside use. Thistype of cord is
designatedwith =WA= on the cord'siacket.
Before usingany extensioncord, inspect it for loose or
exposed wires and cut or worn insulation.
• "/_mpem rating (on _o01{aCeplmte)
0-2.0
2.1-3.4
Cord Length
3.5-5.0
5,1-7,0
7.1-12.0
12.1-16.0
W'weSize (A.W.G.)
25'
16
16
16
16
14
1.4
50'
16
16
16
14
14
12
100'
18
16
14
"{2
10
--
NOTE: AWG = Amedcan Wire Gauge
WARNING: Keep the extension cord clear of the
workingarea, Positionthe cord so that itwiU not get
caught on lumber,toolsor other obstructfonswhile
you are workingwith a power tool. Failureto do so
can result in serious personalinjury.
WARNING: Check extension cords before each
use. If damaged repface Immediately.Never use tool
with a damaged cord since touchingthe damaged
area could cause electricalshock resu{tingin serious
Injury.
PRODUCTSPECIFICATIONS
SizeofPaper
......................................................
1/4 Sheet
Motion ..................................................................... Orbital
input ................................ 120 V,60 Hz, AC only,2.4 Amps
Net Weight............................................................... 3.5 tba.
Orbfta[ Diameter..................................................... 1/16 in.
Paper Type ................................ Non-AdhesiveSandpaper
Adhesive Sandpaper
No Load Speed ............................................... 14,000/min.
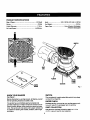
ON
SWITCH
OFF
DUST
BAG
PAPER
CLAMP
PLATEN
CUSHION
PAPER
PUNCH
PAPER
CLAMP
LEVER
Fig. 1
KNOW YOUR SANDER
SWITCH
See Figure 1.
The conveniently located sealed slideswitch helpskeep
out dust for a longerlife.
Before attempting to use this product, familiarizeyourself
with aft operating features and safety rules.
PAPER PUNCH
The sander has a comfortablepalm grip handle that
provides maximum one-hand control and comfortand reduces operator fetfgue during uontinuouasandingoperations. The sander also has quickaction paper clamps and
is suitablefor sanding with coame, medium, and fine grit
sandpaper.
Dustlesssanding occurswhen you use the paper punch
to punch holesin the sandpaper priorto sanding.
DUST COLLECTION
Use either the dust bag includedor attach a 1-1/4 or
2-1/2 fn. vacuum hose for dust col/ection.
8
UNPACKING
Thisproduct
hasbeenshipped
completely
assembled.
_k
WARNING" If any parts are missingdo not operate
thLstool untilthe missing parts are repracsd, Failure
to do so could result in possiblessr[ous persosai
injury.
_
WARNING: Do not attempt to modify this tool
or create accessoriesnot recommended for use
with this tool. Any such atterat(on or modification Ls
misuse end could result in e hazardouscondition
feadiog to possibleserious persona[In}ury.
A
WARN|NG: Do not connect to power supply until
assembly is complete, Failureto comply could result
in accidental startingand possibleseriousinjury.
• Carefullyremove the too[ and any accessories from the
box. Make sure that a_litems listed in the packing mist
are inc)uded.
• Inspect the too[ carefullyto make sure no breakageor
damage occurred during shipping.
• Do not discard the packing materis[ untilyou have
carefullyinspected and satisfactorilyoperated thetool.
• If any parts are damaged or missing, please call
1-800-932-3488 for assistance.
PACKING LIST
Sander
Dust Bag
Paper Punch
Sandpaper (1)
Operator'sManual
_k
WARN|NG: Do not allow familisrity with tools
to make you careless. Rememberthat a careless
fraction of a second is sufficientto inflictserious
injury.
_L
WARNING: Always wear safety gogglesor safety
glasses with side shieldswhen operating power
tools, Failureto do so could rseultin objectsbeing
thrown into your eyes resultingin possibleserious
injury.
• Wrap sandpaper around cushion.Lift lever on opposite
end of sander and insertloose end of sandpaper under
the paper clamp. Fit sandpaper againstcushionas
fight as possible.
• Lift up on paperclamp lever and lock _ntoplace.
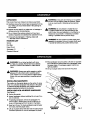
INSTALLING SANDPAPER
The cushionon the sander gives you the option of using
either non-adhesive sandpaperthat clamps to the platen
or adhesive backed sandpaper with pressuresensitive
adhesive backing that sticks to the cushion.
INSTALLING
NON-ADHESIVE
See Figure2.
• Unplug the sander.
SANDPAPER
CUSHION
• inspect sandpaper before installing.Do not use if broken or defsc_ve.
•
•
•
If rap{acingsandpaper, remove old sandpaper. To
remove paper, release paper clamp by lifting up on
lever and disengagingit from the tab on the platen.
Insertend ofnew 1/4sheet sandpaper approximately
(1/2 inch) under the paper clamp.
Lift up on paper clamp (everand lock into p(ace. Apply
downward pressure to conform sandpaper to p(atan.
NON-ADHESIVE
SANDPAPER
PAPER
CLAMP
LEVER
Fig. 2
INSTALLINGADHESIVESANDPAPER
See Figure 3.
•Unp]ug thesander.
• Ifreplacing
adhesivesandpaper,
remove oldsandpaperby peeling
itoffcushion.
Ifreplacing
regular
sandpaper, relsase paper C_T_p by liftingup on paper
cramp lever and disengagingit from the tab on the
platen.
• Remove non-adhesivesandpaper, then lift up on paper
damp lever end lock it into place.
• Carefully peel adhesivebacking from new 114sheet
sandpaper.
• Positionsandpaper, makingsure front edge of sandpaper is alignedwith front edge of the cushion,then
carefully press _cky side of sandpaper on cushion.
NOTE: Sandpaper must be a[igned with the front edge
of the cushionfor proper functioning of the flush sanding feature.
The cushion on the sander ksapprox_nnately
1/4 in. smaller than precut adhesive-backed sanding
sheets. If desiredyou may want to vim off the overhang of sandpaper on the back side of cushion.The
cushion has been made smallerso that multiple sheets
of nonadhesive sandpapercan be installed.
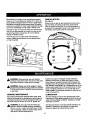
PAPER PUNCH
See Figure4.
A paper punch template has been suppliedwith the sander. It should be used for sflgning and punchingholesin the
sandpaper for alignmentwith the holes in the cushion.
Punching the holes propertyis a necessarystep )n order
tor the dustlessfeature of the sender to function property.
• Instattsandpaperon the sander.
• Align sander cushionto paper punch as shown by the
iconon the paper punch template.
• Push down on sander.
PAPERPUNCH
Fig. 4
DUSTLESS SANDING
See Figure 5 - 6.
The dust bag providesa dust collectionsystem for the
sander.Sanding dust is drawn up through the holes in the
sandpaper end cushion and collects in the dust bag during sanding operation.For more effLcientoperation, empty
dust bag when half full.
TO INSTALL DUST BAG:
• Unplug the sander.
• Aligngrooves on dust bag with notches on sander dust
exhaust.
CUSHInN
• Slide dust bag onto dust exhaust.
• Turn clockwiseuntil bag looksinto place.
TO REMOVE DUST BAG FOR EMPTYING:
• Unplug the sander.
• Turn dust bag counterclockwiseuntil it stops turning.
ADHESIVE
SANDPAPER
• Slide dust bag off sander dust exhaust.
• Shake to empty.
Fig. 3
10
SANDPAPER SELECTION
DUST
BAG
Selectingthe correct size gritand type sandpaper is
an extremelyimportantstep in achievinga high quality
sanded finish.Aluminum oxide, siliconcarbide, and other
syntheticabrsaivea are bestfor power sanding. Natural
abrasivessuch as flint and gernetare too solt for economical use in power sanding. In genera[,coarse grit will
remove the most material and finer grit will produce the
best _nish in all sanding operations.The conditionof the
surface to be sanded will determine which gritwill do the
job. If the surface is rough,start with a coarse grit and
sand untilthe surface Is uniform.Medium grit may then
be used to remove scratches left by the coarser grit a,'_d
finer grit used for finishingof the surface.Always continue
sanding with each grit untilsurface is uniform.
DUET
EXHAUST
Fig. 5
TO CONNECT
See Figure 6.
VACUUM
HOSE:
NOTE: Do not use sanderwithout sandpaper. Doing so
will damage the cushion.
When sanding for an extended period of time, you can
easily attach the dust collectionsystem of the sander to s
CAUTION: Be carafut not to let your hand completelycover the air vents.
vaouum.
To Attach:
• Unplug the sander.
SANDING
See Fcgures7- 8.
• Remove dust bag from sander.
• Attach vacuum hose to dust exhaust.
Clamp or otherwisesecure the work to prevent it from
moving under the sander.
NOTE: Vacuum hose fits inside dust exhaust.
• Connect sander and vacuum to power supply.
,_
_kWARNIING:
When sander is not connected to
vacuum, always installdust bag back on sander.
Fallurato do so could cause sanding dust or foreign
obiects to be thrown into the face or eyes which
could result in posaibie.sariousinjury.
1-1/4 in.VACUUMHOSE
2-1/2 In.VACUUMHOSE
WARNING: Unsecuredwork could be thrown towaraLsthe operator causing in]ur_.
Hold the sander in front and away from you, keeping it
clear of the workpiece. Start the sander by slidingthe
switch button to the ON positionand lettingthe motor
build to its maximum speed. Graduallylower the sander
on the work with a stightforward movement. Move it
slowiyusing forward end backwardstrokes.
DUSTEXHALI_r
DUSTEXHAUST
Fig. 6
NOTE: A standard 1-1/4 in. vacuum hose connection fits
inside the smaller diameter hole inside the dust exhaust,
while a standard 2-1/2 In. vacuum hose connectionfits
inside the larger hole of the dust exhaust.
Fig. 7
fl
Donotforce.Theweightof the unitsuppliesadequate
pressure.Let the sandpaper and sander do the work. Applyingadditional pressuresrowa the motor, rapidlywears
sandpaper and greatlyreducessander speed. Excessive
pressurewill overloadthe motor causing possibledamage
from motor overheatingand can result in inferiorwork.
Any finish or resin on wood maysoften from the frictional
ORBITAL MOTION
See Figure 9.
Orbital motion is idealfor fast cutting actionwhen removing old finishes,smoothingroughwood, cutting stock
down to required dimensions,or for finishingsurfaces to
be painted. The sandpaper moves in tiny circlesat a very
highspeed, arrowing the sander to move easily.
heat. Do not allow sanding on one spot too long, as the
sander's rapid action may remove too much matarial,
making the surface uneven.
The front edge o_the sander allows ftush sandingin
corners.AJwayaremove sander from workptece before
turningthe sander.
Fig. 9
Fig. 8
A
WARNING: When servicing,use only identical
Craftsman replacement parts. Use of any other parts
may create a hazard or cause productdamage.
A
WARNING: Always wear _ataty goggles or safety
glasseswith side shie/ds during power tool operation
or when blowing dust. If operation is dusty,also wear
a dust mask.
Electrictools used on flbargLseamaterial, wallboard,
specklingcompounds, or plasterere subject to scsalstated wear and possiblepremature faiturebecause the
fiberglass chipsand grindingsare highlyabrasiveto bearings, brushes,commutators,etc. Consequently,we do not
recommended usingthis tool for extended work on these
types of materials. However, it you do work with any of
these materials, it is extremelyimportantto clean the tool
using compressed air.
GENERAL MAINTENANCE
LUBRICATION
Avoid usingsolventswhen cleaning plasticparts. Most
plasticsare susceptibleto damage from various types of
commercialsolventsand may be damaged by their use.
Use clean clothsto remove dirt, dust, oil, grease,etc.
All of the bearings in this toolam lubricatedwith a sufficient amount of high grade lubricantfor the life of the unit
under normal operating conditions.Therefore, no further
lubricationis required.
Only the parts shown on the parts listare intended to be
repairedor replaced by the customer.All other parts
should be replaced at a Sears ServiceCenter.
WARNING: Do not at any time let brake fluids,
gasoline, petroleum-b_Lsedproducts, penetn_ting
oils, etc., come in contact with plasticparts. Chemicals can damage, weaken or destroy plasticwhich
may result in serious personalInjury.
12
BRUSH REPLACEMENT
Rgure 10.
• Unp[ugthe sander.
•
•
•
•
•
Remove screws (3) fl'om top cover of sander.
Remove top cover.
Remove clamp screws (2.).
Remove brush tube clamps (2).
Disconnectred and black lead terminals fl'om brush
tubes.
• Remove brushassemblies (2).
• Check for wear. Replace both brush assemblieswhen
e(ther has tess than 1/4 in. length of carbon remaining.
Do not replace one side without replacing the other.
• Install new brush assemblies. Make sure curvature
of brush m_ches curvatureof motor and that brush
moves freely in brush tube.
• Reassembleby reversingthe steps listedabove.
• Tighten all screws securely. Do not overtighten.
BLACX
LEAD
Fig. _0
The following recommended accassodas are currentlyawitab_e at Sears retail stores:
• Aluminum Oxide Sheets With Paper Backing (1/4 Sheet)
X-Fine, Fine, Medium, Coarse
• Presaure-sensitTveAdhesive,Paper Backed Sheets(1/4 Sheet)
X-Fine, Fine, Medium, Coarse
• The FollowingStandard 4-1/2 in.X 11 in. Sanding Sheets Can Be Cut To Fit The Sander
X-Fine, Fine, Medium, Coarse
A
WARNING: Current attanhments end accessoriesevailabla for use with this tsof are listedabove. Do not use any
attachments or accessoriesnot recommended by the manufacturerof this tool. The use of attachments or accessor(es not recommsnde_ can resultIn ser(ouspersona(injury.
13
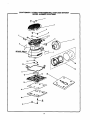
CRAFTSMAN
114 SHEET
MODEL
PROFESSIONAL
DUSTLESS
NUMBER
315.279840
SANDER
SEENOTEt PAGE15
f
J
11_
!.J
14
1.
CRAFTSMAN
I
1/4 SHEET
MODEL
PROFESSIONAL
DUSTLESS
NUMBER
315.279840
SANDER
The model number will be found on a plate a_a_-hed to the motor housing. Always mention the model
number in all correspondence regarding your PROFESSIONAL SANDER or when orderingrepair parts.
SEE BACK PAGE FOR PARTS ORDERING
PARTS
Key
No.
|
J
INSTRUCTIONS
LIST
Pad
Number
Description
1
2
660133001
512486001
Screw (8-18 x 5/8 fn.) ......................................................................................
Top Cap ...........................................................................................................
3
I
3
4
5614001
617800-002
Screw (5-15 x 1/2 in.) ......................................................................................
Brush Clamp ...................................................................................................
2
2
5
2'30069022
6
7
8
940075047
940114103
512355001
Carbon Brush Assembly .................................................................................
Data Plate........................................................................................................
2
1
Logo Plate .......................................................................................................
Adapter ............................................................................................................
1
1
9
968"/00-004
10
630874002
Screw (6-19 x 5/16 in.) ....................................................................................
Retaining Plats ................................................................................................
2
2
11
12
301123001
560671002
Spring Clamp ..................................................................................................
Dust Shrefd ......................................................................................................
2
1
13
14
623019-004
590929001
Rubber Plug ....................................................................................................
Platen ..............................................................................................................
1
1
15
16
631015001
590931002
PJuminumPlate ...............................................................................................
1
Cushion ...........................................................................................................
1
17
18
617966-030
300027048
Screw (8-10 x 5/8 in.] ......................................................................................
4
19
g00510001
20
590999001
Dust B_g .........................................................................................................
Paper Punch....................................................................................................
Dust Rag Assembly (Includes Key No.19) ....................................................... 1
1
1
Sandpaper
w_
983000-513
NOTE:
Qty,
Operator's Manual
The assembly shown representa an imporlmnt part ot the Double Insulated System. To avoid the
pomliblllty of alteration or damage to the 8]p_tem, mmttce should be performed by your nearest
Sears Repair Center. Contact your nearest Sears Reran Store for Service Center Inform'don.
*** Gomplete assortment available at your Neareat 8earn Retail Store
15
,
Your Home
For repair- In your home- of all major brand appliances,
lawn and garden equipment, or heating and cooling systems,
no matter who made it, no matter who sold itl
For the replacement parts, accessories and
owner's manuals that you need to do-it-yourself.
For Sears professional installationof home appliances
and items like garage door openers and water heaters.
1.800-4-MY-HOME
®
(l-eoo-48s-46_)
Call anytime, day or night (U.S_. and Canada)
www.lmar_com
www.seara.ca
Our Home
For repair of carry-in items like vacuums, lawn equipment,
and electronics, call or go on-line for the location of your nearest
Sears Parts & Repair Center.
1-800-488-1222
Call anytime, day or night (U.S.A.
only)
www.sears.com
To purchase a protection agreement (U.Sa_.)
or maintenance agreement (Canada) on a product serviced by Sears:
1-800.827-6655
(u.sJ_.)
Para pedir servicio de repamcidn
a domicilio, y pare ordenar piezas:
1-888-SU-HOGAR"
1-800-361-6665
Au Canada
(Canada)
pour service en francvais:
1-800-LE-FOYER "c
(%888-784-6427)
® Reglltemd Trademmk/ _ TrademstkI aMSel_iee Mark orSeam, Roebuckmd Co.
® Marca Reglstlada/'ra Marca dieFibdca / _ Marca de Servlclode Sears, Roe_k _
ac Ma_ue de cornrnemeJ uoI_
d6p_e_edieSears, RoebuckandCo.
(1-800-533-6937)
www.sears.ca
_.
O Sean;, Roebuckind Co.