1
Operator's Manual
iPR
0 FESS
I 0 HAL
i
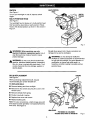
18 VOLT CORDLESS WORKLIGHT
Model No.
315.268260
Use worklight only with recommended
Craftsman battery pack and charger
(both sold separately)
Save this manual
for
future reference
_,
• Safety
• Operation
• Maintenance
CAUTION:
Read and follow all Safety
Rules and Operating Instructions before
first use of this product.
Customer
Help Line: 1-800-932-3188
Sears, Roebuck and Co., 3333 Beverly Rd., Hoffman
Visit the Craftsman web page: www.sears.com/craftsman
983000-061
4-02
Estates,
IL 60179
USA
®
_lh
CAUTION: Carefully read through this entire operator's manual before using your new worklight. Pay close
attention to the Rules For Safe Operation, Warnings and Cautions. Safety, performance and dependability
have been given top priority in the design of this worklight making it easy to maintain and operate. If you use
your worklight properly and only for it's intended use, you will enjoy years of safe, reliable service.
"SAFETY AND INTERNATIONAL SYMBOLS
This operator's manual describes safety and international symbols and pictographs that may appear on this
product. Read the operator's manual for complete safety, assembly, operating and maintenance, and repair
information.
MEANING
Do not expose to rain or use in damp locations.
READ ALL INSTRUCTIONS
DO NOT PERMIT CHILDREN TO USE
•
KNOW YOUR WORKMGHT. Read operator's
manual carefully. Learn its applications and
limitations as well as the specific potential
hazards related to this light.
•
USE ONLY RECOMMENDED BA'I-rERY PACK
WITH YOUR WORKLIGHT. Any attempt to use
another battery pack will cause damage to your
worklight and could possibly explode, cause a fire,
or personal injury.
WORKLIGHT UNSUPERVISED. It is not a toy.
The temperature of the bulb will become hot after
being on for only a short period of time. This hot
temperature can cause burn injury if touched and
can create sufficient heat to melt some fabrics.
•
•
,_
personal injury, never allow the worklight lens to
come in contact with anything.
REMOVE BATTERY PACK FROM
WORKLIGHT BEFORE REPLACING BULB OR
PERFORMING ANY ROUTINE MAINTENANCE
OR CLEANING.
DO NOT DISASSEMBLE
KEEP WORK AREA CLEAN. Cluttered areas
and benches invite accidents.
AVOID DANGEROUS
YOUR WORKLIGHT.
DO NOT PLACE WORKLIGHT
WARNING:
If wrapped or in contact with
fabrics, the worklight lens can produce sufficient
heat to melt some fabrics. To avoid serious
ENVIRONMENT.
KEEP LIGHT DRY, CLEAN, AND FREE FROM
OIL AND GREASE. Always use a clean cloth
when cleaning. Never use brake fluids, gasoline,
petroleum-based products or any strong solvent
to clean your worklight.
OR BATTERY
PACK NEAR FIRE OR HEAT. They may
explode. Also, DO NOT dispose of a worn out
battery pack by incinerating. Do not incinerate
the battery, even if it is severely damaged or
completely worn out. The battery may explode in
fire.
STAY ALERT. Watch what you are doing and
use common sense. Do not rush.
CHECK DAMAGED PARTS. Before further use
DO NOT STORE YOUR WORKLIGHT IN A
DAMP OR WET LOCATION. DO NOT STORE
IN LOCATIONS WHERE THE TEMPERATURE
IS LESS THAN 50°F OR MORE THAN lOO°F.
Do not store in Outside sheds or in vehicles.
of this worktight, a part that is damaged should
be carefully checked to determine that it will
operate properly and perform its intended
function. Do not use worklight if it does not
function properly.
2
RULES
FOR SAFE OPERATION
SAFETY
_
_k
RULES
(Continued)
FOR WORKLIGHTS
WARNING:
Do not operate worklight or charger
near flammable liquids or in gaseous or
explosive atmospheres. Internal sparks may
ignite fumes.
WARNING:
use:
IMPORTANT SAFETY
INSTRUCTIONS
FOR CHARGER
Before using battery charger, read all
instructions and cautionary markings in this
manual, on battery charger, and product using
battery charger.
Lens and bulb become hot during
• During or immediately after use, don't lay
worklight flat on lens surface or place lens
area in contact with a plastic or fabric
covered surface.
_1, CAUTION:
To reduce the risk of injury, charge
only nickel-cadmium type rechargeable batteries.
Other types of batteries may burst causing
personal injury and damage.
• Handle worklight with care around any
flammable surface.
•
Do not expose to wet or damp conditions.
•
To reduce the risk of damage to charger body
and cord, pull by charger plug rather than cord
when disconnecting charger.
• Let worklight cool for several minutes after
use before changing bulb,
• Do not use or permit use of worklight in bed
or sleeping bags. This worklight lens can
melt fabric and a burn injury could result.
IMPORTANT
TOOLS
SAFETY
RULES
FOR BATTERY
• ' An extension cord should not be used unless
absolutely necessary. Use of improper extension
cord could result in a risk of fire and electric
shock. If extension cord must be used, make
sure:
USE ONLY THE CHARGER RECOMMENDED
FOR USE WITH YOUR WORKLIGHT. Do not
substitute any other charger. Use of another
charger could cause batteries to explode causing
possible serious injury.
a. That pins on plug of extension cord are the
same number, size and shape as those of
plug on charger.
•
Your battery tool should be charged in a location
where the temperature is more than 50°F but
less than 100°F.
c. That wire size is large enough for AC ampere
rating of charger as specified below:
•
Under extreme usage or temperature conditions,
battery leakage may occur. If liquid comes in
contact with your skin, wash immediately with
soap and water, then neutralize with lemon juice
or vinegar. If liquid gets in your eyes, flush them
with clean water for at least 10 minutes, then
seek immediate medical attention.
•
,_
_,
•
WARNING: Batteries vent hydrogen gas and
can explode in the presence of a source of
ignition, such as a pilot light. To reduce the risk
of serious personal injury, never use any
cordless product in the presence of open flame.
An exploded battery can propel debris and
chemicals. If exposed, flush with water immediately.
WARNING:
Never use a battery pack that has
been damaged or received a sharp blow. A
damaged battery pack is subject to explosion.
Properly dispose of a damaged battery pack
immediately. Failure to heed this warning can
result in serious personal injury.
WHEN SERVICING USE ONLY IDENTICAL
CRAFTSMAN REPLACEMENT PARTS.
b. That extension cord is properly wired and in
good electrical condition; and
Cord Length (Feet) 25'
50'
100'
Cord Size (AWG)
16
16
16
Note: AWG -- American Wire Gage
•
DO NOT OPERATE CHARGER WITH A
DAMAGED CORD OR PLUG, If damaged, have
replaced immediately by a qualified serviceman.
•
Do not operate charger if it has received a sharp
blow, been dropped, or otherwise damaged in
any way; take it to a qualified serviceman.
•
Do not disassemble charger; take it to a qualified
serviceman when service or repair is required.
Incorrect reassembly may result in a risk of
electric shock or fire.
•
To reduce the risk of electric shock, unplug
charger from outlet before attempting any
maintenance or cleaning. Turning off controls will
not reduce this risk.
•
Do not use charger in wet or damp conditions.
•
Disconned charger from power supply when not in
use.
•
SAVE THESE INSTRUCTIONS. Review them
frequently and use them to instruct others who
may use this light, if you loan someone this light,
loan them these instructions also.
SAVE THESE INSTRUCTIONS
indicates a defective battery pack and should be
replaced.
The battery pack and charger are not included with
this worklight. They are both sold separately. If you
decide to purchase a battery pack and charger, use
battery pack item number 9 11034 (9891404-001) and
charger item number 9 11040 (981399-001).
CHARGING BAI-rERY
Green light on indicates battery pack is fully charged
and slow charging to maintain battery pack.
Yellow light on and red light flashing indicates
defective battery pack. Return battery pack to your
nearest Sears Repair Center for checking or
replacing.
PACK
The battery pack for this tool has been shipped in a
tow charge condition to prevent possible problems.
Therefore, you should charge it until light on front of
charger changes from red to green.
•
When your battery pack becomes fully charged, the red
light will tum OFF and the green light will turn ON.
Note: Batteries will not reach full charge the first time
they are charged. Allow several cycles (operating
worklight followed by recharging) for batteries to
become fully charged.
•
After normal usage, 1 hour of charging time is required
to be fully charged. A minimum charge time of 1-1/2
hours is required to recharge a completely discharged
tool.
TO CHARGE
•
The battery pack willbecome slightly warm to the touch
whilecharging. This is normal and does not indicate a
problem.
•
Do not place charger in an area of extreme heat or
cold. It will work best at normal room temperature.
•
When the batteries become fully charged, unplug
your charger from power supply and remove the
battery pack.
•
Charge battery pack only with the recommended
charger.
•
Make sure power supply is normal house
voltage, 120 volts, 60 Hz, AC only,
•
Connect charger to power supply,
BATTERY
LED FUNCTION
OF CHARGER
LED WILL BE LIGHTED TO INDICATE STATUS OF
CHARGER AND BATTERY PACK:
TO
REMOVE
•
Red LED Lighted = Fast Charging Mode.
•
Green LED Lighted = Fully Charged And Slow
Charging To Maintain Battery Pack.
CHARGER
•
TO
AI"rACH
Red LED Flashing = Hot Or Deeply Discharged
• Battery Pack. Also Defective Battery Pack After 1
Hour.
• Yellow LED Lighted and Red LED Flashing =
Defective Battery Pack.
IMPORTANT
INFORMATION
FOR
RECHARGING
HOT BA'n'ERIES
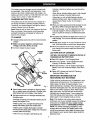
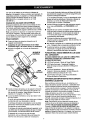
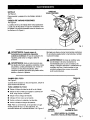
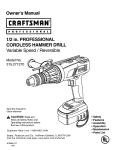
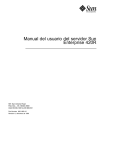
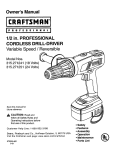
GROOVES
Fig. 1
•
Attach battery pack to charger by aligning raised
ribs on battery pack with grooves in charger, then
slide battery back onto charger. See Figure 1.
•
Red light should turn on. Red light indicates fast
charging mode.
If red light is flashing, this indicates battery pack is
deeply discharged or hot.
If battery pack is hot, red light should become
steady after battery pack has cooled down.
If battery pack is deeply discharged, red light
should become steady after voltage has increased,
normally within 60 minutes.
If after one hour red light is still flashing, this
Under extreme continuous use, the batteries in your
battery pack will become hot. You should let a hot
battery pack cool down for approximately 1 hour
before attempting to recharge. When the battery pack
becomes discharged and is hot, this will cause the red
light on your battery charger to flash. When battery
pack cools down, red light will glow continuously
indicating fast charging mode, 1 hour charge time.
Once the battery pack cools down, it will recharge
battery pack in fast charging mode as normal.
Note: This situation only occurs when extreme
continuous use of your worklight causes the batteries
to become hot. It does not occur under normal
circumstances. Refer to "CHARGING BATTERY
PACK" for normal recharging of batteries. If the
charger does not charge your battery pack under
normal circumstances, return both the battery pack
and charger to your nearest Sears repair center for
electrical check.
,_
TO REMOVE
WORKLIGHT
WARNING:
Always wear safety goggles or
safety glasses with side shields when operating
tools. Failure to do so could result in objects
being thrown into your eyes, resulting in possible
serious injury.
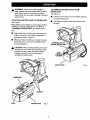
TO ATFACH
BA'R'ERY
BATTERY
PACK FROM
See Figure 3.
•
Depress latch located on front of battery pack (1)
to release battery pack.
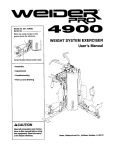
PACK TO WORKLIGHT
•
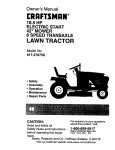
See Figure 2.
Pull forward on battery pack (2) to remove from
worklight.
Note: Battery pack is shipped in a low charge condition.
Therefore, it must be charged prior to use. Refer to
"CHARGING BA'I-rERY PACK" for charging instructions.
•
Align raised ribs on battery pack with grooves on
bottom of worklight, then attach battery pack to
workfight as shown in Figure 2.
•
Make sure latch on battery pack snaps into place
and battery pack is secured to worklight before
DEPRESSLATCHTO
RELEASEBATTERYPACK
turning worklight on.
_k
CAUTION: When attaching battery pack to your
worklight, be sure raised ribs and grooves align
properly and latch snaps into place properly.
Improper assembly can cause damage to
worklight and battery pack.
PULL
TO REMOVE
BATTERYPACK
RAISEDRIBS
GROOVES
LATCH
BATTERYPACK
Fig. 2
5
Fig. 3
MULTI-POSITION
HEAD
SWITCH
See Figure 4.
SWITCH
TRIGGER
To turn your worklight on and off, depress switch
trigger.
MULTI-POSITION
HEAD
See Figure 4.
Your worklight has the feature of a multi-position head
that has positive stop clicks at each position. Rotate
head to the desired position as shown in the arrows in
Figure 4,
Fig. 4
Do not abuse power tools. Abusive practices can
damage tool as well as workpiece.
_1= WARNING: When servicing, use only
identical Craftsman replacement parts. Use of
any other part may create a hazard or cause
product damage.
,_
,_
WARNING:
Do not at any time let brake fluids,
gasoline, petroleum-based products, penetrating
oils, etc. come in contact with plastic parts. They
contain chemicals that can damage, weaken or
destroy plastic.
WARNING:
Do not attempt to modify this
worklight or create accessories not recommended
for use with this worklight. Any such alteration or
modification is misuse and could result in a
hazardous condition leading to possible serious
personal injury.
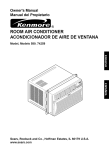
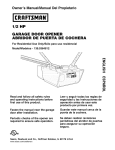
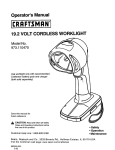
BULB REPLACEMENT
See Figure 5.
SCREWS
When purchasing replacement bulb, request
recommended part number 981258-001.
TO REPLACE BULB:
•
Remove battery pack from worklight.
•
Remove the two screws securing lens cover, then
remove cover.
•
Remove old bulb from spring.
•
Position new bulb in spring.
•
Replace lens cover and screws.
•
Replace battery pack.
BULB
Note: For your convenience, a bulb storage area with
extra bulb has been provided. It is located behind the
lens cover. See Figure 5.
EXTRA
BULB
BULB
STORAGEAREA
LENSCOVER
FOR MODELNO. 315.268260
REQUESTBULBPARTNO.981258-001
6
Fig. 5
BAI-I'ERIES
To preserve natural resources, please
recycle or dispose of batteries
properly.
Your worklight's battery pack is equipped with nickelcadmium rechargeable batteries. Length of service
from each charging will depend on the type of work
you are doing.
The batteries in this worklight have been designed to
provide maximum trouble free life. However, like all
batteries, they wilt eventually wear out. Do not
disassemble battery pack and attempt to replace the
batteries. Handling of these batteries, especially when
wearing rings and jewelry, could result in a serious
burn.
To obtain the longest possible battery life, we suggest
the following:
•
Store and charge your batteries in a cool area.
Temperatures above or below normal room
temperature will shorten battery life.
•
Never store batteries in a discharged condition.
Recharge them immediately after they are
discharged.
•
All batteries gradually lose their charge. The
higher the temperature the quicker they lose their
charge. If you store your worklight for long periods
of time without using it, recharge the batteries
every month or two. This practice will prolong
battery life.
This product contains nickelcadmium batteries. Local, state or
federal laws may prohibit disposal of
nickel-cadmium batteries in ordinary
trash.
Consult your local waste authority for information
regarding available recycling and/or disposal options.
BA'I-rERY
PACK
PREPARATION
REMOVAL
AND
FOR RECYCLING
WARNING:
Upon removal, cover the battery
pack's terminals with heavy duty adhesive tape.
Do not attempt to destroy or disassemble battery
pack or remove any of its components. Nickelcadmium batteries must be recycled or disposed
of properly. Also, never touch both terminals with
metal objects and/or body parts as short circuit
may result. Keep away from children. Failure to
comply with these warnings could result in fire
and/or serious injury.
,_
WARNING:
Do not attempt to disassemble the
battery pack. Fire or injury may result.
For repair of major brand appliances in your own home...
no matter who made it, no matter who sold it!
1-800-4-MY-HOME sMAnytime,
day or night
(1-800-469-4663)
www.sears.com
To bring in products such as vacuums, lawn equipment and electronics
for repair, call for the location of your nearest Sears Parts & Repair Center.
1-800-488-1222
iiiiii!!!ii_
Anytime,
day or night
www.sears.com
iiiii!_i_i
I;_
For the replacement parts, accessories and owner's manuals
that you need to do-it-yourself, call Sears PartsDirect sMI
1-800-366-PART
(1-800-366-7278)
y para ordenar
piezas con entrega
6 a.m.-
11 p.m. CST,
7 days a week
a domicilio:
1 888 SU HOGAR sM
..........
(I 688 784 6427)
[
SEARS
Homeeentral _
® Registered
® Sears,
Roebuck
and Co.
® Marca
Trademark
Registreda
/ _
/
Marca
Trademark
de F&btica
of Sears,
de Sears,
]
Roebuck
Roebuck
and
and
Co.
Co.
_iiii!iiii_;_
'_
i_'_:I:-
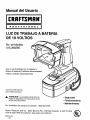
Manual del Usuario
I CRRFTSMRN"
I
P
R
0
F
E
S
I
Q
N
A
L
LUZ DE TRABAJO A BATERIA
DE 18 VOLTIOS
No. de Modelo
315.268260
Usar la luz de trabajo con el cargador y
bloque de baterias Crafstman recomendados
(ambos vendidos
Conserve
este manual
para referencia
,_
separadamente)
futura
ATENCION:
• Seguridad
• Funcionamiento
Lea cuidadosamente todas las
Reglas de Seguridad y las Instrucciones antes
de usar esta herramienta.
• Mantenimiento
No. de tel_fono
de ayuda a los clientes:
1-800-932-3188
Sears, Roebuck
and Co., 3333 Beverly Rd., Hoffman
• i la pagma
" '
V_ste
Web de Craftsman: www.sears.com/craftsman
983000-061
4-02
Estates,
IL 60179
USA
®
ATENCION:
Lea cuidadosamente todo este manual antes de usar su nueva luz de trabajo. Preste mucha
atenci6n alas Reglas para Funcionamiento Seguro, asf como alas Advertenciae y Avisos. Se ha dado
prioridad mdxima a la seguridad, rendimiento y dependabilidad en el dieeho de esta luz de trabajo por Io
cual es f&cil de mantener y operar. Si usted utiliza la luz de trabajo debidamente y solamente para el
prop6sito que ha sido diseSada, usted disfrutar_ de muchos aSos de servicio seguro.
SIMBOLOS
DE SEGURIDAD
E INTERNACIONALES
En este manual del usuario se describen los sfmbolos y pictogramas de seguridad e internacionales que
puedan aparecer en este producto. Lea este manual para obtener informacibn completa sobre seguridad,
montaje, funcionamiento, mantenimiento y reparacion.
SIGNIFICADO
No exponga a la Iluvia ni use en lugares hl_medos.
LEA TODAS
•
•
•
LAS INSTRUCCIONES
CONOZCA SU LUZ DE TRABAJO. Lea atentamente
el manual clelusuario, Aprenda sus aplicaciones y
limitaciones asi como tambi_n los riesgos potenciales
especfficos relacionados con esta luz.
UTILICE SOLAMENTE EL BLOQUE DE SATERIAS
RECOMENDADO CON SU LUZ DE TRABAJO. Si
intenta usar cualquier otro bloque de baterias puede
da_ar la luz de trabajo y posiblemente explotar,
causar un incendio o una lesi6n personal.
RETIRE EL BLOQUE DE BATERIAS DE LA LUZ DE
TRABAJO ANTES DE CAMBIAR EL FOCO O
CUANDO REALICE EL MANTENIMIENTO O
LIMPIEZA RUTINARIA.
•
NO DESARME SU LUZ DE TRABAJO,
•
NO COLOQUE LA LUZ DE TRABAJO O EL
BLOQUE DE SATERIAS CERCA DEL FUEGO O
DEL CALOR. Pueden explotar. Adem_s, NO
descarte un bloque de baterias usado inciner&ndolo.
No incinere la bateria, aun si est&severamente
daSada o completamente agotada. La bateria puede
explotar en el fuego.
NO GUARDE SU LUZ DE TRABAJO EN UN LUGAR
MOJADO O HUMEDO. IGUALMENTE, NO LA
GUARDE EN LUGARES DONDE LA
TEMPERATURA SEA INFERIOR A 50°F O
SUPERIOR A 100°F. No guarde en galpones al aire
libre o en vehfculos.
•
•
NO PERMITA QUE LOS NIl;lOS UTILICEN LA LUZ
DE TRABAJO SIN SER SUPERVISADOS. No es un
juguete. La temperatura del foco es muy caliente aun
cuando haya estado encendido por un perfodo corto
de tiempo. Esta temperatura caliente puede causar
una quemadura si se toca el foco y puede crear
suficiente calor como para derretir algunas telas.
A
ADVERTENCIA:
Si el lente de la luz de trabajo
es envuelto en tela o tiene contacto con alguna tela
puede producirsuficiente calor como para derretirla.
A fin de evitar una lesi6n personalgrave, nunca
permita que el lente de ra luz de trabajo entre en
contacto con nada.
MANTENGA EL AREA DE TRABAJO LIMPIA. Los
lugares y bancos de trabajo desordenados invitan a
los accidentes.
EVITE LOS AMBIENTES PELIGROSOS.
MANTENGA LA LUZ SECA, LIMPIA Y SIN ACEITE
NI GRASA. Siempre utilice un paso limpio para
efectuar la limpieza. Nunca use Ilquidode frenos,
gasolina, productosa base de petr61eoo solventes
para limpiar su luz de trabajo.
•
•
MANTENGASE ALERTA. Ponga atenci6n a Io que
esta haciendo y use sentido com_n. No se apresure.
INSPECClONE LAS PIEZAS DAI_IADAS. Antes de
usar esta luz de trabajo, alguna pieza que este
daSada debe ser revisada cuidadosamente para
determinar si funcionara en forma debida y si
desempehar_ la funcion para la cual fu_ diser_ada.
Una pieza que est_ daSada debe set reemplazada o
reparada en forma apropiada.
REGLAS DE SEGURIDAD
DE TRABAJO
_k
PARA
LAS LUCES
ADVERTENCIA:
No haga funcionar la luz de
trabajo o el cargadorcerca de liquidos inflamables o
en ambientesgaseosos o explosivos.Las chispas
internaspueden encender los vapores.
REGLAS
,_
PARA FUNCIONAMIENTO
ADVERTENClA"
SEGURO
(Continuacibn)
INSTRUCCIONES IMPORTANTES
DE SEGURIDAD PARA EL
CARGADOR
El lente Y el foco se calientan
con el uso.
• No deposite la luz de trabajo apoy_ndola en la
supefficie del lente durante el uso o
inmediatamente despu_s de usarla ni coloque el
&rea del lente en contactocon una superficie de
pl&sticoo cubierta con tela.
•
• Manipule la luz de trabajo con cuidado cuando se
encuentre cerca de cualquier superficie
inflamable.
,_
ATENCION:
Para reducir el riesgo de lesi6n,
cargue solamente baterias recargables de niquel y
cadmio. Otros tipos de baterias pueden explotar
causando lesi6n personaly dafio.
•
No exponga el cargador a ambientes hemedos o
mojados.
Para reducir el riesgo de dafio al cargador y al cord6n,
cuando desconecte el cargador tire del enchufe del
cargador en vez que del cord6n.
• Deje que la luz de trabajo se enfrfe durante varios
minutos despu_s de usarla antes de cambiar el
foco.
• No permita que la luz de trabajo sea usada en la
cama o en sacos de dormir. El lente de esta luz de
trabajo puede derretir las telas y ocasionar una
quemadura.
•
REGLAS DE SEGURIDAD IMPORTANTES
PARA HERRAMIENTAS A BATERIA
•
USE SOLAMENTE EL CARGADOR QUE SE
RECOMIENDA USAR CON LA LUZ DE TRABAJO.
No utilice ning_n otro cargador. Si usa otro puede
hacer explotar la baterfa causando alguna lesi6n
seria.
•
Su herramienta a baterfa debe ser cargada en un
lugar donde la temperatura sea superior a 50°F
(10°C) pero inferior a 100°F (37°C).
Bajo condiciones de uso o temperatura extrema,
puede ocurrir escape de Ifquido en la baterfa. Si el
Ifquido entra en contacto con la piel, I&vese
inmediatamente con agua y jab6n, luego neutralice
con jugo de lim6n o vinagre. Si entra liquido a sus
ojos, I_velos con agua limpia durante 10 minutos,
luego busque atenci6n m6dica inmediata.
•
_i
_i
•
No debe usarse un cord6n de extensi6n a menos que
sea absolutamente necesario. El uso de cordones de
extensi6n inadecuados puede resultar en riesgo de
incendio y de choque el_)ctrico. Si se debe usar un
cord6n de extensi6n, asegL_resede que:
a. Las clavijas del enchufe det cord6n de extensi6n
son iguales en n_mero, tamafio y forma alas del
enchufe del cargador.
b. El cord6n de extensi6n est& debidamente cableado
yen buen estado; y que
c. El calibre del cable sea suficiente para el amperaje
nominal CA del cargador, segl_n se especifica a
continuaci6n:
Largo del Cordbn (Pies)
ADVERTENCIA:
Las baterias emiten hidr6geno
y pueden explotar en presencia de una fuente de
ignici6n,tal como una luz piloto. A fin de reducir el
riesgo de sufrir una lesi6n personal grave, nunca
use ning_n productoa baterfa en presencia de una
llama abierta. Una baterfa que explote puede
lanzar residuos y qufmicos.Si entra en contactocon
tales materiales, I_vese inmediatamente con agua
la parte afectada.
•
•
•
Nunca use un bloque de
ADVERTENClA:
baterias que se haya caido o recibido un golpe
fuerte. Un bloque de baterias dafiado puede
explotar. Descarte inmediatamente y de manera
apropiada un bloque de baterfas que est_ dafiado.
El incumplimientode esta advertencia puede causar
una lesi6n personalgrave.
CUANDO EFECTUE LABORES DE
MANTENIMIENTO, USE SOLAMENTE REPUESTOS
CRAFTSMAN AUTENTICOS.
CONSERVE
Antes de usar el cargador de la bater{a, lea todas las
instrucciones y advertencias indicadas en este
manual, en el cargador de la baterfa yen el producto
que usa el cargador.
25
50
100
Calibre del Cord6n (AWG)
16
16
16
Nota: AWG = American Wire Gage
NO HAGA FUNCIONAR EL CARGADOR SI EL
CORDON O EL ENCHUFE ESTAN DAI_IADOS. Si
estan dafiados, h_lgalos reemplazar inmediatamente
por un electricista calificado.
No haga funcionar el cargador si ha recibido un golpe
fuerte, si se ha cafdo o si se ha dafiado de alguna
manera. Llevelo a un reparador calificado.
No desarme el cargador; Ilevelo a un t_cnico
calificado cuando necesite servicio o reparaci6n. El
rearmado incorrecto puede resultar en un riesgo de
choque el6ctrico o incendio.
•
Para reducir el riesgo de choque el_ctrico,
desenchufe el cargador del tomacorriente antes de
efectuar cualquier mantenimiento o limpieza. AI
apagar los controles no se reducir& este riesgo.
•
•
No use el cargador en lugares h_medos o mojados.
Desenchufe el cargador de la fuente de energia
cuando no este en uso.
CONSERVE ESTAS INSTRUCCIONES. Consulte
estas instrucciones frecuentemente y eselas para
instruira otrossobre el uso de esta luz. Si usted
presta esta luz a otra persona entregue tambi_n las
instrucciones.
ESTAS INSTRUCCIONES
3
Conestaluzdetrabajo no se incluye ni el bloque de
batedas ni el eargador. Ambos se venden por separado. Si
usted desea comprar un cargador y un bloque de batedas,
solicite el bloque de baterias artfculo no. 9 11034
(9891404-001) y el cargador articulo no. 9 11040
(981399-001).
CARGA DEL BLOQUE DE BATERIAS
El bloque de baterias pare esta la luz de trabajo ha sido
enviado con carge baja para evitar posibles problemas.
Por Io tanto usted debe cargarlo haste que la luz situada
en la parte delantera del cargador cambie de roja a verde.
Nota: Las baterfas no alcanzan su carga total la primera
vez que son cargadas. Deje que pasen varios ciclos (la
luz de trabajo en funcionamiento seguido de carga) hasta
que las baterias puedan cargarse en su totalidad.
•
•
•
•
PARA CARGAR
•
•
Cargue el bloque de baterfas solamente con el
cargador recomendado.
Asegdrese de que le alimentaci6n es el voltaje
normal del hogar, 120 voltios, 60 Hz, CA solamente.
Enchufe el cargador en la fuente de alimentaci6n
el_ctrica.
BLOQUEDE
•
•
La luz verde iluminada indice que el bloque de baterias
est& totalmente cargado yen modo de carga lenta para
mantener el bloque de batedas.
La luz amarilla iluminada y la luz roja destellando indica
bloque de baterias defectuoso. Devuelva el bloque de
baterias a su Centro de Reparaci6n Sears m&s
cercano para su revisiSn o reemplazo.
Cuando el bloque de baterias est_ totalmente cargado,
la luz roja se APAGARA y se ENCENDERA la luz
verde.
Despu_s de uso normal, se requiem una I hora de
carga pare que el bloque de baterias quede totalmente
cargado. Se requiere un minimo tiempo de carga de
1-1/2 horas para cargar una herramienta que est_
completamente descargada.
El bloque de baterias permanecer& ligeramente
caliente cuando se est& cargando. Esto es normal y no
es indicaci6n de problema.
No coloque el cargador en un ambiente de mucho calor
o frio. Trabajar& mejor a temperatura ambiente normal.
Cuando las baterias se cargan completamente,
desenchufe el cargador de la fuente de energfa
el_ctrica y descon_ctelo del bloque de baterias.
FUNCION DEL DIODO
DEL CARGADOR
CARGADOR
PARA
INSTALAR
•
•
LED Rojo Iluminado - Modo de Carga R_pida
LED Verde Iluminado - Totalmente Cargado y
Modo de Carga Lenta para Mantener el Bloque de
Baterias.
•
LED Rojo Destellando - BIoque de Baterfas
Caliente o Totalmente Agotado. Tambi_n Bloque de
Baterfas Defectuoso despu_s de 1 hora.
LED Amarillo Iluminado y LED Rojo Destellando Bloque de Batedas Defectuoso.
•
INFORMACION
BATERIAS
RANURAS
Fig. 1
•
DE LUZ (LED)
EL DIODO EMISOR DE LUZ (LED) SE ILUMINA PARA
INDICAR EL ESTADO DEL CARGADOR Y DEL
BLOQUE DE BATERIAS:
PARA
SACAR
•
EMISOR
Instale el bloque de baterfas en el cargador alineando
las nervaduras en relieve del bloque de baterias con
las ranuras del cargador, luego deslice el bloque de
baterfas en el cargador. Ver Figura 1.
La luz roja debe encenderse. La luz roja indica mode
de carga r&pida.
Si la luz roja est& destellando, esto indica que el bloque
de baterias esta muy descargado o caliente.
Si el bloque de baterfas est& caliente, la luz roja debe
permanecer iluminada sin destellar cuando el bloque
de baterias se haya enfriado.
Si el bloque de baterias est& totalmente agotado, la luz
roja debe dejar de destellar despu_s de que el voltaje
ha aumentado, normalmente dentro de 60 minutos.
Si despu_s de una hora la luz roja a0n est_
destellando, esto es indicaci6n de que el b[oque de
baterfas est_ defectuoso y debe ser reemplazado.
IMPORTANTE
PARA CARGAR
CALIENTES
Bajo condicione5 extremas de uso, las baterfas en el
bloque de baterias pueden calentarse. Usted debe dejar
enfriar el bloque de baterias durante aproximadamente
1 hora antes de intentar recargarlo. Cuando el bloque de
baterias se descargue y est_ caliente, la luz roja en el
eargador de la baterfa comenzar& a destellar. Cuando el
bloque de baterias se enfrfe, la luz roja brillar_
continuamente indicando el mode de carga r&pida, 1 hora
de carga. Una vez que el bloque de baterias se ha
enfriado, usted puede recargar el bloque de baterias en el
modo de carga r&pida de manera usual.
Nota: Esta situaci6n ocurre solamente cuando el use
continuo de su luz de trabajo causa que las baterfas se
ealienten. No ocurre bajo circunstancias normales.
Censulte "CARGA DEL BLOQUE DE BATERIAS" para
earga normal de las baterfas. Si el cargador no carga su
bloque de baterias bajo circunstancias normales, devuelva
embos, el bloque de baterias y el cargador a su centro de
reparaci6n Sears rn&s eercano para revisi6n el_ctrica.
_
ADVERTENCIA: Siempre use lentes protectores
o galas de seguridad con protectores laterales
cuando est_ utilizando su herramienta. Si no Io
hace puede que salten objetos a sus ojos,
resultando en una lesi6n grave.
INSTALACION
DEL BLOQUE
EN LA LUZ DE TRABAJO
vet Figura 2.
ATENCION: Cuando instale el bloque de baterias
en la luz de trabajo, aseg_rese de que las
nervaduras en relieve y las ranuras coinciden
perfectamente y que el pestilloentre debidamente
en su lugar a presi6n. El montaje inadecuado puede
dar_ar la luz de trabajo y el bloque de bater{as.
Apriete el pestilloubicado en la parte delantera del
bloque de baterias (1) para liberarel bleque de
baterias.
•
Tire del bloque de baterias hacia adelante (2) para
sacarlo de la luz de trabajo.
APRIETEEL
PESTILLOPARA
DE BMERIAS
TIREHACIA
ADELANTE
DE BATERIAS
NERVADURAS
EN RELIEVE
\
RANURAS
PESTILLO
BLOQUE
DE BATERIAS
Fig. 2
DE BATERIAS
•
DE BATERIAS
Nota: El bloque de baterias se embarca con carga baja.
Pot fo tanto, debe set cargado antes de usarlo. Consutte
"CARGA DEL BLOQUE DE BATERIAS" para las
instruccionesde carga.
• Alinee las nervaduras en relieve del bloque de
baterias con las ranuras en ta parte inferior de la luz
de trabajo, luego instale el bloque de baterias en la luz
de trabajo como se muestra en la Figura 2.
• Aseg_rese de que el pestilloen el bloque de baterias
entre en su lugar a presi6n y que est_ firme en la luz
de trabajo antes de comenzar a usarla.
,_
DESMONTAJE
DEL BLOQUE
DE SU LUZ DE TRABAJO
Vet Figura 3.
Fig. 3
CABEZADE
VARIASPOSICIONES
GATILLO
Ver Figura 4.
Para encender y apagar la luz de trabajo, apriete el
gatillo.
CABEZA
DE VARIAS
GATILLO
POSIClONES
Ver Figura 4.
La cabeza de la luz de trabajo tiene varias posiciones
y cada una de elias tiene un tope con chasquido. Gire
la cabeza a ta posicibn deseada como se muestra con
las flechas en la Figura 4.
Fig. 4
_,
,_
No haga uso abusivo de las herramientas mec&nicas.
El use abusivo puede dafiar la herramienta y tambi_n
la pieza de trabajo.
ADVERTENCIA:
Cuando repare la
herramienta use solamente repuestos
autdnticos Craftsman. El uso de cualquier otto
repuesto puede crear un riesgo o dafiar el
producto.
_,
ADVERTENCIA:
Evite en todo memento que
los liquidos de frenos, gasolina, productos a base
de petr61eo, aceites penetrantes, etc. entren en
contacto con las piezas de pl&stico. EIIos
contienen productos quimicos que pueden dafiar,
debilitar o destruir el pl&stico.
ADVERTENCIA:
No trate de modificar esta
luz de trabajo ni de crear accesorios no
recomendados para su uso con esta luz de
trabajo. Cualquiera alteraci6n o modificaci6n se
considera mal uso y puede resultar en una
condici6n peligrosa que cause una posible
lesi6n personal grave.
TORNILLOS
CAMBIO DEL FOCO
Ver Figura 5.
Cuando desee comprar un foco de repuesto, solicite la
pieza nL_mero981258-001.
PARA CAMBIAR EL FOCO:
•
Saque el bloque de baterfas de la luz de trabajo.
•
Saque los dos tornillos que sujetan ta cubierta del
lente, luego saque la cubierta.
•
Saque el foco antiguo del resorte.
•
Coloque el foco nuevo en el resorte.
•
Vuelva a colocar la cubierta y los tornillos.
•
Vuelva a instalar el bloque de baterfas.
FOCO
FOCO
_DICIONAL
Nora: Para su conveniencia, se ha provisto un lugar
deride guardar el foco y un foco adicional. Se
encuentra detr_s de la cubierta del lente. Ver Figura 5.
CUBIERTA
DELLENTE
AREAPARA
GUARDARELFOCO
PARAELMODELONo.315.268260
SOLICITEEL FOCONo. DE PIEZA981258-001
Fig. 5
6
BATERIAS
Para conservar los recursos
naturales le rogamos reciclar o
eliminar la bateria de manera
apropriada.
El bloque de baterias de su luz de trabajo est,.
equipado con baterfas recargables de n_quel y
cadmio. La duraci6n del servicio de cada carga
depender& del tipo de trabajo que est_ realizando.
Las baterias en esta herramienta han sido dise_adas
para proveer duraci6n m_:_ximasin problemas. Sin
embargo, como todas las bater_as, eventualmente se
agotar&n. NO desarme el bloque de baterias ni
intente reemplazar las baterfas. La manipulaci6n de
estas bater_as, especialmente cuando est_ usando
anillos y joyas, puede resultar en una quemadura
grave.
Consulte con las autoridades locales para obtener
informaci6n sobre el reciclaje y/o la manera correcta
de descartar estos productos.
Para obtener la vida 5til m_s larga de las baterfas,
sugerimos Io siguiente:
EXTRACCION
DEL BLOQUE DE BATERIAS
PREPARACION
PARA EL RECICLAJE
•
&
Guarde y cargue el bloque de bater_as en un lugar
fresco. Las temperaturas superiores a la
temperatura ambiente normal acortar_n la vida Otil
de las baterias.
•
Nunca guarde las baterias descargadas.
C_rguelas inmediatamente despu_s que se hayan
descargado.
•
Todas las bater_as pierden gradualmente su carga.
Mientras m&s alta sea la temperatura, m_.s
r_.pidamente pierden la carga. Si guarda su
herramienta por perfodos de tiempo prolongados
sin usarla, cargue las baterfas cada mes o cada
dos meses. Esta prdctica prolongar& la vida 5til de
las bater_as.
Este producto contiene una baterfa
de niquel y cadmio. Las leyes
locales, estatales y federales pueden
prohibir que las baterfas usadas
sean descartadas en la basura
com_n.
_i
Y
ADVERTENCIA:
Despu_s de sacar el bloque
de baterias, cubra los bornes del bloque de
baterfa con cinta adhesiva resistente. No intente
destruir, desarmar la baterfa o sacar cualquiera
de sus componentes. Las baterias de niquel y
cadmio deben ser recicladas o descartadas de
manera adecuada. Igualmente, nunca toque
ambos bornes con objetos metdlicos y/o una
parte del cuerpo pues se puede producir un
cortocircuito. Mant_ngase fuera del alcance de
los niSos. Si no se cumplen estas advertencias,
se puede producir un incendio y/o lesi6n grave.
ADVERTENCIA:
No intente desarmar et
bloque de baterfas. Puede producirse un
incendio o una lesi6n.
=_i_iiiiiiiiiiiiili!iiliiiiiii
ii_iiiii!!i_!"
For repair of major brand appliances
iiiiiiiiiiiiii
in your own home..,
i_i_!!_
no matter who made it, no matter who sold it!
,_,_;_ili
!iiii_iiii_i
iiiiiii!Iiiiii
iiiiiii'iii!'
1-800-4-MY-HOMESMAnytime.
iiiiiiiiiii!!
dayornight
:iiiiiiiiiiiii
(1-800-469-4663)
iiiiiiiiiiii
!!!!ili!iiiii
............
..............
www sears com
_iiiiiiiiiiiil
.............
..............
i!iiiiiiiiiiii
i_i!_iiiill
,,,,,..............
To bring in products such as vacuums , lawn equipment
and electronics
:_,:_.....
..........
iiii[iiiii
iiil!iiiill
iiiiiiiiiiiifor repair, call for the location of your nearest Sears Parts & Repair Center. iiiiil;;;i;ii
iiiiiiii!ii:
iiiiiiiiii:iii
1-800-488-1222
_iiiiiii%i
Anytime,
day or night
...............
_!i!
i!iiill
..............
,_,_
_'_'
_iii_
ii_i
_i!_iii!
For the repl acemen t parts, accessories and owner's manuals
that you need to do-it-yourself, call Sears PartsDirect SM!
........
1 800 366 PART 6a
.
...........
.
(1 800 366 7278)
v_.sears.
,,_,,_,_,_,,
rn
-
11
rn
!i!_,!II
_
iiiiiiiiiiiiii
CST
_
_
_
7 days a week
.....
iiii_iiiii_il
_
_?_i_ii
com/partsdirect
To purchase or inquire about a Sears Service Agreement:
iiiiiiiiii
1. 800 . 827 . 6655
7 a.m. - 5 p.m. GST, Men. - Sat.
iiiiiiiii!i!!i
i iiiiii_iii
_iiiiiiiiiiii_
Para pedir servicio de reparacidn
a domicilio,
Au Canada
y para ordenar piezas con entrega a domicilio:
1-888-SU-HOGAR
SM
pour service en fran_ais:
1-877-LE-FOYER
(1 -877-533- 6937)
SM
_,;i_,_
_
i_iiiiiiiii_!
(1-888-784-6427)
_iiiiiiiiiiiiii_
....
...........
© Sears, Roebuck
and Co.
{ H°meCentral°°
___
!
® Registered Trademark / _ Trademark of Sears, Roebuck and Co.
® Marca Regislrada / TM Marca de Fdbrica de Sears, Roebuck and Co,