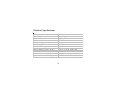
1
OWNER’S INSTRUCTION
MANUAL
DECT 6
CORDLESS TELEPHONE
MODEL 8012
1
Contents
Important Safety Instructions ............................................................ 8
Unpacking and Installation ............................................................... 12
Features ............................................................................................ 13
Telephone Part Identification ........................................................... 14
Key Descriptions ..................................................................................................... 16
Navigation Key ........................................................................................................ 17
Installation ........................................................................................ 20
Basic Functions ................................................................................. 24
Making a Call .......................................................................................................... 24
Making a Call - Standby Mode ................................................................................ 24
Receiving a Call ...................................................................................................... 24
Mute ......................................................................................................................... 25
Volume Control ....................................................................................................... 26
Message Waiting ..................................................................................................... 26
2
Ringer Settings ....................................................................................................... 26
Last Number Redial ................................................................................................ 28
Redial Book Options ............................................................................................... 29
Caller ID Functions ................................................................................................. 30
Review Caller ID Records ....................................................................................... 30
Dial from CID .......................................................................................................... 31
Add CID Number to Phone Book ............................................................................. 31
Delete a CID Number .............................................................................................. 32
Delete all CID Numbers .......................................................................................... 32
Caller ID on Call Waiting ....................................................................................... 33
Key Lock ................................................................................................................. 33
Auto Answer ............................................................................................................ 34
Language ................................................................................................................. 35
Handset Name .......................................................................................................... 36
Range Alarm ........................................................................................................... 37
Paging ..................................................................................................................... 38
Dial Mode ................................................................................................................. 38
Handsfree/Speakerphone ........................................................................................ 39
3
Flash ........................................................................................................................ 40
Backlight ................................................................................................................. 40
Advanced Features ........................................................................... 41
Menu Navigation ..................................................................................................... 41
Standby Mode ........................................................................................................... 41
Phone Book ............................................................................................................. 42
Character Map ........................................................................................................ 42
Adding a Phone Book Entry .................................................................................... 43
Viewing a Phone Book Entry ................................................................................. 44
Dialing from a Phone Book Entry .......................................................................... 44
Editing a Phone Book Entry .................................................................................... 44
Deleting a Phone Book Entry .................................................................................. 45
Deleting all Phone Book Entries ............................................................................ 46
Pause ....................................................................................................................... 46
Phonebook Status .................................................................................................... 46
Base (BS) Settings ............................................................................ 47
Terminate HS (Handset) .......................................................................................... 47
Change Flash Time ................................................................................................. 48
4
Modify PIN ............................................................................................................... 49
BS (Base) Reset ...................................................................................................... 50
Handset (HS) Settings ...................................................................... 51
Alarm ....................................................................................................................... 51
Audio Setup ............................................................................................................. 52
Key Tone .................................................................................................................. 53
LCD Contrast .......................................................................................................... 54
Base Selection ......................................................................................................... 55
Date and Time Format ............................................................................................. 56
Setting Date and Time ............................................................................................. 57
HS Reset .................................................................................................................. 58
Registration ............................................................................................................ 59
Multiple Handset Operation ............................................................ 60
Internal Calling ....................................................................................................... 60
Call Transfer ........................................................................................................... 61
3-Way Conference Call ........................................................................................... 62
Maintenance Information ................................................................. 63
5
Telephone Service Problems ............................................................ 63
Technical Specifications ................................................................... 64
Troubleshooting ................................................................................ 65
Troubleshooting (continued) ............................................................. 66
Telephone Repair ............................................................................. 67
Limited Warranty .............................................................................. 71
6
THANK YOU
FOR PURCHASING THE
8012 DECT 6
CORDLESS TELEPHONE
We want you to know all about your new telephone, how to install it,
the features it provides, and the services you can expect from its use. We
have included this information in your Owner’s Instruction Manual.
PLEASE READ BEFORE INSTALLING AND
USING YOUR NEW TELEPHONE
7
Important Safety Instructions
Always follow basic safety precautions when using your telephone to reduce the risk of fire,
electrical shock and injury.
1. Read and understand all instructions.
2. Follow all warnings and instructions marked on the product.
3. Unplug this product from the wall outlet before cleaning. Do not use liquid cleaners or
aerosol cleaners. Use a damp cloth for cleaning.
4. Do not use this product near water, for example, near a bath tub, wash bowl, kitchen
sink, laundry tub, in a wet basement, or near a swimming pool.
5. Do not place this product on an unstable cart, stand, or table. The product may fall,
causing serious damage to the product.
6. Slots and openings in the cabinet and the back or bottom are provided for ventilation. To
protect it from overheating, these openings must not be blocked or covered. The
openings should never be blocked by placing the product on the bed, sofa, rug, or other
similar surface. This product should never be placed near or over a radiator or heat
register. This product should not be placed in a built-in installation unless proper
ventilation is provided.
7. This product should be operated only from the type of power source indicated on the
marking label. If you are not sure of the type of power supply to your home, consult
your dealer or local power company.
8
8.
Do not allow anything to rest on the power cord. Do not locate this product where the
cord will be damaged by persons walking on it.
9. Do not overload wall outlet extension cords, as this can result in the risk of fire or
electric shock.
10. Never push objects of any kind into this product through cabinet slots as they may
touch dangerous voltage points or short out parts that could result in a risk of fire or
electric shock. Never spill liquid of any kind on this product.
11. To reduce the risk of electric shock, do not disassemble this product. Instead, when some
repair work is required, take the unit to a qualified technician. Opening or removing
covers may expose you to dangerous voltages or other risks. Incorrect reassembly can
cause electric shock when the appliance is subsequently used.
12. Unplug this product from the wall outlet and refer servicing to qualified service personnel under the following conditions:
a. When the power supply cord or plug is damaged or frayed.
b. If liquid has been spilled into the product.
c. If the product has been exposed to rain or water.
9
d.
If the product does not operate normally by following the operating instructions.
Adjust only those controls that are covered by the operating instructions because
improper adjustment of other controls may result in damage and will often require
extensive work by a qualified technician to restore the product to normal operation.
e. If the product has been dropped or cabinet has be damaged.
f. If the product exhibits a distinct change in performance.
13. Avoid using a telephone during an electrical storm. There may be a risk of electrical
shock from lightning.
14. Do not use the telephone to report a gas leak in the vicinity of the leak.
15. Plug the power adaptor into an electrical outlet that is near the equipment and easily
accessible.
Safety Instructions for Handset Battery Pack
CAUTION:
There is a danger of explosion if the batteries are incorrectly replaced. Use only approved
batteries in the handset of your telephone. To reduce the risk of fire or injury, be careful not
to short the batteries with conducting materials such as rings, bracelets, and keys. The
batteries or conducting material may overheat and cause burns.
10
CONTAINS NICKEL-METALHYDRIDE BATTERY. BATTERY MUST BE RECYCLED OR DISPOSED OF PROPERLY
1.
2.
3.
4.
5.
6.
7.
8.
Do not dispose of the batteries in a fire. They may explode. Check with local codes for
possible special disposal instructions.
Do not open or mutilate the batteries. Released electrolyte is corrosive and may cause
damage to the eyes or skin. It may be toxic if swallowed.
Exercise care in handling batteries in order not to short the battery with conducting
materials such as rings, bracelets and keys. The battery or conductor may overheat and
cause burns.
Charge the batteries only in accordance with the instructions and limitations specified in
this manual.
Observe proper polarity orientation for the batteries as marked in the telephone.
Do not mix old and new batteries.
Do not mix batteries of different sizes or from different manufacturers.
Use only the power supply which came with the phone.
11
Unpacking and Installation
Box Contents
The following items should be packed with your 8012. Please contact your dealer if
any of them is missing.
12
Features
1 . 8 G H z D E C T T e c h n o lo g y w it h
GAP
5 R o w B a c k lit D o t M a t rix L C D (1 2 8
X 6 4 ) w it h A d ju s t a b le C o n t ra s t
L ig h t e d K e y p a d
S p e a k e rp h o n e
R e c e i ve r / S p e a k e r / R i n g e r V o l u m e
C o n t ro l
T o n e / P u ls e D ia lin g
F la s h w it h S e le c t a b le T im in g
P ause
M u te
1 0 N u m b e r R e d ia l M e m o ry
5 0 E n t ry N a m e / N u m b e r P h o n e b o o k
C a ll D u ra t io n D is p la y
V IP R i n g t o n e s fo r P h o n e b o o k
E n t rie s
1 0 R in g e r T o n e s
U p t o 5 H a n d s e t s C a n R e g is t e r t o
O ne B ase
U p t o 4 B a s e s C a n R e g is t e r t o O n e
Handset
In t e r n a l C a l l s
C a l l T r a n s fe r
3 - w a y C o n fe r e n c e C a l l
S e le c t a b le K e y t o n e
P re d ia lin g
C lo c k
A la rm C lo c k w it h S n o o z e
O u t o f R a n g e A la rm
P IN fo r S e c u r i t y
K eypad Lock
E ig h t la n g u a g e s
A u t o A n s w e r (O p t io n a l)
Handset Nam e
C a l l e r ID o n C a l l W a i t i n g
4 0 E n t r y C a l l e r ID L i s t
M e s s a g e W a it in g
13
Telephone Part Identification
14
15
Key Descriptions
Dial/Speaker Key - Used to place or answer a call. If pressed during
a call, activates the speakerphone.
End Key - End a call. If pressed and held, powers off the handset
Left/Right Soft Key - Performs the function indicated by the text
immediately over it in the display.
*Key - Press and hold to lock the keypad. Set up a conference call
as described on Page 35.
16
Navigation Key
Up/CID Key - Scrolls up through list and menu options. Increases the receiver or
speakerphone volume during a call. Enters the CID book as described on Page 18.
Down/Phonebook Key - Scrolls down through list and menu options. Decreases the
receiver or speakerphone volume during a call. Enters the phonebook as described
on Page 26.
Left/Int Key - Set up an intercom call to another handset. Transfer a call to another
handset. Set up a conference call with an external line and an intercom handset.
Right/Redial Key - Enter the redial book as described in Page 16. Insert a pause
when pre-dialing.
17
Icons
New Call - One or more calls have been received.
MSG Waiting - One or more voice messages have been received.
Off Hook - The line is in use.
Speakerphone - Speakerphone function is in use.
18
Alarm - The alarm is activated.
Signal - Indicates the signal strength. Blinks if the handset is too far
from the base.
Battery - Shows battery charge level
Keypad Lock - Keypad is locked.
19
Installation
Line and Power Connection
1.
2.
Connect the phone line cord to the telephone line jack in the base. Connect the
other end of the line cord to a telephone outlet.
Connect the AC power adapter to the base power jack. Plug the AC power
adapter into an AC outlet.
20
Battery Installation
Two rechargeable Ni-MH AAA size batteries come with the 8012. These must be
installed before use.
1. Slide the battery cover in the direction shown below and remove.
2. Install the batteries as shown below. Care must be taken to install in the correct
polarity. The 8012 may be damaged if batteries are inserted in incorrect
polarity.
3. Reinstall the battery cover.
Replace the batteries when they fail to return to a full charge after recharging. Use
only Ni-MH rechargeable batteries. Never use other battery types such as alkaline.
21
Charging Handset
The handset should be charged for 15 hours before initial
use. To charge the handset, place it in the base. If the
handset is off, it will automatically turn on.
To turn the handset off, press
until the display turns
off.
To turn the handset on, press
until the display turns on.
If the handset is able to find a base, the display will show the handset number, the
handset name (if one is assigned), the signal icon, battery icon, and the current time.
If the handset cannot find a base, it will display “Searching...”
22
DSL Interference
If the 8012 is used on a line with DSL service, it may be necessary to install a noise
filter. A filter may be obtained from the DSL provider. It should by used if noise is
heard during conversations or Caller ID is not functioning properly.
23
Basic Functions
Making a Call
1.
Remove the handset from the base and press
2.
Dial the telephone number.
Making a Call - Standby Mode
1.
Enter the telephone number (up to 32 digits). Use
to enter a pause. Use
the Erase soft key to correct mistakes.
2.
Press
to dial the number.
Receiving a Call
When a call is received, the InUse indicator on the base will blink. Normally, the
caller’s phone number will be displayed. If the caller cannot be identified, only the
NewCall information will display.
24
1.
If Auto Answer has been activated and the handset is in the base, lift the
handset to answer the call.
2.
Otherwise, press
to answer.
Notes: After the call is terminated, the display will show the call duration. If a
polyphonic ringtone is set, the ringtone may contiue for up to 4 seconds after the
call is answered at another phone.
To change the ringer volume, press
or
while the phone is ringing.
Mute
During a conversation, the microphone of the 8012 can be muted so that the distant
party cannot hear what is being said. To mute the microphone, press the MUTE soft
key. The display will show “CALL MUTED.” To unmute the microphone, press the
MUTE soft key again.
25
Volume Control
or
During a conversation, pressing
will adjust the handset receiver or
speakerphone volume level. Volume can be adjusted in 5 steps.
Message Waiting
If a voice message is received, the display will show the
ON “
To deactivate the
icon, press the
hold the 4 key. Finally, press
icon and “MSG WTG
key in standby mode, then press and
to return to standby mode.
Ringer Settings
Perform the following steps to change the ringer tone or volume. These settings can
apply to either external calls (from the telephone company) or internal calls (from
other handsets registered to the same base).
1. Press the Menu soft key.
2.
Press
or
to choose HS Settings.
26
3.
Press the Select soft key.
4.
Press
5.
Press the Select soft key.
6.
Press the Select soft key to choose INT Ring, or press the
7.
EXT Ring.
Press the Select soft key.
8.
Press
or
or
to choose Ring Setup.
key to choose
to choose Melody or Volume.
9. Press the Select soft key.
10. Choose the desired ring tone (1 - 10) or desired ring volume (1 - 5 or off). The
8012 will play the selected melody or volume level.
11. Press the Save soft key to confirm.
27
Last Number Redial
1.
Press
or the Redial soft key in standby mode. The display will show the
last number dialed.
2.
Press
to dial the number.
Redial Book
The 8012 can also retrieve the last 10 numbers dialed and redial them.
1. Press the Redial soft key in standby mode.
2.
Press
or
to scroll through the list of numbers until the desired
number is displayed.
3.
Press
to dial the number.
28
Redial Book Options
Redial Book Options allows a number to be added to the phone book or deleted from
the redial book.
1. Press the Redial soft key in standby mode.
2.
3.
4.
Press
or
to scroll through the list of numbers until the desired
number is displayed.
Press the More soft key to choose the desired option.
Add to PB allows the number to be added to the phonebook.
Delete removes the selected number from the redial book.
Delete All removes all numbers from the redial book.
If Delete or Delete All are selected, the display will show “Confirm ?” To
confirm, press the Del or Del All soft key. To cancel, press the Cancel soft key.
Press
to return to standby mode.
29
Caller ID Functions
When a call is received, the 8012 will normally display the name and number of the
caller. If the caller has chosen to prevent his information from being transmitted, the
display will show “Private.” If information cannot be received for some other
reason, the display will show “Out Of Area.”
If a call is missed, the
icon will show on the display. If the Caller ID memory is
icon will flash.
full, the
Review Caller ID Records
1.
2.
Press the Menu soft key.
Using the Select soft key, choose the CID Book. CID numbers will be displayed. The CID Book may also be accessed by pressing
mode.
3.
Use
or
in standby
to review the numbers. Each number which has been
reviewed is marked with . Calls which have not been reviewed are marked with
30
Dial from CID
Follow the steps above for reviewing Caller ID Records. When the desired number
to dial.
is displayed, press
Add CID Number to Phone Book
1.
2.
Press the Menu soft key.
Using the Select soft key, choose the CID Book.
3.
Use
or
to review the numbers.
When the desired number is displayed, press the Menu soft key to enter the Add
to PB menu.
5. Press the Select soft key. A prompt for the name will appear.
6. Enter the name and press the Next soft key.
7. Edit the number if necessary.
8. Press the Next soft key.
9. Select the ring tone (1 - 10).
10. Press the Save soft key. A beep will sound to confirm.
4.
31
Delete a CID Number
1.
2.
Press the Menu soft key.
Using the Select soft key, choose the CID Book.
3.
Use
4.
When the desired number is displayed, press the More soft key.
5.
Use
6.
7.
8.
Press the Select soft key.
When the display shows Confirm ?, press the Del soft key.
A beep will sound to confirm and the next number will be displayed.
or
or
to review the numbers.
to choose Delete.
Delete all CID Numbers
1.
2.
3.
Press the Menu soft key.
Using the Select soft key, choose the CID Book.
Press the More soft key.
or
to choose Delete All.
4.
Use
6.
Press the Select soft key.
32
7.
8.
When the display shows Confirm ?, press the Del All soft key.
A beep will sound to confirm and the 8012 will return to standby mode.
Caller ID on Call Waiting
This service allows the number of a calling party to be displayed while on another
call. When the number of the second caller is displayed, press the Flash soft key to
answer. To return to the first caller, press the Flash soft key again.
Key Lock
Activating this feature causes the keypad to be disabled, but allows calls to be
answered.
To lock the keys in the standby mode, press
Locked. The key icon
until the display shows HS
will also appear.
To unlock the keys in the standby mode, press
33
until the key icon disappears.
Auto Answer
Activating Auto Answer allows calls to be answered by simply removing the
handset from the base. To activate Auto Answer:
1. Press the Menu soft key.
or
repeatedly to choose HS Settings.
2.
Press
3.
Press the Select soft key.
4.
Use
5.
Press the Select soft key.
6.
Use
7.
8.
Press the Save soft key.
A beep will sound to confirm.
or
or
to choose Auto Answer.
to choose On/Off to enable or disable the function.
34
Language
The 8012 supports 8 languages: English, French, Spanish, German, Italian, Dutch,
Polish, and Traditional Chinese. To select a language:
1. Press the Menu soft key.
or
repeatedly to choose HS Settings.
2.
Press
3.
Press the Select soft key.
4.
Use
5.
Press the Select soft key.
6.
Use
7.
8.
When the desired language is displayed press the Save soft key.
A beep will sound to confirm.
or
or
to choose Language.
to scroll through the languages.
35
Handset Name
The 8012 handset can be given a name. This is useful if more than one handset is
registered to a base. To set the handset name:
1. Press the Menu soft key.
or
repeatedly to choose HS Settings.
2.
Press
3.
Press the Select soft key.
4.
Use
5.
6.
Press the Select soft key.
Enter the name (up to 12 characters) using the keypad. Use the Erase soft key
to correct any mistakes.
Press the Save soft key.
The handset name will display above the handset number in standby mode.
7.
8.
or
to choose HS Name.
36
Range Alarm
Normally a beep will sound whenever the handset moves out of range of the base.
This feature may be enabled or disabled.
1. Press the Menu soft key.
or
repeatedly to choose HS Settings.
2.
Press
3.
Press the Select soft key.
4.
Use
5.
Press the Select soft key.
6.
Use
7.
8.
Press the Save soft key.
A beep will sound to confirm.
or
or
to choose Tone Setup.
to choose On/Off to enable or disable the function.
37
Paging
The handset can be paged from the base. This is useful to locate a lost handset.
key on the base. All handsets registered to the base will ring
To Page press the
for approximately 60 seconds.
To Stop Paging press the
key again or press any key on the handset.
key for more than 5 seconds will put the base into registraNote: Pressing the
tion mode. See Page 33.
Dial Mode
The 8012 supports DTMF or Pulse dialing. To change the dial mode:
1. Press the Menu soft key.
repeatedly to choose BS Settings.
2.
Press
3.
Press the Select soft key.
4.
Use
or
to choose Dial Mode.
38
5.
Press the Select soft key.
6.
Press
7.
8.
Press the Save soft key.
A beep will sound to confirm.
or
to select the desired dial mode (Tone/Pulse).
Handsfree/Speakerphone
During a call, the speakerphone may be activated.
To Activate Handsfree press
To Deactivate Handsfree press
. The
again. The
will appear in the display.
will disappear from the
display.
Caution: Be sure the speakerphone is deactivated before putting the handset near
your ears.
39
Flash
The Flash key sends a timed line break. This signal is used to activate some special
services such as call waiting. The services available will depend on the telephone
company. To send a flash, press the Flash soft key while the phone is active. The
display will show R.
Backlight
In standby mode, press
to toggle the backlight.
40
Advanced Features
Menu Navigation
1.
2.
3.
4.
Press the Menu soft key.
or
repeatedly to scroll through menu options.
Press
Press the Select soft key to select a menu.
Repeat scrolling and selecting if necessary.
Press the Back soft key from any menu to return to the previous screen.
Standby Mode
Press
to return to standby mode. The 8012 will also return to standby mode
if no key is pressed for 40 seconds.
41
Phone Book
Character Map
Characters are entered by pressing the keypad. The chart below shows the characters that are generated by repeatedly pressing the keys.
Key
0
1
2
3
4
5
6
7
8
9
spc
1
A
D
G
J
M
P
T
W
0
@
B
E
H
K
N
Q
U
X
?
_
C
F
I
L
O
R
V
Y
Character
&
/
+
a
b
d
e
g
h
j
k
m
n
S
p
t
u
Z
w
42
.
"
c
f
i
l
o
q
v
x
,
(
2
3
4
5
6
r
8
y
!
)
%
s
7
z
9
Adding a Phone Book Entry
1.
Press the Menu soft key.
2.
Press
3.
4.
5.
6.
7.
8.
Press the Select soft key to choose New.
The display shows “Name ?”. Enter the name using the keypad.
Press the Next soft key.
Enter the name and press the Next soft key.
The display shows “Number ?”. Enter the number (up to 20 digits) using the
keypad.
Press the Next soft key.
9.
Use
to choose Phonebook.
or
to select the ring tone (1 - 10).
10. Press the Save soft key.
Note: Mistakes may be corrected by using the Erase soft key.
43
Viewing a Phone Book Entry
1.
In standby mode, press
2.
Press
or
.
repeatedly until the desired entry is displayed.
Dialing from a Phone Book Entry
After viewing the desired number as described above, press
or the Dial soft
key.
Editing a Phone Book Entry
1.
Press the Menu soft key.
to choose Phonebook.
2.
Press
3.
Press the Select soft key.
4.
Press
5.
Press the Select soft key.
6.
Press
to choose the Edit menu.
or
repeatedly until the desired entry is displayed.
44
7.
8.
9.
Press the Select soft key.
Edit the entry using the Erase soft key as needed.
Press the Next soft key to save.
10. Use
or
to select the ring tone (1 - 10).
11. Press the Save soft key.
Deleting a Phone Book Entry
1.
Press the Menu soft key.
2.
Press
3.
Press the Select soft key.
4.
Press
5.
Press the Select soft key.
6.
Press
7.
8.
Press the Select soft key. The display shows “Confirm ?”
Press the Del soft key to delete. Press Cancel to exit.
to choose Phonebook.
or
or
to choose Delete.
repeatedly until the desired entry is displayed.
45
Deleting all Phone Book Entries
1.
Press the Menu soft key.
2.
Press
3.
Press the Select soft key.
4.
Press
5.
6.
8.
Press the Select soft key.
Press the Select soft key. The display shows “Confirm ?”
Press the Del All soft key to delete. Press Cancel to exit.
to choose Phonebook.
or
to choose Delete All.
Pause
A pause provides a delay of 3 seconds. It is often necessary to use this which
accessing an interactive voice response system such as automated banking. To
insert a pause in a number to be dialed, press
. The letter P will show in the
display.
Phonebook Status
Phonebook status shows the number of entries stored in the phonebook. To display
this, press the Select soft key when PB Status is displayed.
46
Base (BS) Settings
Terminate HS (Handset)
This allows a handset registration to be deleted from the base.
1. Press the Menu soft key.
or
to select BS Settings.
2.
Press
3.
4.
5.
6.
Press the Select soft key.
Press the Select soft key again to select the Termnate HS menu. The display
shows “PIN ?”
Enter the PIN Code. The default is 0000.
Press the OK soft key.
7.
Press
8.
current handset or a non-existent handset is selected.
Press the Select soft key. The handset is unregistered.
or
to select a handset. A warning beep will sound if the
47
Change Flash Time
Note:The default flash time is correct for almost all phone systems used in North
America.
1. Press the Menu soft key.
or
to select BS Settings.
2.
Press
3.
Press the Select soft key.
4.
Press
5.
6.
Press the Select soft key.
The display will show the current setting.
7.
Press
8.
Press the Save soft key.
or
or
to choose the Flash Time menu.
to select Flash-1/Flash-2.
48
Modify PIN
The default PIN is 0000. If security is a concern, this can be changed.
1. Press the Menu soft key.
or
to select BS Settings.
2.
Press
3.
Press the Select soft key.
4.
5.
6.
7.
Press
or
to choose the Modify PIN menu.
Press the Select soft key. The display shows “PIN ?”
Enter the current PIN Code.
Press the Next soft key. If the current PIN is correct, a prompt for the new PIN
will appear. Otherwise, a warning beep will sound and the handset will return to
the Modify PIN menu.
Enter the new PIN Code.
Press the Next soft key. A prompt will appear to confirm the new PIN code.
8.
9.
49
BS (Base) Reset
This will restore all settings to factory default.
1. Press the Menu soft key.
or
to select BS Settings.
2.
Press
3.
Press the Select soft key.
4.
Press
5.
6.
7.
Press the Select soft key. The display shows “PIN ?”
Enter the PIN Code.
Press the Reset soft key. If the PIN is correct, all base settings will be reset. If
not, a warning tone will sound and all base settings will remain the same.
or
to choose the BS Reset menu.
Note: After resetting, the handset will return to standby mode.
50
Handset (HS) Settings
Alarm
1.
Press the Menu soft key.
2.
Press
3.
4.
Press the Select soft key.
Press the Select soft key to choose the Alarm menu. The display will show the
current alarm time.
5.
Press
6.
7.
Press the Select soft key.
If the alarm is activated, enter the alarm time in HH:MM format. Note that time
must be entered in 24 hour format.
Press the Next soft key. A beep will sound and the display will show Snooze
On/Off.
8.
9.
Press
or
or
or
to select HS Settings.
to select On/Off.
to select enable or disable snooze. If snooze is enabled, the
alarm will sound at 11 minute intervals.
11. Press the Save soft key to confirm and exit.
51
Notes: When the alarm sounds, press any key on the keypad to silence it.
when the alarm sounds.
To disable snooze, press
Audio Setup
Use this option to adjust the volume of the receiver or speaker.
1. Press the Menu soft key.
to select HS Settings.
2.
Press
3.
Press the Select soft key.
4.
Press
5.
Press the Select soft key.
6.
Press
7.
Press the Select soft key. The display will show the current volume setting.
8.
Press
9.
Press the Save soft key to confirm and exit.
or
to choose the Audio Setup menu.
or
or
to select Speaker V or Earpiece V.
to select the volume level (1 - 5).
52
Key Tone
Whenever a key is pressed, the 8012 acknowledges it with a key tone. If silent
operation is desired, this feature may be disabled.
1. Press the Menu soft key.
to select HS Settings.
or
2.
Press
3.
Press the Select soft key.
4.
Press the
5.
6.
Press the Select soft key.
Press the Select soft key again to select Key Tone.
9.
Press
or
or
to choose the Tone Setup menu.
to enable or disable key tone.
10. Press the Save soft key to confirm and exit.
Note: Even if key tone is disabled, warning tones will continue to sound.
53
LCD Contrast
The display contrast may be adjusted to provide better visability.
1. Press the Menu soft key.
to select HS Settings.
or
2.
Press
3.
Press the Select soft key.
4.
Press the
5.
Press the Select soft key.
6.
Press the
7.
teen levels are available.
Press the Save soft key to confirm and exit.
8.
Press
or
or
repeatedly to choose LCD Contrast.
repeatedly to choose the desired contrast level. Seven-
to return to standby mode.
54
Base Selection
The handset may be registered to multiple bases.
1. Press the Menu soft key.
to select HS Settings.
or
2.
Press
3.
Press the Select soft key.
4.
Press the
5.
Press the Select soft key.
6.
Press the
7.
Press the Select soft key to confirm. A warning tone will sound if the base does
not exist. The display will show Selected BSX.
Press the Select soft key to confirm. A confirm tone will sound.
8.
or
or
repeatedly to choose Select Base menu.
to choose the desired base.
55
Date and Time Format
1.
Press the Menu soft key.
2.
Press
3.
Press the Select soft key.
4.
Press
5.
Press the Select soft key.
6.
Press
7.
Press the Select soft key.
8.
Press
9.
Format (12 Hour/24 Hour).
Press the Save soft key to confirm and exit.
or
or
or
or
to select HS Settings.
to choose Date & Time menu.
to choose Date Format or Time Format.
to select the Date Format (DD-MM/MM-DD) or the Time
56
Setting Date and Time
1.
Press the Menu soft key.
2.
Press
3.
Press the Select soft key.
4.
Press
5.
Press the Select soft key.
6.
Press
7.
8.
Press the Select soft key.
Enter the current Time/Date with the keypad. Time must be entered in 24 hour
format even if the display is set for 12 hour.
Press the Save soft key to confirm and exit.
9.
or
or
or
to select HS Settings.
to choose Date & Time menu.
to choose Set Date or Set Time menu.
57
HS Reset
Resetting the handset will restore all hanset features to their factory default values
except LCD Contrast.
1. Press the Menu soft key.
or
to select HS Settings.
2.
Press
3.
Press the Select soft key.
4.
Press
5.
6.
7.
Press the Select soft key. A prompt for the PIN will appear.
Enter the PIN Code. The default is 0000.
Press the Reset soft key. If the PIN is correct, all handset settings will be reset.
If not, a warning tone will sound and all settings will remain the same.
or
to choose the HS Reset menu.
Note: After resetting, the handset will return to standby mode.
58
Registration
The hanset ships from the factory registered as Number 1. Up to 5 handsets can be
registered with one base. This allows a line to be shared among multiple handsets.
Before changing the handset registration, press the
mately 5 seconds. Then perform the following steps.
1. Press the Menu soft key.
or
key on the base for approxi-
repeatedly to select Registration.
2.
Press
3.
Press the Select soft key.
4.
Press
5.
6.
Press the Select soft key to choose a base.
If the base is found, a prompt for the PIN Code will appear. The default PIN
Code is 0000. Enter PIN Code and press the Select soft key. If the PIN Code is
correct, a Registration tone will sound and the handset will be assigned a new
number. If the PIN Code is incorrect, a warning tone will sound and the handset
will return to its previous registration. If the base is not found, the handset will
enter the Out of Range mode.
or
to scroll through the Base Names.
59
Multiple Handset Operation
If more than one handset is registered to a base, internal calls can be made between
handsets and external calls may be transferred between handsets.
Internal Calling
. The display will show a list of available handsets.
1.
Press
2.
3.
Enter the number of the handset to be called.
If the handset number is valid, the called handset will ring and display HSX
Calling.
If the destination handset is not available, the calling handset will return to
standby mode.
4.
Press
to answer an internal call.
5.
Press
to end the internal call.
60
Note: If an external call arrives during an internal call, the display will show the Caller
ID information. To answer the external call, first press
Then, press
to end the internal call.
to answer the external call.
Call Transfer
An external call may be transferred between handsets registered to the same base.
1.
During an external call, press
.
2.
Enter the number of the handset to recieve the transferred call.
3.
Press
to answer a transferred call. Conversation may occur between the
handsets.
4.
To complete the transfer, press
at the transferring handset or replace it
into the base.
61
3-Way Conference Call
A conference call may be extablished between two handsets and one external caller.
.
1.
During an external call, press
2.
Enter the number of the handset to add to the conference call.
3.
Press
to answer the call.
4.
Press
at the calling handset to establish the conference.
Press
at either of the internal handsets to leave the call. Note that the
5.
other handset will remain connected to the call.
62
Maintenance Information
Treat your telephone equipment with care for trouble-free performance. Avoid
dropping the handset. Carefully place the handset in the base after use.
Avoid putting near heating appliances and devices that generate electrical noise (for
example, motors and florescent lamps).
Clean your telephone equipment with a damp cloth. Stains may be removed with a
mild soap. Do not use liquid or aerosol detergents or cleaning agents.
Do not expose to direct sunlight or moisture
Retain the original package in case you need to ship it at a later date.
Telephone Service Problems
If you have any problems with your telephone service, determine if the problem is
with your unit or the telephone company lines BEFORE CALLING THE TELEPHONE COMPANY. Be aware that the telephone company may charge you for a
service call if the problem is caused by your telephone.
63
Technical Specifications
F re q u e n c y R a n g e
C h a n n e ls
C a rrie r P o w e r
M o d u la t io n
F re q u e n c y S t a b ilit y
C h a rg in g T im e
A m b ie n t T e m p e ra t u re
H u m id it y
B a s e D im e n s io n s (m m )
H a n d s e t D im e n s io n s (m m )
B a s e P o w e r S u p p ly
H a n d s e t P o w e r S u p p ly
1.88 ~ 1.90 G H z
1 2 0 D u p le x C h a n n e ls
< 250 m W
GFSK
< ± 50 K hz
1 5 h o u rs
1 5 °C ~ 3 5 °C
0% ~ 90%
B as e: 110 X 100 X 58
150 X 50 X 28
7.5V , 300 m A
N i-M H , 1 . 2 V X 2 , 6 0 0 m A h
64
Troubleshooting
Phone Does Not Operate
1. Power adapter is disconnected.
2. Line cord is disconnected at telephone outlet or at telephone. Test the telephone in a different wall jack. If it works, the first jack may be defective.
3. Batteries are discharged.
4. Batteries are improperly installed.
Blank Screen
1. Batteries are discharged.
2. Batteries are improperly installed.
3. Handset is turned off.
Short Battery Life
1. Base charging contacts are dirty or damaged.
2. Wrong type of batteries used.
3. Batteries may need to be replaced.
65
Troubleshooting (continued)
Callers Are Not Displayed on Screen
1. Verify that you have subscribed to the appropriate service (Caller ID and Call
Waiting Caller ID) from your telephone company. If you only subscribed to
Caller ID service the unit will not display call waiting caller ID information.
2. Check if your answering machine is set to answer before 2 rings.
No Caller Information is Displayed with the Call Waiting Beep
1. Verify that you have subscribed to Call Waiting Caller ID service from your
telephone company.
We encourage you to disconnect all the telephone cords and adapter; and then
reinstall the unit step by step per this instruction manual before you ask for service.
Save These Instructions
66
Telephone Repair
DO NOT ATTEMPT TO REPAIR THIS PRODUCT YOURSELF. Telephones manufactured by CORTELCO must be returned to us for repair. You can return your
telephone to CORTELCO for repair or replacement in accordance with our LIMITED
WARRANTY.
CORTELCO warrants THIS PRODUCT against defects in material and workmanship
in accordance with our LIMITED WARRANTY. If your telephone is returned for
repair, include a copy of your sales receipt containing the date-of-purchase. DO NOT
INCLUDE THE ORIGINAL SALES RECEIPT.
If date-of-purchase is not included, the factory date printed on the label on the
bottom of your telephone will be used as the date-of-purchase. The factory date
allows six months for distribution and sale of this product. If you return your
telephone for repair, the warranty period is not extended. The original date-ofpurchase continues to apply to your warranty.
67
OUT-OF-WARRANTY REPAIR We will repair this product for a nominal fee after
the LIMITED WARRANTY has expired if you send it to us in a complete and
undamaged condition. The repaired unit will be shipped to you C.O.D., freight
collect.
RETURN-FOR-REPAIR PACKAGING If you are returning a unit to us for repair,
package it carefully, preferably in the original carton. Be sure to include your
return address, a copy of the sales receipt showing date-of-purchase, and a note
describing the problem you have with your Telephone. Shipping must be prepaid. If
the telephone is in warranty, it will be repaired or replaced, at our option, at no
cost to you, and it will be returned shipping prepaid.
Ship your telephone (shipping prepaid) to:
CORTELCO
REPAIR CENTER
1703 SAWYER ROAD
CORINTH, MS 38834
68
FCC Information
Part 68 is a Federal regulation which requires equipment to be tested and registered with the
FCC prior to its connection to the network. This equipment complies with Part 68 of FCC
rules. On the bottom of the telephone is a label that contains, among other information, the
FCC Registration Number and the Ringer Equivalence Number (REN) for this equipment.
You must, upon request, provide this information to your telephone company.
The Ringer Equivalence Number, which is used to determine the number of devices you
may connect to your phone line, indicates the amount of power that your telephone draws
from the telephone company line during ringing. If you have more than one telephone (or
other terminal device) connected to the telephone company line, you should total the ringer
equivalence numbers (REN s), and be sure that the total is not more than five. Your telephones may not ring if the total is more than five. Also, in some rural locations, your
telephone may not ring if the REN total is more than three.
RESTRICTIONS You must not connect your telephone to coin-operated lines or party
lines.
69
INSTALLATION This model telephone must be connected to the telephone company lines
through a modular jack. The required USOC for the modular jack is RJ11C for desk mounting
and RJ11W for wall mounting. The USOC number is printed on the label on the bottom of
your telephone.
HEARING-AID COMPATIBILITY The handset on your telephone will work with
magnetically-coupled hearing aids. You can use a hearing aid equipped with a T (Telephone)
switch.
IN CASE OF TROUBLE If your telephone should cause problems on the telephone line,
the telephone company can temporarily disconnect your service. The telephone company
must then notify and allow you to correct the problem.
The telephone company may from time to time change its lines or equipment. They must
notify you if planned changes will affect your telephone service, to allow you to take steps to
prevent interruptions.
Part 15 regulates the electromagnetic energy emitted by equipment to minimize interference
to radio, television, and other wireless devices. This telephone complies with Part 15 of the
FCC Rules. In the unlikely event that interference occurs, move the telephone and/or radio,
television, etc. to increase the separation distance.
70
LIMITED WARRANTY
If you purchased this product new in the U.S. or Puerto Rico, CORTELCO warrants it
against defects in material and workmanship for a period of one (1) year from the date of
original purchase. This warranty is in lieu of all other express warranties. During the warranty
period, CORTELCO agrees to repair or, at its option, replace the defective product, or any
part of it without charge for parts or labor. This is your exclusive remedy. This warranty does
not cover damage resulting from accident, misuse, abuse, improper installation or operation,
lack of reasonable care, the affixing of any attachment not provided by CORTELCO with the
product and loss of parts. The warranty is voided in the event any unauthorized person
alters or repairs the unit.
Telephone companies use different types of equipment and offer various types of services to
customers. CORTELCO does not warrant that this product is compatible with the type
of equipment of any particular phone company or the services provided by it.
CORTELCO DISCLAIMS ANY IMPLIED WARRANTY, INCLUDING THE WARRANTY OF MERCHANTABILITY AND THE WARRANTY OF FITNESS FOR A
PARTICULAR PURPOSE, AS OF THE DATE ONE YEAR FROM THE ORIGINAL
71
PURCHASE OF THE PRODUCT. CORTELCO ASSUMES NO RESPONSIBILITY FOR
ANY SPECIAL, INCIDENTAL OR CONSEQUENTIAL DAMAGES.
THIS WARRANTY GIVES YOU SPECIFIC LEGAL RIGHTS, AND YOU MAY HAVE
OTHER RIGHTS WHICH VARY FROM STATE TO STATE. SOME STATES DO NOT
ALLOW THE EXCLUSION OR LIMITATION OF SPECIAL, INCIDENTAL OR
CONSEQUENTIAL DAMAGES OR LIMITATIONS ON HOW LONG AN IMPLIED
WARRANTY LASTS, SO THE ABOVE EXCLUSION AND LIMITATION MAY NOT
APPLY TO YOU.
If failure occurs and your telephone is in warranty, service shall be provided by returning it
to CORTELCO - Repair Center, 1703 Sawyer Road, Corinth, Mississippi 38834,
shipping prepaid. The product will be repaired or replaced if examination by us determines
the product to be defective. Telephones received damaged as a result of shipping will require
you to file a claim with the carrier.
Rev. 1.0
72