1
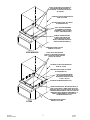
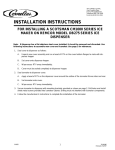
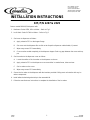
IMI CORNELIUS INC.
One Cornelius Place
Anoka. MN 55303-6234
Telephone (800) 238--3600
Facsimile (612) 422--3246
INSTALLATION INSTRUCTIONS
KIT, P/N 2267 & 2329
Remcor model DB100/150 dispenser with:
1. Manitowoc Series B320, 420 Ice Maker -- Refer to Fig 1.
2. Ice-O-Matic Series GC300 Ice Maker -- Refer to Fig 2.
1. Seal cover to dispenser as follows:
A.
Apply a bead of RTV on the hopper flange.
B.
Set cover onto the dispenser. Be careful not to disrupt the dispenser cabinet labels, if present.
C.
Wipe away excess RTV immediately.
D.
Cover must be sealed completely to the dispenser hopper. Seal any gaps between the cover and hopper.
2. Seal ice maker to the dispenser cover as follows:
A.
Locate the outline of the ice maker on the dispenser as shown.
B.
Apply a bead of RTV on the dispenser cover around the ice maker frame, sides and rear.
C.
Set ice maker on the cover.
D.
Wipe away excess RTV immediately.
3. Secure the ice maker to the dispenser with the brackets provided. Drilling must not interfere with any ice
maker components.
4. Install adhesive backed gasket strip to the removable lid.
5. Follow the manufacturers instructions to complete the installation of the ice maker.
91890
Rev B
1
12/16/96
Revised 10/10/97
APPLY RTV ALONG BOTTOM EDGE OF
ICE RAMP AND FRONT HOPPER LIP.
COOMPLETE COVER MUST BE SEALED
TO HOPPER.
ICEMAKER TO BE FLUSH WITH BACK
EDGE OF COVER.
ADD INSULATION STRIP TO FLANGE
OF REMOVABLE LID.
APPLY RTV AROUND INSIDE
OF ICEMAKER OUTLINE ON
DISPENSER COVER TO FORM
A SEAL. (SIDES AND FRONT)
REMOVE ICEMAKER PANEL
SCREWS THAT ARE IN LINE
WITH COVER HOLES AND
INSTALL MOUNTING BRACKETS
WITH SCREWS PROVIDED (4)
REMOVABLE FRONT LID FOR
MANUAL ICE FILLING.
B320 AND 420
APPLY RTV ALONG HOPPER
FLANGE ALL AROUND FOR PROPER
SEAL. COMPLETE COVER MUST BE
SEALED TO HOPPER.
ICEMAKER TO BE FLUSH WITH BACK
EDGE OF COVER.
ADD INSULATION STRIP TO FLANGE
OF REMOVABLE LID.
APPLY RTV AROUND INSIDE
OF ICEMAKER OUTLINE ON
DISPENSER COVER TO FORM
A SEAL. (4PLCS)
OPTIONAL MOUNTING BRACKETS (2)
USING EXISTING HOLES, MOUNT BRACKETS (4)
WITH 1/4-20 SCREWS. USING UPPER HOLES AS
TEMPLATE, DRILL (4) .136 DIA. HOLES TO SECURE
ICEMAKER AND DISPENSER. DRILLING IS NOT TO
INTERFERE WITH ICEMAKER COMPONENTS. IF
THERE IS INTERFERENCE, USE OPTIONAL
MOUNTING BRACKETS (2).
REMOVABLE FRONT LID FOR
MANUAL ICE FILLING.
GC300
12/16/96
Revised 10/10/97
2
91890
Rev B