1
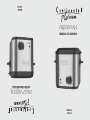
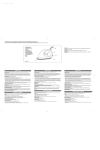
MODELO:
CP43219
DEEP FRYER
INSTRUCTION MANUAL
MANUAL DEL USUARIO
MODEL:
CP43219
FREIDORA
IMPORTANT SAFEGUARDS
When using electrical appliances, basic safety precautions
should always be followed, including the following:
ENCHUFE POLARIZADO
Siempre descongele las carnes, aves o pescado antes de cocinarlos.
freidora.
Mantenga los ingredientes refrigerados hasta el momento de cocinarlos en la
diseñado. No lo use a la intemperie.
•
Este artículo es de uso doméstico solamente. No lo use para fines que no fue
después.
•
Siempre apague el control de temperatura primero y desconecte el enchufe
permita que se anude.
•
No deje el cordón en contacto con objetos calientes, ni colgando de la mesa, ni
el electrodoméstico alejado de las paredes y cortinas.
No coloque este aparato encima ni cerca de la estufa o del horno. Mantenga •
Supervise que el artefacto no sea usado por o cerca de niños.
•
Siempre desconecte el enchufe si no la va a usar o antes de limpiar o guardar.
•
Prevenga electrochoques, no sumerja el cordón, enchufe base en agua.
•
antes de limpiar o remover la olla.
•
No toque partes calientes. Use las asas y perilla. Siempre permítale enfriarse
GUARDE LAS INSTRUCCIONES PARA FUTURA REFERENCIA.
POR FAVOR LEA LAS INSTRUCCIONES ANTES DE USAR SU FREIDORA Y
PRECAUCIONES IMPORTANTES DE
SEGURIDAD
This appliance is for HOUSEHOLD USE ONLY. No user-serviceable parts inside.
Power Unit never needs lubrication. Do not attempt to service this product. Do
not immerse base in water or other liquid. A short power supply cord is provided
to reduce the hazards resulting from entanglement or tripping over a longer
cord. AN EXTENSION CORD MAY BE USED WITH CARE; HOWEVER, THE
MARKED ELECTRICAL RATING SHOULD BE AT LEAST AS GREAT AS THE
ELECTRICAL RATING OF THE Slow Cooker. The extension cord should not be
allowed to drape over the counter or tabletop where it can be pulled on by children
or tripped over.
NOTE: During initial use of this appliance, some slight smoke and/or odor may be
detected. This is normal with many heating appliances and will not recur after a few
uses.
•
SAVE THESE INSTRUCTIONS
•
This appliance has a polarized plug (one blade is wider than the other). To reduce
the risk of electric shock, this plug is intended to fit into a polarized outlet only one
way. If the plug does not fit fully into the outlet, reverse the plug. If it still does not fit,
contact a qualified electrician.
Do not attempt to modify the plug in any way. If the plug fits loosely into the AC
outlet or if the AC outlet feels warm do not use that outlet.
Este artefacto electrodoméstico tiene un enchufe polarizado (una pata es más
ancha que la otra). Como una característica de seguridad, este enchufe encajará
en un tomacorriente polarizado solamente de una manera; si no entra totalmente,
invierta el enchufe. Si tampoco entra, comuníquese con un electricista calificado. No
intente modificar el enchufe de ninguna manera. Si el enchufe queda suelto en el
tomacorriente de CA o si el tomacorriente se calienta, no use ese tomacorriente.
POLARIZED PLUG
GUARDE ESTAS INSTRUCCIONES
1. Read all instructions before using.
2. Do not touch hot surfaces. Use handles or knobs. The lid handle may get hot
while cooking, use of an oven mitt while handling is advised.
3. To protect against electrical shock, do not immerse cord, plug, or
cooking unit in water or other liquids. CAUTION: Never submerge the heating unit
in water or other liquid.
4. Close supervision is necessary when any appliance is used by or near children.
5. Unplug from outlet when not in use and before cleaning. Allow unit to cool before
putting on or taking off parts.
6. Do not operate any appliance with a damaged cord or plug or after the appliance
malfunctions or has been damaged in any manner.
7. The use of accessory attachments not recommended may cause fire, electrical
shock or injury.
8. Do not use outdoors.
9. Do not let cord hang over edge of table or counter, or touch heated
surfaces.
10. Do not place on or near a hot gas or electric burner, or in a heated
oven.
11. Extreme caution must be used when moving an appliance containing
hot oil or other hot liquids. Always use hot pads when moving.
12. Do not use appliance for other than intended use.
This product is only for family use.
Please read these instructions carefully to get the best results from your appliance.
Before connecting the appliance, please check if the voltage indicated on the
bottom of the appliance is in accordance with the main voltage in your home.
Please locate the appliance and plug accessible to the power socket.
Warning: This appliance must be earthed.
Keep the appliance away from children.
The socket used should be in accordance with the plug of the appliance.
Make sure that the temperature controller is on the position of “off” before plugging. After plugging into the power socket, the indicator “POWER” comes on, showing
the appliance is powered. When only the indicator “POWER” comes on, the
appliance is not heated. If the using temperature exceeds rated temperature after
use, the indicator “POWER” still works and at this time, the appliance maybe very
hot.
•Do not heat without food inside.
•Do not open the lid when frying.
•The surface is hot when frying. Never touch the fryer before it’s cooled to avoid
scald.
•Before first use, please check carefully if all the parts of the appliance are in
good condition. If not, please contact the supplier or manufacturer. Never use this
appliance if it is not in good condition.
Using your fryer
1. Introducing the oil or fat
•Open the top lid.
•Lift the basket using the handle.
•Place approximately 1.1 liters of oil or 0.7 kg of hard fat into the fryer body (the
level must always be between the two marks on the oil container wall).
•If you use blocks of fat, cut them into pieces before placing them in the body.
•Set switch of the temperature controller to 140˚(the red Indicator light comes on).
To melt the fat needs roughly 8 minutes.
•Never attempt to melt fat in the basket.
2.Cooking
•Plug in the fryer; the indicator “POWER” comes on.
•Set the temperature controller to the desired temperature depending on what you
are going to cook, the indicator “HEAT” comes on.
•When the indicator “HEAT” goes out (after approx. 5-7 minutes) the fryer has
reached the corresponding temperature. Open the top lid.
•Attach the handle into basket.
•Put the food in the basket.
•Lower the basket into the oil slowly; watching the oil level and foam in order to
keep them from reaching the fringe of the oil container confirming the oil level is
appropriate. Detach the handle. Close the lid.
•When the food is cooked, turn anticlockwise the temperature controller to the
position “OFF”; the indicator “HEAT” goes out. Unplug the fryer or shut the power
socket; the indicator “POWER” goes out. Open the lid. Attach the handle to
basket’s support (at the top of the basket’s body), raise the basket and drain the oil.
•When cooking, the temperature controller will heat or stop heating according to
the set temperature; the “HEAT” indicator light will flicker.
•Regule el control de temperatura a la deseada dependiendo de lo que vaya a
cocer, el indicador “HEAT” se encenderá.
•Cuando el indicador “HEAT” se apague (después de aproximadamente 7-9 minu-
2.Cocinar
•Abra la tapa superior.
•Levante el cesto usando el mango.
•Invierta aproximadamente 1.1 litro de aceite o 0.7 Kg de grasa dura dentro del
recipiente de la freidora (el nivel debe estar siempre entre las dos marcas en la
pared del recipiente interior).
•Si usa bloques de grasa, córtelos en piezas pequeñas antes de colocarlas en el
recipiente.
•Ponga el reloj del control de temperatura a 140ºC. Para derretir la grasa se
necesita aproximadamente 6 minutos.
•Nunca intente derretir la grasa en el cesto.
Usando la freidora
1.Introduciendo el aceite o la grasa
Gracias por haber elegido este producto
Por favor lea las instrucciones detenidamente para conseguir los mejores resultados de su aparato.
CONSEJOS IMPORTANTES
Este producto genera calor y vapor durante su uso. Se debe tomar precauciones
para prevenir el riesgo de quemaduras, incendios u otros daños a personas u
objetos.
•No usar al aire libre.
•No sumergir el enchufe, cable o unidad de freir en agua o cualquier otro líquido.
•No dejar el cable colgando en los bordes de las mesas o barras, ni tocar superficies calientes.
•Antes de conectar el aparato, por favor compruebe si el voltaje indicado en la
parte inferior del aparato está en concordancia el voltaje de su casa.
•Por favor situe el aparato y el enchufe accesible a la toma de corriente.
•Cuando esté usando este aparato, asegure tener buena circulación de aire en el
lugar donde esté usándolo.
•No deje el producto inatendido durante su uso.
•No use este producto para otro propósito diferente del que está diseñado.
Atención: Este aparato debe estar sobre superficie firme.
•Mantenga este aparato fuera del alcance de los niños.
•La toma de corriente usado debe estar en condordancia con el enchufe del
aparato.
•Asegure que el control de temperatura esté en la posición de “off” antes de
enchufar. Después de enchufar en la toma de corriente, el indicador “POWER” se
enciende, queriendo decir que el aparato está en funcionamiento. Si la temperatura usada excede del adecuado, el indicador “POWER” continuará encendido,
queriendo decir que el aparato está aún muy caliente.
•No calentar sin comida dentro.
•No abrir la tapa mientras se frie.
•La superficie está caliente mientras se frie. Nunca toque la freidora antes de que
se enfrie para evitar escaldaduras.
•Antes del primer uso, compruebe cuidadosamente que todas las partes del
aparato esté en buenas condiciones. Si no, por favor contacte con el proveedor o
fabricante. Nunca use este aparato si no está en buenas condiciones y no intente
reparar el aparato defectuoso.
Este producto es solamente para uso familiar
tos), la freidora habrá alcanzado la temperatura deseada. Quite la tapa superior.
•Ponga la comida dentro del cesto, patatas (250g), pescado (250g), gambas (200g),
bistec (250g), muslo de pollo (300g).
•Descender el cesto en el aceite de manera despacio, observe el nivel del aceite y asegure que no sobrepase el nivel máximo de la freidora, cierre después con la tapa.
•Cuando la comida esté hecha, gire el control de temperatura en sentido contrario al de
reloj hasta “OFF”, el indicador “HEAT” se apagará. Abra la tapa, levante el cesto y escurrie el aceite.
•Mientras la freidora está en funcionamiento, el control de temperatura puede estar
encendido o apagado de acuerdo con la temperatura del aceite.
Limpieza
•Desenchufe el aparato cuando lo limpie.
•Limpie el exterior de la freidora y la tapa con un paño húmedo.
•Nunca use productos corrosivos ni alcohol.
•Separe el mango del cesto.
•Limpie el cesto con agua caliente o lavavajillas. Enjuáguelos y séquelos cuidadosamente.
•No sumerja el aparato en agua ni lo lave directamente con ella.
Consejos prácticos
1. Aceites y grasas
•Use siempre aceites y grasas que resistan temperaturas altas.
•No mezcle diferentes tipos de aceite o grasa.
•Cambie el aceite o grasa cuando se vuelvan marrón después de su uso.
2. Preparando la comida
•Cualquiera receta que sea, la comida debe estar perfectamente seca: esto evitará derramar el aceite o grasa y los hará durar más.
3. Cocinando
•No llene en exceso el cesto. Eso hará que la temperatura no sea el adecuado y la
comida esté grasienta.
•No mantenga el aceite a altas temperaturas durante mucho tiempo, ya que le hará
perder sus propiedades.
•Ajuste el control de temperatura al mínimo mientras acaba una comida y empiece con
otra.
•No deje la comida frita en el cesto en posición para escurrir durante demasiado tiempo.
Eso le hará menos crujiente.
•La comida congelada puede freirse en el cesto sin descongelarse antes.
4.Después de cocinar
•El aceite o grasa pueden dejarse en la freidora con el cesto y tapa. No perderá sus
propiedades.
•Cambie la grasa o aceite regularmente, después de aproximadamente 20 usos.
•If there is any breakdown or damage, the appliance must be repaired by
specialized people. Non-specialized people are not permitted to dismantle or repair
the appliance. 2. Repairing:
• Detach the fence lid from the top lid.
•Remove the used filter.
•Clean the top lid, inner cover and fence lid with a damp cloth or sponge.
•Set a new filter.
•Set fence lid back.
1. Replacing the filter
Care and maintenance
•Oil or fat can be left in the fryer with its basket and lid on. It will not lose its
properties.
•Change the fat or oil regularly, after approximately 20 batches.
4.After cooking
•Do not overfill the basket. This will cause the oil temperature dropping and make
the food greasy.
•Do not keep the oil at high temperature for long periods. This will make it lose its
properties.
•Set the temperature controller to the lowest temperature while waiting between two
batches.
•Do not leave the cooked food in the basket in the draining position too long. The
vapors could cause the food to lose its crispness and go soft.
•Frozen food can be cooked in the basket without being defrosted.
3.Cooking
•Whatever the recipe used, the food must be perfectly dry: this will avoid overflowing
and make the oil or fat last longer.
•When preparing potato-based food (chips, crisps, etc.), cut them up and then wash
them in cold water to remove the starch. Dry them carefully. This will stop them
sticking together.
2.Preparing the food
•Always use oil and fats which can withstand high temperature.
•Do not mix different types of oil or fat.
•Change the oil or fat when it becomes brown after cooking.
1.Oils and fats
Tips
Cuidado y mantenimiento
1.Cambiando el filtro
•Separe la tapa lateral de la tapa superior.
•Quite el filtro usado.
•Limpie la tapa superior, cubierta interior y tapa lateral con un paño húmedo o esponja.
•Coloque un nuevo filtro.
•Coloque la tapa lateral.
2.Reparaciones
•Si hubiera algúna rotura o daño, el aparato debe ser reparado por especialistas. Las
personas no especialistas no están permitidas desmontar o reparar el aparato.
•Unplug the appliance when cleaning.
•Clean the outside of the fryer and the lid with a damp cloth.
•Never use abrasive pads or alcohol.
•Detach the handle from the basket.
•Wash the basket with hot water or washing-up liquid. Rinse and dry carefully.
•Never immerse the appliance in water or wash it directly by water.
Cleaning
MODEL:
CP43219
FREIDORA
MANUAL DEL USUARIO
INSTRUCTION MANUAL
DEEP FRYER
MODELO:
CP43219
IMPORTANT SAFEGUARDS
When using electrical appliances, basic safety precautions
should always be followed, including the following:
1. Read all instructions before using.
2. Do not touch hot surfaces. Use handles or knobs. The lid handle may get hot
while cooking, use of an oven mitt while handling is advised.
3. To protect against electrical shock, do not immerse cord, plug, or
cooking unit in water or other liquids. CAUTION: Never submerge the heating unit
in water or other liquid.
4. Close supervision is necessary when any appliance is used by or near children.
5. Unplug from outlet when not in use and before cleaning. Allow unit to cool before
putting on or taking off parts.
6. Do not operate any appliance with a damaged cord or plug or after the appliance
malfunctions or has been damaged in any manner.
7. The use of accessory attachments not recommended may cause fire, electrical
shock or injury.
8. Do not use outdoors.
9. Do not let cord hang over edge of table or counter, or touch heated
surfaces.
10. Do not place on or near a hot gas or electric burner, or in a heated
oven.
11. Extreme caution must be used when moving an appliance containing
hot oil or other hot liquids. Always use hot pads when moving.
12. Do not use appliance for other than intended use.
POLARIZED PLUG
Siempre descongele las carnes, aves o pescado antes de cocinarlos.
Mantenga los ingredientes refrigerados hasta el momento de cocinarlos en la
Este artículo es de uso doméstico solamente. No lo use para fines que no fue
después.
This appliance has a polarized plug (one blade is wider than the other). To reduce
the risk of electric shock, this plug is intended to fit into a polarized outlet only one
way. If the plug does not fit fully into the outlet, reverse the plug. If it still does not fit,
contact a qualified electrician.
Do not attempt to modify the plug in any way. If the plug fits loosely into the AC
outlet or if the AC outlet feels warm do not use that outlet.
GUARDE ESTAS INSTRUCCIONES
Este artefacto electrodoméstico tiene un enchufe polarizado (una pata es más
ancha que la otra). Como una característica de seguridad, este enchufe encajará
en un tomacorriente polarizado solamente de una manera; si no entra totalmente,
invierta el enchufe. Si tampoco entra, comuníquese con un electricista calificado. No
intente modificar el enchufe de ninguna manera. Si el enchufe queda suelto en el
tomacorriente de CA o si el tomacorriente se calienta, no use ese tomacorriente.
ENCHUFE POLARIZADO
Siempre apague el control de temperatura primero y desconecte el enchufe
Siempre desconecte el enchufe si no la va a usar o antes de limpiar o guardar.
•
Supervise que el artefacto no sea usado por o cerca de niños.
SAVE THESE INSTRUCTIONS
permita que se anude.
No deje el cordón en contacto con objetos calientes, ni colgando de la mesa, ni
No coloque este aparato encima ni cerca de la estufa o del horno. Mantenga Prevenga electrochoques, no sumerja el cordón, enchufe base en agua.
•
No toque partes calientes. Use las asas y perilla. Siempre permítale enfriarse
This appliance is for HOUSEHOLD USE ONLY. No user-serviceable parts inside.
Power Unit never needs lubrication. Do not attempt to service this product. Do
not immerse base in water or other liquid. A short power supply cord is provided
to reduce the hazards resulting from entanglement or tripping over a longer
cord. AN EXTENSION CORD MAY BE USED WITH CARE; HOWEVER, THE
MARKED ELECTRICAL RATING SHOULD BE AT LEAST AS GREAT AS THE
ELECTRICAL RATING OF THE Slow Cooker. The extension cord should not be
allowed to drape over the counter or tabletop where it can be pulled on by children
or tripped over.
NOTE: During initial use of this appliance, some slight smoke and/or odor may be
detected. This is normal with many heating appliances and will not recur after a few
uses.
•
freidora.
•
diseñado. No lo use a la intemperie.
•
•
•
el electrodoméstico alejado de las paredes y cortinas.
•
•
antes de limpiar o remover la olla.
•
GUARDE LAS INSTRUCCIONES PARA FUTURA REFERENCIA.
POR FAVOR LEA LAS INSTRUCCIONES ANTES DE USAR SU FREIDORA Y
PRECAUCIONES IMPORTANTES DE
SEGURIDAD
•Regule el control de temperatura a la deseada dependiendo de lo que vaya a
cocer, el indicador “HEAT” se encenderá.
•Cuando el indicador “HEAT” se apague (después de aproximadamente 7-9 minu-
2.Cocinar
•Abra la tapa superior.
•Levante el cesto usando el mango.
•Invierta aproximadamente 1.1 litro de aceite o 0.7 Kg de grasa dura dentro del
recipiente de la freidora (el nivel debe estar siempre entre las dos marcas en la
pared del recipiente interior).
•Si usa bloques de grasa, córtelos en piezas pequeñas antes de colocarlas en el
recipiente.
•Ponga el reloj del control de temperatura a 140ºC. Para derretir la grasa se
necesita aproximadamente 6 minutos.
•Nunca intente derretir la grasa en el cesto.
Usando la freidora
1.Introduciendo el aceite o la grasa
Gracias por haber elegido este producto
Por favor lea las instrucciones detenidamente para conseguir los mejores resultados de su aparato.
CONSEJOS IMPORTANTES
Este producto genera calor y vapor durante su uso. Se debe tomar precauciones
para prevenir el riesgo de quemaduras, incendios u otros daños a personas u
objetos.
•No usar al aire libre.
•No sumergir el enchufe, cable o unidad de freir en agua o cualquier otro líquido.
•No dejar el cable colgando en los bordes de las mesas o barras, ni tocar superficies calientes.
•Antes de conectar el aparato, por favor compruebe si el voltaje indicado en la
parte inferior del aparato está en concordancia el voltaje de su casa.
•Por favor situe el aparato y el enchufe accesible a la toma de corriente.
•Cuando esté usando este aparato, asegure tener buena circulación de aire en el
lugar donde esté usándolo.
•No deje el producto inatendido durante su uso.
•No use este producto para otro propósito diferente del que está diseñado.
Atención: Este aparato debe estar sobre superficie firme.
•Mantenga este aparato fuera del alcance de los niños.
•La toma de corriente usado debe estar en condordancia con el enchufe del
aparato.
•Asegure que el control de temperatura esté en la posición de “off” antes de
enchufar. Después de enchufar en la toma de corriente, el indicador “POWER” se
enciende, queriendo decir que el aparato está en funcionamiento. Si la temperatura usada excede del adecuado, el indicador “POWER” continuará encendido,
queriendo decir que el aparato está aún muy caliente.
•No calentar sin comida dentro.
•No abrir la tapa mientras se frie.
•La superficie está caliente mientras se frie. Nunca toque la freidora antes de que
se enfrie para evitar escaldaduras.
•Antes del primer uso, compruebe cuidadosamente que todas las partes del
aparato esté en buenas condiciones. Si no, por favor contacte con el proveedor o
fabricante. Nunca use este aparato si no está en buenas condiciones y no intente
reparar el aparato defectuoso.
This product is only for family use.
Please read these instructions carefully to get the best results from your appliance.
Before connecting the appliance, please check if the voltage indicated on the
bottom of the appliance is in accordance with the main voltage in your home.
Please locate the appliance and plug accessible to the power socket.
Warning: This appliance must be earthed.
Keep the appliance away from children.
The socket used should be in accordance with the plug of the appliance.
Make sure that the temperature controller is on the position of “off” before plugging. After plugging into the power socket, the indicator “POWER” comes on, showing
the appliance is powered. When only the indicator “POWER” comes on, the
appliance is not heated. If the using temperature exceeds rated temperature after
use, the indicator “POWER” still works and at this time, the appliance maybe very
hot.
•Do not heat without food inside.
•Do not open the lid when frying.
•The surface is hot when frying. Never touch the fryer before it’s cooled to avoid
scald.
•Before first use, please check carefully if all the parts of the appliance are in
good condition. If not, please contact the supplier or manufacturer. Never use this
appliance if it is not in good condition.
Using your fryer
1. Introducing the oil or fat
•Open the top lid.
•Lift the basket using the handle.
•Place approximately 1.1 liters of oil or 0.7 kg of hard fat into the fryer body (the
level must always be between the two marks on the oil container wall).
•If you use blocks of fat, cut them into pieces before placing them in the body.
•Set switch of the temperature controller to 140˚(the red Indicator light comes on).
To melt the fat needs roughly 8 minutes.
•Never attempt to melt fat in the basket.
2.Cooking
•Plug in the fryer; the indicator “POWER” comes on.
•Set the temperature controller to the desired temperature depending on what you
are going to cook, the indicator “HEAT” comes on.
•When the indicator “HEAT” goes out (after approx. 5-7 minutes) the fryer has
reached the corresponding temperature. Open the top lid.
•Attach the handle into basket.
•Put the food in the basket.
•Lower the basket into the oil slowly; watching the oil level and foam in order to
keep them from reaching the fringe of the oil container confirming the oil level is
appropriate. Detach the handle. Close the lid.
•When the food is cooked, turn anticlockwise the temperature controller to the
position “OFF”; the indicator “HEAT” goes out. Unplug the fryer or shut the power
socket; the indicator “POWER” goes out. Open the lid. Attach the handle to
basket’s support (at the top of the basket’s body), raise the basket and drain the oil.
•When cooking, the temperature controller will heat or stop heating according to
the set temperature; the “HEAT” indicator light will flicker.
Este producto es solamente para uso familiar
2.Preparing the food
•Always use oil and fats which can withstand high temperature.
•Do not mix different types of oil or fat.
•Change the oil or fat when it becomes brown after cooking.
1.Oils and fats
•El aceite o grasa pueden dejarse en la freidora con el cesto y tapa. No perderá sus
propiedades.
•Cambie la grasa o aceite regularmente, después de aproximadamente 20 usos.
•Whatever the recipe used, the food must be perfectly dry: this will avoid overflowing
and make the oil or fat last longer.
•When preparing potato-based food (chips, crisps, etc.), cut them up and then wash
them in cold water to remove the starch. Dry them carefully. This will stop them
sticking together.
4.Después de cocinar
3.Cooking
•No llene en exceso el cesto. Eso hará que la temperatura no sea el adecuado y la
comida esté grasienta.
•No mantenga el aceite a altas temperaturas durante mucho tiempo, ya que le hará
perder sus propiedades.
•Ajuste el control de temperatura al mínimo mientras acaba una comida y empiece con
otra.
•No deje la comida frita en el cesto en posición para escurrir durante demasiado tiempo.
Eso le hará menos crujiente.
•La comida congelada puede freirse en el cesto sin descongelarse antes.
•Do not overfill the basket. This will cause the oil temperature dropping and make
the food greasy.
•Do not keep the oil at high temperature for long periods. This will make it lose its
properties.
•Set the temperature controller to the lowest temperature while waiting between two
batches.
•Do not leave the cooked food in the basket in the draining position too long. The
vapors could cause the food to lose its crispness and go soft.
•Frozen food can be cooked in the basket without being defrosted.
3. Cocinando
4.After cooking
•Cualquiera receta que sea, la comida debe estar perfectamente seca: esto evitará derramar el aceite o grasa y los hará durar más.
•Oil or fat can be left in the fryer with its basket and lid on. It will not lose its
properties.
•Change the fat or oil regularly, after approximately 20 batches.
2. Preparando la comida
Care and maintenance
1. Aceites y grasas
•Use siempre aceites y grasas que resistan temperaturas altas.
•No mezcle diferentes tipos de aceite o grasa.
•Cambie el aceite o grasa cuando se vuelvan marrón después de su uso.
1. Replacing the filter
Consejos prácticos
• Detach the fence lid from the top lid.
•Remove the used filter.
•Clean the top lid, inner cover and fence lid with a damp cloth or sponge.
•Set a new filter.
•Set fence lid back.
•Desenchufe el aparato cuando lo limpie.
•Limpie el exterior de la freidora y la tapa con un paño húmedo.
•Nunca use productos corrosivos ni alcohol.
•Separe el mango del cesto.
•Limpie el cesto con agua caliente o lavavajillas. Enjuáguelos y séquelos cuidadosamente.
•No sumerja el aparato en agua ni lo lave directamente con ella.
2. Repairing:
Limpieza
•If there is any breakdown or damage, the appliance must be repaired by
specialized people. Non-specialized people are not permitted to dismantle or repair
the appliance. tos), la freidora habrá alcanzado la temperatura deseada. Quite la tapa superior.
•Ponga la comida dentro del cesto, patatas (250g), pescado (250g), gambas (200g),
bistec (250g), muslo de pollo (300g).
•Descender el cesto en el aceite de manera despacio, observe el nivel del aceite y asegure que no sobrepase el nivel máximo de la freidora, cierre después con la tapa.
•Cuando la comida esté hecha, gire el control de temperatura en sentido contrario al de
reloj hasta “OFF”, el indicador “HEAT” se apagará. Abra la tapa, levante el cesto y escurrie el aceite.
•Mientras la freidora está en funcionamiento, el control de temperatura puede estar
encendido o apagado de acuerdo con la temperatura del aceite.
Tips
Cuidado y mantenimiento
2.Reparaciones
•Si hubiera algúna rotura o daño, el aparato debe ser reparado por especialistas. Las
personas no especialistas no están permitidas desmontar o reparar el aparato.
Cleaning
•Separe la tapa lateral de la tapa superior.
•Quite el filtro usado.
•Limpie la tapa superior, cubierta interior y tapa lateral con un paño húmedo o esponja.
•Coloque un nuevo filtro.
•Coloque la tapa lateral.
•Unplug the appliance when cleaning.
•Clean the outside of the fryer and the lid with a damp cloth.
•Never use abrasive pads or alcohol.
•Detach the handle from the basket.
•Wash the basket with hot water or washing-up liquid. Rinse and dry carefully.
•Never immerse the appliance in water or wash it directly by water.
1.Cambiando el filtro