1
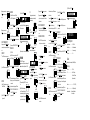
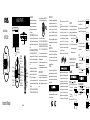
INTRODUCTION
NAME OF PARTS
Portable CD/MP3 Player
with Text Display
1
Please read and follow the instruction manual
carefully before operating in order to avoid any
damages to the unit. Any adjustment or repair
should be done by a qualified service center only
to receive warranty.
A
2. Plug in AC adapter and slide the “CHARGE SWITCH“
to “ON” position to start charging.(AC Adapter Not Included)
Your unit operates on two(2) AA size alkaline batteries.
Open the CD cover and insert the batteries in the battery
compartment following the polarity diagram located
inside.
Door open switch
R/PREVIOUS button
(push POWER button
LCD
Display to left)
EQ button
DBBS button
PROG button
ESP/SEARH
button
MODE button
RE-CHARGEABLE BATTERY OPERATION
(RE-CHARGEABLE BATTERIES NOT INCLUDED)
You can operate this unit with two “AA” rechargeable
batteries. For new or exhausted rechargeable batteries,
we recommend to refer to battery manufacturer’s
guide.
PLAY/PAUSE
button(push
POWER button
upward)
POWER ON/ENTER
button
F.F/NEXT button
(push POWER button
to right)
OFF/STOP button
(push POWER
button downward)
DC jack
Headphone jack
Volume control
When operating the unit with AC adapter and
non-rechargeable batteries in the compartment,
please make sure to set the “Charge” switch
to “Off” position to avoid damaging the unit.
HOLD switch
(on rear)
1. Open the CD cover and insert the batteries (2x”AA”) in
the battery compartment following the polarity diagram
located inside.
BOTH BATTERIES MUST BE RECHARGEABLE NiCd
TYPES. OTHER BATTERIES MAY EXPLODE OR LEAK.
The Dynamic Bass Boost System(DBBS) enhances the
low frequency(Bass) response of the output. Set the
Volume to low listening level and press DBBS switch in
the direction of the arrow to turn this function ON.
Note: Some CD’s with DBBS may exceed the bass
BATTERY OPERATION(BATTERIES NOT INCLUDED)
MP-CD561
DBBS FUNCTION
response capacity and can cause distortion. Do not play
3. Unplug the AC adapter after charging.
DO NOT CHARGE THE BATTERIES MORE THAN 24
HOURS OR MORE THAN RECOMMENDED TIME.
OVERCHARGING MAY DETERIORATE THE PERFORMA N C E O F T H E R E C H A R G E A B L E B AT T E R I E S .
4. If the operating time decrease drastically after the
batteries have been recharged properly, purchase new
rechargeable NiCd batteries.
Do not attempt to recharge alkaline batteries. This may
cause leakage and damage to the unit.
Do not mix alkaline batteries with rechargeable batteries.
MONEY SAVING TIPS.
Due to the nature of CD technology, the unit uses power
even when the unit is off. To extend the batteries’ life, use
the adapter for indoor operation or where power is
supplied. Use the battery operation only when the unit is in
mobile.
DBBS in high volume. Playing DBBS in high volume may
cause damage to the headphone and more importantly to
your hearing.
HOLD FUNCTION
This HOLD function prevents any unwanted function
changes during PLAY or STOP mode. Slide HOLD switch
to the arrow direction (or opposite) to turn the function
mode, except DBBS function.
Hearing experts advise against the constant use of
volume use can lead to hearing loss. If you experience
ringing in the ears or hearing loss, discontinue use and
seek medical advice.
To remove the disc from its storage case, press down on
by the edges as shown below.
not listed in this manual may result in
Read the instruction manual before operating this unit.
Do not expose the unit to high temperature or humidity.
Use dampened soft cloth to clean the unit. Do not use
strong detergent or solvent to clean the unit.
Ensure that all electrical connections(including the main
plug, extension leads and interconnections between
pieces of equipment) are properly made and in
accordance with the manufacture’s instructions.
Consult your dealer if you are ever in doubt about the
installation, operation or safety of your equipment.
(4) When CD track data has been read, Unit will start play from No.1
automatically. LCD SCREEN will display the play time.
EQ
During play, press EQ button alternately
can simulate various sound. including:flat/
classic/jazz/rock/pop.
hazardous radiation exposure.
STOP
POWER ON
(1) Press OFF/STOP (
)button to stop
play , LCD screen will display the last track
number and total play time.
PAUSE
(1) Press PLAY/PAUSE(
CD MODE
) button to pause on/off
alternately,and the time will flash.
AUTO PLAY
(1) Press POWER ON/ENTER button to turn the power on.
LCD screen will display
"HELLO wellcome" .
Then will display
"wellcome to CD/MP3" .
(2) LCD screen will display "NO DISC", if CD is not in the
unit.
HOLD switch
cannot read CD track data.
The CD mechanism and the sensitive circuitry may
cause interference to a radio tuner nearby. Do not
operate this unit while operating other radio devices.
Danger This product utilizes invisible laser
radiation. Avoid direct exposure
to the beam.
Caution Use of controls, adjustments or procedures
Only compact discs identified with this
mark can be used with this player.
CAUTION
personal stereos played at high volume. Constant high
(3) LCD screen will display " NO CD/MP3 " if the unit
IMPORTANT
CONCERNING COMPACT DISCS
ON (OFF). No other function buttons operate on HOLD
the center of the case and lift the disc out. Hold it carefully
Instruction Manual
Insert the disc into the unit with the label of the disc
facing up.
Gently wipe the disc using a soft cloth from the center
to the outer direction to remove dust, fingerprints or any
other particles on the disc surface.
Never use
chemicals, such as record sprays, anti-static sprays,
benzene or thinners to clean the CD. These chemicals
c a n d a m a g e t h e d i s c s u r f a c e p e r m a n e n t l y.
To avoid serious scratches on CD, keep them in the
cases after each use. Scratches can cause the laser
pick-up skip in the future play.
Do not place stickers or write anything on the disc.
LISTEN TO DESIRED TRACK
(or FF
) button to set the desired
(1) Press FR
track#, press PLAY/PAUSE
button to play.
Press FR
(or FF
) button to change the track#
during the play mode.
Press FF button
(3) TO CLEAR, Press OFF/STOP(
(2) During play or pause mode, press
FR
button twice to play previous
RANDOM PLAY
(3) To clear, Press OFF/STOP(
(1) Press MODE button four times at STOP mode
track.
and "RAND" is displayed and flash.
RAND
) button.
SKIP
(2)During play, press FR
EQ
During play, press this button alternately
(3) During play or pause mode, press
FF button to play the next track
) button to play tracks in
"ASP" at anti-shock mode.
(1) Select RANDOM mode during play and "RAND" will flash.
and FR
button to play tracks in random order.
(2) Press FF
MOVE TO THE DESIRED SPOT
During play, press and hold FF
(or FR
) button
continuously to fast forward (or fast reverse) the current
track.
(3) To cancel, press MODE or POWER OFF/CANCEL(
Press and hold FF
1-2 second(s) to read the whole
directory. Press FF
to check the directory down,press
(1) Press MODE button once to repeat one track.
(a) Press PROG button at stop or play mode and "PROG"
and "00" will display.
PROG
(b) Press FF
(or FR
) button to select the track number.
Do not mix audio files and mp3 files within a CD ROM.
INTRO PLAY
(1) Press MODE button three times at stop mode
and "INTRO" will flash.
INTRO
(d) Repeat (b)~(c) to set up to 64 tracks. The display will show the
current set track.
(e) Set tracks can be checked by pressing PROG. button.
(2) TO COMPLETE THE PROGRAMMING AND TO PLAY
Press PLAY/PAUSE(
(2) Press PLAY/PAUSE(
play from track No.1
) button to start INTRO
programmed tracks.
) button to start the
(or FR
) button to set the desired
Press FF
or FR
)or(
Press FF(
)or FR(
Press POWER ON/ENTER(
once.
song info will move from right to left.
or FR
PLAY/PAUSE(
) to confirm and
(1)Press MODE button once to repeat one track.
(2)Press MODE button twice to repeat album tracks.
ALBUM
(3)Press MODE button three times to repeat all tracks.
ALL
Frequency Response..............................20 ~ 20,000Hz
Wow and Flutter......................................Below Measurable Limits
)
INTRO
Sampling Rate.........................................8 times over sampling
D/A Converter..........................................1-Bit
button.
(1) TO PROGRAM
(a) Press PROG button at stop mode and
"PROG" display and "00" will flash.
(or FR ) button to select the folder number.
(b) Press FF
(c) When desired folder is displayed, press PROG. button to set.
(or FR ) button to select the track number.
(d) Press FF
General
Maximum Output (Stereo Headphone)… 20mW+20mW(32ohm)
Power Supply
AC Adapter....................................…110V 60Hz
DC......................................................4.5V with DC Adapter
3V with 2 size “AA” Batteries
(Batteries not Included)
(e) When desired track is displayed, press PROG. button to set.
(f) Repeat (b)~(e) to set up to 64 tracks. The display will show
the current set track.
(g) Set tracks can be checked by pressing PROG. button.
(1) Press MODE button four times at stop mode and "INTRO"
will flash.
search mode.
SPECIFICATION
MP3/CD Play Section
) button to play tracks in
(2) Press PLAY/PAUSE(
random order.
(3) To cancel RANDOM mode, press MODE or OFF/STOP(
PROG
INTRO PLAY
(2) Press ESP SEARCH button twice to enter folder
(2)When the voltage is too low, the unit will automatically turn off.
PROGRAM PLAY
1
) key to play the desired song.
Press FF button
button to start INTRO play from current or
previous track.
1-2 second(s) to search the
desired track,Press POWER ON/ENTER(
If the selection is correct, press MODE once, then press
track number and the playtime, Unit will
start play from track No.1 automatically.
Press and hold FF
) key to confirm the selection.
To delete a letter, press OFF/STOP
the play mode.
"is displayed when the battery voltage reaches low.
RAND
)FR 1-2 second(s) to select the next
) to select the desired letter.
(1)"
button to start INTRO play from next tracks in
random order.
(1) Press MODE button five times at STOP mode and "RAND" is
displayed and flash.
subdirectory.
)button to play.
button to change the track# during
unit.
read, LCD screen will display the total
) button to select the
page or last page.
LISTEN TO DESIRED TRACK
(2) LCD screen will display "NO DISC", if CD is not in the
(3) When MP3/CD track data has been
)or FR(
(3) Press FF
) button.
) button to start INTRO play
RANDOM PLAY
) to enter its
REPEAT PLAY
Press and hold FF(
track#, press PLAY/PAUSE (
(1) Press POWER ON/ENTER ( )button to turn the power on.
ENTER(
(2) Press PLAY/PAUSE(
from track No.1
(4) Press FR
desired letter.
(1) Press FF
AUTO PLAY
button, to check the directory up.
play.
alternately,time will flash at pause mode.
MP3 MODE
POWER ON
track.
FILE SEARCH ON MP3 MODE
Press FF(
PROG
(c) When desired track is displayed, press PROG. button to set.
When the desired directory shows, press POWER ON/
button to pause on/off
IMPORTANT MP3 CD making tips.
Make sure to use mp3 file extension only when burning CDs.
(2) Press MODE button twice to repeat all tracks.
FR
Press the key once to enter file search mode.
PAUSE
(2)When the voltage is too low, the unit will automatically turn off.
MOVE TO THE DESIRED SPOT
(or FR
) button
(1)During play, press and hold FF
continuously to fast forward (or fast reverse) the current
(1) Press ESP SEARCH key to enter selection mode.
"is displayed when the battery voltage reaches low.
Press PLAY/PAUSE
PROG
1
(1)"
PROGRAM PLAY
(1) TO PROGRAM
REPEAT PLAY
track number.
) button.
check the directory.
play desired track.
Press OFF/STOP ( )button to stop play.
LCD screen will display the last
Or
) button to
classic/jazz/rock/pop.
STOP
Press FR button
(or FR
play the next track (or previous track). The unit will start
or stopping of CD player. LCD will display
RAND
(3) During pause mode, press FF
On folder search mode, press MODE button once to
can simulate various sound. including:flat/
Press ESP button to prevent disruption
(2) Press PLAY/PAUSE(
random order.
button to play previous track.
(2) TO COMPLETE THE PROGRAMMING AND TO PLAY
Press PLAY/PAUSE(
programmed tracks.
) button to start the
Dimension
................................5.1"x 1.1"x 5.5"(WHD)
Weight .................................0.66lbs (Main Unit Only)
Accessories Included ………..Professional Digital Neckband
Stereo Headphones