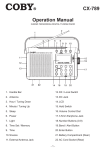
1
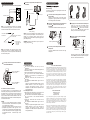
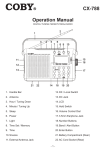
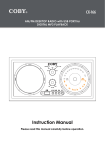
Thank you for selecting the COBY CV-890
Wireless Stereo Headphone System.
Before operating the unit, please read this manual
thoroughly and retain it for future reference, some features
are:
Wireless system that allows you to listen to a program
free from the restriction of a cord.
High fidelity sound reproduction.
A compact transmitter with an AC power adaptor
(supplied) enables simple charging of the headphone
batteries. Just by placing the headphones on the
transmitter, headphone batteries can be charged.
Comfortable Circum-aural headphones with self
adjusting head band.
As power saving feature, the transmitter automatically
turns ON when the audio signal is detected and OFF
when the signal is not received.
Notes on Receiving Performance
The system for this equipment utilizes very high frequency
signals in the 2.4GHz band so the receiving performance
may deteriorate due to the surroundings. Some examples
of conditions that may reduce the possible receiving range
or cause interference with reception.
COBY Customer Service Department
Monday-Friday 8:00 AM - 11:00 PM EST, 1-800-681-2629 or
718-416-3197
Monday-Friday 6:30 PM - 11:00 PM EST, 1-800-727-3592
Saturday-Sunday 9:00 AM - 11:00 PM EST, 1-800-727-3592
Unpacking
Inside a building with walls containing steel beams.
Area with many steel file cabinets, etc.
Area with many electrical appliances capable of
generating electromagnetic noise.
Transmitter is placed on a metal instrument.
Area facing roadways.
Noise or interfering signals exist in the surroundings
due to radio transceivers in trucks, etc.
Noise or interfering signals exist in the surroundings
due to wireless communication systems installed along
roadways.
Battery Caution
Warning
To prevent fire or shock hazard, do not expose the unit
to rain or moisture.
To avoid electrical shock, do not open the cabinet.
Refer servicing to qualified personnel only.
You are cautioned that any changes or modifications not
expressly approved in this manual could void your
authority to operate this equipment.
If you have any questions about this product, you may call:
COBY Customer Service Department
Monday-Friday 8:00 AM - 11:00 PM EST, 1-800-681-2629 or 718416-3197
Monday-Friday 6:30 PM - 11:00 PM EST, 1-800-727-3592
Saturday-Sunday 9:00 AM - 11:00 PM EST, 1-800-727-3592
You can also reach us online at [email protected] or
[email protected]
FCC Rules
This equipment has been tested and found to comply with
the limits for a Class B digital device, pursuant to Part 15 of
the FCC rules. These limits are designed to provide
reasonable protection against harmful interference in a
residential installation. This equipment generates, uses
and can radiate radio frequency energy and, if not installed
and used in accordance with the instructions, may cause
harmful interference to radio communications. However,
there is no guarantee that interference will not occur in a
particular installation. If this equipment does cause
harmful interference to radio or television reception, which
can be determined by turning the equipment off and on, the
user is encouraged to try to correct the interference by one
or more of the following measures:
Reorient or relocate the receiving antenna.
Increase the separation between the equipment and
receiver.
Connect the equipment into an outlet on a circuit
different from that to which the receiver is connected.
Consult the dealer or an experienced radio/TV
technician for help.
Install the batteries
Description
Check that you have the following items when you
open the packaging :
The supplied rechargeable Ni-MH batteries are not
charged from the first time you use them. Be sure to
charge them before use. To charge, the headphones,
place them on the transmitter.
The headband
Turn the battery cover according to the direction
of the arrowhead silk and open it.
Headset leg
Battery cover
Headset cup
Volume UP key
Volume DOWN key
HEADPHONE
TRANSMITTER
Charge contents
BATTERIES
AUDIO LINE
Extra battery
compartment
Audio IN jack
DC IN jack
Insert the supplied rechargeable Ni-MH batteries
into the battery compartment matching the
correct terminals between the batteries and the
compartment.
Close the battery compartment cover according to
the opposite direction of the arrowhead silk .
Charge LED
In Use LED
Connect the supplied AC power adaptor to the
transmitter.
To an AC outlet
AUDIO CONVERSION LINE
AC ADAPTER
AC power
adapter
Channel select button
Power ON/OFF button
To DC IN 9V jack
To reduce the risk of fire or injury to persons, read and
follow these instructions:
For the wireless headphone, use only 3AAA 1.2V
600mAh Nickel Metal Hydride(Ni-MH) batteries (included).
Do not dispose of the batteries in a fire. The cells may
explode. Check with local codes for possible special
disposal instructions.
Do not open or mutilate the batteries. Released
electrolyte is corrosive and may cause damage to the eyes
or skin. It may be toxic if swallowed.
Exercise care in handling batteries in order not to short
the battery with conducting materials such as rings,
bracelets,
and keys. The battery or conductor may
overheat and cause burns.
Do not attempt to rejuvenate the batteries identified for
use with this product by heating them. Sudden release of
the battery electrolyte may occur causing burns or irritation
to eyes or skin.
When inserting batteries into this product, the proper
polarity or direction must be observed. Reverse insertion
of batteries can cause charging, and that may result in
leakage or explosion.
Remove the batteries from this product if the product will
not be used for a long period of time(several months or
more)since during this time the battery could leak in the
product.
Do not store this product ,or the batteries identified for
use with this product, in high temperature areas. Batteries
that are stored in a freezer or refrigerator for the purpose of
extending shelf life should be protected from condensation
during storage and defrosting.
Put the headphone on the
transmitter so that the
headphone's contact meets the
transmitter's contact pin
while making sure that the
charging indicator lights in red.
Charging is completed in about 16
hours and the charging indicator
goes off.
When placing the headphones on
the transmitter, be sure to hold
them level with both hands and
that the right and left housings are
placed straight down on the
transmitter, and then tilt them
back as illustrated above.
The charging hole, and the
headphone's contact is in it
When the indicator does not light in red
Check if the right and left headphones are rested on the
transmitter correctly. The indicator will not light up If the
headphone's contact does not meet the transmitter's
contact pin. Remove the headphones and replace them on
the transmitter again so that the indicator lights in red.
Notes on Batteries
Do not charge the dry battery.
Do not carry a dry battery together with coins or other
metallic objects. It can generate heat if the positive and
negative terminals of the battery accidentally come into
contact with metallic objects.
If you are not going to use the unit for a longtime,
remove the battery to avoid damage from battery
leakage or corrosion.
Setting up the transmitter
Connect the supplied AC power adapter to the
transmitter.
Operating the system
Connect the transmitter to audio/video equipment.
TV set
To connect to LINE OUT
jack
Before listening
To prevent your ears from being damaged, first lower the
volume of headphones.
The wall AC Adapter outlet
VCR
Radio
9V 300mA AC Adapter
To the audio in jack
To DC IN jack
Computer
The audio/video
component
Turn on the audio/video equipment connected to
the transmitter.
Setting the volume control of the audio source
equipment as high as possible but not so high that
the audio signal becomes distorted.
Remove the headphones from the transmitter and
press the
button to turn on the power of
transmitter.
The transmitter's IN USE indicator will light in green.
NOTE: If your audio/video component have right&left
sound track stereo plug system, you can use the audio
connect line and the audio conversion line to connect it.
Polarity of the plug
To the audio in jack
in transmitter
To the audio in jack of the audio
conversion line
To the right/left
sound track in the
audio/video
component
NOTE: Use only the supplied AC power adapter. Do not
use any other AC power adapter. Connect the AC power
adapter to a continuous power supply. Place the
transmitter close the AC outlet so that you can plug the AC
power adapter easily.
WARNING: Charging compartment only and explosion if
charging the dry battery
Turn up the volume to a moderate level with the
volume UP/DOWN button.
Press the volume button
to increase volume
Press the volume button
to decrease volume
The effective areas of the transmitter
The optimum distance is up to approximately 30 feet
without the system picking up some interference. However,
the distance may vary according to the surroundings and
environment. If the system picks up some noise while
using it within the above mentioned distance, reduce the
distance between the transmitter unit and the headphones,
or select another channel.
NOTES:
When you use the headphones inside the effective
areas of the transmitter, the transmitter can be placed
in any direction from the listener.
Even within the signal reception area, there are some
spots(dead spot) where the RF signal can not be
received. This is a characteristic inherent to RF signals,
and does not indicate malfunction. By slightly moving
the transmitter, location of the dead spot can be
changed.
Coupling the code of transmitter and headphone.
Press the volume UP and DOWN button
simultaneously until you hear a low beep sound,
press and hold the
button on the transmitter,
then you will hear a higher beep sound, which
shows you are successful in coupling code.
Select the frequency with the CHANNEL
selector button.
Press the power button
Turn on the power of headphone and put on the
headphones.
NOTE: The transmitter at a frequency that may cause
interference to nearby TVs, Cordless Telephone or other
wireless systems. In such case, place the transmitter away
from the wireless system.
The power ON/OFFswitch
The power ON/OFF switch is located in the right
headphone.
Press the channel
select button
Press the
button on the transmitter to select the
clearest one to provide the best possible reception.
There are 10 channels to be selected.
Troubleshooting
No sound/Muffled sound
Turn on the transmitter first ,then put on the
headphones;
Check the connection of the audio/video equipment or
the AC Power adapter;
Check that the audio/video equipment is turned on;
Turn up the volume on the connected audio/video
equipment, if the transmitter is connected to the
headphones jack;
Change the channel with the CH button on the
transmitter;
The headphone's POWER indicator light is weak or
turned off;
Charge the supplied rechargeable batteries or if the
POWER indicator is still off after charging the
supplied rechargeable batteries, take the
headphones to a COBY dealer for replacement of the
rechargeable battery.
Loud background noise
Move closer to the transmitter. As you move away from
the transmitter, more noise is likely to be heard;
If the transmitter is connected to the headphone's jack,
turn up the volume of the connected audio/video
equipment;
Change the channel with the CH button on the
transmitter;
The headphone's POWER indicator light is weak or
turned off;
Charge the supplied rechargeable batteries or if the
POWER indicator is still off after charging the
supplied rechargeable batteries, take the
headphones to a COBY dealer for replacement of the
rechargeable battery.
WARRANTY
FULL 90 DAYS LIMITED WARRANTY
COBY ELECTRONICS CORP. ( COBY) warrants this product to the original
purchaser to be free from defects in material or workmanship under
normal use for 90 DAYS from the date of original purchase. COBY agrees
at our option under this warranty, to repair or replace it with a new or
reconditioned product at no additional charge. Our warranty , of course,
does not cover any product which has been subject to neglect,
unreasonable use, accident, violation of operating instructions, or any
product that has been repaired or modified by an unauthorized service
agent.
To obtain factory service, return this unit freight-prepaid to the address
shown below
within the duration of this warranty. Enclose $6.00 for each
item in the form of money order made payable to COBY ELECTRONICS
CORP. to cover the cost of postage and handling. Also, include a copy of
the sales receipt to show the proof of purchase and a detailed description
of the problem. The unit(s) must be packaged in such a way as to
reasonably protect it from possible shipping damage. For further
information, email [email protected] or call 1-800-681-2629, 1718-416-3197 or write to :
COBY ELECTRONICS CORP.
Customer Service Dept.
56-65 Rust Street
Maspeth, N.Y. 11378
Coby's liability under any legal theory for any loss or damage in any way
related to this product shall in no event exceed the sales price of this
product. In no event shall COBY be liable for any incidental or
consequential damages resulting from the use of, or inability to use this
product. Repair or replacement as provided under this warranty is the
exclusive remedy of the consumer.
Except to the extent prohibited by law, no express or implied warranty of
merchantability
or fitness for a particular purpose on this product shall
not extend beyond the period of this warranty. Some states prohibit the
exclusion or limitation of incidental or consequential damages, so that the
above limitations or exclusion may not apply to you. This warranty gives
you specific rights, and you may also have other rights which may vary
from state to state.