1
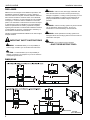
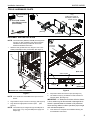
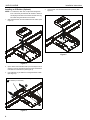
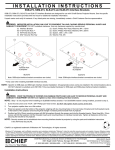
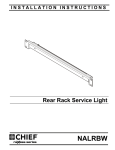
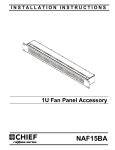
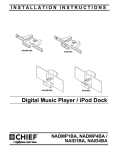
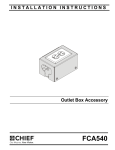
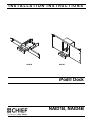
INSTALLATION INSTRUCTIONS
Instrucciones de instalación
Installationsanleitung
Instruções de Instalação
NAID1B
Istruzioni di installazione
Installatie-instructies
Instructions d´installation
NAID4B
iPod® Dock
Spanish Product Description
German Product Description
Portuguese Product Description
Italian Product Description
Dutch Product Description
French Product Description
NAID1B, NAID4B
NAID1B, NAID4B
Installation Instructions
DISCLAIMER
Milestone AV Technologies and its affiliated corporations and
subsidiaries (collectively "Milestone"), intend to make this
manual accurate and complete. However, Milestone makes no
claim that the information contained herein covers all details,
conditions or variations, nor does it provide for every possible
contingency in connection with the installation or use of this
product. The information contained in this document is subject
to change without notice or obligation of any kind. Milestone
makes no representation of warranty, expressed or implied,
regarding the information contained herein. Milestone assumes
no responsibility for accuracy, completeness or sufficiency of
the information contained in this document.
WARNING: Failure to read, thoroughly understand, and
Chief® is a registered trademark of Milestone AV Technologies.
All rights reserved.
WARNING: Never operate this mounting system if it is
IMPORTANT SAFETY INSTRUCTIONS!
WARNING: A WARNING alerts you to the possibility of
follow all instructions can result in serious personal injury,
damage to equipment, or voiding of factory warranty! It is the
installer’s responsibility to make sure all components are
properly assembled and installed using the instructions
provided.
WARNING: Use this mounting system only for its intended
use as described in these instructions. Do not use
attachments not recommended by the manufacturer.
damaged. Return the mounting system to a service center for
examination and repair.
WARNING: Do not use this product outdoors.
--SAVE THESE INSTRUCTIONS--
serious injury or death if you do not follow the instructions.
CAUTION: A CAUTION alerts you to the possibility of
damage or destruction of equipment if you do not follow the
corresponding instructions.
DIMENSIONS
NAID1B
19.00
482.6
NAID4B
7.00
177.8
DIMENSIONS: INCHES
[MILLIMETERS]
2
Installation Instructions
NAID1B, NAID4B
TOOLS / HARDWARE / PARTS
tools/hardware
required
B (1)
[USB power supply &
US adapter, cables and
remote control]
(4) 10-32 x 3/4" header
point Phillips screws
(not included)
A (1)
[NAID1B]
C (6)
[cable ties]
A (1)
[NAID4B]
ASSEMBLY AND INSTALLATION
NOTE: The iPod® docks (NAID1B, NAID4B) are designed for
use with 19" wide equipment racks. See the specific
installation instructions provided with the rack for
additional installation information.
1.
(NAID1B shown)
2
(A)
30-pin
connector
for iPod®
6
Attach the dock (A) within the rack, using four 10-32 x 3/4"
header point Phillips screws (not included). (See Figure 1)
5
(A)
4
(C)
5
5
(Rear view)
(A)
Audio out jack
USB jack
1
3
x4
Video out jack
(Rear view)
(NE1F2023 rack shown with NAID1B)
Figure 2
Figure 1
NOTE: Push iPod® dock drawer IN to both open and close
drawer.
2.
Plug iPod® into 30 pin connector in dock (A). (See Figure 2)
3.
Plug cables into appropriate connection point.
Figure 2)
(See
NOTE: The iPod® may be charged through the USB jack on
back of dock, or by using the USB power supply and
adapter (B).
4.
Fully extend drawer and leave it open. (See Figure 2)
5.
Use cable tie loops (C) as desired for strain relief and to
manage cables. (See Figure 2)
IMPORTANT ! : If cables are tied down while the drawer
is shut, cables may be disconnected or damaged when
drawer is opened! Make sure drawer is fully extended
when securing cables in order to provide a proper length
and unhindered operation.
6.
Close drawer and complete the installation following the
rack installation instructions.
3
NAID1B, NAID4B
Installation Instructions
4.
Installing an IR Emitter (Optional)
NOTE: For a discrete, clean look, a space was designed in
Close drawer and reinstall iPod® dock to drawer. (See
Figure 5)
front of the dock yet behind the IR window to allow for
a third party IR emitter to be installed. Emitter wire may
be routed along the side and out the back.
1.
(NAID1B shown)
With drawer closed, remove iPod® dock from drawer. (See
Figure 3)
(NAID1B shown)
3
1
Figure 5
Figure 3
2.
Open drawer and install IR Emitter (not included) to front of
drawer or on front of iPod® dock sensor as per IR Emitter’s
manufacturer’s instructions. (See Figure 4)
3.
Use cable ties (C) as desired to manage IR Emitter cable.
(See Figure 4)
(NAID1B shown)
2 IR emitter (not included)
4
2
3
Figure 4
4
Installation Instructions
NAID1B, NAID4B
5
NAID1B, NAID4B
6
Installation Instructions
Installation Instructions
NAID1B, NAID4B
7
NAID1B, NAID4B
Installation Instructions
USA/International
Europe
Chief Manufacturing, a products division
of Milestone AV Technologies
8800-002206 Rev00
2012 Milestone AV Technologies, a
Duchossois Group Company
www.chiefmfg.com
09/12
Asia Pacific
A
P
F
A
P
F
A
6436 City West Parkway, Eden Prairie, MN 55344
800.582.6480 / 952.225.6000
877.894.6918 / 952.894.6918
Franklinstraat 14, 6003 DK Weert, Netherlands
+31 (0) 495 580 852
+31 (0) 495 580 845
Office No. 1 on 12/F, Shatin Galleria
18-24 Shan Mei Street
Fotan, Shatin, Hong Kong
P 852 2145 4099
F 852 2145 4477