1
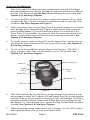
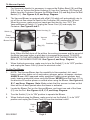
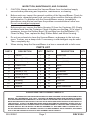
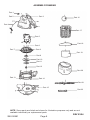
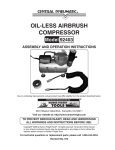
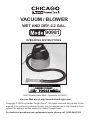
VACUUM / BLOWER
WET AND DRY-2.2 GAL.
90981
OPERATING INSTRUCTIONS
3491 Mission Oaks Blvd., Camarillo, CA 93011
Visit our Web site at http://www.harborfreight.com
Copyright © 2003 by Harbor Freight Tools®. All rights reserved. No portion of this
manual or any artwork contained herein may be reproduced in any shape or form
without the express written consent of Harbor Freight Tools.
For technical questions and replacement parts, please call 1-800-444-3353
Specification
ITEM
Electrical Requirements
Holding Capacity
Flex Hose Dimensions
Overall Dimensions
Weight
DESCRIPTION
120V / 60 Hz
1.5 Peak Horsepower
Double Insulated, Fan Cooled Motor
2.2 Gallons
1-5/8” diameter X 56-3/4” Long
11-1/4”W X 14-1/4”L X 14-3/4”H
7.0 Lbs.
Warning: For Indoor Use Only
Save This Manual
You will need the manual for the safety warnings and precautions, assembly
instructions, operating and maintenance procedures, parts list and diagram. Keep
your invoice with this manual. Write the invoice number on the inside of the front
cover. Keep the manual and invoice in a safe and dry place for future reference.
Safety Warnings and Precautions
WARNING: When using this product, basic safety precautions should always
be followed to reduce the risk of personal injury and damage to equipment.
Read all instructions before using this product!
1.
Keep work area clean. Cluttered areas invite injuries.
2.
Keep children away. Do not allow children to use this product. The Vacuum/
Blower is not a toy.
3.
Store idle equipment. When not in use, keep this product in a dry location to
inhibit rust. Always lock up tools and equipment and keep out of reach of
children.
4.
Do not use this product if under the influence of alcohol or drugs. Read
warning labels on prescriptions to determine if your judgment or reflexes are
impaired while taking drugs. If there is any doubt, do not attempt to use this
product.
5.
Dress properly. Do not wear loose clothing or jewelry as they can be caught
in moving parts. Nonskid footwear are recommended when working. Wear
restrictive hair covering to contain long hair.
6.
Maintain this product with care. Keep tools clean and dry for better
performance.
SKU 90981
Page 2
7.
Do not overreach. Keep proper footing and balance at all times.
8.
Always use protection. Wear ANSI approved safety impact eye glasses
when using this product. ANSI approved safety impact eye glasses are
available from Harbor Freight Tools.
9.
When necessary, use hearing and breathing protection. Wear ANSI
approved hearing protectors when using the Vacuum/Blower for extended
time periods or using it in a noisy work area. For dusty operations, wear an
ANSI approved dust mask. ANSI approved hearing protectors and ANSI
approved dust masks are available from Harbor Freight Tools.
10. Industrial Applications must follow OSHA requirements.
11. Stay Alert. Watch what you are doing at all times. Use common sense.
Do not use this product when you are tired or distracted from the job at
hand.
12. Check for damaged parts. Before using any tool, any part that appears
damaged should be carefully checked to determine that it will operate
properly and perform its intended function. Check for damaged parts and any
other condition that may affect proper operation. Any part that is damaged
should be properly repaired or replaced by a qualified technician. Do not use
the tool if any switch does not turn On and Off properly.
13. Replacement parts and accessories. When servicing, use only identical
replacement parts. Use of any other parts will void the warranty. Only use
accessories intended for use with this tool. Approved accessories are
available from Harbor Freight Tools.
14. Use proper size and type extension cord. If an extension cord is required,
it must be of the proper size and type to supply the correct current to the tool
without heating up. Otherwise, the extension cord could melt and catch fire, or
cause electrical damage to the tool.
15. Maintenance. For your safety, maintenance should be performed regularly
by a qualified technician.
16. Use the right tool for the job. Do not attempt to force a small tool or
attachment to do the work of a larger industrial tool. There are certain
applications for which this tool was designed. Do not modify this tool and do
not use this tool for a purpose for which it was not intended.
SKU 90981
Page 3
SPECIFIC PRODUCT WARNINGS AND PRECAUTIONS
1.
DO NOT SUBMERGE THE MOTOR HOUSING (3) IN WATER OR OTHER
LIQUIDS.
2.
Guard against Electric Shock. Always prevent body contact with grounded
surfaces such as pipes, radiators, ranges, refrigerators, etcetera. Do not handle
any part of the Vacuum/Blower with wet hands when the unit is plugged in to its
electrical supply source. To comply with the National Electric Code (NFPA70),
and to provide additional protection from the risk of electrical shock, this
Vacuum/Blower should only be connected to a receptacle that is protected by a
Ground Fault Circuit Interrupter (GFCI).
3.
Reduce the Risk of fire and/or explosion. Sparks inside the Motor assembly
can ignite flammable vapors, liquids, and dust. Do not use the Vacuum/Blower
in the presence of any flammable, combustible, or explosive substances.
4.
Avoid hazardous vapors and dusts. Never use the Vacuum/Blower in the
presence of toxic materials.
5.
Do not use the Vacuum/Blower as a sprayer. Do not use to groom
animals.
6.
Do not vacuum any material that is burning or smoking, such as hot ashes,
lit cigarettes, etcetera. Avoid vacuuming ashes all together.
7.
Warning: People with pacemakers should consult with their physician(s) before
using this product. Operation of equipment in close proximity to a heart
pacemaker could cause interference or failure of the pacemaker.
8.
Warning: This product contains or produces a chemical known to the State of
California to cause cancer and birth defects (or other reproductive harm).
(California Health & Safety Code 25249.5 et seq.)
Unpacking
When unpacking, check to make sure the following parts (shown on page 7) are
included. If any parts are missing or broken, please call Harbor Freight Tools at the
number on the cover of this manual.
Operation
Note: For additional references to the parts listed below, refer to the Parts List and
Assembly Diagram on pages 7 and 8 of the manual.
SKU 90981
Page 4
To Vacuum Dry Materials:
1.
Note: A dry bag (19) is necessary when vacuuming dry material. If the Bag is
wet when vacuuming dry material, the Bag will clog quickly and become difficult
to clean. If the Bag is wet, dry the Bag before performing dry vacuuming. See
Figures A, B, and Assy. Diagram.
2.
To remove the Motor Housing (3) in order to empty the Container (20), or clean
or replace the Bag (19), pull outward on the latches located on each side of the
Container. See Assy. Diagram and Figure C.
3.
When vacuuming, make sure the Bag (19) is in the proper position to avoid leaks
an/or damage to the Vacuum/Blower. Check to make sure the Bag completely
covers the Ball Basket (17) and that the Rubber Band (18) is as close to the
Worm Cover (13) as possible. Any leaks will allow the vacuumed material to be
blown out of the blower port and back into the surrounding environment. See
Figures A, B, and assy. Diagram.
4.
To use the vacuum, insert the Hose (21) into the Vacuum Port. If necessary, you
may place the Hose Attachment (22) over the end of the Hose. See Figures A,
B, and Assy. Diagram.
5.
To turn on the Vacuum/Blower, plug the Power Cord (4) into a 110V-120V, 3prong, electrical outlet. Then, turn the Switch (1) to its “ON” position. See
Figures A, B, and Assy. Diagram.
Motor Housing (3)
Switch (1)
Power
Cord (4)
Vacuum
Port
Blower Port
Ball Basket (17)
Ball (16)
Figure A
6.
Note: When vacuuming very fine dust, or a large amount of dry material, it may
be necessary to empty the Container (20) and replace Bag (19) at more frequent
intervals. To do so, remove the Motor Housing (3) from the Container (20). Empty
all debris from the Container. Remove the Rubber Band (18) and Bag from the
Ball Basket (17). Clean the Bag. Then, replace the Bag, Rubber Band, and Motor
Housing. See Figures A, B, and Assy. Diagram.
7.
When finished vacuuming, make sure to turn the Switch (1) to its “OFF” position
and unplug the Power Cord (4) from the electrical outlet.
SKU 90981
Page 5
REV 03/04
To Vacuum Liquids:
1.
For Vacuuming liquids it is necessary to remove the Rubber Band (18) and Bag
(19). To do so, remove the Motor Housing (3) from the Container (20). Empty all
debris from the Container. Remove the Rubber Band (18) and Bag from the Ball
Basket (17). See Figures A, B, and Assy. Diagram.
2.
The Vacuum/Blower is equipped with a Ball (16) which will automatically rise to
cut off the air flow when the liquid in the Container (20) reaches the full level.
When this occurs, make sure your hands and feet are dry, turn “OFF” the
Vacuum/Blower at Switch (1), unplug the Power Cord (4), and empty the
Container. See Figure B and C.
Motor Housing (3)
Switch (1)
Hose
(21)
Power
Cord (4)
Vacuum
Port
Blower Port
Container (20)
Bag (19)
Figure C
Figure B
Note: When the Ball shuts off the airflow, the suction increases and the sound of
the Motor becomes higher in pitch due to increased Motor speed. TO AVOID
DAMAGE TO THE VACUUM/BLOWER, DO NOT RUN THE MOTOR WITH THE
BALL IN THE RAISED POSITION. See Figure A, and Assy. Diagram.
3.
When finished vacuuming, make sure to turn the Switch (1) to its “OFF” position
and unplug the Power Cord (4) from the electrical outlet.
To Use The Blower
1.
NOTE: The Vacuum/Blower has the capability to blow sawdust, dirt, sand,
leaves, and other debris out of work areas, garages, patios, driveways, etcetera.
ALWAYS wear ANSI approved safety equipment (safety impact glasses, dust
mask, hearing protection) when using the Blower. NEVER point the Hose (21) in
the direction of another person or animal when using the Blower. See Figures A,
B, C, and Assy. Diagram. Note: Make certain that the vacuum is clean so that
there will be no dust ejected when the blower is activated.
2.
Locate the Blower Port on the Vacuum/Blower, and insert one end of the Hose
(21) into the Port. See Figures A, B, C, D, and Assy. Diagram.
3.
Turn the Switch (1) to its “ON” position to operate the Blower.
4.
When finished using the Blower, make sure to turn the Switch (1) to its “OFF”
position and unplug the Power Cord (4) from the electrical outlet.
Switch
(1)
Blower
Port
SKU 90981
Figure D
Page 6
INSPECTION, MAINTENANCE, AND CLEANING
1.
CAUTION: Always disconnect the Vacuum/Blower from its electrical supply
source before performing and inspection, maintenance, or cleaning.
2.
Before each use, inspect the general condition of the Vacuum/Blower. Check for
broken parts, damaged power cord, and any other condition that may affect its
safe operation. If a problem with the Vacuum/Blower occurs, immediately
discontinue using the tool and have the problem corrected before further use.
Do not use damaged equipment.
3.
Before each use, remove the Motor Housing (3) from the Container (20). Empty
all debris/liquid from the Container. Check to make sure the Bag (19) is clean. If
necessary, remove the Rubber Band (18) and Bag from the Ball Basket (17).
Clean the Bag. Then, replace the Bag, Rubber Band, and Motor Housing.
4.
Do not use solvents to clean the Vacuum/Blower, as damage to the tool may
occur. To clean, use a damp cloth. If necessary, a mild detergent may be used.
Then, completely dry.
5.
When storing, keep the Vacuum/Blower in a box or covered with a cloth cover.
PARTS LIST
PART #
DESCRIPTION
QTY
PART #
DESCRIPTION
QTY
1
Switch
1
12
Screw Cap
1
2
Screw (5 x 18)
7
13
Worm Cover 8mm
1
3
Motor Housing
1
14
Screw (4 X 18)
6
4
Power Cord
1
15
Stator
1
5
Motor
1
16
Ball
1
6
Screw (3 x 8)
4
17
Ball Basket
1
7
Screw (4 x 16)
2
18
Rubber Band
1
8
Motor Fixer
1
19
Bag
1
9
Bushing
1
20
Container
1
10
Impeller
1
21
Hose
1
11
Washer
1
22
Hose Attachment
1
PLEASE READ THE FOLLOWING CAREFULLY
THE MANUFACTURER AND/OR DISTRIBUTOR HAS PROVIDED THE PARTS DIAGRAM IN THIS
MANUAL AS A REFERENCE TOOL ONLY. NEITHER THE MANUFACTURER NOR DISTRIBUTOR MAKES
ANY REPRESENTATION OR WARRANTY OF ANY KIND TO THE BUYER THAT HE OR SHE IS QUALIFIED TO
MAKE ANY REPAIRS TO THE PRODUCT OR THAT HE OR SHE IS QUALIFIED TO REPLACE ANY PARTS OF
THE PRODUCT. IN FACT, THE MANUFACTURER AND/OR DISTRIBUTOR EXPRESSLY STATES THat ALL
REPAIRS AND PARTS REPLACEMENTS SHOULD BE UNDERTAKEN BY CERTIFIED AND LICENSED TECHNICIANS AND NOT BY THE BUYER. THE BUYER ASSUMES ALL RISK AND LIABILITY ARISING OUT OF
HIS OR HER REPAIRS TO THE ORIGINAL PRODUCT OR REPLACEMENT PARTS THERETO, OR ARISING
OUT OF HIS OR HER INSTALLATION OF REPLACEMENT PARTS THERETO.
SKU 90981
Page 7
REV 03/04
ASSEMBLY DRAWING
Part 1
Part 2
Part 3
Part 16
Part 4
Part 17
Part 5
Part 18
Part 6
Part 7
Part 8
Part 19
Part 9
Part 10
Part 11
Part 12
Part 20
Part 13
Part 14
Part 21
Part 15
Part 22
NOTE: Some parts are listed and shown for illustration purposes only and are not
available individually as replacement parts.
SKU 90981
Page 8
REV 03/04