1
SF-4900ER
SF-4980ER
SF-4985ER
User’s Guide
E
CASIO ELECTRONICS CO., LTD.
Unit 6, 1000 North Circular Road
London NW2 7JD, U.K.
IMPORTANT!
Veuillez conserver votre manuel et toute information pour une
référence future.
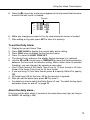
Before using the unit for the first time
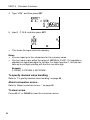
Use the following procedure to load batteries and reset the unit before using it for
the first time.
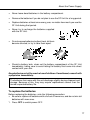
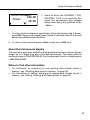
1. Slide the battery compartment cover in the direction indicated by the arrow.
RESET
2. Slide the battery switch to the “REPLACE 1” setting.
REPLACE
RESET
NORMAL
3. Slide the battery holder in the direction indicated by the arrow in the
illustration.
Battery holder
1
Before using the unit for the first time
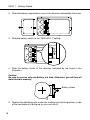
4. Load the new battery into the battery compartment, making sure that the
positive (+) side of the new battery is facing up (so you can see it).
5. Slide the battery holder back to its original position as indicated by the arrow
in the illustration.
Battery holder
6. Slide the battery switch to the “REPLACE 2, 3” setting and repeat steps 3
through 5 for the other batteries.
• Be sure to load all three batteries, using CR2032 lithium batteries only. Never
mix old batteries with new ones.
7. Slide the battery switch to the “NORMAL” setting.
• You will not be able to turn the unit on if the battery switch is not in the
“NORMAL” setting.
8. Replace the battery compartment cover.
9. Press ON to switch power on.
• At this time, one of the following messages appears on the display.
A
•
•
B
If Message B appears, skip step 10 and continue from step 11.
If these messages do not appear, open the battery compartment and press
the RESET button. And then skip step 10 and continue from step 11.
10. Use H to move the highlighting to YES, and press SET.
• This causes Message B to appear on the display.
11. Use H to move the highlighting to YES, and press SET.
• After the RESET operation is complete, the LANGUAGE screen appears on
the display.
12. Use the procedure under “To select the system language” on page 5 to select
a system language.
13. Check the Home Time setting and make changes if necessary (page 71).
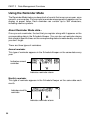
2
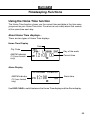
About the EL backlight
About the EL backlight
•
•
This unit is equipped with an EL backlight that allows easy viewing of display
contents in a theater, or anywhere else where lighting is dim.
Note, however, that frequent or extended use of the EL backlight shortens
battery life.
The following shows how backlight use affects battery life under controlled test
conditions.*
Backlight Operation
Battery Life
3 minutes per hour
Approximately 45 hours
15 minutes per hour
Approximately 25 hours
* Test Conditions
• “Battery Life” is the number of hours before battery failure when the unit is left
on with 5 minutes of a processing operation and 55 minutes of continuous
display only (no processing operation) per hour, plus the backlight operation
described below.
• “Backlight Operation” is the number of minutes the backlight is turned on per
hour during the display only (no processing operation) period.
Important!
The EL backlight may fail to operate when battery power is low, in order to
conserve remaining battery power and protect data stored in memory.
3
Introduction SF-4900ER/SF-4980ER/SF-4985ER
Introduction
SF-4900ER/SF-4980ER/SF-4985ER
Congratulations on your selection of CASIO’s new SF-4900ER/SF-4980ER/
SF-4985ER (referred to as SF Unit in this manual). This innovative new personal
data management tool features a selection of powerful functions, including:
•
•
•
•
•
•
•
•
•
•
•
•
Telephone Directory
Memo Mode
Schedule Keeper
To Do Mode
Expense Mode
Reminder Mode
Calendar
Clock with Home Time and World Time functions
Calculator
Conversion Mode
Secret Function
Data Communication
Functions are specially designed to be easy to understand and use, making your
personal data management easier than ever before.
•
All data stored in memory is erased if the SF Unit should malfunction, when
you have it repaired, when the batteries go dead, and whenever you remove
the batteries. Be sure to make written back up copies of all important
data.
•
•
•
4
CASIO COMPUTER CO., LTD. assumes no responsibility for any
damage or loss resulting from the use of this manual.
CASIO COMPUTER CO., LTD. assumes no responsibility for any loss
or claims by third parties which may arise through the use of the SF Unit.
CASIO COMPUTER CO., LTD. assumes no responsibility for any
damage or loss caused by deletion of data as a result of malfunction,
repairs, or battery replacement. Be sure to back up all important data
on other media to protect against its loss.
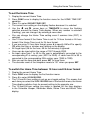
Multiple Language Capability
Multiple Language Capability
Your SF unit is capable of producing messages in any one of five different
languages (English, German, French, Italian, Spanish). Use the following
procedure to select the language you want.
To select the system language
1. Press ON to switch power on.
2. Enter the Telephone Directory Mode.
• You could enter Memo, Reminder, Schedule Keeper, To Do, Expense,
Calendar, Home Time, World Time or Conversion here.
3. Press FUNC three times to display the third function menu.
• In the Calendar, Home Time, World Time or Conversion mode, press FUNC
twice.
• In the Expense Mode, press FUNC four times.
4. Press 1 to select LANGUAGE.
• The above operation causes a list of five languages to appear on the display.
The language that is currently selected is highlighted on the display.
5. Select the language you want to use.
• You can directly specify a language by pressing the number key that
corresponds to the language you want to use.
•
You can also select a language by using K or L, to move the highlighting
around the menu until the language you want to use is highlighted. Each
time you move the highlighting, the title LANGUAGE (1–5) at the top of the
screen changes to the language that is currently highlighted.
5
Introduction SF-4900ER/SF-4980ER/SF-4985ER
6. While the language you want to use is selected (highlighted), press SET.
• To exit the language-selection menu without changing the current language,
press ESC.
• The system language automatically changes to English whenever you
perform the RESET operation (page 19).
About this manual...
This manual is divided into 7 parts.
PART 1
Getting Started
Be sure to read this part of the manual before doing anything else! It includes
important information that you need to know in order to use the SF Unit
correctly.
PART 2
Operation Reference
This part of the manual gives you more detail about the fundamental
operation of the SF Unit. It provides all of the detail you need to help you use
the SF Unit to its full potential. It also helps you to get acquainted with the keys,
features, and functions of the SF Unit. It tells you where everything is located,
what the display indicators mean how to adjust the display contrast, and other
important information.
PART 3
Data Management Functions
This part of the manual details the versatile data management functions of
the SF Unit. It describes the procedures required for data storage, recall and
editing in the Telephone Directory, the Memo Mode, the Schedule Keeper, the
To Do Mode, the Expense Mode, and the Reminder.
PART 4
Timekeeping Functions
Your SF Unit includes powerful timekeeping functions that help to keep
you on time all the time. The Home Time function lets you set the current time
for your home, specifying 12-hour or 24-hour format, standard time or summer
time, even your hometown name. The World Time function gives you instant
access to the current time in any one of 29 time zones around the globe.
6
Manual conventions
PART 5
Calculator Functions
The SF Unit also gives you the capability to perform all of the mathematical
operations available on today’s calculators. In addition, you also get an
innovative date calculation function that makes it possible to perform addition
and subtraction operations that involve dates.
Conversion modes describe functions for converting between three national
currencies, or between euros and national currencies.
PART 6
Data Communications
The data communications capabilities of the SF Unit let you transfer data
between two SF Units, between the SF Unit and the CASIO CSF Unit or NX Unit,
or between the SF Unit and a personal computer.
PART 7
Technical Reference
This part of the manual provides technical information on troubleshooting,
user maintenance, specifications, etc.
Manual conventions
This manual uses the following conventions when mentioning key operations
and functions within text.
•
Keys are indicated using upper-case bold characters LIKE THESE.
•
When a key has more than one function, only the function under discussion
at that time will be noted. With the ON/CLEAR key, for example, ON will be
used to indicate switching the SF Unit on, while CLEAR will be used to indicate
the clear operation.
•
Text that appears on the display of the unit is represented in this manual using
a font that is different from the explanatory text. The display text “NAME?” for
example represented as: NAME?.
•
Note that operation of this unit’s SHIFT key is different from that normally
found on a computer’s keyboard. For the operation SHIFT CLEAR, for
example, you should not hold down the SHIFT key while you press CLEAR.
Instead, you should press and then release the SHIFT key, and then press the
CLEAR key.
7
Introduction SF-4900ER/SF-4980ER/SF-4985ER
Contents
Before using the unit for the first time ........................................ 1
About the EL backlight ............................................................................... 3
Introduction – SF-4900ER/SF-4980ER/SF-4985ER ..................... 4
Multiple Language Capability ......................................................................... 5
About this manual... ....................................................................................... 6
Manual conventions ....................................................................................... 7
PART 1 – Getting Started ........................................................... 13
Read this first! .............................................................................................. 13
Make back up copies of important data! ...................................................... 13
About the “ARE YOU USING.....” and “CLEAR MEMORY.....” messages… 13
General Precautions .................................................................................... 15
About the Power Supply .............................................................................. 15
Low Battery Message .............................................................................. 16
Battery Precautions ................................................................................. 16
To replace the batteries ........................................................................... 17
Resetting the SF Unit’s Memory .................................................................. 19
To reset the SF Unit’s memory ................................................................ 19
PART 2 – Operation Reference .................................................. 21
General Guide ............................................................................................ 21
Setting Up the SF Unit ............................................................................... 21
To switch power on and off ...................................................................... 21
About the Auto Power Off function... ....................................................... 22
To turn on the EL backlight ...................................................................... 22
To adjust the display contrast .................................................................. 22
To select a mode ..................................................................................... 23
To check the memory status ................................................................... 24
To use the FUNCTION key ..................................................................... 24
About the SOUND menu... ...................................................................... 25
To switch the key input and alarm tones on and off ................................ 25
About alarm types .................................................................................... 25
Inputting Letters, Numbers and Symbols ................................................
To input letters and numbers ...................................................................
To input upper-case letters ......................................................................
To shift the keyboard ...............................................................................
To input accented characters ..................................................................
To input other symbols ............................................................................
8
26
27
27
27
27
28
Contents
To correct, delete or insert characters ..................................................... 28
Date and time input ................................................................................. 29
PART 3 – Data Management Functions .................................... 30
To enter a mode ........................................................................................... 30
About display formats .................................................................................. 30
Using the Telephone Directory ................................................................. 32
About Telephone Directory data items and data entries... ...................... 32
Inputting Telephone Directory data ......................................................... 32
To change a FREE entry label ................................................................ 34
Where to find other information ............................................................... 34
Using the Memo Mode ............................................................................... 35
To input Memo Mode data ....................................................................... 35
To insert a new Memo Mode data item between two items in memory ... 35
Where to find other information ............................................................... 36
Using the Calendar .................................................................................... 37
To display the calendar ........................................................................... 37
To scroll through calendars ..................................................................... 37
About the date cursor... ........................................................................... 37
To specify a month for display in the Calendar Mode ............................. 38
To specify a month and date for display in the Calendar Mode .............. 38
To highlight and unhighlight specific dates .............................................. 38
To highlight days of the week for multiple months ................................... 38
To unhighlight all dates in a specific month ............................................. 39
To unhighlight all dates up to a specific month ........................................ 40
Using the Schedule Keeper ...................................................................... 41
To enter the Schedule Keeper ................................................................. 41
To specify a date ..................................................................................... 41
About Schedule Keeper data and initial displays... ................................. 41
To input Schedule Keeper data ............................................................... 42
Using Schedule Alarms ........................................................................... 43
To set a schedule alarm when inputting data .......................................... 43
To set or change a schedule alarm for an existing data entry ................. 44
To view a data entry's current schedule alarm setting ............................. 44
To delete a specific schedule alarm ........................................................ 44
Where to find other information ............................................................... 45
Using the Expense Mode .......................................................................... 46
Before using the Expense Mode ............................................................. 46
About Expense Mode data items and data entries... ............................... 46
9
Introduction SF-4900ER/SF-4980ER/SF-4985ER
10
About Expense Mode Display formats ....................................................
To enter the Expense Mode ....................................................................
To edit labels ...........................................................................................
To specify a date .....................................................................................
To input Expense Mode data ...................................................................
To change the amount type .....................................................................
To calculate expense totals for a specific period .....................................
About the total amount display ................................................................
Where to find other information ...............................................................
46
47
48
49
49
50
51
53
53
Using the To Do Mode ...............................................................................
To input To Do Mode data .......................................................................
About the To Do list .................................................................................
To insert a new To Do item between two existing items .........................
To check and uncheck To Do items ........................................................
54
54
54
54
55
Using the Reminder Mode .........................................................................
About Reminder Mode data... ..................................................................
Inputting reminder data ............................................................................
About Reminder Alarms... .......................................................................
To set a Reminder Alarm when inputting data ........................................
To switch Reminder Alarms on and off ....................................................
Where to find other information ...............................................................
56
56
57
58
58
58
58
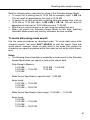
Recalling data stored in memory .............................................................
To locate data using index search ...........................................................
To locate data using initial character search ...........................................
To locate data using mode search ..........................................................
59
59
59
61
Editing, Deleting and Copying data .........................................................
To edit a data item ...................................................................................
To delete a single data item ....................................................................
To delete all data items in a mode ...........................................................
To delete multiple data items in the Schedule Keeper Mode or
Expense Mode ....................................................................................
To move a Schedule Keeper data to a different date ..............................
To move an Expense Mode data item to a different date ........................
To copy a data item .................................................................................
62
62
62
63
Using the Secret function .........................................................................
To create a secret memory area .............................................................
To enter an existing secret memory area ................................................
To edit an existing password ...................................................................
To transfer data from the open memory area to the secret memory
area .....................................................................................................
66
66
67
67
63
64
64
65
68
Contents
To transfer data from the secret memory area to the open memory
area ..................................................................................................... 68
PART 4 – Timekeeping Functions ............................................. 69
Using the Home Time function ................................................................. 69
About Home Time displays... ................................................................... 69
To display the Home Time ....................................................................... 70
To set the Home Time zone .................................................................... 70
To set the Home Time ............................................................................. 71
To switch the Home Time between 12-hour and 24-hour format ............ 71
To switch the Home Time between standard and daylight saving time ... 72
To edit a city code name ......................................................................... 72
To set the Daily Alarm ............................................................................. 73
About the daily alarm... ............................................................................ 73
To select the date format ......................................................................... 74
Using the World Time function ................................................................. 75
To display the World Time ....................................................................... 75
To set the World Time zone .................................................................... 75
To switch a World Time zone between standard and daylight
saving time .......................................................................................... 75
To edit a city code name ......................................................................... 75
City Code List .......................................................................................... 76
PART 5 – Calculator Functions ................................................. 77
Using the Calculator .................................................................................. 77
To enter the Calculator Mode .................................................................. 77
About the Calculator Mode keys... ........................................................... 77
To perform calculations ........................................................................... 79
To perform constant calculations ............................................................. 80
To correct errors in calculations .............................................................. 80
About calculation errors... ........................................................................ 80
To clear errors ......................................................................................... 81
Performing date calculations .................................................................... 81
To calculate the number of days between two dates .............................. 81
To calculate the date that is a specific number of days after
another date ........................................................................................ 82
Using the General Conversion Mode .......................................................
To enter the General Conversion Mode ..................................................
To set an exchange rate ..........................................................................
To view the current General Conversion Mode rates ..............................
83
83
83
85
11
Introduction SF-4900ER/SF-4980ER/SF-4985ER
To perform a currency conversion ...........................................................
To change the currency name and rate ...................................................
To specify decimal value handling ...........................................................
About conversion errors... .......................................................................
To clear errors .........................................................................................
86
87
88
89
89
Using the Euro Conversion Mode ............................................................
To enter the Euro Conversion Mode .......................................................
To view the euro conversion rate table ....................................................
To perform the currency conversion ........................................................
To change the currency name and rate ...................................................
To specify decimal value handling ...........................................................
About conversion errors... .......................................................................
To clear errors .........................................................................................
90
90
91
92
93
94
94
94
PART 6 – Data Communications ............................................... 95
About data compatibility ...........................................................................
Setting Up for Data Communications ......................................................
To connect the SF-4900ER/SF-4980ER/SF-4985ER to another
SF Unit (or CSF Unit/NX Unit) .............................................................
Performing data communications between an SF Unit and a personal
computer .............................................................................................
To set the SF Unit hardware parameters ................................................
About communications parameters... ......................................................
To set up the SF Unit to receive data ......................................................
Sending Data ............................................................................................
About data transfer types... ...................................................................
To send all data items ...........................................................................
To send one Telephone Directory, Memo Mode, To Do Mode,
or Reminder Mode item .....................................................................
To send one Schedule Keeper or Expense Mode entry ........................
To send one month of Calendar data (highlights) .................................
To send all Telephone Directory, Memo Mode, To Do Mode,
or Reminder Mode data ....................................................................
To send all Schedule Keeper or Expense Mode data in a specific period ....
To send all Calendar data in a specific period .......................................
95
96
96
97
98
98
99
100
100
101
102
102
103
103
104
105
PART 7 – Technical Reference ................................................ 106
Keys ..........................................................................................................
Storage Capacity ......................................................................................
Auto Sort Sequence .................................................................................
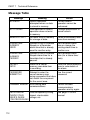
Message Table .........................................................................................
Specifications ...........................................................................................
12
106
109
111
112
114
PART 1
Getting Started
Read this first!
You must be familiar with the following information in order to use the SF Unit
correctly. It tells you what to do in order to avoid losing important data stored
in memory. Please be sure to read the following before using the SF Unit!
Make back up copies of important data!
Your SF Unit employs electronic memory, which makes it possible to store
large volumes of data and to recall stored data quickly and easily. Data is
retained as long as power is supplied by the batteries. This means that should
batteries go dead, or if you make a mistake while replacing batteries, the data
stored in memory may be damaged or lost entirely. Data contents can also be
damaged or lost due to strong electrostatic charge, strong impact, or extremes
in temperature and humidity.
All of this means that you should make back up copies of important data in a
notebook in case any of the above conditions occur.
About the “ARE YOU USING.....” and “CLEAR
MEMORY.....” messages…
Whenever you turn on the power of the SF Unit, it performs a self-check before
beginning operation. If a problem is discovered during the self-check, the SF Unit
displays one of the following messages.
A
B
Note
• The above messages always appear in English, regardless of the system
language setting.
13
PART 1 Getting Started
If this is the first time you ever turned on the SF Unit…
Perform the RESET procedure under “Before using the unit for the first time” on
page 1, starting from step 9.
If this is not the first time you are using the SF Unit...
There is probably a problem with the data in memory (data error). Note that once
data is lost it cannot be recovered. Such data errors are generally caused by one
of the following problems.
•
•
•
Interruption of battery power.
Severe electrostatic charge, impact, change in temperature, or change in
humidity.
Hardware problem.
After a data error is discovered, you will not be able to input or edit data. In order
to return memory to normal (allowing further input and editing of data), you must
perform the RESET operation to clear the memory of all data. Before doing so,
you may want to recall important data and write it down (if you don’t already have
a copy). You can then re-input the data after clearing the memory.
The RESET procedure you should use depends on the type of message error
message on the display.
“ARE YOU USING A NEW UNIT FOR THE FIRST TIME?”
1. Make sure that NO is highlighted and then press SET. If YES is highlighted,
press J to move the highlighting to NO and then press SET.
• The message “DATA ERROR! CHECK YOUR USER’S GUIDE FOR PROCEDURE!” appears on the display at this time. After this message appears,
you can press CLEAR to clear it from the display and recall data in order to
make a back-up record of it before continuing.
2. Press the RESET button, which is located inside the battery compartment
cover on the back of the unit.
• This causes the “CLEAR MEMORY AND SET UP THE UNIT FOR OPERATION?” message to appear on the display.
3. Press H to move the highlighting to YES and then press SET to reset the unit.
• Highlighting NO and pressing SET clears the reset message and displays the
Home Time screen.
“CLEAR MEMORY AND SET UP THE UNIT FOR OPERATION?”
1. Make sure that YES is highlighted. If OFF is highlighted, press H to move the
highlighting to YES.
• Highlighting OFF and pressing SET turns off the unit without resetting the unit.
14
About the Power Supply
2. Press SET to reset the unit.
If you still have trouble after trying the RESET operation, you may have a
hardware problem. If so, consult with your nearest CASIO dealer.
General Precautions
•
•
•
•
•
•
•
•
•
Never try to take the SF Unit apart.
Avoid strong impact and sudden temperature changes.
At very low temperatures, the display response time may slow down or the
display may fail completely. This is temporary and correct operation should
return at normal temperature.
To avoid serious damage to the SF Unit caused by leaking batteries, replace
batteries once every two years, regardless of how much you use the SF Unit
during that time.
Never use thinner, benzine or other volatile agents to clean the exterior of the
SF Unit. Instead, wipe it off with a soft cloth dampened in a solution of water
and a mild, neutral detergent. Wring the cloth out until it is almost dry.
If the SF Unit is exposed to strong electrostatic charge, the display may dim
or the SF Unit may lock up. To correct this situation, switch power off, and then
remove and then replace the batteries.
Do not press the keys with a pen, pencil or other sharp object.
The SF Unit may cause interference with radio or television reception. Keep
it away from such appliances when you are using it.
Note that pressing SHIFT and then LIGHT causes the backlight to light and
stay lit as long as you continue to operate the SF Unit, or until you press LIGHT
again to turn it off manually.
Leaving the backlight on for long periods greatly reduces battery life!
About the Power Supply
The SF Unit is powered by three CR2032 lithium batteries. Replace batteries as
soon as possible after low battery power is indicated by any of the following.
• Low battery message appears on the display
• Blank display when power is turned on
• Dim display figures even after display contrast is adjusted
• Failure of the backlight to turn on
15
PART 1 Getting Started
Caution
• All data stored in memory is lost if you remove more than one battery
at the same time.
• Be sure that you keep a separate copy of all important data that you
store in the SF Unit.
Low Battery Message
A message appears on the display to warn you when the batteries power drops
below a certain level. Should battery power drop too low, data in memory may be
corrupted or lost. Whenever a low battery power message appears on the
display, be sure to stop operation of the SF Unit and replace batteries as soon
as possible.
Important!
Whenever the message “WEAK BATTERIES! CONSULT YOUR USER’S
GUIDE IMMEDIATELY!” appears, be sure to replace all batteries.
Battery Precautions
Incorrectly using batteries can cause them to burst or leak, possibly damaging
the interior of the SF Unit. Note the following precautions.
16
•
Be sure that the positive (+) side of each
battery is facing up (so you can see it).
•
Never mix batteries of different types.
•
Never mix old batteries and new ones.
About the Power Supply
•
Never leave dead batteries in the battery compartment.
•
Remove the batteries if you do not plan to use the SF Unit for a long period.
•
Replace batteries at least once every year, no matter how much you use the
SF Unit during that period.
•
Never try to recharge the batteries supplied
with the SF Unit.
•
Do not expose batteries to direct heat, let them
become shorted, or try to take them apart.
•
Should a battery leak, clean out the battery compartment of the SF Unit
immediately, taking care to avoid letting the battery fluid come into direct
contact with your skin.
Keep batteries out of the reach of small children. If swallowed, consult with
a physician immediately.
The batteries that come with this unit discharge slightly during shipment and
storage. Because of this, they may require replacement sooner than the
normal expected battery life.
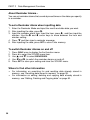
To replace the batteries
Before replacing the batteries, note the following precaution:
• Be sure to replace all batteries with a full set of new ones, and do not mix old
batteries with new ones.
1. Press OFF to switch power OFF.
17
PART 1 Getting Started
2. Slide the battery compartment cover in the direction indicated by the arrow.
RESET
3. Slide the battery switch to the “REPLACE 1” setting.
REPLACE
RESET
NORMAL
4. Slide the battery holder in the direction indicated by the arrow in the
illustration.
Caution
Be sure to remove only one battery at a time. Otherwise, you will lose all
data stored in memory.
Battery holder
5. Replace the old battery with a new one, making sure that the positive (+) side
of the new battery is facing up (so you can see it).
18
Resetting the SF Unit’s Memory
6. Slide the battery holder back to its original position as indicated by the arrow
in the illustration.
Battery holder
7. Slide the battery switch to the “REPLACE 2, 3” setting and repeat steps 4
through 6 for the other batteries.
• Be sure to replace all three batteries, using CR2032 lithium batteries only.
Never mix old batteries with new ones.
8. Slide the battery switch to the “NORMAL” setting.
• You will not be able to turn the unit on if the battery switch is not in the
“NORMAL” setting.
9. Replace the battery compartment cover.
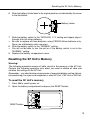
Resetting the SF Unit’s Memory
Warning!
The following procedure erases all data stored in the memory of the SF Unit.
Perform the following operation only when you want to delete all data and
initialize the settings of the SF Unit.
Remember − you should always keep copies of important data by writing it down,
by transferring it to a personal computer or other SF Unit, CSF Unit or NX Unit.
To reset the SF Unit’s memory
1. Press ON to switch power on.
2. Open the battery compartment and press the RESET button.
RESET button
RESET
19
PART 1 Getting Started
•
At this time the following message appears on the display.
3. Make sure that YES is highlighted. If NO is highlighted, press H to move the
highlighting to YES.
Warning!
The next step deletes all data stored in the SF Unit’s memory. Make sure
that you really want to delete the data before you continue!
4. Press SET to start the RESET procedure.
• After the RESET operation is complete, the LANGUAGE screen appears on
the display.
5. Use the procedure under “To select the system language” on page 5 to select
a system language.
• After you set the system language, the Home Time Screen appears.
6. Check the Home Time setting and make changes if necessary (page 71).
Following the reset operation described above, the Home Time display appears
and the SF Unit settings are initialized as noted below.
Home Time:
LON
JAN/ 1/2000 SAT
12:00 AM
12-hour format
World Time:
NYC
Daily Alarm:
12:00 PM
Sound:
Schedule alarm — ON
Reminder alarm — ON
Daily alarm — OFF
Key — ON
Messages:
English
Character input: CAPS
20
PART 2
Operation Reference
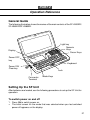
General Guide
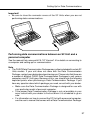
The following illustration shows the names of the main controls of the SF-4900ER/
SF-4980ER/SF-4985ER.
Light key
Numeric
Keys
Cursor Keys
Display
Power OFF
key
Keyboard
Power ON/
Clear key
Lock
Connector
Terminal
Mode Keys
Setting Up the SF Unit
After batteries are loaded, use the following procedures to set up the SF Unit for
operation.
To switch power on and off
1. Press ON to switch power on.
• The initial screen for the mode that was selected when you last switched
power off appears on the display.
21
PART 2 Operation Reference
•
If either of the messages (A or B) shown on page 13 appears on the display,
follow the procedures described on page 14.
• If a low battery power message appears on the display or if the display
remains blank when you turn power on, replace batteries as soon as
possible.
2. Press OFF to switch power off.
About the Auto Power Off function...
The SF Unit is equipped with an Auto Power Off function that switches power off
automatically whenever you do not perform any key operation for about six
minutes. To restore power, press ON.
To turn on the EL backlight
There are two ways to turn on the backlight of the display.
Pressing LIGHT causes the backlight to turn on for about 15 seconds, and then
turn off automatically.
Pressing SHIFT and then LIGHT also turns on the backlight, but in this case the
backlight stays on as long as you keep performing key operations on the SF Unit.
The backlight turns off automatically if you do not perform any key operation for
about 15 seconds.
Leaving the backlight on for long periods greatly reduces battery life!
You can manually turn the backlight off by pressing LIGHT again.
Failure of the backlight to turn on indicates low battery power. Replace batteries
as soon as possible.
To adjust the display contrast
1.
•
2.
3.
Enter the Telephone Directory Mode.
You could enter any mode except the Calculator Mode here.
Press SHIFT CONTRAST.
Use the H and J keys to adjust the contrast.
4. After you are finished, press ESC to clear the contrast adjustment display.
22
Setting Up the SF Unit
To select a mode
Press one of the mode keys to select the mode you want.
In cases where two modes are assigned to the same key, each press of a key
toggles between the two modes.
_
TEL
Telephone Directory Mode for storage of telephone
numbers, names, addresses, and six user-definable
entries.
"y MEMO/TO DO
• Memo Mode for storage of unformatted data in a
kind of electronic notebook.
• To Do Mode for storage of reminders of things to do.
You can affix a check mark to items as you complete
them, and even note the date that you check them.
HOME/WORLD Home Time/World Time Modes for display of the current time in your hometown and other locations around
the globe. For example, you can set New York as your
home time and London as the world time.
[ + EXP/REM
• The Expense Mode lets you store expense data,
including payment date, payment method, description, etc. You can also produce total for a specific
period of time.
• Reminder Mode to create reminders and alarms for
annual, monthly, and daily events.
>
SCHEDULE
Schedule Keeper Mode for storage of appointments
scheduled for specific dates and times, and setting of
Schedule Alarms to remind you of your appointments.
: CALENDAR
Displays any monthly calendar from January 1901
through December 2099.
s CAL/CONV
• Calculator Mode for basic calculations with the touch
of a key.
• The Conversion Mode lets you select between
general conversion and euro conversion.
23
PART 2 Operation Reference
To check the memory status
Press SHIFT and then hold down CAPA to display a screen that shows the
current memory status. To clear the memory status display, release CAPA.
You can enter any mode except the Calculator Mode, Conversion Mode and
Home/World Time Mode here.
Remaining memory
capacity
Total number of
characters stored in
memory
Note
The screen example shown here is the SF-4900ER. The capacity values (FREE
and USED total) is different on the SF-4980ER/SF-4985ER display.
To use the FUNCTION key
Press the FUNC key to display a function menu that makes it possible to perform
functions that are not marked on the unit’s keys.
Just like in the above example display, all of the functions included in a function
menu have a number at the beginning. Press the number key that corresponds
to the function you want to perform.
Whenever a function menu item’s leading number is replaced by “ x ”, it means
you can’t select that menu item in the operation you are performing.
24
Setting Up the SF Unit
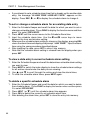
About the SOUND menu...
The sound menu lets you switch the key input tone and the various alarms of the
SF Unit on and off.
•) as shown
The on/off status of each SOUND menu item is indicated by a dot (
above.
To switch the key input and alarm tones on and off
1.
•
2.
3.
4.
5.
6.
Press FUNC once to display the first function menu.
In the Expense Mode, you should press FUNC twice.
Press 4 to select the SOUND menu item.
Use the K and L keys to move the dot to the item you want to change.
Use H and J to switch the key input tone or an alarm tone on and off.
Repeat steps 3 and 4 to change other items if you want.
Press SET to store your setting and clear the SOUND menu.
About alarm types
This unit has three types of alarms: the Daily Alarm, Schedule Alarm, and
Reminder Alarm. The following describes each of these alarms.
Daily Alarm
The Daily Alarm sounds at the same time everyday, when the Home
Time reaches the time you have set as the Daily Alarm (page 73).
Reminder Alarm
The Reminder Alarm sounds on the same date each month or each year, or
at the same time everyday. Use the Reminder Mode to set this type of alarm
(page 58).
Schedule Alarm
The Schedule Alarm sounds at the specified time on a specified date. Use
the Schedule Keeper Mode to set this type of alarm (page 43).
25
PART 2 Operation Reference
An alarm tone sounds for about 20 seconds and an alarm message appears on
the display whenever an alarm time is reached, even if unit power is switched off.
You can stop the alarm by pressing any key and then press ESC to return to the
display that was shown before the alarm began to sound.
Important!
• An alarm will not sound if that type of alarm is switched off on the SOUND
menu. This is especially important to remember when you want to use
Reminder and Schedule Alarms. For details on how to switch alarms on, see
“About the SOUND menu...” on page 25.
• If the Daily Alarm set in the Home Time Mode and a Daily Reminder alarm
set in the Reminder Mode are set for the same time, the Daily Reminder alarm
takes precedence. This means that the Daily Reminder message appears on
the display when the alarm time is reached.
• The alarm does not sound if you are performing a data communications
operation when the alarm time is reached.
• The alarm may fail to sound if battery power is too low.
Note
If the message “SECRET DATA!” appears on the display, it means that an alarm
time set in the secret memory area (see page 66) was reached.
Inputting Letters, Numbers and Symbols
The following describes the basic input operations for the SF Unit. Note that
you can use the following operations to input data only in the Telephone
Directory, the Memo Mode, the Schedule Keeper, the To Do Mode, the Expense
Mode, and the Reminder.
In all of the following operations, the input or correction is performed at the current
cursor location. To move the cursor around the display, use the K, L, H, and
J cursor keys. Press SHIFT and then H to make the cursor jump to the first
character of an entry, or SHIFT J to jump to the end of an entry.
Note
Every character and symbol you input is counted as an input character. Next (œ)
and new-line (¥) symbols are also counted as input characters. The maximum
number of input characters that can be stored for each data item is 384. When
the number of characters you are inputting into the current data item exceeds
374, the cursor changes shape from “_” to “❚”. This indicates that you can input
only 10 more characters for the current data item.
26
Inputting Letters, Numbers and Symbols
To input letters and numbers
Press the key that is marked with the letter or number that you want to input.
To input upper-case letters
Press CAPS to switch the keyboard between upper-case and lower-case letters.
The indicator “CAPS’’ on the display shows that the keyboard is shift-locked
for upper-case letters.
•
•
The upper-case/lower-case setting you make with CAPS remains in effect
until you change it, even when you switch the SF Unit off.
A shift-lock operation using CAPS affects the letter keys only. It does not
shift the number keys for punctuation symbol input.
To shift the keyboard
Press SHIFT to temporarily shift the keyboard between upper-case and
lower-case letters. The indicator “SHIFT’’ on the display shows that the keyboard
is shifted.
•
•
If the keyboard is shift-locked for upper-case input, pressing SHIFT shifts
to lower-case. If the keyboard is set for lower-case letters (by the CAPS
key), pressing SHIFT changes to upper-case.
With SHIFT, the keyboard remains shifted for input of one character only.
As soon as you input one character, the keyboard switches back to the
status set by CAPS.
To input accented characters
Press the CODE key and confirm that the “CODE” indicator is on the display.
Next, input the character. The following character accents are available.
•
•
•
•
•
Umlaut (Ä, Ë, Ï, Ö, Ü, ä, ë, ï, ö, ü) .................... CODE
Acute Accent (Á, É, Í, Ó, Ú, á, é, í, ó, ú) .......... CODE
Grave Accent (À, È, Ì, Ò, Ù, à, è, ì, ò, ù) .......... CODE
Circumflex (Â, Ê, Î, Ô, Û, â, ê, î, ô, û ) .............. CODE
Tilde (Ã, Õ, Ñ, ã, õ, ñ) ...................................... CODE
F
A
S
D
G
27
PART 2 Operation Reference
To input other symbols
1. Press SYMBOL to display a menu of numbered symbols.
• There are a total of 8 symbol menu screens.
§
(
>
1
Å
å
$
3
•
!
)
?
}
Ø
ø
±
ƒ
”
*
@
~
ß
£
°
|
#
,
[
¡
¶
¥
$
/
\
¿
¢
2
3
Fr
←
%
:
]
IJ
ij
ª
µ
→
&
;
^
Æ
æ
º
2
^
’<
{
Ç
ç
#
4
To clear the symbol menu from the display without inputting a symbol, press
ESC.
2. Use K and L to scroll through the symbol menu screens until the one
that contains the symbol you want appears on the display.
3. Press the number key (1 thru 8) that matches the number to the left of the
symbol you want to input. The symbol is input at the current cursor position
and the symbol menu is cleared from the display.
To correct, delete or insert characters
To correct a character, simply move the cursor to the location of the character and
input the character you want to change to.
To delete a character, move the cursor to the character you want to delete and
press DEL.
To insert a character, move the cursor to the desired position. Press SHIFT INS
and then type the character you want.
28
Inputting Letters, Numbers and Symbols
Date and time input
The following guidelines apply to inputting dates and times in the Schedule
Keeper and Reminder Modes, and dates in the Expense Mode.
•
•
•
•
•
•
•
•
Years can be input within the range of 1901 through 2099.
Pressing TIME/DATE or J while there is nothing inside the year input area
inputs 2000.
An input value from 1 to 49 for the year is automatically converted to the
corresponding 21st century year (2001 to 2049). A value from 50 to 99 is
converted to the corresponding 20th century year (1950 to 1999).
You must input all four digits to specify a date from 1901 to 1949 or from 2050
to 2099.
Use 12-hour format if the Home Time is set for 12-hour format or 24-hour
format if the Home Time is set for 24-hour format.
You do not have to input the minutes if they are “00'’.
If you are using 12-hour time format, press A to specify AM or P to specify PM.
All illegal input (13 for the month, for example) is ignored.
29
PART 3 Data Management Functions
PART
3
Data Management Functions
This part of the manual describes how to input and store data in the Telephone
Directory, Memo, Schedule Keeper, To Do, Expense and Reminder Modes. It
also describes how the Calendar Mode can be used in combination with the
Schedule Keeper Mode.
To enter a mode
Press the mode key that corresponds to the mode that you want to enter. When
you enter the Telephone Directory, Memo Mode, To Do Mode or Reminder
Mode, an initial screen appears on the display.
In cases where two modes are assigned to the same key, each press of a key
toggles between the two modes.
About display formats
There are two display formats used in the Telephone Directory, Memo Mode,
Schedule Keeper, To Do Mode, Expense Mode and Reminder Mode: a data
display format and an index display format. The data display shows all of the data
entries contained in a data item, while an index display abbreviates each data
item into one or two lines. The index display makes it possible to quickly scroll
through data items to find the one that you want.
You can switch between the data display and index display formats at any time
by pressing DISP CHNG.
30
About display formats
Data Display
You can scroll through a data display line-by-line using the K and L cursor
keys. If you press SHIFT before K and L, the display scrolls data item-by-data
item.
Index Display
You can scroll through an index display data item-by-data item using the K and
L cursor keys. If you press SHIFT before K and L, the display scrolls one
screen at a time.
31
PART 3 Data Management Functions
Using the Telephone Directory
The innovative Telephone Directory Mode of the SF Unit lets you input names,
telephone numbers, and addresses (e-mail/home) for instant look up when you
need them. It even gives you a total of six user-definable items that you can use
to record birthdays, hobbies, or any other information you want. Each Telephone
Directory data item can contain up to 384 characters (including next and newline
symbols).
About Telephone Directory data items and data entries...
Telephone Directory information is stored in units called data items. Each data
item is made up of a number of data entries. Telephone Directory
data items are made up of nine entries: Name, Number, Addresses (e-mail/
home) plus 6 FREE entries (FREE 1 ~ FREE 6). These “FREE” entries can be
used to store any type of data you want. You can even change the FREE labels
to create your own named entries.
Inputting Telephone Directory data
Use the following procedure to input Telephone Directory data.
Note
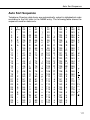
• Telephone Directory data is automatically sorted according to name entries.
See “Auto Sort Sequence” for information on how this unit sorts data.
To input Telephone Directory data
Example: To input the following data.
Name: ERIC JACKSON
Phone Number: 123-4567, 987-5432
E-mail address: eric@***.com
1. Enter the Telephone Directory Mode. At this time, you could press CLEAR to
clear the initial Telephone Directory screen and change to the name input
screen.
Prompt for name
input
32
Using the Telephone Directory
2. Input the name with the last name first, since the data is sorted according to
the name entry.
3. Press NEXT. You can press the L key in place of the NEXT key. The
“NUMBER?” prompt appears to ask you to input the telephone number.
4. Input the telephone number.
5. After inputting a telephone number, press NEXT to advance to address input.
6. Input the e-mail address and home address.
• The display scrolls automatically as you input more data.
7. After inputting the e-mail address and home address, press NEXT to advance
to the FREE input.
8. Input any other information you want.
33
PART 3 Data Management Functions
9. After inputting all of the data you want, press SET to store it in memory.
•
You can press SET at any point in the above procedure to store the data you
have input up to that point.
To change a FREE entry label
1.
2.
3.
•
Press TEL and display the initial screen of the Telephone Directory Mode.
Press FUNC twice to display the second function menu.
Press 3 to select LABEL EDIT.
To clear the function menu without selecting anything, press ESC.
4. Use K and L to move the cursor between the FREE labels.
• To cancel the editing operation without making any changes, press ESC
or CLEAR.
5. When the cursor is located at the text you want to change, enter the text you
want.
• Labels can be up to 14 characters long.
6. After making the changes you want, press SET to store them.
• The labels you create appear as prompts when you are inputting Telephone
Directory data.
Where to find other information
•
•
34
For information on searching for and recalling data already stored in
memory, see “Recalling data stored in memory” on page 59.
For information on editing, deleting and copying data already stored in
memory, see “Editing, Deleting and Copying data” on page 62.
Using the Memo Mode
Using the Memo Mode
The Memo Mode of the SF Unit is like a pad of electronic memo paper that lets
you store information in any format you want. You can input Memo Mode data by
adding new memos to the end of data already in memory, or you can insert new
memo data between two existing Memo Mode data items. Each Memo Mode
data item can contain up to 384 characters (including newline symbols).
To input Memo Mode data
1. Enter the Memo Mode. At this time, you could press CLEAR to clear the initial
Memo Mode screen and change to the memo input screen.
Prompt for memo
input
2. Input the first line of memo data you want to store.
• Note that the first line of memo data is treated as the memo’s name. Because
of this, it is a good idea to use a short descriptive title as the first line.
3. Input the rest of your data.
Newline symbol
4. After inputting all of the data you want, press SET to store it in memory.
To insert a new Memo Mode data item between two items in
memory
1. Enter the Memo Mode.
2. Recall the data item you want to come after the new data item you are about
to input, and move the name of the data item into the top line of the display.
(See “Recalling data stored in memory” on page 59)
3. Input the new data item.
35
PART 3 Data Management Functions
4. Press SHIFT SET to store the new data item.
• If you press SET without pressing SHIFT, the new data item is automatically
stored at the end of the data already existing in memory.
Where to find other information
•
•
36
For information on searching for and recalling data already stored in
memory, see “Recalling data stored in memory” on page 59.
For information on editing, deleting and copying data already stored in
memory, see “Editing, Deleting and Copying data” on page 62.
Using the Calendar
Using the Calendar
The calendar is pre-programmed to display full-month calendars of any month
from January 1901 through December 2099.
To display the calendar
Press CALENDAR to enter the Calendar Mode.
Year
Month
•
•
•
•
The dates on each calendar are shown starting from Sunday (on the far left)
through Saturday (on the far right).
The above procedure displays the calendar that contains the date currently
set in the Home Time display.
If you press CALENDAR while the Home Time display is shown, the calendar
appears with the current date flashing within the calendar.
When you press CALENDAR right after you are in the Schedule Keeper or the
Expense Mode, the calendar that contains the Schedule Keeper or the
Expense Mode date you were viewing appears. In this case, the Schedule
Keeper or the Expense Mode date you were viewing appears flashing within
the calendar.
To scroll through calendars
1. Press CALENDAR to display the Calendar Mode.
2. Use the K and L cursor keys to scroll sequentially through the calendars.
Holding down either key scrolls at high speed.
• The above procedure works only when the date cursor is not flashing in the
calendar. To clear the date cursor from the calendar, press ESC.
About the date cursor...
•
•
The date cursor flashes at a date in a calendar to indicate that the date is
selected.
If a calendar is already shown on the display, press the J cursor key to make
the date cursor appear at the first date in the calendar, or the H cursor key
to make it appear at the last date in the calendar.
37
PART 3 Data Management Functions
•
•
•
You can make the date cursor appear at any specific date within a displayed
calendar by entering that date. For example, pressing 1 2 causes the 12th to
start flashing in the displayed calendar.
You can move the date cursor around the calendar using the K, L, H, and
J cursor keys.
To clear the date cursor from a calendar, press ESC.
To specify a month for display in the Calendar Mode
1.
2.
3.
4.
While a calendar is displayed, press CLEAR.
Input the year of the calendar you want to display and press TIME/DATE.
Input the month of the calendar you want to display.
Press CALENDAR. The calender for the month you specified is displayed.
To specify a month and date for display in the Calendar Mode
1.
2.
3.
4.
While a calendar is displayed, press CLEAR.
Input the year of the calendar you want to display and press TIME/DATE.
Input the month of the calendar you want to display and press TIME/DATE.
Input the date and press TIME/DATE or CALENDAR to display the calendar
for the month you specified. The date cursor is flashing within the calendar
at the date you specified.
To highlight and unhighlight specific dates
1. Press CALENDAR to display the Calendar Mode.
2. Display the calendar that contains the date you want to highlight.
• You can either scroll through calendars using K and L, or you can
specify the month.
3. Use the date cursor to select the date that you want to highlight.
4. Press SET to highlight the date currently selected by the date cursor.
• To unhighlight the date, press SET again.
5. After you highlight the dates you want, press ESC to clear the date cursor
from the calendar.
To highlight days of the week for multiple months
1. Press CALENDAR to display the Calendar Mode.
38
Using the Calendar
2. Display the calendar from where you want highlighting to start.
• You can either scroll through calendars using K and L, or you can
specify the month.
3. Press FUNC twice to display the second function menu.
4. Press 3 to select MULTIPLE HL.
• To clear the function menu without highlighting anything, press ESC.
5. Input the year of the calendar where you want the highlighting to end and
press TIME/DATE.
6. Input the month of the calendar where you want the highlighting to end and
press TIME/DATE.
SUN flashes because
it is selected.
7. Use the cursor keys to select the day of the week you want to highlight.
8. Press SPACE to specify the currently selected day of the week for
highlighting.
• When a day of the week is specified for highlighting, its abbreviation
appears highlighted (reverse field) on the display.
• To deselect (unhighlight) a day of the week, select it and press SPACE.
9. After specifying all of the days of the week you want highlighted during
the period you specified in steps 2 through 6 above, press SET to highlight the
applicable dates.
To unhighlight all dates in a specific month
1. Press CALENDAR to display the Calendar Mode.
2. Display the calendar for the month whose dates you want to unhighlight.
• You can either scroll through calendars using K and L, or you can specify
the month.
3. Press FUNC once to display the first function menu.
4. Press 2 to select MONTH DELETE.
• To clear the function menu without deleting anything, press ESC.
5. Press SET to clear all highlights from the month you specified in step 2
above or ESC to abort the operation without deleting anything.
• Remember that the delete operation cannot be undone.
39
PART 3 Data Management Functions
To unhighlight all dates up to a specific month
1.
2.
3.
•
4.
Press CALENDAR to display the Calendar Mode.
Press FUNC twice to display the second function menu.
Press 2 to select ALL DELETE.
To clear the function menu without unhighlighting anything, press ESC.
Input the year of the calendar where you want the unhighlighting to end
and press TIME/DATE.
5. Input the month of the calendar where you want the unhighlighting to end
and press TIME/DATE.
6. Press SET to clear all highlights from January 1901 up to the month
you specified in steps 4 and 5 above, or ESC to abort the operation without
deleting anything.
• Remember that the delete operation cannot be undone.
40
Using the Schedule Keeper
Using the Schedule Keeper
The Schedule Keeper lets you store data about your appointments to keep you
on time all the time. It lets you input the time and a description of your
appointment. You can even set Schedule Alarms that remind you when it is
time to get ready for your appointments. When you input data for a specific date,
a marker appears next to that date on the calendar to let you keep track of your
schedule at a glance. Each Schedule Keeper data can contain up to 384
characters, including newline symbols.
Note
• When there is a lot of Schedule Keeper data stored in memory, operations
such as display of the calendar and data communication take more time.
To enter the Schedule Keeper
You can use either of the two following methods to enter the Schedule Keeper.
•
•
Press SCHEDULE. The Schedule Keeper screen for the current date set on
the Home Time display appears.
Display the calendar and move the cursor to the date you want, then press
SCHEDULE. The Schedule Keeper screen for the day you select appears on
the display.
To specify a date
Schedule Keeper data is stored along with its date, with the date being treated
as a separate data entry. Use the following procedure to specify a date in the
Schedule Keeper Mode.
1.
2.
3.
4.
Press SHIFT CLEAR.
Input the year and press TIME/DATE.
Input the month and press TIME/DATE.
Input the date and press TIME/DATE. The Index Display that contains that
date appears on the display.
About Schedule Keeper data and initial displays...
Schedule Keeper information is stored under dates, with each date acting as a
unit called a data item. Each data item is made up of a number of data entries.
In the Schedule Keeper, the appearance of the currently displayed date depends
on whether or not Schedule Keeper data is already stored under that date.
41
PART 3 Data Management Functions
No data stored
Data already stored
(Index Display)
Schedule Keeper
data entry
In the case of the display on the right (data already stored), you can display the
“TIME?’’ prompt by pressing CLEAR.
To input Schedule Keeper data
1. Press SCHEDULE to enter the Schedule Keeper, and enter a date as
instructed in “To specify a date”.
2. Press CLEAR.
• You can skip this step.
3. Input the starting time of the appointment, pressing TIME/DATE between
the hour and the minutes.
• If you are using the 12-hour timekeeping format, be sure to press A to specify
AM or P to specify PM when inputting time.
• To create a Schedule Keeper data entry with a description only (without
any start time or end time), press NEXT (to advance directly to step 7) without
entering a time. You can press the J key in place of the NEXT key.
4. Press TIME/DATE again.
• To create a Schedule Keeper data entry with a start time and description only
(without any end time), press NEXT (or J) (to advance directly to step 7)
instead of TIME/DATE.
5. Input the ending time of the appointment, pressing TIME/DATE between the
hour and the minutes.
6. Press NEXT (or J).
7. Input a description of the appointment.
• If you want to set a schedule alarm, press NEXT (or L) after inputting the
description. See “To set a schedule alarm when inputting data”.
8. After inputting the data, press SET to store it into memory.
42
Using the Schedule Keeper
Using Schedule Alarms
You can set schedule alarms for Schedule Keeper data entries to help you keep
on time for important appointments. Note the following important points when you
are using a schedule alarm.
•
•
The alarm indicator and time are automatically cleared after the alarm time
is reached.
Schedule alarms can only be set for Schedule Keeper data entries that
include time data. If you set a schedule alarm for a Schedule Keeper entry
with time data and then later clear the time data, the schedule alarm is
also cleared automatically.
To set a schedule alarm when inputting data
1. Enter the Schedule Keeper and input data, using the procedures described
in steps 1 through 7 under “To input Schedule Keeper data’’ on page 42.
2. After inputting the description, press NEXT (or L).
• You can press the NEXT (or L) without inputting anything for the description.
3. Input the schedule alarm time. Use the J and H cursor keys to move
between the hour and minutes setting.
Time data
Schedule alarm
indicator
Schedule alarm
time
•
You can skip this input if you want the schedule alarm time to be the same
as that for the schedule data time.
• Whenever the schedule alarm setting is shown on the display, pressing
DEL clears the alarm time and displays the prompt “ALM TIME?’’ Input the
alarm time using the same procedure described above.
4. After inputting the data, press SET to store it into memory.
• Note that the schedule alarm setting is cleared from the display when you
press SET.
• If you attempt to set a schedule alarm time that is already passed, the
message “ALARM TIME ALREADY PASSED!’’ appears on the display.
Then the data is stored without a schedule alarm.
43
PART 3 Data Management Functions
•
If you attempt to set a schedule alarm time that is already set for another data
entry, the message “ALARM TIME ALREADY USED!’’ appears on the
display. Press ESC, J or H to display the schedule alarm to change it.
To set or change a schedule alarm for an existing data entry
1. Enter the Schedule Keeper and recall the data for which you want to set or
change a schedule alarm. Press FUNC to display the function menu and then
press 1 to select ITEM EDIT.
2. Press NEXT until the cursor moves to the Schedule Alarm time.
3. Input the schedule alarm time. Use the H and J cursor keys to move
between the hour and minutes setting.
• Whenever the schedule alarm setting is shown on the display, pressing DEL
clears the alarm time and displays the prompt “ALM TIME?”. Input the alarm
time using the same procedure described above.
4. After inputting the data, press SET to store it into memory.
• Note that the schedule alarm setting is cleared from the display when you
press SET.
To view a data entry's current schedule alarm setting
1. Enter the Schedule Keeper and recall the date whose schedule alarm setting
you want to view.
2. Press NEXT to switch the index display to show the schedule alarm settings
for all entries stored under the date you are viewing.
3. Use K and L to scroll through the entries and view the alarm times.
4. To clear the schedule alarm times, press NEXT again.
To delete a specific schedule alarm
1. Enter the Schedule Keeper and recall the data for which you want to delete
the schedule alarm. Press FUNC to display the function menu and then press
1 to select ITEM EDIT.
2. Press NEXT (or L) until the schedule alarm time appears.
3. Press DEL to delete the currently set schedule alarm time.
4. After deleting the alarm time, press SET to store the entry into memory.
44
Using the Schedule Keeper
Where to find other information
•
•
For information on searching for and recalling data already stored in
memory, see “Recalling data stored in memory” on page 59.
For information on editing, deleting and copying data already stored in
memory, see “Editing, Deleting and Copying data” on page 62.
45
PART 3 Data Management Functions
Using the Expense Mode
The Expense Mode lets you store expense data, including payment date,
payment amount, payment method, expense type and description. You can also
produce total for other period of time.
Before using the Expense Mode
When inputting data about the payment type and expense type in the Expense
Mode, you can use preset labels to make input quicker and easier. This means
that you should assign the text you want to the preset labels before actually using
the Expense Mode. For details on how to do this, see “To edit labels” on page 48.
About Expense Mode data items and data entries...
Each Expense Mode data item is made up of the following five data entries.
Data Entry
•
Description
Date
Year/Month/Date
Amount
Numbers up to eight digits long can be input
Payment Type
9 payment types, including “AMEX,” “Cash” and others
are preset for you to choose from. These preset labels
can be edited freely.
Expense Type
6 expense types, including “Meals,” “Mileage” “Entertainment” and others are preset for you to choose from.
These preset labels can be edited freely.
Description
Up to 331 Characters
You can edit the 9 Payment Type and the 6 Expense Type labels using the
procedures described on page 48.
About Expense Mode Display formats
As with the other modes, Expense Mode data can be displayed using an Index
Display or a Data Display. The following describes the contents of each type of
display.
46
Using the Expense Mode
Index Display
The Index Display shows data day-by-day.
•
•
In the Index Display, only the first six characters of the name are shown.
Up to three entries are shown, along with payment type or expense type.
Data Display
The Data Display shows all of the details for a specific entry.
•
•
Press the DISP CHNG key to switch between the Index Display and Data
Display.
The Index Display is always selected automatically whenever you press
EXP/REM to enter the Expense Mode.
To enter the Expense Mode
You can use either of the two following methods to enter the Expense Mode.
•
•
Press EXP/REM. The Expense Mode screen for the current date (as noted on
the Home Time display) appears*.
Display the calendar, move the cursor to the date you want, and then press
EXP/REM. The Expense Mode screen for the day you selected appears on
the display.
* If you press EXP/REM while in the Schedule Keeper Mode, the Expense
Mode screen for the date you were viewing in the Schedule Keeper Mode
appears.
47
PART 3 Data Management Functions
To edit labels
Use the following procedure to change the labels assigned to expense and
payment types.
1. Press EXP/REM to enter the Expense Mode.
2. Press FUNC once to display the first function menu.
3. Press 3 if you want to edit payment type labels or 4 to edit expense type labels.
4. Use K and L to select the item whose label you want to change.
5. While the label you want to change is selected, input the text for the label to
which you want to change.
• Labels can be up to 14 characters long.
6. After you make all of the changes you want, press SET to store them in
memory.
• The new labels will be displayed when you next input new data.
• If you try to store a label that is identical to one already in memory, the
message “SAME TYPE ALREADY USED!” appears.
Note
• Using the above procedure to change a label does not change labels that are
already assigned to expenses or payments. If you change a label from
“Miscellaneous” to “Grocery,” for example, entries that are already assigned
the “Miscellaneous” are not changed.
48
Using the Expense Mode
To specify a date
Expense Mode data is stored along with its date, with the date being treated as
a separate data entry. Use the following procedure to specify a date in the
Expense Mode.
1.
2.
3.
4.
Press SHIFT CLEAR.
Input the year and press TIME/DATE.
Input the month and press TIME/DATE.
Input the date and press TIME/DATE. The Index Display that contains that
date appears on the display.
To input Expense Mode data
1. Press EXP/REM to enter the Expense Mode, and input a date using the
procedure described under “To specify a date.”
2. Input the amount of the expense and press NEXT.
• You can input an amount up to 99999999.
• Two decimal places is the default for the expense amount. This means that
an input of 123 is automatically stored as 123.00. If you input a value that is
seven digits long, the default becomes one decimal digit. A value that is eight
digits long has no decimal digits.
3. The list of payment type labels takes up three screens. Use K and L to
switch between screens. While a screen is displayed, use number keys 1
through 9 to select the payment type label you want. If you want to skip this
entry without inputting anything, press NEXT to move on to the next entry and
leave the payment type blank.
4. The list of expense type labels takes up two screens. Use K and L to switch
between screens. While a screen is displayed, use number keys 1 through
6 to select the expense type label you want. If you want to skip this entry
without inputting anything, press NEXT to move on to the next entry and leave
the expense type blank.
49
PART 3 Data Management Functions
5. Input a description of the expense, along with any other comments you want
to include.
6. After you finish inputting data, you can use the K and L keys to scroll
through the data entries and make any changes that you want.
•
Whenever you return to the expense type or payment type item, the currently
selected label is highlighted on the display.
7. Press SET to store the data item in memory.
To change the amount type
Use the following procedure to specify whether the payment or expense type
should appear on the Index Display.
1. Press EXP/REM to enter the Expense Mode.
2. Press FUNC once to display the first function menu, and then press 2 to select
AMOUNT TYPE.
50
Using the Expense Mode
3. Press 1 to select PAYMENT or 2 to select EXPENSE . As soon as you make
a selection, the function menu is cleared from the display.
To calculate expense totals for a specific period
Use the following procedure to calculate totals (subtotals for each type and grand
total) for data in the Expense Mode.
1. Press EXP/REM to enter the Expense Mode, and input a date using the
procedure described under “To specify a date.”
• The date you input here is the starting date of the period.
2. Press FUNC to display the function menu, and then 1 to select PERIOD
TOTAL.
This tells the calculator that you will calculate the total during a period starting
from the date you input in step 1, up to another date (wihich you will specify
in the next step).
3. Input the ending date using the following input sequence:
Year TIME/DATE Month TIME/DATE Date TIME/DATE
51
PART 3 Data Management Functions
•
You can change the starting date, but you must do so before you press the
TIME/DATE key at the end of the ending date input sequence above. To do
so, use H and J to move the cursor to the starting date and make the
changes you want.
4. When you press the TIME/DATE key at the end of the ending date input
sequence in step 3, a screen appears to let you specify the subtotal type. Use
H and J to select totalization by payment type or expense type (the
currently selected type is highlighted on the display).
5. Press SET to calculate totals for the period you specified in accordance with
the conditions you specified.
52
•
This operation produces a total for each
PAYMENT TYPE or EXPENSE TYPE,
plus a grand total. This example here
shows totalization according to EXPENSE TYPE.
•
If all of the data cannot fit on the display,
use L and K to scroll two lines at a
time.
•
Press SHIFT and then K or L to scroll
data one screen (two items) at a time.
Using the Expense Mode
•
•
Items for which the PAYMENT TYPE/
EXPENSE TYPE is not specified (because this specification was skipped
during data input) are totalized under
“-Other-”.
To return from this display to specification of the total format (step 4 above),
press ESC. Now you can repeat steps 4 and 5 to calculate totals for the same
period using different specifications.
6. To return to the normal Expense Mode screen, press ESC twice.
About the total amount display
The amount for each type subtotal and the grand total can be an amount with an
integer up to 10 digits long, plus a two-digit decimal part. This means that the
maximum value is 9,999,999,999.99. Any value greater than this is displayed as
“AMT TOO LONG”.
Where to find other information
•
•
For information on searching for and recalling data already stored in
memory, see “Recalling data stored in memory” on page 59.
For information on editing, deleting and copying data already stored in
memory, see “Editing, Deleting, and Copying data” on page 62.
53
PART 3 Data Management Functions
Using the To Do Mode
The To Do Mode gives you a handy list of things to do. You can input To Do data
by adding new items to end of those already in memory, or you can insert new
items data between two existing items. Each To Do Mode item can contain up to
384 characters (including newline symbols).
To input To Do Mode data
1.
2.
3.
•
Enter the To Do Mode.
Press CLEAR.
Input the text you want in the To Do list.
A check box is automatically inserted at the beginning of the To Do item. After
you finish the task described in the To Do list, you can check it or delete it.
4. After inputting data, press SET to store it.
About the To Do list
Items in the To Do list are not sorted. They are displayed in the same sequence
as they are input.
There are two types of items: unchecked items and checked items. Unchecked
items come first in the To Do list, and they always start with a blank box. Checked
items are at the bottom of the To Do list, and they start with a box that has a check
mark inside.
To insert a new To Do item between two existing items
1. Enter the To Do Mode.
2. Use the search procedures described under “Recalling data stored in
memory” on page 59 to find the item you want to come after the new item you
are about to input.
3. Using the procedure described under “To locate data using index search”,
move the name of the item you want to come after the new item into the top
line of the Index Display.
54
Using the To Do Mode
4. Input the new To Do Mode data.
5. Press SHIFT followed by SET to store the new item above the item you
selected in step 3.
• If you press SET without pressing SHIFT, the new item is automatically stored
at the end of the unchecked To Do list items already in memory. The SHIFT key
tells the SF Unit to store the new item above the item you selected in step 3.
To check and uncheck To Do items
1. Enter the To Do Mode.
2. Use the search procedures described under “Recalling data stored in
memory” on page 59 to find the item you want to check or uncheck.
3. Using the procedure described under “To locate data using index search“, move
the item you want to check or uncheck into the top line of the Index Display.
4. Press FUNC twice to display the second function menu, and then press 3 to
select ITEM CHECK.
5. A submenu appears to give you a number of options to choose from. Input
a number to select the option you want.
1 CHECK
This option inserts a check mark into the box at the beginning of the item you
selected in step 3, and moves it to the bottom of the To Do list.
2 CHECK & DATE
This option inserts a check mark into the box at the beginning of the item you
selected in step 3, and moves it to the bottom of the To Do list. It also lets you
mark the item with the current date.
3 DATE & TIME
This option inserts a check mark into the box at the beginning of the item you
selected in step 3, and moves it to the bottom of the To Do list. It also marks
the item with the date and time it was checked.
4 CHECK ERASE
This option is available when the item you selected in step 3 is already
checked, and selecting it unchecks the item. The unchecked item is then
moved to the bottom of the list of any other unchecked items.
55
PART 3 Data Management Functions
Using the Reminder Mode
The Reminder Mode helps you keep track of events that occur once a year, once
a month, or once a day. You can input a reminder message which appears on the
display at preset times. Each reminder can contain up to 384 characters,
including newline symbols.
About Reminder Mode data...
Once you set a reminder, the text that you register along with it appears on the
corresponding date in the Schedule Keeper. You can also set reminder alarms
that sound at specific times on the corresponding dates to make doubly sure that
you don’t forget.
There are three types of reminders.
Annual reminder
This type of reminder appears in the Schedule Keeper on the same date every
year.
Indicates annual
reminder
Indicates reminder alarm
Monthly reminder
This type of reminder appears in the Schedule Keeper on the same date each
month.
Indicates monthly
reminder
Indicates reminder alarm
56
Using the Reminder Mode
Daily reminder
This type of reminder does not appear in the Schedule Keeper, but sounds an
alarm and displays its messages daily.
Inputting reminder data
You can use the same procedure to input annual, monthly, and daily events. The
type of Reminder data is determined by the date information that you input.
Reminder Type
Annual
Monthly
Daily
Month
Input month
Input: “–”
Input: “–”
Date
Input date
Input date
Input: “–”
To input reminder data
Example: To input the message “BIRTHDAY!” as an annual reminder message
for October 13.
1. Enter the Reminder Mode. At this time, you could press CLEAR to clear the
initial Reminder mode screen and change to the month input screen.
2. Input 10 as the month for the annual reminder.
• In the case of a monthly or daily reminder, you would input @ for the month.
3. Press J.
4. Input 13 as the date of the reminder.
• In the case of a daily reminder, you would input @ for the date.
5. Press L(or NEXT).
• If you want to set a Reminder Alarm, you should press J in place of L (or
NEXT). See “To set a Reminder Alarm when inputting data” for details on
setting a Reminder Alarm.
6. Input the reminder message (such as “BIRTHDAY!”).
7. After inputting the data, press SET to store it into memory.
57
PART 3 Data Management Functions
About Reminder Alarms...
You can set reminder alarms that sound at preset times on the dates you specify
in a reminder.
To set a Reminder Alarm when inputting data
1. Enter the Reminder Mode and input the month and date data you want.
2. After inputting the date, press J.
3. Input the reminder alarm time. Input the hour, press J, and then input the
minutes. Use the J and H cursor keys to move between the hour and
minutes setting.
4. Press L and then input a reminder message.
5. After inputting the data, press SET to store it into memory.
To switch Reminder Alarms on and off
1.
2.
3.
4.
5.
Press FUNC once to display the first function menu.
Press 4 to select the SOUND menu item.
Use K and L to select REMINDER.
Use H and J to switch the reminder alarms on and off.
Press SET to store your setting and clear the SOUND menu.
Where to find other information
•
•
58
For information on searching for and recalling data already stored in
memory, see “Recalling data stored in memory” on page 59.
For information on editing, deleting and copying data already stored in
memory, see “Editing, Deleting and Copying data” on page 62.
Recalling data stored in memory
Recalling data stored in memory
The following search capability lets you recall data stored in memory quickly
and easily.
•
•
•
With index search, you scroll through an index display of data items.
With initial character search, you specify the data item you are looking for
by inputting the first few letters of an entry.
With mode search, you specify the data item you are looking for by inputting
characters that might occur anywhere in any one of its entries.
Each of the above search procedures produces an index display of the found
data items. You can then use DISP CHNG to switch to the full data display of
the data item you want.
Note
You cannot perform mode search or initial character search in the Expense
Mode.
To locate data using index search
1. Enter the mode you want to search.
2. Press K or L to scroll through the index display. You can also scroll to the
next page of items by pressing SHIFT K or SHIFT L.
• In the Telephone Directory, Memo Mode, To Do and Reminder Mode,
pressing L when the initial screen of the mode is displayed starts the index
display from the first data item, while pressing K starts from the last data
item.
3. When the data item you are looking for is in the top of the display (the line
immediately below the date in the Schedule Keeper Mode and Expense
Mode), press DISP CHNG to switch to the full data display.
To locate data using initial character search
1. Enter the mode you want to search.
2. Enter the first few characters of the entry for the data item you want to look
for.
• You can input one or more characters.
• In the Reminder Mode, you can input a date for the search instead of text.
See the notes following this procedure for details.
• In the Schedule Keeper Mode, you can input a time for the search instead
of text. See the notes following this procedure for details.
59
PART 3 Data Management Functions
3. Press SEARCH to start the search. An index display of all data items in the
mode whose initial characters match those that you specified appears on the
display.
Indicates this index display
is result of a search operation.
•
To clear the “SEARCH” indicator from the display (and cancel the current
search operation), press either ESC or SEARCH. The search operation is
also canceled when you change modes, or by any data edit or input
operation.
• If no data item matches your specification, the message “NOT FOUND!’’
appears on the display.
• If there is no data stored in memory, the message “NO DATA!’’ appears on
the display.
• When one of the above error messages appears, you can press ESC, H,
or J to display your original specification. Make any necessary changes
and try again. If you don’t want to try again, press CLEAR to clear the
error message.
4. Scroll through the index display item-by-item using K and L. You can
also scroll to the next page of items by pressing SHIFT K or SHIFT L.
5. When the entry of the data item you are looking for is in the top line
(second line in the Schedule Keeper Mode) of the display, press DISP CHNG
to switch to the full data display.
Notes
Note the following when searching for a date in the Reminder Mode.
• When searching for an annual reminder, be sure to input both the month and
date. To search for an annual reminder for October 5, input 1 0 TIME/DATE
•
•
60
5
When searching for a monthly reminder, be sure to input @ for the month.
When searching for a daily reminder, input @ for both the month and the
date.
Recalling data stored in memory
Note the following when searching for a time in the Schedule Keeper Mode.
• To search for a starting time of 10:30 AM for example, input: 1 0 J 3 0.
This will recall all appointments that start at 10:30 AM.
• To search for an item using both a starting time and ending time, such as
10:30 AM to 11:30 AM, input: 1 0 J 3 0 J 1 1 J 3 0. This will recall all
appointments that start at 10:30 AM and end at 11:30 AM.
• Note that you cannot search for an item using the ending time only.
• When you search the Schedule Keeper Mode for text data, matching
Reminder Mode annual and monthly reminders are also recalled.
To locate data using mode search
Use the same procedures as described under “To locate data using initial
character search,” but press SHIFT SEARCH to start the search. Note that
mode search, however, recalls all data items in the mode that contain the
characters you specify anywhere within their data (no just as the initial characters).
Notes
• The following shows how data is recalled by a mode search in the Schedule
Keeper Mode when you specify a time as the search data.
Data Stored in Memory:
10:00 AM
10:00 AM — 11:00 AM
10:30 AM
10:30 AM — 12:00 PM
11:00 AM
Mode Search Specification (specific time): 10:30 AM
Items found:
10:00 AM — 11:00 AM
10:30 AM
10:30 AM — 12:00 PM
Mode Search Specification (time range): 10:00 AM — 11:00 AM
Items found:
10:00 AM
10:00 AM — 11:00 AM
10:30 AM
10:30 AM — 12:00 PM
61
PART 3 Data Management Functions
Editing, Deleting and Copying data
To edit a data item
1. Enter the mode you want to edit a data item.
2. Use index search, initial character search, or mode search to find the data item
you want to edit.
3. Move the entry of the data item you want to edit into the top line (second line
in the Schedule Keeper Mode and the Expense Mode) of the index display.
• At this point, you may want to switch to the full data display by pressing
DISP CHNG. The following steps are the same regardless of whether you are
continuing from the index display or the data display.
4. Press FUNC.
• In the Expense Mode, you should press FUNC twice.
5. Press 1 to select ITEM EDIT.
• To clear the function menu without selecting anything, press ESC.
6. Make any changes you want.
• To cancel the editing operation without making any changes, press ESC
or CLEAR.
7. After making the changes you want, press SET to store the data item with its
new changes.
To delete a single data item
1. Enter the mode you want to delete a data item.
2. Use index search, initial character search, or mode search to find the data
item you want to delete.
3. Move the entry of the data item you want to delete into the top line (second
line in the Schedule Keeper Mode and the Expense Mode) of the index
display.
4. Press FUNC.
• In the Expense Mode, you should press FUNC twice.
5. Press 2 to select ITEM DELETE.
• To clear the function menu without deleting anything, press ESC.
6. Press SET to clear the data item you selected or ESC to abort the operation
without deleting anything.
• Remember that the delete operation cannot be undone.
62
Editing, Deleting and Copying data
To delete all data items in a mode
Important!
Use the following procedure to delete all data items in the Telephone
Directory, Memo Mode, To Do Mode and Reminder Mode. To delete multiple data
items in the Schedule Keeper Mode and Expense Mode, see the procedure under
“To delete multiple data items in the Schedule Keeper Mode or Expense Mode.”
1.
2.
3.
•
4.
•
Enter the mode where you want to delete all data items.
Press FUNC twice to display the second function menu.
Press 2 to select ALL DELETE.
To clear the function menu without deleting anything, press ESC.
Press SET to delete all data items in the current mode or ESC to abort the
operation without deleting anything.
Remember that the delete operation cannot be undone.
To delete multiple data items in the Schedule Keeper Mode or
Expense Mode
1.
2.
•
3.
•
Enter the Schedule Keeper Mode or Expense Mode.
Press FUNC twice to display the second function menu.
In the Expense Mode, you should press FUNC three times.
Press 2 to select ALL DELETE.
To clear the function menu without deleting anything, press ESC.
•
You can use the H and J keys to move the cursor between the starting date
and ending date and change the days, months, and years.
Input the year up to which you want to delete Schedule Keeper or Expense
Mode data and press TIME/DATE.
Input the month and press TIME/DATE.
Input the date and press TIME/DATE.
Press SET to delete all Schedule Keeper or Expense Mode data items
during the period that you specified above, or ESC to abort the operation
without deleting anything.
Note that the above operation does not affect Reminder Mode annual and
monthly reminders that appear in the Schedule Keeper Mode displays.
Remember that the delete operation cannot be undone.
4.
5.
6.
7.
•
•
63
PART 3 Data Management Functions
To move a Schedule Keeper data to a different date
1. Enter the Schedule Keeper.
2. Use index search, initial character search, or mode search to find the data
entry that contains the data you want to move.
• You cannot use this procedure to edit Reminder Mode data.
3. Move the data you want to edit into the second line of the index display.
4. Press FUNC twice to display the second function menu.
5. Press 3 to select DATE CHANGE.
• To clear the function menu without selecting anything, press ESC.
6. Input the year of the date and press TIME/DATE.
7. Input the month of the date and press TIME/DATE.
8. Input the date and press TIME/DATE to move the data and return to the
Schedule Keeper, with the display showing the date you specified.
9. After making any changes you want in the data, press SET to store the data
entry.
To move an Expense Mode data item to a different date
Use the following procedure to change the date entry of an existing Expense
Mode data item.
1.
2.
3.
4.
5.
Enter the Expense Mode.
Recall the data item whose date entry you want to change.
Press FUNC three times to display the third function menu.
Press 3 to select DATE CHANGE.
Input a new date using the following operation sequence:
Year TIME/DATE Month TIME/DATE Date TIME/DATE
•
64
For full details on inputting dates, see “To specify a date” on page 49.
Editing, Deleting and Copying data
6. After inputting the date, press SET to store the data in memory.
•
To abort this operation without changing anything, press ESC instead of SET.
Note
• When you press TIME/DATE after inputting the date in step 5 of the above
procedure, the unit enters the data editing mode. At this time you can use the
K and L keys to move the cursor around the data item and make changes
in other entries if you want.
To copy a data item
The Copy Function lets you duplicate selected data. This function helps to cut down
input time when you have multiple data items with similar data. You simply copy
the original and then make any necessary changes to create a new data item.
1.
2.
3.
•
4.
•
•
Enter the mode you want to copy a data item.
Search for and display the data you want to copy.
Press FUNC.
In the Expense Mode, you should press FUNC twice.
Press 3 to select ITEM COPY.
At this time, the copy of the data you selected in step 2 above appears, along
with the cursor.
If you are copying Schedule Keeper or Expense Mode data, the following
screen appears at this point to ask you to specify the date where the data
should be copied to.
• Input the year, month, and date, following each entry by pressing TIME/DATE.
5. Make any changes you want.
6. After you are finished making changes, press SET to store the new data in
memory.
65
PART 3 Data Management Functions
Using the Secret function
The Secret Function ensures that your personal data is kept private, but providing
you with the means to restrict access to those who know your secret password.
You can store Telephone Directory, Memo Mode, Schedule Keeper, To Do
Mode, Expense Mode and Reminder Mode data in the secret memory area.
Important!
Once you register a password, there is no way delete it without performing the
RESET operation described on page 19. If you forget your password, you will not
be able to recall data stored in the secret memory area, and you also will not be
able to use the Secret Function unless you perform the RESET operation. Be sure
that you do not forget your password!
To create a secret memory area
1. Enter the Telephone Directory, Memo Mode, Schedule Keeper, To Do Mode,
Expense Mode or Reminder Mode.
2. Press C to display the password input screen.
3.
•
4.
•
Enter the word you want to use as your secret password.
You can use up to 48 letters, numbers and symbols in a password.
Press C again to store the password.
The following shows an example display for the Telephone Directory.
Total number of
data items in
Telephone
Directory secret
memory area
Prompt for name
input
66
Secret memory
area indicator
Using the Secret function
5. While in the secret memory area, you can change modes, input data, edit
data, recall data, and delete data using the procedures explained under each
mode in this manual.
6. To exit the secret memory area (and return to the open memory area),
press C.
• At this time, the “C’’ indicator disappears from the display.
To enter an existing secret memory area
1. Enter the Telephone Directory, Memo Mode, Schedule Keeper, To Do Mode,
Expense Mode or Reminder Mode.
2. Press C to display the password input screen.
3. Enter the password.
4. Press C again to enter the secret memory area for the mode you selected
in step 1 above.
• If the password you enter in step 3 does not match the one that is registered,
the message “PASSWORD MISMATCH!’’ appears.
To edit an existing password
1. While in the secret memory area, press CLEAR, followed by C to display
the currently registered password.
2. Press FUNC once to display the first function menu.
3. Press 1 to select PASSWORD EDIT.
• The password reappears on the display with the cursor. Make any changes
in the password you want.
4. After editing the password, press C to store it.
67
PART 3 Data Management Functions
To transfer data from the open memory area to the secret
memory area
1. While not in the secret memory area, enter the Telephone Directory,
Memo Mode, Schedule Keeper, To Do Mode, Expense Mode, or Reminder
Mode.
2. Search for and display the data you want to move.
3. Press FUNC twice to display the second function menu.
• In the Expense Mode, you should press FUNC three times.
4. Press 1 to select TO SECRET AREA.
• At this time, a prompt appears on the display asking you for the password
registered for the secret memory area.
5. Enter the password.
6. Press C.
• If the password you enter in step 5 does not match the one that is registered,
the message “PASSWORD MISMATCH!’’ appears.
7. Press SET to transfer the selected data from the open memory area to the
secret memory area, or ESC to abort the operation without transferring
anything.
• When you transfer data to the secret memory area, it is automatically deleted
from the open memory area.
To transfer data from the secret memory area to the open
memory area
1. Enter the Telephone Directory, Memo Mode, Schedule Keeper, To Do Mode,
Expense Mode, or Reminder Mode.
2. Enter the secret memory area.
3. Search for and display the data you want to move.
4. Press FUNC twice to display the second function menu.
• In the Expense Mode, you should press FUNC three times.
5. Press 1 to select TO OPEN AREA.
6. Press SET to transfer the selected data from the secret memory area to the
open memory area, or ESC to abort the operation without transferring anything.
• When you transfer data to the open memory area, it is automatically deleted
from the secret memory area.
68
PART 4
Timekeeping Functions
Using the Home Time function
The Home Time function shows you the current time and date in the time zone
you preset as your Home Time zone. You also can set a daily alarm that sounds
at the same time each day.
About Home Time displays...
There are two types of Home Time displays.
Home Time Display
Date
City Code
Day of the week
AM/PM indicator
(12-hour format
only)
Current time
Alarm Display
AM/PM indicator
(12-hour format
only)
Alarm time
Use DISP CHNG to switch between the Home Time display and the Alarm display.
69
PART 4 Timekeeping Functions
To display the Home Time
Press HOME/WORLD to display the current Home Time.
To set the Home Time zone
1. Press HOME/WORLD to display the current Home Time.
2. Press FUNC twice to display the function menu for the ZONE CHANGE
operation.
3. Press 2 to select ZONE CHANGE.
City code
•
The current zone flashes on the World Map display. Its city code is also
shown.
• You can edit city code names. See “To edit a city code name”.
4. Use the H and J cursor keys to move the flashing time zone on the World
Map. Note that the city code changes as you do.
5. When the time zone that you want for the Home Time is flashing (and the city
code you want is shown on the display), press SET to register the new zone.
70
Using the Home Time function
To set the Home Time
1. Display the current Home Time.
2. Press FUNC once to display the function menu for the HOME TIME SET
operation.
3. Press 1 to select HOME TIME SET.
• The current hour setting on the display flashes because it is selected.
4. Use the H and J cursor keys or TIME/DATE to move the flashing
selection around the Home Time display. When any number is selected
(flashing), you can change it by entering a new value.
• You can change the Home Time setting even if summer time (DST) is
selected.
• Use 12-hour format if the Home Time is set for 12-hour format or 24-hour
format if the Home Time is set for 24-hour format.
• If you are using 12-hour time format, press A to specify AM or P to specify
PM while the hour or minutes are flashing on the display.
• All illegal input (26 for the hour, 65 for the minutes) is ignored.
• Years can be input within the range of 1901 through 2099.
• An input value from 1 to 49 for the year is automatically converted to the
corresponding 21st century year (2001 to 2049). A value from 50 to 99 is
converted to the corresponding 20th century year (1950 to 1999).
5. After you set the time and date, press SET to store them.
• The seconds count of the timepiece resets to “00'’ when you press SET.
To switch the Home Time between 12-hour and 24-hour format
1.
2.
3.
•
•
Display the current Home Time.
Press FUNC once to display the first function menu.
Press 2 to select 12/24 HOURS.
The 12-hour/24-hour setting is set up as a toggle setting. This means that
each time you select the 12/24 HOURS item in the function menu, the Home
Time display switches from its present setting to the opposite one.
The 12-hour/24-hour setting you make is applied for the time displays
in the Schedule Keeper, Reminder Mode, Home Time and World Time
display.
71
PART 4 Timekeeping Functions
To switch the Home Time between standard and daylight
saving time
1.
2.
3.
•
•
Display the current Home Time.
Press FUNC once to display the first function menu.
Press 3 to select DST ON/OFF.
The standard/DST setting is set up as a toggle setting. This means that each
time you select the DST ON/OFF item in the function menu, the Home Time
display switches from its present setting to the opposite one.
The following shows an example display with the DST indicator (which
indicates that DST is on).
To edit a city code name
1.
•
2.
3.
Display the Home Time.
You can also edit a city code name starting from the Home Time display.
Press FUNC twice to display the second function menu.
Press 3 to select ZONE NAME EDIT.
Ball cursor
City codes
Difference from GMT
4. Use the K and L cursor keys to move the ball cursor up and down until it
is located to the left of the time zone whose city code you want to edit.
• Holding down either key moves the ball cursor at high speed.
• The display starts to scroll automatically whenever the ball cursor reaches
the top or the bottom of the display.
72
Using the Home Time function
5. Press the J cursor key, and a cursor appears in the city code of the time zone
at which the ball cursor is located.
Cursor
6. Make any changes you want in the city code where the cursor is located.
7. After editing a city code, press SET to store it in memory.
To set the Daily Alarm
1.
2.
3.
4.
•
5.
Display the current Home Time.
Press DISP CHNG to display the current daily alarm setting.
Press FUNC once to display the first function menu.
Press 1 to select ALARM TIME SET.
The alarm’s hour setting on the display flashes because it is selected.
Use the H and J cursor keys or TIME/DATE to move the flashing selection
between the hour and the minutes setting. When either value is selected
(flashing), you can change it by entering a new value.
• Use 12-hour format if the Home Time is set for 12-hour format or 24-hour
format if the Home Time is set for 24-hour format.
• If you are using 12-hour time format, press A to specify AM or P to specify
PM.
• All illegal input (26 for the hour, 65 for the minutes) is ignored.
6. After you set the alarm time, press SET to store it.
• For details on how to switch the Daily Alarm off, see “To switch the key input
and alarm tones on and off” on page 25.
About the daily alarm...
Once you set the daily alarm, it sounds at the same time every day (as long as
the DAILY AL setting is ON).
73
PART 4 Timekeeping Functions
To select the date format
1.
2.
3.
4.
•
Display the current Home Time.
Press FUNC twice to display the second function menu.
Press 4 to select DATE FORMAT.
Select a format by entering its number.
The following shows an example of each format
1 M/D/Y: JAN/1/2000 SAT
2 D/M/Y: 1/JAN/2000 SAT
3 Y/M/D: 2000/1/1 SAT
74
Using the World Time function
Using the World Time function
With the World Time function, you can view the current time in any one of 29 time
zones around the world. The times and dates that appear in the World Time
displays are based on the current Home Time setting.
AM/PM indicator
(12-hour format only)
City Code
Current time
To display the World Time
While the Home Time is shown, press HOME/WORLD to display the World
Time.
• The time zone that you last selected when displaying the World Time
appears on the display.
To set the World Time zone
Enter the World Time Mode and perform the same procedure as that described
under “To set the Home Time zone” on page 70.
To switch a World Time zone between standard and daylight
saving time
Select the World Time zone that you want to set summer time for, and then
perform the same procedure as that described under “To switch the Home Time
between standard and daylight saving time” on page 72.
To edit a city code name
Enter the World Time Mode and perform the same procedure as that described
under “To edit a city code name” on page 72.
75
PART 4 Timekeeping Functions
City Code List
76
City
Code
City Name
Time
Difference
– 11
HNL
ANC
LAX
DEN
CHI
NYC
CCS
RIO
– 2H
– 1H
LON
PAR
CAI
JRS
JED
THR
DXB
KBL
KHI
DEL
DAC
RGN
BKK
HKG
TYO
ADL
SYD
NOU
WLG
(GMT – 11)
Honolulu
Anchorage
Los Angeles
Denver
Chicago
New York
Caracas
Rio de Janeiro
(GMT – 2)
(GMT – 1)
London
Paris
Cairo
Jerusalem
Jeddah
Tehran
Dubai
Kabul
Karachi
Delhi
Dhaka
Yangon
Bangkok
Hong Kong
Tokyo
Adelaide
Sydney
Noumea
Wellington
– 11
– 10
– 09
– 08
– 07
– 06
– 05
– 04
– 03
– 02
– 01
± 00
+ 01
+ 02
+ 02
+ 03
+ 03:30
+ 04
+ 04:30
+ 05
+ 05:30
+ 06
+ 06:30
+ 07
+ 08
+ 09
+ 09:30
+ 10
+ 11
+ 12
Other Cities in Zone
Midway
San Francisco, Seattle, Las Vegas
El Paso
Dallas, Mexico City, Houston
Washington D.C., Boston,Montreal
Santiago
Sao Paulo, Buenos Aires
Azores
Greenwich Mean Time
Rome, Madrid, Amsterdam, Berlin
Athens, Helsinki, Beirut
Kuwait, Nairobi
Shiraz
Abu Dhabi
Calcutta, Mumbai
Colombo
Jakarta, Hanoi
Beijing, Taipei, Singapore, Manila
Seoul, Pyongyang
Darwin
Guam
Port vila
Auckland
PART 5
Calculator Functions
Using the Calculator
Whenever you enter the Calculator Mode, some of the keys on the SF Unit
keyboard take on calculator functions.
To enter the Calculator Mode
Press CAL/CONV to enter the Calculator Mode.
About the Calculator Mode keys...
The following illustration shows the SF Unit keys that are used in the Calculator
Mode.
7
8
9
÷
4
5
6
#
1
2
3
–
0
.
=
+
TIME/DATE
•
•
•
•
AC
C
MC
MR
Q
W
E
R
M
T
M
Y
U
I
AC — clears the calculator completely (except the calculator memory).
Use C to clear a value if you have not yet entered the operator following that
value.
CLEAR — clears the calculator.
Use the number keys ( 0 through 9 ) to enter values. Press • to input a decimal
point.
77
PART 5 Calculator Functions
•
•
•
•
•
•
•
78
Use MC, MR, M@ and M+ for calculator memory operations.
MC — clears the calculator memory.
MR — recalls the current calculator memory contents.
M@ — subtracts the currently displayed value from the current memory
contents. You can also press M@ to execute a calculation, with the
result being subtracted from the memory contents.
M+ — adds the currently displayed value to the current memory contents. You can also press M+ to execute a calculation, with the
result being added to the memory contents.
Use !, @, # and $ to specify the arithmetic operation that is marked above
each key.
= — executes a calculation and displays its result.
Use % for percentage calculations.
Use ` for square root calculations.
J shifts the displayed value to the right, cutting off the rightmost digit.
TIME/DATE — used for date calculation.
Using the Calculator
To perform calculations
a
53q123w63u
23w56e963u
56e3w89r5.2
q63u
123456e741852u
C
3ye5u
23qq12u
45u
78u
5.6ww7u
2u
12ee2.3u
4.5u
9.6rr45u
78u
78.19230769
E 9.158608051
9.158608051
8.660254035
35.
K+
K+
68.
101.
K+
K−
1.4
K−
− 3.6
27.6
K×
54.
K×
K÷
4.6875
8.125
K÷
12% of 1500
1500e12t
180.
Percentage of 660 against 880
660r880t
75.
15% add-on of 2500
2500e15tq
2875.
25% discount of 3500
53 + 123 − 63 =
963 × (23 − 56) =
(56 × 3 − 89) ÷ 5.2 + 63 =
123456 × 741852 =
3× 5=
12 + 23 =
45 + 23 =
78 + 23 =
7 − 5.6 =
2 − 5.6 =
2.3 × 12 =
4.5 × 12 =
45 ÷ 9.6 =
78 ÷ 9.6 =
0.
113.
− 31779.
3500e25tw
2625.
What will the selling price and
profit be when the purchasing
price of an item is $480 and
the profit rate to the selling
price is 25%?
480q25t
w
640.
160.
If you made $80 last week and
$100 this week, what is
the percent increase?
100w80t
25.
80 × 9 = 720
−) 50 × 6 = 300
20 × 3 = 60
480
{80e9|
50e6}
20e3|
\
M
M
M
M
720.
300.
60.
480.
79
PART 5 Calculator Functions
To perform constant calculations
}
3 qq 2
u
u
1. Enter the Calculator Mode.
2. Enter the calculation, pressing the arithmetic operator
key twice. This will causes the “K” indicator to appear on
the display to indicate a constant calculation.
• You can use this constant calculation technique for
addition, subtraction, multiplication, and division.
3. Press & to display the initial result (in this case, 5).
4. Press & again to add 3 to the result (in this case, 5 + 3
= 8).
• You can repeat the above operation as many times as
you like. Each time you press &, the previous result
obtained is added to, subtracted from, multiplied by, or
divided by the value to the left of the arithmetic operator.
• To clear a constant calculation, press AC.
To correct errors in calculations
If you enter a wrong value, press C and then enter the correct value.
If you press the wrong arithmetic operator key (!, @, #, $), simply press the
correct key before entering anything else.
About calculation errors...
Whenever an error occurs, the indicator “E” appears on the display.
The following conditions all result in errors.
•
80
When the number of digits in the mantissa of an intermediate or a final result
exceeds 10 digits.
Performing date calculations
•
•
When the number of digits in the mantissa of a value stored in memory
exceeds 10 digits. In this case, the SF Unit automatically retains the last value
stored that did not exceed 10 digits.
Division by zero.
To clear errors
Press C to continue with the same calculation. If you want to clear the calculation
and start again, press AC.
Performing date calculations
The SF Unit lets you perform calculations involving dates within the range of
January 1, 1901 through December 31, 2099. If you try to use dates outside this
range, the “E” indicator appears on the display to indicate an error. Note that you
can use constant calculation techniques and calculation memory when performing date calculations.
To calculate the number of days between two dates
}
2000 O 7
O3
1. Enter the Calculator Mode.
2. Enter the later date, pressing TIME/DATE after the year
and month entries.
• Here, we will calculate the number of days between
December 5, 1999 and July 3, 2000.
w
3. Press @ for the subtraction operation.
81
PART 5 Calculator Functions
1999 O 12
O5
4. Enter the earlier date, pressing TIME/DATE after the
year and month entries.
u
5. Press & to display the result.
To calculate the date that is a specific number of days after
another date
}
2010 O 12
O 20
q
300
u
1. Enter the Calculator Mode.
2. Enter the date, pressing TIME/DATE after the year and
month entries.
• Here, we will calculate the date that comes 300 days
from December 20, 2010.
3. Press ! for the addition operation.
4. Enter the number of days.
5. Press & to display the result.
•
82
Use subtraction instead of addition to calculate a date
that is a specific number of days before a date.
Using the General Conversion Mode
Using the General Conversion Mode
The General Conversion Mode lets you perform currency conversions between
up to three national currencies. You can also define cross rates to perform
conversions between different currency pairs.
To enter the General Conversion Mode
Press CAL/CONV twice to enter the Conversion Mode.
• Use DISP CHNG to change modes between the General Conversion Mode
and Euro Conversion Mode.
DISP
CHNG
General Conversion
Euro Conversion
To set an exchange rate
•
•
•
Initially this mode is set up to convert between dollars ($), pounds (£), and yen
(¥).
Be sure to set the correct rates before performing currency conversions.
You can change currency names and specify the exchange rate to use for
conversions.
Example 1
Set the following conversion rates.
$1 1 = £1.7125 2
£1 2 = ¥130 3
83
PART 5 Calculator Functions
1. Enter the General Conversion Mode.
1
2
3
2.
3.
4.
5.
Use K and L to move the cursor to 2£ (pounds), and then press FUNC.
Press 1 to select SETTINGS.
Press SET.
Input the current exchange rate for the number of pounds 2 per dollar 1.
6. Press SET.
7. Input the current exchange rate for the number of yen 3 per pound 2.
8. Press SET.
84
Using the General Conversion Mode
Example 2
Add the following cross conversion rate to the rates you set in Example 1,
above.
$1 1 = ¥105 3
9. Enter the General Conversion Mode.
1
2
3
10. Use K and L to move the cursor to 3 ¥ (yen), and then press FUNC.
11. Press 1 to select SETTINGS.
12 Press SET.
13. Input the current exchange rate for the number of yen 3 per dollar 1.
14. Press SET.
Note
• The interrelationship between rate 2 and rate 3 remains in accordance with
the settings you made in step 7 of Example 1.
15. Press SET.
To view the current General Conversion Mode rates
1. Enter the General Conversion Mode
2. Press FUNC.
3. Press 2 to select RATE TABLE.
•
Press ESC to return to the General Conversion Mode initial screen.
85
PART 5 Calculator Functions
To perform a currency conversion
Example 1
How many 2 £ (pounds) and 3 ¥ (yen) are 1 $50 (dollars)?
1. Enter the General Conversion Mode.
2. Use K and L to move the cursor to 1 $ (dollar).
3. Enter 5 0.
1
2
3
4. Press SET or =.
Example 2
How many 1 $ (dollars) and 3 ¥ (yen) are 2 £ 100 (pounds)?
1. Enter the General Conversion Mode.
2. Use K and L to move the cursor to 2 £ (pounds).
3. Enter 1 0 0.
1
2
3
4. Press SET or =.
86
Using the General Conversion Mode
Notes
• Any decimal values produced by a calculation result are handled in accordance with the decimal value setting you make using the procedure under “To
specify decimal value handling”.
• Pressing an arithmetic key (+, –, #, $) immediately after a conversion
switches to the Calculator Mode with the conversion result part of the
calculation.
Pressing CAL/CONV in the Conversion Mode immediately after performing a
conversion clears the display to zero.
• Pressing CAL/CONV in the Calculator Mode changes to the Conversion
Mode with the calculated result ready for conversion.
To change the currency name and rate
Example
To specify an exchange rate of $1 (dollar) = 1.1825 DEM
1. Enter the General Conversion Mode.
2. Use K and L to move the cursor to £ (pounds), and then press FUNC.
3. Press 1 to select SETTINGS.
4. Input “DEM”, and then press SET.
87
PART 5 Calculator Functions
5. Enter 1 . 1 8 2 5.
6. Press SET.
• This stores the input value into memory.
7. Input a rate for converting deutsche marks to yen.
8. Press SET.
To specify decimal value handling
1. Enter the Conversion Mode.
2. Use K and L to move the cursor to the currency whose decimal place
setting you want to change, and then press FUNC.
88
Using the General Conversion Mode
3. Enter 3 to select DECIMAL PLACES.
• 0: Round off to an integer (no decimal places) (1.6253 → 2)
• 2: Round off to two decimal places (1.6253 → 1.63)
• EXACT FIGURE: No rounding
4. Use K and L to move the pointer to the decimal place option you want to
select.
5. Press SET to apply your selection.
About conversion errors...
Whenever an error occurs, the indicator “E” appears on the display.
The following condition results in error.
•
When the number of digits in the mantissa of an intermediate or a final result
exceeds 10 digits.
To clear errors
Press AC, C, or CLEAR to clear the conversion errors.
89
PART 5 Calculator Functions
Using the Euro Conversion Mode
•
•
This mode lets you convert between euros ( ) and national currencies.
You can select form any of 11 European currencies and their fixed exchange
rates, or you can input your own national currency name and rate.
To enter the Euro Conversion Mode
Press CAL/CONV twice to enter the Conversion Mode.
• Use DISP CHNG to change modes between the General Conversion Mode
and Euro Conversion Mode.
DISP
CHNG
General Conversion
Example
To select the fixed exchange rate of 1
Euro Conversion
(euro) = 166.386 ESP (peseta)
1. Enter the Euro Conversion Mode.
2. Use K and L to move the cursor to DEM, and then press FUNC.
3. Press 1 to select SETTINGS.
•
90
Use K and L to scroll through the preprogrammed currencies and fixed
exchange rates, and then choose “ESP” (See “Pre-programmed Currencies
and Fixed Exchange Rates”).
Using the Euro Conversion Mode
4. Press SET twice.
• This registers the fixed exchange rate you recalled, so you can use it for
currency conversion.
Pre-programmed Currencies and Fixed Exchange Rates
Country
Germany
France
Italy
Spain
Netherlands
Belgium
Portugal
Austria
Finland
Ireland
Luxembourg
•
Fixed Rate (per euro)
1.95583 DEM (marks)
6.55957 FRF (francs)
1936.27 ITL (lira)
166.386 ESP (peseta)
2.20371 NLG (guilder)
40.3399 BEF (franc)
200.482 PTE (escudo)
13.7603 ATS (shilling)
5.94573 FIM (markka)
0.787564 IEP (pound)
40.3399 LUF (franc)
Decimal Places
2
2
0
0
2
0
0
2
2
2
0
The Decimal Places column of the above table shows the default setting for
the number of decimal places for each currency. These settings can be
changed to 0 (round off to integer), 2 (round off to two decimal places), or
EXACT FIGURE (no rounding). See “To specify decimal value handling” on
page 88.
To view the euro conversion rate table
1. Enter the Euro Conversion Mode.
2. Press FUNC.
91
PART 5 Calculator Functions
3. Press 2 to select RATE TABLE.
•
Press ESC to return to the Euro Conversion Mode initial screen.
To perform the currency conversion
The following examples assume that the pre-programmed currencies DEM, FRF
and ITL are already selected.
Example 1
How many 2 DEM (marks), 3 FRF (francs) and 4 ITL (lira) are 1 50
1. Enter the Euro Conversion Mode.
2. Use K and L to move the cursor to
1
2
3
4
3. Input 5 0.
4. Press SET or =.
92
(euros).
(euros)?
Using the Euro Conversion Mode
Example 2
How many 1
(euros), 3 FRF (franc) and 4 ITL (lira) are 2 100 DEM (marks)?
1. Enter the Euro Conversion Mode.
2. Use K and L to move the cursor to DEM.
1
2
3
4
3. Enter 1 0 0.
4. Press SET or =.
Notes
• Any decimal values produced by a calculation result are handled in accordance with the decimal value setting you make using the procedure under “To
specify decimal value handling”.
• Pressing an arithmetic key (+, –, #, $) immediately after a conversion
switches to the Calculator Mode with the conversion result part of the
calculation.
Pressing CAL/CONV in the Conversion Mode immediately after performing a
conversion clears the display to zero.
• Pressing CAL/CONV in the Calculator Mode changes to the Conversion
Mode with the calculated result ready for conversion.
To change the currency name and rate
Example
To change the DEM name to US$ and the rate to 1.7125.
1. Enter the Euro Conversion Mode.
2. Use K and L to move the cursor to DEM, and then press FUNC.
3. Press 1 to select SETTINGS.
93
PART 5 Calculator Functions
4. Type “US$”, and then press SET.
5. Input 1 . 7 1 2 5, and then press SET.
•
This stores the input value into memory.
Notes
• You can input up to four characters for the currency name.
• You can input a rate within the range of 999999 to 0.0001. EU regulations
stipulate six significant digits for the rate. For digits less than 1, the rate can
have up to six digits starting with the first non-zero digit.
Example
0.123456, 0.0123456, 0.000123456
To specify decimal value handling
Refer to “To specify decimal value handling” on page 88.
About conversion errors...
Refer to “About conversion errors...” on page 89.
To clear errors
Press AC, C, or CLEAR to clear the conversion errors.
94
PART 6
Data Communications
Data communications capabilities let you transfer data between two CASIO SF
Units, between an SF Unit and a CASIO CSF Unit or NX Unit, or between this unit
and a personal computer. You can perform such operations in the Telephone
Directory, Memo, Schedule Keeper, Calendar, To Do, Expense or Reminder
modes.
About data compatibility
Whenever you exchange data with a CASIO SF Unit, there are certain restrictions concerning data compatibility.
Send data
• You cannot send data to the CASIO SF-A Series Units (SF-A10, etc.).
• Some SF Units, CSF Units, NX Units do not have modes that are included
with this Unit. For example, some Units do not have a Reminder Mode or an
Expense Mode. Data from a mode cannot be received by an SF Unit, CSF
Unit, NX Unit unless that SF Unit, CSF Unit, NX Unit also has the same mode.
• Data cannot be sent from this SF unit to a CASIO SF-5580, 5580E, 5590SY,
5590SYE, 5780, 5780E, 5790SY, 5790SYE, 5980, 5980E, 5990SY, 5990SYE,
6500SY, 6700SY, 6900SY, 7100SY or 7200SY unit.
• When data is sent from this SF Unit to a CASIO CSF or NX Unit, data stored
in Telephone Directory items FREE1 through FREE6 is stored in the
Telephone Directory MEMO item of the unit to which you are sending data,
with newline symbols between the FREE items.
• When data is sent from this SF Unit to a CASIO CSF or NX Unit, all text is blue.
• When data is sent from this SF Unit to a CASIO CSF or NX Unit, all calendar
highlighting is blue.
• The euro mark can be transferred between two SF-4900ER/SF-4980ER/
SF-4985ER units. Euro marks are replaced by blank spaces when data is
transferred from a SF-4900ER/SF-4980ER/SF-4985ER unit to an older
model.
Receive data
• You cannot receive data from the CASIO SF-A Series Units (SF-A10, etc.).
• Some SF Units, CSF Units, NX Units have modes that are not included with
this unit. Data from such modes cannot be received by this unit.
• The Schedule Keeper of some SF Units is capable of storing multiple-date
data items. Whenever you transfer such a data item to the your SF Unit, it is
automatically converted to a single-date data item. The date used is the one
that starts the original multiple-date data item.
95
PART 6 Data Communications
•
•
•
•
•
•
Some SF Unit models have a mark protection feature to protect against
accidental erasure of data. This unit does not feature mark protection, and so
such data is received by this unit disregarding the mark protection.
Data cannot be sent to this SF Unit from a CASIO SF-5580, 5580E, 5590SY,
5590SYE, 5780, 5780E, 5790SY, 5790SYE, 5980, 5980E, 5990SY, 5990SYE,
6500SY, 6700SY, 6900SY, 7100SY or 7200SY unit.
When data is sent to this SF Unit from a CASIO CSF or NX Unit, CSF/NX
Telephone Directory MEMO item data is stored in the Telephone Directory
FREE1 item of this SF Unit.
When data is sent to this SF Unit from a CASIO CSF or NX Unit, all text
becomes monochrome.
When data is sent to this SF Unit from a CASIO CSF or NX Unit, all calendar
highlighting becomes monochrome. All CSF/NX calendar dates that are
orange or green are converted to highlighted dates.
This unit cannot receive PERSONAL, FAMILY, TIMETABLE, or GOLF
memo data from a CASIO NX Unit.
Setting Up for Data Communications
The following describes what you should do to set up for data communications
between two SF Units, between an SF Unit and a CASIO CSF Unit or NX Unit,
or between this unit and a personal computer.
To connect the SF-4900ER/SF-4980ER/SF-4985ER to another
SF Unit (or CSF Unit/NX Unit)
1. Make sure that the power of both units is switched off.
2. Open the covers of the data communication jacks of the two SF Units.
3. Connect the two units using the optional SB-62 cable.
•
96
The 3-pin plug of the SB-62 cable is a two-step type. When attaching the plug,
be sure to push it firmly into the jacks as far as it will go.
Setting Up for Data Communications
Important!
• Be sure to close the connector covers of the SF Units when you are not
performing data communications.
Performing data communications between an SF Unit and a
personal computer
See the manual that comes with FA-127 Version1.4 for details on connecting to
a computer and setting up for communication.
Note
• The CASIO Data Communication Package may not be included with certain SF
Units models. If your unit does not come with the Data Communication
Package, contact your dealer about purchasing one. Please note that there are
a number of different CASIO Data Communication Packages to suit various
computers and SF Unit types. Because of this, you should note the following
important points when purchasing a Data Communication Package. If you
have any question about which package you need, consult with your dealer.
•
•
•
Make sure the Data Communication Package is designed for use with
your particular model of personal computer.
If the proper Data Communication Package is not yet available in your
area, consult with your dealer to find out when it is scheduled to go on
sale.
For information on how to connect the SF Unit with a personal computer,
see the user’s manual that comes with a Data Communication Package.
97
PART 6 Data Communications
To set the SF Unit hardware parameters
1. Press FUNC twice to display the second function menu.
• You can perform the above operation in the Telephone Directory, Memo
Mode, Schedule Keeper, To Do Mode, Calendar or Reminder.
• In the Expense Mode, you should press FUNC three times.
2. Press 4 to select DATA COMM.
3. Press 3 to select SET UP PAR.
•
The highlighted items on the display are the parameters that are currently
set.
• The PARITY parameter is flashing because it is selected.
4. Use the K and L cursor keys to change the selected parameter on the display.
5. Use the H and J cursor keys to change the highlighted setting of the
currently selected parameter.
6. When the parameters are set the way you want them, press SET to store
them in memory.
About communications parameters...
Communications parameters make it possible for two communicating units to
understand each other. The following explanations are provided for your information only. The only thing you need to remember is that the parameters of the send
unit and the receive unit must be identical. Otherwise you will not be able to
transfer data successfully.
PARITY
Parity is used for error detection during data exchanges. You can set the SF Unit
parity as even (E), odd (O), or none (N).
BIT LENGTH
The bit length parameter states how many bits are to be used for each character.
You can set the SF Unit bit length as 7 bits or 8 bits.
BPS
The letters “BPS” stand for “bits per second,” and this setting represents
the speed at which data is sent. The SF Unit lets you set a speed of either 4800
or 9600.
98
Setting Up for Data Communications
To set up the SF Unit to receive data
1. While an initial screen is displayed, press FUNC twice to display the second
function menu.
• You can perform the above operation while the initial screen of the Telephone
Directory, Memo Mode, Schedule Keeper, To Do Mode, Calendar or Reminder is displayed.
• In the Expense Mode, you should press FUNC three times.
• If you want the received data to be stored in the secret memory area, you
should also enter the secret memory area at this point. If you are in the open
memory area on the receiving unit, received data is stored into the open
memory area.
2. Press 4 to select DATA COMM.
3. Press 2 to select RECEIVE.
•
This message indicates that the receive unit is standing by for data. Perform
the required procedures to start sending data from another SF Unit, a CSF
Unit, an NX Unit (see manual for details) or a personal computer (see the
Interface Unit manual for details).
• To abort the receive operation at any time, press ESC.
• This procedure is the same regardless of whether the data is received from
another SF Unit, a CSF Unit, an NX Unit or from a personal computer.
4. The display changes to the following once the SF Unit starts receiving data.
Receive data
item count
•
•
•
The number of data items received is counted on the display.
If an error occurs during the receive operation, the message “TRANSMIT
ERROR!” appears on the display. Press ESC to clear the error message.
Received data is added to the data already stored in memory. If the memory
becomes full during the receive operation, the message “MEMORY FULL!”
appears and data transfer stops. Press ESC to clear the error message.
99
PART 6 Data Communications
•
If an alarm (Daily Alarm, Schedule Alarm or Reminder Alarm) is reached
while data is being received, the alarm does not sound until the data receive
operation is complete.
Sending Data
This section tells you how to operate the SF Unit to send data to another SF Unit,
a CSF Unit, an NX Unit or to a personal computer. There are a number of possible
procedures you can use, depending on the mode and how many data items you
want to send. Note that the following information is for the SF Unit only. Consult
with your manuals for the correct operation of your other SF Unit, a CSF Unit, an
NX Unit or personal computer.
About data transfer types...
There are a number of different ways you can transfer data.
• One Data Item
This transfer method lets you send a single Telephone Directory, Memo Mode,
Reminder Mode, Schedule Keeper, To Do Mode or Expense Mode item from the
SF Unit.
• Mode Data Items
This method is used to send all data items stored in the Telephone Directory,
Memo Mode, To Do Mode, Calendar or Reminder Mode from the SF Unit.
With the Schedule Keeper or Expense Mode, this procedure can be used to send
all the data stored in a specific period (from one date to another).
For the Calendar Mode, this procedure makes it possible to send all the highlight
data in a specific period (from one month to another).
• Month Data
This method lets you send the highlight data for a specific month in the Calendar
Mode.
• All Data Items
With this method, you can send all data items stored in the Telephone Directory,
Memo Mode, Reminder Mode, Schedule Keeper, To Do Mode, Expense Mode
and the Calendar from the SF Unit.
100
Sending Data
Note
• If an alarm (Daily Alarm, Schedule Alarm or Reminder Alarm) is reached
while data is being sent, the alarm does not sound until the data send
operation is complete.
To send all data items
1. While an initial screen is displayed, press FUNC twice to display the second
function menu.
• You can perform the above operation while the initial screen of the Telephone
Directory, Memo Mode, Schedule Keeper, To Do Mode, Calendar or Reminder is displayed.
• In the Expense Mode, you should press FUNC three times.
• Note that this operation sends all open memory area data or all secret
memory area data. Make sure you are in the memory area you want (open
or secret) before proceeding.
2. Press 4 to select DATA COMM.
3. Press 1 to select SEND.
4. Press 3 to select ALL DATA.
5. Press SET to start the send operation or ESC to abort the operation without
sending anything.
•
Data is sent in the sequence: Telephone Directory, Memo Mode, Reminder
Mode, Schedule Keeper, Calendar, To Do Mode, Expense Mode.
• To abort the send operation at any time, press ESC.
• If an error occurs during the send operation, the message “TRANSMIT
ERROR!” appears on the display. Press ESC to clear the error message.
• Some SF Units do not have modes that are included with this unit. For
example, some units do not have a To Do Mode, Expense Mode, or
Reminder Mode. Data from a mode cannot be received by an SF Unit
unless that SF Unit also has the same mode. When sending data to a
personal computer, certain mode data may be disregarded, depending
upon the version of software you are using for SF data handling on the
personal computer.
6. After the send operation is complete, the display returns to the screen of
the mode you were in when you started this procedure.
101
PART 6 Data Communications
To send one Telephone Directory, Memo Mode, To Do Mode, or
Reminder Mode item
1. In the Telephone Directory, Memo Mode, To Do Mode, or Reminder Mode,
press FUNC twice to display the second function menu.
• You can perform the following operation while in the open memory area or the
secret memory area.
2. Press 4 to select DATA COMM.
3. Press 1 to select SEND.
4. Press 1 to select ONE ITEM.
5. Press K or L to show an index display of items stored in memory.
• Pressing L starts the index display from the top of the data items, while
pressing K starts from the bottom.
• You could also use initial character search or mode search to locate the data
you want to send.
6. Use K and L to scroll through the index display until the item you want to
send is located in the top line.
7. Press DISP CHNG to switch to the data display of the selected item.
8. Press SET to start the send operation or ESC to abort the operation without
sending anything.
• To abort the send operation at any time, press ESC.
• If an error occurs during the send operation, the message “TRANSMIT
ERROR!” appears on the display. Press ESC to clear the error message.
9. To interrupt a data transfer operation, press ESC.
To send one Schedule Keeper or Expense Mode entry
1. Enter the Schedule Keeper or Expense Mode.
2. If you are in the Schedule Keeper, press FUNC twice. In the Expense Mode,
press FUNC three times.
• You can perform the following operation while in the open memory area or the
secret memory area.
3. Press 4 to select DATA COMM.
4. Press 1 to select SEND.
5. Press 1 to select ONE ITEM.
6. Use index search, initial character search, or mode search to find the
Schedule Keeper item you want to send.
• You cannot perform mode search or initial character search in the Expense
Mode. You can use Index Search only.
102
Sending Data
7. Use K and L to move the entry you want to send into the second line of the
display.
• You cannot send Reminder Mode data listed under a Schedule Keeper date.
Use the procedure on page 102 to send a single Reminder Mode data item.
8. Press DISP CHNG to switch to the data display of the selected entry.
9. Press SET to start the send operation or ESC to abort the operation without
sending anything.
• To abort the send operation at any time, press ESC.
• If an error occurs during the send operation, the message “TRANSMIT
ERROR!” appears on the display. Press ESC to clear the error message.
10. To interrupt a data transfer operation, press ESC.
To send one month of Calendar data (highlights)
1. In the Calendar Mode, press FUNC twice to display the second function
menu.
2. Press 4 to select DATA COMM.
3. Press 1 to select SEND.
4. Press 1 to select MONTH.
5. Display the calendar whose highlights you want to send.
• Use K and L to scroll through the calendar.
6. Press SET to start the send operation or ESC to abort the operation without
sending anything.
• If the corresponding calendar in the receiving unit already contains highlighted dates, the received data is ignored. You have to clear the corresponding data in the receiving unit before it can receive highlight data.
• To abort the send operation at any time, press ESC.
• If an error occurs during the send operation, the message “TRANSMIT
ERROR!” appears on the display. Press ESC to clear the error message.
7. To interrupt a data transfer operation, press ESC.
To send all Telephone Directory, Memo Mode, To Do Mode, or
Reminder Mode data
1. In the Telephone Directory, Memo Mode, To Do Mode, or Reminder Mode,
press FUNC twice to display the second function menu.
• You can perform the following operation while in the open memory area
or the secret memory area.
2. Press 4 to select DATA COMM.
3. Press 1 to select SEND.
4. Press 2 to select MODE DATA.
103
PART 6 Data Communications
5. Press SET to start the send operation or ESC to abort the operation without
sending anything.
• To abort the send operation at any time, press ESC.
• If an error occurs during the send operation, the message “TRANSMIT
ERROR!’’ appears on the display. Press ESC to clear the error message.
6. After the send operation is complete, the display returns to the initial screen
of the mode you were in when you started this procedure.
To send all Schedule Keeper or Expense Mode data in a
specific period
1. Select the Schedule Keeper or Expense Mode date that starts the period you
want to send.
2. Press FUNC twice to display the second function menu.
• In the Expense Mode, you should press FUNC three times.
• You can perform the following operation while in the open memory area or
the secret memory area.
3. Press 4 to select DATA COMM.
4. Press 1 to select SEND.
5. Press 2 to select MODE DATA.
Date selected in
step 1 above
•
At this time, both the start date and the end date for the period are the same
as the date you selected in step 1.
6. Using the H and J keys to move the cursor, input the starting and ending
date of the period.
• To send the data from January 1, 2000 to April 1, 2000, for example, press
J to move the cursor under the month (2000/1/1) and press 4.
7. After you specify the ending date, press TIME/DATE.
8. Press SET to start the send operation or ESC to abort the operation without
sending anything.
• To abort the send operation at any time, press ESC.
• This operation does not send Reminder Mode data listed under a Schedule
Keeper date. Use the procedure on page 103 to send all Reminder Mode data
item.
104
Sending Data
•
If an error occurs during the send operation, the message “TRANSMIT
ERROR!” appears on the display. Press ESC to clear the error message.
9. After the send operation is complete, the display returns to the Schedule
Keeper or Expense Mode screen.
To send all Calendar data in a specific period
1.
2.
3.
4.
5.
Select the calendar month that starts the period you want to send.
Press FUNC twice to display the second function menu.
Press 4 to select DATA COMM.
Press 1 to select SEND.
Press 2 to select MODE DATA.
Month selected in
step 1, above
6. Enter the year that ends the period of data you want to send and press
TIME/DATE.
7. Enter the month and press TIME/DATE.
• If the month/year you enter comes before the month/year of the calendar
you selected in step 1, the starting and ending calendars are switched
automatically.
8. Press SET to start the send operation or ESC to abort the operation without
sending anything.
• To abort the send operation at any time, press ESC.
• If an error occurs during the send operation, the message “TRANSMIT
ERROR!” appears on the display. Press ESC to clear the error message.
9. After the send operation is complete, the display returns to the calendar
selected in step 1 above.
105
PART 7 Technical Reference
PART 7
Technical Reference
Keys
Key Cap
Name
Function
CAL/CONV
Calculator Mode and
Conversion Mode key
Press this key to enter the Calculator
Mode or Conversion Mode.
Calendar key
Press this key to enter the Calendar
Mode.
Caps key
Press this key to shift-lock the
keyboard between upper-case and
lower-case characters.
Code key
Use this key to input accented
characters.
Cursor Right key
Press this key to move the cursor to
the right.
Cursor Left key
Press this key to move the cursor to
the left.
Cursor Up key
Press this key to move the cursor up,
or to scroll the display.
Cursor Down key
Press this key to move the cursor
down, or to scroll the display.
Delete/Insert key
• Press this key to delete the character at the current cursor position.
Holding down this key deletes characters at high speed.
• Press SHIFT and then INS key to
open a space at the current cursor
position. Holding down this key inserts spaces at high speed.
Display Change key
• Press this key to switch between
the index display format and the
data display format.
• In the Conversion modes, pressing
this key toggles between general
conversion and euro conversion.
CALENDAR
CAPS
CODE
J
H
K
L
DEL
INS
DISP CHNG
106
Keys
Key Cap
Name
Function
Escape key
Press this key to interrupt any
operation.
Function key
Press this key to display function
menus.
Home/World Time
key
Press this key to display the current
Home Time and World Time.
Letter keys
Press these keys to enter the
corresponding letter. Use the CAPS
and SHIFT key to switch between
upper-case and lower-case letters.
LIGHT
Light key
Press this key to light up the display.
MEMO/
TO DO
Memo and To Do
Mode key
Press this key to enter the Memo
Mode or To Do Mode.
Newline key
Press this key to create a new line
within a data entry.
Next/Capacity key
• Press this key to complete input of
a data entry and move to the next
data entry.
• Press SHIFT and then hold down
CAPA key when you want to display
the current status of the memory.
Numeric keys
Press these keys to enter the
corresponding number.
Off key
Press this key to switch power off.
Power On/Clear key
• Press this key to switch power on.
• Press this key to clear the display.
Expense and
Reminder Mode key
Press this key to enter the Expense
Mode or Reminder Mode.
Schedule Mode key
Press this key to enter the Schedule
Keeper.
ESC
FUNC
HOME/
WORLD
~
A
Z
B
NEXT
CAPA
~
1
0
OFF
ON
CLEAR
EXP/REM
SCHEDULE
107
PART 7 Technical Reference
Key Cap
SEARCH
C
SET
SHIFT
SPACE
SYMBOL
TEL
TIME/DATE
CONTRAST
Name
Function
Search key
Press this key to start a search for
data stored in memory.
Secret key
Use this key to register a password,
to access the secret memory area,
and to exit the secret memory area.
Set key
Press this key to store input data
into memory.
Shift key
Press this key to temporarily shift
the keyboard for one character.
Space key
Press this key to input a space.
Symbol key
Press this key to display a menu of
symbols on the display.
Telephone Directory
key
Press this key to enter the
Telephone Directory.
Time/Date/Contrast
key
• Press this key to enter values that
represent hours, minutes, years,
months, or dates.
• Press SHIFT and then CONTRAST
key when you want to adjust the
brightness of the display.
For information on the AC, C, MC, MR, M–, M+, q, %, +, –, #, $, and = keys, see
“About the Calculator Mode keys...” on page 77.
108
Storage Capacity
Storage Capacity
The 128K (SF-4900ER)/256K (SF-4980ER/SF-4985ER) bytes memory capacity
includes a 126,306 (SF-4900ER)/257,378 (SF-4980ER/SF-4985ER) bytes user
area. The following shows examples of what this means for the storage of data
in each mode.
Telephone Directory
Approximately 6,000 (SF-4900ER)/12,200 (SF-4980ER/SF-4985ER), under the
following conditions:
8-character name
10-character telephone number
Approximately 3,000 (SF-4900ER)/6,100 (SF-4980ER/SF-4985ER), under the
following conditions:
8-character name
10-character telephone number
20-character address (E-mail/home)
Memo
Approximately 5,700 (SF-4900ER)/11,600 (SF-4980ER/SF-4985ER), 20character memos.
Schedule Keeper
Approximately 3,800 (SF-4900ER)/7,700 (SF-4980ER/SF-4985ER), under the
following conditions:
1 item per day, 20 characters per item
30 days per month
Starting time specified, alarm time set
Approximately 4,500 (SF-4900ER)/9,100 (SF-4980ER/SF-4985ER), under the
following conditions:
1 item per day, 20 characters per item
30 days per month
Starting time specified, no alarm time
109
PART 7 Technical Reference
To Do
Approximately 4,600 (SF-4900ER)/9,500 (SF-4980ER/SF-4985ER), 20-character
items.
Expense
Approximately 4,300 (SF-4900ER)/8,800 (SF-4980ER/SF-4985ER), under the
following conditions:
4 items per day, 30 days per month
up to $999.99 per amount item
8-character payment type
8-character expense type
Reminder
Approximately 7,400 (SF-4900ER)/15,100 (SF-4980ER/SF-4985ER), under the
following conditions:
10 characters per item
Alarm time set
Approximately 8,400 (SF-4900ER)/17,100 (SF-4980ER/SF-4985ER), under the
following conditions:
10 characters per item
No alarm time
110
Auto Sort Sequence
Auto Sort Sequence
Telephone Directory data items are automatically sorted in alphabetical order
according to the first letter in the NAME entry. The following table shows the
sequence used for data sorts.
1
2
3
4
5
6
7
8
9
10
11
12
13
14
15
16
17
18
19
20
21
22
23
24
25
26
27
28
29
30
§
(space)
!
”
#
$
%
&
’
(
)
*
+
,
—
.
/
0
1
2
3
4
5
6
7
8
9
:
;
<
31
32
33
34
35
36
37
38
39
40
41
42
43
44
45
46
47
48
49
50
51
52
53
54
55
56
57
58
59
60
=
>
?
@
A
B
C
D
E
F
G
H
I
J
K
L
M
N
O
P
Q
R
S
T
U
V
W
X
Y
Z
61
62
63
64
65
66
67
68
69
70
71
72
73
74
75
76
77
78
79
80
81
82
83
84
85
86
87
88
89
90
[
\
]
^
a
b
c
d
e
f
g
h
i
j
k
l
m
n
o
p
q
r
s
t
u
v
w
x
y
z
91
92
93
94
95
96
97
98
99
100
101
102
103
104
105
106
107
108
109
110
111
112
113
114
115
116
117
118
119
120
{
1
}
~
Á
É
Í
Ó
Ú
À
È
Ì
Ò
Ù
Â
Ê
Î
Ô
Û
¡
á
é
í
ó
ú
à
è
ì
ò
ù
121
122
123
124
125
126
127
128
129
130
131
132
133
134
135
136
137
138
139
140
141
142
143
144
145
146
147
148
149
150
â
ê
î
ô
û
¿
Ä
Ë
ï
Ö
Ü
Ã
Õ
Ñ
IJ
Æ
Ç
Å
Φ
ß
¶
¢
ä
ë
ï
ö
ü
ã
õ
ñ
151
152
153
154
155
156
157
158
159
160
161
162
163
164
165
166
167
168
169
170
171
172
173
174
175
176
177
ij
æ
ç
å
ø
£
¥
ª
º
#
$
±
°
2
3
µ
1
2
1
4
3
4
ƒ
|
Fr
←
→
^
111
PART 7 Technical Reference
Message Table
Message
Meaning
Action
NO DATA!
Search operation
attempted when no data
is stored in memory.
Current search
operation cannot be
performed.
NOT FOUND!
Data specified in search
operation does not exist
in memory.
Change specification or
cancel search.
MEMORY FULL!
No more room in memory
for storage of data.
Delete unnecessary data
items from memory.
ALARM TIME
ALREADY
USED!
Attempt to set a Schedule
Keeper or a Reminder
alarm time that is already
used for another entry.
Set a different alarm
time or change the
existing alarm time to
another one.
ALARM TIME
ALREADY
PASSED!
Attempt to set a Schedule
Keeper alarm time for a
time/date that is already
passed.
Set a different alarm
time (for a future time/
date).
SECRET
DATA!
Alarm for a secret
memory area data item
is sounding.
Enter the secret memory
area to veiw details of
the alarm.
PASSWORD
MISMATCH!
Attempt to enter the
Use the correct
secret memory area
password.
using a password that does
not match the one preset
for the secret area.
TRANSMIT ERROR! Error during data
communications.
Cancel the data
communications
operation and try again.
Data corrupted by strong
DATA ERROR!
impact, electrostatic
CHECK YOUR
charge, etc.
USER’S GUIDE
FOR PROCEDURE!
See page 14 of this
manual.
112
Message Table
Message
Meaning
Action
ARE YOU USING
A NEW UNIT FOR
THE FIRST TIME?
YES/NO
• This is the first time you
• See “Before using the
have turned the power on
unit for the first time”
after purchasing the unit.
(page 1).
CLEAR MEMORY
AND SET UP THE
UNIT FOR
OPERATION?
YES/OFF
• Data corrupted by strong
impact, electrostatic
charge, etc.
• See page 14 of this
manual.
WEAK
BATTERIES!
CONSULT YOUR
USER’S GUIDE
IMMEDIATELY!
The batteries are getting
weak.
Replace batteries
immediately (page 17).
113
PART 7 Technical Reference
Specifications
Model:
SF-4900ER/SF-4980ER/SF-4985ER
Main Modes:
Telephone Directory, Memo, Schedule Keeper, To Do, Expense, Reminder,
Calendar, Home Time, World Time, Calculator, General Conversion and Euro
Conversion.
Data storage:
Storage and recall of telephone, memo, schedule, to do, expense, reminder data;
calendar display; secret memory area; editing; memory status display
Clock:
World time; reminder alarm; schedule alarm; daily alarm; accuracy under normal
temperatures: average ±3 seconds per day
Calculation:
10-digit arithmetic calculations; arithemetic constants (+, −, ×, ÷); independent
memory; percentages; square roots; 20-digit approximations; date calculations;
other mixed calculations
General:
Display element: 16-column × 4-line LCD
Memory capacity: SF-4900ER: 128KB
SF-4980ER/SF-4985ER: 256KB
Main component: LSI
Power supply: 3 lithium batteries (CR2032)
Power consumption: 0.2W
114
Specifications
Battery life: • Approximately 170 hours of continuous display only in Telephone Mode.
• Approximately 100 hours with 55 minutes of continuous display
only and 5 minutes of processing operation per hour.
• Approximately 45 hours with 55 minutes of continuous display
only and 5 minutes of processing operation per hour, plus 3
minutes of backlight operation per hour during continuous display only period.
Auto power off: Approximately 6 minutes after last key operation
Operating temperature: 0°C ~ 40°C (32°F ~ 104°F)
Dimensions:
Unfolded: 12.2H × 143W × 160D mm (1/2"H × 55/8"W × 61/4"D)
Folded: 15H × 143W × 82D mm (5/8"H × 55/8"W × 31/4"D)
Weight: Approximately 120g (4.2 oz) including batteries
115
CASIO COMPUTER CO., LTD.
6-2, Hon-machi 1-chome
Shibuya-ku, Tokyo 151-8543, Japan
MO9905-A Printed in China