1
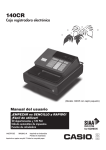
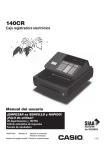
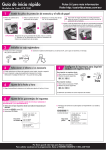
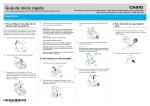
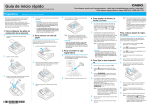
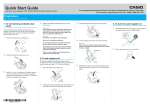
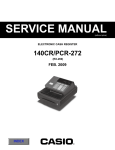
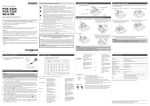
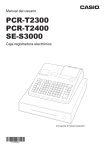
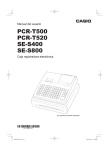
Quick Start Guide
For Programming Assistance Please Call
TOLL FREE 1-800 638-9228
Also, visit http://casio4business.com/sa/support/index_support.html
Casio Model Numbers PCR-272, 140CR
Initialize Your Cash Register
1
(See Page 9 in the User’s Manual)
A) Insert the supplied key and
turn to the “OFF” position.
B) Plug the power cord into an AC outlet.
REG
PGM
CAL X
Z
OFF
RF
PGM
Load the Memory Protection Batteries and Paper Roll
2
(See Page 9 - 10 in the User’s Manual)
A) Remove the printer cover.
B) Open battery compartment cover.
6
To prevent to lose all of your setting and sales data, we
recommended you to install the memory protection batteries.
C) Insert 3 new “AA” type batteries
in to the compartment.
D) Turn to the “REG” position. Install the supplied 58mm paper roll
placing the paper roll into the printer well. Insert the paper into the
inlet and press l key to set the paper.
6
REG
CAL X
Z
6
OFF
IMPORTANT Be sure that the plus (+) and minus (-) ends of the batteries
are facing in the directions indicated the illustration inside the
battery compartment.
6
RF
PGM
No battery is included in the accessories.
E) Proceed to the Next step “Setting the Date and Time”.
Setting the Date and Time
3
(See Page 11 in the User’s Manual)
A) Using the key marked “PGM” turn
the key to the “PGM” position.
REG
PGM
CAL X
Z
OFF
RF
PGM
B) When the display shows blinking
“0”, such as 00-00-00 , enter
current date in Month, Day, Year
order.
Example: January, 8, 2010,
enter ?Z?<Z?
• Enter 6-digit, last 2 digits for year set.
(2010 –>10)
• By pressing y key, this procedure
returns one by one.
00-00-00
00-00-00
01-00-00
01-00-00
01-08-00
01-08-10
01-08-10
C) When the display shows blinking
00-00 , enter
“0”, such as
current time in Hour, Minute order.
00-00
10-00
Example: 1:18 PM, enter
ZCZ<.
13-00
• Enter 4-digit, use 24-hour system.
• By pressing y key, this procedure
returns one by one.
• If you want to adjust the date/time,
please refer to page 31 of the User’s
Manual.
13-10
13-18
~00
Setting Tax Rates
4
(See Page 11 in the User’s Manual)
Prepare the tax rate of your state. If your tax table has break point, refer to page 24 of the
user’s manual.
Example1: Set state tax 6% to department 2, 3 key
~
Input the desired flat tax rate to the appropriate department key.
A) Turn the key to the “PGM” position.
REG
PGM
CAL X
NS
Enter tax rate and press dept key.
ND
Enter tax rate and press dept key.
k
Z
Start tax program
To end the setting.
OFF
RF
PGM
Example 2: Set state tax 5.5% to department 2 key and tax
7% to department 3 key
~
B) Press the ~ key.
C) Enter tax rate.
(Example: For 6% enter “6”, 5.75% enter “5.75”.)
B"B S
Enter tax rate and press dept key.
MD
Enter tax rate and press dept key.
k
D) Press the appropriate department key.
Start tax program
To end the setting.
E) Repeat step C) and D) to set other department key.
F) Press the s key to end tax programming.
Note: In case of setting the wrong tax rate to the key, please enter ? and press those department keys above, and quit this procedure by pressing k key, and start from the beginning of this procedure.
Please start with the department 2 key (taxable department). Department 1 key is initialized as non taxable.
QSG260*ES
5
Quick Start Setup Completed!
Please keep this sheet for future reference.
0812-A
Guía de inicio rápido
Llame al siguiente número si desea asistencia automatizada
NÚMERO GRATUITO 1-800 638-9228
Por otro lado, también puede visitar
http://casio4business.com/sa/support/index_support.html
Modelos de Casio PCR-272, 140CR
Inicialice su caja registradora
1
(Consulte la página 9 del manual del usuario)
A) Introduzca la llave suministrada y gire a la posición “OFF”.
CAL X
REG
PGM
B) Conecte el cable de alimentación a una toma de CA.
Z
OFF
RF
PGM
Instale las pilas de protección de memoria y el rollo de papel
2
(Consulte las páginas 9 -10 del manual del usuario)
A) Retirar la cubierta de la
impresora.
B) Abra la cubierta del compartimento de las pilas.
6
C) Introduzca 3 nuevas pilas
de tipo “AA” en el compartimento.
Para evitar el riesgo de perder sus configuraciones y
datos de ventas, le recomendamos instalar las pilas de
protección de la memoria.
D) Gire a la posición “REG”. Instale correctamente el rollo de
papel de 58mm suministrado en la impresora. Inserte el papel
en la entrada y presione la tecla l para ajustar el papel.
6
REG
CAL X
Z
OFF
IMPORTANTE Asegúrese de que la polaridad de las pilas, más (+) y menos (-), apuntan
en las direcciones que indica la ilustración del interior del compartimento
de las pilas.
6
6
RF
PGM
E) Proceda al siguiente paso: “Ajuste de la fecha y
hora”
Los accesorios no incluyen pilas.
Ajuste de la fecha y hora
3
(Consulte la página 11 del manual del usuario)
A) Utilice la llave marcada “PGM”
para girar a la posición “PGM”.
REG
PGM
CAL X
Z
OFF
RF
PGM
B) Cuando en la presentación aparezan “0” destellando, como por
ejemplo, 00-00-00 , ingrese
la fecha actual, en el siguiente
orden: mes, día, año.
Ejemplo: enero, 8, 2010: ingrese
?Z?<Z?
• Ingrese 6 dígitos; para el año, los
últimos dos dígitos. (2010 → 10)
• Al presionar y, este procedimiento vuelve hacia atrás uno a uno.
00-00-00
00-00-00
01-00-00
01-00-00
01-08-00
01-08-10
01-08-10
C) Cuando en la presentación aparezcan “0” destellando, como por
00-00 , ingrese
ejemplo
la hora actual, en el siguiente
orden: hora, minutos.
Ejemplo: 13:18, ingrese
ZCZ<
00-00
• Ingrese 4 dígitos, utilice el sistema de 24 horas.
• Al presionar y, este procedimiento vuelve hacia atrás uno a
uno.
• Si desea ajustar la fecha u hora,
consulte, por favor, la página 31
del manual del usuario.
13-10
10-00
13-00
13-18
~00
Ajuste de los porcentajes de impuestos
4
(Consulte la página 11 del manual del usuario)
Prepare la tasa de impuesto de su estado. Si su tabla de impuestos tiene un punto de
separación, consulte la página 24 del manual del usuario.
Ingrese la tasa única de impuesto deseada en la tecla de departamento correspondiente.
Ejemplo 1: Ajuste de la tasa estatal del 6% para las teclas de
departamento 2 y 3.
~ Comienzo de la programación de impuestos.
A) Gire el selector de modo a la posición “PGM”.
REG
PGM
CAL X
Z
PGM
B) Pulse la tecla ~.
C) Ingrese la tasa de impuesto. (Ejemplo: para 6%, ingrese “6”; para 5,75%, ingrese “5,75”.)
D) Pulse la tecla del departamento correspondiente.
E) Repita los pasos B) o C) para ajustar otra tecla de departamento.
F) Pulse la tecla k para finalizar la programación de impuestos.
Nota: En el caso de que ajustara una tasa incorrecta de impuestos en la tecla, por favor ingrese ? y pulse
las teclas de departamento indicadas anteriormente; salga de este procedimiento pulsando la tecla
k, y vuelva a comenzar desde el principio.
Comience, por favor, con la tecla 2 de departamento (departamento gravable). La tecla 1 de departamento está inicializada como no gravable.
Ingrese la tasa de impuesto y pulse la tecla dept.
ND
Ingrese la tasa de impuesto y pulse la tecla dept.
k
OFF
RF
NS
Para finalizar el ajuste.
Ejemplo 2: Ajuste de la tasa estatal del 5,5% para la tecla 2 de
departamento y la tasa del 7% para la tecla 3 de
departamento.
~
Comienzo de la programación de impuestos.
B"B S
Ingrese la tasa de impuesto y pulse la tecla dept.
7D
Ingrese la tasa de impuesto y pulse la tecla dept.
k
5
Para finalizar el ajuste.
Aquí finalizan los ajustes de inicio
rápido!
Por favor guarde esta hoja para futuras consultas.