1
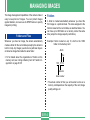
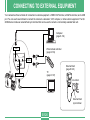
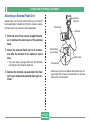
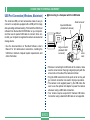
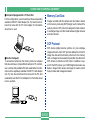
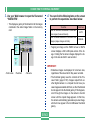
DELETING
IMAGES
DELETING IMAGES
Your camera lets you use any one of the following four methods to delete images from its memory. You can delete the
currently displayed image, one or more selected images, all
the images in one or more selected folders, or all the images
in the camera’s memory.
Deleting the Displayed Image
Use the following procedure when you want to delete the
image that is currently on the monitor screen.
1. Enter the PLAY mode.
IMPORTANT!
• Image deletion cannot be undone. Before deleting an
image, make sure you no longer need it or you have a
back-up copy saved on you computer, on diskette, or
on some other medium. Be especially careful with
“Deleting All Unprotected Images” operation, which
deletes all unprotected images in memory.
• A protected image cannot be deleted. See “Protecting
Images Against Deletion” on page E-116 for details on
protecting and unprotecting images.
• Delete operations are disabled when all of the images
on the camera’s memory card are protected.
2. Use [+] and [–] to scroll through images and
display the image you want to delete.
3. Press
.
4. In response to the confirmation message that
appears, use [+] and [–] to select “Yes”.
• If you change your mind and do not want to delete the
image, select “No” instead.
5. Press the shutter release button.
• Displaying a panorama or movie image in step 2 of the
above procedure causes all of the images that make
up the panorama or movie to be deleted.
E-110
DELETING IMAGES
NOTE
Deleting Selected Images
• The camera does not maintain open spaces in its
memory. Deleting an image causes images following
the deleted image to be shifted up to fill in the empty
space created by the deletion.
The following procedure lets you select one or more image
for deletion.
1. Enter the PLAY mode.
100-1
100-2
100-3
100-4
2. Press MENU.
3. Select “DELETE”
“Select”, and then press
the shutter release button.
100-1
100-2
100-3
4. Use [+] and [–] to display the image you want to
delete.
5. Press the shutter release button to toggle the
displayed image’s
E-111
icon on and off.
DELETING IMAGES
• Any image marked with the
icon is marked for deletion. It will be deleted when you perform the next
step of this procedure.
• Note that the image that was on the monitor screen
when you pressed MENU in step 2 appears first with
its
icon turned on.
• You can repeat steps 4 and 5 to mark and unmark
multiple images if you want.
6. Press
Deleting All Images in Selected Folders
Use the following procedure to select one or more folder for
deletion of all their images.
1. Enter the PLAY mode.
2. Press MENU.
3. Select “DELETE”
.
“Folder”, and then press
the shutter release button.
7. In response to the confirmation message that
4. Use [+] and [–] to display the folder whose im-
appears, use [+] and [–] to select “Yes”.
• If you change your mind and want to cancel the delete,
select “No” instead.
ages you want to delete.
5. Press the shutter release button to toggle the
8. Press the shutter release button.
displayed folder’s
E-112
icon on and off.
DELETING IMAGES
• Any folder with the
icon is marked for deletion. All
its images will be deleted when you perform the next
step of this procedure.
• Note that the folder whose image was on the monitor
screen when you pressed MENU in step 2 appears
first with its
icon turned on.
• You can repeat steps 4 and 5 to mark and unmark
multiple folders if you want.
6. Press
Deleting All Unprotected Images
Use the following procedure when you want to delete all of
the images currently on the camera’s memory card.
1. Enter the PLAY mode.
2. Press MENU.
3. Select “DELETE”
.
“All”, and then press the
shutter release button.
7. In response to the confirmation message that
4. In response to the confirmation message that
appears, use [+] and [–] to select “Yes”.
appears, use [+] and [–] to select “Yes”.
• If you change your mind and want to cancel the delete,
select “No” instead.
• If you change your mind and want to cancel the delete,
select “No” instead.
8. Press the shutter release button.
5. Press the shutter release button.
E-113
MANAGING
IMAGES
MANAGING IMAGES
The image management capabilities of the camera make it
easy to keep track of images. You can protect images
against deletion, and even use its DPOF feature to specify
images for printing.
Folders and Files
Whenever you shoot an image, the camera automatically
creates a folder for the current date (as kept by the camera’s
built in clock). Any images you shoot on a particular day are
all stored as image files inside the same folder.
Folders
A folder is created automatically whenever you shoot the
first image on a particular date. The name assigned to the
folder is based on the current date, as described below. You
can have up to 900 folders on a memory card at the same
time (subject to storage capacity restrictions).
Example: Folder created on July 19, which is the 100th
folder on the memory card
Month
Day
• For full details about the organization of folders on the
memory card, see “Using a Memory Card to Transfer Image Data” on page E-135.
100_0719
Underbar
Serial number
• The actual number of files you will be able to store on a
memory card depends on the capacity of the card, image
quality settings, etc.
E-114
MANAGING IMAGES
Files
Each folder can contain up to 250 image files. If you try to
save the 251st image to a folder, the camera automatically
creates a new folder and stores the image there. The names
assigned to files are based on the current date, as shown
below.
Example: 26th image shot on November 7
Month
• In addition to image files, memory cards also contain a
number of other files used by the system for image data
management.
• The actual number of files you will be able to store on a
memory card depends on the capacity of the card, image
quality settings, etc.
• Panorama images are stored as groups of multiple individual images.
• If there are more than 250 image files in a folder (due to
copying from another digital camera or other source), only
the first 250 (in name sequence) can be played back.
Day
11070026.JPG
Extension (.JPG/.TIF/.AVI)
Serial number
E-115
MANAGING IMAGES
Selecting a Folder for Playback
Protecting Images Against Deletion
Use the following procedure to select a particular folder and
play back the image files it contains.
Image protection guards against accidental deletion of images stored on the camera’s memory card. A protected image cannot be deleted until it is unprotected (page E-110).
You can protect and unprotect a single specific image, all the
images in a particular folder, or all images currently on the
memory card.
1. Enter the PLAY mode.
2. Press
.
3. Use [+] and [–] to select the folder you want,
and then press the shutter release button.
• This displays the image of the first file (in name sequence) contained in the folder you selected.
Protecting Selected Images
1. Enter the PLAY mode.
2. Press MENU.
3. Select “PROTECT”
“Select” and then press
the shutter release button.
4. Use [+] and [–] to display the image you want to
protect.
E-116
MANAGING IMAGES
5. Press the shutter release button to toggle the
displayed image’s
icon on and off.
Protecting and Unprotecting All Images
in Selected Folders
1. Enter the PLAY mode.
2. Press MENU.
3. Select “PROTECT”
“Folder”, and then press
the shutter release button.
4. Use [+] and [–] to display the folder whose im• Any image marked with the
icon is marked for protection. It will be protected when you perform the next
step of this procedure. Any image without the
icon
will be unprotected.
• You can repeat steps 4 and 5 to turn on the
for multiple images if you want.
ages you want to protect.
5. Press the shutter release button to toggle the
icon
6. Press
to protect all the images marked for
protection, and unprotect the unmarked images.
E-117
displayed folder’s
icon on and off.
MANAGING IMAGES
• Any folder with the
icon is marked for protection.
All its images will be protected when you perform the
next step of this procedure. All images in any folder
without the
icon will be unprotected.
Protecting and Unprotecting All Images
• You can repeat steps 4 and 5 to turn on the
for multiple folders if you want.
2. Press MENU.
6. Press
icon
to protect the images in all the folders marked for protection, and unprotect the
images in the unmarked folders.
1. Enter the PLAY mode.
3. Select “PROTECT”
“All”, and then press the
shutter release button.
4. Select the memory protection setting you
want, and then press the shutter release button to apply it.
To do this
Protect all images on the memory card
Unprotect all images on the memory card
E-118
Select this
On
Off
MANAGING IMAGES
DPOF
The letters “DPOF” stand for “Digital Print Order Format”, which is a format for recording on
a memory card or other medium which digital
camera images should be printed and how
many copies of the image should be printed.
Then you can print on a DPOF-compatible
printer or at a professional print service from
the memory card in accordance with the file
name and number of copies settings recorded
on the card.
■ DPOF Settings
File Name, number of copies, date
Making DPOF Settings for Particular Images
1. Enter the PLAY mode.
2. Press MENU.
3. Select “DPOF”
“Select”, and then press the
shutter release button.
4. Use [+] and [–] to display the image you want to
print.
5. Use the button operations described below to
make the DPOF settings you want.
E-119
MANAGING IMAGES
To do this
Press this button
Decrease the number of copies value
SHIFT INFO
Making DPOF Settings for Particular
Folders
Increase the number of copies value
Toggle printing of the recording date
on and off
/
1. Enter the PLAY mode.
/MF
RESIZE
2. Press MENU.
• An image selected for printing is marked by the
icon.
3. Select “DPOF”
• An image for which printing of the recording date is
turned on is marked with the
icon. Note that some
printers may not support recording date printing.
4. Use [+] and [–] to display the folder whose im-
• You can repeat steps 4 and 5 to make DPOF settings
for multiple image files, if you want.
“Folder” and then press the
shutter release button.
ages you want to print.
5. Use the same procedures as those described
in step 5 under “Making DPOF Settings for Particular Images” on page E-119 to make the
DPOF settings you want.
6. After you are finished making the settings you
want, press
to complete the procedure.
6. After you are finished making the settings you
want, press
E-120
to complete the procedure.
MANAGING IMAGES
Making DPOF Settings of All Images on
the Memory Card
1. Enter the PLAY mode.
2. Press MENU.
3. Select “DPOF”
“All”, and then press the
shutter release button.
4. Use the button operations described below to
5. After you are finished making the settings you
make the DPOF settings you want.
To do this
Press this button
Decrease the number of copies value
SHIFT INFO
Increase the number of copies value
Toggle printing of recording dates on
and off
/
/MF
RESIZE
E-121
want, press
to complete the procedure.
MANAGING IMAGES
PRINT Image Matching
This camera supports PRINT Image
Matching, which means that images
recorded with it include information
about the mode settings, camera
setup, etc. When you print an image on
a printer that supports PRINT Image
Matching, the printer reads this data
and adjusts the printed image accordingly, so your images come out just the
way you intended when you recorded
them. See the documentation that
came with your printer for full details
about PRINT Image Matching.
* PRINT Image Matching is a term for the
print command that is embedded in
header file of the image created by Digital
Camera.It contains color setting and image parameter information.
E-122
OTHER
SETTINGS
OTHER SETTINGS
3. Select the setting you want, and then press the
Turning the Monitor Screen
Indicators On and Off
shutter release button.
You can use the procedure below to turn the following monitor screen indicators on and off: exposure mode, memory
capacity, image size, image protection indicator, folder
name, file number, battery capacity.
1. Enter the REC mode or PLAY mode.
2. Select “Indicators” using one of the following
two key operations, and then press the shutter
release button.
If you are here
REC mode
PLAY mode
Select this on the menu screen
“FUNCTION”
“SET UP”
“SET UP”
“Indicators”
“Indicators”
E-123
To do this
Turn on display indicators
Select this setting
On
Turn off display indicators
Off
OTHER SETTINGS
4. Select the setting you want, and then press the
Changing the Display Language
Use the following procedure to switch the display language
between English and Deutsch.
1. Enter the REC mode or PLAY mode.
2. Press MENU.
3. Select “Language/Sprache” using one of the
following two key operations, and then press
the shutter release button.
If you are here
Select this on the menu screen
REC mode
“SET UP”
“FUNCTION”
“Language/Sprache”
PLAY mode
“SET UP”
“Language/Sprache”
E-124
shutter release button.
To do this
Display on-screen text in English
Select this setting
English
Display on-screen text in Deutsch
Deutsch
OTHER SETTINGS
4. Select the setting you want, and then press the
Turning the Confirmation Beep On and Off
Use the following procedure to turn the beep that sounds
each time you press a button on and off.
2. Press MENU.
3. Select “Beep” using one of the following two
key operations, and then press the shutter release button.
PLAY mode
Select this on the menu screen
“FUNCTION”
“SET UP”
“Beep”
“SET UP”
To do this
Turn on the confirmation beep
Turn off the confirmation beep
1. Enter the REC mode or PLAY mode.
If you are here
REC mode
shutter release button.
“Beep”
E-125
Select this setting
On
Off
CONNECTING
TO EXTERNAL EQUIPMENT
CONNECTING TO EXTERNAL EQUIPMENT
Your camera has three terminals for connection to external equipment: a VIDEO OUT terminal, a DIGITAL terminal, and a USB
port. You can use these terminals to connect the camera to a television, VCR, computer, or other external equipment. The QV2900UX also includes an external flash sync terminal that can be used to connect a commercially available flash unit.
Computer
(page E-132)
USB
Wired remote controller
(page E-129)
DIGITAL
USB
VIDEO OUT
DIGITAL
DC IN 6V
VIDEO OUT
External flash
(page E-129)
TV
(page E-127)
QV-2900UX
External flash
sync terminal
E-126
CONNECTING TO EXTERNAL EQUIPMENT
IMPORTANT!
Connecting to a Television
• Be sure to turn off both the camera and the other
equipment before making any connections.
• Check the documentation that comes with your other
equipment for information you may need to know
when making connections.
• Leaving the same image displayed on a television or
computer display screen for very long periods can
cause the image to be “burned in” on the screen.
When this happens, a faint after-image remains on the
screen, even after you disconnect the camera. To
avoid this, you should not leave the same image displayed on such a screen for very long periods.
• This camera does not support cable transfer of data
with other CASIO digital cameras.
Images being displayed on the camera’s monitor screen,
whether for recording or playback can also be displayed on
the screen of a connected television. Connect the camera to
a TV as illustrated below.
Video cable
(Bundled with camera.)
TV
USB
INPUT
L
R
VIDEO OUT
DIGITAL
DC IN 6V
VIDEO
AUDIO
VIDEO IN terminal
E-127
VIDEO OUT
terminal
CONNECTING TO EXTERNAL EQUIPMENT
1. Use the video cable to connect the camera to
IMPORTANT!
the television as shown in the illustration.
• When you have PAL selected as the video signal output mode, the monitor screen is turned off when you
connect the cable to the VIDEO OUT terminal.
2. Perform the required operation on the TV to set
it up for video input.
• See the documentation that comes with your television for information about how to do this.
3. Perform normal playback and recording operations on the camera.
1. Enter the REC mode or PLAY mode.
2. Press MENU.
3. Select “VIDEO OUT” using one of the following
two key operations, and then press the shutter
release button.
IMPORTANT!
• Icons and other indicators that normally appear on the
camera’s monitor screen will also appear on the
screen of the connected TV.
If you are here
REC mode
PLAY mode
Select this on the menu screen
“FUNCTION”
“SET UP”
“VIDEO OUT”
“SET UP”
“VIDEO OUT”
Selecting the Video Output Signal Mode
Your camera supports both NTSC (used in U.S., Japan, and
other countries) and PAL (used in Europe and other areas)
video output signal systems. The video system you should
use depends on the country of origin of the equipment you
are connecting to the camera’s VIDEO OUT terminal.
4. Use [+] and [–] to select “NTSC” or “PAL”, and
E-128
then press the shutter release button.
CONNECTING TO EXTERNAL EQUIPMENT
Connecting the Wired Remote Controller
to the Camera
Connecting an External Flash Unit
(QV-2900UX Only)
The optionally available wired remote controller lets you operate the camera with touching it. This capability helps to
avoid the effects of unintended camera movement when
shooting at slow shutter speeds or with high telephoto settings with the camera mounted on a tripod. You can also use
it to scroll through images during presentations on a TV
screen. For more information about using the wired remote
controller, see the instructions that come with it.
Use of a commercially available flash unit makes it possible
to obtain a higher level of brightness (guide number) than
you get when using the built-in flash alone. An external flash
also makes it possible to extend the effective range of flash
photography.
• The guide number of the internal flash is 9 (ISO 100/m).
Wired Remote
Controller Model: WR-2C (option)
Approximate Cable Length: 1 meter
USB
VIDEO OUT
DIGITAL
DC IN 6V
Wired
Remote
Controller
DIGITAL terminal
• You can perform the following operations using the wired
remote controller: shutter release, zoom slider, MENU, /
/MF RESIZE, [+], [–], SHIFT INFO,
,
.
External Flash Unit Requirements
The external flash unit you use with your camera must satisfy the following requirements.
• Configuration: tripod hole mountable grip type with sync
cable; or tripod hole mountable with grip-equipped bracket
and sync cable
• Coverage Angle: Coverage of 40mm equivalent 35mm focal length lens (without wide conversion lens)
• Some flash performance may be lost when using a ring
flash or other type of unit with a long flash time.
• The aperture values and ISO sensitivity available with
some flash units may not match the values supported by
your camera. In such a case, make adjustments in the aperture and ISO sensitivity settings of the external flash and
the camera until proper brightness is achieved.
• Some flash performance may be lost when using a zoom
flash.
E-129
CONNECTING TO EXTERNAL EQUIPMENT
Attaching an External Flash Unit
Always make sure that the external flash unit is turned off
before attaching it to detaching it from the camera. Leaving
the flash unit on can cause it to fire unexpectedly.
External
flash unit
Tripod hole
Bracket
1. Point the lens of the camera straight forward,
so it matches the optical axis of the external
flash.
2. Attach the external flash unit to its bracket,
and affix the bracket to the camera’s tripod
hole.
• If you are using a grip type flash unit, affix the flash
unit directly to the camera’s tripod hole.
3. Remove the terminal cap and attach the flash
unit’s sync cable to the external flash sync terminal.
E-130
External flash
sync terminal
Sync cable
Terminal cap
• Make sure you do not misplace the terminal cap. Always keep the terminal covered when an external
flash unit is not connected.
CONNECTING TO EXTERNAL EQUIPMENT
4. Turn on camera power and make the required
IMPORTANT!
camera settings.
• Exposure Mode: M (Manual Exposure)
• Shutter Speed: Around 1/60 (Actual setting should be
in accordance with aperture setting.)
• For maximum brightness of areas that are not reached
by flash illumination, use the camera’s maximum aperture opening (F3.2).
• White Balance: Sunlight
• Flash Mode:
(Off)
5. Turn on the external flash unit and set it up for
the camera’s aperture (F) value (page E-83)
and sensitivity value (page E-85).
• Depending on shooting conditions, proper exposure
may not be obtained even if you properly set the auto
aperture (F) value and ISO sensitivity of the flash unit
to match those of the camera. If this happens, adjust
the aperture value and ISO sensitivity settings of the
flash unit and camera.
E-131
• The external flash connected to the external flash
sync terminal always fires. To record an image without
using external flash, disconnect the sync cable from
the terminal or turn off external flash unit power.
• After recording an image, check it on the monitor
screen. If it is not what you expected, use the controls
on the external flash unit to adjust flash intensity, and
adjust the aperture and ISO sensitivity settings on the
camera. Note that you cannot control external flash
unit intensity using camera settings.
• Close up images often tend to be overexposed. If you
are having overexposure problems, try adjusting the
aperture and ISO sensitivity settings of the external
flash unit and the camera. You can also try using the
camera’s built in flash to correct for overexposure.
• Note that the camera’s built in flash fires whenever its
Flash Mode setting is something other than
(Off).
The camera’s sensitivity is fixed at ISO 80 when the
built-in flash is turned on.
• Improper installation of an external flash unit can
cause it to fire unexpectedly or to misfire. Make sure
you install the external flash unit correctly.
CONNECTING TO EXTERNAL EQUIPMENT
• Camera aperture (F) values are based on the widest
optical zoom (1X). Using telephoto can cause slight
lens darkness. Adjust the aperture and ISO sensitivity
settings of the external flash unit and the camera as
required when using optical zoom.
• When using a zoom flash, set the coverage angle of
the flash for a focal distance of 40mm or less.
• The optical axis of the lens may not match that of the
external flash unit, even if the lens is pointed straight
forward. If this happens, try expanding the coverage
angle (decreasing the guide number) of the flash unit.
• ISO sensitivity values for a digital camera are slightly
different from those for silver oxide film. Because of
this, you may have to make adjustments of the ISO
setting of your external flash unit to obtain the desired
results.
Connecting to a Computer
The CD-ROM disc that comes bundled with your camera includes special software (Photo Loader) that makes transfer
of images from the camera to a computer quick and easy.
The following types of computer connections are supported.
■ Windows
USB port connection
Serial port (RS-232C) connection
■ Macintosh
USB port connection
• Photo Loader does not run on the Apple Macintosh. You
can, however, use the USB cable to connect the camera to
a Macintosh and upload images manually.
E-132
CONNECTING TO EXTERNAL EQUIPMENT
■ Connecting to a Computer with the USB Cable
The camera’s USB port and accessories make it easy to
connect to a computer equipped with a USB port for image
data uploading and downloading. First install the USB driver
software from the bundled CD-ROM disc on your computer,
and then use its special USB cable to connect. Once connected, your computer recognizes the camera as an external
storage device.
Small connector
Special USB cable
(bundled with camera)
USB port
DC IN 6V
VIDEO OUT
DIGITAL
• See the documentation on “Bundled Software User’s
Manual” for full details about connections, installing the
USB driver, minimum computer system requirements, and
other information.
USB
USB Port Connection (Windows, Macintosh)
Large connector
(standard USB
connector)
arrow
mark
USB port
• Whenever connecting the USB cable to the camera, make
sure the arrow mark on the plug is aligned properly with the
arrow mark on the side of the camera’s terminal.
• Plug the USB connectors into the ports as far as they will
go. Incorrect connection can result in improper operation.
• The camera is not supplied power by the USB cable. Be
sure to use the optional AC adaptor to power the camera
whenever using a USB cable connection.
• Your camera requires a special QV Camera USB cable.
Connection using a standard USB cable is not supported.
E-133
CONNECTING TO EXTERNAL EQUIPMENT
• Never disconnect the USB cable while a data communication operation is in progress. Doing so can corrupt memory
data.
• USB data communication is supported in both the REC
mode and PLAY mode.
• Be sure to disconnect the USB cable from the camera and
computer after you are finished exchanging data.
• You cannot turn off the camera while the USB cable is connected. Disconnect the USB cable first when you want to
turn off the camera.
■ Windows
The Data Transfer Cable connects to an IBM PC/AT or compatible equipped with a D-Sub 9-pin RS-232C serial port, as
shown below.
Data Transfer Cable
Serial port
(RS-232C D-Sub 9-pin)
USB
Using a Serial Port Connection
VIDEO OUT
DIGITAL
DC IN 6V
You can connect a computer to the camera’s DIGITAL terminal for image data uploading and downloading. For such a
connection, you must install the Photo Loader software from
the bundled CD-ROM disc on your computer, and use a
separately available CASIO data transfer cable to make the
connection. The type of cable you should use depends on
what kind of computer you are connecting to.
• This manual covers actual physical connection procedures. See the documentation on the Bundled Software
User’s Manual for full details about connections, installing
Photo Loader, and other information.
E-134
DIGITAL terminal
CONNECTING TO EXTERNAL EQUIPMENT
IMPORTANT!
Using a Memory Card to Transfer Image Data
• Be sure to turn off the camera, computer, and all peripherals connected to the computer (monitor, hard
disk, etc.) before connecting the camera to the computer.
• After connecting the camera to the computer, slide the
REC/PLAY selector to “PLAY”, and then turn on the
camera. Data communication with a computer is disabled while the camera is in the REC mode.
• Never connect or disconnect the cable while a data
communication operation is in progress. Doing so can
cause problems with program execution, can corrupt
data, and can damage the camera and your computer.
• Data transfer while camera batteries are low can result in unexpected shutdown of the camera. Because
of this, use of the optional AC adaptor is recommended whenever performing data communication
with the camera.
• This camera does not support data communication
with any of the optionally available CASIO PC link
software applications: LK-1, LK-1A, LK-10V, LK-11W,
LK-2, LK-2A, LK-2V, LK-21.
In addition to the cable connections described in the previous sections, you can also exchange data between your
camera and computer by reading it directly from the memory
card. The Photo Loader software that comes on the bundled
CD-ROM disc automatically reads the images from the
memory card and stores them in folders on your computer’s
hard disk.
The following provides general information about how to directly read images from a memory card. Certain details may
be different depending on the type of computer you are using.
■ Computer Equipped with a CompactFlash Card Slot
Simply insert the memory card into your computer’s
CompactFlash card slot.
E-135
CONNECTING TO EXTERNAL EQUIPMENT
■ Computer Equipped with a PC Card Slot
For this configuration, you will need to purchase a separately
available CASIO PC Card Adapter (CA-10). See the instructions that come with the PC Card Adapter for information
about how to use it.
Memory Card Data
Images recorded with this camera and other data is stored
on the memory card using DCF (Design rule for Camera File
system) protocol. DCF protocol is designed to make it easier
to exchange image and other data between digital cameras
and other devices.
DCF Protocol
■ Another Computer
To access the contents on the memory card on a computer
that does not have a CompactFlash card slot or PC card slot,
use a commercially available PC card reader/writer in combination with a separately available CASIO PC Card Adapter
(CA-10). See the instructions that come with the PC card
reader/writer and the PC Card Adapter for information about
how to use them.
DCF devices (digital cameras, printers, etc.) can exchange
images with each other. DCF protocol defines the format for
image files data and the directory structure for the memory
card, so images can be viewed using another manufacturer’s
DCF camera or printed on a DCF printer. In addition to support for the DCF protocol, your CASIO digital camera also use
dates in image folder names and image file names, which
helps to make data management easier.
E-136
CONNECTING TO EXTERNAL EQUIPMENT
<¥SCENE¥>
Memory Card File Structure
<¥DCIM¥>
HTML
INDEX2.HTM
MENU.HTM
(Card Browser Folder)
Card Browser Files: Files and folders
required for the Card Browser display
(
(Sample Image File)
(Sample Image File)
U2400001.JPE
U2400002.JPE
(Sample Image File)
(Sample Image File)
SCENE.QVS
(Best Shot Management File)
...
(Parent Folder)
(Card Browser Main File)
(Management File)
...
INDEX.HTM
QVCAM.QVS
(Best Shot Folder)
• QV-2400UX
S2400001.JPE
S2400002.JPE
)
...
• QV-2900UX
S2900001.JPE
S2900002.JPE
(Main Image Folder)
(Management File)
(Main Image File)
(Main Image File)
(Main Movie File)
(Preview Folder)
Card Browser Files: Files and folders
required for the Card Browser display
(Preview Image File)
(Preview Image File)
(Preview Image File for Movie File)
(
...
101_MMDD
102_MMDD
(Image Folder)
(Image Folder)
...
<¥MISC¥>
AUTPRINT.MRK
(DPOF File Folder)
(DPOF File)
100_MMDD
MMDD0001.TIF
(TIFF Data Parent Folder)
(TIFF Image Folder)
(TIFF Image File)
<¥TIFF¥>
(Sample Image File)
(Sample Image File)
SCENE.QVS
(Best Shot Management File)
)
■ Folder and File Contents
• Parent Folder
Contents: All files used by the digital camera
• Card Browser Main File
Contents: Template for card browser, which is used for
viewing image previews with a web browser
• Management File
Contents: Information about folder management, image
sequence, etc.
...
101_MMDD
102_MMDD
U2900001.JPE
U2900002.JPE
...
...
PREVIEW
DATA.HTM
INDEX1.HTM
MMDD0001.JPG
MMDD0002.JPG
MMDD0003.JPG
(TIFF Image Folder)
(TIFF Image Folder)
(Sample Image File)
(Sample Image File)
...
100_MMDD
100_MMDD.QVS
MMDD0001.JPG
MMDD0002.JPG
MMDD0003.AVI
E-137
CONNECTING TO EXTERNAL EQUIPMENT
• Card Browser Folder
Contents: Files used by the card browser
• TIFF Image File
Contents: TIFF format image file
• Card Browser File
Contents: Data used by the card browser
• Best Shot Folder
Contents: Sample images from CD-ROM
• Main Image Folder
Contents: Image files recorded by the camera
• Sample Image File
Best Shot Mode files
• Main Image File
Contents: Still image file recorded by the camera
NOTE
• A memory card’s actual file structure may differ somewhat in accordance with the type of Card Browser you
are using (page E-140).
• Main Movie File
Contents: Movie file recorded by the camera
• Preview Folder
Contents: Preview images (hidden file)
• Preview Image File
Contents: Preview images of still image and movie files
used for temporary playback and card browser
previews
• DPOF File Folder
Contents: DPOF files
• TIFF Data Parent Folder
Contents: All TIFF format image related files
Image Files Supported by the Camera
• Image files recorded with the CASIO QV-2400UX or QV2900UX Digital Camera
• DCF protocol image files
• Image file containing an image with a maximum width of
1,600 pixels and maximum height of 1,200 pixels.
• Maximum image file size of 1 Mbytes.
Certain DCF functions may not be supported.
• TIFF Image Folder
Contents: TIFF format image files
E-138
CONNECTING TO EXTERNAL EQUIPMENT
Precautions when Using a Memory Card
on a Computer
• This camera uses management files to manage the sequence and attributes of image files. Because of this, if you
use your computer to modify or delete memory card files, to
change management file contents, or to change image file
sequence and attributes and then transfer the images back to
the camera, you may end up with the wrong image sequence,
ungrouped panorama images, and slow image scrolling.
• Note that the folder named “DCIM” is the parent (top) folder
of all the files on a memory card. When transferring
memory card contents to a hard disk, floppy diskette, MO
disk, or other external storage, treat all the contents inside
a DCIM folder as a set and always keep them together.
Also, never use your computer to edit or delete the management files (those whose file names have the extension
.QVS) inside a DCIM folder. You can change the name of
the DCIM folder on your computer. Changing the name to a
date is a good way to keep track of multiple DCIM folders.
However, be sure you change the name of the DCIM folder
back to “DCIM” before you copy it back to a memory card
for playback on the camera. The camera does not recognize any folder name other than DCIM.
• The above is also true about the names of folders inside
the DCIM folder. These folders must be returned to the
names assigned to them by the camera whenever you
copy the folder back to the memory card for playback on
the camera.
• We also strongly recommend that after transferring data
from a memory card to other external storage that you reformat the memory card and delete its contents before using it to record more images.
• The camera formats memory cards using ATA format,
which means that a Macintosh sees all memory card files
as text files. To view memory card files on a Macintosh, use
PC Exchange to associate the files on the memory card
(which are JPEG/TIFF files) with an application that is able
to open JPEG/TIFF files.
E-139
CONNECTING TO EXTERNAL EQUIPMENT
Specifying the Card Browser Type
Using the HTML Card Browser
The camera’s Card Browser generates HTML files that let
you see a table of image thumbnails for easy selection, and
even view the properties of each image.
• Card Browser files can be viewed using the Web browsers
listed below. Movie files require QuickTime.
1. Enter the REC mode or PLAY mode.
2. Press MENU.
3. Select “Card Browser” using one of the following two key operations, and then press the
shutter release button.
Microsoft Internet Explorer 4.01 or later
Netscape Communicator 4.5 or later
If you are here
REC mode
PLAY mode
E-140
Select this on the menu screen
“FUNCTION”
“SET UP”
“Card Browser”
“SET UP”
“Card Browser”
CONNECTING TO EXTERNAL EQUIPMENT
4. Select the Card Browser setting you want.
5. After selecting the setting you want, press the
shutter release button.
When you want this
To turn off the Card Browser (no HTML files
generated)
Maximum performance, including access to
image properties and slideshow capabilities
• This format uses high-level Java Script, and
Select this
• When a Card Browser type is selected, a file named
“INDEX.HTM” is created inside the “DCIM” folder
whenever you turn off the camera. Other files are also
created and stored on the memory card at this time.
Off
• Pressing
in place of the shutter release button
in step 5 immediately starts creation of Card Browser
files, which is indicated by the message “One moment
please...” on the monitor screen. Never turn off camera power while this message is on the display.
Type1
requires Microsoft Internet Explorer 4.01 or
later or Netscape Communicator 4.5 or later.
Light image viewing with access to image properties
Type2
NOTE
Basic image viewing with slideshow capabilities
• This format uses high-level Java Script, and
requires Microsoft Internet Explorer 4.01 or
later or Netscape Communicator 4.5 or later.
Basic image viewing
• If the memory card in the camera has a large number
of files on it, it may take quite a bit of time for the camera to create the required HTML files and turn off. Because of this, we recommend that you normally leave
the Card Browser turned off. We suggest that you turn
off the Card Browser if you normally do not need to
use it. The power down routine performed by the camera is much shorter when the Card Browser is turned
off.
Type3
Type4
E-141
CONNECTING TO EXTERNAL EQUIPMENT
IMPORTANT!
Viewing Card Browser File Contents
• When the Card Browser is turned on, the monitor
screen goes blank when you turn off the camera, but
the operation lamp continues to flash for some time as
the camera internally creates Card Browser files. Performing any of the operations listed below while the
operation lamp is flashing not only stops creation of
Card Browser files, it can also result in corruption of
the image data on the memory card.
• Opening the memory card slot cover
• Unplugging the AC adaptor
• Removing the camera’s batteries
• Other actions similar to those above
• Note that Card Browser files may be corrupted if batteries go low or if the memory card becomes full during file generation.
• You can specify the language for the Card Browser’s
on-screen text using the procedure under “Changing
the Display Language” (page E-124).
Use your computer’s Web Browser to view the contents of
the Card Browser files.
1. Transfer the image data from the camera to
your computer by cable (page E-132) or by accessing the memory card from your computer
(page E-135).
2. On the memory card, open the folder named
E-142
“DCIM”.
CONNECTING TO EXTERNAL EQUIPMENT
3. Use your Web browser to open the file named
4. You can click the following items on the screen
“INDEX.HTM”.
to perform the operations described below.
• This displays a gallery of thumbnails for all the images
contained in the oldest image folder on the memory
card.
To do this
Start an automatic slideshow of full-screen
size images (5-second interval)
Start a manual slideshow of full-screen size
images (image changes with click)
Click here
AUTO
MANUAL
• Tapping an image on the INDEX screen or DATA
screen displays a 640 x 480-pixel version of the image. Clicking the full-screen images displays the image in the size at which it was recorded.
IMPORTANT!
Folder name
Thumbnail
• Slideshow images are displayed in full-screen size,
regardless of the size at which they were recorded.
• The thumbnail gallery uses the contents of the Preview Folder (page E-138). Images copied from another digital camera or a computer do not have preview images associated with them, so their thumbnails
do not appear in the thumbnail gallery. If this happens,
scroll through the images on the camera’s monitor
screen until the copied image appears. At this time,
the camera automatically generates a preview image,
which will now appear in the Card Browser thumbnail
gallery.
File name
E-143
CONNECTING TO EXTERNAL EQUIPMENT
• Image Properties
The following is the information provided by the Image
Properties screen.
File Size
Resolution
Quality
Recording mode
AE
Light metering
Shutter speed
Aperture stop
Exposure comp
Focusing mode
Flash mode
Sharpness
Saturation
Contrast
White balance
Sensitivity
Filter
Enhancement
Flash intensity
Digital zoom
Date
Model
INDEX
DATA
E-144
: File size
: Resolution
: Quality
: Recording mode
: Exposure mode
: Metering mode
: Shutter speed
: Aperture stop
: Exposure compensation
: Focusing mode
: Flash mode
: Sharpness
: Saturation
: Contrast
: White balance
: Sensitivity
: Filter setting
: Enhancement setting
: Flash intensity
: Digital zoom setting
: Recording date and time
: Camera model name
CONNECTING TO EXTERNAL EQUIPMENT
5. To exit the Card Browser, simply quit your Web
browser.
Saving Card Browser Files
• To save Card Browser files, use a USB cable connection
(page E-133) or memory card transfer (page E-135) to
copy the folder named “DCIM” on the memory card to a
hard disk, floppy diskette, MO disk, or other external storage. Never use your computer to edit or delete files, to add
new images, or to delete images. Doing so will make it impossible to view image normally using the Card Browser.
• Never edit or delete any of the files inside the “DCIM”
folder. You can use the Photo Loader application contained on the bundled CD-ROM disc to save Card Browser
files. See the documentation that comes with Photo Loader
on the disc for full details.
• We also strongly recommend that after transferring data
from a memory card to other external storage that you reformat the memory card and delete its contents before using it to record more images.
E-145
REFERENCE
REFERENCE
Camera Menus
The following shows lists of menus that appear in the REC
mode and PLAY mode, and their settings.
• The settings that are underlined in the following table are
initial defaults.
• “” indicates items that can be included as part of a shortcut (page E-95).
FUNCTION
REC mode
NORMAL
PORTRAIT
LANDSCAPE
NIGHT SCENE
TIFF mode
Off / On
Sensitivity
Filter
ISO 80 / ISO 160 / ISO 320
Off / B/W / Sepia / Red / Green / Blue /
Exposure Mode
Yellow / Pink / Purple
P/A/S/M
Metering
White Balance
Multi / Center / Spot
Auto / Daylight / Shade / Tungsten /
Enhancement
Fluorescent / Manual
Off / Red / Green / Blue / Flesh Tones
Grid
Flash Intensity
Off / On
Strong / Normal / Weak
Sharpness
Saturation
Hard / Normal / Soft
High / Normal / Low
Contrast
Time Stamp
High / Normal / Low
Off
Year / Month / Day
Day Hour:Minutes
BEST SHOT
MOVIE
Digital Zoom
Year / Month / Day Hour:Minutes
Off / Auto / X2 / X4
INTERVAL
Size/Quality
Sleep
Auto Power Off
Off / 30sec / 1min / 2min
2min / 5min
FUNCTION
MOVIE (PAST)
PANORAMA
1600 x 1200 / Fine
1600 x 1200 / Normal
1600 x 1200 / Economy
800 x 600
800 x 600
/ Fine
/ Normal
800 x 600
/ Economy
Best Shot setting Built-in + CF / Built-in / CF
Mode Memory
Recording Mode
Off / On
TIFF mode
Off / On
Sensitivity
Exposure Mode
E-146
Off / On
Off / On
REFERENCE
Mode Memory
FUNCTION
SET UP
Metering
Off / On
쑗
White Balance
Flash
Off / On
Off / On
쑗
쑗
Focus
Digital Zoom
Off / On
Off / On
쑗
쑗
Flash Intensity
Indicators
Off / On
Off / On
쑗
쑗
Card Browser
Off /
Type1 / Type2 /
쑗
Beep
Date Style
Date / Time
Type3 / Type4
Off / On
PLAY mode
SET UP
Indicators
Card Browser
Off / On
Off / Type1 / Type2 /
Beep
Type3 / Type4
Off / On
Date Style
쑗
Year / Month / Day
Day / Month / Year 쑗
Month / Day / Year
Time setting
쑗
Date / Time
Month / Day / Year
Time setting
Language / Sprache
Format
English / Deutsch
No / Yes
Video Out
Link*
NTSC / PAL
Off / Mode1 / Mode2 /
Restore
Mode3
No / Yes
Language / Sprache English / Deutsch
Format
No / Yes
쑗
쑗
Video Out
Link*
NTSC / PAL
Off / Mode1 /
쑗
DELETE
DPOF
Select / Folder / All
Select / Folder / All
쑗
PROTECT
SLIDE SHOW
Select / Folder / All
Restore
Mode2 / Mode3
No / Yes
쑗
Year / Month / Day
Day / Month / Year
* This function is not available with this model.
* This function is not available with this model.
E-147
REFERENCE
Mode Settings
Settings in Each Mode
: Available : Partially available ҂ : Not available
Partial Shutter Release
Button Press
Normal
Recording Mode
Portrait
Landscape
Night Scene
Best Shot
Movie (Normal)
Movie (Past)
Panorama
Exposure Mode
Interval
P Mode
A Mode
S Mode
M Mode
Flash
Mode
Self-timer
Focus
Frame
Display
AF
Lock
AE
Lock
҂
҂
҂
҂
҂
҂
҂
҂
҂
҂
: The camera will not enter the Self-timer Mode while the shutter speed it set to “BULB”.
E-148
REFERENCE
Recording Mode + Exposure Mode Combinations
The following table shows to what extent each recording mode can be
used in combination with each exposure mode.
: Available : Partially available ҂ : Not available
Exposure Mode
Normal
Recording Mode
Portrait
Landscape
Night Scene
Best Shot
Movie (Normal)
Movie (Past)
Panorama
Interval
P Mode
A Mode
S Mode
M Mode
҂
҂
҂
҂
: Entering the Interval Mode while “BULB” is selected as the shutter speed
automatically changes the shutter speed to 1 second.
E-149
REFERENCE
Troubleshooting
Symptom
Recording
Power Supply
No power
Probable Cause
1. Batteries are not oriented correctly.
2. Batteries are dead.
3. Using the wrong AC adaptor.
Sudden loss of power
1. Activation of Auto Power Off (page E-37).
2. Dead batteries
3. QV-2400UX: Turning power on in the REC Mode
while the lens cap is attached to the lens.
Action
1. Load batteries correctly (page E-32).
2. Replace batteries with a full set of new ones
(page E-32).
3. Use only the specified AC adaptor.
1. Turn power back on.
2. Replace batteries with a full set of new ones
(page E-32).
3. QV-2400UX: Remove the lens cap and try turning power on again.
or
indicator on the
monitor screen
Batteries are low.
Replace batteries with a full set of new ones (page
E-32).
No recording when the
shutter release button is
pressed
1. The REC/PLAY selector is set to “PLAY”.
2. Flash unit is charging.
3. The message “MEMORY FULL” is on the
monitor screen.
4. No memory card loaded in the camera
1. Slide to REC/PLAY selector to “REC”.
2. Wait until flash unit charging is finished.
3. Delete images you no longer need from camera
memory or change to another memory card.
4. Load a memory card.
Unable to focus properly
with Auto Focus
1. Dirty lens
2. Subject is outside the focus frame.
1. Clean the lens.
2. Compose the image so the subject is inside the
focus frame.
3. Switch to the Manual Mode and focus manually
(page E-58).
4. Use a tripod.
3. Conditions make it impossible to obtain proper
focus.
4. Camera is unsteady or shaking.
E-150
REFERENCE
Probable Cause
Recording
Symptom
Improper focus
Make sure the subject on which you want to focus is
inside the focus frame.
Power failure during selftimer operation.
Batteries are dead.
Replace batteries with a full set of new ones (page
E-32).
Monitor screen image is out
of focus.
1. Poor focusing in the manual focus mode.
2. Attempting to record scenery or portraits in the
Macro Mode.
3. Attempting to use the Auto Focus mode for a
subject that is too close.
1. Focus the image (page E-58).
2. Use Auto Focus for scenery and portraits.
1. Batteries going low before the image save operation is complete.
2. Opening of the memory card slot cover before
the image save operation is complete.
1. Replace batteries with a full set of new ones.
Colors of recorded image
are different from those on
the monitor screen.
1. Direct sunlight or light from another source shining into the lens.
2. Image quality setting
1. Reorient the camera so that light is not shining
directly into lens.
2. Change to a higher image quality for recording.
[+] and [–] operations do not
work while the 9-image view
is on the monitor screen.
You are operating the [+] and [–] buttons while the
scroll operation is still being performed.
Wait until image scrolling is complete before pressing [+] or [–].
Cannot display a particular
image.
Memory card images recording using a camera that
does not support DCF.
The file management systems of cameras that do
not support DCF are different from the one used by
this camera. This camera cannot read cards recorded with such cameras.
Recorded image is not
saved.
Playback
Action
Recorded image is blurred.
E-151
3. Use the Macro Mode for close ups.
2. Keep the memory card cover closed until the
image save operation is complete.
REFERENCE
Other
Deletion
Playback
Symptom
Monitor screen contents do
not appear on the screen of
a connected TV.
Probable Cause
1. Incorrect camera-TV connection
2. Wrong TV settings
3. Wrong video signal output mode
Action
1. Connect correctly using the video cable (page E127).
2. Check the documentation that comes with the
TV and set it up correctly for video input.
3. Select the video output mode that suits the type
of equipment you are using (page E-128).
Cannot access the delete
screen.
All images on the memory card are protected.
Unprotect the images you want to delete (page E118).
Cannot select menu items
in the PLAY mode.
1. Some functions cannot be selected for playback
of certain types of images.
2. No images stored on the memory card.
1. Select a different function or change to another
image.
2. Record an image to make the functions available.
All buttons and switches are
dead.
Circuit damage due to static electrical charge from
connected device or due to strong impact.
Remove batteries and disconnect the AC adaptor if
you are using one. Restore power and turn the
camera on. If this does not work, contact your
dealer or an authorized CASIO service provider.
Nothing appears on the
monitor screen.
1. The monitor is asleep.
2. Communication over the USB cable is in
progress.
1. Wake up the monitor (page E-37).
2. After the communication operation over the USB
cable is complete, unplug the USB cable from
the camera.
E-152
REFERENCE
Messages
RECORD ERROR
1. Press MENU.
Some problem occurred when compressing image
data to save it on the memory card. Shoot the image
again.
There are no images There is no image data stored on the memory card.
on this memory card!
This camera cannot
display the image
you selected!
The image file you are trying to view is corrupted, or
it was recorded with a camera whose image file format is not supported by this camera.
2. Use [+] and [–] to select “Yes”, and then press
the shutter release button.
• To cancel this procedure, press MENU.
• Whenever formatting a memory card, be sure to
use the AC adaptor to power the camera or replace its batteries with a full set of new alkaline or
lithium batteries before starting. Unexpected loss
of power can result in incomplete formatting and
improper operation of the memory card.
• The message “There are no images on this
memory card!” appears on the monitor screen after formatting is complete.
REPLACE BATTERY! Battery power is low. Camera power turns off automatically shortly after this message appears.
NO FORMAT
MENU
The memory card you are using is not formatted.
You must format the memory card before you can
use it to store images (page E-41).
CF ERROR
You must format the
CompactFlash card
before using it with
this camera.
FORMAT
MENU
There is some problem with the memory card you
are using. Perform the following procedure to correct the problem.
Warning!
The following procedure deletes all files currently
stored on the memory card. Before proceeding,
try to back up the contents of the memory card
onto your computer’s hard disk drive or some
other type of external storage medium.
Insert memory card!
MEMORY FULL
Change quality or
delete unneeded
images
E-153
There is no memory card loaded in the camera.
Load a memory card (page E-39).
There is not enough memory to record an image
with your current quality and size settings. Change
the image quality and size settings and try again, or
delete some images from the memory card (page E110).
REFERENCE
MEMORY FULL
Delete unneeded
images
• There is not enough memory for further recording.
Delete some images you don’t need from memory
card (page E-110).
• The DCIM folder or other file (page E-137) cannot
be created due to insufficient memory when
downloading data from a computer to the memory
card. Use your computer to delete unneeded images to free up memory card space for the images
you are downloading. You could also press the
MENU button and format the memory card in the
camera, but doing so deletes all image files currently stored on the memory card.
LENS CAP!
• This message appears and power turns off automatically if you turn on power while the REC/
PLAY selector is set to “REC” and the lens cap is
attached. Remove the lens cap and then turn on
power (QV-2400UX only).
E-154
REFERENCE
Movie (320 x 240 pixels)
Specifications
Description ......................... Digital camera
Recorded Image
File Format ......................... Still images (including panoramas):
JPEG (Exif. Ver. 2.1) / TIFF, DCF standard (Design rule for Camera File system), DPOF compatible
Movies: AVI (Motion JPEG)
Recording Medium ............ CompactFlash card (Type I/II),
IBM Microdrive
Recorded Image Size ........ 1600 x 1200 pixels, 800 x 600 pixels
Standard Memory Capacity, Number of Image Files,
Computer Output Image Size (JPEG imges only)
Still
Number of images
Quality
File size
FINE
850
KB/image
600
KB/image
350
KB/image
200
KB/image
150
KB/image
120
KB/image
(pixels)
1600
x
1200
NORMAL
ECONOMY
800
x
600
FINE
NORMAL
ECONOMY
Approximately 300KB/second
Recording Time
16 seconds per movie
• The above figures are approximations only.
Model .................................. QV-2400UX/QV-2900UX
Image
size
Storage Capacity
8MB
memory card
340MB
Microdrive
8
images
11
images
19
images
33
images
43
images
53
images
401
images
562
images
943
images
1587
images
2054
images
2494
images
Image Deletion ................... Single image; all images in a folder; all images in memory (with image protection)
Imaging Element ................ 1/2.7-inch CCD (Total Pixels: 2.11 million, Effective Pixels; 2.02 million)
Lens .................................... • QV-2400UX
F2.8 to 4.5; f = 6.2 to 18.6mm (equivalent to 41 to 123mm lens for 35mm film)
• QV-2900UX
F3.2 to 3.5; f = 6 to 48mm (equivalent
to 40 to 320mm lens for 35mm film)
Zoom ................................... • QV-2400UX
Optical zoom: 3X
Digital zoom: 12X
(in combination with optical zoom)
• QV-2900UX
Optical zoom: 8X
Digital zoom: 32X
(in combination with optical zoom)
Image size is 800 x 600 pixels when 4X
digital zoom is used.
Focusing ............................. Contrast-detect Auto Focus; manual focus with macro mode and focus lock
E-155
REFERENCE
Focus Range ...................... • QV-2400UX
Normal focus: 10cm to ∞ (1X zoom)
50cm to ∞ (3X zoom)
Macro focus: 1cm to 50cm (1X zoom)
Manual focus: 1cm to ∞ (1X zoom)
50cm to ∞ (3X zoom)
• QV-2900UX
Normal focus: 40cm to ∞ (1X zoom)
1m to ∞ (8X zoom)
Macro focus: 1cm to 50cm
(1 to 1.6X zoom)
Manual focus: 1cm to ∞ (1X zoom)
1m to ∞ (8X zoom)
The focusing range is the distance from
the lens surface to the subject.
Exposure Control
Light Metering: ................ Multi-pattern, center point, spot by CCD
Exposure: ........................ Program AE, Aperture priority AE, Shutter priority AE
Exposure
Compensation: ................ –2EV to +2EV (1/3EV units)
Shutter ................................ CCD electronic shutter; mechanical
shutter, BULB, 60 to 1/2000 second
Self-timer ............................ 10 seconds, 2 seconds
Built-in Flash
Flash Modes: ................... AUTO, OFF, ON, Red eye reduction
Flash Range: ................... • QV-2400UX
Approximately 0.5 to 2 meters
• QV-2900UX
Approximately 0.5 to 2.5 meters
Recording Functions ........ Normal, movie, panorama, landscape,
night scene, portrait, self-timer, macro,
Best Shot, Interval
Monitor ................................ 1.8" TFT, low-glare color HAST LCD
(122,100 pixels, 555 x 220)
Viewfinder .......................... LCD Monitor or optical viewfinder
Clock ................................... Built-in quartz digital timepiece for time
and date recording and storage with image data; auto calendar up to 2049
Input/Output Terminals .... DIGITAL IN/OUT, USB port (special
mini port), AC adaptor connector,
VIDEO OUT (NTSC, PAL), External
flash sync terminal (QV-2900UX)
Power Supply ..................... Four AA-size alkaline or lithium batteries
Four AA-size nickel-metal hydride rechargeable batteries (NP-H3)
AC adaptor (AD-C620)
AC adaptor charger (BC-3HA)
Aperture .............................. • QV-2400UX
F2.8, F5.6, auto switching or manual
switching
• QV-2900UX
F3.2, F4.8, F8, auto switching or
manual switching
White Balance .................... Automatic, fixed (4 modes), manual
switching
E-156
REFERENCE
Battery Life
The values noted below indicate the number of hours before battery failure
under normal operating temperature (25°C). These values are for reference
only, and do not guarantee that any particular set of batteries actually will
provide the service life indicated. Low temperatures shorten battery life.
Type of
Operation
AA-size Alkaline
Batteries LR6
AA-size Lithium
Batteries FR6
AA-size Ni-MH
Batteries NP-H3
Continuous
Playback
170 minutes
300 minutes
180 minutes
Continuous
Recording
80 minutes
(480 shots)
200 minutes
(1200 shots)
120 minutes
(720 shots)
• This camera does not have a separate battery to power its clock.
Clock settings are cleared whenever power to the camera is cut off
(by batteries going dead while the camera is not connected to an
AC power outlet with the AC adaptor) for about 24 hours. After
power is resumed, either by loading fresh batteries or connecting to
an AC power outlet, you will have to set the correct time and date
again.
• The liquid crystal panel built into this camera is the product of precision engineering, with a pixel yield of 99.99%. This also means,
however that 0.01% of the pixels can be expected to fail to light or
to remain lit at all times.
• The above figures are approximations only.
• The above guidelines are based on the following battery types:
Alkaline: MX1500 (AA) DURACELL ULTRA
Lithium: Energizer
• Battery life varies with brand.
Continuous recording values show the number of shots without using the
flash. The number of shots depends on use of the flash and whether flash
is turned on or off.
Power Consumption ......... • QV-2400UX Approximately 5.3W
• QV-2900UX Approximately 5.8W
Dimensions ........................ • QV-2400UX 118(W) x 67(H) x 54(D) mm
• QV-2900UX 121(W) x 80.5(H) x 66(D) mm
Weight ................................. • QV-2400UX Approximately 245g
• QV-2900UX Approximately 295g
(excluding batteries)
Standard Accessories ...... 8MB CompactFlash memory card,
Strap; lens cap; cap holder; soft case
(QV-2400UX); special USB cable;
special video cable; data transfer
cable; CD-ROM; four LR6 alkaline
batteries; Basic Reference, Bundled
Software User’s Manual; Best Shot
scene List
E-157