1
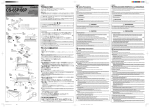
JESPoCkAr 準備 • 組み立て用の工具は付属しておりません。あらかじめ大きめのプラス(+)ドライバーをご用意ください。 • 最初に以下の部品がそろっていることをご確認ください。 カシオ ペダルユニット SP-33 CASIO Pedal Unit SP-33 Unidad de Pedal CASIO SP-33 Unidade de Pedais SP-33 da CASIO 組み立て方 Assembling the Stand Armado del soporte Montagem do suporte Getting Ready • This stand does not include any of the tools required for assembly. It is up to you to prepare a large Phillips head (+) screwdriver for assembly. • Before starting assembly, check to make sure that you have all the parts shown below. Procedimientos iniciales • Este soporte no incluye ninguna de las herramientas requeridas para el armado. Tenga a mano un destornillador grande tipo Philips (+) pues lo necesitará para el armado. • Antes de comenzar el armado, compruebe que cuenta con todas las piezas mostradas debajo. * 注 意 • ペダルユニットをスタンドに取り付ける際、手などをはさまないようにご注意ください。 • 組み立ては、必ず平らな場所で行ってください。 〒東京都渋谷区本町 * CAUTION #!3)/#/-054%2#/,4$ +"'!=dc"bVX]^&"X]dbZ H]^WjnV"`j!Id`nd&*&"-*)(!?VeVc • When installing the Pedal Unit onto the stand, take care that you do not pinch your fingers. • This stand should be assembled on a flat surface. * PRECAUCIÓN C MA1209-B Printed in China SP33-WL-1B • Cuando instale la unidad de pedal en el soporte, tenga la precaución de no pillarse los dedos. • El armado de este soporte debe realizarse sobre una superficie plana. ×2 ペダルユニット Pedal Unit Unidad de pedal スタンドを組み立てる前に / Before Assembling the Stand / Antes de armar el soporte スタンドの側板についている金具のネジ(左右 4 箇所)を取り外して、金具を図のようにスライドさせます。 Quite los tornillos de los anclajes de la superficie interior de los paneles laterales (dos tornillos por cada panel, cuatro en total) y, a continuación, cambie la posición de los anclajes, como se muestra en la figura. 1 Remove the bracket screws from the inside surfaces of the side panels (two screws each panel, four total) and then shift the position of the brackets as shown in the figure. Replace the screws you removed in step 1-a above and temporarily tighten the brackets in place. 5 手順2で取り付けた金具の上にペダルユニットを Remove the bracket screws from the inside surfaces of the side panels (two screws each panel, four total). Quite los tornillos de los anclajes de la superficie interior de los paneles laterales (dos tornillos por cada panel, cuatro en total). キャップ Caps Tapas 3 側板の外側から、SP-33 に付属されているネジを使って仮留め します。 Insert the angle brackets that come with the SP-33 Pedal Unit between the panel brackets and the side panels. Insert the screws that come with the SP-33 Pedal Unit from the outside of the side panels and temporarily tighten the angle brackets in place. Inserte los anclajes angulares entregados con la unidad de pedal SP-33 entre los anclajes de los paneles y los paneles laterales. Inserte los tornillos entregados con la unidad de pedal SP-33 desde el exterior de los paneles laterales y apriete temporalmente los anclajes angulares. Loosen the screws of the panel brackets at the bottom of the side panels (two screws each panel, four total). Afloje los tornillos de los anclajes de panel en la parte inferior de los paneles laterales (dos tornillos para cada panel, cuatro en total). •Simplemente afloje los tornillos. No los saque totalmente de sus orificios. Vuelva a colocar los tornillos quitados en el paso 1-a anterior, y fije los anclajes en posición. 箇所)を取り外します。 金具 Angle Brackets Anclajes angulares ×2 •Simply loosen the screws. Do not allow them to come completely out of their holes. -b 手順 1-a で取り外したネジを使って金具を仮留めします。 4 スタンドの側板についている金具のネジ(左右4 クリップ Clips Clips ×2 ネジを緩めます(左右 4 箇所)。 ・ネジを完全に取り外さないようにしてく ださい。 Use the anti-tipping brackets to protect the stand from tipping over when it is in a location that is not against a wall, etc. Utilice los anclajes antivuelco para evitar que el soporte vuelque cuando se lo coloca alejado de una pared, etc. 1 -a ネジ Screws Tornillos 金具を差し込みます。 1スタンドの側板の底面についている金具の 壁から離れた場所に設置する場合は、スタンドを倒れにくくするために転倒防止金具を使います。 ×2 2 金具と側板の隙間に、SP-33 に付属されている 壁に近づけてスタンドを設置する場合 Locating the Stand against a Wall COLOCACIÓN DEL SOPORTE CONTRA UNA PARED 転倒防止金具を使う場合 Using the Anti-tipping Brackets USO DE LOS ANCLAJES ANTIVUELCO ペダル取付用ネジ Pedal Installation Screws Tornillos para la instalación del pedal ×2 6 SP-33 に付属のペダル取付用ネジでしっかり 乗せます。 7 ペダルの位置(高さ)を調整してから、手順 3 で Mount the pedal unit onto the angle brackets you installed in step 2 of this procedure. Securely tighten the two pedal installation screws that came with the SP-33 Pedal Unit. Monte la unidad de pedal en los anclajes angulares instalados por usted en el paso 2 de este procedimiento. Apriete firmemente los dos tornillos de instalación del pedal entregados con la unidad de pedal SP-33. ご注意 ペダルユニットをスタンドに取り付けた後に、付属の キャップをネジにかぶせてください。 Important! After attaching the pedal unit to the stand, cover the screws with the supplied caps. !Importante! Tras fijar la unidad de pedal al soporte, cubra los tornillos con las tapas suministradas. 8 ペダルユニットのプラグをイラストと同じ向きにして、ピアノ 仮留めしたネジをしっかり締めます。 固定します(2 箇所)。 After adjusting the position (height) of the pedal, securely tighten the screws you temporarily tightened in step 3 of this procedure. Después de ajustar la posición (altura) del pedal, apriete firmemente los tornillos apretados temporalmente en el paso 3 de este procedimiento. 本体底面のペダルコネクターに差し込み、ペダルのコードをク リップで固定します。 Orienting the pedal unit plug as shown in the illustration, plug it into the pedal connector on the bottom of the piano. Secure the pedal cord with the clips. Oriente la clavija de la unidad de pedal tal como se muestra en la ilustración, e introdúzcala en el conector de pedal de la parte inferior del piano. Asegure el cable del pedal con los clips. • スタンドの側板にクリップを 2 箇所、 図のように取り付けます。 • Note that you must install the two clips on the side panel of the stand as shown in the illustration. • Tenga en cuenta que es necesario instalar los dos clips en el panel lateral del soporte, tal como se muestra en la ilustración. 4HISRECYCLEMARKINDICATESTHATTHEPACKAGINGCONFORMSTOTHEENVIRONMENTALPROTECTIONLEGISLATIONIN'ERMANY %STAMARCADERECICLAJEINDICAQUEELEMPAQUETADOSEAJUSTAALALEGISLACINDEPROTECCINAMBIENTALEN!LEMANIA %STAMARCADERECICLAGEMINDICAQUEAEMBALAGEMCUMPRECOMALEGISLA½áODEPROTE½áODOMEIOAMBIENTENA!LEMANHA Preparativos • Este suporte não inclui nenhuma das ferramentas necessárias para montá-lo. O usuário deve preparar uma chave de fenda Phillips grande (+) para a montagem. • Antes de começar a montagem, certifique-se de que tenha todas as peças mostradas abaixo. CEマーキングは、ヨーロッパ地域の基準適合マークです。 このマークはEU諸国におけるリサイクル規制のマークです。 4HISMARKAPPLIESIN%5COUNTRIESONLY %STES¤MBOLOESVÕLIDOSLOENPA¤SESDELA5% %STAMARCAAPLICASOMENTENOSPA¤SESDA5NIáO%UROP£IA Declaration of Conformity According to EU Directive Declaración de conformidad con la Directiva UE Declaração de Conformidade com a Diretiva EU * PRECAUÇÃO • Ao instalar a unidade de pedais no suporte, tome cuidado para não prender os dedos. • O suporte deve ser montado em uma superfície plana. Manufacturer: CASIO COMPUTER CO., LTD. 6-2, Hon-machi 1-chome, Shibuya-ku, Tokyo 151-8543, Japan Responsible within the European Union: CASIO EUROPE GmbH Casio-Platz 1, 22848 Norderstedt, Germany ×2 Unidade de pedais Antes de montar o suporte / / USO DOS BRAÇOS ANTI-TOMBAMENTO 1 -a Retire os parafusos do braço desde as superfícies interiores dos painéis laterais (dois parafusos de cada painel, num total de quatro) e, em seguida, desloque a posição dos braços como mostrado na figura. 1 -b Recoloque os parafusos retirados no passo 1-a acima e aperte os braços temporariamente em posição. 4 Retire os parafusos do braço desde as superfícies interiores dos painéis laterais (dois parafusos de cada painel, num total de quatro). 5 Monte a unidade de pedais nos braços angulares instalados no passo 2 deste procedimento. Parafusos 2 Insira os braços angulares que vêm com a LOCALIZAÇÃO DO SUPORTE CONTRA UMA PAREDE Use os braços anti-tombamento para evitar que o suporte tombe quando estiver em um lugar que não seja contra uma parede, etc. Parafusos de instalação de pedal ×2 ×2 Grampos ×2 Braços angulares ×2 Tampas 3 Insira os parafusos que vêm com a unidade de pedais unidade de pedais SP-33 entre os braços dos painéis e os painéis laterais. SP-33 desde o exterior dos painéis laterais e aperte os braços angulares temporariamente em posição. 7 Depois de ajustar a posição (altura) do pedal, 8 Orientando o plugue da unidade de pedais como mostrado na 1Afrouxe os parafusos dos braços dos painéis na parte inferior dos painéis laterais (dois parafusos de cada painel, num total de quatro). •Simplesmente afrouxe os parafusos. Não os deixe sair completamente dos seus furos. 6 Aperte firmemente os dois parafusos de instalação de pedal que vêm com a unidade de pedais SP-33. Importante! Depois de instalar a unidade de pedais no suporte, cubra os parafusos com as tampas fornecidas. aperte firmemente os parafusos apertados temporariamente no passo 3 deste procedimento. ilustração, conecte-o ao conector de pedais na parte inferior do piano. Segure o cabo dos pedais com os grampos. • Repare que você deve instalar os dois grampos no painel lateral do suporte como mostrado na ilustração.