1
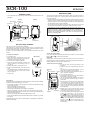
SCR-100
SCR-100-1
GENERAL GUIDE
WARNING ALARM
• The configuration of your clock may differ somewhat from that shown in the
illustration.
This clock comes with a vibration sensor built in. When you hang the clock on
a doorknob and switch it on, a warning alarm sounds whenever any tries to
move the doorknob.
• With some doorknobs (depending on shape and material), the warning alarm
sounds as soon as someone touches the doorknob, even without moving it.
• The warning alarm may not work properly with certain doorknob shapes and
with doorknobs made of certain materials.
• You can set the warning alarm to sound for five to 90 seconds. To stop the
warning alarm sound before its preset time, slide the selector to OFF.
[Front]
[Back]
PM indicator Minutes
Hour
Seconds
Sensitivity
dial
THIS PRODUCT IS NOT INTENDED TO BE USED AS, AND IS NOT A
SUBSTITUTE FOR, A COMPLETE HOME SECURITY SYSTEM. THE
MANUFACTURE ASSUMES NO RESPONSIBILITY FOR BURGLARIES,
ENTRIES, OR OTHER INCIDENTS THAT MAY OCCUR WHILE THIS
PRODUCT IS BEING USED.
PM
SENSITIVITY
OFF
ON/TEST
SET
START
AC/C
CAL
TM/AL
FOREGIN
HOME
12/24
RESET
Cover
Start button
Selector
SET button
Hook Battery
compartment
Hook
BATTERY REPLACEMENT
PM
This clock is powered by two lithium batteries.
The display of the clock becomes dim or difficult to read, or the alarm sound
becomes weak when battery power becomes low. When this happens, use the
procedure described below to replace the batteries.
Be sure to use only CASIO brand or other approved batteries for the best
results.
To replace the batteries
1. Pull out the hook.
2. Open the battery compartment cover on the
back of the clock by sliding it in the direction
indicated by the arrow on the cover.
3. Remove the two old lithium batteries.
4. Load two new lithium batteries, making sure
that the positive (+) side is facing up (so you
can see it).
5. Replace the battery compartment cover.
6. Press the All Reset Button on the back of the
clock.
• The All Reset Button is located inside the hole
on the back of the clock. Use a thin, pointed
object to press it.
7. Set the time.
[Back side]
+ +
Battery
compartment
RESET
All reset button
PERSONAL GUARD
To test the warning alarm
In any mode besides the Warning Alarm Mode, hold down one of the START
or
) to test the warning alarm.
buttons (
Important!
Warning alarm volume becomes weak when battery power runs low. Be sure
to test the alarm to check for low battery power before using the warning alarm.
Replace batteries if warning alarm volume is low.
To activate the warning alarm
1. Pull out the hook and hang the alarm on the
doorknob.
2. Open the clock’s cover and slide the selector to
ON.
Sensitivity
• This enters the Warning Alarm Mode, which is
dial
shown by the indicator on the display.
Mode indicator Hook 3. Rotate the sensitivity dial downwards as far as it
will go (minimum sensitivity).
4. Try moving the doorknob.
• If the alarm does not sound, move the sensitivity
dial upwards a little and try again.
5. Use your hand to stop any swinging movement of
the unit, and then release the unit so it is completely still.
• If the alarm does not stop sounding within about
10 seconds after you remove your hand from the
unit, or if the alarm suddenly sounds even if no
one moves the doorknob, it means that sensitivity
is too high and you should rotate the sensitivity
dial downwards.
6. Repeat steps 4 and 5 until the alarm sounds
whenever the doorknob is moved, and does not
Start button
SET button sound when the doorknob is not moved.
Selector
• If you want to switch the warning alarm off while
setting the sensitivity, you should first
press CAL and then slide the selector to OFF. If
you slide the selector to OFF without first pressing
CAL , the Timekeeping Mode display will appear
with the current time flashing on the display. If this
happens, press SET twice to stop the time from
flashing and return to the normal Timekeeping
Mode display.
SENSITIVITY
Precautions:
Careless handling of batteries can cause them burst or leak. Note the following
precautions and avoid damage to your clock.
• Be sure that the positive (+) and negative (–) poles of the batteries are facing
in the proper direction.
• Never mix batteries of different types.
• Never mix old batteries and new ones.
• Never leave dead batteries in the battery compartment.
• Remove the batteries if you do not plan to use the clock for long periods.
• Replace the batteries at least once every year, no matter how much the clock
is used during that period.
• Never try to recharge the batteries supplied with the clock.
• Do not expose batteries to direct heat, let them become shorted, or try to take
them apart.
Keep batteries out of the reach of small children. If swallowed, consult with a
physician immediatly.
OFF
ON/TEST
START
SET
AC/C
CAL
TM/AL
FOREGIN
HOME
12/24
SCR-100-2
Start button
START
Volume
indicator
Markers
[Warning alarm switched on]
7. Press one of the START buttons (
or
).
• Press
or normal volume, or
for high
volume.
• To change from one volume to another,
simply press the applicable START button.
• An indicator appears on the display to show
which volume level you selected.
• A series of 8 markers also appear on the
display, and then are cleared one-by-one.
The warning alarm does not sound if you
handle the clock or touch the doorknob while
these markers are on the display.
8. While markers remain on the display, close
the clock’s cover and steady the clock so that
it is not moving.
• The warning alarm is activated when the last
marker disappears from the display, and the
timekeeping display appears. Either Home
Time or Dual Time appears in the timekeeping
display, depending upon which was displayed
when you entered the Warning Alarm Mode.
Notes
• The back of the unit should hang so it is about 1cm from the door’s surface.
• You cannot switch to any other mode while the warning alarm is switched on.
If you want to change to another mode, first set the selector to OFF to switch
the warning alarm off.
• Be sure always to set the sensitivity of sensor before using the warning alarm.
• If you have trouble rotating the sensitivity dial with your fingertip, use a thin,
pointed object.
• Changes in temperature can affect sensitivity, causing the Warning Alarm to
suddenly start sounding. When using the Warning Alarm on a metal door or
in environments subject to temperature drops, be sure to set the Sensitivity
dial more towards the LOW sensitivity side.
• In hot environments, the sensitivity may become somewhat weaker.
• If you do not press one of the START buttons within about 10 minutes after
adjusting the sensitivity, the clock automatically activates the warning alarm
(normal volume) and shows the timekeeping display.
• If you maintain contact with the doorknob or the hook of the clock as the last
of the 8 markers are cleared from the display (see Step 6, above), the warning
alarm will not operate until you let go of the doorknob or hook. Once you do,
the warning alarm should sound if you move the doorknob or hook again.
• After you activate the warning alarm, be sure to try moving the doorknob to
see that the warning alarm operates correctly.
• If you have set a time for an alarm, it will sound when the time is reached, even
if the warning alarm is switched on. Note that the volume of the alarm will be
the same as the volume you set for the warning alarm.
To set the duration of the warning alarm
1. Press TM/AL to enter the Timekeeping Mode.
2. W h i l e i n t h e T i m e k e e p i n g M o d e ,
Mode
Warning alarm
press HOME to display the Home Time.
indicator duration
3. Press SET twice and the warning alarm
duration and mode indicator start to flash on
the display.
4. Use
and
to set the warning
alarm duration.
• Each press of
increases the duration
by one second, while
decreases it.
• Holding down either button changes the time
setting at high speed.
• You can set the duration within the range of
5 to 90 seconds.
5. After you finish setting the warning alarm duration, press SET to return to the
normal display.
• If you do not operate any button for a few minutes while a selection is flashing,
the flashing stops and the clock goes back to the Normal Timekeeping display
automatically.
Personal Alarm Function
Hold down the
button and a high-volume alarm sounds for about three
minutes. To stop the alarm, open the cover and press CAL .
• You can press
while the clock’s cover is closed.
TIMEKEEPING FUNCTION
PM indicator
This clock lets you keep track of the current time in
two different areas: your home area and another
area.
To enter the Timekeeping Mode
Press TM/AL to enter the Timekeeping mode.
Minutes
Seconds
Hour
To switch between Home Time and Dual Time
Press FOREIGN to switch from Home Time to Dual Time. To switch from Dual Time
to Home Time, press HOME .
• The indicator TIMEII appears on the display when you select Dual Time.
To set your Home Time
1. While in the Timekeeping mode, press HOME to
display the Home Time.
2. Press SET and the time starts to flash on the
display.
3. Each press of the
button increases the time by one minute, and
pressing
button decreases it by one minute.
• Holding down either button changes the time setting at high speed.
• The hour setting is changed automatically whenever a change in the minutes
increases past 59 minutes or decreases past 00 minutes.
• The seconds are reset to “00” whenever you change the minutes setting.
4. After you finish setting the time press SET twice to return to the Normal
Display.
• If you do not operate any button for a few minutes while a selection is flashing,
the flashing stops and the clock goes back to the Normal display automatically.
To set the Dual Time
1. While in the Timekeeping mode, press FOREIGN to
display the Dual Time.
2. Press SET and the Hour and Minutes digits start to
flash on the display.
button increases the time by one minute, and
3. Each press of the
pressing
button decreases it by one minute.
• Holding down either button changes the time setting at high speed.
• The hour setting is changed automatically whenever a change in the minutes
increases past 59 minutes or decreases past 00 minutes.
• The seconds count for Dual Time is the same as the ongoing count being
performed by the Home Time. Registering a new Dual Time setting does not
affect the seconds count.
4. After you finish setting the time press SET to return to the Normal Display.
• If you do not operate any button for a few minutes while a selection is flashing,
the flashing stops and the clock goes back to the Normal display automatically.
To switch between the 12-hour and 24-hour formats
to switch between the 12-hour and
While in the Timekeeing Mode, press
24-hour formats.
• The timekeeping format you set for one time (Home Time or Dual Time) is
automatically applied in the other time, also.
SCR-100-3
ALARM FUNCTION
When the Daily Alarm is switched on, the alarm sounds for 60 seconds at the
preset time each day. Press any button to stop the alarm after it starts to sound.
When the Hourly Time Signal is switched on, the clock beeps every hour on the
hour.
• The alarm sounds when the currently displayed time (either Home Time or
Dual Time) reaches the time you set.
To set an Alarm Time
AM indicator
Minutes
Hour
Mode indicator
1. W h i l e i n t h e T i m e k e e p i n g M o d e ,
press TM/AL to display the alarm display.
2. Press SET and the alarm time starts to flash
on the display.
• At this time, the alarm is automatically
switched on.
3. Each press of the
button increases the
alarm time by one minute, and pressing
button decreases it by one minute.
• Holding down either button changes the time setting at high speed.
• The hour setting is changed automatically whenever a change in the minutes
increases past 59 minutes or decreases past 00 minutes.
• The format (12-hour and 24-hour) of the alarm time matches the format you
select for normal timekeeping.
• When setting the alarm time using the 12-hour format, take care to set the
time correctly as morning (AM) or afternoon (PM).
To switch the Alarm on and off
1. While in the Timekeeping Mode, press TM/AL to display the alarm display.
to switch the alarm on and off.
2. Press
• If the alarm is on, the Alarm On Indicator (
) is shown on the display.
To switch the Hourly Time Signal on and off
1. While in the Timekeeping Mode, press TM/AL to display the alarm display.
to switch the Hourly Time Signal on and off.
2. Press
• If the Hourly Time Signal is on, the Hourly Time Signal On Indicator ( ) is
shown on the display.
CALCULATOR FUNCTION
The Calculator lets you perform addition, subtraction,
multiplication and division using 8-digit values.
Constant Calculations
Input the number you want to use as a constant, and then press one of the
arithmetic keys twice. This causes the “K” indicator to appear on the display,
indicating constant calculations.
Example
Operation
Display
10+7=17
12+7=19
7 + + 10 =
12 =
K+
K+
17.
19.
78–12=66
45–12=33
12 – – 78 =
45 =
K–
K–
66.
33.
2×12=24
5×12=60
12 × × 2 =
5 =
K×
K×
24.
60.
45÷9=5
72÷9=8
9 ÷ ÷ 45 =
72 =
K÷
K÷
5.
8.
17+17+17+17=68
17 + + = = =
K+
68.
(2.3)4 =27.984
2•3 × × = = =
K × 27.9841
2 2
*To perform the above as (2.3 ) :
2•3 × = × =
CURRENCY CONVERSION
The currency conversion feature lets you convert between your home country’s
currency and the currency of another country. You can specify an exchange
rate based either on your home currency (1 unit in foreign currency = how much
in home currency) or the foreign currency (1 unit in home currency = how much
in foreign currency).
To set a conversion rate
1. Press CAL to enter the Calculator Mode.
2. Press SET and the currently set rate appears on the display.
• If you want to change the direction (home → foreign / foreign → home) of the
conversion, perform steps 3 and 4. Otherwise, skip to step 5.
3. Press
to change to the conversion
direction display.
4. Each press of HOME and FOREIGN switches the
conversion direction. Select the direction
you want to use.
5. Input the conversion rate.
Indicator Set Mode
To enter the Calculator Mode
Press CAL to enter the Calculator mode.
To use the calculator
Be sure to press CAL twice to clear the calculator before beginning each
calculation.
Appears when a
Function command
number is set as
sign
a constant.
8-digit entry can be made.
• To clear a value you have just input, press CAL .
• If you press the wrong arithmetic operation key, simply press the correct key
before inputting anything else.
• If the result of a calculation exceeds 8 digits, an “E” (error) indicator appears
on the display. To clear the entire calculation, press CAL twice.
Calculation Examples
Basic Calculations
The +, – , ×, and ÷ indicators appear on the display whenever you press the
corresponding operation key.
Example
Operation
12.3+74–90 = –3.7
12 • 3 + 74 – 90 =
(12–0.5)×3÷7 = 4.9285714
12 – • 5 × 3 ÷ 7 =
Direction
indicator (foreign
currency to home
currency)
Currently set rate
• If your home currency is trading at 130 to the dollar, for example, input 130
here if the dollar is the foreign currency you want to use for conversion (using
your home currency as the base).
• To clear the conversion rate to zero, press CAL .
6. Make sure the data is correct and then press SET to store it in memory.
• Nothing is stored in memory until you press SET . This means that if you press
any other key to exit the input screen, the currency and rate is unchanged.
To perform a currency conversion
1. Press CAL to enter the Calculator mode.
2. Enter the amount that you want to convert from.
3. Specify the direction of the conversion to display the result.
• Press HOME to treat the amount you entered as a foreign currency converted
to your home currency. Press FOREIGN to treat the amount you entered as your
home currency converted to foreign currency.
To use currency conversion in calculations
Example: How much in pounds would 5 boxes of French candy cost, if the cost
per box is 30 francs?
Display
–3.7
4.9285714
1. Convert 30 francs into pounds (your home currency, preset as 1 franc=0.1£):
HOME
CAL (twice)
2. Multiply by 5:
The result is 15£.