1
Step by Step An Example for each Application
ClassPad website: http://edu.casio.com/products/classpad/
CASIO Education website: http://edu.casio.com
For information on where to buy, FAQs, user’s guides, please visit:
http://edu.casio.com/support/
Written by
CASIO Education Technology M.R.D. Center
Portland, Oregon USA
Index
Main … page 2
Math calculations with a computer algebra system (CAS).
eActivity … page 4
Input math, text, and other applications to create and save activities, and share data between
applications using drag and drop.
Verify … page 7
Verifies your work (available from within Main or eActivity).
Statistics … page 8
Input lists of data, obtain statistical results and draw stat graphs.
Statistics Wizard … page 9
Statistical tests, intervals and distributions made easy.
Probability … page 10
Random samples for dice and more (available from within Main or eActivity).
Spreadsheet … page 11
Similar to a standard spreadsheet application with the added ability to use CAS commands.
Using the Statistics Wizard in the Spreadsheet Application…page 12
Statistical results for multiple inputs.
Graph & Table … page 13
Graph functions and relations, view properties and data tables.
3D Graph … page 14
3 Dimensional graphing in rectangular or parametric form.
Geometry … page 15
Constraint based Geometry designed to interact with Algebra.
Conics … page 16
Graph a conic section, transform an equation into a conic form and view properties.
DiffEqGraph … page 17
Graph various types of differential equations and more.
NumSolve … page 18
Solves an equation based on known values input by the user.
Sequence … page 19
Solve, graph and create tables for recursive and explicit equations.
Financial … page 20
Simple to use, offers 15 different financial calculations.
Advanced Math Features … page 21
Implicit differentiation, Laplace, Fourier and more.
Picture … page 23
Similar to a standard paint application (available on PC only).
Program … page 24
Create custom programs.
Presentation … page 25
Allows you to create a slideshow for presentation or review.
Communication and System … page 26
Link to a PC or another ClassPad 330. Memory management and other system configurations,
including setting the contrast, defining shift keys and naming ClassPads.
Hi! Each section of this handout introduces you to a different feature of the ClassPad. To
ensure that you get the same results as we do, please make sure your status bar displays the
same settings. Have fun learning how to drag, drop and explore math in a new way!
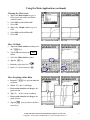
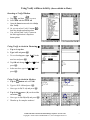
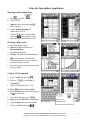
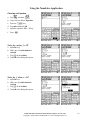
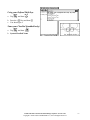
Setting the Result Type
a. Tap
b.
c.
d.
e.
f.
m
and then M
Open the O menu (tap to open)
Select Default Setup
Tap the OK button to reset
Tap OK again
Notice that some of your basic format
settings show in the status bar
Great Feature…
Just tap a format
name in the status bar
to change it!
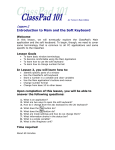
Setting Contrast
*Handheld ClassPad 330 Only
a. Tap
m and then Y
b. Tap Z (on the toolbar)
c. Adjust the contrast
d. Select Set
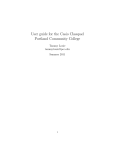
Resizing the Window
*Computer Software Only
a. Right click anywhere on the ClassPad
Manager
b. If you have the ClassPad Manager
Professional version, select Resizable
Mode (drag a window edge to resize)
ClassPad Manager’s
“right click” menu
c. If you have only the ClassPad Manager
Basic version, select LCD Window for
better viewing
d. I like to check the “Always on top” option
CASIO ClassPad 330 and ClassPad Manager Software Version 3.04
Copyright © 2009 CASIO COMPUTER CO., LTD. All Rights Reserved.
1
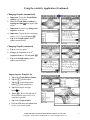
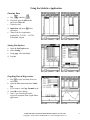
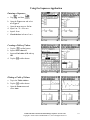
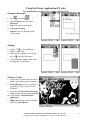
Using the Main Application
Creating a Sequence
a. Tap
m and then M
b. Input x{2
c. Select x^2
d. Open the Interactive menu
e. Select List-Create and then seq
f. Fill in the data and select OK
g. You will see {1,4,9,16,25,36,49,64}
Using 2D Math
a. Press the k key
b. Tap the 2D tab and select V
c. Input 2
d. Press the right cursor key
e. Input 3 and press E
f. Tap on the line containing log 2 (3)
g. Tap u to change result to decimal
Dragging and Editing Data
a. Drag over log 2 (3) to select it and let go
b. Press on selection and drag to next line
c. Let go when you see the cursor blinking
d. Select the 3 in log 2 (3)
e. Tap the x key and press E
Graphing within Main
a. Tap the 2nd n arrow on the toolbar and
select $
b. Select log 2 (x) and release
c. Drag the selection to the graph window
CASIO ClassPad 330 and ClassPad Manager Software Version 3.04
Copyright © 2009 CASIO COMPUTER CO., LTD. All Rights Reserved.
2
Using the Main Application (continued)
Clearing the Work Area
a. Tap in the Main window to give it
focus (notice the toolbar and bolder
window border)
b. Select Edit and then Clear All
c. Select OK
d. Tap in the Graph window to give it
focus
e. Select Edit and then Clear All
f. Select OK
More 2D Math
a. Tap in the Main window and then press
the k key
b. Tap the 2D tab and then the CALC
button
c. Select the 2D derivative symbol
d. Tap the x key
e. Press the right cursor key
f. Input x^3 - 6x +1 and press E
More Graphing within Main
a. Press the k key again to close the
keyboard
b. Select x^3 - 6x +1 and let go
c. Press on the selection and drag to the
graph window
d. Tap 3 x 2 − 6 (the result) to select it
e. Press on the selection and drag to the
graph window
f. Tap the r icon (just above the hard
cursor key)
CASIO ClassPad 330 and ClassPad Manager Software Version 3.04
Copyright © 2009 CASIO COMPUTER CO., LTD. All Rights Reserved.
3
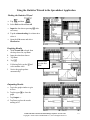
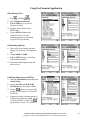
Using the eActivity Application
Entering Text and Math
a. Tap
m and then A
b. Select Edit and then Clear All
c. Press the k key
d. Tap the abc tab and type in the text
shown
e. Tap anywhere on the line: seq(x,x,-5,5)
f. On the toolbar, tap u to toggle it to
(changing from type text to math)
g. Press E
Storing Values in Variables
a. Tap (place focus) following seq(x,x,-5,5)
b. Tap the mth tab on the keyboard
c. Tap the W key and then a
d. Press E to store list in a
e. Select seq(x,x,-5,5)⇒a and let go
f. Press on selection and drag to the next
math line (let go when you see the
cursor blinking)
g. Change the sequence to seq(x,x,-8,8)⇒b
and press E
Inserting a Strip & Begin Drawing
a. Open the Insert menu and select
Strip then Graph Editor
b. To understand strips, tap in eActivity
and then tap
to minimize the
Graph Editor
c. Tap it again ( ) to reopen the
Graph Editor strip (Easy and fun!)
d. Input and s the equations shown
e. Tap the $ toolbar button!
CASIO ClassPad 330 and ClassPad Manager Software Version 3.04
Copyright © 2009 CASIO COMPUTER CO., LTD. All Rights Reserved.
4
Using the eActivity Application (Continued)
Changing Graphs Automatically
a. Important: Tap in the Graph Editor
window to give it focus
b. Close the Graph Editor window by
tapping the small in the upper right
corner
c. Important: In eActivity, change each
sequence as shown
d. Important: Tap on the line containing
seq(x,x,-12,12,3)⇒a and press E
e. Tap in the Graph window and it
updates automatically!
Changing Graphs (continued)
a. Tap in eActivity again
b. Change the beginning of the 1st
sequence from x to x/2 and press E
c. Tap in the Graph window and it
updates automatically!
Improving our Graphic Art
a. Tap in the Graph Editor window
b. Tap the ! toolbar button
c. Tap the n toolbar button and
select f (polar graph form)
d. Tap following r3: and type
cos(b*θ)
Press E [θ is in the mth tab of
the keyboard or press Ctrl+t on a
computer keyboard]
f. Tap in the Graph window
g. Open the File menu and select Save
to save your artistic graph!
e.
CASIO ClassPad 330 and ClassPad Manager Software Version 3.04
Copyright © 2009 CASIO COMPUTER CO., LTD. All Rights Reserved.
5
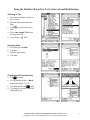
Using the Geometry Link within eActivity
Inserting a Geometry Link
a. Tap
m and then A
(if needed)
b. Select Edit and then Clear All
c. Open the Insert menu and select Strip
then Geometry
d. Tap below the Geometry strip that you
just inserted
e. Open the Insert menu and select
Geometry Link
Linking an Equation to Geometry
a. Tap in the box just following the link
symbol
b. Input y = x^2
c. Select y = x^2 and let go
d. Press on the selection and drag to the
Geometry window
e. Tap q three times to turn the axis
and grid on
Exploring with the Geometry Link
a. Select the graph you just drew (tap it)
b. Press on a handle (z) and drag to move
your graph (notice the linked equation
updated)
c. Tap in the eActivity window
d. Change your equation and press E
e. Try other equations, such as y=sin(x)
CASIO ClassPad 330 and ClassPad Manager Software Version 3.04
Copyright © 2009 CASIO COMPUTER CO., LTD. All Rights Reserved.
6
Using Verify within eActivity (also available in Main)
Inserting a Verify Window
a. Tap
m and then A(if needed)
b. Select Edit and then Clear All
c. Open the Insert menu and select Strip
then Verify
d. Or, you can select Verify’s button ( )
from the dropdown button palette
e. You will also find Verify’s button in
the Main application’s dropdown
button palette
Using Verify to Assist in Factoring
a. Tap in the top box
b. Type in 45 and press E
c. To see what happens, type 8*5 in the
next box and press E
d. Tap OK and change 8*5 to 9*5 and
press E
e. In the next box, type in 3*3*5 and
press E
Using Verify to Assist in Algebra
a. Tap the
button and select OK
b. Type in 5x^2 +20 and press E
c. Next, type in 5(x^2 +4) and press E
d. Tap the down arrow (C) on the toolbar
and select
.
e. Next, type in 5(x+2i)(x-2i) and press E
f. Thumbs up for complex numbers!
CASIO ClassPad 330 and ClassPad Manager Software Version 3.04
Copyright © 2009 CASIO COMPUTER CO., LTD. All Rights Reserved.
7
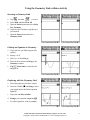
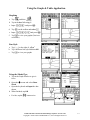
Using the Statistics Application
Entering Data
a. Tap
m and then I
b. If needed, open the Edit menu
and select Clear All
c. Tap below list1
d. Input data and press E after
each input
e. *Data is the low temperature
predicted for 12/21/03 – 12/27/03
in Portland, Oregon
Setting Stat Options
a.
b.
c.
d.
Open the SetGraph menu
Select Setting…
Setup page 1 for StatGraph1
Tap Set
Graphing Data & Regressions
a. Tap y to plot your data (first icon
b.
c.
d.
e.
on toolbar)
Open the Calc menu and select Cubic
Reg
If you want to, set Copy Formula to y1
Tap OK to close dialogs
Note: Copy Formula places the
regression equation in the Graph Editor
application
CASIO ClassPad 330 and ClassPad Manager Software Version 3.04
Copyright © 2009 CASIO COMPUTER CO., LTD. All Rights Reserved.
8
Using the Statistics Wizard for Tests, Intervals and Distributions
Selecting a Test
a. Tap in the List Editor window to
give it focus
b. Open the Calc menu and select
Test
c. Tap r (just above the cursor
pad)
d. Select One-Sample TTest from
the drop down list
e. If you want to, s Help
Inputting Data
a.
b.
c.
d.
Select the type Variable
Tap Next
Input the data shown
Tap Next
Graphing and Experimenting
a. Tap $ to graph
b. To experiment, tap the << Back
button and change o to 5.5
c. Tap Next and then tap $ again
d. Try using the wizard for intervals
and distributions
CASIO ClassPad 330 and ClassPad Manager Software Version 3.04
Copyright © 2009 CASIO COMPUTER CO., LTD. All Rights Reserved.
9
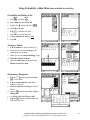
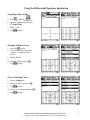
Using Probability within Main (also available in eActivity)
Probability and Rolling a Die
a. Tap
m and then M
b. Select Edit and then Clear All
c.
d.
e.
f.
g.
h.
Tap the 2nd n button and select
Tap OK to accept
Tap O to begin a new trial
Tap OK to clear the last trial
Change Number of trials to 100
Tap OK
Turning a Matrix
a. Tap the matrix to select it and let go
b. Press on the selection and drag to the
small input box in Main
c. When you see the cursor blinking, let go
d. Select the Matrix in Main
e. Open the Interactive menu and select
Matrix-Create then trn
Displaying a Histogram
a. Tap the 2nd n button again and select
( (List Editor)
b. Tap the output matrix in the Main
window to select it
c. Press on selection and drag to the List
Editor
d. Tap the G button and change Type to
Histogram
e. Set XList to list1 and Freq to list2
f. Tap the y button and then OK to the
dialog for step size
CASIO ClassPad 330 and ClassPad Manager Software Version 3.04
Copyright © 2009 CASIO COMPUTER CO., LTD. All Rights Reserved.
10
Using the Spreadsheet Application
Entering and Graphing Data
a. Tap
m and then
b. Tap in cell A1
c. Input the data shown pressing E
after each entry
d. Tap the column heading for
column A to select it
e. Tap the 2nd n arrow on the toolbar
and select
(Or, open the Graph
menu and select Column/Clustered)
Drawing a Regression
a. Tap in the graph window
b. Open the Calc menu and select
Exponential Reg
c. Tap Close when ready
d. Change cell A2 from 6 to 4 and press
E (curve updates automatically!)
e. Tap on the regression curve to select it
(near left border is easiest)
f. Press on the curve (near left border) and
drag to cell B1
Using a CAS Command
a. Tap in cell B2 and then tap r
b. Press the k key and type in
=expand((x+
c. Tap cell A2 and then type )^2)
d. Press E and then select cell B2
e. Open the Edit menu and select Copy (or
tap
on keyboard)
f.
g.
h.
i.
Close the keyboard (press k)
Drag over cells B3 to B6 to select them
Open the Edit menu and select Paste
Tap on cell B3 and then tap
CASIO ClassPad 330 and ClassPad Manager Software Version 3.04
Copyright © 2009 CASIO COMPUTER CO., LTD. All Rights Reserved.
11
Using the Statistics Wizard in the Spreadsheet Application
Finding the Statistics Wizard
a. Tap
m and then
b. Select Edit and then Clear All
c. Input the data shown pressing E after
each entry
d. Tap the column heading for column A to
select it
e. Open the Calc menu and select
Distribution
Graphing Results
a.
b.
c.
With Normal PD selected from
the drop down list, tap Next
Input the other data shown
Tap Next
d.
Tap $
e.
Following Prob, tap the n and
select another value
f.
Selected data
is in the first
field!
Notice the graph updates
automatically!
Outputting Results
a. Tap in the graph window to give
it focus
b. Tap the upper S to close the
graph
c. Tap Output >>
d. Tap Paste to place the results
starting at B1
CASIO ClassPad 330 and ClassPad Manager Software Version 3.04
Copyright © 2009 CASIO COMPUTER CO., LTD. All Rights Reserved.
12
Using the Graph & Table Application
Graphing
a. Tap
m and then g
b. Tap in the box following y1
c. Input x{2 and press E
d. Tap # on the toolbar and select h
e. Input y{2-1and press E
f. Tap $ to view your graphs (first icon
on toolbar)
Line Style
a. Tap [-----] to the right of y1=x 2
b. Tap a different line style and then OK
c. Tap $ to view your graphs
Using the Shade Type
a. Tap in the Graph window to give it
focus
b. Open the a menu and select Draw
Shade
c. Open the keyboard and input the data
shown
d. When finished, tap OK
e. For fun, tap the r button twice
CASIO ClassPad 330 and ClassPad Manager Software Version 3.04
Copyright © 2009 CASIO COMPUTER CO., LTD. All Rights Reserved.
13
Using the 3D Graph Application
Graphing z=f(x,y) Form
a. Tap
m and then D
b. Tap in the box following z1
c. Input: 1/(x^2+y^2)
d. Press E
e. Tap % on the toolbar
f. Press and drag within the
graph window
Graphing in Parametric Form
a. Tap in the box following z2
b. Tap the
button to change to
parametric
c. Press the k key
d. Tap the mth tab and then TRIG
e. Input: Xst2=2sin(s)cos(t)
Yst2=cos(t)
Zst2=t
f. Press E and then tap %
Modifying Graphs
a. Change Yst2 to cos(t)cos(s)
b. Tap % on the toolbar
c. Tap r to enlarge the graph
window
d. Press and drag to rotate your graph
Hot Keys for all graph windows
•
•
•
Tap the + key
Tap the - key
Tap the = key
CASIO ClassPad 330 and ClassPad Manager Software Version 3.04
Copyright © 2009 CASIO COMPUTER CO., LTD. All Rights Reserved.
14
Using the Geometry Application
Drawing an Ellipse with Foci
a. Tap
m and then G
b. Tap the 2nd n and select the ellipse
with foci icon
c. Tap twice (about 1 inch apart)
d. Tap a third time and drag until you
are happy
Adding Segments and Selecting
a. Tap the 2nd n and select the segment
icon
b. Tap point A and then point C
c. Tap point B and then point C (Notice
the status bar as you tap!)
d. Select the 1st toolbar button (G) to
change to select mode
e. Tap point C, let go, and then press on
C and drag to move it
Displaying Measure
a. Tap the right most u to discover the
Measurement Box
b. Tap in any white space to deselect C
c. Tap segment AC to select it
d. Tap segment BC to select it
e. Tap n and select Q (if needed)
f. Tap Q to put the angle value in the
Geometry window
g. Select point C and drag – your angle
measure updates as you move
CASIO ClassPad 330 and ClassPad Manager Software Version 3.04
Copyright © 2009 CASIO COMPUTER CO., LTD. All Rights Reserved.
15
Using the Conics Application
Graphing
a. Tap
m and then C
b. Tap in the box below “Conics
Equation:”
c. Input x^2-2x-y^2=4
d. Press E
e. Tap ^ on the toolbar
f. Open the Zoom menu and select
Quick Initialize (if needed)
Fitting into a Form
a. Tap in the Conics Equation
window to give it focus
b. Open the Fit menu and select
Fit into Conics Form
c. Select the correct form
d. Tap OK
Drawing Asymptotes
a. Tap in the Graph window
b. Open the Analysis menu and
select G-Solve
c. Select Asymptotes from the list
CASIO ClassPad 330 and ClassPad Manager Software Version 3.04
Copyright © 2009 CASIO COMPUTER CO., LTD. All Rights Reserved.
16
Using the Differential Equation Application
Graphing a Slope Field
a. Tap
m
and then
b. Open the Type menu and select
1st (Slope Field)
c. Input y’=2x
d. Tap
to graph
Drawing Solution Curves
a. Select the
button
b. Tap a single point in the graph
window – a solution curve is
drawn
c. Tap the IC tab
d. Set xi=2, yi=1 and press E
e. Tap
to graph
Guess a Solution Curve
a. Tap the Graphs tab
b. Input your guess and press E
c. Tap
to graph
d. Input a second guess and press E
e. Tap
to graph
CASIO ClassPad 330 and ClassPad Manager Software Version 3.04
Copyright © 2009 CASIO COMPUTER CO., LTD. All Rights Reserved.
17
Using the NumSolve Application
Entering an Equation
a. Tap
m and then N
b. Tap in the box below Equation:
c. Press the k key
d. Tap mth and then VAR
e. Input the equation: 9/5c + 32 = f
f. Press E
Solve for c when f = 50o
a. Input 50 for f
b. Make sure c’s radio button is
selected
c. Tap 1 on the toolbar
d. Tap OK to the dialog that opens
Solve for f when c = 50o
a. Input 50 for c
b. Make sure f’s radio button is
selected
c. Tap 1 on the toolbar
d. Tap OK to the dialog that opens
CASIO ClassPad 330 and ClassPad Manager Software Version 3.04
Copyright © 2009 CASIO COMPUTER CO., LTD. All Rights Reserved.
18
Using the Sequence Application
Entering a Sequence
a. Tap
m and then H
b. Open the Type menu and select
an+1 Type a1
c. Open the n,an menu to find an
d. Input 1/an ^ 2 + 1 for an+1
e. Input 1 for a1
f. Check the box in front of an+1
Creating a Table of Values
a. Tap the 8 toolbar button
b. Input a Start value of 1
c. Input an End value of 10 and tap
OK
d. Tap the # toolbar button
Plotting a Table of Values
a. Tap in the Table window
b. Tap the $ toolbar button
c. Open the Zoom menu and
select Auto
CASIO ClassPad 330 and ClassPad Manager Software Version 3.04
Copyright © 2009 CASIO COMPUTER CO., LTD. All Rights Reserved.
19
Using the Financial Application
Purchasing a Car
a. Tap
m and then
b. Select Compound Interest
c. Tap the Help tap (very useful –
tap again to close)
d. Input the values shown (leave
PMT blank)
e. Tap the PMT or Solve in the
status bar to solve for your
monthly payment (you will need
to pay $412.49 per month)
Calculating Options
a. How would your monthly payment
change if you choose a less expensive
car?
b. Change 18000 to 15000
c. Tap the PMT button to recalculate
your monthly payment
d. Experiment with length of loan and
interest level!
Calculate Interest you will Pay
a. Open the Calculations menu and select
Amortization
b. Input 1 for PM1 and 48 for PM2
c. Scroll down (use the right scrollbar)
d. Tap the
button (so you are really
paying $15,000+interest = $16499.68
for the car)
e. Assume you make a down payment of
$3000 and pay $400 per month. Set PV
to 12000 and PMT to -400. Tap
again (interest is now -993.2996078)
CASIO ClassPad 330 and ClassPad Manager Software Version 3.04
Copyright © 2009 CASIO COMPUTER CO., LTD. All Rights Reserved.
20
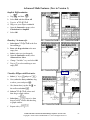
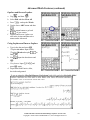
Advanced Math Features (New in Version 3)
Implicit Differentiation
a. Tap
m and then J
b. Select Edit and then Clear All
c. Type in: x^2+3y^2=4
d. Drag over your ellipse to select it
e. Open the Interactive menu, select
Calculation then ImpDiff
f. Select OK
Rewrite y’ in terms of x
a. Select just x^2+3y^2=4 in the first
b.
c.
d.
e.
line and let go
Press and drag selection to the next
empty line
Select (what you just dropped)
Open the Interactive menu, select
Advanced then Solve
Change “Variable:” to y and select OK
f. Tap
to select and drag to next
empty line
Visualize Ellipse with Derivative
a. Select “y” in
and press K
b. Next, select the first y solution, drag
to where y was and press E
c. Ok (almost there), tap the 2nd n on
the toolbar and select $
d. Select x^2+3y^2=4, release and
then drag to graph window
e. Select just
(tap twice then
drag to select), release and then drag
to graph window
f. Repeat with
CASIO ClassPad 330 and ClassPad Manager Software Version 3.04
Copyright © 2009 CASIO COMPUTER CO., LTD. All Rights Reserved.
21
Advanced Math Features (continued)
Laplace and Inverse Laplace
a. Tap
m and then J
b. Select Edit and then Clear All
c. Press k and tap the 2D tab
d. Tap the lower ADV button and then
e. Tap the return button to go back
) if you want to
(
f. Laplace and Inverse Laplace are
also in the Action and Interactive
menus under Advanced
Using Laplace and Inverse Laplace
a. Type in the data and press E
*Tap the abc tab to input s and t
*Tap the 2D tab and maybe
find
b. Find
to
, input the data shown and
E
c. Nice feature: Input
and
press E again
d. Experiment with Fourier, delta,
heaviside and gamma!
If you are using the ClassPad Manager Professional, right click and select Resizable Mode!
CASIO ClassPad 330 and ClassPad Manager Software Version 3.04
Copyright © 2009 CASIO COMPUTER CO., LTD. All Rights Reserved.
22
Using the Picture Application (PC only)
The handheld has a picture viewer available within eActivity
Drawing a Rectangle
a. Tap
m and then
b. Open the Draw menu and select
Rectangle
c. Tap to create one corner point
d. Tap again and drag
e. Release when you are happy with
your rectangle
Shading
a. Tap the 3rd n on the toolbar and
choose a shade type
b. Draw another rectangle (you can tap
the 2nd n and select the shape)
c. Circle and ellipse shapes can be solid
or transparent - experiment
Picture is Useful
a. Open Paint or a picture that you like in
another application on your computer
b. Select and copy part of your picture or
press HCopy copy a screen of your
ClassPad
c. If you have the ClassPad Professional
version, right click and select Resizable
d. Tap inside the ClassPad Picture
application
e. Right click anywhere on the ClassPad
and select Paste Special
CASIO ClassPad 330 and ClassPad Manager Software Version 3.04
Copyright © 2009 CASIO COMPUTER CO., LTD. All Rights Reserved.
23
Using the Program Application
Naming a Program
a. Tap
m and then p
b. Tap the O toolbar button
c. Enter a name for your program
d. Tap OK
Entering Code
a. Open the Ctrl menu
b. Select For : and then For
c. Continue to use the Ctrl menu to
input remaining code for the loop
d. You will find Print in the I/O
menu under Output
Running your Program
a. Tap the { toolbar button
b. Tap the ) toolbar button
c. Tap the p toolbar button
d. Tap OK
e. Tap in the upper window and
select P to edit your program
CASIO ClassPad 330 and ClassPad Manager Software Version 3.04
Copyright © 2009 CASIO COMPUTER CO., LTD. All Rights Reserved.
24
Using the Presentation Application
Creating a Presentation
a. Tap
m
and then P
b. Tap following P1 and input a name
c. Press E
d. Tap h (notice 0 changes to 1)
e. Tap
m and then g
f. Graph a few functions
g. Tap hto store the picture (or press
the F8 key on your computer)
Showing a Presentation
a. Tap
m and then P
b. Tap 6 on the toolbar to see your
presentation play automatically
c. Tap 7 to present one page
(hardcopy) at a time
d. Tap the ? to advance to the next
page
*You can save up to 60 pages per
presentation
Ways to Show a Presentation
a. Open the O menu
b. Select Presentation
c. Set the Play Speed (1 is fast and
10 is very slow!)
d. s Repeat
e. Tap Set
f. Tap 6 and then ESC or Clear to
stop
CASIO ClassPad 330 and ClassPad Manager Software Version 3.04
Copyright © 2009 CASIO COMPUTER CO., LTD. All Rights Reserved.
25
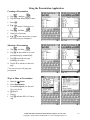
Viewing the Communication Application
General Communication Info
a. Tap
m and then B
b. “USB cable” is good! When you
connect a handheld ClassPad to
your PC, it will automatically go
into standby mode for data
transfer
c. If you want to connect to another
handheld ClassPad, you will need
to change the Cable Type to 3pin
cable
Please view the manual for additional
information. Thanks!
Useful Features in the System Application
Defining Shift Keys
a. Tap
m
and then Y
b. Open System menu and select Shift Keys
c. s the box to make the z act as a shift
key
d. Select a key from the dropdown list to
assign a shift key to (I am using x)
e. Tap in the box following
f. Open the keyboard and input a value
(I am assigning π)
g. Tap
to set the value
h. Assign more keys or tap OK
CASIO ClassPad 330 and ClassPad Manager Software Version 3.04
Copyright © 2009 CASIO COMPUTER CO., LTD. All Rights Reserved.
Useful!
26
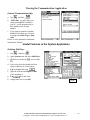
Using your Defined Shift Keys
a. Tap
m and then M
b. Press the z key and then x
c. You should get π!
Name your ClassPad (handheld only)
a. Tap
m and then Y
b. System/ClassPad Name
CASIO ClassPad 330 and ClassPad Manager Software Version 3.04
Copyright © 2009 CASIO COMPUTER CO., LTD. All Rights Reserved.
27