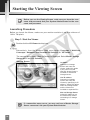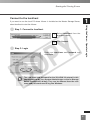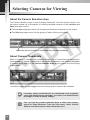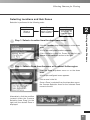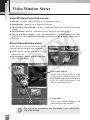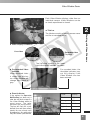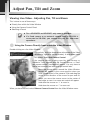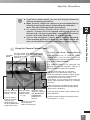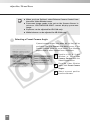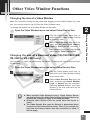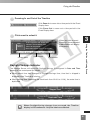
1
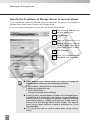
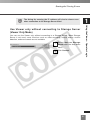
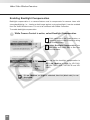
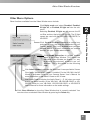
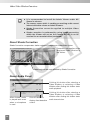
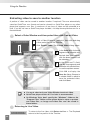
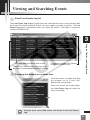
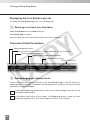
Network Camera Recording and Monitoring System
Network Video Recorder
VK-64/VK-16
Viewer Manual
Ver. 1.4
1.3
In addition to Viewer Manual and Setting Manual, Administrator’s Manual is also available in CD-ROM.
Introduction
Thank you for purchasing Network Video Recorder VK-64 v1.4 (hereafter referred to as “VK64”). VK-64 is a network video recording and monitoring system and consists of the Storage
Server and Viewer. This manual explains how to use the Viewer. Please read this manual
prior to operation to ensure you will be able to use the Viewer and Storage Server effectively.
This manual also explains how to use the Network Video Recorder VK-64 v1.4 and ViewerOnly use. When you have finished reading this manual, please store it in a safe place.
* VK-16 has the same functionality as VK-64 outlined in this manual, unless explicitly indicated
otherwise.
Request to Customers
(1) Canon owns the copyright of this manual. The content of this manual may not be reproduced in
its entirety or in part without prior permission.
(2) The content of this manual is subject to change without notice.
(3) All possible measures have been taken to ensure that the content of this manual is accurate. If
you happen to notice errors, omissions or other faults, please contact your vendor.
(4) Irrespective of items (2) and (3) above, Canon cannot bear responsibility for any effects that
result from operation.
(5) When description of this manual uses the Control Panel, it conforms to operations with Window
XP Classic style.
Request to Customers (Indemnity)
Software defect may cause an error in recording and damage or loss of recorded data.
Canon cannot bear responsibility for any effects that result from operation. You should
agree with it before using the product.
Support Information
For various types of information relating to support, including updated product software (patch installer),
User’s Manual, operating environment, etc., please refer to Canon Web site.
Copyright Information
Please note that copyright laws prohibit the customer from using recorded videos and still pictures for
any purpose other than personal requirements, without permission from the copyright holder.
Trademarks
Canon and the Canon logo are registered trademarks of Canon Inc.
Microsoft Windows is a trademark of Microsoft Corporation in the United States and other countries.
Windows is legally recognized as Microsoft Windows Operating System.
QuickTime is a trademark of Apple Computer Inc.
Apache is a trademark of the Apache Software Foundation.
Pentium is a trademark of Intel Corporation.
All other company or product names used in this manual are trademarks or registered trademarks of
their respective holders.
Icons Used in this Manual
Indicates important information that must be observed or actions that are
prohibited during an operation. These notes must be read to prevent possible
Note faults or errors during operation.
Tip
Indicates supplementary information or a reference to an operation. Users are
advised to read these memos.
Storage Server includes software developed by the Apache Software Foundation (www.apache.org). Apache software is
protected by the copyright law (Copyright(c) 2000-2003 Apache Software Foundation). For the license terms associated with
this software, please refer to the file APACHE_LICENSE in the folder LICENSE, within the installation directory.
2
Contents
Introduction
Overview . . . . . . . . . . . . . . . . . . . . . . . . . . . . . . . . . . . . . . . . . . . .5
Chapter 1 Using the Viewer - Operator Login
Viewing Screen Example . . . . . . . . . . . . . . . . . . . . . . . . . . . . . . .8
Starting the Viewing Screen . . . . . . . . . . . . . . . . . . . . . . . . . . .10
Launching Procedure . . . . . . . . . . . . . . . . . . . . . . . . . . . . . . . . . . . . . . . . . .10
Connect to the localhost . . . . . . . . . . . . . . . . . . . . . . . . . . . . . . . . . . . . . . . .11
Specify the IP address of Storage Server to connect Viewer . . . . . . . . . . . .12
Use Viewer only without connecting to Storage Server (Viewer Only Mode) 13
Viewer Start-up Window . . . . . . . . . . . . . . . . . . . . . . . . . . . . . . . . . . . . . . . .14
Viewing Screen Menu bar . . . . . . . . . . . . . . . . . . . . . . . . . . . . .15
Menu Bar Functions . . . . . . . . . . . . . . . . . . . . . . . . . . . . . . . . . . . . . . . . . . .15
Chapter 2 Working with Video Windows
Selecting Cameras for Viewing . . . . . . . . . . . . . . . . . . . . . . . . .18
About the Camera Selection Area . . . . . . . . . . . . . . . . . . . . . . . . . . . . . . . . .18
About Camera Thumbnails . . . . . . . . . . . . . . . . . . . . . . . . . . . . . . . . . . . . . .18
Selecting Locations and their Zones . . . . . . . . . . . . . . . . . . . . . . . . . . . . . . .19
Basic Video Window Functions . . . . . . . . . . . . . . . . . . . . . . . .20
Creating, scaling and moving Video Windows . . . . . . . . . . . . . . . . . . . . . . .20
Arranging Video Windows . . . . . . . . . . . . . . . . . . . . . . . . . . . . . . . . . . . . . . .22
Selecting Multiple Video Windows . . . . . . . . . . . . . . . . . . . . . . . . . . . . . . . .23
Video Window States . . . . . . . . . . . . . . . . . . . . . . . . . . . . . . . . .24
Video Window Properties include: . . . . . . . . . . . . . . . . . . . . . . . . . . . . . . . .24
About Video Window states . . . . . . . . . . . . . . . . . . . . . . . . . . . . . . . . . . . . .24
Adjust Pan, Tilt and Zoom . . . . . . . . . . . . . . . . . . . . . . . . . . . . .26
Viewing Live Video - Adjusting Pan, Tilt and Zoom
. . . . . . . . . . . . . . . . . . .26
Other Video Window Functions . . . . . . . . . . . . . . . . . . . . . . . .31
Changing the size of a Video Window . . . . . . . . . . . . . . . . . . . . . . . . . . . . .31
Changing the size of a Received Video (VB-C50i/VB-C50iR, VB-C50FSi,
VB-C50Fi only) . . . . . . . . . . . . . . . . . . . . . . . . . . . . . . . . . . . . . . . . . . . . . . .31
Enabling Backlight Compensation . . . . . . . . . . . . . . . . . . . . . . . . . . . . . . . .32
Other Menu Options . . . . . . . . . . . . . . . . . . . . . . . . . . . . . . . . . . . . . . . . . . .33
About Shade Correction . . . . . . . . . . . . . . . . . . . . . . . . . . . . . . . . . . . . . . . .34
About Audio Panel . . . . . . . . . . . . . . . . . . . . . . . . . . . . . . . . . . . . . . . . . . . .34
Chapter 3 Using the Timeline and Viewing Events
*If you are using the Viewer
only, you can skip this chapter.
Using the Timeline . . . . . . . . . . . . . . . . . . . . . . . . . . . . . . . . . . .38
Timeline Overview . . . . . . . . . . . . . . . . . . . . . . . . . . . . . . . . . . . . . . . . . . . . .38
Monitoring Live Video in relation to the Timeline . . . . . . . . . . . . . . . . . . . . .39
Using the Timeline to check, play and extract video . . . . . . . . . . . . . . . . . . .40
Initiating a manual recording with duration of one minute . . . . . . . . . . . . . . .42
Capturing a Still Frame . . . . . . . . . . . . . . . . . . . . . . . . . . . . . . . . . . . . . . . . .42
Daylight Savings Indicator . . . . . . . . . . . . . . . . . . . . . . . . . . . . . . . . . . . . . . .43
Extracting video to save to another location . . . . . . . . . . . . . . . . . . . . . . . . .44
3
Contents
Viewing and Searching Events . . . . . . . . . . . . . . . . . . . . . . . . .45
Displaying the Live Events Log List . . . . . . . . . . . . . . . . . . . . . . . . . . . . . . .46
Overview of Alert Parameters . . . . . . . . . . . . . . . . . . . . . . . . . . . . . . . . . . . .46
Searching Events . . . . . . . . . . . . . . . . . . . . . . . . . . . . . . . . . . . . . . . . . . . . .47
Selecting Criteria for Searching . . . . . . . . . . . . . . . . . . . . . . . . . . . . . . . . . .48
Viewing found events . . . . . . . . . . . . . . . . . . . . . . . . . . . . . . . . . . . . . . . . . .49
Index
4
. . . . . . . . . . . . . . . . . . . . . . . . . . . . . . . . . . . . . . . . . . .51
Overview
●
VK-64/VK-16 is a network video recording and monitoring software and consists of
the Storage Server and Viewer. The Storage Server can record videos and events
(sensor input and motion detection) data from multiple camera servers. The
Viewer can display videos from multiple camera servers in real time and play back
videos recorded on the Storage Server.
This manual explains how to use the Viewer.
●
The Viewer can be used by itself without connecting to the Storage Server (Some
functions such as video recording, sensor events, and motion detection Capture
Still Frame are not available) (➝ P. 13).
5
6
Chapter 1
Using the Viewer Operator Login
This chapter outlines how to start the Viewer and
gives a brief overview of the Viewing Screen.
Viewing Screen Example
Location selector (➝ P. 18)
Drop-down menu indicating
locations available in the
system.
Menu bar (➝ P. 15)
Access common menus
from here.
Zone selector (➝ P. 18)
Drop-down menu indicating
zones within a location.
Camera Control Panel
(➝ P. 27)
A range finder enables you to
control a camera and quickly
determine a camera position.
Event indicator (➝ P. 25)
A color bar is displayed at the
top of live Video Windows
when an event occurs (if
enabled).
Viewing Area for Video
Windows (➝ P. 14)
The Video Windows are
arranged here. Video Windows
can be re-sized.
They can also be arranged into
a uniform grid.
Video Window (➝ P. 20)
Recorded videos and live
videos are displayed in these
windows.
Camera Name (➝ P. 38)
Name of camera currently
selected.
Playback controls (➝ P. 38)
Click the VCR-like controls to
play, rewind, fast forward or
jump to previous and next
events.
Timeline control (➝ P. 38)
Scroll forwards through the
current day or jump forward
incrementally by day or week.
Timeline (➝ P. 38)
Paste date and time as well as events which
occurred are displayed here. Events are displayed
as bars colored according to the priority. Click and
drag the Time bar to go back or forwards in time.
8
Record Now button
(➝ P. 42)
Click to initiate a
manual recording with a
duration of one minute.
Capture Still Frame
button (➝ P. 42)
Click to save the current
image on a Video
Window.
Viewing Screen Example
Camera Selection Area (➝ P. 18)
Thumbnail representations of cameras added to each zone are displayed here.
These can be dragged onto the Viewing Area for viewing.
Video Window menu icon
(➝ P. 31)
Select preset camera angles,
custom pan, tilt and zoom, and
select a Video Window size.
1
Using the Viewer - Operator Login
Live Events Log list (➝ P. 45)
Indicates events that have
been logged on Storage
Servers after the Viewer was
launched.
Zoom In and Zoom Out
buttons (➝ P. 38)
Click to zoom in or out of the
Timeline.
Event Search button
(➝ P. 47)
Click to bring up a dialog and
enter search details based on
time range, Location/Zone and
priority.
Jump to Time button
(➝ P. 41)
Click to enter a specific date
and time to jump to, to start
playing recorded video. The
Timeline moves to the time
selected.
Extract Video button
(➝ P. 44)
Click to extract a segment of
video to save as another file.
Return to Live button
(➝ P. 44)
Click to return the Timeline
playhead to the current time. If
you click this button while
playing recorded video, the
selected Video Window will
return to live video.
Timeline playhead (➝ P. 40)
Click and drag to positions on the Timeline to show
video from that time.
Timeline control (➝ P. 39)
Scroll forwards through the
current day or jump forward
incrementally by day or week.
9
Starting the Viewing Screen
Note
Before you use the Viewing Screen, make sure you have the user
name and password. Ask your System Administrator for the user
name and password.
Launching Procedure
Before you launch the Viewer, make sure your monitor resolution is set to a minimum of
1024 x 768 pixels.
●
Step 1: Start the Viewer
Double-click the VK Viewer desktop icon.
Alternatively, from the Windows Start menu select: Programs > WebView
Livescope > Network Video Recorder VK Series v1.4 > VK Viewer.
The connect option menu (Start-up Screen) is displayed. Select Master Storage
Server option and click Connect.
Start-up Screen
localhost
Connects to Storage
Server and starts the
Viewer. Select this option
if you want to use the
local PC where Viewer is
installed as the Master
Storage Server.
Use IP address
Connects to Storage
Server and starts the
Viewer by specifying its IP
address. Select this option
when the Storage Server
and the Viewer are
installed on separate PCs.
Not use Storage Server
Select this option to use
the Viewer only without
connecting to a Storage
Server.
Tip
10
If a connection error occurs, you may not have a Master Storage
Server connected. Ask your System Administrator.
Starting the Viewing Screen
Connect to the localhost
1
●
Step 1: Connect to localhost
1
2
●
Using the Viewer - Operator Login
If you want to use the local PC where Viewer is installed as the Master Storage Server,
select localhost to start the Viewer.
Select localhost from the
drop-down menu.
Click Connect.
Step 2: Login
Enter your User Name and Password, and
click Login.
Note
The user name and password for the VK-64/VK-16 entered in this
step are defined by your System Administrator on the he Storage
Server Configuration dialog. They can be different from the user
name and password used to log into Windows.
11
Starting the Viewing Screen
Specify the IP address of Storage Server to connect Viewer
If you installed the Viewer and Storage Server on separate PCs, specify an IP address of
Storage Server and connect Viewer to the Storage Server.
If you are unsure of the address to use, ask your System Administrator.
1
2
3
4
5
Note
Tip
12
Select Use IP address from
the drop-down menu.
Click Connect.
Enter the IP address or host
name of the Master Storage
Server in Host Name or IP,
and the port number in Port.
Click Connect.
Enter your User Name and
Password, and click Login.
● If you need to use a proxy server, you need to change the
Internet option settings in the following procedure:
1. Select Start > Control Panel > Internet Option.
2. Select the Connection tab.
3. Click LAN settings ….
Change the proxy server settings.
● If using a proxy server between a Viewer and a Storage Server,
it should be one which does not perform response buffering.
Proxies which are configured to perform response buffering
may lead to delays in sending small amounts of data (such as
events) from the Storage Server to the Viewer. The Apache
server
doesbe
perform
so is not
Theproxy
dialog
will also
shownresponse
when thebuffering
Storage Server
is
recommended.
stopped.
● You cannot transmit or receive audio when using a proxy
server.
Starting the Viewing Screen
Tip
1
The dialog for entering the IP address will also be shown even
when connection to the Storage Server failed.
Using the Viewer - Operator Login
Use Viewer only without connecting to Storage Server
(Viewer Only Mode)
You can use the Viewer only without connecting to a Storage Server. When Storage
Server is not used, some functions such as video recording, sensor events, motion
detection, and event search are not available.
1
2
Select Not use Storage
Server from the drop-down
menu.
Click Connect.
13
Starting the Viewing Screen
Viewer Start-up Window
When you start the VK-64/VK-16 for the first time and/or no Layouts have been
configured, you will notice that the Viewing Area is blank as shown below. Previouslyconfigured cameras on the network will appear as thumbnail images in the Camera
Selection Area on the top of the screen. These can be dragged onto the Viewing Area for
monitoring. If your Administrator has already created a Layout for you, then the Viewing
Area will display the first Personal Layout (or first Shared Layout if there are no
Personal Layouts) as shown in the example on the previous pages.
You can
hide these
panels via
the View
menu
(➝ P. 15).
14
Click
to maximize the
Viewing Screen.
Viewing Area
Viewing Screen Menu bar
Menu Bar Functions
1
Menu
Menu sub-item
Function
File
Switch Master Storage Server
Switches among Master Storages Servers. The connect option menu for
Storage Server is displayed.
Exit
Closes the application.
Cut
In the Viewing Screen, this removes selected Video Windows from the
current layout and places to the Clipboard. You can paste these Video
Windows onto the same or another layout.
Copy
In the Viewing Screen, this copies selected Video Windows from the
current layout and places to the Clipboard. You can paste these Video
Windows onto the same or another layout.
Paste
In the Viewing Screen, this action pastes the cut or copied Video Window
into the current Layout.
Delete
In the Viewing Screen, this deletes selected Video Windows from the
current layout.
Edit
Using the Viewer - Operator Login
The following table lists the Viewing
Screen menus.
In the Storage and Camera Server Summary screen, this deletes
selected Storage Servers, Camera Servers, Locations or Zones.
In the Recording Schedule screen, this deletes selected Normal or
Special Day schedules.
Select All
View
In the Viewing Screen, this action selects all Video Windows in the current
Layout.
Search Events
The Event Search dialog is displayed.
Configuration
Selects the Configuration and Preferences Screen if the Viewing Screen
is open.
Viewing Screen
Selects the Viewing Screen if the Configuration and Preferences Screen
is open.
Full screen
Hides the Menu Bar and Title Bar to allow more display room for Video
Windows. Clicking the Esc key restores the Viewer to its previous state
(i.e., before selecting the Full Screen mode).
Captions
Hide/Show the captions of Video Windows.
Camera Selector
Hide/Show the Camera Selection Area.
Timeline
Hide/Show the Timeline Area.
Live Events
In the Viewing Screen, this action opens the Live Events Log at the
position and size that it was last open. A tick beside the menu item
indicates that the screen is open. Selecting the menu item again will close
the window and the menu item will be unticked.
Camera Control
Brings up the Camera Control Panel where you can set the viewing
position and zoom.
15
Viewing Screen Menu bar
View
Help
16
Audio panel
Displays the Audio panel to transmit or receive audio.
Status bar
Shows or hides the captions of the status bar. The status bar displays load
information for the Viewer (i.e., total frame rate, CPU %, number of
displayed events, number of Video Windows).
About
This action opens the About box featuring the startup splash screen with
version number.
Chapter 2
Working with Video Windows
This chapter shows you how to create Video Windows for viewing in the Viewing
Area and how to adjust camera angles.
Selecting Cameras for Viewing
About the Camera Selection Area
The Camera Selection Area is used to display thumbnails of all the camera servers. You
can select another set of thumbnails of currently-available cameras via the Location and
Zone drop-down menus.
● The Location drop-down menu lists the physical locations of cameras on the system.
● The Zone drop-down menu lists the groups of areas within each location.
When you select a location, its associated zones will be listed below.
About Camera Thumbnails
When a Location is selected, the thumbnail images of the Camera Servers registered in
that Location will appear. Depending on the number of cameras in the selected Location,
a scrollbar at the bottom of the Camera Selection Area can be used to scroll the display
of thumbnails.
Thumbnail images can be dragged onto the Viewing Area to create Video Windows.
Note
Tip
18
Locations, zones and thumbnails are configured and managed by
users with Administrator privileges. You must have Administrator
privileges in order to modify settings.
You can hide the Camera Selection Area to allow more display
space for Video Windows. From the View menu, select Camera
Selector to hide/show the Camera Selection Area.
Selecting Cameras for Viewing
Selecting Locations and their Zones
Selection is performed in the following order:
2
3
Select a
Location
Select a Zone in
that Location
Click and drag
thumbnails to
view live video
2
Working with Video Windows
●
1
Step 1: Select a Location from the drop-down menu
Click the Location drop-down menu or on the down
arrow.
A list of pre-configured locations appears.
Click a location in the list. Zones for that list will
appear in the thumbnail section to the right.
●
Step 2: Select a Zone from the menu or thumbnail folder region
Click the Zone drop-down menu or on the down
arrow.
A list of pre-configured zones appears.
Click a zone in the list.
Once a Zone is selected from the drop-down menu,
the Camera Selection Area for the selected Zone
moves to the left.
Alternatively, click the scrollbar
located under the Camera
Selection Area. Drag it to the
right until the desired Zone is
displayed.
19
Basic Video Window Functions
Creating, scaling and moving Video Windows
Once you have chosen a location and a zone, you are ready to view one or more cameras
in that zone. Camera thumbnail images are used to create Video Windows in the Viewing
Area. The Viewing Area can support multiple Video Windows for live monitoring and
viewing recorded video simultaneously.
●
Click and drag a camera thumbnail onto the Viewing Area
Click the thumbnail image and while
1 holding down the mouse button,
drag its boundary anywhere onto
the Viewing Area.
Release the mouse button. The
2 live Video Window with video
image will be displayed.
When placed the thumbnail
image, the Video Window is
re-sized and re-positioned
according to the Layout
Grid.
A selected Video Window is
highlighted.
Note
20
An error message will appear in the Video
Window if there is a connection problem.
Basic Video Window Functions
●
Re-size a Video Window
1
●
2
Working with Video Windows
2
Click a Video Window to highlight it.
An arrow icon will appear in the
lower right corner. Click the arrow
icon and drag outwards. You can
also click on the other corners and
drag to re-size the window.
Release the mouse button when you
have reached the desired size.
Alternatively, click the Video
Window menu button and select
Video Display Size. Select Small,
Medium, Large, or Default from the
sub-menu.
A right-click action on the Video
Window will also bring up the same
menu.
Move a Video Window
Click anywhere on a Video
Window and drag it to any
position in the Viewing Area.
Note
For best performance on the Viewer, such as to view as many
Video Windows as possible, re-size the Video Windows to a
standard resolution (for example, 160 x 120, 320 x 240, 640 x
480).
When Video Windows that are other than a standard
resolution are displayed, the load on the computer CPU will be
high and Viewer operations may take longer.
21
Basic Video Window Functions
●
Add more Video Windows
Click and drag other camera thumbnails onto the Viewing Area to create Video Windows
for monitoring. Your Viewing Screen could look like this.
Arranging Video Windows
There are various ways you can manage the layout of Video Windows in the Viewing
Area. Ask your System Administrator.
Note
22
In the Viewer, the number of Video Windows you can display
simultaneously will depend on your video card, the resolution
and quality settings of the camera and the Live Video Viewing
Settings (frame rate) set in the Viewer Settings window of the
Configuration and Preferences screen.
If the load on the computer CPU is high, Viewer operations
may take longer.
Basic Video Window Functions
Selecting Multiple Video Windows
You can select multiple video windows easily. You can also move, cut, or copy multiple
windows simultaneously.
●
2
Selecting Multiple Video Windows
Working with Video Windows
There are three ways to select multiple windows:
On your keyboard, hold down the Ctrl key and click each
Video Window to select them.
Click outside the Video Windows and drag a selection box
around the Video Windows you want selected, as shown
below. Only windows contained within the area of selection
are selected. Dragging around part of an image will not
select it.
If you wish to select all Video Windows, click Select All
from the Edit menu (or on your keyboard press Ctrl + A).
Tip
Video Windows from different zones and locations can be
displayed in the same Layout.
You can copy and paste a multiple selection of Video
Windows at one time which can be pasted into and saved as a
new Layout.
23
Video Window States
Video Window Properties include:
Title bar - indicates name of camera, live or recorded viewing.
Video display - displays live or recorded information.
Pre-recorded video indicator - displays a time/date stamp in the title bar for recorded
footage.
Event indicator - displays a colored bar across the top of the Video Window.
Pan, tilt and zoom controls - when the Video Window is double-clicked or the Video
Window menu item, Get Camera Control is selected, controls appear to enable pan, tilt
and zoom.
About Video Window states
Video Windows can be displayed in the
Viewing Area according to their conditions:
Live - when viewing live video from a
Camera Server.
Pre-recorded - displays pre-recorded video
from a Storage Server.
Live Events Log list
Double-click an event to view it in the
corresponding Video Window. The
Live Events Log opens automatically
when you launch the Viewer, if left
open in a previous session.
Pre-recorded
Click to view recorded footage in the
corresponding Video Window.
Note
24
The full camera name/event may not display if you reduce the
size of the window.
Video Window States
Each Video Window displays video from an
individual camera. Video Windows can be
re-sized, repositioned or closed.
2
Title bar
Working with Video Windows
The title bar consists of menu, camera name
and live or recorded status.
Video display conditions
Live video
Recorded video
Playback
The lightning symbol in the lower
right-hand corner indicates live video.
Pre-recorded Video
Indicator
When recorded video
is shown, the title bar
on a Video Window will
change from black to
gray.
Event Indicator
If the option for Operator
Notification has been set, a
color bar will flash on top of a
live Video Window when an
event occurs. The color
indicates the event priority.
The bar will flash for a predefined time and then remain
steady for one minute until
disappearing. An audio alert
may also sound if pre-defined.
For recorded video, the
time/date indicator may
not fully display if the
Video Window size has
been reduced.
Color
Priority
Red
Highest
Orange
High
Yellow
Medium
Light Green Low
Dark Green Lowest
25
Adjust Pan, Tilt and Zoom
Viewing Live Video - Adjusting Pan, Tilt and Zoom
This is done in one of three ways:
Directly from within the Video Window
Using the Camera Control Panel
Selecting a Preset
Note
●
For a VB-C50FSi and VB-C50Fi, only zoom is available.
If a fixed camera or an external camera such as VC-C50i is
connected to VB-C50i, you cannot use pan, tilt, and zoom
operations.
Using the Camera Directly from within the Video Window
Double-clicking on a live Video Window.
Alternatively, click the down-arrow at the base of the Video
Window (or right-click on the window). A drop-down menu
will appear. Select Get Camera Control.
If the camera server is being used by the Viewers or
VBAdmin Tools supplied with the Camera Server, a “Can’t
get camera control” message will appear. You may have to
wait a few moments and attempt to get control later.
Move the mouse cursor around the Video Window.
Arrows will appear in the cursor position when you
have gained control of the camera. Click and drag the
cursor in the direction of the arrow for pan and tilt.
When you move the mouse cursor to the center of
the image, a zoom in or zoom out control will appear.
Hold down the mouse on “+” to zoom in.
Hold down the mouse on “-” to zoom out.
When you have finished, select Release Camera Control from the Video Window menu.
26
Adjust Pan, Tilt and Zoom
Tip
2
Working with Video Windows
●
If you have camera control, you can only drag the window by
clicking and holding the title bar.
When you have control, the camera can be controlled either by
clicking or moving the mouse while holding the left button
down. The latter method provides finer control.
If a control warning “Control will be lost in 10 seconds.”
appears, it means you have stopped making changes for 30
seconds and a 10 second countdown commences. To continue
control, click in the Video Window, i.e. use the controls.
You can still manipulate a camera that is currently recording.
If the recording position has been set, the Camera Server will
return to that position after the Viewer release camera control.
Using the Camera Control Panel
Pan/Tilt controls. Click Clicking this button
Set Night to nudge or click and returns the camera
hold for continuous
to face the front.
Mode.
movement.
To display, select View > Camera Control
from the menu bar, or click the Video
window menu icon (or right-click in the
Video Window) to bring up a context menu
and select Camera Control.
If a Video Window is not selected, the
preview window will be blank. Click on a
Video Window to control the camera.
You can control the pan, tilt, and zoom
operation using a panorama image. Click
inside the Panorama window to adjust the pan
and tile angles so that the clicked position
becomes the center of the image.
Alternatively, you can move or zoom in/out the
yellow scope to perform the pan, tilt, and zoom
operation.
If the digital zoom is enabled by the Camera
Server, a boundary between the optical and
digital zoom is displayed.
Click this button to
display exposure
control (➝ P. 28).
Click this button
to display white
balance control
(➝ P. 29).
If preset camera
angles have been
set up by your
Administrator, they
will be available from
a drop-down menu.
When the Video
Window is selected,
click Get Control.
Click Release
Control when
finished.
Click and drag the Zoom slider to perform the
zoom operation.
Click this button to display extended camera
control panel (➝ P. 29).
Switch On and Off of
external device
output of the camera.
27
Adjust Pan, Tilt and Zoom
Note
When using the VB-C300, you cannot use Night Mode in the
following cases:
When Day&Night is set to Auto on the Camera and Video
Settings page
When the Night Mode is set to Auto with a recording schedule
Exposure Control Items (when the Exposure Mode is Auto)
Set the Exposure Mode to Auto (VBC300 only).
Auto: Automatically adjusts the
exposure.
Clicking this button enables high-level
backlight compensation.
Clicking this button enables mid-level
backlight compensation.
Clicking this button disables
backlight compensation.
Clicking this button enables
low-level backlight
compensation.
Exposure Control Items (when the Exposure Mode is Manual)
Set the Exposure Mode to Manual (VBC300 only).
Manual: Dragging slide bars adjust
the aperture value, shutter
speed, and gain value.
Drag each slide bar to adjust the
aperture value, shutter speed, or gain
value.
28
Adjust Pan, Tilt and Zoom
White Balance Control Items
To forcibly adjust the white balance,
capture a white object (e.g., a piece
of white paper) and click One Shot
WB.
2
Working with Video Windows
Drag each slide bar to adjust
each gain value.
Select the White Balance mode from the
drop-down menu. The following modes
are available (VB-C300 only).
Auto: Automatically adjusts the
white balance.
Fluorescent:
Select this option when using
the camera under neutral
white or cool white
fluorescent lighting.
Fluorescent H:
Select this option when using
the camera under a day light
fluorescent lighting.
Mercury light:
Select this option when using
the camera under a mercury
lighting.
Sodium light:
Select this option when using
the camera under orange
light of a sodium lighting.
Halogen light:
Select this option when using
the camera under a halogen
or incandescent lighting.
Manual:Drag each slide bar to adjust
each gain value (R or B
gain).
Other items
Select from Slow, Normal, and
Fast for Pan and Tilt.
Select from Slow and Fast for
Zoom.
Switch between Auto Focus and Manual Focus.
Auto:
Adjust the focus automatically.
Auto (for domes):
When the optional dome housing is used, select this option to automatically adjust the
focus without focusing on the wall surface.
Fixed at Infinity:
Focus is fixed at a point of infinity.
Manual: Press and hold Far or Near button to adjust the focus. Clicking One Shot AF adjusts the
focus just once automatically (VB-C300 only).
29
Adjust Pan, Tilt and Zoom
Note
●
When you have finished, select Release Camera Control from
the active Video Window menu.
Panorama image needs to be set on the Camera Server in
advance. VB-C50FSi/VB-C50Fi cannot display panorama
image.
Exposure can be adjusted for VB-C300 only.
White balance can be adjusted for VB-C300 only.
Selecting a Preset Camera Angle
If preset camera angles have been set up, they will be
available from the Preset drop-down menu of the
Camera Control panel or a sub-menu. The following
explains how to select a preset from a sub-menu.
1
2
3
30
Double-click a Video
Window or select Get
Camera Control from the
Video Window menu.
From the Video Window
menu, click Preset Camera
Angles.
Select a preset position
from the sub-menu.
Other Video Window Functions
Changing the size of a Video Window
Apart from manually clicking on the corner and dragging out the Video Window to a new
size, you can also select a set size from the Video Window menu.
To change the display size of a Video Window via the menu:
2
Open the Video Window menu and select Video Display Size
1
2
Working with Video Windows
●
Click the Video window menu icon, or
right-click in the Video Window to bring
up a context menu.
Select Video Display Size from the
menu, and then select Small, Medium,
Large, or Raw from the sub-menu. A
Raw selection displays the Video Window
selected at the Video Receive Size.
Changing the size of a Received Video (VB-C50i/VB-C50iR,
VB-C50FSi, VB-C50Fi only)
You can select a video size received by the Viewer. To change the size of received video
via the menu:
●
Open the Video Window menu and select Video Receive Size
1
2
Note
Click the Video window menu icon, or
right-click in the Video Window to bring
up a context menu.
Select Video Receive Size from the
menu, and then select Small, Medium,
Large, or Default from the sub-menu.
Selecting Default displays the Video
Window in the size received from the
Camera Server.
When multiple Video Windows from a single Camera Server
are displayed and the Video Receive Size is changed from one
of them, the change will apply to all Video Windows.
Selected video receive sizes are saved when the layout is
saved.
The Video Receive Size used for Default is determined when
connection with Camera Server starts. Even if you change the
size from the Camera Server after the connection is made, it
will not apply.
31
Other Video Window Functions
Enabling Backlight Compensation
Backlight compensation is a camera feature used to compensate for camera views with
strong backlighting, i.e., viewing a dark image against a strong backlight. It can be enabled
from the Video Window menu. It is not to be confused with Shade Correction.
To enable backlight compensation:
●
While Camera Control is active, select Backlight Compensation
1
2
Click menu bar of the Video window, or
right-click in the Video Window to bring
up a context menu.
Select Backlight Compensation from
the menu and select Off, or On from
the sub-menu.
You can set the backlight compensation to
Off, Low, Medium or High for VB-C300,
VB-C50i / VB-C50iR, VB-C50FSi and VBC50Fi.
Note
32
If Low, Medium, or High is selected, the tick (black dot) is not
displayed.
Other Video Window Functions
Other Menu Options
Other functions available from the Video Window menu include:
Click Night mode and select Disabled, Enabled,
IR light off, or Enabled, IR light on from the submenu.
Selecting Enabled, IR light on will remove the IR
cut filter and turn the built-in IR light on. The IR light
cannot be used with the VB-C300, VB-C50FSi, or
VB-C50Fi.
2
Working with Video Windows
Click Control External Devices to control any
external devices that may be connected to your
Camera Server. This is only enabled when you have
camera control. For more information on external
devices, ask your System administrator.
Click Shade Correction to correct shaded
areas in the Video Window. This affects the
individual Video Window on display, i.e., any
duplicate (unselected) windows are not
affected. This is discussed on the following
page.
Click Admin Viewer to activate the WebView Livescope Admin Viewer
if the Admin Viewer or NC Viewer is installed. For the VB-C300, the NC
Viewer is activated. Refer to your Camera Server User’s Manual for
more information on the Admin Viewer or NC Viewer.
Click Audio Panel to display the Audio Panel (➝ P. 34) when you want
to use the audio function of the VB-C300, VB-C50i/VB-C50iR, or VBC50FSi. Refer to your VB-C300, VB-C50i/VB-C50iR, or VB-C50FSi
User’s Manual for more information on the audio settings.
Click Close Window to close the Video Window that is currently selected. You
can also close a selected Video Window by pressing the Delete key.
33
Other Video Window Functions
Note
It is recommended to install the Admin Viewer and/or NC
Viewer in advance.
The camera server which is sending or receiving audio cannot
interact with other viewer or Admin Viewers.
Shade Correction cannot be applied to multiple Video
Windows.
Shade correction is performed by using image processing
within the Viewer and not on the Camera Server. It can be
used on live or recorded video (see below).
About Shade Correction
Shade Correction compensates darker regions of images and makes them lighter.
Correction only applies to the
displayed Video Window in
the Viewer.
Shade Correction Off
Shade Correction High
Darker regions are most affected by Shade Correction.
About Audio Panel
Clicking this button after selecting a
Video Window, or selecting a Video
Window after clicking this button starts
audio playback.
When ticked, audio
is played back even
when a microphone
is used.
34
Click this button to
display silent detection
control.
Clicking this button after selecting a
Video Window, or selecting a Video
Window after clicking this button starts
audio transmission.
Other Video Window Functions
When ticked, silent intervals are
detected while transmitting audio. For a
silent interval, network load can be
mitigated by reducing data to transmit.
Working with Video Windows
Tick this option to
detect silent intervals
with predefined
sensitivity.
2
Tick this option to
manually adjust the
detection sensitivity.
Drag the slide bar to
adjust the detection
sensitivity.
35
36
Chapter 3
Using the Timeline and
Viewing Events
This chapter shows you how to use the Timeline for live and
pre-recorded viewing as well as view and search events.
If you are using the Viewer only,
you can skip this chapter.
Using the Timeline
Timeline Overview
On the Viewing Screen, a timeline of past events associated with displayed cameras is
shown in the Timeline Area (➝ P. 8) at the bottom of the Viewer as colored bars. Selecting
a colored bar moves the Playhead to the event and the associated Video Window is
switched to playback mode.
Video Window
Playback controls
Click to save the current image
on a Video Window in a file.
Click to Zoom in
Camera Name
or out of the
A manual recording
Timeline to or
The name of the with duration of one
less.
camera currently minute is initiated.
selected.
Click to scroll back
hours, by days or by
weeks.
Darker areas indicate
recorded video for this
period.
Events for non-selected cameras
(Video Windows) in the Viewing Area
are in weaker colors indicated as
secondary event.
Playback controls
Playhead region
Previous Event
Rewind
Nudge Back
Play/Pause
Nudge Forward
Fast Forward
Next Event
38
Click in this area of
the Playhead shaft
and drag to positions
on the Timeline.
Using the Timeline
Monitoring Live Video in relation to the Timeline
When a Video Window is created from a camera thumbnail, video is seen live. The
Playhead (shown below) will be in a “live” position. The “live” position represents the
present time. The Playhead remain fixed as time scrolls to the left underneath,
representing the passage of real time.
Click to search for
past events.
Click to jump to a
specified date/time.
Click to return the
Playhead to the
Live position (if it
has been moved).
Click to extract a
segment of video to
save as another file.
Events associated with
selected cameras (Video
Windows) in the Viewing
Area are indicated in
stronger colors as
primary events.
Using the Timeline and Viewing Events
Click the time bar and drag to
scroll through the Timeline.
3
Click to scroll
forward hours, by
days or by weeks.
Day indicator
Event display area
Priorities are color-coded as follows.
Note
Tip
If no cameras are selected, all events are
shown as primary events.
You can hide the timeline by de-selecting
Timeline from the View menu.
Color
Priority
Red
Highest
Orange
High
Yellow
Medium
Light Green
Low
Dark Green
Lowest
39
Using the Timeline
Using the Timeline to check, play and extract video
You can view pre-recorded video by moving the Playhead control in the Timeline or
entering a timecode and jumping to it. Methods include:
●
Use the Playback Controls
You can control to play, rewind, fast forward or jump
to previous and next events (➝ P. 38).
The fast forward and rewind speeds change by 1x,
2x, 5x and 10x each time you click the buttons.
Tip
●
Drag the Playhead to a new time
●
Click in the Event Display Area of the Timeline
Click and drag the Playhead shaft to another location.
When you move the Playhead, you are effectively
controlling all Video Windows that have been selected.
Click in the Event Display Area of the
Timeline. The Playhead will move to that
location and playback of recorded video
commences from that time.
Note
40
Videos recorded at different times can be played back
simultaneously. First select a Video Window and move the
Playhead to start playback. Next select another Video Window
and move the Playhead to another time. This is ideal for
comparing the same or different cameras at different times.
When you choose to play back video, the video is played over a
network. Therefore the response and smoothness of the play back
will depend on network traffic and other properties of the network.
The time displayed on the Timeline is the time of PC where the
Viewer is running.
Using the Timeline
●
Click and drag the time bar to move through the Timeline
●
Jump to Time
Move your mouse pointer over the time bar and it
becomes a hand. Click and drag to the left or
right to move back or forward in time. You can
only scroll right to the current time, or “live” time.
1
3
Select a Video Window and click Jump to Time.
3
The Jump to Time dialog opens. Select a
day and/or time.
Using the Timeline and Viewing Events
2
Click OK.
The Playhead and Timeline will move to
the time selected. If no Video Windows are
selected, only the timeline is moved.
Using the calendar is shown below.
Click to scroll back
through the months.
Click to scroll forward
through the months.
Click a day to highlight
it, then click OK to
bring up that day in
the Timeline.
Alternatively, click the
current month and a
month selector will
appear.
Click up/down arrows
to select a time or
click each time
segment and
overwrite existing
value.
To select another year,
click the current year and
scroll down or back up,
using the up/down
arrows.
41
Using the Timeline
Initiating a manual recording with duration of one minute
A manual recording with duration of one minute can be initiated at the maximum frame
rate. The manual recording is displayed on the Timeline and Live Events Log as “Manual
recording (username)”. This is handy for capturing random events not associated with
sensor recording or outside preset recording times.
To initiate manual recording:
1
2
Note
Select a Video Window for
manual recording.
Click Record Now.
The Record Now function records at the maximum frame rate.
Extended recording time will use additional disk space on the
Storage Server. Excessive use of this function should not be
performed without first checking with an administrator.
The Record Now function is only enabled if a Storage Server is
configured for the camera.
Recording will be for approximately one minute. The actual
duration of recorded video may vary depending on settings
and network delays.
The priority of an event created by a manual recording using
Record Now will always be Priority 1. It cannot be changed
from Event tab.
Capturing a Still Frame
Click Capture Still Frame to save
the current image on a Video
Window.
1
2
Note
42
Select a Video Window to
capture a still image.
Click Capture Still Frame.
On Windows Vista, don’t specify the “Windows” folder or the
“Program Files” folder on the system drive to store snapshots
and video files, as image and video files can't be saved in those
folders.
Using the Timeline
●
Zooming In and Out of the Timeline
Click Zoom In to zoom into a time period in the Event
Display Area.
Click Zoom Out to zoom out a time period in the
Event Display Area.
●
Click event to select it
A time segment with darker color
indicates that recorded video
exists for that period.
Using the Timeline and Viewing Events
Click
event to
select it.
3
When you click an event
to select it, the associated
Video Window will display
the event(s).
Move mouse over event to get details.
Camera Name
Type of event
Time of event
Daylight Savings Indicator
The Storage Server will adjust for Daylight Savings if configured in Date and Time
property of the control panel as follows:
When normal time has changed to Daylight Savings time, time that is skipped is
displayed in the Timeline as missing.
When gaining time (rewinding the clock back from 02:00 to 01:00), the extra time is
duplicated.
Skipped Time
Duplicated Time
Note
Where Daylight Saving changes have occurred, the Timeline
display is still continuous. Only the labels are affected.
43
Using the Timeline
Extracting video to save to another location
A portion of video can be saved to another location if required. Files are automatically
saved as QuickTime .mov format and can be viewed in a QuickTime player or any other
player that supports .mov files. A maximum of one hour of video can be extracted at a
time. If you do not have a QuickTime player installed, visit http://www.quicktime.com for a
free download.
●
Select a Video Window and time period then click Extract Video
1
2
Click a Video Window to highlight it, then click and drag
a time period for it in the Timeline.
Click Extract Video. The Extract Video dialog opens.
3
4
5
Note
●
44
In the Date: field, click each
segment and overwrite with
desired date. Alternatively
click the down arrow to use
the calendar.
In the From and To field,
click the time segments and
overwrite with desired time,
or use the up/down arrows.
Click OK to display the
Save As dialog. Browse to
a suitable folder in which to
save the extracted video,
and click Save.
You must select only one Video Window to extract video.
QuickTime player version 6.5.1 or later is recommended.
On Windows Vista, don’t specify the “Windows” folder or the
“Program Files” folder on the system drive to store snapshots
and video files, as image and video files can't be saved in
those folders.
Returning to Live Video
To return to the live video, click Return to Live ➞. The Playhead
returns to the live position in the Timeline.
Viewing and Searching Events
●
About Live Events Log list
The Live Events Log displays events that have occurred with one or more cameras after
the Viewer has been launched. Events are color coded according to priority. The Live
Events Log opens automatically when you launch the Viewer, if left open in a previous
session of VK-64/VK-16.
3
Using the Timeline and Viewing Events
Click and drag scroll bar to view events.
To maximize, double-click title bar
or click the maximize icon.
The bell icon is replaced by a dot icon when
the event is acknowledged by double clicking.
●
Re-sizing the window to a custom size
Click the corners or edges and drag
the window out to a new size.
Release the mouse button.
When you launch the Viewer again,
the Live Events Log will retain the
size you selected.
Note
Only the most recent 200 events are shown in the Live Events
Log.
45
Viewing and Searching Events
Displaying the Live Events Log List
To display the Live Events Log List, if it is not displayed:
●
Selecting Live Events from View Menu
Select Live Events from the View menu bar.
Live Events Log list opens.
Once selected, the menu item will be ticked next time you display it.
Overview of Alert Parameters
Acknowledgement status
Priority of the event (1:Highest, 2:High, 3:Medium, 4:Low, 5:Lowest)
Event type that has occurred
Camera name where event occurred
Date and time of event
Location and Zone
●
Acknowledging and Viewing Events
A new event entry will appear at the top of the Live Events Log list and will flash for a
defined period if configured. If Operator Acknowledgement is required, the event will flash
indefinitely if not acknowledged.
46
1
In the Live Events Log, double-click on the event to acknowledge it and view it in its
associated Video Window.
2
In the bottom right corner of the Viewer, click Return to Live ➞ when you have
finished viewing the event. The Video Window will return to live viewing.
Viewing and Searching Events
Searching Events
If you have multiple events, you can initiate a search for a particular event via the Event
Search dialog.
To launch the Event Search Dialog:
●
Click Event Search
On the Timeline, click Event Search.
3
The Event Search dialog opens.
Enter a search end
date and time.
Using the Timeline and Viewing Events
Enter a search start
date and time.
Enter a keyword
for particular
events.
Select a
Location
and Zone.
Select a
Priority.
Select a
state of
event.
Select a
type of
event.
Search
Result
Display
Area
Double-click an event to view it in the Video Window, or
click an event to highlight it and then click View Event
in Camera to view it.
47
Viewing and Searching Events
Selecting Criteria for Searching
When you initiate a search, certain criteria can be specified such as Priority, Location and
Zone on the network, a date range when the event may have occurred and a time period.
To initiate a search:
●
Step 1: Select a date and time range to search
Click in the From and To date panels and overwrite the existing entries for
month/day/year and time.
Alternatively, click the down arrow next to each date panel
to bring up the calendar. Click off the calendar to close it
again.
In the Event Search dialog, you can also scroll through
time using the up/down arrows. Click an hours, minutes or
seconds segment to highlight it and then click the up or
down arrow.
48
●
Step 2: Select an event keyword
●
Step 3: Select a Location and Zone to Search
In the Description field, enter a
keyword such as, “deleting”,
“recording”, “frames”, etc. Found
events will be based on your text
entry.
From the Where fields, select a
Location and Zone from the
drop-down lists. Only events
within the location will be
selected.
Viewing and Searching Events
●
Step 4: Select a type of Event
●
Step 5: Select a State
Select a type of Event from the drop-down list.
Select a State for the event, whether it was On or Off during the
period. Alternatively, select All States.
Step 6: Select a Priority
●
Step 7: Click Search
Using the Timeline and Viewing Events
●
3
Select a Priority from the drop-down list.
When you have entered the day and time range, click Search to initiate the event search.
Events that are found will be listed in the window below. If necessary, stop a search at any
time by clicking Stop Search.
Viewing found events
To view an event in a Video Window,
click the event to highlight it and click
View Event in Camera to view it in a
Video Window.
You can also double-click an event to
view it in a Video Window.
Clicking Cancel stops any searching
and closes the dialog.
Note
When you have finished viewing an event in a Video Window,
click Return to Live ➞ in the Timeline to return the Video Window
to live viewing.
49
50
Index
Index
A
S
Audio Panel ...........................................34
Searching Events ..................................47
C
Camera Control Panel...........................27
Exposure Mode .........................................28
Focus.........................................................29
Pan, Tilt and Zoom ....................................29
Cameras for Viewing .............................18
Camera Thumbnails ..................................18
Location and Zone drop-down...................19
Selecting Locations and their Zones ...............19
Capture Still Frame ...............................42
D
Daylight Savings Indicator.....................43
E
Extracting video to save to
another location.....................................44
G
Get Camera Control ..............................24
Criteria for Searching ................................48
Date and Time Range ...............................48
Event Search.............................................47
View Event in Camera...............................49
Viewing found events ................................49
Selecting a Preset Camera Angle.............30
Shade Correction ..................................34
Starting Viewing ....................................10
Connect to the localhost............................11
Specify the IP address of Storage Server to
connect Viewer..........................................12
Viewer Only Mode .....................................13
T
Timeline.................................................38
Capture Still Frame .............................38, 42
Extract Video .......................................39, 44
Jump to Time.......................................39, 41
Overview ...................................................38
Playback Controls ...............................38, 40
Playhead region ..................................38, 40
Record Now.........................................38, 42
Return to Live ......................................39, 44
Zoom in/Zoo out ............................38, 39, 43
I
Introduction..............................................2
V
Video Window .................................20, 31
M
Manual Recording .................................42
Menu Bar...............................................15
O
Overview .................................................5
P
Pan, Tilt and Zoom ................................26
Arranging...................................................22
Audio Panel ...............................................34
Camera Thumbnail....................................20
Changing the size......................................31
Control External Devices...........................33
Creating, scaling and moving ....................20
Enabling Backlight Compensation.............32
Night mode ................................................33
Selecting Multiple Video Windows .............23
Shade Correction ......................................34
Video Window States ................................24
Viewing and Searching Events..............45
Live Events Log List ..................................46
Searching Events ......................................47
Viewing Screen Example ........................8
52
Index
53
CANON INC.
30-2, Shimomaruko 3-chome, Ohta-ku, Tokyo 146-8501, Japan
U.S.A.
CANON U.S.A.,INC. NEW JERSEY OFFICE
One Canon Plaza Lake Success, NY 11042-1198 USA
If you have any questions, call the Canon U.S.A. Information
Center toll-free at 1-800-828-4040(U.S.A.only)
CANADA
CANON CANADA INC.NATIONAL HEADQUARTERS
6390 Dixie Road, Mississauga, Ontario L5T 1P7
CANON CANADA INC. CALGARY
2828, 16th Street, N.E, Calgary, Alberta T2E 7K7
CANON CANADA INC. MONTRÉAL
8801 Trans Canada Hwy, St. Laurent Québec H4S 1Z6
If you have any questions, call the CANON CANADA Customer Information
Centre toll-free at 1-800-OK-CANON (652-2666) (Canada only)
MEXICO
CANON MEXICANA, S DE R.L.DE C.V.
Boulevard Manuel Avila Camacho, No.138 PB, Pisos 15, 16 y 17 Col Lomas de
Chapultepec C.P. 11000 México, D.F. México
ASIA
CANON SINGAPORE PTE LTD
1 HarbourFront Avenue, #04-01, Keppel Bay Tower
Singapore 098632
CANON HONGKONG CO., LTD.
19/F., The Metropolis Tower, 10 Metropolis Drive, Hunghom, Kowloon,
Hong Kong
OCEANIA
CANON AUSTRALIA PTY. LTD.
1 Thomas Holt Drive, North Ryde, Sydney, N.S.W. 2113, Australia
EUROPE
CANON EUROPA N.V.
Bovenkerkerweg 59-61, P.O. Box 2262, 1185 XB Amstelveen, The Netherlands
CANON EUROPE LTD.
6 Roundwood Avenue, Stockley Park, Uxbridge Middlesex, UB11 1JA,
United Kingdom
PUB. YT1-1391-000