1
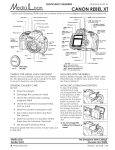
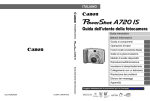
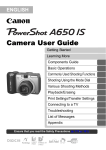
edia
oan
Operating Guide for
Canon Powershot
Media Loan Operating Guides are also available online at www.evergreen.edu/media/ml/
A95
Shooting
Shooting Mode Dial
Speaker
Shutter Button
Zoom Lever
Microphone
Power Lamp
On/Off Button
Viewfinder Window
Flash
AF-assist beam
Red-eye reduction Lamp
Self-Timer Lamp
A/V Out
Terminal
Ring Release
Button
Lens
Ring Terminal
USB
Cover Terminal
Strap Mount
Mode Switch
Make sure camera is in
shooting mode, and then
turn the shooting dial to
the desired setting (AUTO
is easiest). Aim the camera
and use the zoom lever
to frame the shot to your
desires. Press the shutter
button down halfway to let
the camera adjust focus
and exposure. When ready
press the button down
complete to take the
image.
LCD Monitor
(A95 only)
Use the LCD monitor to
check an image during
shooting, to play back
recorded images or to
CD Card Slot Cover
adjust menu settings.
Flash/Up Button
Right Button
The LCD monitor will
Left Button
automatically turn off
Macro/Manual Focus/
DC in
when it clicks shut against
Down Button
the camera body. For
Function/Single
Image
SET Button
protection, always close
Erase
Button
Battery
Menu Button
the LCD monitor after use.
Display
Cover
Pressing the DISP button
Button
Print/Share Button
switches the LCD monitor
Tripod Socket Battery Cover Lock
display mode. The AF
frame changes according
to its setting (LCD monitor
Warnings!
On).
N Do not aim the camera directly into the sun or other intense
Indicators
Viewfinder
LCD Monitor
light sources.
N Do not immerse camera in liquid or allow to get wet. Wipe
dry with soft, absorbent cloth if exterior contacts liquid or salt
air.
N Do not use, place or store in direct sunlight or in places
subject to high temperatures such as the dashboard or trunk
of a car.
N Do not place camera on speakers, electric motors or other
equipment generating strong electromagnetic fields.
Func Menu
The mode dial will determine what options are available. Press the FUNC
button, then use the Up/Down buttons to select a function to change, and
left/right to set the function. When done setting up the camera, press the
FUNC button to return to shooting mode.
Media Loan
360.867.6253
˛ Please Recycle!
AF Frame set to [AiAF]
Green: Focusing
complete (focused AF
frame)
Does not appear:
Focusing difficulty
Af Frame set to
[Center] or [Flexizone]
Green: Focusing
complete
Yellow: Focusing
difficulty
The Evergreen State College
Olympia, WA 98505
canona95 | 02.25.08 | JW
Media Loan
Canon powershot
A530 & A550
Viewfinder window
AF-assist beam/
Red-eye reduction lamp/
Self-timer lamp
Mode switch
A/V out/ USB/
DC in
Flash
FUNC./SET
Viewfinder
Speaker
Mode dial
Flash/ "up" button
Microphone
Lens
LCD monitor
Ring
Shooting Mode Dial
Exposure/ single
image erase
Macro/manual focus/
"down" button
Creative Zone
Use the shooting mode dial to switch
between the shooting modes.
The user selects exposure, aperture or other settings
to achieve special effects.
P : Program AE
Auto
The camera Automatically selects settings.
Tv : Shutter-speed priority AE
Image zone
Av : Aperture priority AE
M : Manual exposure
The camera automatically selects settings
according to the image composition type.
: Portrait – Use this mode when you want the
subject to appear sharp and the background to
blur.
C : Custom
Switching between
Shooting and Playback
: Landscape – Use this mode to shoot spacious
landscape scenes.
To enter Shooting mode,
slide the mode switch to the
camera icon. To view images,
slide the mode switch to the
play icon
: Night Scene – Use this mode to capture human
subjects against the backdrop of an evening sky
or night scene.
: Fast Shutter – Use this mode to shoot fast moving
objects.
: Slow Shutter – Use this mode to shoot moving
objects to make them appear blurred.
Playback & Zooming
SCN : Special Scene – Select from 8 scene modes
to shoot with the most appropriate settings for the
scene.
Slide the mode switch to the camera icon, and
using the left/right buttons move between images.
To magnify an image, use the zoom lever.
When zoomed, use the left/right/up/down buttons
to move around the image. Use the zoom lever
again to return to full view.
: Stitch Assist – Use this mode when taking shots
that you want to combine into a panorama.
: Movie– Use this mode to shoot movies. Sound is
also recorded simultaneously.
Canon powershot
Media Loan
Transferring Images to a Computer
Resetting to defaults
(Using Windows Vista, XP or Mac OSX (v 10.3/10.4)
1. Plug camera USB cable into Camera USB port
After you're done using the Powershot, please return
the settings to their default values.
1. Press the Menu (set up) button and scroll down to
RESET ALL.
2. Plug other end of cable into an available USB port
3. Turn camera on and wait follow on-screen
prompts
2. Select [OK] and press the FUNC./SET button.
Settings cannot be reset when the camera is
connected to a computer or printer.
It may take a few minutes for the initial install before
you can transfer your photos.
The following cannot be reset: Shooting mode,
Date/Time, White balance data recorded with the
custom white balance func., Colors specified in the
[color accent] or [color swap] modes (A530 model
only)
Disconnecting the Camera
Make sure no information is being transferred
(green light is not flashing). Then unplug the usb
cable and turn off the camera.
Please note: For some older versions of Mac
OS you must unmount the camera drive by
dragging it to the trash bin before disconnecting
the USB cable or turning the camera off.
Formatting Memory cards You should always format a new memory card or
one from which you wish to erase all
images and other data.
M Please note: Formatting (initializing)
a memory card erases all (past and
present) data.
Viewing images on a TV monitor
Using a video-compatible television as a monitor to
shoot or play back images when it is connected to
the camera with the supplied AV cable.
1. Turn off the camera and the TV
1. Press MENU and select the Format option.
2. Select [OK] and press the FUNC./SET button.
2. Connect the AV cable to the camera's AV OUT
terminal
Low level format
We recommend you select [Low level format] when
you think that the recording/reading speed of a
memory card has dropped. This may require up to 2
or 3 minutes for some cards.
3. Plug the other ends of the AV cable to the VIDEO
IN and AUDIO IN jacks on the TV
4. Tun on the TV and switch it to Video mode.
5. Turn on the camera
General Information
Storage
Audio Format
Video
SD (& multimedia for
A550) up to
2GB
WAVE, only as A530: 640 x 480 @ 10
1 minute clips FPS, 320 x 240 @ 20
or with video. FPS and 160 x 120 @ 15
FPS.
A550: 640 x 480 @ 30
Note: Camera
or 15 FPS, 320 x 240 @
comes w/512
30 or 15 FPS Sequencard, please
tial motion JPEG AVI
do not remove
(not the more efficient
this card.
MPEG).
Image sizes
Power
2,592 x 1,944 pixels native.
2,592 x 1,456
(16:9 cropped)
2,048 x 1,536,
1,600 x 1,200,
640 x 480.
(A550 adds
3072 x 2304 &
3072 x 1728)
Two AA Batteries (four for A95),
Alkaline/rechargeable. Rated only
90 shots with
alkaline batteries.
Rated 360 shots
with rechargeable.
(140, and 550 for
A550).
Please note: If the camera is malfunctioning or not working, please do not attempt to fix the
problem yourself. Take it back to media loan and discuss the problem with a media loan staff
member. Do not clean the camera using thinners, benzine, Synthetic cleaning substances or
water. All the above substances may distort or damage the camera.
For more information please visit www.canon.com or ask for Media Loan assistance.