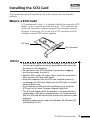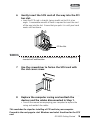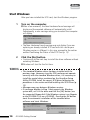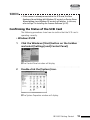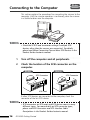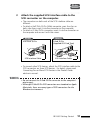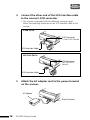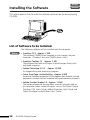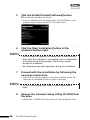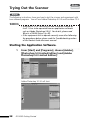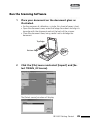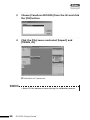
1
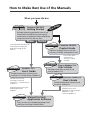
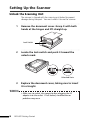
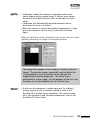
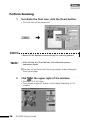
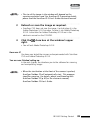
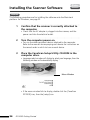
rr e
ea
ad
d
tt h
h ii ss
ff ii rr ss tt
Canon Color Image Scanner
CanoScan FB1200S
Getting
Started
Inspect the package contents
▼
Setting Up the scanner
▼
Installing the software
▼
Test scanning operation
Guide to
the software
how to use the scanning software
Windows
ScanGear CS-S
ScanGear Toolbox CS
Adobe Photoshop 5.0 LE
Caere OmniPage Limited Edition
Macintosh
Plug-in Module CS-S
CanoScan Toolbox CS
Adobe Photoshop 5.0 LE
How to Make Best Use of the Manuals
When you open the box
Printed Manual
ide
u
is G
CanoScan FB1200S
Th
Getting Started
Describes operating procedure from set up
and software installation to scanning and
confirmation of operation. Please read before
using the scanner for the first time.
Windows
Macintosh
Learn advanced techniques for
scanning after reading this
guide and setting up the
scanner.
Electronic Manual CanoScan FB1200S
Product Guide
Explains in detail how to use the
scanner, CD-ROM and optional ADF
Learn more about
operating the
scanner, CD-ROM
and ADF.
Electronic Manual
Electronic Manual
ScanGear CS-S
User's Guide
User's Guide
Detailed information on how to use
Plug-in Module CS-S.
Detailed information on how to use
ScanGear CS-S and ScanGear Toolbox CS.
Electronic Manual
Proceed to these after
thoroughly mastering
ScanGear CS-S and ScanGear
Toolbox CS.
Read these before using the
bundled application
programs.
Electronic Manuals
Plug-in Module CS-S
Manual for Each
Application Software
Tells you how to use Adobe Photoshop 5.0 LE
and Caere OmniPage Limited Edition.
CanoScan Toolbox CS
User's Guide
Detailed information on how to use
CanoScan Toolbox CS.
Proceed to these after
thoroughly mastering Plug-in
Module CS-S and
CanoScan Toolbox CS.
How to Use this Guide
Thank you for purchasing the CanoScan FB1200S color image scanner.
This Getting Started guide explains the necessary steps to connect the scanner to
your computer and begin scanning. We recommend that you carefully read this
entire guide to learn the proper procedures to avoid malfunctions.
Organization of the Guide
The guide is divided into two main sections.
• Setting Up the Scanner
This section provides a step-by-step explanation of how to set up the
scanner for first-time users. Make sure to read this section carefully
and follow the procedures exactly.
• Guide to the Software
This section offers a brief explanation of the features and applications
of the software bundled with the scanner. Read this section as
required.
• References to Windows® in this guide are to Windows® 95, Windows® 98 and
Windows NT® 4.0.
Conventions Used in the Guide
Important information in the guide is indicated by the following symbols.
WARNING
This symbol indicates precautions that must be taken
when operating the equipment. Ensure that you read
all warnings.
• NOTE •
This symbol indicates supplementary operating
procedures and other useful information.
Table of Contents
CHAPTER 1
Setting Up the Scanner
Before using this scanner for the first time, follow the
procedures in this section to connect to the computer and
install the software.
Inspecting the Package Contents ....................................................... 5
Setting Up the Scanner ...................................................................... 6
Installing the SCSI Card ..................................................................... 7
Connecting to the Computer .......................................................... 16
Installing the Software ..................................................................... 20
Windows Windows Platform: Installing the Scanner Software ...... 22
Trying Out the Scanner ................... 28
Macintosh Macintosh Platform: Installing the Scanner Software ...... 34
Trying Out the Scanner ................... 40
CHAPTER 2
Guide to the Software
How to Use the Software ................................................................ 46
Windows Windows Platform
Using ScanGear CS-S ................................................................. 47
Scanning with ScanGear Toolbox CS .......................................... 49
Scanning with Adobe Photoshop 5.0 LE .................................... 50
Scanning with Caere OmniPage Limited Edition ........................ 51
Macintosh Macintosh Platform
Using Plug-in Module CS-S ........................................................ 53
Scanning with CanoScan Toolbox CS ......................................... 55
Scanning with Adobe Photoshop 5.0 LE .................................... 56
Viewing Electronic Manuals with Adobe Acrobat Reader 3.0 .......... 57
System Information ......................................................................... 59
Features of the CanoScan FB1200S
This scanner is a flatbed color scanner with 1200 dpi optical resolution
incorporating the following features.
• Fine Color Tones and High Resolution
Achieves a maximum optical resolution of 1200 dpi x 1200
dpi. The 1200 dpi primary scan (horizontally across
document) is realized with VAROS, the proprietary Canon
system short for VAriable Refraction Optical System. VAROS
is a two-pass scanning technique that combines the results
of the scanning unit's first pass with a second pass that is
optically shifted by a half pixel. Reading 12 bits (4,096
colors) per red, green and blue (RGB) channel, the scanner
offers 12-bit or 8-bit output that reproduces brilliant tones
at high resolution.
• Standby Power and Energy-Saving Features
This scanner, even with the power on, consumes only 12
watts or lower at standby and only 35 watts or lower at full
operation. The standby feature means the scanner is always
ready to use. The product meets the Energy Star
requirements for energy conservation.
• Convenient Start Button
The one-touch start button on the front of the scanner
allows convenient use of the accompanying software
(ScanGear Toolbox CS/CanoScan Toolbox CS).
• Optional Film Adapter Unit
The FAU-S10 optional film adapter unit allows films and
transparencies to be scanned singly or in batches, increasing
the versatility of this high-quality scanner. Refer to the
manual accompanying the FAU-S10.
• Optional Automatic Document Feeder
The ADF-S9 optional automatic document feeder permits
hands-free operation for up to 20 sheets, a convenient
time-saving feature. Refer to the Product Guide.
FB1200S Getting Started
3
CHAPTER 1
Setting Up the Scanner
In this section, we explain the step-by-step procedures for
setting up the scanner from opening the package to checking
the operation of the scanner.
Please follow the procedures without skipping any steps.
Inspecting the Package
Contents
P. 5
Setting Up the Scanner
Unlock the Scanning Unit
P. 6
Will the Scanner be the only SCSI
Device Connected to the Computer?
NO
YES
Setting the SCSI ID and
the Terminator Settings
Product Guide p.20
SCSI Card Installed
in your computer?
NO
YES
Installing the SCSI Card
Connecting to the Computer
P. 16
Connecting the AC Adapter
P. 18
Installing the Software
Windows
P. 7
P. 20
Macintosh
Trying Out the Scanner
P. 28
Trying Out the Scanner
P. 40
Inspecting the Package Contents
After opening the box, inspect its contents.
Scanner Unit and Accessories
Power Cord
AC Adapter
Scanner Unit
AVA-2902E SCSI Card
Windows Platform
SCSI Interface Cable
Connects the scanner to a computer
(Half Pitch 50-Pin, D-Sub 25-Pin)
Software and Documents
• CanoScan Setup Utility CD-ROM
Contains the software to operate the scanner, the software
manuals and reader software for the manuals.
• Getting Started (This Guide)
Explains the procedures for preparing the scanner to connect it to a
computer and introduces the accompanying software.
• Other Documents
WARNING
• Please contact your retailer if any item is missing.
You are now ready to set up the scanner.
FB1200S Getting Started
5
Setting Up the Scanner
Unlock the Scanning Unit
The scanner is shipped with the scanning unit locked to prevent
damage during transport. You must unlock it to use the scanner.
○
1
○
○
○
○
○
○
○
○
○
○
○
○
○
○
○
○
○
○
○
○
○
○
○
○
○
○
○
○
○
○
○
○
○
Remove the document cover. Grasp it with both
hands at the hinges and lift straight up.
Lock Switch
○
2
○
○
○
○
○
○
○
○
○
○
○
○
○
○
○
○
○
○
○
○
○
○
○
○
○
○
○
○
○
○
○
○
○
○
○
○
○
Locate the lock switch and push it toward the
unlock mark.
Unlocked State
○
3
○
○
○
○
○
○
○
○
○
○
○
○
○
○
○
○
○
○
○
○
○
○
○
○
○
○
○
○
Replace the document cover, taking care to insert
it in straight.
WARNING
• Make sure to unlock the scanner before plugging the AC
adapter into the outlet. If left locked, a malfunction or
problems may occur.
6
○
FB1200S Getting Started
Installing the SCSI Card
Windows
Macintosh
These procedures are only required for use of the scanner with the Windows
platform.
What is a SCSI Card?
SCSI (pronounced ‘scuzzy’) is a standard interface for connecting SCSI
devices, such as scanners and hard disk drives. SCSI connectors are
usually not supplied as standard equipment on computers running
Windows. Accordingly, a SCSI card with a SCSI connector must be
installed to connect SCSI devices together.
SCSI Card
SCSI Connector
WARNING
• Before you pick up the SCSI card, discharge the static electricity from your body by touching a grounded metal surface like
the chassis of the computer.
• Do not remove the SCSI card from its protective wrapping
until you are ready to install it.
• Hold the SCSI card by the edges. Never touch the terminals or
other circuitry with your bare hands.
• Using the computer with the SCSI card installed incorrectly
can damage the SCSI card. Make sure the SCSI card is installed
correctly before use.
• If you experience difficulty with installation or in using the
SCSI card, call a Canon Customer Support Help Desk.
• The SCSI card shipped with this product is not guaranteed to
support daisy chain device configurations. It is recommended
that this SCSI card be used only to connect the scanner to your
computer.
• Windows models can be used with Windows 95, Windows 98
and Windows NT 4.0.
FB1200S Getting Started
7
Windows
Macintosh
How to Install the SCSI Card
Have a Phillips (+) screwdriver handy and follow the procedures below
to install the AVA-2902E SCSI Card into your computer.
○
1
○
2
○
○
○
○
○
○
○
○
○
○
○
○
○
○
○
○
○
○
○
○
○
○
○
○
○
○
○
○
○
○
○
○
○
○
○
○
○
○
○
Turn off your computer and disconnect all the
connected devices and cables.
○
○
○
○
○
○
○
○
○
○
○
○
○
○
○
○
○
○
○
○
○
○
○
○
○
○
○
○
○
Remove the computer casing.
• Please remove the casing after reading the manual accompanying
the computer. Some computers may require specialized tools or
procedures to remove the casing. Please consult the retailer from
which you purchased your computer if you are unclear about the
requirements for the task.
○
3
○
○
○
○
○
○
○
○
○
○
○
○
○
○
○
○
○
○
○
○
○
○
○
○
○
○
○
○
○
○
○
Discharge the static electricity from your body by
touching the chassis or another metal part of your
computer.
• Static electricity can irrevocably damage the high-precision
components on the SCSI card. It is, therefore, essential to discharge
any static electricity from your body before you proceed.
○
4
○
○
○
○
○
○
○
○
○
○
○
○
○
○
○
○
○
○
○
○
○
○
○
○
○
○
○
○
○
○
○
○
○
Locate a free PCI bus slot on your computer.
• Consult the manual accompanying your computer to locate a free
PCI bus slot on your computer.
○
5
○
○
○
○
○
○
○
○
○
○
○
○
○
○
○
○
○
○
○
○
○
○
○
○
○
○
○
○
○
○
○
○
Use the Phillips (+) screwdriver to remove the slot
cover from the PCI bus slot in which the SCSI card
will be installed.
• Save the screw that fastened the slot cover and use it to fasten the
SCSI card to the computer. Keep the slot cover in a safe place for
future use.
Screw
Slot Cover
8
FB1200S Getting Started
○
Windows
Macintosh
○
6
○
○
○
○
○
○
○
○
○
○
○
○
○
○
○
○
○
○
○
○
○
○
○
○
○
○
○
○
○
○
○
○
○
Gently insert the SCSI card all the way into the PCI
bus slot.
• Insert the SCSI card in straight, being careful not to tilt it at an
angle. A reasonable amount of force is required to insert the card
all the way into the slot. Ensure that you push it in until your hand
meets solid resistance.
PCI Bus Slot
WARNING
• A SCSI card that has been inserted at an angle or incompletely
inserted will malfunction.
○
○
○
○
○
○
○
○
○
○
○
○
○
○
○
○
○
○
○
○
○
○
○
○
○
○
○
○
○
○
○
○
7
Use the screwdriver to fasten the SCSI card with
the slot cover screw.
8
Replace the computer casing and reattach the
devices and the cables disconnected in Step 1.
○
○
○
○
○
○
○
○
○
○
○
○
○
○
○
○
○
○
○
○
○
○
○
○
○
○
○
○
○
○
○
○
○
○
○
○
• Consult the manual accompanying your computer to replace the
casing and reattach the cables.
This concludes the steps for installing a SCSI card into your computer.
Proceed to the next page to start Windows and select the driver for the SCSI
card.
FB1200S Getting Started
9
Windows
Macintosh
Start Windows
After you have installed the SCSI card, start the Windows program.
○
1
○
○
○
○
○
○
○
○
○
○
○
○
○
○
○
○
○
○
○
○
○
○
○
○
○
○
○
○
○
○
○
○
○
○
○
Turn on the computer.
▼After a few moments, the New Hardware Found message will
display and the required software will automatically install.
Subsequently, a new message asking you to restart the computer
will display.
• The New Hardware Found message may not display if you are
replacing an already installed SCSI card with this card or your
Windows version is different. In this case, proceed to the section
entitled Confirming the Status of the SCSI Card (p. 15).
○
2
○
○
○
○
○
○
○
○
○
○
○
○
○
○
○
○
○
○
○
○
○
○
○
○
○
○
○
○
○
○
○
Click the [No] button.
• Continue on to the next step to install the driver software without
restarting Windows.
▼Windows will start for the first time.
WARNING
• The standard Windows driver has been installed with the
previous steps. However, since the SCSI card may not operate
correctly with the standard Windows driver, it is necessary to
install the special driver contained on the CanoScan Setup
Utility CD-ROM. Install the correct SCSI driver following the
procedures in the section entitled Installing the SCSI Driver (p.
13).
• Messages may vary between Windows versions.
• If a message displays in Step 1 that requests the Windows
system disk, set it in the drive and click the [OK] button (use
the requested floppy disk if the Windows system is on floppies
or the CD-ROM if it is on a CD-ROM). Pressing the OK button
starts the automatic installation of the standard driver
software and starts Windows.
10
FB1200S Getting Started
Windows
Macintosh
WARNING
• If the scanner is already connected to the SCSI card, the New
Hardware Found dialog (old Windows 95 version) or Device Driver
Wizard dialog (new Windows 95 version) will display. In this case,
refer to Step 3 in Installing the Scanner Software (p. 22).
Confirming the Status of the SCSI Card
The following procedures show how to confirm that the SCSI card is
operating correctly.
• Windows 95/98
○
1
○
○
○
○
○
○
○
○
○
○
○
○
○
○
○
○
○
○
○
○
○
○
○
○
○
○
○
○
○
○
○
○
○
○
○
Click the Windows [Start] button on the taskbar
and select [Settings] and [Control Panel].
▼The Control Panel window will display.
○
2
○
○
○
○
○
○
○
○
○
○
○
○
○
○
○
○
○
○
○
○
○
○
○
○
○
○
○
○
○
○
○
Double-click the [System] icon.
▼The System Properties window will display.
FB1200S Getting Started
11
Windows
Macintosh
○
3
○
○
○
○
○
○
○
○
○
○
○
○
○
○
○
○
○
○
○
○
○
○
○
○
○
○
○
○
○
○
○
○
○
Click the [Device Manager] tab and click the [+]
mark beside the SCSI Controller item.
• The SCSI card is operating correctly if “Adaptec AIC-7850 PCI SCSI
Controller” displays underneath the SCSI Controller item.
○
4
○
○
Click
it.
○
○
○
○
○
○
○
○
○
○
○
○
○
○
○
○
○
○
○
○
○
○
○
○
○
○
○
○
○
○
at the top right of each window to close
• Windows NT 4.0
After you finish the next section, Installing the SCSI Driver, confirm that
the SCSI card is operating correctly. For instructions, read Confirming
the Status of the SCSI Card with Windows NT 4.0 (p. 15).
WARNING
12
• If the Adaptec AIC-7850 PCI SCSI Controller does not display in
the Device Manager tab, check the SCSI card installation. In
particular, check that the SCSI card is inserted all of the way
into the PCI bus slot (p. 9).
• If there are other cards than the SCSI card installed (sound
and network cards, etc.), there may be a conflict with the IRQ
and I/O port address that prevents the SCSI card or the other
card from working properly. If this should occur, change the
IRQ or I/O port address.
FB1200S Getting Started
○
Windows
Macintosh
Installing the SCSI Driver
After the SCSI card has been installed, you should install the SCSI
driver from the CanoScan Setup Utility CD-ROM onto the computer’s
hard disk. The SCSI driver software is required to operate the SCSI
card with your computer. Have the CanoScan Setup Utility CD-ROM
close at hand and follow the steps below.
• Windows 98
There is no need to install the SCSI driver provided on the CD-ROM.
Turn off the computer and proceed to the section entitled Connecting
to the Computer (p. 16).
• Windows 95/NT 4.0
Install the SCSI driver with the following procedures.
WARNING
• The driver software installed below is for exclusive use with
the Adaptec AIC-7850 PCI SCSI Controller card included in
your scanner package. If you are using another SCSI card,
please do not install this driver.
• Do not install the ScanGear CS-S program and the other
application software programs supplied on the CanoScan
Setup Utility CD-ROM until you have completed the
following steps.
○
1
○
○
○
○
○
○
○
○
○
○
○
○
○
○
○
○
○
○
○
○
○
○
○
○
○
○
○
○
○
○
○
○
○
Set the CanoScan Setup Utility CD-ROM into the
computer drive.
▼Language select window will display to select your language, then the
following window will automatically display.
Menu Window
• If the menu window does not display, double-click the [My
Computer] icon on the Windows desktop, then the [Canoscan] icon
to start the CanoScan Setup Utility.
FB1200S Getting Started
13
Windows
Macintosh
○
2
○
○
○
○
○
○
○
○
○
○
○
○
○
○
○
○
○
○
○
○
○
○
○
○
○
○
○
○
○
○
○
○
○
○
○
○
○
○
○
○
○
○
○
○
Click [Install the SCSI driver].
▼Installation of the SCSI driver will commence.
○
3
○
○
○
○
○
○
○
○
○
○
○
○
○
○
○
○
○
○
○
○
○
○
Follow the instructions in the window to complete
the installation.
▼A message instructing you to close the CanoScan Setup Utility and
turn off the computer will display after the installation has finished.
○
4
○
○
○
○
○
○
○
○
○
○
○
○
○
○
○
○
○
○
○
○
○
○
○
○
○
○
○
○
○
○
○
○
○
Close the CanoScan Setup Utility and remove the
CD-ROM from the drive.
• Handle the CD-ROM with care, placing it in a case for safe-keeping.
○
5
○
○
○
○
○
○
○
○
○
○
○
○
○
○
○
○
○
○
○
○
○
○
○
○
○
○
○
○
○
○
○
Shut down the computer.
• Windows NT 4.0: confirm the status of the SCSI card. For
instructions, read Confirming the Status of the SCSI Card with
Windows NT 4.0. on the next page.
WARNING
• If you are using the supplied SCSI card with Windows 95 or
Windows NT 4.0, ensure that you install the driver software
from the CanoScan Setup Utility CD-ROM. The standard
Windows driver installed from the system disk may not
operate correctly with the supplied SCSI card.
14
FB1200S Getting Started
○
○
Windows
Macintosh
Confirming the Status of the SCSI Card with Windows NT 4.0
After you have installed the SCSI card and driver, use the
procedures below to ensure that they are operating correctly.
○
○
○
○
○
○
○
○
○
○
○
○
○
○
○
○
○
○
○
○
○
○
○
○
○
○
○
○
○
○
○
○
○
○
○
○
○
○
○
○
○
○
○
○
○
○
○
○
○
○
○
○
○
○
○
○
○
○
○
○
○
○
1
Turn on the computer.
2
Click the Windows [Start] button on the taskbar and
select [Settings] and [Control Panel].
• The Control Panel will display.
3
Double-click the [SCSI Adapter] icon.
• The SCSI card is operating correctly if [aic78xx] displays in the
SCSI Adapter window.
4
Click
5
Turn off the computer.
○
○
○
○
○
○
○
○
○
○
○
○
○
○
○
○
○
○
○
○
○
○
○
○
○
○
○
○
○
○
○
○
○
○
○
○
○
○
○
○
○
○
○
○
○
○
○
○
○
○
○
○
○
○
○
○
○
○
○
○
○
○
○
○
○
○
○
○
○
○
○
○
○
○
○
○
at the top right of each window to close it.
○
○
○
○
○
○
○
○
○
○
○
○
○
○
○
○
○
○
○
○
○
○
○
○
○
○
○
WARNING
• If “aic78xx” does not display in the SCSI Adapter window,
install the SCSI driver with the following procedures.
1 Double-click the [SCSI Adapter] icon in the Control Panel.
2 Click the [Driver] tab.
3 Click the [Add] button.
4 Click the [Use Disk] button.
5 Place the supplied CanoScan Setup Utility CD-ROM in
the drive.
6 Select the folder containing the SCSI driver and follow
the instructions in the window to install it.
• If the above procedures are followed to install the SCSI
driver, “Adaptec AVA-290XE PCI SCSI Controller (NT 4.0)”
should display in the SCSI Adapter window.
This concludes the procedures for installing the SCSI driver.
Proceed now to Connecting to the Computer.
FB1200S Getting Started
15
Windows
Macintosh
Connecting to the Computer
This section explains the procedures for connecting the scanner to the
computer. Until the scanner operation is confirmed, place the scanner
in a stable location near the computer.
WARNING
• Check the SCSI ID and terminator settings if multiple SCSI
devices, other than the scanner, are connected. For details,
please read When Connecting Two or More SCSI Devices in the
Product Guide electronic manual.
○
○
○
○
○
○
○
○
○
○
○
○
○
○
○
○
○
○
○
○
○
○
○
○
○
○
○
○
○
○
○
○
○
○
○
○
○
○
○
○
1
Turn off the computer and all peripherals.
2
Check the location of the SCSI connector on the
computer.
○
○
○
○
○
○
○
○
○
○
○
○
○
○
○
○
○
○
○
○
○
○
○
○
○
○
○
○
Macintosh
Windows
SCSI Connector
SCSI Connector
SCSI Card
If other SCSI devices are connected to the computer, check the
connector of the last SCSI device.
WARNING
• SCSI connectors on SCSI cards and SCSI devices come in many
different types. For more details on SCSI connector types,
please read SCSI Connector and SCSI Interface Cable
Descriptions in the Product Guide electronic manual.
16
FB1200S Getting Started
Windows
Macintosh
○
3
○
○
○
○
○
○
○
○
○
○
○
○
○
○
○
○
○
○
○
○
○
○
○
○
○
○
○
○
○
○
○
○
○
Attach the supplied SCSI interface cable to the
SCSI connector on the computer.
• The connectors on both ends of the SCSI interface cable are
different.
• To attach a Half Pitch 50-Pin (Male) connector, press the clips on
both sides then insert it into the connector on the computer.
• To attach a D-Sub 25-Pin connector, insert it into the connector on
the computer and secure it with the screws.
Windows
Half Pitch 50-Pin
Macintosh
D-Sub 25-Pin
(Supplied SCSI Card Type)
Screws
SCSI Interface Cable
SCSI Interface Cable
• To connect other SCSI devices, attach the SCSI interface cable to the
SCSI connectors on those SCSI devices. For details, please read
Connecting Two or More SCSI Devices in the Product Guide
electronic manual.
WARNING
• Do not connect the D-Sub 25-Pin connector to the computer’s
printer port.
• Although D-Sub 25-Pin SCSI connectors are standard on Apple
Macintosh, there are many types of SCSI connectors for the
Windows environment.
FB1200S Getting Started
17
Windows
Macintosh
○
4
○
○
○
○
○
○
○
○
○
○
○
○
○
○
○
○
○
○
○
○
○
○
○
○
○
○
○
○
○
○
○
○
○
Connect the other end of the SCSI interface cable
to the scanner’s SCSI connector.
• This scanner is equipped with two different connector types.
Attach the matching connector on the SCSI interface cable to the
scanner.
D-Sub 25-Pin
SCSI Connector
D-Sub 25-Pin (Female)
SCSI Interface Cable
Half Pitch 50-Pin
SCSI Connector
Half Pitch 50-Pin
(Female)
SCSI Interface Cable
○
5
○
○
○
○
○
○
○
○
○
○
○
○
○
○
○
○
○
○
○
○
○
○
○
○
○
○
○
○
○
○
AC Adapter
Power Terminal
18
○
○
Attach the AC adapter cord to the power terminal
on the scanner.
FB1200S Getting Started
○
Windows
Macintosh
○
6
○
○
○
○
○
○
○
○
○
○
○
○
○
○
○
○
○
○
○
○
○
○
○
○
○
○
○
○
○
○
○
○
○
○
○
○
○
○
○
○
Attach the power cord to the AC adapter.
Power Cord
○
7
○
○
○
○
○
○
○
○
○
○
○
○
○
○
○
○
○
○
○
○
○
○
○
○
○
○
Close the document cover. Plug the power cord
into an electrical outlet.
• Ensure that the document cover is closed before you plug in the
power cord.
• To provide the convenience of continuous standby operation, this
equipment does not feature a power switch. It powers up as soon
as the power cord is plugged in. However, it is equipped with
power-saving features so that the unit may be left on under normal
operating conditions.
WARNING
• Do not use an AC adapter other than the one supplied with
the scanner. Other adapters may damage the equipment.
• Always attach the AC adapter plug to the scanner first before
plugging in the power cord plug to the electrical outlet.
Reversing this order may lead to malfunctions.
• To power down the scanner, first turn off the computer and
other peripheral devices before unplugging the scanner’s
power cord plug from the electrical outlet.
You are now ready to install the software.
FB1200S Getting Started
19
Installing the Software
Windows
Macintosh
This section explains how to install the software contained on the accompanying
CD-ROM.
List of Software to be Installed
The following software will be installed onto the computer.
Windows
• ScanGear CS-S Approx. 3 MB
The software (TWAIN Driver) required to scan images into your
computer. (Chapter 2 discusses TWAIN driver issues.)
• ScanGear Toolbox CS Approx. 3 MB
The software that loads and copies scanned images directly into
registered programs.
• Adobe Photoshop 5.0 LE Approx. 40 MB
An image editing and retouching program.
• Caere OmniPage Limited Edition Approx. 8 MB
An optical character recognition (OCR) program that converts scanned
documents into text that can be edited with word processor programs.
• Adobe Acrobat Reader 3.0 Approx. 10 MB
The reader program for the electronic manuals (manuals read on
the computer screen instead of paper), such as the Product Guide,
ScanGear CS-S User’s Guide, Adobe Photoshop User’s Guide and
Caere OmniPage Limited Edition User’s Guide.
20
FB1200S Getting Started
Windows
Macintosh
Macintosh
• Plug-in Module CS-S Approx. 700 KB (English version)
(Multiply this by the number of programs with which it will be used.)
The software required (Plug-in Software) to scan images into your
computer.
• CanoScan Toolbox CS Approx. 4 MB (English version)
The software that loads and copies scanned images directly into
registered programs.
• Adobe Photoshop 5.0 LE Approx. 40 MB
An image editing and retouching program.
• Adobe Acrobat Reader 3.0 Approx. 13 MB
The reader program for the electronic manuals (manuals read on
the computer screen instead of paper), such as the Product Guide,
Plug-in Module CS-S User’s Guide, CanoScan Toolbox CS User’s
Guide and Adobe Photoshop 5.0 LE User’s Guide.
WARNING
• You must have sufficient free hard disk space to install all the
programs. In addition, more free hard disk space will be
required when operating the software.
Windows:
Macintosh:
• NOTE •
Approx. 64 MB
Approx. 58 MB
• Software descriptions are contained in the Guide to the
Software section of this guide (p. 45).
• The installation procedures for each software program are
explained from pages 22 to 27 for Windows and pages 34 to
39 for Macintosh. Experienced users, however, may follow the
on-screen instructions and select not to install some of the
programs or to change target directories.
FB1200S Getting Started
21
Windows
Macintosh
Installing the Scanner Software
Windows
It is now time to install the software required to operate the scanner. This section
explains the procedures for the Windows platform. For Macintosh, see page 34.
○
1
○
○
○
○
○
○
○
○
○
○
○
○
○
○
○
○
○
○
○
○
○
○
○
○
○
○
○
○
○
○
○
○
○
○
○
Confirm that the scanner is correctly attached.
• Confirm that the AC adapter is plugged into the scanner, and the
power cord into the electrical outlet.
○
2
○
○
○
○
○
○
○
○
○
○
○
○
○
○
○
○
○
○
○
○
○
○
○
○
○
○
○
○
○
○
○
Turn the computer power on.
• Turn on the other peripheral devices connected to the computer.
Refer to the manuals accompanying each device for instructions on
the correct order in which to turn them on.
○
3
○
○
○
○
○
○
○
○
○
○
○
○
○
○
○
○
○
○
○
○
○
○
○
○
○
○
○
○
○
○
○
○
Follow the procedures below if a dialog, such as
New Hardware Found or Device Driver Wizard,
displays.
• These dialogs will display the first time Windows is started up after
the scanner has been attached.
• The procedures in this step should be followed if the computer
detects the scanner.
If Neither Dialog Displays (Windows NT 4.0)
Proceed to Step 4.
New Hardware Found Dialog Displays (Windows 95 Older Version)
A Select [Driver from disk...]
and click the [OK] button.
B Place the CanoScan Setup
Utility CD-ROM in the
computer drive if the Install
from Floppy Disk message
displays.
22
FB1200S Getting Started
○
Windows
Macintosh
C Click the [Browse] button
and specify the CD-ROM
drive in the input box.
Although this example uses
[D:] as the CD-ROM drive
Input the drive
letter, your computer may
letter corresponduse another letter, such as
ing to your CD[E:] or [F:]. Substitute the
ROM drive.
appropriate drive letter for
your system.
▼The required files will be loaded onto your computer and Windows
will start.
D Remove the CanoScan Setup Utility CD-ROM from the drive.
Device Driver Wizard Dialog Displays (Windows 95 Newer Version)
A Place the CanoScan Setup
Utility CD-ROM in the drive
and click the [Next] button.
B Click the [Finish] button
when the New driver found
for this device dialog
displays.
WARNING
• If the Driver Not Found dialog displays, click the [Back] button
and redo Step A. The driver was probably not found because
the Next button was clicked before the computer was able to
finish reading the CD-ROM.
▼The required files will be loaded from the CD-ROM and Windows will
start.
C Remove the CanoScan Setup Utility CD-ROM from the drive.
FB1200S Getting Started
23
Windows
Macintosh
Add New Hardware Wizard Displays (Windows 98)
A Click the [Next] button.
B Select [Search for the best
driver for your device] and
click the [Next] button.
C Place the CanoScan Setup Utility CD-ROM in the drive.
D Select the CD-ROM drive and
click the [Next] button.
E Click the [Next] button if
Canon CanoScan FB1200S
Scanner displays in the
following dialog.
Canon CanoScan FB1200S
Scanner Displays
WARNING
• If the Driver Not Found dialog displays, click the [Back] button
and redo Step D. The driver was probably not found because
the Next button was clicked before the computer was able to
finish reading the CD-ROM.
24
FB1200S Getting Started
Windows
Macintosh
F Click the [Finish] button.
▼Windows will start.
G Remove the CanoScan Setup Utility CD-ROM from the drive.
○
4
○
○
○
○
○
○
○
○
○
○
○
○
○
○
○
○
○
○
○
○
○
○
○
○
○
○
○
○
○
○
○
○
○
Place the CanoScan Setup Utility CD-ROM in the
computer drive.
• Language select window will display to select your language, then the
following window will automatically display.
Menu Window
• If the menu window fails to display, double-click the [My Computer]
icon on the Windows desktop, then the [Canoscan] icon.
FB1200S Getting Started
25
Windows
Macintosh
○
5
○
○
○
○
○
○
○
○
○
○
○
○
○
○
○
○
○
○
○
○
○
○
○
○
○
○
○
○
○
○
○
○
○
○
○
○
○
○
○
○
Click the [Install/Uninstall Software] button.
▼The following window will display.
• If you accidentally click the wrong item, click the [Return to the
previous menu] button and reclick the correct item.
○
6
○
○
○
○
○
○
○
○
○
○
○
○
○
○
○
○
○
○
○
○
○
○
○
○
○
○
○
○
○
○
Click the [Start Installation] button at the
window’s bottom right.
WARNING
• Do not restart the computer or remove the CD-ROM from the
drive while the installation is proceeding unless so directed by
a CanoScan Setup Utility message. These actions would
disrupt the installation.
• Do not perform any other operations during the installation.
○
7
○
○
○
○
○
○
○
○
○
○
○
○
○
○
○
○
○
○
○
○
○
○
○
○
○
○
○
○
○
○
○
Proceed with the installation by following the
on-screen instructions.
• After all the software programs have been installed, restart the
computer as prompted by the on-screen instruction.
WARNING
• Do not click anything other than the specified buttons or
items.
○
8
○
○
○
○
○
○
○
○
○
○
○
○
○
○
○
○
○
○
○
○
○
○
○
○
○
○
○
○
○
○
Remove the CanoScan Setup Utility CD-ROM from
the drive.
• Handle the CD-ROM with care, placing it into a protective case.
26
○
FB1200S Getting Started
Windows
Macintosh
WARNING
• Please see the Users Registration Card for the serial number
required to install Adobe Photoshop 5.0 LE.
• If the installation is unsuccessful even when all the prescribed
procedures are followed, read the following procedures.
Installation does not seem to be working (Windows)
Solution:
Manually install the software by clicking the [Start] button,
selecting [Run] and typing one of the command lines below
into the box. If your CD-ROM drive is labeled other than [D:],
substitute the appropriate letter, such as [E:] or [F:], in the
lines below.
To install ScanGear CS-S:
To install ScanGear Toolbox CS:
To install Adobe Photoshop 5.0 LE:
To install Caere OmniPage Limited Edition:
To install Adobe Acrobat Reader 3.0:
• NOTE •
[D:\Scangear\English\Disk1\Setup.exe]
[D:\Toolbox\English\Disk1\Setup.exe]
[D:\Photosle\English\Setup.exe]
[D:\Ople\Disk1\Setup.exe]
[D:\Acroread\English\Ar32e301.exe]
• The above instructions are for installing all of the supplied
software programs. However, you can control which programs
are installed by clicking the check box beside the name of a
program and deleting the check mark before clicking the
[Start Installation] button. You may also use the [Install/
Uninstall Software] button to delete the supplied programs
from your computer.
• The CD-ROM can also be used to read the electronic manuals
accompanying the software and display the list of files on the
CD-ROM. For more detail, refer to Chapter 2 in the Product
Guide, How to use the CanoScan Setup Utility CD-ROM.
You are now ready to try out the scanner.
FB1200S Getting Started
27
Windows
Macintosh
Trying Out the Scanner
Windows
The following instructions show you how to test the scanner and experiment with
two software programs. You will use Adobe Photoshop 5.0 LE and ScanGear CS-S.
WARNING
• ScanGear CS-S is a TWAIN driver and cannot be started by
itself. It has to be operated from an application software
such as Adobe Photoshop 5.0 LE. For details, please read
What is a TWAIN Driver? (p. 48).
• If the equipment fails to operate correctly even after following
the procedures below, please read the Troubleshooting section
of the Product Guide electronic manual.
Starting the Application Software.
○
1
○
○
○
○
○
○
○
○
○
○
○
○
○
○
○
○
○
○
○
○
○
○
○
○
○
○
○
○
From [Start] and [Programs], choose [Adobe],
[Photoshop 5.0 Limited Edition] and [Adobe
Photoshop 5.0 Limited Edition].
Adobe Photoshop 5.0 LE will start.
28
○
FB1200S Getting Started
○
○
○
○
Windows
Macintosh
Run the Scanning Software
○
1
○
○
○
○
○
○
○
○
○
○
○
○
○
○
○
○
○
○
○
○
○
○
○
○
○
○
○
○
○
○
○
○
○
Place your document on the document glass as
illustrated.
• For the purposes of calibration, a single, thin sheet of paper is best.
• Open the document cover, orient the image face down and align its
top edge with the alignment mark at the back of the scanner.
• Close the document cover, being careful not to dislodge the
document.
Top Edge
Bottom Edge
○
2
○
○
○
○
○
○
○
○
○
○
○
○
○
○
○
○
○
○
○
○
○
○
○
○
○
○
○
○
○
○
○
○
○
Click the [File] menu and select [Import] and [Select TWAIN_32 Source].
The [Select source] window will display.
FB1200S Getting Started
29
Windows
Macintosh
○
○
○
○
○
○
○
○
○
○
○
○
○
○
○
○
○
○
○
○
○
○
○
○
○
○
○
○
○
○
○
○
Choose [CanoScan FB1200S] from the list and click
the [OK] button.
4
Click the [File] menu and select [Import] and
[TWAIN_32].
○
○
○
○
○
○
○
○
○
○
○
○
○
○
○
○
○
○
○
○
○
○
○
○
○
○
○
○
○
○
○
▼Calibration will commence.
WARNING
• Never lift the document cover during the calibration process.
30
○
3
FB1200S Getting Started
○
○
○
○
Windows
Macintosh
• NOTE •
• Calibration enables the scanner to reproduce colors more
closely aligned to the original tones. It teaches your scanner
the correct white balance from which to calculate the other
colors.
• Calibration will automatically be performed each time a
preview or final scan is initiated.
• When the scanner is used in low ambient temperatures, it may
take a few moments for the unit to settle after the lamp
lights.
When the calibration process completes, the preview scan will initiate,
gradually presenting the image in the preview window.
The image that appears in the window is merely a preview
image. The preview image is generally used to adjust the
scan parameters, such as the area to be scanned, the
magnification and the brightness. The actual scan is
performed at a later stage. For the purpose of the test scan,
however, we will proceed directly to the final scan.
• NOTE •
• A trial scan of a document is called a preview. As a default
setting, a preview scan is normally started as soon as the
ScanGear CS-S window launch completes. This can be turned
off in the Preferences tab. For more information, refer to the
ScanGear CS-S Users Guide.
FB1200S Getting Started
31
Windows
Macintosh
Perform Scanning
○
1
○
○
○
○
○
○
○
○
○
○
○
○
○
○
○
○
○
○
○
○
○
○
○
○
○
○
○
○
○
○
○
○
○
○
○
To initiate the final scan, click the [Scan] button.
• The final scan will be performed.
WARNING
• Never lift the document cover during the scanning process.
• NOTE •
• After clicking the [Scan] button, the calibration process
commences again.
▼The scan will end when the Scanning progress dialog disappears
from the window.
○
2
○
○
Click
○
○
○
○
○
○
○
○
○
○
○
○
○
○
○
○
○
○
○
○
○
○
○
○
○
○
○
○
at the upper right of the window.
• ScanGear CS-S will close.
• The scanned image will display in the Adobe Photoshop 5.0 LE
window.
32
FB1200S Getting Started
○
Windows
Macintosh
• NOTE •
• The size of the image in the window will depend on the
scanning resolution used. For ScanGear CS-S operating details,
please read the ScanGear CS-S User’s Guide electronic manual.
○
3
○
○
○
○
○
○
○
○
○
○
○
○
○
○
○
○
○
○
○
○
○
○
○
○
○
○
○
○
○
○
○
○
○
Retouch or save the image as required.
• ScanGear CS-S does not save the image, it only displays it in the
Adobe Photoshop 5.0 LE window. To save it, use Adobe Photoshop
5.0 LE. Instructions for Adobe Photoshop 5.0 LE are in the
electronic manual on the CD-ROM.
○
4
○
○
○
○
○
Click the
right.
○
○
○
○
○
○
○
○
○
○
○
○
○
○
○
○
○
○
○
○
○
○
○
○
○
○
○
○
close box at the window’s upper
• You will exit Adobe Photoshop 5.0 LE.
How was it?
You have now tested the scanner and experimented with ScanGear
CS-S and Adobe Photoshop 5.0 LE.
You are now finished setting up.
In the next chapter, we introduce you to the software for scanning
and manipulating images.
• NOTE •
• When the start button at the front of the scanner is pushed,
ScanGear Toolbox CS will automatically start. This program
simplifies scanning. For details, please read Scanning with
ScanGear Toolbox CS (p. 49) or the electronic manual,
ScanGear Toolbox CS User’s Guide.
FB1200S Getting Started
33
Windows
Macintosh
Installing the Scanner Software
Macintosh
The following procedures are for installing the software onto the Macintosh
platform. For Windows, see page 22.
○
1
○
○
○
○
○
○
○
○
○
○
○
○
○
○
○
○
○
○
○
○
○
○
○
○
○
○
○
○
○
○
○
○
○
○
○
Confirm that the scanner is correctly attached to
the computer.
• Check that the AC adapter is plugged into the scanner, and the
power cord into the electrical outlet.
○
2
○
○
○
○
○
○
○
○
○
○
○
○
○
○
○
○
○
○
○
○
○
○
○
○
○
○
○
○
○
○
○
Turn the computer power on.
• Turn on the other peripheral devices attached to the computer.
Refer to the manuals accompanying each device for instructions on
the correct order in which to turn on each device.
○
3
○
○
○
○
○
○
○
○
○
○
○
○
○
○
○
○
○
○
○
○
○
○
○
○
○
○
○
○
○
○
○
○
Place the CanoScan Setup Utility CD-ROM in the
computer drive.
• Language select window will display to select your language, then the
following window will automatically display.
Menu Window
• If the menu window fails to display, double-click the [CanoScan
FB1200S] icon, then the [setup] icon.
34
FB1200S Getting Started
○
Windows
Macintosh
○
4
○
○
○
○
○
○
○
○
○
○
○
○
○
○
○
○
○
○
○
○
○
○
○
○
○
○
○
○
○
○
○
○
○
○
○
Click the [Install Software] button.
▼The following window will appear.
• Begin by installing Adobe Photoshop 5.0 LE. Quit all other
applications that are running before starting the installation.
• If Adobe Photoshop 5.0 LE or another plug-in compatible
application program is already installed on your computer, please
proceed to Step 9 because you will not need to install Adobe
Photoshop 5.0 LE.
WARNING
• Please see the Users Registration Card for the serial number
required to install Adobe Photoshop 5.0 LE.
• You will require Plug-in Module CS-S and a plug-in compatible
application program to operate the scanner. If you do not
already have a plug-in compatible application program
available for installation, be sure to install Adobe Photoshop
5.0 LE.
• NOTE •
• Adobe Photoshop 5.0 LE is photo retouching software that
allows you to edit and apply special effects to images.
Since it is a plug-in compatible application program, you
can summon Plug-in Module CS-S from within it to scan
and acquire images.
• See “What is a Plug-in?” (p. 54) for more information on
plug-ins.
○
5
○
○
○
○
○
○
○
○
○
○
○
○
○
○
○
○
○
○
○
○
○
○
○
○
○
○
○
○
○
○
○
Click [Yes].
• Next, follow the on-screen instructions to install Adobe Photoshop
5.0 LE.
FB1200S Getting Started
35
Windows
Macintosh
○
6
○
○
○
○
○
○
○
○
○
○
○
○
○
○
○
○
○
○
○
○
○
○
○
○
○
○
○
○
○
○
○
○
○
○
○
If the Adobe Photoshop 5.0 LE installation is
complete and the following message displays,
click [Restart].
▼The computer will restart.
WARNING
• Restart the computer manually if you accidentally click the
[Quit] button in the message above.
○
7
○
○
○
○
○
○
○
○
○
○
○
○
○
○
○
○
○
○
○
○
○
○
○
○
○
○
○
○
○
○
○
Place the CanoScan Setup Utility CD-ROM back in
the computer drive after the computer restarts.
▼Language select window will display to select your language, then
the following window will automatically display.
• If the menu window fails to display, double-click the [CanoScan
FB1200S] icon, then the [setup] icon.
36
FB1200S Getting Started
Windows
Macintosh
○
8
○
○
○
○
○
○
○
○
○
○
○
○
○
○
○
○
○
○
○
○
○
○
○
○
○
○
○
○
○
○
○
○
○
Click the [Install Software] button again.
▼The following window will display.
• Next, install the application programs other than Adobe Photoshop
5.0 LE.
○
9
○
○
○
○
○
○
○
○
○
○
○
○
○
○
○
○
○
○
○
○
○
○
○
○
○
○
○
○
○
○
○
○
○
This time, click the [No] button.
▼The following window will display.
• To return to the menu window, click the [Return to the previous
menu] button.
• You can display a description of each application program by
positioning the mouse cursor over it.
WARNING
• Although all of the software is being installed in this
example, you may selectively install only the programs you
require. Programs that have the [√] mark removed by
clicking them will not be installed.
FB1200S Getting Started
37
Windows
Macintosh
○
○
○
○
○
○
○
○
○
○
○
○
○
○
○
○
○
○
○
○
○
○
○
○
○
○
○
○
○
○
○
○
○
○
10 Click the [Start Installation] button at the bottom
right of the window.
WARNING
• Do not restart the computer or remove the CD-ROM from
the drive while the installation is proceeding unless so
directed by a CanoScan Setup Utility message. These
actions would disrupt the installation.
• Do not perform any other operations during the
installation.
○
○
○
○
○
○
○
○
○
○
○
○
○
○
○
○
○
○
○
○
○
○
○
○
○
○
○
○
○
○
○
○
○
○
11 Finish the installation by following the on-screen
instructions.
• After all the software programs have been installed, restart the
computer as prompted by the on-screen instruction.
WARNING
• Do not click anything other than the specified buttons or
items.
○
○
○
○
○
○
○
○
○
○
○
○
○
○
○
○
○
○
○
○
○
○
○
○
○
○
○
○
○
○
○
○
○
12 Remove the CanoScan Setup Utility CD-ROM from
the computer drive.
• Handle the CD-ROM with care, placing it into a protective case.
38
FB1200S Getting Started
○
Windows
Macintosh
WARNING
• If the installation is unsuccessful even when all the prescribed
procedures are followed.
Installation does not seem to be working (Macintosh)
Solution:
Please double-click the following icons, then install manually.
To install Plug-in Module CS-S:
CanonPI CS-S Installer
To install CanoScan Toolbox CS:
CanoScan Toolbox CS Installer
To install Adobe Photoshop 5.0 LE:
Adobe Photoshop 5.0 LE\English\Install Photoshop LE
To install Adobe Acrobat Reader 3.0:
Adobe Acrobat Reader\English\Reader 3.01 Installer
You are now ready to try out the scanner.
FB1200S Getting Started
39
Windows
Macintosh
Trying Out the Scanner
Macintosh
The following instructions show you how to test the scanner and experiment with
two software programs, an application program and a plug-in. You will use Adobe
Photoshop 5.0 LE and Plug-in Module CS-S.
WARNING
• Plug-in Module CS-S is a plug-in and cannot be started by
itself. It has to be operated from an application program,
such as Adobe Photoshop 5.0 LE. For details, please read What
is a Plug-In ? (p. 54).
• If the equipment fails to operate correctly even after following the procedures below, please read the Troubleshooting
section of the Product Guide electronic manual .
Starting the Application Program.
○
1
○
○
○
○
○
○
○
○
○
○
○
○
○
○
○
○
○
○
○
○
○
○
○
○
○
○
○
○
Double-click the [Adobe® Photoshop® 5.0 LE]
icon.
• Adobe Photoshop 5.0 LE will start.
40
○
FB1200S Getting Started
○
○
○
○
Windows
Macintosh
Run the Scanning Software.
○
1
○
○
○
○
○
○
○
○
○
○
○
○
○
○
○
○
○
○
○
○
○
○
○
○
○
○
○
○
○
○
○
○
○
Place your document on the document glass as
illustrated.
• For the purposes of calibration, a single, thin sheet of paper is best.
• Open the document cover, orient the image face down and align its
top edge with the alignment mark at the back of the scanner.
• Close the document cover, being careful not to dislodge the
document.
Top Edge
Bottom Edge
○
2
○
○
○
○
○
○
○
○
○
○
○
○
○
○
○
○
○
○
○
○
○
○
○
○
○
○
○
○
○
○
○
○
○
Open the [File] menu and select [Import] and
[Canon PI CS-S 3.6].
▼The Plug-in Module CS-S window will display and calibration will
start.
WARNING
• Never lift the document cover during calibration.
FB1200S Getting Started
41
Windows
Macintosh
• NOTE •
• Calibration enables the scanner to reproduce colors more
closely aligned to the original tones. It teaches your scanner
the correct white balance from which to calculate the other
colors. Calibration is conducted each time a preview or final
scan is initiated.
▼When calibration is complete, the preview scan will initiate,
gradually displaying the image.
The image that appears in the window is merely a preview
image. The preview image is generally used to adjust the
scan parameters, such as the area to be scanned, the
magnification and the brightness. The actual scan is
performed at a later stage. For the purpose of the test scan,
however, we will skip adjustments and proceed directly to
the final scan.
• NOTE •
42
• A trial scan of a document is called a preview. As a default
setting, a preview scan is normally started as soon as the PlugIn Module CS-S window launch completes. This can be turned
off in the Preferences window. For more information, refer to
the Plug-In Module CS-S Users Guide.
FB1200S Getting Started
Windows
Macintosh
Perform Scanning
○
1
○
○
○
○
○
○
○
○
○
○
○
○
○
○
○
○
○
○
○
○
○
○
○
○
○
○
○
○
○
○
○
○
○
To initiate the final scan, click the [Scan] button.
The Plug-in Module CS-S window will disappear and the final scan will
be performed.
WARNING
• Never lift the document cover during the scanning process.
• NOTE •
• After clicking the [Scan] button, the calibration process
commences again.
▼The scan will end when the Scanning progress window disappears.
When the scan is complete, the Plug-in Module CS-S window will
disappear and the scanned image will display in the Adobe
Photoshop 5.0 LE window.
• NOTE •
• The size of the image in the window will depend on the
scanning resolution used.
• For Plug-in Module CS-S operating details, please read the
Plug-in Module CS-S User’s Guide electronic manual.
FB1200S Getting Started
43
Windows
Macintosh
○
2
○
○
○
○
○
○
○
○
○
○
○
○
○
○
○
○
○
○
○
○
○
○
○
○
○
○
○
○
○
○
○
○
○
Retouch or save the image as required.
• Plug-in Module CS-S does not save the image, it only displays it in
the Adobe Photoshop 5.0 LE window. To save it, use Adobe
Photoshop 5.0 LE. Instructions for Adobe Photoshop 5.0 LE are in
the electronic manual on the CD-ROM.
• Quit Adobe Photoshop 5.0 LE after checking the image file.
○
3
○
○
○
○
○
○
○
○
○
○
○
○
○
○
○
○
○
○
○
○
○
○
○
○
○
○
○
○
○
○
○
Choose [Quit] from the [File] menu.
• Adobe Photoshop 5.0 LE will close.
How was it?
You have now tested the scanner and experimented with Plug-in
Module CS-S and Adobe Photoshop 5.0 LE.
You are now finished setting up.
In the next chapter, we introduce you to the software for scanning
and manipulating images.
• NOTE •
44
• When the start button at the front of the scanner is pushed,
CanoScan Toolbox CS automatically starts. This program
simplified scanning. For details, please read Scanning with
CanoScan Toolbox CS (p. 55) or the electronic manual,
CanoScan Toolbox CS User’s Guide.
FB1200S Getting Started
○
○
CHAPTER 2
Guide to the Software
Here, we introduce each program that was
installed in the last chapter.
How to Use the Software ................................................................ 46
Windows Platform
Using ScanGear CS-S ................................................................. 47
Scanning with ScanGear Toolbox CS .......................................... 49
Scanning with Adobe Photoshop 5.0 LE .................................... 50
Scanning with Caere OmniPage Limited Edition ........................ 51
Macintosh Macintosh Platform
Using Plug-in Module CS-S ........................................................ 53
Scanning with CanoScan Toolbox CS ......................................... 55
Scanning with Adobe Photoshop 5.0 LE .................................... 56
Viewing Electronic Manuals with Adobe Acrobat Reader 3.0 .......... 57
System Information ......................................................................... 59
Windows
How to Use the Software
Windows
Macintosh
The following software is included with this scanner.
Windows
•
•
•
•
•
ScanGear CS-S 4.3
ScanGear Toolbox CS 1.1
Adobe Photoshop 5.0 LE
Caere OmniPage Limited Edition 5.1
Adobe Acrobat Reader 3.0
Macintosh
•
•
•
•
Plug-in Module CS-S 3.6
CanoScan Toolbox CS 1.0
Adobe Photoshop 5.0 LE
Adobe Acrobat Reader 3.0
The next pages provide a simple introduction to the purpose,
characteristics and use of each program. Please read them at your
leisure.
WARNING
• If you have not performed the software installation
mentioned in the previous chapter, be sure to install
ScanGear CS-S for Windows or Plug-in Module CS-S for
Macintosh. You cannot operate the scanner without this
software.
• NOTE •
46
• The programs mentioned above should have been installed
onto your computer with the procedures in the previous
chapter. If they are not installed, you will need to install
them. For details, please read Installing the Software (p. 20).
• Adobe Acrobat Reader 3.0 is a program that allows you to
read the electronic manuals. It is not used to operate the
scanner.
FB1200S Getting Started
Windows
Macintosh
Using ScanGear CS-S
ScanGear CS-S is a program that loads images. You can also use it to adjust the
image as it is scanned. It is used as a TWAIN driver. For more detail, please read
What is a TWAIN Driver? (p. 48).
Click here to display
the [Help] screen
Click here to
start the final
scan
Click here to
start the
preview
scan
Click here to adjust the
brightness and tone
You can adjust
the scanning
mode, resolution
or image size
Convenient Applications of ScanGear CS-S
• Scanning photographs or illustrations into your word processing
document.
• Scanning photographs or illustrations into your homepage.
• ScanGear CS-S performs the basic function of capturing images and
documents.
FB1200S Getting Started
47
Windows
Macintosh
How to Use ScanGear CS-S
• Starting ScanGear CS-S
Select [TWAIN_32] as a TWAIN driver from a program (p. 29).
• How to View the Electronic Manual
Place the CD-ROM in the CD-ROM drive, click [View the Electronic
Manuals] and select [ScanGear CS-S].
The procedures to read the electronic manuals are explained in the
section entitled Viewing Electronic Manuals with Adobe Acrobat
Reader 3.0 (p. 57).
What is a TWAIN Driver?
• TWAIN is the acronym for a set of worldwide standards for software that
processes data exchanged between graphics programs and input devices,
such as scanners. A device driver based on these standards is called a
TWAIN driver.
• ScanGear CS-S is not a stand-alone program that can be started by itself.
It is used as a TWAIN driver. In this case, start another program first,
then select [TWAIN_32] from within the program. The images scanned
at this time will be directly loaded into that program (the program must
comply with the TWAIN_32 standard).
Start the TWAIN driver from the
program
The TWAIN driver operates in the
program’s window
• The method for starting TWAIN drivers varies between programs.
48
FB1200S Getting Started
Scanning with ScanGear Toolbox CS
Windows
Macintosh
ScanGear Toolbox CS is a software which makes scanning easier. You can easily
scan just by clicking the buttons in ScanGear Toolbox CS. The scanned images will
be loaded automatically into the selected application program. You can also copy
images.
(1) For example, click
the [Copy] button
(2) the document is
automatically scanned
(3) Print directly with
the printer
Convenient at Times Like These
• When you want to fax or E-mail the scanned images.
• When you want to copy using the scanner and printer.
• When you want to edit the scanned images in the selected
application program.
How to Use ScanGear Toolbox CS
• Starting ScanGear Toolbox CS
Push the button at the front of the scanner.
Start Button
• How to View the Electronic Manual
Place the CD-ROM in the CD-ROM drive, click [View the Electronic
Manuals] and select [ScanGear CS-S] and [Using ScanGear Toolbox
CS].
• NOTE •
• The [Fax], [e-mail] and [Copy] buttons are preset, but other
buttons can be added as needed.
FB1200S Getting Started
49
Scanning with
Adobe Photoshop 5.0 LE
Windows
Macintosh
Adobe Photoshop 5.0 LE can retouch and manipulate images.
Scan the pictures...
Convenient Applications of Adobe Photoshop 5.0 LE
•
•
•
•
Correcting images, such as those that are too dark or bright.
Adding special effects, such as the mosaic or wave effect, to images.
Creating reports, presentation materials or websites with images.
Effortlessly creating original postcards, invitations, business cards,
labels or CD covers with images.
How to Use Adobe Photoshop 5.0 LE
• Refer to Trying Out the Scanner (p. 28).
• How to View the Electronic Manual
Place the CD-ROM in the drive and click [View the Electronic
Manuals] and [Adobe Photoshop 5.0 Limited Edition] .
• For instructions to read the electronic manual, please read Viewing Electronic
Manuals with Adobe Acrobat Reader 3.0 (p. 57).
50
FB1200S Getting Started
Windows
Macintosh
Scanning with
Caere OmniPage Limited Edition
Caere OmniPage Limited Edition is an optical character recognition (OCR) program
that converts scanned words into text data that can be edited with word processors.
Convert the
graphics file data
into text data
Scan a text document
Convenient Applications of Caere OmniPage
Limited Edition
• Converting words scanned from a book, magazine, newspaper or fax
into text data for editing or digital transmission. After conversion,
the text can be edited with word processors and similar programs.
How to Use Caere OmniPage Limited Edition
• Starting Procedure
Click the [Start] button on the Windows taskbar and select
[Programs], [Caere Applications] and [Caere OmniPage Limited
Edition] in succession.
• Scanning
Click the [File] menu and select [Acquire Image]. Then click the
[Scan] button.
Select [Acquire
Image] from the
[File ] menu
Click the [Scan] button
Scanning will commence in the
Caere OmniPage Limited Edition
window
FB1200S Getting Started
51
Windows
Macintosh
• How to View the Electronic Manual
Place the CD-ROM in the CD-ROM drive, click [View the Electronic
Manuals] and click [Caere OmniPage Limited Edition 5.1] button.
For details, please read View the Electronic Manual with Adobe
Acrobat Reader 3.0 (p. 57).
• NOTE •
52
• When you install Caere OmniPage Limited Edition, the [Select
Source] dialog will display. Choose the CanoScan FB1200S
option. This instructs Caere OmniPage Limited Edition to
select the correct scanner for scanning.
• After scanning completes, click the [File] menu and select
[OCR] to convert the image data to text.
• You can also load the text data directly into word processing
or spreadsheet programs. For details, Please read the
electronic manual Caere OmniPage Limited Edition.
FB1200S Getting Started
Windows
Macintosh
Using Plug-in Module CS-S
Plug-in Module CS-S is a software which acquires the image. The image file to
satisfy you can be created with the numerous adjustment functions. It is used as a
plug-in software (More about plug-in software later).
Click here to display
numerous menus.
You can set
the scan
mode, scan
resolution,
image size.
Click here to adjust
the brightness.
Final Scan will
happen
Preview will
happen
Convenient Applications of Plug-in Module CS-S
• Scanning photographs or illustrations into word processor documents.
• Scanning photographs or illustrations into your homepage.
• Plug-in Module CS-S is a software which does the most basic function
of the scanner, [Upload the Document].
FB1200S Getting Started
53
Windows
Macintosh
How to Use Plug-in Module CS-S
• Starting Plag-In Module CS-S
Select [Canon PI CS-S 3.6] as a plug-in from the application
program (P. 41).
• How to View the Electronic Manual
Place the CD-ROM in the CD-ROM drive, click [View the Electronic
Manuals] and click [Plug-in Module CS-S (English version)] button. For
details, please read View the Electronic Manual with Adobe Acrobat
Reader 3.0 (P. 57).
What is a Plug-in?
• Plug-in is software that processes data exchanged between graphics
application programs which are plug-in compatible and input devices,
such as scanners.
• Plug-in Module CS-S is not a stand-alone application program that can
be started by itself. It is used as a Plug-in program. In this case, start
another application program first, then select [Canon PI CS-S 3.6] from
within the program. The images scanned at this time will be directly
loaded into that application program.
Start the plug-in program from
the application software
The plug-in software operates in
the application program window
• The method for starting Plug-ins varies between application programs.
For individual application programs, please read the other application
program’s respective manuals.
54
FB1200S Getting Started
Scanning with
CanoScan Toolbox CS
Windows
Macintosh
CanoScan Toolbox CS is a software which makes scanning easier. You can easily
scan just by clicking the buttons in [CanoScan Toolbox CS]. The scanned images
will be loaded automatically into the selected application program. You can also
copy images.
(1) For example, click the
[Copy] button
(2) the document is
automatically scanned
(3) Print directly
with the printer
Convenient at Times Like These
• When you want to fax the scanned images.
• When you want to copy using the scanner and printer.
• When you want to edit the scanned images in the selected application program.
How to Use CanoScan Toolbox CS
• Starting CanoScan Toolbox CS
Push the button at the front of the scanner.
Start Button
• How to View the Electronic Manual
Place the CD-ROM in the CD-ROM drive, click [View the Electronic
Manuals] and select [CanoScan Toolbox CS] (English version).
• The procedures to read the electronic manuals will be explained in
the latter pages. For details, please read Viewing Electronic
Manuals with Adobe Acrobat Reader 3.0 (P. 57).
• NOTE •
• The [Scan], [Fax], [Copy] and [Edit] buttons are preset, but
other buttons can be added as needed.
FB1200S Getting Started
55
Scanning with
Adobe Photoshop 5.0 LE
Windows
Macintosh
Adobe Photoshop 5.0 LE can retouch and manipulate images.
Scan the pictures...
Convenient Applications of Adobe Photoshop 5.0 LE
•
•
•
•
Correcting images, such as those that are too dark or bright.
Adding special effects, such as the mosaic or wave effect, to images.
Creating reports, presentation materials or websites with images.
Effortlessly creating original postcards, invitations, business cards,
labels or CD covers with images.
How to Use Adobe Photoshop 5.0 LE
• Refer to Trying Out the Scanner (p. 40).
• How to View the Electronic Manual
Place the CD-ROM in the drive and click [View the Electronic
Manuals] and [Adobe Photoshop 5.0 LE] .
• For instructions to read the electronic manual, please read Viewing Electronic
Manuals with Adobe Acrobat Reader 3.0 (p. 57).
56
FB1200S Getting Started
Windows
Macintosh
Viewing Electronic Manuals
with Adobe Acrobat Reader 3.0
The operation procedures for Product Guide, ScanGear CS-S, Plug-in Module CS-S,
CanoScan Toolbox CS, Adobe Photoshop 5.0 LE and Caere OmniPage Limited
Edition electronic manuals are contained on the CanoScan Setup Utility CD-ROM.
An electronic manual is not a printed manual but a manual intended to be read on
the computer screen.
Adobe Acrobat Reader 3.0 is a program used to read the electronic manuals.
The diagram below explains the minimum necessary functions required to view an
electronic manual. This example shows Windows screens which are similer to
Macintosh versions.
○
1
○
○
○
○
○
○
○
○
○
○
○
○
○
○
○
○
○
○
○
○
○
○
○
○
○
○
○
○
○
○
○
○
○
Set the CanoScan Setup Utility CD-ROM into the
computer drive.
▼Language select window will display to select your language, then
the following window will automatically display.
○
2
○
○
○
○
○
○
○
○
○
○
○
○
○
○
○
○
○
○
○
○
○
○
○
○
○
○
○
○
○
○
○
○
○
Click [View the Electronic Manuals].
▼The following window will display.
• NOTE •
• Consult the Reader Online Guide in the Adobe Acrobat Reader
Help menu for further instructions on how to use the program.
FB1200S Getting Started
57
Windows
Macintosh
○
3
○
○
○
○
○
○
○
○
○
○
○
○
○
○
○
○
○
○
○
○
○
○
○
○
○
○
○
○
○
○
○
○
○
Select the manual you wish to view.
• Adobe Acrobat Reader will automatically start and display the
manual. Navigate through the manual using the program’s menus
and buttons.
The diagram below explains the minimum necessary functions
required to view an electronic manual.
Click this button first then Click this button Click this button
click on the page to zoom to return to the to advance to
it. Hold the [Ctrl] key and previous page
the next page
click on the page to zoom
out (Hold the [Option]
Key for Macintosh)
Exit Adobe Acrobat
Reader with this close
box (For Windows)
Jump to a specific
page by clicking its
icon here (This area
may not be available
in some manuals)
Main Page
• NOTE •
• With minor exceptions, these procedures are similar for both the
Windows and Macintosh platforms. To close Adobe Acrobat
Reader 3.0 on a Macintosh, open the [File] menu and select [Quit].
○
4
○
○
○
○
○
○
○
○
○
○
○
○
○
○
○
○
○
○
○
○
○
○
○
○
○
○
○
○
○
○
○
If you have finished viewing all manuals, click the
on the Adobe Acrobat Reader title bar, then
click the [Return to the previous menu] button.
• The menu window will display.
WARNING
• Please delete installed versions of Adobe Acrobat Reader
other than Version 3.0 or it may not be possible to read the
electronic manuals.
58
○
FB1200S Getting Started
○
System Information
This form is used to record the operating environment of the purchased scanner.
If any problems occur with the scanner, you will need this information when you
contact our Customer Support Help Desk. Please make sure to record this and
secure it safely.
• When repair is needed, warranty information is required. Please make
sure to record information and secure carefully.
• The replacement parts for servicing this equipment have an expiration
date of seven years after production. (Replacement parts mean any part
that is required for optimum operation of equipment.)
Date of Purchase:
Name of Dealer:
Tel:
Address of Dealer:
Scanner Model Name:
CanoScan FB1200S
Mainbody equipment type number (displayed on the back of the equipment):
• About the Computer Used
Name of Manufacturer: Name of Equipment:
Name of CPU:
Clock Speed:
Memory Capacity (RAM):
MB
Hard Disk Capacity:
MB
MHz
Space Available:
OS Name: ❏ Windows 95 ❏ Windows 98 ❏ Windows NT 4.0 ❏ Mac OS
Monitor Type:
Monitor Size:
Name of Printer:
Manufacturer:
Type of Printer:
Printer Resolution:
MB
OS Version:
Inches
dpi
Installed Virus Protection Program:
Installed Compression Program:
On Board Expansion Cards:
Attached Peripherals:
Name of Network Connected:
• If Using Computers Other Than Macintosh
SCSI Board Used (Name of Manufacturer and Type):
ASPI Manager Used:
Version:
FB1200S Getting Started
59
Use of shielded cable is necessary to comply with the technical requirements of the EMC Directive.
Caution:
1. No part of this document may be reproduced or transmitted in any form or by any
means, electronic or mechanical, for any purpose, without the express written
permission of Canon Inc.
2. The equipment and software described in this guide are subject to change without
notice.
3. Notwithstanding the considerable care taken in preparing this guide, please note that
Canon Inc. does not accept liability for any results arising from the operation of the
equipment or software mentioned herein.
4. Please note that scanning copyrighted materials, including documents and images,
without permission from the copyright holder is prohibited by law, except for personal
or household use.
5. Portions of this guide are reproduced herein with the permission of Adobe Systems
Incorporated.
• CanoScan is trademark of Canon Inc.
• Adobe, Adobe Acrobat and Adobe Photoshop are trademarks of Adobe Systems Incorporated.
• IBM and IBM PC/AT Series are registered trademarks of International Business Machines
Corporation.
• Macintosh and Power Macintosh are trademarks of Apple Computer Inc.
• Microsoft, Windows and Windows NT are registered trademarks of Microsoft Corporation in
the U.S. and other countries.
• OmniPage is a trademark of Caere Corp.
• Other names and products not mentioned above may be trademarks or registered trademarks
of their respective companies.
Copyright © 1999 Canon Inc. All rights reserved.
60
FB1200S Getting Started
CANON (UK) LTD.
Woodhatch, Reigate
Surrey RH2 8BF, United Kingdom
For technical support, please contact Canon
Helpdesk.
Helpdesk:
P.O. Box 431, Wallington, Surrey SM6 0XU
TEL: (08705) 143 723
FAX: (08705) 143 340
For sales enquiries: (0121) 666-6262
CANON FRANCE S.A.
17, quai du Président Paul-Doumer
92414 Courbevoie Cedex, France
Tél.01 4199 7777 Fax.01 4199 7951
Hotline: Tél.01 4199 7070
CANON DEUTSCHLAND GmbH
Postfach 528, 47705 Krefeld, Germany
CANON- Hotline-Service
Customer Support: (0 21 51)349-555
Info-Desk: (0 21 51)349-566
Mailbox: (0 21 51)349-577
Telefax: (0 21 51)349-588
CANON ITALIA S.p.A
Palazzo L, Strada 6,
20089 Milanofiori-Rozzano (MI), Italy
TEL: 02/8248. 1 FAX: 02/8248. 4604
Pronto Canon 02/8249. 2000
http://www.canon.it
CANON OY AB
Kornetintie, 3, 00380 Helsinki, Finland
Puhelin: 010 544 20
Help Desk: 0600-0-22606
(maksu 14,80 mk/min)
Fax: 010 544 4571
CANON SVENSKA AB
Stensätravägen 13, S-127 88 Skärholmen,
Sweden
CANON DANMARK
Vasekær 12, DK-2730 Herlev, Denmark
Hotline: 44 88 26 66
http://www.canon.dk
CANON NORGE AS
Hallagerbakken 110, Boks 33, Holmlia, 1210
Oslo 12, Norway
Tlf: 2262 9321 FAX. 2262 0615
CANON BENELUX NEDERLAND N.V.
Neptunusstraat 1, 2132 JA Hoofddorp
The Netherlands
Tel: 023-5 670 123 Fax: 023-5 670 124
Helpdesk: 023-5 681 681
I-IE-025BA
CANON BENELUX BELGIUM N.V./S.A.
Bessenveldstraat 7, 1831 Diegem, Belgium
Tel: 02 7220411 Fax: 02 7213274
Helpdesk: 02 7220404
CANON GmbH
Zetschegasse 11, 1232 Wien, Austria
CANON (SCHWEIZ) A.G.
Industriestrasse 12, CH-8305 Dietlikon
Switzerland
Tel: (01)835 61 61 Fax: (01)835 68 60
Hotline: 157 30 20
CANON ESPAÑA S.A.
C/Joaquin Costa No 41, 28002
Madrid, Spain
Help Desk: 906.301255
Tel.: 91-5384500 Fax.: 91-4117780
CANON AUSTRALIA PTY. LTD.
1 Thomas Holt Drive, North Ryde, Sydney N.S.W.
2113, Australia
Info-Line: (02)9805 2864
CANON NEW ZEALAND LTD.
Fred Thomas Drive, Takapuna
P.O. Box 33-336 Auckland, New Zealand
Info-Line: 0900-522666
CANON HONGKONG CO., LTD.
9/F, The Hong Kong Club Building,
3A Chater Road, Central, Hong Kong
TEL: (852) 2739 0802
FAX: (852) 2739 6428
CANON SINGAPORE PTE. LTD.
79 Anson Road #09-01/06
Singapore 079906
CANON CANADA INC.
6390 Dixie Road
Mississauga, Ontario, L5T 1P7
1-800 OK CANON (652-2666)
http://www.canon.ca
CANON LATIN AMERICA, INC.
6505 Blue Lagoon Drive Suite 325
Miami, Florida 33126, U.S.A.
CANON EUROPA N.V.
P.O. Box 2262 1180 EG Amstelveen,
The Netherlands
CANON INC.
30-2 Shimomaruko 3-chome, Ohta-ku
Tokyo 146-8501, Japan
Please refer to the electronic manual for more
information.
©CANON INC. 1999
PRINTED IN JAPAN