1
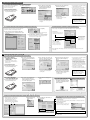
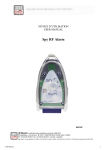
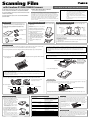
Scanning Film
with CanoScan D1230U/D2400U Scanners
User’s Guide for Film Adapter Unit FAU-S12/FAU-S13
The film adapter unit makes it possible to scan positive and negative
35 mm, 120 and 4"x5" format films on CanoScan D1230U/D2400U.
“Remove Dust and Scratches” Function
The CanoScan D2400U scanner features “Remove Dust and Scratches”
function for film scanning.
The “Remove Dust and Scratches” function works by scanning films with a
white light from a cold-cathode fluorescent lamp first, then scanning with
infrared light. Since the clean portions of the film are translucent to infrared rays,
the dirt and scratches are easily detected and the driver software can retouch the
affected portions of the film. Please note that scanning with this function takes
longer because it requires an extra pass. We do not recommend using this
function with KODACHROME* films. It does not work with black and white films
(positive or negative).
For scanner instructions, please see the CanoScan D1230U/D2400U
Quick Start Guide.
Warnings
(CanoScan D2400U equipped with FAU-S13)
• Film Adapter Unit FAU-S12 is for exclusive use with
CanoScan D1230U scanners. Film Adapter Unit FAU-S13
is for exclusive use with CanoScan D2400U scanners.
Neither unit can be used with other scanners.
• The film adapter unit contains a lamp unit and other
delicate components. Be extremely careful not to drop or
bang it.
• Do not place any items on top of the film adapter unit or
press down on it.
* KODACHROME is a registered trademark of Eastman Kodak Company.
List of Items
Installation onto the Scanner
Removing the Protective Sheet
• These items are contained in the scanner package if you
purchased a model with a preinstalled film adapter unit.
The following items are included in the film adapter unit
package. Please contact your retailer if any items are missing
or damaged.
• Start from Step 5 if you purchased a model with a preinstalled film
adapter unit.
Install the film adapter unit onto the scanner as
shown below.
The film adapter unit is equipped with a protective sheet for the light source.
Remove this sheet before scanning films.
A Slide the
sheet up and
out to free it
from the
tabs at the
top.
1. Shut down and turn off the computer.
2. Unplug the AC adapter from the scanner.
3. Lift the scanner’s document cover
straight up and off.
4. Insert the two hinge pins on the film
adapter unit into the two holes in the
scanner body from straight above.
5. Attach the film adapter unit’s cable to
the connector on the scanner’s rear
panel.
6. Connect the AC adapter to the
scanner.
35 mm/120 Format
Film Guide
4" x 5" Film Guide
Film Adapter Unit
A protective sheet covers the light
source
Shields
35 mm, 120 Format
User’s Guide
(this guide)
B Do the
same
for the
bottom.
Replace the protective sheet over the light source when not scanning films. Non-film
items can be scanned with the protective sheet in place. Avoid pressing down heavily
on the film adapter unit to scan thick books or three-dimensional objects. Pressing on it
may damage the light source.
Installation Procedure
1. Align the sheet’s bottom holes over the tabs on the film adapter unit and slide
the sheet down.
2. Align the top holes and slide the sheet down into place.
○
○
• The film has a calibration slot used to calculate the color balance by the scanner. The film cannot be scanned
with the correct color balance if this slot is obstructed. Keep this slot clear.
• Scanning with dust or dirt stuck on the document glass or light source through this slot will result in poor
image quality. Please remove all dirt according to the instructions in the Care and Maintenance section of
this guide.
5. Open the film adapter unit and place the loaded film guide in the correct position on the document glass.
○
○
• Images will not scan correctly, or error messages will display, if the film guide is positioned incorrectly. Take
care to position it correctly.
○
○
○
6 mark
2. Place the film face down into the groove in the film guide. Align the first frame’s right side with the
on the film guide.
○
○
○
○
○
○
○
○
○
○
1. Insert a fingernail into the slot in the film guide and lift up while pinching the edge of the flap inward.
○
○
○
Load a film into the film guide as shown below and place the loaded guide onto the scanner’s document glass
(platen). The procedures are the same for both 35mm/120 format and 4”x5” film guides.
○
Positioning Film
○
Align the film guide’s
mark with the scanner’s
mark and ensure that the
top edge rests right
against the top edge of
the document glass.
6. Close the film adapter unit.
○
○
○
○
○
○
○
Positioning Slides
Load 35 mm slides into the 120 format film side of the film guide. Position the slide right against the right upper
edge so there are no gaps and cover the remaining area to the left with the shield.
○
○
○
○
Press inward while pressing down
to slip the tab into its slot.
○
○
○
○
3. Close the flap by aligning its tab with the slot in the bottom piece and pressing down and inward.
○
○
○
○
• Hold the film by the edges with your fingertips to avoid getting fingerprints or dirt on the film surface.
• Any dust on the film, scanner document glass or film adapter unit light source will show in the scanned images.
Remove dust with a blower brush.
• With CanoScan D2400U and FAU-S13, the small dust or scratches on the film can be removed. Please see the
instructions on the back of this sheet.
○
○
○
○
○
○
○
○
○
○
○
○
○
○
○
○
○
Calibration Slot
35 mm Slide
○
○
Shield
Shield
120 Format Film
Cover this area with black paper
if the halation effect is severe.
○
35 mm Film
○
Calibration Slot
○
○
○
4. Use the supplied shields if there are any gaps (empty frames) in the film groove.
Load 120 format slides into the 4"x 5" film guide. Position the slide right against the right upper edge so there
are no gaps and cover the remaining area to the left with the shield.
○
○
○
○
○
○
○
○
Shield
Care and Maintenance
FAU-S12/FAU-S13 Specifications
Dampen a soft, clean cloth and wring it well before wiping dust and
dirt off the exterior (upper surface).
• Never apply a sopping wet cloth or spray
water or soap directly onto the film
adapter unit. The liquid could penetrate
the interior and either diminish image
quality or damage the unit.
• Never use alcohol, solvents or benzene.
These substances may deform, discolor
or melt the casing.
Use a blower brush to blow dust off
the document glass or light source, or
wipe them lightly with a soft, dry cloth.
• Never wipe forcefully. It will scratch the
surfaces.
• Never use alcohol, solvents or benzene.
These substances may deform, discolor or
melt the document glass or light source.
Supported Film:
35 mm film strips (scanning max. 3 frames),
35 mm slides, 120 format film (max. 12 x 6
cm), 4" x 5" film (supports both positives
and negatives) • 6-frame 35 mm film
strips fit into the film guide
Scanning Speed
FAU-S12:
3.6-101.2 msec/line
(automatically selected to suit film type)
FAU-S13:
4.5-162.0 msec/line
(automatically selected to suit film type)
Remove Dust and Scratches Function: Supported by the FAU-S13
Film Scan Button:
Button on film adapter unit top starts
ScanGear Toolbox or CanoScan Toolbox
Operating Environment:
Temperature: 10-35 ºC (50-95 ºF)
Humidity: 20%-80% RH (without
condensation)
Light Source:
Cold-cathode fluorescent lamp
Power Supply:
Supplied by scanner
Dimensions (w x l x h):
285 x 410 x 31 mm (11.2 x 16.1 x 1.2 in.)
Weight:
Approx. 1.1 kg (2.4 lbs.)
Other specifications correspond to those for the scanner.
I-IE-047AA
©CANON INC. 2001
PRINTED IN TAIWAN
Halation
If film is loaded into a film guide with gaps around it, the bordering
areas on the scanned image may be discolored. This phenomenon is
called halation and is particularly noticeable with negative film. To avoid
it, position the film in the guide with no gaps between the film and
guide. If the film strip is shorter than the guide, use the supplied shield
to fill the gap.
Place the shield in the 120
format film groove when
you scan 35 mm film strips
and vice versa.
35 mm Film
Shield
Newton Rings
Portions of films with curled edges and large format films, such as 4"x5"
film, may adhere to the document glass and produce ring patterns (termed
Newton rings) on the scanned image. If Newton rings appear, load the film
upside down in the guide and reverse the scanned image later with the
driver software or an application program.
Film Scanning Procedures (Windows)
1. Procedures with the Film Scan Button (ScanGear Toolbox)
Only 35 mm film can be scanned with
this method. The fax and email
functions cannot be used.
2. Click the [Copy] button.
3. Select a Film type, Image quality,
Scan frame type, and a frame for
scanning (35 mm film strips) and
click the [OK] button.
4. Select the Paper size and Print size
and click the [OK] button.
Copying (Printing) Example
1. Press the Film Scan Button on the
top of the film adapter unit.
5. Set the number of copies and click
the [OK] button.
• The printer will print out the
scanned images.
• Frame Button No. 1 corresponds to
the frame at the extreme right of the
film guide.
• The scanned size of an image is slightly
smaller than its frame size.
• Up to three frames of 35 mm film can
be scanned consecutively. Set the
number of frames to be scanned with
the Frame Selection buttons. Please
note that with certain films the gaps
between frames may be included with
the images in consecutive scans. If this
happens, scan frames singly.
• In the Print size category, you can
select between the L, LL, postcard, etc.
• For more detailed instructions,
please refer to the ScanGear
Toolbox User’s Guide (electronic
manual) on the CD-ROM.
2. Procedures without the Film Scan Button (ScanGear Toolbox Not Used)
Convenient Features of the Driver Software (ScanGear CS-U)
All three film types, 35 mm film, 120 format and 4"x5"
format films, can be scanned using this method.
These settings can be adjusted in the Advanced Mode’s [D1230U] or [D2400U] tab.
1. Start ScanGear CS-U from within an application
program according to the instructions in the Quick
Start Guide.
2. In the [Image Source] category, select [Film].
• In Advanced Mode, you can set the film settings by
clicking the [D1230U] or [D2400U] tab.
Auto Exposure
Automatically adjusts the exposure
compensation to an optimal value.
3. Select the film type and film size of the loaded film.
• The Film Type and Film Size categories appear when
the film option is selected in Step 2.
Save Exposure Data
Saves the exposure data
for a particular frame,
making it available for
scanning subsequent
frames.
Remove Dust and Scratches
(CanoScan D2400U)
Removes small dirt spots or
scratches. Scan between 252400 dpi scanning resolution.
After adjusting the film settings, initiate the scan according to the instructions in the Quick
Start Guide.
This illustration shows the Simple Mode.
Film Scanning Procedures (Macintosh)
1. Procedures with the Film Scan Button (CanoScan Toolbox)
(1) Procedures without
2. The Canon Scanner Assistant will
appear. Select [Copy] and click the
Displaying Canon Plug-in
[Next] button.
Module CS-U
3. Select a Film Type, Scan Frames, and
a frame for scanning (for 35 mm film
strips), and click the [Next] button.
4. Select the Paper Size, Print Size and
Print Layout, and click the [Next]
button.
• Only 35 mm film can be scanned
using this method. The fax function
cannot be used.
Copying (Printing) Example
1. Press the Film Scan Button on the
top of the film adapter unit.
• Frame Button No. 1 corresponds to
the frame at the extreme right of
the film guide.
(2) Procedures Displaying
Canon Plug-in Module CS-U
1. Press the Film Scan Button on the
top of the film adapter unit.
2. The Canon Scanner Assistant will
appear. Select [Show CanoScan
Toolbox Toolbar before scanning],
and click the [Next] button.
3. In the toolbar that displays, click
[Scan].
5. Set the number of copies and other
settings, and click the [Print] button.
• The printer will print out the
scanned images.
• The scanned size of an image is slightly
smaller than its frame size.
• Up to three frames of 35 mm film can
be scanned consecutively. Set the
number of frames to be scanned with
the Frame Selection buttons. Please
note that with certain films the gaps
between frames may be included with
the images in consecutive scans. If this
happens, scan frames singly.
• In the Print Size category, you can
select between the L, LL, postcard, etc.
• For more detailed instructions,
please refer to the CanoScan
Toolbox User’s Guide (electronic
manual) on the CD-ROM.
2. Procedures without the Film Scan Button (CanoScan Toolbox Not Used)
1. Start Canon Plug-in Module CS-U
from within an application program
according to the instructions in the
Quick Start Guide.
Canon Plug-in Module CS-U will
start.
Settings for Scanning Film with the Driver Software (Canon Plug-in Module CS-U)
• All three film types, 35 mm film, 120
format and 4"x5" format films, can
be scanned using this method.
• Display the Film menu by clicking the
[Preferences] menu and selecting [Film].
1.
2.
1. Click the [Preferences]
menu and select
[Film].
2. Select the Film Type and Film Size of
the loaded film.
Convenient Features of the Driver Software (Canon Plug-in Module CS-U)
Auto Exposure
Automatically adjusts the exposure compensation to an optimal value.
Save Exposure Data
Saves the exposure data for a particular frame, making it available for scanning subsequent frames.
Remove Dust and Scratches
(CanoScan D2400U)
Removes small dirt spots or scratches. Scan
between 25-2400 dpi scanning resolution.
• For more detailed instructions, please refer to the Canon Plug-in Module CS-U
User’s Guide (electronic manual) on the CD-ROM.
After adjusting the film settings, initiate the scan according to the instructions in the
Quick Start Guide.