1
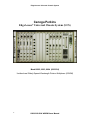
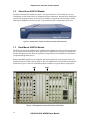
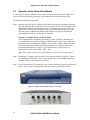
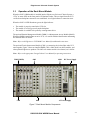
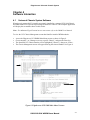
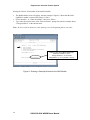
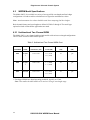
EdgeAccess
Universal Chassis System
®
Model 6002, 6003, 6004
Unidirectional Widely Spaced
Wavelength Division
Multiplexer (WWDM)
Users Manual
®
EdgeAccess Universal Chassis System
Caution!
This product is a passive device that may route light emitted by a laser diode operating at a
wavelength of 1300nm - 1600nm. Use of optical instruments (for example: collimating optics)
with this product may increase eye hazard. Use of controls or adjustments or performing
procedures other than those specified herein may result in hazardous radiation exposure.
ATTENTION!
Cet équipement peut avoir une diode laser émettant à des longueurs d’onde allant de 1300nm à
1600nm. L’utilisation d’instruments optiques (par exemple : un collimateur optique) avec cet
équipement peut s’avèrer dangereuse pour les yeux. Procéder à des contrôles, des ajustements ou
toute procédure autre que celles décrites ci-après peut provoquer une exposition dangereuse à des
radiations.
Warning!
This device contains static sensitive components. It should be handled only with proper
Electrostatic Discharge (ESD) grounding procedures.
NOTE!
Cet équipement contient des composants sensibles aux décharges électro-statiques. Il doit
absolument être manipulé en respectant les règles de mise à la terre afin de prévenir de telles
décharges.
ii
6002/6003/6004 WWDM Users Manual
®
EdgeAccess Universal Chassis System
NOTICE
Canoga Perkins has prepared this user manual for use by customers and Canoga Perkins
personnel as a guide for the proper installation, operation and/or maintenance of Canoga Perkins
equipment. The drawings, specifications and information contained in this document are the
property of Canoga Perkins and any unauthorized use or disclosure of such drawings,
specifications and information is prohibited.
Canoga Perkins reserves the right to change or update the contents of this manual and to change
the specifications of its products at any time without prior notification. Every effort has been
made to keep the information in this document current and accurate as of the date of publication
or revision. However, no guarantee is given or implied that the document is error free or that it is
accurate with regard to any specification.
CANOGA PERKINS CORPORATION
An Inductotherm Company
20600 Prairie Street
Chatsworth, California 91311-6008
Business Phone: (818) 718-6300
(Monday through Friday 7 a.m. – 5 p.m. Pacific Time)
FAX: (818) 718-6312 (24 hrs.)
Web Site: www.canoga.com
Email: [email protected]
Copyright © 2000 Canoga Perkins Corporation
All Rights Reserved
EdgeAccess®
Universal Chassis System
Models 6002, 6003, 6004
Unidirectional Widely spaced
Wavelength Division Multiplexer (WWDM)
Users Manual
Model Number 6002/3/4 - UM Part Number 6912370
Rev A 04/2000
6002/6003/6004 WWDM Users Manual
iii
®
EdgeAccess Universal Chassis System
®
Canoga Perkins
EdgeAccess Universal Chassis System (UCS)
Model 6002, 6003, 6004 (6002/3/4)
Unidirectional Widely Spaced Wavelength Division Multiplexer (WWDM)
iv
6002/6003/6004 WWDM Users Manual
®
EdgeAccess Universal Chassis System
Table of Contents
Chapter 1 General Overview ......................................................................... 1-1
1.1
Overview.............................................................................................. 1-1
1.2
Stand Alone 6002/3/4 Models.............................................................. 1-2
1.3
Rack Mount 6002/3/4 Models .............................................................. 1-2
Chapter 2 Set-up and Installation ................................................................. 2-1
2.1
Unpacking and Installing the Stand Alone Models............................... 2-1
2.2
Unpacking and Installing the Rack Mount Models ............................... 2-1
2.3
Installing Modules into a UCS Chassis ................................................ 2-1
2.4
Cabling................................................................................................. 2-2
2.4.1
Fiber Optic Cabling .............................................................................. 2-2
2.4.2
Cleaning Fiber Optic Connectors......................................................... 2-2
2.4.3
Connecting Fiber Optic Cables ............................................................ 2-2
2.4.4
Checking Optical Power Levels ........................................................... 2-3
2.4.5
Measuring Remote Transmitter Output Power..................................... 2-3
2.4.6
Measuring Receiver Input Power......................................................... 2-4
Chapter 3 User Operation.............................................................................. 3-1
3.1
WWDM Application.............................................................................. 3-1
3.2
Operation of the Stand Alone Models .................................................. 3-2
3.3
Operation of the Rack Mount Models .................................................. 3-3
Chapter 4 Software Interaction ..................................................................... 4-1
4.1
Universal Chassis System Software .................................................... 4-1
4.2
Naming the WDM module in a Chassis Configuration ......................... 4-3
Chapter 5 Troubleshooting and Maintenance ............................................. 5-1
5.1
Troubleshooting Fiber Optic Cables .................................................... 5-1
5.2
Troubleshooting Guide ........................................................................ 5-1
5.3
Maintenance ........................................................................................ 5-2
Chapter 6 Specifications ............................................................................... 6-1
6.1
Single Mode Specifications.................................................................. 6-1
6.1.1
Local Channels .................................................................................... 6-1
6.1.2
Remote Channels ................................................................................ 6-1
6.1.3
Physical ............................................................................................... 6-1
6.1.4
Environmental...................................................................................... 6-1
6.2
WWDM Model Specifications............................................................... 6-2
6.2.1
Unidirectional Two Channel WDM ....................................................... 6-2
6.2.2
Unidirectional Three Channel WWDM ................................................. 6-3
6.2.3
Unidirectional Four Channel WWDM ................................................... 6-3
6002/6003/6004 WWDM Users Manual
v
®
EdgeAccess Universal Chassis System
Appendix A Warranty
A.1
Warranty .............................................................................................. A-1
A.1.1 Electronic Products.............................................................................. A-1
A.1.2 Cable Products .................................................................................... A-1
A.1.3 Limitations............................................................................................ A-2
A.2
Customer Service Department Repair Warranty.................................. A-2
A.3
Return Policy ....................................................................................... A-2
A.4
Extended Warranty Policy.................................................................... A-3
List of Figures
Figure 1.
Figure 2.
Figure 3.
Figure 4.
Figure 5.
Figure 6.
Figure 7.
Figure 8.
Figure 9.
Figure 10.
Figure 11.
Figure 12.
Model 6002 and 6004 Rack Mount Modules .................................. 1-1
Model 6000 Series of Devices Stand Alone Module ...................... 1-2
Management Aware Rack Mount Modules ..................................... 1-2
WWDM Installation Diagram .......................................................... 3-1
Model 6000 Stand Alone (Front View) ............................................ 3-2
Model 6002 Stand Alone (Rear View) ............................................. 3-2
Rack Mount Module Components .................................................. 3-3
EdgeAccess UCS DMM Main Menu Screens ................................. 4-1
Chassis Management Screen Showing Inserted Modules ............. 4-2
WDM Information Screen for the WWDM Model 6002 ................... 4-2
Accessing the Select Module Menu ............................................... 4-3
Entering a Descriptive Name for the 6002 Module ......................... 4-4
List of Tables
Table 1.
Table 2.
Table 3.
Table 4.
vi
Troubleshooting Cause and Solution Chart ....................................... 5-1
Unidirectional Two Channel WDM Chart ........................................... 6-2
Unidirectional Three Channel WWDM Chart ..................................... 6-3
Unidirectional Four Channel WWDM Chart ....................................... 6-3
6002/6003/6004 WWDM Users Manual
®
EdgeAccess Universal Chassis System
Chapter 1
General Overview
1.1
Overview
EdgeAccess® Models 6002, 6003, 6004 (6002/3/4)
are passive, unidirectional Widely spaced
Wavelength Division Multiplexers (WWDM) that
fit into the EdgeAccess Universal Chassis System
(UCS), or a stand alone enclosure. The WWDM
multiplexes (MUX) two to four optical signals onto
a single composite signal for transmission to a
remote location. Additionally, it demultiplexes
(DEMUX) the composite signals back to their
constituent wavelengths at a level that is acceptable
to minimize data channel crosstalk.
Model 6002/3/4 devices efficiently combine
wavelengths in the 1310nm, 1480nm, and 1550nm
optical windows together over a single mode fiber.
The signals are then optically separated
(demultiplexed) at the remote end. Each model is
protocol, speed, and line code transparent.
The 6002/3/4 models are configured in two, three,
and four channel wavelength applications.
Stand alone model – Model 6002 non-managed,
non-powered stand alone module can be included in
a variety of environments. See Figure 2 for the
Model 6000 series of stand alone devices.
Rack mount models – Models 6002, 6003, 6004,
management aware, non-powered modules can
become part of the UCS (Universal Chassis System).
Figures 1 and 3 show the 6002 and 6004 modules.
The 6003 model is similar in design, but not shown.
Figure 1. Model 6002 and 6004 Rack Mount Modules
6002/6003/6004 WWDM Users Manual
1-1
®
EdgeAccess Universal Chassis System
1.2
Stand Alone 6002/3/4 Models
The 6002/3/4 stand alone models are passive, non-powered devices. The models have no user
configurable switches and require no management aware connections. Because these models have
no electrical components, they can fit easily into multiple environments. The stand alone Model
6000 Optical Multiplexer shown in Figure 2, represents the 6002/3/4 stand alone (SA) series.
Figure 2. Model 6000 Series of Devices Stand Alone Module
1.3
Rack Mount 6002/3/4 Models
The 6002/3/4 rack mount models can be installed into the EdgeAccess Universal Chassis System
(UCS). When inserted in the UCS and a connection is established, the non-powered module will
become management aware. Refer to applicable Canoga Perkins Users Manuals for information
on optional management devices.
Rack mount (RM) models are hot-swappable and can be installed or removed at any time in an
operating Universal Chassis System. Refer to the UCS Model 1000 Users Manual for installation
instructions. Figure 3 shows two 6002 RM modules installed in a typical chassis configuration.
6002
6002
Figure 3. Management Aware Rack Mount Modules
1-2
6002/6003/6004 WWDM Users Manual
®
EdgeAccess Universal Chassis System
Chapter 2
Set-up and Installation
2.1
Unpacking and Installing the Stand Alone Models
Each stand alone 6002/3/4 is factory tested and shipped in protective cartons. After unpacking the
unit and its accessories, retain the shipping carton and protective packing material in the event a
need arises in which the equipment must be returned to the factory. SA models can be installed on
any desktop, shelf, or mounted in a rack with the optional rack mount bracket kit.
Note: Before mounting a stand alone model, keep in mind that the operator must have access to
the rear of the unit for optical cable attachments.
2.2
Unpacking and Installing the Rack Mount Models
Each rack mount 6002/3/4 is factory tested and shipped in protective cartons. After unpacking the
unit and accessories, retain the shipping carton and packing materials. In the unlikely event that a
need will arise, these items should be used to return the module to the factory.
Recommended installation sequence:
•
•
•
Complete the installation of the EdgeAccess Universal Chassis System first. Refer to the
UCS Model 1000 Users Manual for complete installation and operating instructions.
If the Domain Management Module (DMM) is to be included in the UCS, it should be
installed prior to the 6002/3/4 models.
If the Chassis Interconnect Module (CIM) is to be employed, it should be installed in the
UCS prior to the 6002/3/4 models.
Note: See the appropriate EdgeAccess Users Manual for additional installation instructions.
2.3
Installing Modules into a UCS Chassis
Rack mount models can be inserted into the EdgeAccess Universal Chassis System at any time.
The UCS connector interface will detect installed RM modules. System rebooting is not required.
Note: Never force the module into a chassis slot, as damage to the connector pins may occur.
Install the 6002/3/4 RM model into an available UCS slot:
•
•
While sliding the hot-swappable module into position, you will feel and hear the module
connect firmly with the backplane. It should fit snugly into the connector.
Hand-tighten the knurled knobs, which will fasten the module in place. The use of a
screwdriver is not necessary, nor recommended.
When a module is inserted into an active UCS, the 6002/3/4 model’s LED will display to verify
that a connection is made. If an installed DMM is operational, it will detect the presence of all
inserted modules. The DMM will display the modules status on appropriate software screens.
See Chapter 4 for software interaction.
6002/6003/6004 WWDM Users Manual
2-1
®
EdgeAccess Universal Chassis System
2.4
Cabling
The 6002/3/4 models are passive, unidirectional wavelength division multiplexers. Each module
allows simultaneous transmission of two to four optical signals over a single fiber pair.
2.4.1 Fiber Optic Cabling
Optical cabled devices transmit (Tx) and receive (Rx) channel-to-channel signals through local
and remote modules. All fiber optic cables should be properly connected using the Tx to Rx, or
Rx to Tx orientation. The diagram in Figure 4 shows the correct cable installation.
Note: When cables are not in use it is imperative to keep the connectors clean and protected.
Optical cable management is important to ensure proper cable installation and system operation.
Each fiber cable and connector must be labeled appropriately.
Note: Different applications may dictate that a change in the labeling convention of the fiber
optics is required – dependent upon the architecture of the customer's application.
2.4.2 Cleaning Fiber Optic Connectors
Use a lint-free alcohol pad from a fiber cleaning kit to clean the ferrule and the end-face surface
of the fiber coupler before installing any type of cable or connector.
The ferrules and end-face surfaces of optical components must be kept clean and free of all
contaminants. Use an appropriate lint-free alcohol pad, (or similar lint-free cloth saturated with
reagent grade Isopropyl alcohol) to clean the end-surfaces of your fiber coupling. You may also
use special swabs made specifically for cleaning fiber optic couplers.
Note: Optical components must be kept clean at all times. Attach protective dust covers to fiber
connectors or cable ends when they are not in use.
2.4.3 Connecting Fiber Optic Cables
Attach the required transmit and receive cables to the 6002/3/4 modules. The connectors on the
rack mount models are located on the front panel. The stand alone model has the connecting ports
on the rear panel.
Note: Use extreme care when installing or removing connectors so that damage is not incurred
to the fiber end-face surface, or to the connector housing.
Dirty optical connectors are a common source of link loss or attenuation problems, especially for
the single mode fiber (SMF). Connectors should be checked and cleaned whenever there is a
significant or unexplained light loss.
Note: To prevent contamination, install appropriate dust covers on all unused or disconnected
optical components. Always clean the optical connectors before connecting them.
2-2
6002/6003/6004 WWDM Users Manual
®
EdgeAccess Universal Chassis System
2.4.4 Checking Optical Power Levels
Each 6002/3/4 model is shipped with a document that lists the specific output power for each
local and remote laser. To ensure proper optical performance levels, the link loss or attenuation of
all fiber cables should be measured and identified. Determine the link attenuation by using a
1310/1550nm laser source. Either a hand-held or other similar measuring device can be used.
To measure power levels of local and remote transmitters, these parts will be needed:
•
•
•
Signal source capable of the proper wavelength.
Test jumper cable.
Optical power meter.
Note: For accurate results, be sure that each component’s attenuation is known. The modules
should be warmed up for at least 30 minutes prior to checking input and output power levels.
2.4.5 Measuring Remote Transmitter Output Power
When connecting to a Wavelength Division Multiplexer (WDM) module, measure the power
output level at the remote transmitter (Tx) port.
Note: Remote transmitters may operate in the 1550nm window; therefore, it is important that the
optical power meter be calibrated for the proper wavelength.
To measure power output level of the remote transmitter:
Step 1 Activate the laser for the specific channel to be tested.
Note: Measurement of the remote transmitter output power should be done by
sequentially activating one channel at a time, and taking a measurement after each
channel is activated. This will ensure that the output power level has not become
corrupted with power from adjacent wavelength channels.
Step 2 Connect the power meter to the remote transmit (Tx) connector on the 6002/3/4 module
using an appropriate fiber optic jumper cable.
Step 3 Record the level and compare to the value on the furnished performance sheet for that
particular channel. Note that the remote output power decreases by about one dBm per
channel with each increasing channel number.
Note: A less negative numerical value indicates a greater optical power level.
For example, a power reading of -17.0dBm is greater than -20.5dBm.
Step 4 Repeat steps 1 through 3 for the other remote channels.
Note: If you cannot get a correct reading, take a second measurement using a different
cable. Call Technical Support if the power level is not within the required range.
If the link attenuation is known or has been measured, then subtracting this value from
the values measured above will give the power expected at the remote cable end or the
expected receiver input power level.
6002/6003/6004 WWDM Users Manual
2-3
®
EdgeAccess Universal Chassis System
2.4.6 Measuring Receiver Input Power
If the link attenuation is not known, the Model 6002/3/4 can be used to measure the link loss or
attenuation. If the link attenuation is already known – skip this section.
To measure the link attenuation:
Step 1 At the local site, connect the remote fiber link cable to the remote Tx connector on the
6002/3/4 model.
Note: Prior to measuring input power, let the units warm up for at least 30 minutes.
Step 2 At the remote site connect an optical power meter to the remote fiber link cable which
would normally be connected to the remote Rx port.
Step 3 Power-up the 6002/3/4 and the user’s power meter. Record the optical power level and
compare with the acceptable levels for your link fiber type on the furnished data sheet.
Step 4 The link loss is calculated by subtracting the value found above. The resultant value
represents the link loss, referenced in dB. It is important to keep track of which channel
is being tested to ensure that false results are not obtained.
Note: Link attenuation should be measured on all fiber cables in the transmit direction.
2.4.7 Measuring Local Transmitter Output Power
Transmitters do not operate at the same wavelength; therefore, it is imperative that the optical
power meter be calibrated for the proper wavelength.
Note: Check that each module has been warmed up before checking power output levels.
To measure the output power of the local transmitter:
Step 1 Attach an appropriate optical jumper cable between the remote Tx and Rx connectors
on the 6002/3/4. This will cause the local Tx to become active when a signal is applied.
Step 2 Attach one side of a jumper cable to the local Tx connector and the other side to an
optical power meter.
Step 3 Activate the channel to be tested by introducing an optical signal into the local Rx.
This will cause the 6002/3/4 to turn on the remote Tx for that channel. The signal will
pass through the loop-back jumper and into the remote Rx port where it will be detected
internally. This will cause the local Tx to activate.
Step 4 Record the optical power level for the local Tx and compare to the information provided
on the data sheet.
Step 5 Repeat steps 2 through 4 for the remaining channels.
2-4
6002/6003/6004 WWDM Users Manual
®
EdgeAccess Universal Chassis System
Chapter 3
User Operation
3.1
WWDM Application
WWDM (widely spaced wavelength division multiplexer) models multiplex and demultiplex
wavelengths in the 1310nm, 1480nm, and 1550nm windows, and are protocol, speed, and line
code transparent. Each 6002/3/4 model is unidirectional (meaning that light travels in only one
direction on a fiber line) and transmits signals through a composite pair of single mode fibers.
Customer devices transmit (Tx) and receive (Rx) channel-to-channel signals through the local
WWDM. Optical signals are received and demultiplexed with isolation levels that minimize
channel crosstalk.
Note: The 6002/3/4 rack mount models used in a chassis configuration contain EEPROM’s for
identification and management purposes. The stand alone models are non-powered units, which
have no user configurable switches and require no special jumpers.
For the correct fiber optic cable application see the WWDM Installation Diagram in Figure 4.
Note: All optical connections must be cabled using the Tx to Rx and Rx to Tx scheme.
Important: Do not over tighten FC/PC connectors or damage may occur.
Figure 4. WWDM Installation Diagram
6002/6003/6004 WWDM Users Manual
3-1
®
EdgeAccess Universal Chassis System
3.2
Operation of the Stand Alone Models
To ensure proper optical performance levels, you will need to determine the loss budget. This
factor will ensure link integrity and ample signal strength at the remote end of your link.
To operate the 6002 stand alone model:
Step 1 Measure each of the optical composite fiber links at the lowest wavelength of operation.
This will determine the limiting factor in the loss budget. Each Tx device attached to the
WDM (Wavelength Division Multiplexer) has a loss budget that was specified by the
manufacturer. This specified loss budget must be greater than the measured loss of the
fiber link, plus the additional attenuation of the WDM. For applicable channel and
wavelength specifications, see the tables in Chapter 6.
Example for a Model 6002, 1310/1550 WWDM:
The composite link has an 8dB loss measured at 1310nm. The device attached to the
1310nm channel has a stated loss budget of 15dB. The 6002 1310/1550nm model has a
maximum end-to-end attenuation of 2dB for a pair of units on SMF (single mode fiber).
Factor in approximately 1dB for the additional connector loss from the patch cables
between the 6002 and the local devices. This would result in a safety margin of
approximately 15dB – (8dB + 2dB + 1dB) = 4dB.
Note: When connecting any device, pay attention to the proper wavelength channel.
Step 2 Attach one (1) composite fiber link cable to the connector marked "Remote Tx" on the
local WDM and "Remote Rx" on the remote WDM. Refer to the WWDM Installation
Diagram in Figure 4 for connection orientation.
Step 3 Check the installation. The equipment is now ready to transmit the optically multiplexed
signals. Figures 5 and 6 represent the non-powered 6002/3/4 stand alone models.
Figure 5. Model 6000 Stand Alone (Front View)
Figure 6. Model 6002 Stand Alone (Rear View)
3-2
6002/6003/6004 WWDM Users Manual
®
EdgeAccess Universal Chassis System
3.3
Operation of the Rack Mount Models
When the 6002/3/4 RM module is installed into the EdgeAccess Universal Chassis System, a
“STA” or status LED on the front panel will illuminate amber. This test signal from the UCS
verifies that a backplane connection was established. A red light indicates a connection error.
When the 6002/3/4 LED illuminates green, the light indicates:
•
•
•
The module is properly seated in the UCS slot.
The module is receiving power from the backplane.
The module is available to be polled by a management device.
The optional Domain Management Module (DMM) is a Management Access Module (MAM).
When the DMM is installed into an active UCS, it is used for module identification and naming
the installed 6002/3/4 models.
Note: Refer to the EdgeAccess UCS DMM Users Manual for additional instructions.
The optional Chassis Interconnect Module (CIM) is a connecting device that links other UCS
units together. Figure 7 shows an installed DMM, CIM, a 6004 model, two 6002 modules, and
other optional EdgeAccess products. The 6003 rack mount module is not shown, but is similar.
Note: Refer to the appropriate Canoga Perkins Users Manual for operating instructions.
DMM (MGR)
CIM
6002
6004
6002
DC Power Supply
AC Power Supply
Figure 7. Rack Mount Module Components
6002/6003/6004 WWDM Users Manual
3-3
®
EdgeAccess Universal Chassis System
This Page is Intentionally Left Blank
3-4
6002/6003/6004 WWDM Users Manual
®
EdgeAccess Universal Chassis System
Chapter 4
Software Interaction
4.1
Universal Chassis System Software
When the rack mount 6002/3/4 models are properly installed in a managed UCS 1000 Chassis,
the DMM module will open the required HyperTerminal™ software. The computer application
will display the screenshots shown in this section.
Note: For additional HyperTerminal access instructions refer to the DMM Users Manual.
To view the UCS Chassis Management screen that identifies installed WDM modules:
•
•
•
•
Access the EdgeAccess UCS DMM Main Menu screens as shown in Figure 8.
Choose number 3, or “Manage or access a specific Chassis”, and press the Enter key.
The identified UCS Chassis number will be highlighted, [Chassis 1], then press <Enter>.
The Chassis Management screen will appear showing the selected module. See Figure 9.
Figure 8. EdgeAccess UCS DMM Main Menu Screens
6002/6003/6004 WWDM Users Manual
4-1
®
EdgeAccess Universal Chassis System
The DMM will show that two Model
6002-LightWave Modules are inserted
into Chassis 1 on the LOCAL UCS.
The Status of Slots 4 & 5 will show OK.
Figure 9. Chassis Management Screen Showing Inserted Modules
To access inserted modules from the UCS DMM Chassis Management screen:
•
•
•
•
•
Press the SPACE BAR to move the cursor to the desired Slot number (refer to Figure 9).
When the selected Slot number 4 is highlighted, press the CR (Carriage Return / Enter key).
The WDM Information screen will appear, identifying the data of a polled module. All
information that the DMM gathered for the selected module is shown in Figure 10.
Press the SPACE BAR to select another installed component (reference Slot number 5).
Press the ESC (Escape key) to return to the previous screens.
The WDM Information screen will show
WWDM Model 6002 information – no customer
configurable prompts are available.
Press ESC to go to previous screen.
Figure 10. WDM Information Screen for the WWDM Model 6002
4-2
6002/6003/6004 WWDM Users Manual
®
EdgeAccess Universal Chassis System
4.2
Naming the WDM module in a Chassis Configuration
In many applications, it may be beneficial to name the WDM module in the UCS Chassis or the
circuit path that it is part of. This identification feature is useful to name the circuit designations
of all connected modules. When multiple customers are serviced with a single 6002/3/4 module,
a customer name can be included for effective system management.
Accessing the Chassis / Slot number of the installed module:
•
•
•
•
From the Main Menu screen (refer to Figure 8), select number 4, or “Manage or access a
specific Module”, then press <Enter>.
The Select Module Menu screen will appear as shown in Figure 11.
You will be prompted to enter the desired Chassis and Slot numbers where the installed
6002/3/4 module resides.
Enter the Chassis / Slot numbers as requested; type in 1 / 4, then press <Enter>.
Figure 11. Accessing the Select Module Menu
6002/6003/6004 WWDM Users Manual
4-3
®
EdgeAccess Universal Chassis System
Naming the Chassis / Slot number of the installed module:
•
•
•
The Module Menu screen will appear, note the example in Figure 12 shows that the 6002LightWave module is inserted into Chassis 1, Slot 4.
Choose number 1, or “Name the module”, then press <Enter>.
Type in the desired new name at the “Enter new name” prompt line, note the example shows
“Canoga Perkins-2” as the entered name.
Note: Do not exceed 16 characters when choosing a circuit designation path or new name.
Adding a name for the Model 6002 that is
loaded into Chassis 1, Slot 4:
Canoga Perkins-2 – or use circuit
designations, e.g. C1-4 (Chassis 1, Slot 4)
Figure 12. Entering a Descriptive Name for the 6002 Module
4-4
6002/6003/6004 WWDM Users Manual
®
EdgeAccess Universal Chassis System
Chapter 5
Troubleshooting and Maintenance
5.1
Troubleshooting Fiber Optic Cables
All optical cables should be connected using a Tx to Rx, or Rx to Tx orientation for correct MUX
and DEMUX signal operation. Proper labeling of each connecting cable is highly recommended.
5.2
Troubleshooting Guide
The 6002/3/4 models are passive, unidirectional WWDMs. The modules provide simultaneous
transmission of two to four optical signals over a composite SMF pair. Keeping all optical
pathways clean and dust free is imperative for trouble-free operation. Refer to Table 1.
Table 1. Troubleshooting Cause and Solution Chart
Symptom
Possible causes
Solution
Local or remote
equipment is not
receiving optical
signal
1. Dirty fiber optic cable
1. Clean all fiber optic cables in the
circuit
2. Bad connection to
equipment
2. Replace fiber optic cable
connection
3. Optical loss budget has
been exceeded
3. Check loss budget of equipment
being installed
4. Fiber optic cable cut
4. Check the condition and
integrity of all fiber optic cables
in the circuit. Immediately
replace or repair cut fiber optic
cable.
5. Fiber optic cables crossed
5. Reconfigure the link using the
Rx to Tx orientation
6. Local or remote equipment
not transmitting sufficient
optical signal
6. Measure the optical transmit
power of equipment using an
optical power meter. Determine
that the equipment is providing a
sufficient optical signal.
6002/6003/6004 WWDM Users Manual
5-1
®
EdgeAccess Universal Chassis System
5.3
Maintenance
The Model 6002/3/4 is designed to perform at specified performance levels. Damaged fiber
cables and dirty connectors are a common source of signal loss or link attenuation. Single mode
optical fibers should be checked frequently. Inspect and test all suspect components to maintain
optimal system performance levels.
As a rule, whenever there is a significant, unexplained light loss, check the fiber cable and the
connectors for potential problems. Remove and inspect optical connectors, be careful not to
damage the fiber end-face surface or the connector housing. Do not force or over tighten the
FC/PC connectors.
Note: It is important to clean the fiber connectors before reinstalling them. Use the protective
dust covers on unused or disconnected components to prevent damage or contamination.
Clean the end-surfaces of fiber cables and connectors with a fiber optics cleaning kit. The ferrules
and end-face surfaces of fiber components must be kept clean and free of contaminants to
function within the established parameters.
Note: Special fiber optics cleaning swabs and lint-free cloth pads saturated with reagent grade
Isopropyl alcohol may also be used to clean optical components.
For additional information on cleaning and connecting fiber optic cables refer to Chapter 2.
Cable management and identification markers should receive a high priority to ensure troublefree maintenance tasks. Properly maintained components will assure optimal system operation.
5-2
6002/6003/6004 WWDM Users Manual
®
EdgeAccess Universal Chassis System
Chapter 6
Specifications
6.1
Single Mode Specifications
6.1.1 Local Channels
Data Rate:
Protocols:
Fiber:
Optical Connector:
Speed transparent
All, no limitation
Single mode (SMF)
ST, FC/PC, or SC Duplex
APC connectors (special order)
6.1.2 Remote Channels
Composite Data Rate:
Protocols:
Fiber:
Optical Connector:
Speed transparent
All, no limitation
Single mode (SMF)
ST, FC/PC, or SC Duplex
APC connectors (special order)
6.1.3 Physical
Dimensions:
Stand Alone:
1.72"H x 8.45"W x 11.50"D
(43 x 215 x 291mm)
Rack Mount:
8.5"H x 1.0"W x 9.75"D
(215.9 x 25 x 247.65mm)
Stand Alone:
1.5 lb. (0.68kg)
Rack Mount:
1.2 lb. (0.54kg)
Weight:
6.1.4 Environmental
Operating Temperature:
Stand Alone:
-20° to 70° C
Rack Mount:
0° to 50° C
Operating Humidity:
10 to 95%, non-condensing
6002/6003/6004 WWDM Users Manual
6-1
®
EdgeAccess Universal Chassis System
6.2
WWDM Model Specifications
The Model 6002/3/4 is available in a variety of user-specified wavelengths and loss budget
configurations. All end-to-end loss calculations were figured at maximum loss values.
Note: Actual attenuation loss values should be used when computing final loss budgets.
Basic channel features and wavelengths are defined in Tables 2 through 4. The model type
options for fused or filtered fiber applications are noted.
6.2.1 Unidirectional Two Channel WDM
The Model 6002 is a two channel unidirectional module with various wavelength configurations.
Table 2 shows current available model options.
Table 2. Unidirectional Two Channel WDM Chart
MODEL
NUMBER
MODEL
TYPE
WAVELENGTH
Nanometers (nm)
END-TO-END
LOSS (dB)
DIRECTIVITY
(dB)
ISOLATION
(dB)
6002
FUSED
1310 / 1550
2.0 (1310)
2.0 (1550)
55
≥25
1480 / 1550
1.7 (1480)
1.7 (1550)
55
≥25
1543 / 1557
3.0 (1543)
2.0 (1557)
55
≥25
*
6002
FUSED
*
6002
FILTER
* Fused type WDMs have broad operating passbands, typically at ±15nm.
Note: This enables the 6002 models to be used over a larger wavelength range.
6-2
6002/6003/6004 WWDM Users Manual
®
EdgeAccess Universal Chassis System
6.2.2 Unidirectional Three Channel WWDM
The Model 6003 is a three channel unidirectional module with various wavelength
configurations. Table 3 shows current available model options.
Table 3. Unidirectional Three Channel WWDM Chart
MODEL
NUMBER
MODEL
TYPE
WAVELENGTH
Nanometers (nm)
END-TO-END
LOSS (dB)
DIRECTIVITY
(dB)
ISOLATION
(dB)
6003
FUSED *
or
FILTER
1310 / 1480 / 1550
1.5 (1310)
3.0 (1480)
2.5 (1550)
55
≥25
6003
FUSED *
or
FILTER
1310 / 1543 / 1557
1.5 (1310)
3.6 (1543)
2.8 (1557)
55
≥25
6003
FUSED *
or
FILTER
1480 / 1543 / 1557
1.5 (1480)
3.8 (1543)
2.8 (1557)
55
≥25
* Fused type WWDMs have broad operating passbands, typically at ±15nm.
Note: This enables the 6003 models to be used over a larger wavelength range.
6.2.3 Unidirectional Four Channel WWDM
The Model 6004 is a four channel unidirectional module with optional fused or filter signal
applications. Table 4 shows current available model options.
Table 4. Unidirectional Four Channel WWDM Chart
MODEL
NUMBER
MODEL
TYPE
WAVELENGTH
Nanometers (nm)
6004
FUSED *
or
FILTER
1310 / 1480 /
1543 / 1557
END-TO-END
LOSS (dB)
1.3
3.6
4.9
4.5
DIRECTIVITY
(dB)
ISOLATION
(dB)
55
≥25
(1310)
(1480)
(1543)
(1557)
* Fused type WWDMs have broad operating passbands, typically at ±15nm.
Note: This enables the 6004 model to be used over a larger wavelength range.
6002/6003/6004 WWDM Users Manual
6-3
®
EdgeAccess Universal Chassis System
This Page is Intentionally Left Blank
6-4
6002/6003/6004 WWDM Users Manual
®
EdgeAccess Universal Chassis System
Appendix A
Warranty
A.1
Warranty
A.1.1 Electronic Products
Canoga Perkins warrants to the Customer that all goods sold to the Buyer will perform in
accordance with the applicable data sheets, drawings or written specifications, and at the time of
sale will be free of defects in material and workmanship. The warranty period for OSP test
equipment shall be ONE (1) YEAR from the date of shipment. The warranty period for all other
data communications equipment shall be THREE (3) YEARS from the date of shipment. This
warranty shall apply unless goods have been subject to lightning damage or other Acts of Nature,
misuse, neglect, accident, damage, improper installation or maintenance, or alteration or repair by
anyone other than the Seller or its authorized representative. Buyer should notify Canoga Perkins
promptly in writing of any claim based on warranty, and Canoga Perkins, at its option, may first
inspect such goods at the premises of the Buyer, or may give written authorization to Buyer to
return the goods to Canoga Perkins, transportation charges prepaid, for examination by Canoga
Perkins. Canoga Perkins shall not be liable for any inspection, packing or labor costs in
connection with return of goods. In the event Canoga Perkins breaches its obligation of warranty,
the sole and exclusive remedy of Buyer is limited to replacement, repair or credit of the purchase
price, at Canoga Perkins’ Option.
A.1.2 Cable Products
Carefully inspect the cable upon receipt. If the cable is defective, prior to returning the cable,
contact the Canoga Perkins Customer Service Department within ten (10) working days of receipt
to obtain a Return Material Authorization (RMA) number. If defective, the cable will be repaired
or replaced in accordance with the warranty of the cable manufacturer, which is the sole
warranty. Unless the customer order specifies that Canoga Perkins shall install or supervise
installation of cable, Canoga Perkins assumes no responsibility for the installation. Canoga
Perkins shall not be liable for defective cable, cost of removing defective cable, or cost of
installing replacement cable.
6002/6003/6004 WWDM Users Manual
A-1
®
EdgeAccess Universal Chassis System
A.1.3 Limitations
Other than those expressly stated herein, THERE ARE NO OTHER WARRANTIES OF ANY
KIND, EXPRESSED OR IMPLIED, AND SPECIFICALLY EXCLUDED BUT NOT BY WAY
OF LIMITATION, ARE THE IMPLIED WARRANTIES FOR FITNESS FOR A
PARTICULAR PURPOSE AND MERCHANTABILITY. IT IS UNDERSTOOD AND
AGREED THE SELLER'S LIABILITY WHETHER IN CONTRACT, IN TORT, UNDER ANY
WARRANTY, IN NEGLIGENCE OR OTHERWISE SHALL NOT EXCEED THE AMOUNT
OF THE PURCHASE PRICE PAID BY THE PURCHASER AND UNDER NO
CIRCUMSTANCES SHALL SELLER BE LIABLE FOR SPECIAL, INDIRECT,
INCIDENTAL OR CONSEQUENTIAL DAMAGES. THE PRICE STATED FOR THE
EQUIPMENT IS A CONSIDERATION IN LIMITING SELLER'S LIABILITY. NO ACTION,
REGARDLESS OF FORM, ARISING OUT OF THE TRANSACTIONS OF THIS
AGREEMENT MAY BE BROUGHT BY PURCHASER MORE THAN ONE YEAR AFTER
THE CAUSE OF THE ACTION HAS ACCRUED. SELLERS MAXIMUM LIABILITY
SHALL NOT EXCEED AND BUYER'S REMEDY IS LIMITED TO EITHER (i) REPAIR OR
REPLACEMENT OF THE DEFECTIVE PART OF PRODUCT, OR AT THE SELLER'S
OPTION (ii) RETURN OF THE PRODUCT AND REFUND OF THE PURCHASE PRICE,
AND SUCH REMEDY SHALL BE BUYER'S ENTIRE AND EXCLUSIVE REMEDY.
A.2
Customer Service Department Repair Warranty
Repairs performed by the Canoga Perkins Customer Service Department are warranted to be free
from defects in material and workmanship for a period of 90 DAYS from the date of shipment of
the repaired product, or until the expiration of the original factory warranty, whichever is longer.
Shipping charges to and from Canoga Perkins will be at customer's expense. Units will be
shipped F.O.B. Origin. Repaired units will be returned to the customer by standard ground
shipment unless otherwise specified, with any additional costs for customer specified overnight or
second day deliveries at the customer’s expense.
A.3
Return Policy
RETURN MATERIAL AUTHORIZATION (RMA)
You must obtain an RMA (Return Material Authorization) number from the Canoga Perkins
Customer Service Department (818) 718-6300, prior to returning a product for service or repair.
If the product's warranty has expired, you will need to provide the Canoga Perkins Customer
Service Representative with a Purchase Order to authorize the repair.
Whenever possible, products should be returned in the original shipping carton or packaging with
a description of the failure and results of any diagnostic testing included.
A-2
6002/6003/6004 WWDM Users Manual
®
EdgeAccess Universal Chassis System
A.4
Extended Warranty Policy
Canoga Perkins will, at its factory location, repair all defects occurring in Canoga Perkins
products for a period of one year after the expiration of the original three-year factory warranty
for a fee equal to six (6) percent of the current list price of the product. The product must be
placed under extended warranty by written order from the customer and may be renewed for up to
three years beyond the original extension. This service is available to products purchased directly
from Canoga Perkins or through its System Integrators or Authorized Resellers.
This extended warranty will not apply to products that have been subject to misuse, neglect,
accidental damage, improper installation or maintenance, alteration or repair by anyone other than
Canoga Perkins or its authorized representative.
Inbound freight for returned units will be at the customer's expense. Outbound freight for repaired
units will be at Canoga Perkins’ expense. Repaired units will be returned to the customer in the
48 continental states by standard ground shipment unless otherwise specified, with any additional
costs for customer specified overnight or second day deliveries at the customers expense.
Extended warranty service must be arranged through the Regional Sales Manager, or the Canoga
Perkins Customer Service Department, PRIOR to the expiration of the initial Factory Warranty
period. Renewal of an Extended warranty must also be placed prior to the expiration of the
extended period A Return Material Authorization (RMA) number will be issued for each product
to be returned for service. Products returned for repair without an RMA will be refused.
Canoga Perkins reserves the right to replace defective products with comparable products, either
new or used. Repaired products will carry an added 90-day warranty if repair is made within 90
days of the expiration of the extended warranty agreement.
Purchase orders for extended warranty service must include the model number and serial
number(s) of the products to be covered.
All returned equipment, with RMA number, should be sent to:
CANOGA PERKINS CORPORATION
Customer Service Department
20600 Prairie Street
Chatsworth, California 91311-6008 USA
Business Phone: (818) 718-6300
(Monday through Friday 7:00 a.m. – 5:00 p.m. Pacific Time)
FAX: (818) 718-6312
Web Site: www.canoga.com
Email: [email protected]
24 Hour Emergency Repair Hot Line
(800) 360-6642 – in the USA
6002/6003/6004 WWDM Users Manual
A-3