1
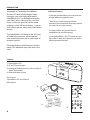
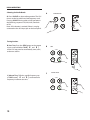
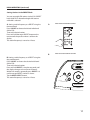
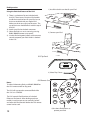
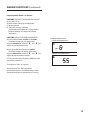
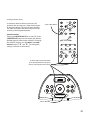
SoundWorks ® i525 USER MANUAL WARNING DO NOT OPEN TO PREVENT THE RISK OF ELECTRIC SHOCK, DO NOT REMOVE COVER. NO USER-SERVICEABLE PARTS INSIDE. REFER SERVICING TO QUALIFIED SERVICE PERSONNEL The lightning flash with arrowhead symbol, within an equilateral triangle, is intended to alert the user to the presence of un-insulated “dangerous voltage” within the product’s enclosure that may be of sufficient magnitude to constitute a risk of electric shock to persons. The exclamation point, within an equilateral triangle, is intended to alert the user to the presence of important operating and maintenance (servicing) instructions in the literature accompanying the appliance. SEE MARKING ON BOTTOM/BACK OF PRODUCT 1) 2) 3) 4) 5) 6) 7) IMPORTANT SAFETY INSTRUCTIONS Read these instructions. Keep these instructions. Heed all warnings. Follow all warnings. Do not use this apparatus near water. Clean only with dry cloth. Do not block any ventilation openings. Install in accordance with the manufacturer’s instructions. 8) Do not install near any heat sources such as radiators, heat registers, stoves, or other apparatus (including amplifiers) that produce heat. 9) Do not defeat the safety purpose of the polarized or grounding-type plug. A polarized plug has two blades with one wider than the other. A grounding type plug has two blades and a third grounding prong. The wide blade or the third prong are provided for your safety. If the provided plug does not fit into your outlet, consult an electrician for replacement of the obsolete outlet. 10) Only use attachments/accessories specified by the manufacturer. 12) Use only with the cart, stand, tripod, bracket, or table specified by the manufacturer, or sold with the apparatus. When a cart is used, use caution when moving the cart/apparatus combination to avoid injury from tip-over. 13) Unplug this apparatus during lightning storms or when unused for long periods of time. 14) Refer all servicing to qualified service personnel. Servicing is required when the apparatus has been damaged in any way, such as power supply cord or plug is damaged, liquid has been spilled or objects have fallen into the apparatus, the apparatus has been exposed to rain or moisture, does not operate normally, or has been dropped. 15) Do not expose this apparatus to drips or splashes. 16)The apparatus shall not be exposed to dripping or splashing and that no objects filled with liquids, such as vases, shall be placed on the apparatus. 17) Do not install this apparatus in a confined space such as a book case or similar unit. 18) The apparatus draws nominal non-operating power from the AC outlet with its STANDBY/ON switch in the standby position. 19) The apparatus should be located close enough to the AC outlet so that you can easily grasp the power cord plug at any time. 20) To completely disconnect the power input, the mains plug of the AC/DC adaptor shall be disconnected from the AC mains, as the disconnect device is the mains plug of the AC/DC adaptor. 21) Excessive sound pressure from earphones and headphones can cause hearing loss. 22) The battery shall not be exposed to excessive heat such as sunshine, fire or the like. CAUTION Danger of explosion if battery is incorrectly replaced. Replace only with the same or equivalent type. Additional Safety Advice 1) Keep surrounding objects at least four inches away from the apparatus for adequate ventilation. 2) Ventilation openings on the apparatus should not be impeded by such items as newspaper, cloths, curtains, and the like. 3) Do not place naked flame sources near the apparatus, such as lighted candles. 4) Dispose of the battery in accordance with local safety regulations. 5) Do not operate the apparatus at a temperature less than 36˚ F/ 2˚ C or greater than 100˚ F/38˚ C. CAUTION • DO NOT REMOVE THE EXTERNAL ENCLOSURE PARTS TO EXPOSE THE ELECTRONICS. NO USER SERVICEABLE PARTS ARE INSIDE. • IF YOU ARE EXPERIENCING PROBLEMS WITH THIS PRODUCT, CONTACT CREATIVE LABS NORTH AMERICA OR CREATIVE LABS EUROPE FOR A SERVICE REFERRAL. DO NOT USE THE PRODUCT UNTIL IT HAS BEEN REPAIRED. For CANADA AC POWER CORD CONNECTION CAUTION: TO PREVENT ELECTRIC SHOCK, MATCH WIDE BLADE OF PLUG TO WIDE SLOT, FULLY INSERT. Pour le CANADA CORDE DE CONNEXION CA ATTENTION: POUR EVITER LES CHOCS ELECTRICQUES, INTRODUIRE LA LAME LA PLUS LARGE DE LA FICHE DANS LA BORNE CORRESPONDANTE DE LA PRISE ET POUSSET JUSQU’AU FOND. WARNING: TO PREVENT FIRE OR SHOCK HAZARD, DO NOT EXPOSE THIS APPLIANCE TO RAIN OR MOISTURE. FCC STATEMENT FOR THE U. S. A. This equipment has been tested and found to comply with the limits of part 15 of the FCC rules. These limits are designed to provide reasonable protection against harmful interference in a residential installation. This equipment generates, uses, and can radiate radio frequency energy and, if not installed and used in accordance with the instruction, may cause harmful interference to radio communications. However, there is no guarantee that interference will not occur in a particular installation. If this equipment does cause harmful interference to radio or television reception, which can be determined by tuning the equipment off and on, the user is encouraged to try to correct the interference by one or more of the following measures: • Reorient or relocate the equipment and/or the receiving antenna. • Increase the separation between the equipment and receiver. • Connect the equipment to an AC outlet of a different mains circuit from the mains circuit/ outlet providing power to the receiver. • Consult the dealer or an experienced radio/TV technician for help. CAUTION Changes or modifications to this equipment not expressly approved by Creative Labs or Cambridge SoundWorks for compliance will void the user’s warranty. Table of Contents Introduction and Contents..............................................................................6 Getting Started................................................................................................7-8 Display Brightness Control...............................................................................9 Radio Operation..........................................................................................10-11 iPod Operation.................................................................................................. 12 X-Fi Processing.................................................................................................. 13 Quick Reference-Top panel........................................................................... 14 Quick Reference-Remote Control............................................................... 15 Quick Reference-Rear Connections........................................................... 16 Convenience Features.................................................................................... 17 Wakeup Functions.....................................................................................18-21 Specification....................................................................................................... 22 Please Note: The contents of this document are subject to change without notice. Please check www.cambridgesoundworks.com for any available updates to the Owner’s Manual, or associated documentation. INTRODUCTION Additional Features The people at Cambridge SoundWorks, division of Creative Technologies, hope you enjoy your new high-performance SoundWorks i525. In addition to bringing your iPod ’s music library to life, your new music system has great FM stereo sound and plays useful AM band stations. It stores 8 FM station presets along with 8 AM station presets. • A dimmer function allows you to choose one of eight different brightness levels. • The i525 has a built-in energy cell that maintains the current time accurately without AC power for up to ten minutes. • A side jack allows easy connection of headphones for private listening. The SoundWorks i525 features the X-Fi suite of audio enhancements, which improve your audio enjoyment with a wide range of program sources. • A convenient MENU / SELECT button lets you adjust Bass, Treble and Snooze time, as well as other adjustable functions. The large display and full-function remote makes i525 operation easy from across the room. Contents 1) Sound Works i525 2) AC to DC Power Supply 3) Package of iPod dock inserts to fit a variety of Apple iPod models. 4) Infrared Remote Control. 1 Not Pictured SoundWorks i525 User Manual AM Antenna 2 iPod V O LU M E ENTER Examples only. Your parts may differ in appearance. SELECT MENU SOURCE SEEK S M A RT V O L TUNE S U R R O U N D C R YS TA L I Z E R 1 2 5 6 3 4 7 8 PRESETS 3 MUTE SLEEP SNOOZE 4 1 2 NAP GETTING STARTED A) Remove the SoundWorks i525 from its protective polybag and place it in your preferred location. A B) On the rear panel, locate the FM wire antenna. Remove the wire tie, then unroll and extend the antenna. B EXTEND THE FM ANTENNA C) Connect the Power Supply to a convenient AC outlet. Then insert the Power Supply DC plug into the DC POWER INPUT jack in the rear panel of the i525. C CONNECT THE POWER SUPPLY Lynx Radio Rear Panel Artwork Revision 1 Date: 12/11/09 DC POWER INPUT DC POWER INPUT jack Connect the power supply to this jack. Input: 12V AUX IN AM ANT 1500 mA All Artwork to be Warm Gray 3C GETTING STARTED (Continued) Set the Current Time D D) After connecting the i525 to power, it may show “AM 12:00”. This indicates the current time needs to be adjusted. Press and hold MENU / SELECT on the top of theSOURCE i525 for 5 seconds. This will begin the “Time Set” function. Release the button when “12” appears with a blinking “:” . 1 Use the WHEEL on the top panel to adjust the current hour. Press MENU / SELECT, then use the WHEEL again to adjust the current minutes setting. Press MENU / SELECT, then use the WHEEL again to adjust the day of the week, Press MENU / SELECT to store the current time. TUNE PRESET 1-8 MENU SELECT SLEEP NAP 2 SNOOZE / MUTE Note: The remote control can also adjust the current time. Use the SELECT button on the remote control, as you would the MENU / SELECT button on the top panel. Use the VOLUME up and VOLUME down buttons on the remote control, as you would the WHEEL on the top panel. iPod VOLUME ENTER Current Time Maintainence Feature MENU SOURCE SEEK 6 5 4 7 MUTE E 8 SLEEP NAP SNOOZE iPod TUNE VOLUME 2 SELEC T MENU SOURCE SEEK 1 ENTER TUNE SLEEP NAP 2 button chooses Standby or On SMART VOL SURROUND CRYSTALIZER 1 SNOOZE / MUTE 3 2 4 PRESETS 6 5 MUTE 7 SLEEP SNOOZE 1 3 2 PRESETS MENU SELECT Standby and On TUNE SURROUND CRYSTALIZER 1 This device also lets you move the radio from one site in a residence or officeSOURCE to another site without PRESET 1-8 losing the current time. 1 SELEC T SMART VOL The i525 features a internal power cell that maintains the clock’s accuracy during a short interruption in AC power (up to ten minutes). This device will never need replacement. E) Pushing the operation. TIME ADJUSTMENT 2 8 NAP Brightness Function TUNE F) For quick and easy adjustment of the display brightness, from Standby operation, repeatedly tap the SNOOZE / MUTE button on the top panel. This will cycle through the available brightness settings. SOURCE MENU SELECT 1 Once the desired brightness setting is displayed, simply wait for the menu to timeout (about 5 seconds) and the brightness setting is stored. PRESET 1-8 SLEEP NAP 2 SNOOZE / MUTE RADIO OPERATION Selecting the Radio Bands A RADIO BUTTON A) Press SOURCE to select radio operation. The i525 returns to the last radio band and frequency used. Pressing SOURCE during radio or AUX operation in the following sequence--FM, AM, AUX, then back to FM. Note: AUX selection is omitted if there is no plug connected to the AUX input jack on the back panel. iPod VOLUME ENTER SOURCE PRESET 1-8 SELEC T MENU SOURCE SEEK SMART VOL 1 TUNE MENU SELECT SURROUND CRYSTALIZER 3 2 4 PRESETS 1 6 5 2 7 MUTE 8 SLEEP NAP SNOOZE 1 2 SNOOZE / MUTE Tuning Stations B) Auto Tune: Press the SEEK button on the remote or press and hold either TUNE [ and ] on the i525 top panel to automatically tune (seek) to the next station. PRESET SOURCE B SEEK TUNE iPod VOLUME ENTER 1-8 MENU SELECT 1 SELEC T MENU SOURCE SEEK SMART VOL SLEEP NAP 2 TUNE SURROUND CRYSTALIZER 1 2 5 6 3 4 PRESETS 7 MUTE 8 SLEEP NAP SNOOZE 1 2 Press and Hold SNOOZE / MUTE C TUNE BUTTONS C) Manual Tune: To find a specific frequency, tap a TUNE button [ and ] to advance one frequency increment at a time. PRESET SOURCE TUNE iPod VOLUME ENTER 1-8 MENU SELECT 1 MENU SOURCE SEEK SMART VOL SLEEP NAP 2 SELEC T SURROUND CRYSTALIZER 1 2 5 6 7 SLEEP SNOOZE 10 3 4 PRESETS MUTE 1 SNOOZE / MUTE TUNE 2 8 NAP SLEEP NAP RADIO OPERATION (continued) Storing Stations in the PRESET Bank You can store eight FM stations in the i525’s PRESET bank while FM is selected and eight AM stations while AM is selected. A) Storing a radio frequency as a PRESET using the remote control: Press SOURCE to choose the desired radio band (AM or FM). Tune to the desired station. Press and hold the target PRESET button on the remote until the preset number is solid on the display. The station frequency is stored as a Preset. A PRESET BANK ON THE REMOTE CONTROL iPod VOLUME ENTER SELEC T MENU SOURCE SEEK SMART VOL TUNE SURROUND CRYSTALIZER 1 2 5 6 3 4 7 8 PRESETS MUTE SLEEP NAP SNOOZE 1 B B) Storing a radio frequency as a PRESET using the top panel controls: Press SOURCE to choose the desired radio band (AM or FM). Tune to the desired station. Press and hold PRESET 1-8 on the top panel until the display changes to show Preset numeral 1. Within five seconds, repeatedly press PRESET 1-8 until the target PRESET number is shown. Tap the MENU SELECT button. The station frequency is stored as a Preset. 2 PRESET SELECTION FROM THE TOP PANEL TUN SOURCE PRESET 1-8 MENU SELECT 1 SLEEP NAP 2 SNOOZE / MUTE 11 iPod Operation 1) Install the dock insert that fits your iPod. Using the iPod dock feature of the i525 1) There is a selection of inserts included with the i525. These inserts fit various iPod models. Install the insert that best fits your iPod, or use the insert included with your Apple iPod. Make sure the insert snaps into the recess. The top of the insert should be flush with the top of the i525. 2) Attach your iPod to the dock connector. 3) Select the iPod as a music source by pressing PLAY / PAUSE (remote or top panel). 4) Use the iPod navigation buttons on the remote control to operate your iPod while it is docked in the i525. 2) Connect your iPod. UNEM i525 Top Panel TUNE 3) Select Play / Pause SOURCE PRESET 1-8 MENU SELECT 1 SLEEP NAP 2 i525 Remote Control Notes: To wake a hibernating iPod, push PLAY / PAUSE on the i525 remote control or top panel. SNOOZE / MUTE iPod V O LU M E ENTER The i525 will not control a connected iPod while the i525 is in STANDBY. The i525 controls iPod functions of a docked iPhone or iPod touch. After docking one these models, it may be necessary to manually “unlock” and select the iPod function before the i525 remote control can be used. 12 SELECT MENU SOURCE SEEK TUNE 4) Use these iPod buttons to operate your iPod. S M A RT V O L S U R R O U N D C R YS TA L I Z E R Creative’s X-Fi audio processing technology Using the X-Fi features of the i525 X-Fi technology on the i525 allows you to combine four different audio enhancements, creating better sound than possible “linear” audio circuitry. The four different X-Fi enhancement choices are: Crystalizer Creative Multi-Speaker Surround Virtual Speakers (SURROUND on remote control) Creative Multi-Speaker Surround Virtual iPod Headphones (SURROUND on remote control, V O LU M E when heaphones are connected) ENTER (SMART VOL on the Smart Volume Management remote control) SELECT MENU S O UMulti-Speaker RCE Creative SEEK Surround-Virtual On/Off S M A RT V O L Combined TUNE X-Fi processing On/Off S U R R O U N D CRYSTALIZER 1 2 Creative Smart Volume Management On/Off 5 i525 Remote Control 6 3 4 Creative Crystalizer On/Off P R E S ETS 7 8 Crystalizer restores the crisp treble and bass punch UTE NAP erased by Maudio compressorSLEEP processing employed SNOOZE to create MP3, AAC, and other similar files from the original, higher quality 1 2 audio file. FM radio and any compressed audio files sound more life-like when Crystalizer is used. Creative Multi-Speaker Surround Virtual analyzes the audio signal and restores the sonic cues inherent in the original material’s wide soundstage. When X-Fi SURROUND is chosen on the i525, music seems to fill the width of the room. The i525 disappears as the source of the sound. Creative Multi-Speaker Surround VirtualHeaphones improves your headphone experience. Use it whenever the i525 is available and you would normally listen to you iPod on headphones. Select X-Fi SURROUND while headphones are connected to the i525 to employ this powerful digital algorithm designed specifically for headphones. With Creative Multi-Speaker Surround Virtual-Heaphones, music seems to float in front of you, instead of being trapped “between” your ears. This effect greatly enhances any audio program on headphones. Smart Volume Management is a sophisticated audio engine that eliminates disruptive changes in output from any audio program. It is useful anytime that large volume changes are unwelcome. a) Use it at night at a low volume when you want to hear all the music but don’t want it to get too loud. b) Use it on radio to “harmonize” the output of different stations, which otherwise may have different overall sound levels. c) Smart Volume Management is also useful if you want to hear music in a noisy environment. With SVM, you can set the radio to a level loud enough to overcome the background noise, secure in the knowledge that your music will maintain this consistent output level. The CRYSTALIZER, SURROUND and SMART VOL audio functions on the remote control can also be combined. For instance, you can combine Crystalizer and Smart Volume Management, Surround with Smart Volume Management, or combine all three. Select which processes you want. Once you have made your choice, you can use the X-Fi button on the remote control to compare enhanced (combined X-Fi processing) with the non-enhanced audio. 13 QUICK REFERENCE GUIDE - SOUNDWORKS i525 TOP PANEL CONTROLS Select iPod mode if an iPod is docked. Select iPod Play/Pause. Snooze adjustments. Press and hold for current time/ day adjustment. Radio: manual tune. iPod: next/previous track. Adjust playback volume and settings sequence. Press and hold to select preset and store current station. SOURCE TUNE PRESET 1-8 MENU SELECT 1 SLEEP NAP 2 “Standby” and “On” operation. SNOOZE / MUTE Press and hold to adjust alarm. Radio and band selection. Selects between radio bands and Aux only if a source is plugged into the Aux input. 14 When in “Standby”, Press to trigger delayed On (Nap). (15m, 30m, 45m, 60m, 90m, 120m, 180m, 240m). When in “On” operation, Press to trigger delayed Standby (Sleep). Normal operation: Mute/Unmute. During alarm operation: Activate snooze. (15m, 30m, 45m, 60m, 90m, 120m). QUICK REFERENCE GUIDE - SOUNDWORKS i525 REMOTE CONTROL Move up and down within an iPod menu. THESE BUTTONS SUBSTITUTE FOR THE CLICK WHEEL ON AN iPod. Select iPod player, if docked. Toggle between iPod Play/Pause. i Po d Press to move back and forth within the current playlist. Press and hold to forward scan or reverse scan the current program. ENTER PRESS MENU TO SHOW THE iPod’s MENU FUNCTION Choose menu items or start program play. MEN U iPod Same as top panel. VOLUME ENTER SELEC T MENU SOURCE SEEK Activate/cancel CREATIVE MULTI-SPEAKER SURROUND VIRTUAL or CREATIVE MULTI-SPEAKER SURROUND VIRTUAL-HEADPHONES audio processing. TUNE Activate/cancel combined X-Fi audio Activate/cancel CREATIVE SMART VOLUME MANAGEMENT audio processing. SMART VOL Activate/cancel CREATIVE CRYSTALIZER audio processing. SURROUND CRYSTALIZER 1 2 3 4 7 8 PR ES ETS 6 5 Press and hold any preset to store the current station. Same as top panel. MUTE SLEEP NAP SNOOZE 1 2 15 QUICK REFERENCE GUIDE - SOUNDWORKS i525 REAR CONNECTIONS Lynx Radio Rear Panel Artwork Revision 1 Date: 12/11/09 DC POWER INPUT Input: 12V AUX IN AM ANT 1500 mA All Artwork to be Warm Gray 3C DC Input jack Connect the power supply to this jack. Connect any audio signal source with a 3.5 mm stereo miniplug to this jack. Listening to An External Sound Source A) If you have an external audio program source (a portable MP3 player, for example), connect it to the AUX IN jack on the rear panel. B) Press the SOURCE button on the front panel or remote control until the AUX icon appears on the display screen. NOTE: AUX can not be selected if there is no miniplug connected to the AUX IN jack on the rear panel. 16 CONVENIENCE FEATURES Mute A) Press the SNOOZE/MUTE bar (top panel) or the SNOOZE/MUTE button on the remote control. Mute is cancelled if the POWER button is pressed or the volume is adjusted. Sleep Delay B) Delayed Turn Off function: While the i525 is “On”, press the SLEEP button on the remote control or the SLEEP / NAP button on the top panel until the desired sleep delay interval is reached. Sleep delay intervals are 15, 20, 30, 45, 60, 90 and 120 minutes. Sleep delay is cancelled if the POWER button is pressed. B) SLEEP DELAY ADJUSTMENT Nap Feature C) Use NAP for an automatic turn on after a specific period of time. Set the radio or iPod to your desired playback volume. Press the POWER button to enter Standby operation. Press the NAP button on the remote control or the SLEEP / NAP button on the top panel using repeat presses until the desired nap interval is reached. Nap intervals are 15, 20, 30, 45, 60, 90, 120,180, and 240 minutes. Nap is cancelled if the POWER button is pressed. C) NAP ADJUSTMENT MENU / SELECT button operation: D) Press the MENU / SELECT button on the top panel or SELECT remote control to select the BASS, TREBLE, SNOOZE, X-Fi, and Alarm Day adjustments. Use the WHEEL on the top panel of the i525 or use the Volume buttons [ 5 and 6 ] on the remote control to adjust settings of BASS, TREBLE, SNOOZE, X-Fi, Alarm Days, and Brightness. Any SELECT button function stores its current setting and returns the i525 to normal operation after five seconds of inactivity. Pressing other i525 buttons during a SELECT button function may cancel SELECT button adjustment. • Bass: Adjustment range is -8 to +8. • Treble: Adjustment range is -8 to +8. • Snooze Interval Adjustment is 5 minutes to 30 minutes. • X-Fi Adjustments are All Off, Crystalizer On, CMSS On, SVM On, and combinations. • Wakeup day pattern Adjustments are 7 Day, 5 Day, or 2 Day (see next page). • Brightness Adjustment range is 1 to 8. ADJUST SLEEP ADJUST NAP SELECT BUTTON ADJUSTMENT D) BASS ADJUSTMENT ADJUST BASS E) TREBLE ADJUSTMENT ADJUST TREBLE F) SNOOZE ADJUSTMENT ADJUST 17 WAKEUP FUNCTIONS Music Wakeup Features Each of the two Wakeup Alarms on the i525 will store the following settings: Wakeup time Wakeup source (radio frequency, iPod) Wakeup Volume (for radio or iPod) X-Fi setting The Alarm Settings on the i525 are maintained even if the i525 is unplugged. Tone Wakeup or Music Wakeup When activating either alarm, the user chooses between Tone wakeup and Music wakeup. Tone wakeup uses an electronic tone to wakeup the user at the stored wakeup time. Music wakeup uses the stored settings for source, volume and X-Fi processing. Storing The Wakeup Settings--Overview Storing your desired wakeup settings for either Alarm 1 or Alarm 2 involves two steps. First, set the i525 to your desired source, volume and X-Fi setting. Second, press and hold an Alarm button until you see the display change. Now you can adjust the wakeup hour, the wakeup minutes and the daily wakeup pattern. At the end of this simple adjustment session, the i525 reminds you of the stored wakeup settings on its display. After a Tone Wakeup event occurs, the Tone alarm will continue for ten minutes. After ten minutes, the alarm will reset itself and the i525 will enter Standby. 18 After a Music Wakeup event occurs, the Music alarm will continue for one (1) hour. After one hour, the alarm will reset itself and the i525 will enter Standby. If a second alarm is set to occur during the activation time of the first alarm, the second alarm will override the first alarm. This allows a user to set the Music wakeup for 30 minutes earlier than a Tone wakeup. Please note: Once the Wakeup settings have been stored, use the i525 any way you wish, with any source. The i525 will wakeup according to the stored wakeup settings. Wakeup day pattern--7 days a week, 5 days a week (Monday to Friday) and 2 days a week (Saturday and Sunday). This setting is adjustable in the MENU SELECT button operation discussed on page 17. DAYS OF WEEK ADJUSTMENT DISPLAY 5 DAY ADJUST MON TUE WED THU FRI WAKEUP FUNCTIONS (Continued) Preparing either Alarm 1 or Alarm 2: PART ONE: PRESELECT THE SOURCE AND VOLUME A) Turn the i525 on. B) Select a radio station or iPod playback. C) Set the Volume. D) Adust X-Fi settings, if desired. (Smart Volume Management is a great choice for Music Wakeup, as it keeps the volume consistent.) PART TWO: ADJUST THE HOURS AND MINUTES A) Press and hold either ALARM 1 or ALARM 2. The display changes to Hour adjustment. Use the TUNE/ADJUST buttons [ and ] to adjust the correct wakeup hour. B) Press the same Alarm button or SELECT. The display changes to Minutes adjustment. Use the TUNE/ADJUST buttons [ and ] to adjust the correct wakeup minute. ALARM ADJUSTMENT DISPLAYS A) HOUR ADJUSTMENT DISPLAY ADJUST B) MINUTES ADJUSTMENT DISPLAY ADJUST C) Press the same Alarm button or SELECT to store your alarm preferences. The display will show, in sequence: Stored Wakeup Time and Daily Pattern Stored Wakeup Source (radio frequency or iPod) Stored Wakeup Volume and Wakeup X-Fi setting. 19 WAKEUP FUNCTIONS (Continued) iPod V O LU M E ENTER Activating/Deactivating Alarms Press either alarm button to activate or deactivate that alarm. Both alarm buttons follow this sequence: Activating/Deactivating Alarms SELECT MENU SOURCE SEEK TUNE i525 Top Panel i525 Remote Control S M A RT V O L S U R R O U N D C R YS TA L I Z E R 1 2 5 6 3 4 7 8 PRESETS Start: . .............................................. Alarm inactive First alarm button press:................. Tone Alarm Second alarm button press: ....... Music Alarm Third alarm button press:......... Alarm inactive MUTE SLEEP PRESET 1-8 SOURCE NAP SNOOZE 1 MENU SELECT 2 2 1 Music Alarm occurs only if the i525 is in Standby. Tone Alarm occurs if the i525 is in Standby or On. Use Tone Wakeup as a reminder function during the day while using the i525 normally. SNOOZE / MUTE No activated alarms FRI PRESET C R Y S TA L I Z E R SURROUND Alarm 1 set for Tone Wakeup, 7 days a week 7 DAY FRI PRESET C R Y S TA L I Z E R SURROUND Both alarms set for Music Wakeup. Alarm 1 set for 5 days a week, Alarm 2 set for 7 days a week. 5 DAY FRI 7 DAY PRESET C R Y S TA L I Z E R SURROUND Alarm 2 set for Tone Wakeup, 2 days a week FRI 2 DAY PRESET C R Y S TA L I Z E R SURROUND 20 Cancelling An Alarm for the Day To cancel an alarm for the day and reset it for operation the next day, press either Alarm button or the power button. The i525 will enter Standby. The alarm will remain activated and occur on the next day in the designated pattern. iPod Snooze / Mute Button Snooze Function Tapping the SNOOZE/MUTE bar on the i525 or the SNOOZE/MUTE button on the remote will silence a Wakeup alarm for nine minutes (default). To change the SNOOZE duration, use the SELECT and TUNE/ ADJUST buttons [ and ] to change the settings (5 minutes to 30 minutes). V O LU M E ENTER SELECT MENU SOURCE SEEK S M A RT V O L TUNE S U R R O U N D C R YS TA L I Z E R 1 3 2 4 PRESETS 6 5 7 MUTE SLEEP 8 NAP SNOOZE 1 2 To silence and reset any active alarm, press either alarm button or the power button, on the top panel or the remote. TUNE SOURCE PRESET 1-8 MENU SELECT 1 SLEEP NAP 2 SNOOZE / MUTE Snooze / Mute Bar 21 SPECIFICATIONS Internal audio source FM stereo/AM tuner (all digital processing of analog RF signals) Inputs: Apple iPod Dock on the top panel Rear panel Aux input (3.5 mm stereo minijack) Outputs: One front panel headphone output (3.5 mm stereo minijack) Dimensions: Height: Width: Depth: Weight: Power Consumption, maximum: 20 watts Input voltage: DC 12V 22 3 3/8 in 10 in 6 in 3 lbs 86 mm 255 mm 153 mm 1.4 kg 23 Cambridge SoundWorks 120 Water Street North Andover, MA USA 01845 R1, 22 March 2010 P81-2440 24