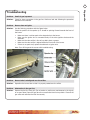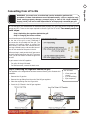
1
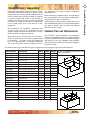
LTR20091038, Rev. A
12/16/08
WARNING
If the information in this manual is not followed
exactly, a fire or explosion may result causing
property damage, personal injury or loss of
life.
Do not store or use gasoline or other flammable
vapors and liquids in the vicinity of this or any
other appliance.
Do not store an LP cylinder not connected for
use in the vicinity of this or any other appliance.
A fire resulting in serious injury or death may
occur.
If you are installing a natural gas grill, you are
responsible for ensuring that the natural gas
line installed is safe to use. LMS will not be
held responsible for an improperly installed gas
line.
Installation / Assembly
Cabinet Cut-out Dimensions . . . . . . . . . . . . 3
Gas Requirements and Connection . . . . . . . 5
Leak Testing Procedure . . . . . . . . . . . . . . . . 5
LP Gas . . . . . . . . . . . . . . . . . . . . . . . . . . . . . . 6
Natural Gas . . . . . . . . . . . . . . . . . . . . . . . . . . 7
Installing the Transformer . . . . . . . . . . . . . . 8
Installing Grills in Barbecue Islands . . . . . . 9
Installing the Rotisserie . . . . . . . . . . . . . . . . 9
Installing Side Burners . . . . . . . . . . . . . . . . 10
Using Your Grill
Grill Controls . . . . . . . . . . . . . . . . . . . . . . . . 11
Lighting the Grill . . . . . . . . . . . . . . . . . . . . . 12
Basic Grill Operation . . . . . . . . . . . . . . . . . . 13
Cooking with the Rotisserie . . . . . . . . . . . 13
Cooking with a Convection Grill . . . . . . . . 14
Cooking with a Charcoal Grill . . . . . . . . . . 14
Turning on and off the Lights and Fan . . . 15
Read all instructions before you
operate your grill.
Save these instructions!
Drop-In Food Warmer . . . . . . . . . . . . . . . . 15
Griddle . . . . . . . . . . . . . . . . . . . . . . . . . . . . . 15
Cleaning and Maintenance
Drip Pan . . . . . . . . . . . . . . . . . . . . . . . . . . . 16
Care of Stainless Steel . . . . . . . . . . . . . . . . 16
Covering Your Cart or Grill . . . . . . . . . . . . . 16
CONTACT INFORMATION
After Use Care . . . . . . . . . . . . . . . . . . . . . . . 16
For customer service, please contact your authorized
dealer immediately. If you need additional information
and/or assistance, please contact:
Griddle . . . . . . . . . . . . . . . . . . . . . . . . . . . . . 17
LMS Customer Service Department
1462 East Ninth Street
Pomona, CA 91766.
Charcoal Grill . . . . . . . . . . . . . . . . . . . . . . . 17
Toll Free: 1-800-CAL-SPAS
Fax: 1-909-629-3890
Drop-in Food Warmer . . . . . . . . . . . . . . . . . 17
Light Bulb Replacement . . . . . . . . . . . . . . . 18
Appendix
Troubleshooting . . . . . . . . . . . . . . . . . . . . . 19
Converting from LP to NG . . . . . . . . . . . . . 21
Installing and Replacing Infrared Burners 23
Copyright 2008-2009 LMS, Inc. All rights reserved.
Duplication without written consent is strictly prohibited.
Cal Flame™ is registered trademark.
Due to continuous improvement programs, all models,
operation, and/or specifications are subject to change
without prior notice.
LTR20091038, Rev. A
12/16/08
Replacement Covers . . . . . . . . . . . . . . . . . . 23
2009 Warranty . . . . . . . . . . . . . . . . . . . . . . 24
Location of Serial Number Plate . . . . . . . . 26
1
Safety Instructions
Placement and Location
•
We recommend that a licensed contractor install
your Cal Flame™ grill. Installation must conform
to local codes, or in the absence of local codes,
with either the National Fuel Gas Code, ANSI
Z223.1 / NFPA54, Natural Gas and Propane
Installation Code, CSA B149.1, or Propane
Storage and Handling Code, B149.2), as
applicable.
•
Your Cal Flame™ grill or cart must be plugged
into a permanent, grounded 110V outlet with a
dedicated 15A GFCI breaker in accordance with
local codes or the National Electrical Code,
ANSI / NFPA 70, or the Canadian Electrical
Code, CSA C22.1.
•
Do not use an extension cord to supply power to
your Cal Flame™ grill or cart. Such use may result
in fire, electrical shock or other personal injury. Do
not install a fuse in the neutral or ground circuit.
A fuse in the neutral or ground circuit may result
in an electrical shock hazard. Do not ground this
appliance to a gas supply pipe or hot water pipe.
Keep any electrical supply cords and the fuel
supply hose away from any heated surfaces.
•
To prevent fire and smoke damage, remove all
packaging material before operating grill.
•
Before you start cooking, clean the entire grill
thoroughly with hot, soapy water. This is necessary
to remove residual solvents, oil and grease used
in the manufacturing process. The grates should
also be thoroughly cleaned in the same manner.
• Cal Flame™ grills and carts are designed for
outdoor use only.
•
Never locate this appliance in an enclosed room,
under a sealed overhead structure, or in any
type of enclosed area such as a garage, shed, or
breezeway. Keep clear of trees and shrubs.
•
Do not place this grill under or near windows or
vents that can be opened into your home.
•
Cal Flame™ grills are not intended for installation
in or on recreational vehicles or boats.
•
Maintain sufficient distance as to not overheat any
overhead combustible material such as a patio
cover.
•
The area surrounding your new grill should be
kept clean and free from flammable liquids and
other combustible materials such as mops, rags or
brooms, as well as solvents, cleaning fluids, and
gasoline.
•
Do not use the grill, grill cabinet, or area surrounding
the grill as a storage area for flammable or plastic
items. Do not store the liquid propane (LP) cylinder
in the vicinity of this or any other appliance when
it is not being used.
Set-Up
•
Before installing built in grills in enclosures, copy
all product information such as model number,
serial number and type of grill (e.g. natural gas
or LP) and store information in a safe place. This
information is located on a plate located behind
the grill and is visible when the hood is lowered or
on the right side of the chassis. There is an area
on the back cover of this manual where you can
write down this information.
DANGER
Operation
•
Do not use grill for other than intended use.
•
In the event that a burner goes out, turn burner
knobs to the full OFF position, fully open the grill
hood and let it air out. Do not attempt to use the
grill until the gas has had time to dissipate.
•
Never use the grill if the drip pan is not properly
installed. Drip pan should be pushed all the way
to the rack located just under the grill. Fire or
explosion can result from an improperly installed
drip pan.
•
Keep all electrical supply cords and the rotisserie
motor cord away from the heated areas of the
grill.
•
Never use the grill or side burner in windy
conditions. If used in a consistently windy area a
windbreak will be required. Always adhere to the
specified clearances listed in this manual.
What To Do If You Smell Gas
• Shut off gas to the appliance.
• Extinguish any open flame.
• Open lid.
• If odor continues, keep away from the
appliance and immediately call your
gas supplier or your fire department.
2009 Barbecue Grills and Carts
LTR20091038, Rev. A
www.calspas.com
Safety Instructions
WARNING: Improper installation, adjustment, alteration, service or maintenance
can cause injury or property damage. Read the installation, operating and maintenance
instructions thoroughly before installing or servicing this equipment.
Safety Instructions
2
•
Never line the grill or side burners with aluminum
foil.
•
When the unit is not in use, be sure to turn off the
gas at the LP tank.
•
•
•
Only use dry pot holders and do not use a towel or
other bulky cloth in place of pot holders. Moist or
damp pot holders used on hot surfaces can cause
burns.
Do not install or operate your grill unit in such a
manner that the cross ventilation openings are
blocked. Fresh air must be able to pass though
installed vents to safeguard against residual gas
accumulation. Failure to allow proper ventilation
may cause fire or explosion.
•
Do not heat any unopened glass or metal container
of food on the grill. Pressure may build up and cause
the container to burst, possibly resulting in serious
personal injury or damage to the grill.
•
Do not reach over your grill or any other surfaces
when hot or in use.
When handling LP gas line and connectors, do
not allow them to come in contact with any metal
surfaces of the cart or cabinet. Do not drop LP
connectors.
Maintenance and Repair
•
Do not use fuel such as charcoal briquettes in electric
or gas grills
•
Gas sources to the grill and side burners must be
regulated. Do not operate grill or side burners if
regulators have been removed, fire or explosion can
occur.
•
Never leave the grill and side burners unattended
when in use. When using pots and pans, boilovers will cause smoking and greasy boil-overs may
ignite.
•
Always use the proper size pan. Select utensils with
flat bottoms large enough to cover the burner. The
use of under-sized utensils exposes the sides of
the utensils to direct contact with a portion of the
flame. This can scorch utensils and hamper cleanup.
Excessive flames on large stainless steel pots can
result in permanent discoloration. For best results,
we recommend commercial quality aluminum pans
and utensils.
•
•
•
•
Always position handles of utensils so they do not
extend over adjacent work areas or cooking areas.
This reduces the risk of burns, ignition of flammable
materials, and spillage due to accidental contact
with the utensils.
Do not use water on grease fires. Never pick up a
flaming pan. Turn the appliance off and smother the
flaming pan with a tight-fitting lid, a cookie sheet or
a flat tray. For flaming grease outside of the pan,
smother it with baking soda or use a dry chemical or
foam-type fire extinguisher.
Never allow clothing, pot holders or other flammable
materials come in contact with or be close to any
grate, burner or hot surface until it has fully cooled.
Never wear loose fitting or hanging garments while
using your grill. Fabric may ignite and result in
personal injury.
When using the grill, do not touch the grill rack,
burner grate, or immediate surroundings as these
areas become extremely hot and can cause burns.
Use handles or knobs.
•
Spiders and other insects can nest in the burners of
the grill and block the gas and airflow to the burner
ports. This creates a dangerous condition that can
result in a fire behind the valve panel. Inspect
and clean the burners periodically and follow the
guidelines in the Cleaning and Maintenance section
of this manual.
•
Unless specifically recommended in this manual, do
not repair or replace any part of the grill. A qualified
technician should perform all service. Any repairs
made by a non-L.M.S. approved dealer technician
will void your warranty.
Storage
•
When your gas grill is not in use, turn off the gas at
the supply cylinder.
•
Storage of a grill or cart indoors is permissible only if
the supply cylinder is disconnected and removed.
Precautions Regarding Children
•
Never leave children unattended in the area where
the grill is being used. Close supervision of children is
necessary when any appliance is use near children.
•
Do not store items of interest to children around or
below the grill or cart.
•
Never allow children to sit or stand on any part of
the grill or cart.
Carts
•
Do not attempt to move the stainless steel cart while
it is hot or in use.
•
It is extremely important to lock all caster wheels
even on flat surfaces.
•
Do not lean, sit or stand on the stainless steel cart,
including the foldout work surfaces.
•
Do not exceed 50 pounds of weight on the foldout
work surfaces.
2009 Barbecue Grills and Carts
www.calspas.com
LTR20091038, Rev. A
3
Installation / Assembly
We recommend the installation, adjustment and
service of your new grill be performed by L.M.S.
qualified installers and service technicians to ensure
proper operation and prevent accidents.
When planning your Cal Flame grill or cart location,
access to gas lines and 110V power supplies should
be considered. The location with the shortest gas
line run is recommended. A grounded, dedicated,
15A, 110V, GFCI power source is required for use of
your appliances (e.g. lights, rotisserie, refrigerator,
receptacles, etc.).
When determining a suitable location, consider factors
such as exposure to wind, proximity to traffic paths,
and windows that open into the home.
Locate barbecue grills and stainless steel carts only in
well-ventilated areas and only on solid, flat foundations
(e.g. deck or cement slab). Do NOT place stainless
steel carts on dirt or grass.
Cabinet Cut-out Dimensions
Your Cal Flame™ grill is designed for easy installation
into a non-combustible enclosure. The supporting deck
or counter must be flat and level. When determining the
final location of your grill, adequate cross ventilation
must be present to prevent gas from being trapped in
the event of a leak.
Installation / Assembly
Most cities and counties require permits for exterior
construction and electrical circuits. In addition, some
communities have codes requiring residential barriers
such as fencing and/or self-closing gates on property
to prevent unsupervised access to the property by
children under the age of five. Your dealer can provide
information on which permits may be required and
how to obtain them prior to the delivery of your
equipment.
The drawings below show the different types of cabinet cut-out dimensions for gas grills and accessories.
Model Number
Description
Width
Depth
BBQ08870P
BBQ08880P
BBQ08872P
BBQ08873P
BBQ08874P / CP
BBQ08875P / CP
BBQ08881P
BBQ08898P
BBQ08899P
BBQ08954P
BBQ07864P
BBQ07888P
BBQ07842P-12
BBQ07842P-18
BBQ07902
Charcoal Grill
Charcoal Grill Convection
2 Burner Grill
3 Burner Grill
4 Burner Grill
5 Burner Grill
4 Burner Smoker
Deluxe Single Side Burner
Deluxe Double Side Burner
Deluxe Side by Side Burner
Ice Chest
Food Warmer
12” Cocktail Center
18” Cocktail Center
30” Drop-in Bar Center
30 ¾”
30 ¾”
23 ¼”
23 ¼”
30 ¾”
38 ¼”
38”
12 1/8”
12 3/8”
25 ¼”
31”
12 ½”
12 ¼”
17 ½”
28 ¾”
22 ¼”
22 ¼”
22 ¼”
22 ¼”
22 ¼”
22 ¼”
30 ¼”
21 ¾”
21 ¾”
13 ¼”
22 ½”
20 ½”
21 ¾”
24 3/8”
22 ¾”
Model Number
Description
Width
Depth
Height
BBQ07852P
BBQ07963
BBQ08953P
BBQ07912
Drop In Standard Side Burner
17 ¾”
14 ½”
19 ¾”
7”
2 ¾”
Drop In Sink
Standard Side by Side Burner
Counter Top Blender Station
11
14
24
10
½”
½”
¼”
¼”
Height
9
9
9
9
9
9
8
7
7
7
8
¼”
¼”
¼”
¼”
¼”
¼”
½”
¼”
¼”
¼”
¾”
7”
7”
10”
12”
Cut-out for barbecues, side burners and
slide-in accessories
WIDTH
HEIGHT
Cut-out for drop in accessories
WIDTH
4 ¼”
4 ¾”
DEPTH
DEPTH
HEIGHT
2009 Barbecue Grills and Carts
LTR20091038, Rev. A
www.calspas.com
Installation / Assembly
4
Model Number
BBQ08874F
BBQ04103034
Description
4 Burner Flat Drop In Grill
Drip tray cut-out
A
21 ¾”
Width
37 ¾”
B
1 ¾”
Depth
22 ¾”
C
5”
Cut-out for flat drop-in grill and drip
Height tray
8 ¾”
D
6 ½”
DEPTH
WIDTH
GRILL
CUT-OUT
D
C
B
A
DRIP
TRAY
CUT-OUT
Model Number
BBQ07868P
BBQ07862P
BBQ07889P
BBQ07891P
BBQ08967P
Description
2 Drawer Storage
Griddle and Griddle Storage
30” Warming Drawer
Cutting Board and Drawer
110V Electric Pizza Oven
Width
10 ¾”
13 ½”
28 ¾”
13 ½”
28 ½”
Depth
19 ¾”
19”
20 ½”
19 ½”
21 ½”
Height
17 ¼”
2 ½”
10”
3”
10”
Cut-out for drawers
DEPTH
HEIGHT
WIDTH
Model Number
BBQ07863P
BBQ07857P
BBQ08839P-18
BBQ08839P-30
BBQ08840P-18
BBQ08840P-30
BBQ07909
BBQ07910
BBQ07843P
BBQ07849P
BBQ07908
BBQ07841P-27
BBQ08866
BBQ08961
BBQ08865
BBQ07850P
Description
3 Pull Out Drawer, SS
Refrigerator
Propane Tank Compartment
Width
25”
Depth
22 7/8”
Height
32 ¼”
14 ¾”
16 ¼”
20 ½”
Single Access Door
Double Access Door
16 ½”
28 ¾”
17”
28 ¾”
51 ½”
8 ¾”
21 ¼”
21 ¼”
15 ¼”
24 ½”
17 ½”
10 ¾”
21 ½”
2 ¾”
2 ¾”
20 ¼”
20 ¼”
20 ½”
6 ½”
22”
22”
23 ¾”
20 ¼”
19 ¾”
23”
19”
19”
19 ¼”
19 ½”
19 ½”
14 ¾”
34 ¼”
34 ¼”
34 ¼
17 ½”
19 ½”
17 ½”
22”
21 ¼”
23 ½”
34 ¼”
18” Door and Drawer Combo
30” Door and Drawer Combo
Complete Utility Storage Kit
Paper Towel Storage
Beer Tap Refrigerator
Stainless Refrigerator
Ice Maker
27” Access Door
Wide Storage Drawer
Grill Steam Cleaner
1 Pull Out Drawer
Refrigerator
Outdoor Beverage Cooler
Cut-out for refrigerators, cocktail
centers and access doors
DEPTH
HEIGHT
WIDTH
2009 Barbecue Grills and Carts
www.calspas.com
LTR20091038, Rev. A
5
IMPORTANT: Cal Flame™ grills are manufactured to operate on either liquid propane (LP) or natural gas
(NG) and cannot be converted. To verify the grill’s operating fuel, check the serial number label in the back
of the chassis as you are looking at the grill from the front. Either LP or NG will be marked on the operating
tab, indicating the proper operating fuel. Attempting to convert Cal Flame™ grills from one fuel to another
may result in serious injury and will void the warranty coverage.
Always check the rating plate to make sure the gas supply you are hooking up to is the gas type the grill is
manufactured for.
If you do not have an updated filler valve on your existing propane tank, you will need to purchase one at
your local hardware store. Without it you will not be able to attach your tank to your Cal Flame™ grill or
refill the tank at your local propane refill station.
Leak Testing Procedure
Perform a leak test at least once a year whether the
gas supply cylinder has been disconnected or not.
In addition, whenever the gas cylinder is connected
to the regulator or whenever any part of the gas
system is disconnected or replaced, perform a leak
test.
As a safety precaution, remember to always leak test
your grill outdoors in a well-ventilated area. Never
smoke or permit sources of ignition in the area while
doing a leak test. Do not use a flame, such as a
lighted match to test for leaks. Use a solution of
soapy water.
1. Prepare a leak testing solution of soapy water by
mixing in a spray bottle one part liquid soap to
one part water.
2. Make sure all the control knobs are in the OFF
position.
3. Turn on the gas.
a. On natural gas systems, turn the main feed
valve to the grill.
b. On LP systems, turn the cylinder valve knob
counter clockwise one turn to open.
4. Apply the leak-testing solution by spraying it
on joints of the gas delivery system. Blowing
bubbles in the soap solution indicates that a leak
is present.
5. Stop a leak by tightening the loose joint or by
replacing the faulty part with a replacement
part recommended by the manufacturer. Do
not attempt to repair the cylinder valve if it is
damaged. The cylinder must be replaced.
6. Turn all control knobs back to the full OFF
position.
If you are unable to stop a leak:
1. Turn all control knobs back to the full OFF
position.
2. Shut off the gas supply to the grill and release
pressure in the hose and manifold by pushing in
and turning any of the control valves one quarter
turn counter-clockwise.
3. On LP systems, remove the cylinder from the
grill.
4. Call an authorized gas appliance
technician or an LP gas dealer.
service
Do not use the appliance until the leak is corrected.
2009 Barbecue Grills and Carts
LTR20091038, Rev. A
www.calspas.com
Installation / Assembly
Gas Requirements and Connection
Installation / Assembly
6
LP Gas
Tank Requirements
For plumbed-in LP installation, use a
convertible regulator and set it for LP
gas.
Maximum line pressure for plumbed-in
propane is 14” WC (3.5 kPa). Minimum
line pressure for propane is 11” WC.
The grill unit must be used with the
gas pressure regulator. The regulator
will control and maintain a uniform gas
pressure in the manifold. The burner orifices have
been sized for the gas pressure delivered by the
regulator.
WARNING: Attempting to operate the grill unit
without the gas regulator installed could cause an
explosion and possible death.
Cylinder Specification
Any LP gas supply cylinder used with this grill must
be:
•
•
Constructed and marked in accordance with
the Specifications for LP-Gas Cylinders
of the U.S. Department of Transportation
or the National Standard of Canada, CAN/
CSA-B339, Cylinders, Spheres and Tubes
for Transportation of Dangerous Goods;
and Commission, as applicable.
Approximately 12 inches in diameter and 18
inches high.
The maximum fuel capacity is 20 lbs. of propane, or 5
gallons. Full cylinder weight should be approximately
38 lbs. (43.7 lbs. nominal water capacity.) Never fill
the cylinder beyond 80% full.
Place the dust cap on the cylinder valve outlet
whenever the cylinder is not in use. Only install the
type of dust cap on the cylinder valve outlet that is
provided with the cylinder valve. Other types of caps
or plugs may result in leakage of propane.
LP Gas Hook Up
An enclosure for an LP gas cylinder shall be vented by
openings at the level of the cylinder valve and at floor
level. The effectiveness of the openings for purposes
of ventilation shall be determined with the LP-gas
supply cylinder in place. This shall be accomplished
in one of the following manners:
1. One side of the enclosure shall be completely
open.
2. Enclosures that have four sides, complete with a
top and bottom:
a. At least two ventilation openings at cylinder
valve level shall be provided in the sidewall,
equally sized, spaced at 180º (3.14 rad),
and unobstructed. Each opening shall have
a total free area of not less than one square
inch per pound (7.1 cm²/kg) of stored fuel
capacity, and not less than a total free area
of 10 square inches (64.5 cm²).
b. Ventilation openings shall be provided at
floor level and shall have a total free area of
not less than one square inch per pound (7.1
cm²/kg) of stored fuel capacity and not less
than a total free area of 10 square inches
(64.5cm²). If ventilation openings at floor
level are in a sidewall, there shall be at least
two openings. The bottom of the openings
shall be at floor level and the upper edge no
more than 5 inches (127 mm) above the floor.
The openings shall be equally sized, spaced
at 180º (3.14 rad) and unobstructed.
c. Every opening shall have minimum
dimensions so as to permit the entrance of a
1/8 inch (3.2 mm) diameter rod.
Transporting and Storing LP Gas
Transport only one cylinder at a time. Ensure the
cylinder is secured in an upright position with the
control valve turned off and the dust cap in place.
Store cylinders outdoors and out of reach of children.
Do not store cylinders in a building, garage, or any
other enclosed area.
2009 Barbecue Grills and Carts
www.calspas.com
LTR20091038, Rev. A
7
Requirements
Always check the rating plate to make sure the gas
supply you are hooking up to is the gas type the grill
is manufactured for.
IMPORTANT: Never connect the grill to an unregulated
gas supply.
The installation of this appliance must conform
with local codes or, in the absence of local codes,
to the national fuel gas code, ANSI Z223.1a-1998.
Installation in Canada must be in accordance with
the standard CAN/CGA-B149.2, Propane Installation
Code.
A licensed contractor or local gas company
representative must perform all natural gas
connections.
Ensure that the service supplying the grill is fitted
with a shut off valve conveniently positioned near the
grill and giving ease of access.
The grill must be isolated from the gas supply piping
system by closing its individual manual shutoff valve
during any pressure testing of the gas supply piping
system at test pressures equal to or less than 0.5 psi
(3.5 kPa).
The grill and its individual shutoff valve must be
disconnected from the gas supply piping system
during any pressure testing of that system at test
pressure in excess of 0.5 psi (3.5 kPa).
Your Cal Flame™ grill for use with natural gas comes
equipped with its own regulator that MUST NOT
be removed. If, this regulator needs to be replaced
use only the type specified by Cal Flame™ for this
appliance.
Connection
1. Remove the rear panel from the barbecue to
gain access to the regulator and gas connection
point.
2. Connect a suitable flex connector to the grill
regulator.
3. Check the grill controls to ensure all control valves
are in the full OFF position.
4. Turn on the main gas supply and check all
connections for leaks using soapy water as
described in the leak testing procedure section.
Warning: If you see bubbles in the soapy solution at
any of the connections, turn off the gas supply and
tighten the connection. If tightening the connection
does not seal the leak, it may be necessary to replace
the flex hose.
2009 Barbecue Grills and Carts
LTR20091038, Rev. A
www.calspas.com
Installation / Assembly
Natural Gas
Installation / Assembly
8
Installing the Transformer
All grills with electrical components such as lights or a convection
fan will require the transformer to be installed and plugged in
before you can use it. This needs to be done before the grill
is inserted in the island or modular cart. When the transformer
is attached to the grill chassis, use care in placing the grill in the
island cutout to avoid hitting the transformer.
1. Remove the transformer and the metal screws from the plastic
bag.
2. Place the grill on a sturdy surface and tilt it back to show the
underside of the grill.
3. Using the metal screws, attach the transformer to
the left side of the grill near the internal electrical
connection. Attach the metal plate to the outside
surface of the grill as shown in the figure below.
4. When you have firmly tightened the screws and
nuts, connect the plug from the transformer to
the grill. Screw on the stainless steel retainer.
2009 Barbecue Grills and Carts
www.calspas.com
LTR20091038, Rev. A
9
You will need a second person to help you to
avoid damaging the grill, the transformer, or
your barbecue island.
Before installing a grill or side burner in any island
or cut out, make sure that the opening is not bigger
than the outside frame of the grill unit. The grill
should rest on the lip of the frame. For drop-in
accessories, adequate cross ventilation must be
designed into enclosure to ensure the drop-in grill
or side burner does not become overheated.
Installing the Rotisserie
Attach the two brackets to the sides of the grill, one
on each side, using two screws as shown below.
Slide the rotis motor on one of the brackets as
shown below. The rotis motor will work on either
side of the grill.
Remove the metal cap protecting the outlet that
provides power for the rotis motor. Plug in the motor
cord and screw on the retainer nut to keep the plug
in place.
Pay careful attention to the location of gas lines.
Gas lines should be routed away from sources of
heat and should make as few bends as possible.
Check to see if gas line connections will be accessible
when grill is installed.
• If gas line connections are not easily accessible
when the grill is installed, support the grill
above counter level and attach the gas lines to
the grill. When the gas connections are made,
slide the grill into the cut out.
• If gas line connections are accessible when the
grill is installed, slide the grill into the cut out
and then attach the gas lines.
Be very careful not to kink gas lines when lowering
the grill or side burner into the cut out.
Keep your fingers away from where the grill will be
supported on counter. Your fingers could become
trapped and serious injury could occur.
Check to make sure the grill is level and is supported
around the entire outside edge. If the grill is not
level or is unstable, use non-combustible shims
under the outside lip to stabilize it.
Perform the leak test procedure as described earlier
in this manual.
2009 Barbecue Grills and Carts
LTR20091038, Rev. A
www.calspas.com
Installation / Assembly
Installing Grills in
Barbecue Islands
Installation / Assembly
10
Installing Side Burners
3. Connect the flexible hose (male end) to the pipe
tee.
1. Assemble a 3/8” pipe nipple to the 3/8” pipe
tee using Teflon tape or pipe sealant. Use only
sealant that is approved for use on LP gas.
4. Install and secure the side burner into the island
by simply setting it in place.
2. Install the pipe tee assembly to the grill intake
pipe. Tighten assembly and align the branch
opening of the tee with the hole of the cabinet.
5. Connect the female end of the flexible hose to
the side burner intake pipe.
6. Connect gas supply to the grill.
7. Check for gas leaks using soap water solution.
Items Included with Barbecue
Open barbecue door. Install hose with regulator on propane
tank. Then connect other end to "T" adapter. Make sure to
use gas rated tape seal when installing adapter to insure
proper seal.
A
1) "T" adapter (3/8")
2) 2 each Hose 3/8" Fittings
3) Regulatorw/ Hose
C
Grill
"T" Adapter (3/8" Threaded)
To grill, located
underneath and
behind grill
Items Included with Barbecue
1) "T" adapter (3/8")
2) 2 each Hose 3/8" FittingsTo
3) Regulatorw/ Hose
A
side burner, located
underneath behind burner.
To grill, located
underneath and
behind grill
Open barbecue door. Install hose with regulator on propane
tank. Then connect other end to "T" adapter. Make sure to
use gas rated tape seal when installing adapter to insure
proper seal.
C
Grill
"T" Adapter (3/8" Threaded)
From Grill
B
B
To side burner, located
From Side Burner
underneath behind burner.
A
3/8" Fittings
Side Burner
ToFrom
Propane
Tank
From Grill
3/8" Fittings
B
B
To Propane Tank
C
NOTE: You will need to use a gas rated
sealer on gas connectors that are not flared.
NOTE: You will need to use a gas rated
sealer on gas connectors that are not flared.
Then take other end of "T" adapter with hose attached
and connect to end of male located underneath and at
the back of the grill.
A (Use gas rated tape seal on all
connections).
Then take other end of "T" adapter with hose attached
and connect to end of male located underneath and at
the back of the grill. (Use gas rated tape seal on all
Connect
the last open line to the side burner
connections).
(Use gas rated tape seal on all connections)
Connect the last open line to the side burner
C (Use gas rated tape seal on all connections)
GAS LINE
GAS LINE
2009 Barbecue Grills and Carts
www.calspas.com
LTR20091038, Rev. A
11
Using Your Grill
We recommend you wash your entire grill with soap
and water prior to lighting it for the first time. Oils
are used during the manufacturing process and some
residual oil may still be on the stainless steel parts
of your grill. Washing will reduce the possibility of
discoloration. We also recommend you keep your
grill covered when not in use. This will minimize the
amount of dust and dirt that accumulates on your
grill and extend the life of your grill.
•
Do not heat sealed containers such as cans or
jars on grills or side burners. Explosion may
result resulting in injury or death. Any sealed
container, such as a pressure cooker, must have
a properly operating pressure relieve valve to
minimize explosion hazard.
•
Never put combustible material such as paper,
cloth, or flammable liquids on your grill at any
time. Do not use grill, side shelves, cabinets,
or any area around grill to store flammable
materials.
•
Never operate main burners and rear infrared
convection burners at the same time. Excessive
grill temperatures will result. Never allow your
grill temperatures to exceed 500° F.
Remember to use your Cal Flame grill safely by
following these reminders:
•
It is dangerous to use barbecue grills and side
burners in any manner other than for what it is
designed for.
•
Do not use charcoal in a gas grill or side burner
or electric grill.
Grill Controls
Infrared Burner
Infrared Burner
The controls shown at right
are for the Cal Flame™ drop-in
grills and stainless steel carts.
Familiarize yourself with these
controls before using your Cal
Flame™ barbecue.
Light Switch
Light Switch
Grill
Grill
Grill
Right Side Burner
Left Side Burner
Grill
Grill
Grill
Three Burner Cart with Sideburner
Three Burner Grill and Cart
Infrared Burner
Infrared Burner
Light Switch
Light Switch
Grill
Grill
Grill
Grill
Grill
Grill
Grill
Right Side Burner
Left Side Burner
Grill
Off
Four Burner Grill and Cart
Four Burner Cart with Sideburner
High
Low
Infrared Burner
Infrared Burner
Grill Knob Operation
Light Switch
Infrared Burner
Infrared Burner
Light Switch
Grill
Grill
Grill
Grill
Grill
Grill
Five Burner Grill and Cart
Grill
Grill
Right Side Burner
Left Side Burner
Grill
Grill
Five Burner Cart with Double Side Burners
Warning
NEVER cover the entire cooking or grill surface with griddles or pans. Overheating will occur and burners
will not perform properly when combustion heat is trapped below the cooking surface.
CAUTION: NEVER spray water on a hot gas unit. This may damage porcelain or cast iron components.
2009 Barbecue Grills and Carts
LTR20091038, Rev. A
www.calspas.com
Using Your Grill
Read all instructions before you operate your grill.
Using Your Grill
12
Lighting the Grill
Each time you light the grill, check the following:
•
•
Inspect the hose before using the grill. If there
is excessive abrasion or wear, or if the hose is
cut, it must be replaced prior to using the grill. If
you need a replacement hose, contact your Cal
Flame dealer.
Ensure the area around the barbecue is clear
of flammable substances such as gasoline, yard
debris, wood, etc.
•
Ensure there is no blockage of the airflow
through the vent space located below the face
of the unit.
•
When using propane gas:
attached to the regulator before each
use.
• Ensure the propane cylinder, regulator,
and rubber hose are installed in a
location not subject to heating above
125º F (51º C).
•
Ensure the burner flames burn evenly along both
sides of each burner with a steady flame (mostly
blue with yellow tipping). If burner flames are not
normal, check the orifice and burner for insects
or insect nests.
•
Ensure the in-line gas valve or gas cylinder valve
is always shut OFF when the barbecue is not in
use.
•
Do not operate the side burner with its cover closed
or the back burner with its cover installed.
• Keep the special ventilation openings in
the enclosure free and clear of debris.
• If connected to a propane cylinder,
carefully inspect the rubber hose
Electronically Lighting the Grill and
Infrared Burners
1. Open the hood.
2. Keep your face as far away from the burners
as possible.
3. Rapidly rotate the burner knob counter
clockwise past the light position to HIGH. You
will hear a loud click as the electronic lighter
produces a spark.
4. Listen for the sound of the gas igniting. If the
burner does not light on the first try, repeat
immediately.
5. If the burner does not light after three
attempts, turn the control knobs to the OFF
position. Wait five minutes until the gas clears
before attempting to light it again.
6. Repeat the procedure or try the manual lighting
procedure below.
7. Upon successful lighting, repeat the process on
the other burners you wish to light.
8. To shut off the burners, rotate the knob and
turn to OFF. It is normal to hear a popping
sound when the burners are turned off.
Manually Lighting the Grill and
Infrared Burners
5. Light and insert a long stem match, holding it
near the burner ports.
WARNING: Do not use standard matches or
cigarette lighters to perform match lighting
procedures. Serious burns can occur and lighters
can explode.
6. Push in and turn the control knob just past the
LIGHT position to HIGH.
1. Open the hood.
2. If you have just attempted to light the burner,
allow five minutes for any accumulated gas to
dissipate.
3. Slide out the drip tray from the grill.
7. Listen for the sound of the gas igniting. If the
burner does not light after five seconds, turn
the control knobs to the OFF position. Wait five
minutes until the gas clears before attempting
to light it again.
8. If the burner does not light after several
attempts see Troubleshooting Guide in the
back of this manual.
4. Keep your face as far away from the burners
as possible.
2009 Barbecue Grills and Carts
www.calspas.com
LTR20091038, Rev. A
13
Before lighting, make sure all burner controls are off.
Do not attempt to light the burners if the smell of
gas is present. Check the connection with a soap and
water solution after attaching the hose. For LP units,
make sure there is gas in the tank and it is sitting
upright. For natural gas units, make sure the shut off
valve is on.
3. Turn the control knob to HIGH and preheat the
grill for 15 minutes. Close the top cover during
the appliance preheat period.
1. Make sure the drip tray is in place.
5. Allow the grill to cool and clean the drip tray after
each use.
2. Light the grill burners using the instructions on
the previous page.
4. Place the food on the grill and cook to desired
completion. Adjust heat setting if necessary. You
may set the control knob to any position between
HIGH and LOW.
Do not leave the grill unattended while cooking.
Cooking with the Rotisserie
The rotisserie burner is an infrared type, which
provides intense searing radiant heat. It is designed
to cook items from the back using infrared heat.
The location of the burner allows the placement of
a rotisserie-basting pan (NOT included) beneath the
food to collect juices and drippings for basting and
gravy.
The rotisserie does not require and additional outlet
as it is powered by a 12-volt input located on the side
of the grill connected with a stainless steel sheathed
power cable.
1. To load the rotisserie rod, hold the handle firmly
while sliding one of the fork assemblies (prongs
facing away from the handle) onto the rod. Push
the rod through the center of the food, then slide
the other holder (prongs toward the food) onto
the rod. Center the meat on the rod and push
the fork assemblies firmly together. Tighten the
thumbscrews. To secure any loose portions of
your meat, use butcher string (never use nylon
or plastic string). Place a basting pan under the
food to collect the drippings.
2. To use the rotisserie, first mount the motor on the
left side of the grill. Place securely onto support
bracket.
3. The rod of the rotisserie system is assembled
into the motor by placing the pointed end into
the motor and resting the threaded end on the
support at the side of the grill. Once the rod
is pushed as far as possible into the motor, the
grooved end of the rod should rest on the right
side bracket.
4. If necessary, to offset unbalanced loads, slide the
counter weight on to the rod. With the counter
weight loose, allow the loaded rod to rotate and
come to a stop. Now rotate the counter weight
above the rod in a vertical position and tighten
the thumbscrew. You can slide the counter
weight away from or closer to the rotisserie rod
as needed for balanced operation. Once lit, the
rotisserie burner will reach cooking temperature
in about one minute. The orange/red glow will
even out in about five minutes.
2009 Barbecue Grills and Carts
LTR20091038, Rev. A
www.calspas.com
Using Your Grill
Basic Grill Operation
Using Your Grill
14
Cooking with a Convection Grill
A convection grill has an internal fan that circulates heated air evenly throughout the grilling area when the
hood is closed. Cooking in this way distributes heat more efficiently so you no longer have to be concerned
with “hot spots” on the grill where food tends to burn. The fan switch is located at the far left of the front
panel of the grill.
EXHAUST VENTS HEAT
THAT IS DRAWN IN
FROM THE BACK. IT
IS THEN REDISTRIBUTED
INTAKE VENTS
INTAKE VENTS
A
FRONT VIEW OF GRILL
Intake/Recirculation Fan
Cooking with a Charcoal Grill
Lighting Instructions
NEVER use flammable materials and fluids such as
gasoline, kerosene, butane or propane, diesel fuel,
or alcohol to light or re-light fires. Keep the grill away
from such substances when lit.
Use high quality hardwood charcoal to ensure a good
flame. Charcoal briquettes made from maple, oak,
birch, or elm woods will burn cleanly, minimizing
smoke and unpleasant odors.
1. Open the hood and remove cooking grates.
2. Place charcoal on the ashtray at the bottom of
grill and arrange charcoal in a pyramid shaped
stack.
3. Add charcoal lighting fluid according to
manufacturer’s instructions. Let it stand for about
a minute to let fluid penetrate charcoal.
4. Carefully light charcoal, allowing it to burn
approximately 15 to 20 minutes or until a light
gray ash develops.
Leave about a one-half inch space between each
piece of charcoal. This helps to avoid flare-ups from
the meat juices and provides the even heat best
suited for grilling.
Grilling
NEVER allow children or pets unattended in an area
where a grill is being used. Never allow children to
sit, stand or play on or around the grill at any time.
When in use, certain areas of the grill get hot enough
to cause severe burns.
Leave the hood open for “Texas Style” open air
grilling. Close the hood for “smoker” cooking.
For the greatest concentration of heat, leave the hood
open. Adjust the crank handle to lift the charcoal tray
up so the burning charcoal will be close to the grilling
meat. Lower the charcoal tray to slow the grilling
temperature.
Storage
Never store the grill with ashes or combustible
materials inside. Do not store the grill until the fire
is completely extinguished and the grill body has
cooled.
2009 Barbecue Grills and Carts
www.calspas.com
LTR20091038, Rev. A
15
Using Your Grill
Turning on and off the Lights and Fan
The ON / OFF switch controlling your halogen
light is located at the control panel on the front
lower left side.
Certain models of the Cal Flame grill are equipped
with either one or two halogen light.
Your grill is equipped with a grounded (3 prong)
120 VAC plug located in the lower left rear corner
of your cart and must be plugged into a permanent
grounded 120 VAC outlet with a dedicated 15amp
GFI breaker. DO NOT cut or remove the ground
prong as this may result in fire, electrical shock
or other personal injury. This electrical source
provides power to the lights.
Drop-In Food Warmer
Attach this three-pan food warmer to your favorite
bartending center or grill and serve a variety of hot,
fresh hors d’ oeuvres and side dishes. The food
warmer has three steamer pans and a built-in fuel
drawer.
1. Remove one steamer pan and fill the container
pan with approximately 2”-3” warm water. Gently
place the steamer pan back on to the container
pan.
2. Open the sterno fuel drawer. Remove the sterno
fuel can holder covers. Place two sterno fuel cans
into the can holder.
3. Using a butane lighter or long stem match, light
the sterno fuel. For safety, the rear one first.
5. Place food to be warmed into the steamer pans
and cover with pan lids.
6. To extinguish the sterno fuel flame, open the
drawer and carefully replace the fuel holder
covers. Flames will go out.
IMPORTANT
•
The water in the container pan is a scald and
burn hazard as it gets hot. Do not attempt to
empty it until it is cooled.
•
Do not burn sterno fuel with the drawer open.
•
Do not leave sterno fuel burning unattended.
Do not leave children unattended around food
warmer during and immediately after use.
4. Close the drawer.
Griddle
When sliding the griddle out of the enclosure, always do it slowly as the heavy weight may cause you to
suddenly drop the griddle. Lift the griddle out of the enclosure instead of sliding it all the way out.
Remove two cooking grates for the griddle space. Leave grease in the front drain when cooking. Wait until
the griddle cools down when done cooking. Use both hands when removing the griddle and draining the
grease.
Before storing the griddle, make sure it is clean and dry. Slide the griddle into the enclosure for safe and
easy storage.
2009 Barbecue Grills and Carts
LTR20091038, Rev. A
www.calspas.com
Cleaning and Maintenance
16
Cleaning and Maintenance
To ensure safe and proper maintenance, we recommend you follow these directions carefully.
Clean internal parts of the grill regularly as determined by the amount of use and foods cooked. The entire
grill should be cleaned at least once a year.
In addition, keep the area around your grill or cart clear and free from combustible materials, gasoline, and
other flammable vapors and liquids. Do not obstruct the flow of combustion and ventilation air.
If your LP-gas grill is placed in a stationary barbecue island, keep the access door for the propane cylinder
clear of any obstruction. Ensure the ventilation opening for cylinder enclosure is kept clear.
DISCONNECT ELECTRICAL SUPPLY BEFORE CLEANING ANY PART OF THE GRILL.
Burners
Spiders and small insects occasionally inhabit or make
nests in the burner tubes, obstructing the gas flow.
Sometimes this results in a type of fire in and around
the gas tubes called “flashback”. To reduce the risk of
flashback, this procedure should be followed at least
once a month or when your grill has not been used for
an extended period of time.
IMPORTANT: Prior to starting this procedure, turn
OFF all of the gas control knobs, shut off the fuel
supply, and disconnect the fuel line.
1. Remove burners from the grill by carefully lifting
each burner up and away from the gas valve
orifice.
2. Use a wire brush to clean the outer surface of each
burner to remove food residue and dirt. Clean any
clogged ports with a stiff wire such as an opened
paper clip.
3. Inspect each burner for damage (cracks and
holes). If any damage is found, replace the burner
and discontinue grill usage.
4. Upon reinstallation, inspect the gas valve orifices
for cleanliness and condition and the location of
the igniters.
Care of Stainless Steel
Do NOT use wire wool pads, scrappers, harsh abrasive,
scoring materials, bleaches, or harsh cleaners on your
cart or grill, or allow salt and vinegar mixtures to
remain in contact for a long period of time. This will
cause scratching, scoring, rusting and pitting.
We recommend that you clean stainless steel
components with a cleaner that is approved for
stainless steel and only clean when the grill is cool
and in indirect light. Never use steel wool.
Covering Your Cart or Grill
When not in use and after cooling, cover your cart or
grill with our full length, zippered side canvas cover.
(See your local Cal Flame dealer for details.) The cover
will help protect your cart or grill from detrimental
effects of weather and environmental pollutants.
Never put a cover on a hot grill. Allow the grill to cool
before covering.
After Use Care
The easiest way to clean the grill is immediately after
cooking is completed and after turning off the flame.
Drip Pan
•
Scrub the grill rack with a brass bristle barbecue
brush and hot soapy water.
The full width drip pan will collect grease from the
main grill area. The pan should be cleaned after every
use to avoid the possibility of a grease fire. Be sure to
allow the drip pan to cool prior to cleaning. You may
clean the drip pan with a solution of warm soapy water.
Make sure to rinse thoroughly to avoid staining.
•
Wipe the grill with a damp soapy cloth and rinse
with warm/hot, clean water. For more tenacious
deposits, including oil, grease and water-borne
deposits, use a multipurpose cream cleanser and
apply with a soft, damp cloth.
•
Dry with a soft, dry, clean towel if preferred.
2009 Barbecue Grills and Carts
www.calspas.com
LTR20091038, Rev. A
17
Charcoal Grill
Be sure to unplug the electrical supply before cleaning
any part of your Cal Flame barbecue. Spray cabinet
area with a soap and water solution. Rinse with a
gentle stream of fresh water.
To prevent burns or injury, make sure the grill is
completely cool before cleaning. After initial usage,
areas of the grill may discolor from the grill’s heat.
Griddle
To prevent burns or injury, make sure the griddle is
completely cool before cleaning.
The griddle is made from non-magnetic, 304 grade
stainless steel. There are various stainless steel cleaners
available. Always use the mildest cleaning procedure
first, and always scrub in the direction of the grain.
Soapy water should be sufficient for most cleaning. A
sniff brush may also be helpful in removing grime and
food deposits. Wipe all area dry before storing.
Drop-in Food Warmer
To prevent burns or injury, make sure the food warmer
is completely cool before cleaning. The drop in food
warmer is made from non-magnetic, 304 grade
stainless steel. There are various stainless steel
cleaners available. Always use the mildest cleaning
procedure first, and always scrub in the direction of
the grain. Soapy water should be sufficient for most
cleaning. All parts of the food warmer can be cleaned
with hot soapy water, rinsed, dried and buffed with a
heavy pile cloth.. Be sure to rinse thoroughly and to
wipe dry to avoid watermarks.
Note: DO NOT use oven cleaners or abrasive cleaners
on enameled surfaces. They may damage the finish,
causing accelerated wear.
There are various stainless steel cleaners available.
Always use the mildest cleaning procedure first, and
always scrub in the direction of the grain. Soapy water
should be sufficient for most cleaning.
DO NOT use oven cleaners or abrasive cleaners on
enameled surfaces. They may damage the finish,
causing accelerated wear.
Ash Removal
Remove the ashes as soon as possible after each use.
Wait until the charcoal has cooled, slide out the drip
pan and pour out the ashes. You can save the larger
pieces of charcoal for the next time you cook. Use
a garden hose to wash out accumulated grease and
ashes. Allow the drip pan to dry before reinserting into
the grill.
Cooking Grates
Use a solution equal parts detergent and hot water
just as you would for any cooking equipment. A stiff
brush may also be helpful in removing grime and food
deposits.
Hood and Body
Wipe the inside hood and body with detergent and hot
water. The external surfaces may be cleaned in the
same fashion. Wipe all area dry before storing.
Storage
For your safety, make sure unit is cool and wood
and charcoal embers completely extinguished before
storing.
2009 Barbecue Grills and Carts
LTR20091038, Rev. A
www.calspas.com
Cleaning and Maintenance
Island Cabinets
Cleaning and Maintenance
18
Light Bulb Replacement
WARNING: Never attempt to replace a light bulb
when the grill is in use. Serious burns will result.
WARNING: Never touch halogen bulbs with your
bare fingers. Use a tissue or a small piece of paper
to handle bulbs. Oils from your hands will damage
halogen bulbs.
Light Removal
1. Open the grill hood and locate the glass light
covers at the back of the grill.
2. Using a small screwdriver, gently pry the light
cover away from the housing. Be extremely
careful prying off the light cover. You may
damage the light cover as a result.
3. Unscrew the two screws located at the side of
the white ceramic light fixture.
4. Pull the burnt bulb out of the socket.
Light Replacement
1. Using a tissue or small piece of paper, carefully
push a new bulb into the socket, making sure
both wires on the bulb go into the light socket
evenly.
2. Tighten the two screws on the side white ceramic
light fixture.
3. Carefully replace the light cover by snapping it
in place.
2009 Barbecue Grills and Carts
www.calspas.com
LTR20091038, Rev. A
19
Problem:
Smell of gas is present
Solution:
Check for loose connections in the gas line. Perform a leak test following the procedure
described in this manual.
Problem:
Burner does not ignite
Solution:
Use the following procedure with the figure below.
Check the position of the sparker tip. It should be pointing forward towards the front of
the burner.
•
•
•
•
•
Make sure there is a blue spark at the electrode tip to the burner.
Make sure the igniter wire is connected firmly to the valve ignition device and the
electrode.
Make sure the valve orifice is free of any debris, dust or grease.
Make sure the valve orifice is aligned inside the front hole of the burner.
If there is no spark at all, replace the electrode or igniter wire.
Note: Turn off the gas at the source while troubleshooting.
Problem:
Burner tube is misaligned over the orifice
Solution:
Reposition the burner tube so that it is properly seated over the orifice.
Problem:
Obstruction in the gas line
Solution:
Remove the fuel line from grill. (Do not smoke or perform any maintenance in the vicinity
of an open flame.) Open the gas valve for one second to blow out any debris. Close off the
gas valve and reconnect the fuel line securely.
2009 Barbecue Grills and Carts
LTR20091038, Rev. A
www.calspas.com
Appendix
Appendix
Troubleshooting
Appendix
20
Problem:
Yellow Flame
Solution:
Once the entire burner is operating, check the flame color to be sure that it is mostly blue.
Some yellow at the tips may be present due to impurities in the fuel. If the flame is golden
or yellow in color, the reason could be seasoning salts, oil film, or other foreign matter on
the burner.
Problem:
Plugged orifice
Solution:
Unplug the orifice as follows:
•
Remove cooking grills, flame tamer and grease tray.
•
Remove burners from the bottom of the firebox by pulling the cotter pin from beneath
the burner peg using a standard screwdriver or needle nose pliers.
•
Carefully lift each burner up and away from the gas orifice.
•
Remove the orifice from the control valve.
•
Gently clear any obstruction with a fine wire.
•
Reinstall the orifice, reinstall the burners over the orifices, and seat each burner peg
into position hole at the bottom ledge of the firebox.
•
Replace all cotter pins.
•
Replace cooking components and grease collectors.
If an obstruction is suspected in the control valve, contact your local Cal Flame dealer for
assistance.
Problem:
Misalignment of Igniter on Burner
Solution:
•
Check for proper position of the electrode tip, which should be pointing forward towards
the front of the burner and free of grease to allow proper sparking.
•
The ignition wire should be connected firmly to the valve ignition device and electrode.
Replace the ignition wire if it is frayed or cracked.
•
With the gas supply closed and all control knobs set to the off position, check each
position igniter individually for the presence of a spark at the electrode. Push each knob
in fully and rotate it about 1/4 turn to the left (counter-clockwise) until you hear a loud
click. The trigger hitting the strike block should produce a blue spark at the electrode
tip. Return control knob to the off position before checking the next igniter.
•
While the grill is still hot, wait for a minimum of five minutes before commencing reignition. (This allows accumulated gas fumes to clear.) If all checks / corrections have
been made and the gas grill still fails to operate properly, contact your local Cal Flame
dealer.
Problem:
Flashback
Solution:
When fire occurs in and around the burner tubes, immediately turn off gas at its source and
turn the control knobs clockwise to the ‘OFF’ position. Wait until the grill has cooled off and
then clean the burner tubes and burners as described on page of this manual.
2009 Barbecue Grills and Carts
www.calspas.com
LTR20091038, Rev. A
21
WARNING! You must have an authorized service technician perform this
procedure. If these instructions are not followed exactly, a fire or explosion may
result causing property damage, personal injury or loss of life. Lloyd’s Material
Supply (L.M.S.) will not be held responsible for an improperly converted gas grill.
All Cal Heat grills are manufactured as standard liquid propane (LP) grills and can be converted to burn
natural gas (NG). There are two steps required to convert a grill from LP to NG. You must perform
both steps.
Step 1:Switching the regulator behind the grill
Step 2: Changing the burner orifices
You will need some or all of the fittings (depending
on the size of the grill or cart) contained in
the conversion kit provided with the grill. The
conversion kit contains orifices to convert five
main burners, two small rear infrared burners,
one large infrared burner, and two side burners.
You will not need all of the parts in the kit.
Before you begin, make certain the LP gas source
has been disconnected from the grill. If you have
a cart, you do not need to remove the grill from
the cart.
To gain access to the NG regulator:
•
For grills, tilt the grill forward.
•
For barbecue carts, remove the back cover.
Step 1: Switching the regulator behind the grill
The regulator in the image below has been removed from a grill to illustrate this
procedure.
1. Remove the LP gas line.
2. Remove the cap fitting from the end of the NG gas regulator.
You will need:
• 13mm open end
wrench
• 3/4” flared fitting
• Pipe compound
3. Place the cap fitting over the LP gas inlet.
4. Insert the 3/4” flared in the NG gas regulator.
2009 Barbecue Grills and Carts
LTR20091038, Rev. A
www.calspas.com
Appendix
Converting from LP to NG
Appendix
22
Step 2: Changing the burner orifices
1. Replace the infrared burner orifices
a. Using a 13mm wrench, remove the orifice for the infrared burner.
b. Apply pipe compound to the fitting threads where you will place the
new orifice.
c. Screw on the correct orifice for your grill until it is finger tight.
d. Tighten the orifice with the 13mm wrench.
e. If you have dual infrared burners, repeat the previous steps for the
second burner.
You will need:
• 13mm open end
wrench
• One #50 orifice (for
single infrared burner)
• Two #54 orifices (for
dual infrared burners)
• Pipe compound
f. Replace the back cover.
2. Replace the side burner orifices
a. Remove the grate, burner cap and burner diffuser from the side
burner.
b. Using a 7mm wrench, remove the orifice for the burner.
c. Apply a small amount of pipe compound to the orifice threads.
d. Screw in the orifice until it is finger tight.
e. Tighten the orifice with the 7mm wrench.
You will need:
• 7mm wrench, socket,
or nut driver
• One or two 1.75mm
orifices (depending on
your side burner)
• Pipe compound
f. If you have dual side burners, repeat the previous steps for the
second burner.
3. Replace the main burner orifices
a. Remove the grates, flame tamers, and drip tray from the grill.
b. Remove the cotter pins from the end of the burners. The cotter pins
are accessible from underneath the grill in the back in the accessory
cabinet.
c. Carefully remove the burner.
d. Using a 6mm socket or nut driver, remove the orifice for the
burner.
You will need:
• 6mm socket or nut
driver
• Two to five 1.9mm
orifices (depending on
your grill
• Pipe compound
e. Apply a small amount of pipe compound to the orifice threads.
f. Screw in the orifice until it is finger tight.
g. Tighten the orifice with the 6mm wrench.
h. Repeat the above steps for the remaining burners.
i. Replace the burners, cotter pins, flame tamers, drip tray, and grates.
4. Apply the sticker
After conversion has been completed, apply the enclosed sticker to the rating plate. The sticker reads “This
unit has been converted from LP to NG.”
2009 Barbecue Grills and Carts
www.calspas.com
LTR20091038, Rev. A
23
Appendix
Installing and Replacing Infrared Burners
1. Disconnect or shut off the liquid propane or
natural gas line connect to the grill. Wait until
the burners cool down.
2. Open the hood and remove the grate and flame
tamer on top of the burner you want to replace.
3. Through the access door underneath the grill,
find the round stud and locking pin that locks the
burner you want to replace.
6. Take the burner out of the grill and store it in a
safe and dry place.
7. Install the infrared burner. Align the gas inlet on
the burner with the gas supply valve on the grill
and torch tube with ignition. Make sure they align
perfectly. Slide the stud at the other end into the
locking hole.
8. Adjust the infrared burner. Make sure the burner
is aligned and in position.
9. Install the locking pin. Through the access door
underneath the grill, find the stud to lock the
burner in place. Install the locking pin. Make sure
the locking pin is secured correctly.
10. Repeat steps 2 through 9 if you want to replace
other burners.
4. Carefully remove the locking pin with your
fingers.
5. Raise the stud from the locking hole and move
the burner forward carefully to release it from
the ignition and gas supply valve.
11. Put back the grate you just removed. (You don’t
need the flame tamer for infrared burners.)
12. Reconnect or turn on the gas line.
If you want to change back to regular burners, just
follow the procedure above in reverse order.
Replacement Covers
Cal Flame Drop-Ins
BBQ010
BBQ011
BBQ012
BBQ013
COVER,
COVER,
COVER,
COVER,
Cal Flame Carts
BBQ835CR4
BBQ835CR5
BARBECUE CART COVER, 4 BURNER, BLACK
BARBECUE CART COVER, 3 & 5 BURNER, BLACK
GRILL, SMALL, 3 BURNER
GRILL, MEDIUM, 4 BURNER
GRILL, LARGE, 5 BURNER
SIDE BURNER, SINGLE & DOUBLE
2009 Barbecue Grills and Carts
LTR20091038, Rev. A
www.calspas.com
Appendix
24
2009 Warranty
LMS offers the following limited warrants against defects in material and
workmanship on Cal Flame barbecue products and components:
Lifetime Component Warranty
Lifetime Equipment Warranty
LMS warrants against deterioration and corrosion
LMS warrants against deterioration and corrosion
•
•
•
•
•
•
•
•
•
Flame Tamers -- Stainless Steel
Burners - Cast Stainless Steel
Grates - Stainless Steel
Griddle
Rotisserie - HD Stainless Steel
Mountings - Stainless Steel
Grill Lid and Body - Stainless Steel
Flat Drop-In Body
Charcoal Grill
LMS warrants the cart’s structural frame, all non-stainless steel fasteners, rotisserie motor, temperature gauge,
plastic items, stainless steel drawers, doors, sinks, warming racks, igniters, tube stainless steel burners, gas
valves, food warmer, sear zone, infrared burners, cocktail center, modules, and ice chest for a period of one
year.
Extent of Warranty
This 2009 Cal Flame Warranty is only valid on Cal Flame models delivered in the United States or Canada and
extends through the selling dealer to the original purchaser at the original site of installation. This warranty
becomes valid at time of purchase and ends either by specified time-frame listed above or upon owner transfer
or relocation.
Manufacturer Warranty
All Cal Flame models are manufactured with the highest quality appliances and are warranted to be free from
defects in material and workmanship at time of delivery. The appliance warranty is extended through the
manufacturer of the product.
Warranty Performance
In the event of a malfunction or defect covered under the terms of this warranty, a factory authorized service
agent of LMS will perform the necessary repairs. To obtain service, contact the selling dealer. In the event the
consumer is unable to obtain satisfactory customer service from the selling dealer or service agent, written
notification must be given to the LMS Customer Relations Department within 30 days of the reported failure.
There will be no charge for parts or labor on a covered item. However, the service agent may assess a
reasonable travel or mileage charge per service call. If LMS determines that repair of a covered item is not
feasible, L.M.S. reserves the right to replace the defective merchandise with merchandise equal in value to the
original purchase price. Warranty repair and / or replacement is the sole discretion of LMS and this warranty
does not cover costs therein, including but not limited to: freight, removal, re-installation, etc. This warrant is
non-transferable and may not be extended beyond the above mentioned time frames under any circumstances,
by any of LMS’s representatives.
Warranty Limitations
This warranty is void if the barbecue grill, cart or island has been subject to negligence, alteration, misuse,
repairs, dings, dents, scratches, or incorrect and / or prohibited applications, as specified in the owner’s manual.
Gas lines must be installed by a licensed plumber only or local gas company agent. Incorrect electrical installation
by unlicensed electricians, service by non-LMS authorized representatives, acts of God and other cases beyond
the control of LMS are not covered by this warranty. Please refer to the owner’s manual for examples of
exclusions and common acts invalidating this warranty. This limited warranty applies only to barbecue grills,
carts, and associated hardware used for personal, family, and outdoor household purposes. This warranty does
not apply to labor charges on grills, replacement parts and hardware. This limitation is retroactive and applies
to all grills and hardware manufactured from 2000 and hereafter.
2009 Barbecue Grills and Carts
www.calspas.com
LTR20091038, Rev. A
25
LMS shall not be liable for loss of use of the barbecue
grills, carts, related hardware or other incidental or
consequential costs, expense or damages, which may
include, but are not limited to, removal of permanent
deck or other custom fixtures or the necessity for crane
removal. Any implied warranty shall have duration
equal of the applicable warranty stated above.
incorrect electrical installation, acts of God and any
other cases beyond the control of LMS Examples of
common acts invalidating this warranty include but are
not limited to:
•
Scratches caused by normal use.
•
Damage caused by extreme weather conditions
(hot, cold, etc.)
•
Damage caused by dirt, sand, and/or water
damage.
•
Damage caused by continued operation of
the barbecue with either known or unknown
problems.
Customer Service
•
Damage caused by direct sunlight.
For customer service, contact the authorized selling
dealer immediately. If you need additional information
or assistance, please contact the LMS Customer
Relations Department at 1462 E. Ninth St., Pomona
CA 91766 or call (800) 225-7727.
•
Damage caused as a result of failure to follow the
operating instructions as defined in this owner’s
manual.
Legal Remedies
This limited warranty gives you specific legal rights.
You may have other rights, which may vary from state
to state.
See your Cal Flame barbecue dealer for a copy of the
applicable warranty, details and any questions you
may have regarding the warranty coverage on your
barbecue.
This Limited Warranty specifically excludes commercial
barbecue grills or carts.
Warranty Exclusions
Warranty Limitations
The Limited Warranty is void if the grill or cart has
been subject to negligence, alteration, misuse, abuse,
repairs by non-LMS authorized representatives,
BTU Ratings
This Limited Warranty applies only to barbecues
normally used for personal, family, or household
purposes.
LMS warrants the grills, carts, and associated hardware
from defects in material and workmanship for a period
of one year from the original date of purchase.
Main burners
Infrared burner CF 3 – 5
Infrared burner CF 4
Side burner
15,000 BTU
9,000 BTU
12,000 BTU
13,000 BTU
1.9mm
#54 DMS
#52 DMS
#50 DMS
2009 Barbecue Grills and Carts
LTR20091038, Rev. A
www.calspas.com
Appendix
Disclaimers
Locating the product serial number
The serial number of your Cal Flame grill is located
on the back and is visible when the hood is down.
You will need this number to properly register
your grill or cart and activate coverage. Write this
information in the space provided below.
Grill or cart model: ______________________________________________________________________
Grill or cart serial number: _ ______________________________________________________________
Type of fuel (circle one):
Liquid propane
Natural gas
Charcoal
Date purchased: _ ______________________________________________________________________
Date installed: _________________________________________________________________________
Cal Flame dealer’s phone number: _________________________________________________________
Cal Flame dealer’s address: _______________________________________________________________
Don’t forget to register your new product at www.calspas.com.
CONTACT INFORMATION
For customer service, please contact your authorized
dealer immediately. If you need additional information
and/or assistance, please contact:
LMS Customer Service Department
1462 East Ninth Street
Pomona, CA 91766.
Toll Free: 1-800-CAL-SPAS
Fax: 1-909-629-3890
www.calspas.com