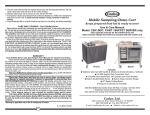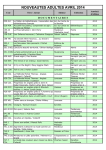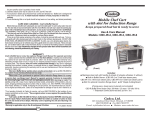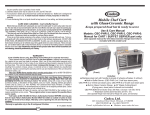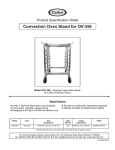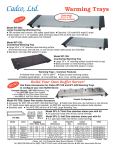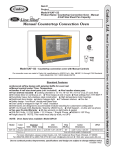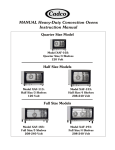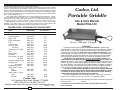
1
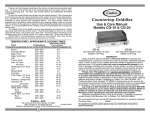
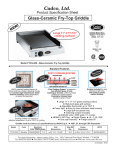
will not seriously alter the release properties of the surface. To remove this discoloration, use a commercial cleaner designed for cleaning nonstick surfaces. These cleaners are available at most grocer y and hardware stores. For best results, follow the manufacturers instructions, being careful that any cleaning solution coming in contact with the exterior of the appliance is wiped off. After treating the griddle with a commercial cleaner, it is recommended that the cooking surface be wiped lightly with a cooking oil before using. The outside finish of the griddle is easy to keep attractive and looking new. Simply wipe away spills and drips as they occur. If food should happen to bur n on, it is easily removed with warm, sudsy water and a dish cloth. Any food residue remaining can be whisked away with a gentle stroke of a nylon mesh pad. Rinse and wipe dry. IMPORTANT: To insure continued accuracy of the heat control, avoid rough handling in use and storage. Any maintenance required for this product other than normal household care and cleaning, should be performed by our Factory. TEMPERATURE / APPROXIMATE COOKING TIMES Cadco, Ltd. Portable Griddle Use & Care Manual Model PCG-10C Approximate Cooking Time in Minutes* *Cooking times are approximate and can vary due to food thickness, starting food temperature, etc. Food Bacon Canadian Bacon Eggs, Fried Eggs, Scrambled Fish French Toast Ham 1/2" thick 3/4" thick Hamburgers 1/2" thick Liver Minute Steak Pancakes Pork Chops, 1/2" thick 3/4" thick Potatoes, cottage fried Sausage, link precooked Sandwiches, grilled Steak, Beef 1 " thick Rare Medium Steak, Beef 11/2" thick Rare Medium Temperature 300°-325° 275°-300° 250°-275° 250°-275° 325°-375° 300°-325° 325°-350° 325°-350° 325°-375° 325°-350° 375°-400° 300°-325° 325°-375° 325°-375° 300°-350° 300°-325° 325°-350° 300°-325° 5-8 3-4 3-5 3-5 5-10 4-6 12-14 14-16 8-12 5-10 4-5 2-3 15-20 20-25 10-12 20-30 10-12 5-10 350°-400° 350°-400° 6-7 10-12 350°-400° 350°-400° 8-10 18-20 120 volts - 1500 watts- 12.5 amps WARRANTY Cadco warrants that this Griddle be free from defects in material and workmanship for a period of one year from date of purchase. (Warranty provides repair of unit.) A copy of your original purchase receipt is required for proof of purchase date. This warranty does not cover consequential damage of any kind or damages resulting from accident, misuse, abuse, or external service or repair attempts by unauthorized personnel. Inquiries concerning this warranty and the use and maintenance of this unit should be directed to Cadco, Ltd. Please note: This appliance is a carry-in service item; customer is responsible for packaging the unit securely and returning it to Cadco* for service, along with a copy of your original purchase receipt, a description of the problem, and your name, shipping address and phone number. Ship to: Cadco, Ltd., Attn: REPAIR, 145 Colebrook River Road, Winsted, CT 06098. If shipping the unit for service, we recommend that you insure it for its original purchase price. Cadco is not responsible for damage or loss of unit in transit to us. Call Cadco at 860-738-2500 for Return Authorization Number BEFORE returning any item for repair. Return Authorization Number MUST be written on outside of carton to track the unit and avoid service delays. Warranty covers repairing the unit and returning it to customer. Warranty is applicable only in USA and Canada*. (*Canadian customers contact Joicey Food Services, Ltd. in Ontario, Tel. (905) 825-9665.) Cadco, Ltd. 145 Colebrook River Road, Winsted, CT 06098 (860) 738-2500 l Fax (860) 738-9772 Website: www.cadco-ltd.com.com E-mail: [email protected] 4 5/28/2004 RV02 We recommend that you record the following information for warranty purposes: Purchase Date:_____________Dealer:__________________________ To expedite all warranty claims please keep your dated sales receipt from place of purchase. This is a UL Listed appliance. The following important safeguards are recommended by most portable appliance manufacturers. IMPORTANT SAFEGUARDS To reduce the risk of personal injury or property damage when using electrical appliances, basic safety precautions should always be followed, including the following: 1. READ ALL INSTRUCTIONS. 2. Do not touch hot surfaces. Use handles. Use hot mitts or potholders. 3. To protect against electrical shock, do not immerse control, cord or plug in water or other liquid. 4. Close supervision is necessary when any appliance is used by or near children. 5. Unplug from outlet when not in use and before cleaning. Allow to cool before putting on or taking off parts, and before cleaning the appliance. 6. Do not operate any appliance with a damaged cord or plug or after the appliance malfunctions or has been damaged in any manner. Contact the Cadco Factory Service Department at (860) 738-2500 for examination, repair or adjustment. In Canada call (905) 825-9665. 7. The use of accessory attachments not recommended by the appliance manufacturer may cause injuries. 8. Do not use outdoors. 9. Do not let cord hang over edge of table or counter or touch hot surfaces. 10. Do not place on or near a hot gas or electric burner or in a heated oven. 11. It is recommended that this appliance not be moved when it contains hot oil or other hot liquid. 12. ALLOW GREASE TRAY TO COOL COMPLETELY BEFORE REMOVING. 13. Always attach heat control to appliance first, then plug cord into wall outlet. To disconnect, turn control to "OFF", then remove plug from wall outlet 14. Do not use appliance for other than intended use. SAVE THESE INSTRUCTIONS CAUTION: For safety's sake, when using non-stick cookware or electric appliance with nonstick coatings, keep your pet birds out of the room. Birds have respiratory systems that are sensitive to many kinds of fumes, including fumes from overheated nonstick cookware. NOTE: A short power supply cord (or cord set) has been provided to reduce the hazards resulting from becoming entangled in or tripping over a longer cord. Longer cord sets or extension cords may be used if care is properly exercised in their use. If a long cord set or extension cord is used, the marked electrical rating of the cord set or extension cord should be at least as great as the electrical rating of the appliance. The longer cord should be arranged so that it will not drape over the counter top or table top where it can be pulled on by children or tripped over accidentally. socket, and lift up. Allow unit to cool before removing splah guard. 6. Push heat control into heat control socket, dial side up. Figure A Figure B Splash Guard Handle/Leg Heat Control Socket Splash Guard Handle/Leg Rear Leg Splash Guard Hook Rear Leg Non-stick Cooking Surface Grease Tray Heat Control HOW TO USE (Before using for the first time, become familiar with the griddle features, Figure B. Wash griddle in dishwasher or in warm sudsy water, rinse and dry. Do not submerge heat control or let the heat control come in contact with any liquid. )To "season" the nonstick properties of the surface coating, rub the cooking surface of the griddle lightly with cooking oil. Season with each use to maintain the nonstick properties. 1. Prepare food for cooking. 2. Plug unit into appropriate 3-prong wall socket. Turn heat control to desired temperature. Preheat griddle for at least 5 minutes before placing food on it. Pilot light will turn off when selected temperature is reached. During cooking, pilot light will go on and off, indicating desired temperature is being maintained. 3. Because the griddle features a nonstick finish, food may be prepared with or without shortening, according to taste. 4. Place food on griddle and cook according to temperature time table (page 4). H e a t should be adjusted according to personal preference and particular food being cooked. Temperatures and times in the table are approximate. 5. NOTE: You may notice at higher temperatures that the left side of griddle is a little hotter than right side, due to the nature of how heat behaves in the curve of a heating element. This is not a defect. Use the left side to cook items that normally take a little longer to cook. Another option is to start placing the food on the griddle from right to left, so the right food has a little longer to cook. 6. Turn heat control to OFF when cooking is completed. Unplug heat control from wall outlet, then from appliance. Allow unit to cool completely before removing grease tray to empty, or removing splash guard. Grease tray and splash guard are made of stainless steel for durability. During use, they get very hot. Extreme care should be used when handling, emptying, etc. As a precaution, always use a hot mitt or potholder. CARE AND CLEANING Please read these instructions carefully. Refer to Figure A. 1. Place unit securely on table or counter. 2. Position the splash guard above the cooking surface with the long sides parallel, the splash guard arms facing forward, and the front edge of the right arm lined up directly behind the heat control socket on right side of the unit. 3. Press splash guard down until it sits on the cooking surface. 4. Push the splash guard toward rear until the splash guard hooks are flush with the rear legs. 5. To remove for cleaning, pull spash guard back until it is flush with the heat control Before initial use and after each subsequent use, disassemble and wash griddle in dishwasher or in warm sudsy water, rinse and dry. DO NOT IMMERSE HEAT CONTROL IN WATER OR LET IT COME IN CONTACT WITH ANY LIQUID. Season the cooking surface after each cleaning by rubbing with cooking oil to maintain the nonstick properties. To maintain the integrity of the nonstick coating, only nylon, plastic, wooden or rubber utensils should be used. Metal utensils may be used, bur over time they will wear off the nonstick coating. Do not use a knife to cut the food on the cooking surfaces. If there is any food residue remaining on the surface, it should be removed after each use. To do so, scrub gently with a fine cleansing pad such as nylon mesh or other ordinary cleansing pad. DO NOT USE STEEL WOOL OR ABRASIVE KITCHEN CLEANERS. In time, the nonstick finish may darken over the healing element. This is normal and 2 3 ASSEMBLY