1
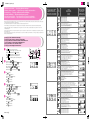
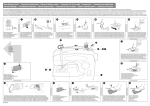
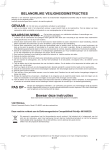
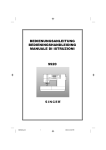
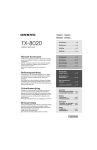
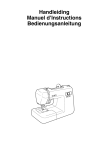
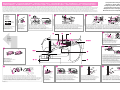
Computerized Sewing Machine
Machine à coudre informatisée
Computergestützte Nähmaschine
Gecomputeriseerde naaimachine
Máquina de Coser Computerizada
Macchina da cucire computerizzata
Quick Reference Chart 1 – Preparing the bobbin thread – / Tableau de référence rapide 1 – Préparation du fil de la canette – / Kurzübersicht 1 – Vorbereitung des Spulenfadens –
Verkorte handleiding 1 – De onderdraad voorbereiden – / Tabla de referencia rápida 1 – Preparación del hilo de la bobina – / Tabella di riferimento rapido 1 – Preparazione della spolina –
Be sure to first read the “Safety Precautions” in the Operation Manual. This Quick Reference Chart provides information on winding and installing the bobbin. For each step in the procedure, refer to the illustration of the sewing machine in the center for an indication of the exact location of the operation. For details on the procedure, refer to “Winding/Installing the Bobbin” in the Operation Manual.
Lisez attentivement les “Précautions d’utilisation” du manuel d’instructions. Ce tableau de référence rapide donne des informations sur le bobinage et l’installation de la canette. A chaque étape de la procédure, reportez-vous à l’illustration de la machine à coudre, se trouvant au centre, pour une indication de l’emplacement exact de l’opération. Pour obtenir des détails sur la procédure, reportez-vous à la section “Bobinage/installation de la canette” du manuel d’instructions.
Lesen Sie in jedem Fall zunächst die “Sicherheitshinweise” in der Bedienungsanleitung. Diese Kurzübersicht enhält Informationen zum Aufspulen und Einsetzen der Unterfadenspule. Beachten Sie bei jedem Bedienungsschritt die Abbildungen der Nähmaschine in der Mitte, aus denen der genaue Ort der Bedienungsvorgänge zu ersehen ist. Für Einzelheiten zur Bedienung lesen Sie bitte den Abschnitt über das “Aufwickeln und Einsetzen der Spule” in der Bedienungsanleitung.
Zorg ervoor dat u eerst de “Veiligheidsmaatregelen” in de handleiding hebt gelezen. In deze Verkorte handleiding vindt u informatie over het opwinden en het plaatsen van de spoel. Voor elke stap in de procedure raadpleegt u de afbeelding van de naaimachine in het midden voor een verwijzing naar de exacte locatie van de handeling. Voor details over de procedure raadpleegt u “De spoel opwinden/installeren” in de handleiding.
Lea primero las “Medidas de seguridad” del Manual de Instrucciones. Esta tabla de referencia rápida proporciona información acerca del devanado y la instalación de la bobina. Para cada fase del procedimiento, fíjese en la ilustración de la máquina de coser que se encuentra en el centro para saber exactamente dónde se sitúa la operación. Para más detalles sobre el procedimiento, consulte el apartado “Devanado/Colocáción de la bobina” en el Manual de Instrucciones.
Leggere dapprima le “precauzioni di sicurezza” del manuale d’istruzione. La presente tabella di rapida consultazione riporta le informazioni sull’avvolgimento e il montaggio della spolina. Per ogni passo della procedura, fare riferimento alla figura della macchina da cucire al centro per stabilire così l’esatta posizione dell’operazione. Per informazioni dettagliate sulla procedura, consultare “Avvolgimento/installazione della spolina” del manuale d’istruzione.
1
Actual size
Taille réelle
Tatsächliche Größe
Ware grootte
Tamaño real
Dimensioni attuali
2
3
4
1
1
11.5mm
(7/16inch)
2
Prepare a specially designed bobbin.
Préparez une canette appropriée.
Bereiten Sie eine für diese Maschine geeignete Unterfadenspule vor.
Bereid een speciaal ontworpen spoel voor.
Prepare una bobina especialmente diseñada.
Preparare una spolina speciale.
Turn on the sewing machine.
Mettez la machine à coudre sous tension.
Schalten Sie die Nähmaschine ein.
Schakel de naaimachine in.
Encienda la máquina de coser.
Accendere la macchina da cucire.
Slide the spool and spool cap onto the spool pin. ● Make sure that the thread unrolls from the bottom of the spool.
Placez la bobine de fil et le couvercle de bobine sur le porte-bobine. ● Veillez à ce que le fil se déroule à partir de l’arrière de la bobine.
Schieben Sie die Garnrolle und die Garnrollenkappe auf den Garnrollenhalter. ● Achten Sie darauf, daß der Faden von der unteren Seite der Garnrolle abgespult wird.
Schuif de klos en kloskap op de klospin. ● Zorg ervoor dat de draad van de onderzijde van de klos afwikkelt.
Coloque el carrete de hilo y la tapa del carrete en el portacarrete. ● Compruebe que el hilo se desenrolle desde la parte inferior del carrete.
Inserire il rocchetto, il fermo per rocchetto sul portarocchetto. ● Il filo deve srotolarsi dalla parte inferiore del rocchetto.
Place the bobbin on the bobbin winder shaft 1, and then slide the bobbin winder shaft to the right.
Placez la canette sur l’axe du bobineur 1, puis faites-le glisser vers la droite.
Setzen Sie die Spule auf den Spuler 1, und schieben Sie den Spuler nach rechts.
Plaats de spoel op de spoelopwindas 1 en schuif vervolgens de spoelopwindas naar rechts.
Coloque la bobina en la clavija de la devanadora 1 y desplácela hacia la derecha.
Posizionare la spolina sull’albero avvolgitore spolina 1, quindi spingere verso destra l’albero avvolgitore spolina.
4
3
Pass the thread behind the thread guide cover 1, then under the thread guide plate 2. ● Thread the sewing machine in the order indicated by the broken line on the machine.
Passez le fil derrière le capot du guide-fil 1, puis sous la plaque du guide-fil 2. ● Enfilez la machine à coudre dans le sens indiqué par la ligne discontinue.
Führen Sie den Faden hinter die Abdeckung der Fadenführung 1, und dann unter die Fadenführungsplatte 2. ● Führen Sie den Faden entlang der Fadenführung, die an der Maschine als gepunktete Linie aufgedruckt ist.
Leid de draad achter de draadgeleiderdeksel 1 en vervolgens onder de draadgeleiderplaat 2. ● Breng de draad in de naaimachine aan in de volgorde die wordt aangegeven met de stippellijn op de machine.
Pase el hilo por detrás de la tapa de la guía 1 y después por debajo de la placa de la guía del hilo 2. ● Enhebre el hilo siguiendo el orden indicado por la línea discontinua de la máquina.
Passare il filo dietro lo sportello guidafilo 1, quindi sotto la piastra guidafilo 2. ● Infilare la macchina da cucire secondo l’ordine indicato dalla linea tratteggiata sulla macchina.
5
5
See reverse.
Voir au verso.
Siehe Rückseite.
Zie ommezijde.
Ver al dorso.
Vedere fermatura.
1
1
Wind the thread around the bobbin winder thread guide 1.
Enroulez le fil autour de l’axe du guide-fil 1.
Wickeln Sie den Faden um die Spulenfadenführung 1.
Wind de draad rond de draadgeleider 1 van de spoelopwinder.
Pase el hilo alrededor de la guía del hilo de la devanadora 1.
Avvolgere il filo attorno al guidafilo 1 avvolgitore spolina.
269
6
b
2
78
7
1
1
Reattach the bobbin cover.
Replacez le couvercle de la canette.
Setzen Sie die Spulenkapselabdeckung wieder ein.
Bevestig de spoelkap opnieuw.
Vuelva a colocar la tapa de la bobina.
Montare lo sportello spolina.
0
–b
a
1
0
1
Wind the thread clockwise around the bobbin four or five times, and then cut the thread
by passing it through the slit in the bobbin winder seat 1.
Enroulez quatre ou cinq fois le fil dans le sens des aiguilles d’une montre autour de la
canette, puis coupez-le en le passant dans la fente de la base du bobineur de canette 1.
Wickeln Sie den Faden vier oder fünfmal im Uhrzeigersinn um die Spule, und schneiden
Sie den Faden ab, indem Sie ihn durch den Schlitz am Boden des Spulers 1 ziehen.
Wind de draad vier of vijf keer rechtsom om de spoel en leid de draad vervolgens door de
sleuf in de spoelopwinderbasis 1 om de draad door te snijden.
Enrolle el hilo en la bobina en el sentido de las agujas del reloj cuatro o cinco veces; para
cortarlo, páselo por la ranura de la guía en la base de la devanadora 1.
Avvolgere 4 o 5 volte il filo verso destra, attorno alla spolina, quindi tagliare il filo
passandolo attraverso la fessura di guida nell’alloggiamento 1 dell’avvolgitore spolina.
9
8
7
1
1
1
Insert the bobbin into the shuttle, pass the thread through the slot, and then cut the thread with the cutter 1. ● Be sure to insert the bobbin correctly.
Insérez la canette dans la boîte à canette, guidez le fil dans la rainure, puis coupez-le à l’aide du coupe-fil 1. ● Veillez à insérer correctement la canette.
Setzen Sie die Spule in die Kapsel, führen Sie den Faden durch den Schlitz, und schneiden Sie den Faden mit dem Fadenabschneider 1 ab. ● Achten Sie auf den richtigen Sitz der Spule.
Plaats de spoel in het spoelhuis, leid het draad door de sleuf en snij de draad vervolgens door met de draadafsnijder 1. ● Zorg ervoor dat de spoel op de juiste wijze geplaatst is.
Introduzca la bobina en la lanzadera, pase el hilo por la ranura y corte el extremo sobrante con la cuchilla 1. ● Asegúrese de que la bobina esté colocada correctamente.
Inserire la spolina nella navetta, passare il filo attraverso l’asola, quindi tagliare il filo con il tagliafilo 1. ● Assicurarsi di inserire la spolina correttamente.
XC4546-1511
Remove the bobbin cover 1.
Otez le couvercle de la canette 1.
Entfernen Sie die Spulenkapselabdeckung 1.
Verwijder de spoelkap 1.
Retire la tapa de la bobina 1.
Togliere lo sportello spolina 1.
Cut the thread, slide the bobbin winder shaft to the left, and then remove the bobbin.
Coupez le fil, faites glisser l’axe du bobineur de canette vers la gauche, puis retirez la canette.
Schneiden Sie den Faden ab, schieben Sie den Spuler nach links und entfernen Sie die volle Spule vom Spuler.
Snij de draad door, schuif de spoelopwindas naar links en verwijderd de spoel.
Corte el hilo, desplace la clavija de la devanadora hacia la izquierda y retire la bobina.
Tagliare il filo, spingere l’albero avvolgitore spolina verso sinistra, quindi togliere la spolina.
After the bobbin stops spinning, press the start/stop button 1.
Une fois que la canette s’arrête de tourner, appuyez sur la touche Marche/Arrêt 1.
Sobald sich die Spule nicht mehr dreht, drücken Sie die Start/Stop-Taste 1 erneut.
Nadat de spoel gestopt is met draaien, drukt u op de start/stop-knop 1.
Cuando la bobina deje de girar, pulse el botón de arrancar/parar 1.
Quando la spolina cessa di girare, premere il pulsante Avvio/stop 1.
2
Increase the sewing speed 1, and then press the start/stop button 2.
Augmentez la vitesse de couture 1, puis appuyez sur la touche Marche/Arrêt 2.
Erhöhen Sie die Nähgeschwindigkeit 1, und drücken Sie die Start/Stop-Taste 2.
Verhoog de naaisnelheid 1 en druk vervolgens op de start/stop-knop 2.
Aumente la velocidad de la máquina 1 y pulse el botón de arrancar/parar 2.
Aumentare la velocità di cucitura 1, quindi premere il pulsante Avvio/stop 2.
Computerized Sewing Machine
Machine à coudre informatisée
Computergestützte Nähmaschine
Gecomputeriseerde naaimachine
Máquina de Coser Computerizada
Macchina da cucire computerizzata
Quick Reference Chart 2 – Upper threading – / Tableau de référence rapide 2 – Enfilage supérieur – / Kurzübersicht 2 – Einfädeln des Oberfadens –
Verkorte handleiding 2 – De bovendraad inrijgen – / Tabla de referencia rápida 2 – Enhebrado superior – / Tabella di riferimento rapido 2 – Infilatura superiore –
Be sure to first read the “Safety Precautions” in the Operation Manual. This Quick Reference Chart provides information on threading the sewing machine. For each step in the procedure, refer to the illustration of the sewing machine in the center for an indication of the exact location of the operation. For details on the procedure, refer to “Upper Threading” in the Operation Manual.
Lisez attentivement les “Précautions d’utilisation” du manuel d’instructions. Ce tableau de référence rapide donne des informations sur l’enfilage de la machine à coudre. A chaque étape de la procédure, reportez-vous à l’illustration de la machine à coudre, se trouvant au centre, pour une indication de l’emplacement exact de l’opération. Pour obtenir des détails sur la procédure, reportez-vous à la section “Enfilage supérieur” du manuel d’instructions.
Lesen Sie in jedem Fall zunächst die “Sicherheitshinweise” in der Bedienungsanleitung. Diese Kurzübersicht enhält Informationen zum Befädeln der Nähmaschine. Beachten Sie bei jedem Bedienungsschritt die Abbildungen der Nähmaschine in der Mitte, aus denen der genaue Ort der Bedienungsvorgänge zu ersehen ist. Für Einzelheiten zur Bedienung lesen Sie bitte den Abschnitt über das “Einfädeln des Oberfadens” in der Bedienungsanleitung.
Zorg ervoor dat u eerst de “Veiligheidsmaatregelen” in de handleiding hebt gelezen. In deze Verkorte handleiding vindt u informatie over het aanbrengen van de draad in de naaimachine. Voor elke stap in de procedure raadpleegt u de afbeelding van de naaimachine in het midden voor een verwijzing naar de exacte locatie van de handeling. Voor details over de procedure raadpleegt u “De bovendraad inrijgen” in de handleiding.
Lea primero las “Medidas de seguridad” del Manual de Instrucciones. Esta tabla de referencia rápida proporciona información sobre cómo enhebrar la máquina de coser. Para cada fase del procedimiento, fíjese en la ilustración de la máquina de coser que se encuentra en el centro para saber exactamente dónde se sitúa la operación. Para más detalles sobre el procedimiento, consulte el apartado “Enhebrado superior” en el Manual de Instrucciones.
Leggere dapprima le “precauzioni di sicurezza” del manuale d’istruzione. La tabella di riferimento rapido riporta le informazioni sull’infilatura della macchina da cucire. Per ogni passo della procedura, fare riferimento alla figura della macchina da cucire al centro per stabilire così l’esatta posizione dell’operazione. Per informazioni dettagliate sulla procedura, consultare “Infilatura superiore” del manuale d’istruzione.
1
2
3
5
4
2
1
1
1
Turn on the sewing machine.
Mettez la machine à coudre sous tension.
Schalten Sie die Nähmaschine ein.
Schakel de naaimachine in.
Encienda la máquina de coser.
Accendere la macchina da cucire.
Raise the presser foot lever 1.
Relevez le levier du pied-de-biche 1.
Heben Sie den Nähfußhebel 1.
Zet de persvoethendel 1 omhoog.
Levante la palanca del pie prensatela 1.
Sollevare la leva piedino premistoffa 1.
Press the needle position button 1 to raise the needle.
Appuyez sur la touche “Positionnement aiguille” 1 pour mettre l’aiguille en position haute.
Drücken Sie die Nadelpositionstaste 1, um die Nadel anzuheben.
Druk de naaldpositie-knop 1 in om de naald omhoog te brengen.
Pulse el botón de posición de la aguja 1 para levantar la aguja.
Premere il pulsante Posizione ago 1 al fine di sollevare l’ago.
Slide the spool and spool cap onto the spool pin. ● Make sure that the thread unrolls from the bottom of the spool.
Placez la bobine de fil et le couvercle de bobine sur le porte-bobine. ● Veillez à ce que le fil se déroule à partir de l’arrière de la bobine.
Schieben Sie die Garnrolle und die Garnrollenkappe auf den Garnrollenhalter. ● Achten Sie darauf, daß der Faden von der unteren Seite der Garnrolle abgespult wird.
Schuif de klos en kloskap op de klospin. ● Zorg ervoor dat de draad van de onderzijde van de klos afwikkelt.
Coloque el carrete de hilo y la tapa del carrete en el portacarrete. ● Compruebe que el hilo se desenrolle desde la parte inferior del carrete.
Inserire il rocchetto, il fermo per rocchetto sul portarocchetto. ● Il filo deve srotolarsi dalla parte inferiore del rocchetto.
6
5
Pass the thread behind the thread guide cover 1, then under the thread guide plate 2. ● Thread the sewing machine in the order indicated by the solid line on the machine.
Passez le fil derrière le capot du guide-fil 1, puis sous la plaque du guide-fil 2. ● Enfilez la machine à coudre dans le sens indiqué par la ligne continue.
Führen Sie den Faden hinter die Abdeckung der Fadenführung 1, und dann unter die Fadenführungsplatte 2. ● Befädeln Sie die Nähmaschine in der Reihenfolge, die entlang der durchgezogenen Linie auf der Maschine angegeben ist.
Leid de draad achter de draadgeleiderdeksel 1 en vervolgens onder de draadgeleiderplaat 2. ● Breng de draad in de naaimachine aan in de volgorde die wordt aangegeven met de ononderbroken lijn op de machine.
Pase el hilo por detrás de la tapa de la guía 1 y después por debajo de la placa de la guía del hilo 2. ● Enhebre la máquina siguiendo el orden indicado por la línea continua de la máquina.
Passare il filo dietro lo sportello guidafilo 1, quindi sotto la piastra guidafilo 2. ● Infilare la macchina da cucire secondo l’ordine indicato dalla linea intera sulla macchina.
6
4
a
Refer to the Operation Manual for additional details.
Consultez le manuel d’instructions pour plus de détails.
Beachten Sie die Bedienungsanleitung für weitere Einzelheiten.
Raadpleeg de handleiding voor aanvullende details.
Para más detalles, consulte el Manual de Instrucciones.
Per ulteriori informazioni, consultare il manuale dell’istruzione.
9
Pass the thread through the guides.
Faites passer le fil par les guides.
Führen Sie den Faden durch alle Fadenführungen.
Leid de draad door de geleiders.
Pase el hilo alrededor de las guías.
Passare il filo attraverso le guide.
3
c
20
7
8
5cm
(2 inch)
b
Pass the thread through the presser foot, and then pull out about 5 cm (2 inch) of thread
toward the rear of the machine.
Faites passer le fil sous le pied-de-biche, puis tirez environ 5 cm de fil vers l’arrière de la
machine.
Führen Sie den Faden durch den Nähfuß, ziehen Sie etwa 5 cm des Oberfadens heraus
und führen ihn unter dem Nähfuß nach hinten durch.
Leid de draad door de persvoet en trek vervolgens circa 5 cm draad naar de achterkant
van machine.
Pase el hilo por debajo del pie prensatela y tire de él aproximadamente unos 5 cm hacia
la parte posterior de la máquina.
Passare il filo attraverso il piedino premistoffa, quindi tirarlo per circa 5 cm verso la parte
posteriore della macchina.
b
1
7
Pass the thread through the thread hook 1.
Faites passer le fil par le crochet guide-fil 1.
Führen Sie den Faden durch den Fadenhaken 1.
Leid de draad door de draadhaak 1.
Pase el hilo a través del ganchillo 1.
Passare il filo attraverso il gancio filo 1.
1
a
0
9
8
1
1
5
1
1
Carefully pull on the loop of thread passed through the eye of the needle.
Tirez doucement la boucle formée par le fil introduit dans le chas de l’aiguille.
Ziehen Sie vorsichtig an der Fadenschleife, die durch das Nadelöhr geführt wurde.
Trek voorzichtig aan de draadlus die door het oog van de naald is geleid.
Tire con cuidado del hilo introducido por el ojo de la aguja.
Con dovuta attenzione, spingere verso l’alto il cappio di filo passato attraverso la cruna dell’ago.
XC4546-1511
Lower the needle threader lever 1 until it clicks, and then release the lever.
Abaissez au maximum le levier de l’enfileur d’aiguille 1, puis relâchez-le.
Senken Sie den Nähfußhebel 1, bis er einrastet, und lassen Sie dann den Hebel los.
Laat de naaldinrijghendel 1 zakken tot deze vastklikt en laat vervolgens de hendel los.
Baje la palanca del enhebrador 1 hasta que haga clic y después suéltela.
Abbassare la leva infila ago 1, fino a farla scattare, quindi rilasciare la leva.
Lower the presser foot lever 1.
Abaissez le levier du pied-de-biche 1.
Senken Sie den Nähfußhebel 1.
Zet de persvoethendel 1 omlaag.
Baje la palanca del pie prensatela 1.
Abbassare la leva piedino premistoffa 1.
Cut the thread on the thread cutter 1.
Coupez le fil à l’aide du coupe-fil 1.
Schneiden Sie den Faden mit dem Fadenabschneider 1 ab.
Snij de draad door met de draadafsnijder 1.
Corte el hilo con la cuchilla 1.
Tagliare il filo con il tagliafilo 1.
Pass the thread through the thread guide discs 1 from the front.
Faites passer le fil par les disques du guide-fil 1 par l’avant.
Führen Sie den Faden von vorne durch die Fadenführungsscheiben 1.
Leid de draad door de draadgeleiderpoelie 1 vanaf de voorzijde.
Pase el hilo a través de los discos de la guía del hilo 1 en la parte frontal.
Passare il file attraverso i dischetti guida filo 1 dal davanti.
M
XC4589-051_brother_01
Icon
Attribute selection screen
Icône
Ecran de sélection des attributs
Symbol
Attribut-Wahlbildschirm
Attributen-selectiescherm
Pictogram
Pantalla de selección de atributo Icono
Schermata di selezione attributi
Icona
Quick Reference Guide – Specifying Machine Settings –
Guide de référence rapide – Spécification des réglages de la machine –
Kurzanleitung – Festlegen der Maschinen-Einstellungen –
Verkorte handleiding – Machine-instellingen opgeven –
Guía de referencia rápida – Especificación de los ajustes de la máquina –
Guida di rapida consultazione – Specificazione delle impostazioni della macchina –
•Be sure to first read the “Important Safety Instructions” (→ P.6) in the Operation Manual. This Quick Reference Guide provides a sample procedure for specifying machine settings.
For more details on the procedures, refer to the Operation Manual.
•Ce Guide de référence rapide donne un exemple de procédure de spécification des réglages de la machine.
•Die Kurzanleitung beschreibt ein Beispielverfahren zum Festlegen der Maschinen-Einstellungen. Weitere Einzelheiten über das Verfahren siehe Bedienungsanleitung.
•In deze Verkorte handleiding wordt een voorbeeld beschreven van het opgeven van een machine-instelling. Voor verdere details over de procedure kunt u de normale
handleiding raadplegen.
•La Guía de referencia rápida le ofrece un ejemplo del procedimiento a seguir para especificar los ajustes de la máquina. Para más detalles sobre el procedimiento, consulte el
Manual de instrucciones.
•Questa Guida di rapida consultazione spiega un procedimento di esempio per la specificazione delle impostazioni della macchina. Per maggiori dettagli sui procedimenti, fare
riferimento al Manuale d’istruzione.
[Example] Specifies automatic thread-cutting.
[Exemple] Spécifie le mode de coupure de fil automatique.
[Beispiel] Schaltet die automatische Fadenabschneidefunktion ein.
[Voorbeeld] Hiermee stelt u automatisch draadknippen in.
[Ejemplo] Determina el corte automático del hilo.
[Esempio] Specifica il taglio automatico del filo.
1 Press
(settings key) in the operation panel.
Appuyez sur
Drücken Sie im Bedienfeld die Taste
Druk op
Pulse
( tecla de ajustes) en el panel de operaciones.
(il tasto delle impostazioni) sul pannello operativo.
2 Press the keys of
until
is selected.
Appuyez sur les touches de
jusqu´à ce que
Drücken Sie die Tasten von
Druk op de toetsen van
Pulse las teclas de
totdat
.
(OK-Taste).
(tecla Aceptar).
(il tasto OK).
or
until
Appuyez sur
ou
Drücken Sie
oder
Druk op
of
o
Premere
is selected.
jusqu´à ce que
, bis
totdat
o
is geselecteerd.
(touche OK).
Drücken Sie die Taste
(OK-toets).
(tecla Aceptar).
Premere
XC4589-051 1
.
fino a che viene selezionato
(OK key).
Druk op
soit sélectionné.
gewählt ist.
hasta seleccionar
Appuyez sur
Pulse
.
(OK-toets).
Premere
5 Press
is geselecteerd.
(touche OK).
Druk op
Pulse
gewählt ist.
fino a che viene selezionato
Drücken Sie die Taste
4 Press
soit sélectionné.
(OK key).
Appuyez sur
Pulse
, bis
hasta seleccionar
Premere i tasti di
3 Press
(Einstelltaste).
(instellingentoets) op het bedieningspaneel.
Premere
2
(touche de réglage) sur le panneau de commande.
(il tasto OK).
(OK-Taste).
.
1
4
3
5
Details
Détails
Beschreibung
Bijzonderheden
Detalles
Dettagli
Ajusts the tension of the upper thread.
Ajusts the tension of the upper thread.
Ajusts the tension of the upper thread.
Ajusts the tension of the upper thread.
Ajusts the tension of the upper thread.
Ajusts the tension of the upper thread.
Specifies automatic reverse/reinforcement stitching.
Spécifie la couture automatique de points inverses/renfort.
Schaltet automatische Verstärkungsstiche ein.
Hiermee stelt u automatisch achteruitnaaien/verstevingssteken in.
Determina la costura en reversa/reforzada automática.
Specifica la cucitura con punti di fermatura/rinforzo automatici.
Specifies automatic thread-cutting.
Spécifie le mode de coupure de fil automatique.
Schaltet die automatische Fadenabschneidefunktion ein.
Hiermee stelt u automatisch draadknippen in.
Determina el corte automático del hilo.
Specifica il taglio automatico del filo.
Allows combined patterns to be checked.
Permet de vérifier des motifs combinés.
Ermöglicht die Überprüfung zusammengesetzter Muster.
Hiermee controleert u combinatiepatronen.
Permite comprobar los dibujos combinados.
Consente di verificare i motivi combinati.
Mirror images patterns along a vertical axis.
Motifs d´images en miroir le long d´un axe vertical.
Spiegelbildmuster entlang einer senkrechten Achse.
Hiermee spiegelt u patronen langs een verticale as.
Imágenes simétricas verticales.
Motivi ad immagini speculari lungo un asse verticale.
Adjusts the length of satin stitches.
Règle la longueur des points plumetis.
Stellt die Länge der Satinstiche ein.
Hiermee stelt u de lengte van satijnsteken in.
Ajuste de la longitud de la costura de realce.
Regola la lunghezza dei punti a raso.
Sets the size of patterns to be large or small.
Agrandit ou réduit la taille des motifs.
Vergrößert bzw. verkleinert die Größe der Muster.
Hiermee stelt u de grootte van het patroon in op groot of klein.
Determina el tamaño grande o pequeño de los dibujos.
Imposta la dimensione (grande o piccola) dei motivi.
Specifies whether the pattern will be sewn once or repeatedly.
Spécifie si le motif doit être cousu une seule ou plusieurs fois.
Gibt an, ob das Muster einmal oder wiederholt genäht werden soll.
Hiermee stelt u in of het patroon meerdere malen of eenmaal wordt genaaid.
Determina si el dibujo debe coserse una o repetidas veces.
Specifica se il motivo debba essere cucito una o più volte.
Specifies the sewing density of the stitching.
Spécifie la densité de couture du point.
Gibt die Nähdichte der Stiche an.
Hiermee stelt u de naaidichtheid van de steken in.
Determina la densidad de la costura en las puntadas.
Specifica la densità di cucitura dei punti.
Allows adjusted pattern widths and lengths to be saved.
Permet d´enregistrer la largeur et la longueur réglées du motif.
Ermöglicht das Speichern der eingestellten Stichmusterbreiten und -längen.
Hiermee kunt u gewijzigde patroonbreedten en -lengten opslaan.
Guardar la anchura y longitud del dibujo.
Consente di salvare le impostazioni definite per le larghezze e le lunghezze del motivo.
Specifies where the needle is positioned when the sewing machine is stopped.
Spécifie le positionnement de l´aiguille lorsque la machine à coudre est arrêtée.
Gibt an, wo die Nadel steht, wenn die Nähmaschine anhalt.
Hiermee stelt u in waar de naald blijft staan wanneer u stopt met naaien.
Especifica la posición de la aguja al detener la máquina de coser.
Specifica la posizione dell´ago all´arresto della macchina da cucire.
Specifies the twin needle.
Spécifie l´aiguille jumelée.
Wählt die Zwillingsnadel aus.
Hiermee stelt u de tweelingnaald in.
Uso de la aguja gemela.
Specifica l´ago doppio.
Allows the stitch width to be adjusted with the sewing speed controller.
Permet de régler la largeur du point à l´aide du sélecteur de vitesse de couture.
Ermöglicht die Einstellung der Stichbreite mit dem Nähgeschwindigkeitsregler.
Hiermee kunt u de steekbreedte aanpassen met de schuifknop voor snelheidsregeling.
Permite ajustar la anchura de costura utilizando el control de velocidad de cosido.
Consente la regolazione della larghezza del punto con il regolatore della velocità di cucitura.
Allows the language used in the screens to be changed.
Permet de modifier la langue utilisée à l´écran.
Ermöglicht die Einstellung der Sprache für die Bildschirmanzeige.
Hiermee kunt u de schermtaal wijzigen.
Permite cambiar el idioma de las pantallas.
Consente di cambiare la lingua utilizzata nelle schermate.
Specifies whether or not a beep is sounded with each operation.
Spécifie si un bip est émis à chaque opération.
Legt fest, ob bei jedem Vorgang ein Summton ertönen soll.
Hiermee stelt u in of na elke handeling een pieptoon klinkt.
Determina si suena o no un pitido cada vez que se ejecuta una función.
Specifica se il cicalino debba o meno attivarsi a ciascuna operazione.
Adjusts the brightness of the LCD.
Règle la luminosité de l´écran à cristaux liquides.
Stellt die Helligkeit des LCD-Bildschirms ein.
Hiermee past u de helderheid van het LCD-scherm aan.
Ajusta el brillo de la pantalla LCD.
Regola la luminosità del display a cristalli liquidi.
Adjusts the up and down position of the pattern.
Règle la position du motif vers le haut et vers le bas.
Verschiebt das Muster nach oben bzw. nach unten.
Hiermee past u de verticale positie van het patroon aan.
Ajusta la posición vertical del dibujo.
Regola la posizione del motivo verso l´alto e verso il basso.
Adjusts the left and right position of the pattern.
Adjusts the left and right position of the pattern.
Adjusts the left and right position of the pattern.
Adjusts the left and right position of the pattern.
Adjusts the left and right position of the pattern.
Adjusts the left and right position of the pattern.
K
Setting screen
Ecran de réglage
Einstellbildschirm
Instelscherm
Pantalla de ajustes
Schermata di impostazione
M
XC4589-051_brother_02
Pattern group selection screen
Icon
Ecran de sélection d´un groupe de motifs Icône
Mustergruppen-Wahlbildschirm Symbol
Patroongroep-selectiescherm
Pictogram
Pantalla de selección de grupo de diseños
Icono
Icona
Schermata di selezione gruppo di motivi
Quick Reference Guide – Selecting Stitching –
Guide de référence rapide – Sélection des points –
Kurzanleitung – Stiche wählen –
Verkorte handleiding – Steken selecteren –
Guía de referencia rápida – Selección de puntada –
Guida di rapida consultazione – Selezione dei punti –
•Be sure to first read the “Important Safety Instructions” (→ P.6) in the Operation Manual. This Quick Reference Guide provides a sample procedure for selecting stitching. For
more details on the procedures, refer to the Operation Manual.
•Ce Guide de référence rapide donne un exemple de procédure de sélection des points. Pour obtenir davantage de détails sur les procédures, reportez-vous au manuel
d´instructions.
•Diese Kurzanleitung beschreibt ein Beispielverfahren zum Wählen von Stichen. Weitere Einzelheiten über das Verfahren siehe Bedienungsanleitung.
•In deze Verkorte handleiding wordt een voorbeeld beschreven van het selecteren van een steek. Voor verdere details over de procedure kunt u de normale handleiding
raadplegen.
•Esta Guía de referencia rápida le ofrece un ejemplo del procedimiento a seguir para seleccionar una puntada. Para más detalles sobre el procedimiento, consulte el Manual de
instrucciones.
•Questa Guida di rapida consultazione spiega un procedimento di esempio per la selezione dei punti. Per maggiori dettagli sui procedimenti, fare riferimento al Manuale
d’istruzione.
[Example] Selecting the decorative stitch
[Exemple] Sélection d´un point décoratif
[Beispiel] Wählen des Zierstichs
[Voorbeeld] De decoratieve steek selecteren
[Ejemplo] Selección de una puntada decorativa
[Esempio] Selezione del punto decorativo
1 Press
(stitch selection key) in the operation panel.
Appuyez sur
Drücken Sie
Druk op
Pulse
(Stichauswahltaste) im Bedienfeld.
(steekselectietoets) van het bedieningspaneel.
1
(tecla de selección de puntada) en el panel de operaciones.
Premere
(il tasto di selezione punto) sul pannello operativo.
2 Press the keys of
until
is selected.
Appuyez sur les touches de
jusqu´à ce que
Drücken Sie die Tasten von
Druk op de toetsen van
Premere i tasti di
Druk op
is geselecteerd.
.
fino a che viene selezionato
.
(touche OK).
(OK-Taste).
(OK-toets).
(tecla Aceptar).
Premere
(il tasto OK).
4 Press the keys of
until
is selected.
Appuyez sur les touches de
jusqu´à ce que
Drücken Sie die Tasten von
Druk op de toetsen van
Pulse las teclas de
Premere i tasti di
, bis
totdat
(touche OK).
(OK-toets).
(tecla Aceptar).
Premere
XC4589-051 1
is geselecteerd.
.
fino a che viene selezionato
Drücken Sie die Taste
Druk op
soit sélectionné.
gewählt ist.
hasta seleccionar
(OK key).
Appuyez sur
Pulse
gewählt ist.
hasta seleccionar
Drücken Sie die Taste
5 Press
soit sélectionné.
(OK key).
Appuyez sur
Pulse
, bis
totdat
Pulse las teclas de
3 Press
2
(touche de sélection de point) sur le panneau de commande.
(il tasto OK).
(OK-Taste).
.
4
3
5
Details
Détails
Beschreibung
Bijzonderheden
Detalles
Dettagli
Utility stitches
Points de couture courants
Nutzstiche
Naaisteken
Costura con aplicaciones
Punti utili
Decorative stitches
Points décoratifs
Zierstiche
Decoratieve steken
Costura decorativa
Punti decorativi
Satin stitches
Points plumetis
Satinstiche
Satijnen steken
Puntadas para satén
Punti a raso
Cross-stitches
Points croisés
Kreuzstiche
Kruissteken
Costura cruzada
Punti croce
Decorative satin stitches
Points plumetis décoratifs
Satin-Zierstiche
Decoratieve satijnen steken
Costura decorativa para satén
Punti decorativi a raso
Character stitch-Gothic font
Point caractère - Police gothique
Buchstabenstich-Schriftart Gotisch
Lettersteek - type Gothic
Costura de caracteres- fuente gótica
Punto con caratteri -carattere gotico
Character stitch-Script font
Point caractère - Police script
Buchstabenstich-Schriftart Script
Lettersteek - type Script
Costura de caracteres- Escritura decorada
Punto con caratteri -carattere in corsivo
Character stitch-Outline style
Point caractère - Style contours
Buchstabenstich-Umriss
Lettersteek - opmaak Contour
Costura de caracteres- escritura con borde
Punto con caratteri-Stile contorno
K
Sample pattern selection screen
Ecran de sélection d´un échantillon de motif
Beispielmuster-Wahlbildschirm
Voorbeeldpatroon-selectiescherm
Pantalla de selección de diseño de ejemplo
Schermata di selezione motivo campione