1
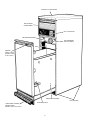
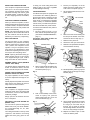
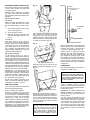
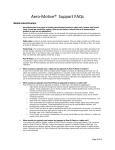
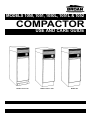
MODELS 1050, 1051, 1050L, 1051L & 1052
COMPACTOR
USE AND CARE GUIDE
MODELS 1050 & 1051
MODELS 1050L & 1051L
MODEL1052
OPTIONAL CUTTING BOARD
BAG STORAGE
COMPARTMENT
KEY LOCK SWITCH
AIR FRESHENER PANEL
AIR FRESHENER
(NOT INCLUDED)
RAM
DRAWER
SAFETY LATCH
(MODELS 1050L
& 1051L ONLY)
REMOVABLE DRAWER
LEG LEVELERS
CONTAINER LATCH
“HANDS FREE” DRAWER
OPENING PEDAL
(MODELS 1050 & 1051 ONLY)
2
SAVE THESE
INSTRUCTIONS
IMPORTANT SAFEGUARDS.
READ ALL INSTRUCTIONS
CAREFULLY BEFORE OPERATING COMPACTOR.
Basic precautions should always be
taken when using an electrical appliance
– including the following:
1. Close supervision is necessary
when any appliance is operated near
children. Do not allow the appliance
to be used as a toy, or to run unattended at any time. Turn key to “OFF”
and remove it to lock the compactor. Store the key out of reach to prevent children or others from operating or tampering with the compactor.
2. Do not push trash into compactor
drawer with hands or feet. Trash
might contain broken glass, sharp
pieces of metal, etc., which would
cause injury.
3. Do not compact volatile material.
Paint, oily rags, lighter fluid cans,
and paint thinner cans could combust spontaneously and cause an
explosion and/or fire.
4. Do not compact aerosol cans or any
other containers still holding toxic
chemicals, insecticides, or combustible contents. Fumes may be released which are hazardous to
health.
5.
Do not compact lighted cigarettes,
cigars, or other hot or burning items.
6.
Do not overload the compactor.
7.
Be careful when removing and carrying bag. Broken glass or other
sharp objects may pierce bag.
8.
Do not operate this unit with an extension cord.
9.
Use only Broan approved accessories.
10. Do not touch moving parts.
11. Do not take this appliance apart. Incorrect reassembly can cause electrical shock when operated.
12. Do not operate with a damaged
power cord, plug, motor, or after
damage of any kind. Have the compactor examined, and all repairs
made, by an authorized serviceman.
13. This compactor is FOR HOUSEHOLD USE ONLY. Use it only as
described in this manual.
14. Unplug the appliance from outlet
before servicing.
GROUNDING INSTRUCTIONS
TO REDUCE THE RISK OF
ELECTRIC SHOCK.
IMPORTANT — Please read carefully.
For proper operation, the compactor
must be level with all four legs properly
adjusted. For proper drawer pedal operation, the unit must be level.
UNDER-COUNTER INSTALLATION
Fig. 1
Fig. 2
FOR PERSONAL SAFETY, THIS APPLIANCE
MUST
BE
PROPERLY
GROUNDED. The power cord on this
appliance is equipped with a three-prong
(grounding) plug which mates with a
standard three-prong (grounded) receptacle. (Fig. 1)
If there is a two-prong outlet located
where you will install the compactor, it is
your responsibility to have it replaced with
a properly grounded three-prong wall receptacle.
DO NOT, UNDER ANY CIRCUMSTANCES, CUT OR REMOVE THE
THIRD (GROUND) PRONG FROM THE
POWER CORD PLUG.
The GREEN (or GREEN & YELLOW)
conductor in the cord is the grounding
wire. Never connect the GREEN (or
GREEN & YELLOW) wire to a live terminal.
A 120 volt, 60 Hz., A.C., 15 amp fused
and grounded electrical supply is required (time-delay fuse or circuit breaker
is recommended). It is recommended
that a SEPARATE CIRCUIT serving only
this appliance be provided.
DO NOT USE AN EXTENSION CORD
WITH THIS APPLIANCE.
INSTALLATION
Your Broan Compactor has been designed to require minimum space without loss of capacity whether free-standing or built-in.
Your compactor has been designed to
require a minimum of space whether
free-standing or built-in. Only 12” wide x
20” deep, your compactor is smaller than
most on the market. (Fig. 2)
To install compactor under counter, use
Figure 2 to determine the cutout size.
Back up compactor with a 2 x 4 to prevent unit from shifting backwards due to
repeated closing of compactor drawer.
The power outlet should be installed per
electrical code near the center of the
opening or unit, and 15” to 18” from the
floor.
The bag storage compartment allows you
to store bags and air fresheners conveniently. The swing open storage compartment door allows easy access to bags,
etc.
IMPORTANT: Make sure compactor can
be easily removed (slid out) from under
counter in case service is ever necessary. DO NOT fasten compactor to cabinets, countertop, or floor. Do not install
flooring material after compactor is
placed under the counter of the flooring
may later interfere with the compactor
being able to be removed from under
counter.
Fig. 3
REMOVE
SCREW
FREE-STANDING
The unit should usually be placed where
the bulk of trash is generated — kitchen,
utility room, or garage.
3-4 FT.
LEVELERS
Your compactor has four adjustable levelers which allow you to adjust for uneven floors and also trim the unit up to
fit the under-counter installation snugly.
To level the unit, tip the compactor to one
side and turn the levelers out only far
enough to properly level the unit. Do the
same on the other side, until the unit sits
level on the floor. Check the unit from
front to back, and side to side.
3
WIRE
CLAMP
For free-standing unit, remove wire
clamp to obtain additional cord length if
necessary. (Fig. 3)
Remove top right back panel screw, slip
wire clamp off cord, and replace screw.
WHAT YOUR COMPACTOR DOES
Your compactor compresses household
trash up to 1/12 of its original volume.
The compactor will take normal household trash including milk cartons, glass
and plastic bottles, containers and jars,
tin cans, wrappings, boxes, food wastes,
etc.
HOW YOUR COMPACTOR WORKS
When you start the compactor, an electrically powered ram moves down into the
compactor drawer, compresses the trash
and then returns to the “UP” position and
shuts off automatically.
To keep your wood cutting board from
warping, apply a thin coat of vegetable
oil after detergent washing.
4.
Pull the pin completely out of the
pedal, and lift the pedal spring out
of its notch in the pedal. (Fig. 6)
COLOR MATCHING
5.
Lift the drawer pedal off of the compactor drawer.
Your Broan Compactor is equipped with
a convenient color matching feature in
the door panel. Each compactor (except
Model 1052) has one reversible color
panel finish in black/almond (Models
1050 & 1050L) or black/white (Models
1051 & 1051L). The main door panel behind the reversible color panel is black.
COLOR PANEL
TRIM
STRIP
To remove and install the color panel on
your compactor:
NOTE: The ram travels about 2/3 of the
way down into the container. Because of
this, the container must be at least 1/3
full before you notice any compressing.
1.
KEY LOCK SWITCH
For Models 1052, 1050L & 1051L use
instructions 6 thru 9 only.
The key lock switch on your compactor
is provided for your protection as a safety
measure. When the key switch is in the
“OFF” position, the compactor will not
operate. Lock your compactor, and remove the key for safekeeping to keep
children from operating the unit or to prevent anyone from tampering with it.
Fig. 7
Remove drawer and set it on its
back, with the door panels facing up.
(See section “DRAWER REMOVAL”,
page 7.)
Fig. 4
DRAWER PEDAL
6.
Remove the two screws holding the
trim strip to the bottom of the door,
and remove the trim strip (Fig. 7)
7.
Slide the color panel out.
8.
Choose the color you want to show.
9.
Slide the color panel back into place,
and reinstall the trim strip.
Fig. 8
NOTE: Opening the drawer during operation will stop the unit. If the compactor is stopped during its cycle, it will always move back UP when restarted.
DRAWER SAFETY LATCH (MODELS
1050L & 1051L ONLY)
RETAINER CAP
The drawer latches automatically when
closed. To unlatch the drawer, move the
lever to the left and pull on the handle.
2.
HANDS-FREE DRAWER OPENING
(MODELS 1050 & 1051 ONLY)
Fig. 5
With a commonhead screwdriver pry
off the retainer cap on each end of
the drawer pedal. (Fig. 4)
For proper operation, be sure compactor is level. Adjust the level legs as necessary.
HINGE BRACKET
10. Reinstall pedal by matching it up and
sliding hinge pin through one hinge
bracket. (Fig. 8)
Fig. 9
Quickly depress foot pedal and immediately remove foot. Drawer will open for
easy access to trash container.
AIR FRESHENER
Your Compactor is equipped with Air
Freshener Panel, which can hold a solid
air freshener, such as a Stick-UP® Air
Freshener package.
Simply open the air freshener and fasten it to the panel.
OPTIONAL CUTTING BOARD KIT
(MODEL 1004)
3.
With a small Phillips head screwdriver or 8 penny nail, push the
drawer pedal hinge pin out of one
end of the drawer. (Fig. 5)
11. Use a needle nose pliers to hold the
pedal spring, slip it over the end of
the hinge pin and slide the pin
through. (Fig. 9) Push pin through
second hinge bracket and then the
rest of the way through the pedal.
Fig. 6
You can order an optional cutting board,
Model 1004, from your Broan Distributor, or write Broan Mfg. Co., Inc., Hartford, WI 53027.
The cutting board rests on the top of the
compactor, and features non-marring
rubber feet and a gravy groove on the
top.
PEDAL SPRING
12. Replace the retainer caps on each
end of the drawer pedal.
4
DECORATIVE PANEL INSTALLATION
A decorative panel insert can be installed
in place of the colored door panel and
corrugated spacer.
Remove drawer assembly, foot pedal,
trim strips, color panel and corrugated
spacer following instructions under “Color
Matching.”
Panels over 1/4” thick:
OPTION #1:
Make sure panel fits inside the chrome
door trim. Inside dimensions of chrome
trim are approximately 11-5/16” x 20-1/
2”.
1. Drill holes through the door for the
screw size being used.
2. Screw the panel to door.
3. Reinstall trim strip, foot pedal, and
slide door assembly back into compactor.
OPTION #2:
Start with a panel 11-11/16” x 20-7/8”.
Use a router to cut 3/16” wide edges, 3/
32” thick, all around. Carefully bend tabs
of side door trim 90° to provide clearance. Slide panel under chrome door
trim. Carefully bend tabs back to their
original position. Replace trim strip, foot
pedal and drawer assembly.
Panels 1/4” or thinner:
Cut decorative panel to 11-11/16” x
20-7/8”. Carefully bend tabs of side door
trim 90° to provide clearance. Slide panel
under chrome door trim. Depending on
the thickness of your panel, you may
need to use the original colored panel or
cardboard to space the decorative panel
out tight against the door trim. Carefully
bend tabs back to their original position.
Replace trim strip and door assembly.
IMPORTANT: If compact has yet to be
delivered to job site, reinstall drawer assembly. Run compactor so ram extends
down into the drawer, against the cardboard filler. This will prevent damage to
the mechanism during delivery.
Do not ship or deliver compactor on its
back. If it cannot be delivered upright, it
is preferable to ship it on its side.
BAG INSTALLATION
Your compactor has been furnished with
reinforced polyethylene bags.
They are ready to be installed.
DO NOT use plastic bags other than
those which have been designed for use
in your compactor. Unauthorized bags
may become caught in the mechanism
requiring you to pay service charges
which cannot be covered by the warranty.
If you unable to find the proper bags locally, please call 1-800-558-1711 or write:
Broan Mfg. Co., Inc., 926 W. State Street,
Hartford, WI 53027 requesting the name
and location of the nearest source.
Fig. 10
Fig. 13
“V GROOVE”
CONTAINER
LATCH
With the drawer extended to the second
stop, release the container latch and
swing open door. Then slide bag into
drawer from front to back. Starting at the
back of the drawer, fold bag over top rim
of drawer on all sides. (Fig. 10)
Fig. 11
PREPUNCHED HOLES
Press the bag into all corners of the
drawer and smooth the bottom. (Fig. 11)
Fig. 12
Bag is locked between door flange and
drawer. When door is closed and latched
properly, door guide “V” will be snug in
“V” groove in drawer flange. (Fig. 13)
Failure to align “V” properly or to latch
drawer to door will cause compactor to
stall with ram down. This condition can
be corrected by turning the key to the
start position. The ram should return to
its normal position and stop. If necessary,
push in on front of drawer to engage interlock. Relatch the drawer and begin
compacting.
COMPACTING
After properly installing a new bag, the
compactor is ready to use.
FOR BEST RESULTS
ALWAYS FILL THE BAG COMPLETELY BEFORE OPERATING THE COMPACTOR FOR THE FIRST TIME. DOING SO WILL MINIMIZE BAG PULLUP AND TEARING.
DRAWER BUTTONS
Smooth and shape the bag carefully —
this will prevent the bag from being torn
by the ram during compaction. Using buttons on side of drawer, button your bag
in place by using the prepunched holes
in the side of the bag. Figure 12 shows
the bag installed.
NOTE: If you have difficulty installing
the bag, remove drawer completely
from unit by lifting front of drawer
slightly and pulling forward (place on
rug or other surface to protect floor).
This will clear back of container from
housing for easier installation of bag.
5
Close drawer completely. Rotate key past
“ON” to “START” position. Hold in
“START” momentarily and release back
to “ON” position. Motor will start and compaction will proceed.
CAUTION: DO NOT FORCE KEY
WHEN TURNING. It should always rotate easily. Forcing may break key and
damage switch.
The ram travels downward into the
drawer compacting the trash; at the bottom of the ram stroke, the unit automatically reverses and retracts upward out
of the drawer. Total cycle time is a little
over a minute. At the top of the stroke,
the unit automatically shuts itself off and
the compactor is ready to receive more
trash.
Although it is not necessary to compact
until the drawer is full or nearly so, it is
suggested that for maximum compaction, you start the compactor each time
a significant amount of trash is added.
At full stroke, the ram does not travel all
the way to the bottom of the container.
Trash in the bottom 1/3 of the container
will be crushed during subsequent compacting.
Glass bottles can make a loud noise
when they break during compaction. This
is normal. Bottles do not always break
during the first cycle. Breaking glass and
associated noise may occur several
cycles later depending on type and volume of trash.
TO STOP THE COMPACTOR
RAM CLEANING
The unit may be stopped at any time by
turning the key to “OFF” or opening the
drawer. If the unit is stopped, the ram
will always move back to the up position
when restarted again.
1.
After removing drawer as described
above, ram can be removed.
Fig. 15
BAG REMOVAL
1.
Open drawer to first stop.
2.
Unhook container latch from door
catch. Swing door open.
3.
Unbutton bag from drawer and close
by twisting bag. Fasten with twist tie
provided.
2.
Fig. 14
Remove bolt in center of ram with
1/2” wrench. (Fig. 15)
CAUTION:
WATCH FOR GLASS FRAGMENTS
Bottles and large cans compact best
when laid flat near the center of the
drawer.
Fig. 16
Place a couple of folded sheets of newspaper, or a large grocery bag on top of
the load to be compacted when:
1.
Compacting large or several glass
bottles or jars (or any items that
might shatter). This will help prevent
glass fragments and particles from
flying out of drawer into mechanism.
2.
Compacting unwrapped messy food
waste. This will help keep the power
ram clean.
There are certain types of trash that create exceptionally strong odors such as
raw meat, fish, grapefruit rinds, personal
hygiene items, and disposable diapers.
You may not wish to put such items into
your compactor.
If the compactor will not be used for an
extended period of time, such as during
vacation, remove the bag to prevent a
build-up of undesirable odor.
CAUTION
DO NOT COMPACT AEROSOL CANS
OR ANY OTHER CONTAINERS
STILL HOLDING OR WHICH HELD
TOXIC CHEMICALS, INSECTICIDES,
OR COMBUSTIBLE CONTENTS.
FUMES MAY BE RELEASED THAT
ARE HAZARDOUS TO HEALTH OR
MAY RESULT IN FIRE OR EXPLOSION.
NEVER PUSH TRASH INTO THE
CONTAINER WITH HANDS OR FEET.
Trash might contain broken glass,
sharp pieces of metal, etc., which
could cause injury. Never compact
flammable materials in your compactor.
Do not put paint, oily rags, lighter
fluid cans, paint thinner cans, etc.,
in your compactor. Doing so could
result in spontaneous combustion
causing a fire and/or explosion.
4.
Use a twist-tie to secure the top of
the bag. Pull upward and forward —
tipping the bag toward you. A full
compacted bag of trash is easily removed in this fashion. (Fig. 14)
MAINTENANCE AND CLEANING
3.
Place hand on ram face, supporting
its entire length. (Fig. 16)
Fig. 17
Your compactor has been designed with
easy access for cleaning when required.
The interior and exterior of the cabinet
are finished with a durable baked-on
enamel finish.
Do not use harsh or gritty cleanser or
scouring pads which may mar the finish.
Use a high-grade wax cleaner on these
surfaces.
TO REMOVE DRAWER AND CLEAN
INTERIOR
1.
Pull out drawer until it stops.
2.
Lift up on drawer slightly and then
pull out drawer to second stop.
3.
Lift drawer up and out of compactor.
4.
Vacuum and clean cabinet base,
track channels, and drawer, particularly in corners.
5.
Wash the cabinet interior with normal mild household cleaners.
WARNING: Glass fragments may be lying in bottom of cabinet — to avoid injury, use care in cleaning.
6
4.
With other hand, press back on front
of ram, sliding it until it releases.
(Fig. 17)
5.
To replace ram, slide ram into
grooves on mechanism and slide forward until it snaps into position.
6.
Replace center bolt with 1/2”
wrench.
Ram should be cleaned with normal, mild
household cleaners.
HANDY HINTS
Before you call for service, check these handy hints which may save you the cost of a service call:
1. Is electric cord plugged in securely?
2. Has a house fuse blown or a circuit
breaker tripped?
3. Is the drawer pushed firmly shut?
4. Is the key switch in the “ON” position?
5. Did you hold the key switch in
“START” long enough to start the
compaction cycle?
6. If drawer is difficult to close, check
to see if any trash has fallen behind
the container preventing safety
switch closure.
amount of compacting will be apparent as the ram does not travel all
the way to the bottom of the container. Trash in the bottom 1/3 of the
container will be crushed during subsequent compacting.
9. On rare occasions, a large can
placed near the outer edge of the
container may become wrapped
around the edge of the ram. This
could interfere with the opening of
the door. To correct, simple grasp
door handle and move the drawer
back and forth until the stuck can
becomes dislodged.
7. The motor has an automatic thermal cutout. If you have compacted
repeatedly, this protector may have
opened the circuit. Wait a few minutes and the cutout will reclose automatically.
10. Grease from mechanism may drop
into the drawer or be found on the
front of the bag early in the life of
your compactor. This is not cause
for alarm.
8. The container must be at least 1/2”
full of trash before any appreciable
11. In the unlikely event that the actuator (on the inside of the door) breaks
off, the compactor will not operate.
7
DO NOT ATTEMPT TO OPERATE
COMPACTOR IN ANY OTHER
MANNER. A replacement actuator
can be ordered from your dealer, local service center, or Broan Mfg.
Co., Inc., Hartford, WI 53027 (414)
673-4340.
12. To obtain service, provide the unit
model number, serial number and
nature of any defect in the product
or part. The model number, serial
number and all other data is shown
on the model plate, which is located
inside of the bag storage compartment, behind the flip-down door.
When requesting warranty service,
evidence of the original purchase
date must be presented. To obtain
the name of the warranty service
center serving your location, contact
the dealer who sold you your compactor or write Broan Mfg. Co., Inc.,
Hartford, WI 53027 (Telephone 414673-4340).
BROAN ONE YEAR LIMITED WARRANTY
Broan warrants to the original consumer purchaser of its products that such products will be free from defects in materials or workmanship for
a period of one year from the date of original purchase. THERE ARE NO OTHER WARRANTIES, EXPRESS OR IMPLIED, INCLUDING, BUT
NOT LIMITED TO, IMPLIED WARRANTIES OF MERCHANTABILITY OR FITNESS FOR A PARTICULAR PURPOSE.
During this one-year period, Broan will, at its option, repair or replace, without charge, any product or part which is found to be defective under
normal use and service.
THIS WARRANTY DOES NOT EXTEND TO FLUORESCENT LAMP STARTERS AND TUBES. This warranty does not cover (a) normal
maintenance and service or (b) any products or parts which have been subject to misuse, negligence, accident, improper maintenance or
repair (other than by Broan), faulty installation or installation contrary to recommended installation instructions.
The duration of any implied warranty is limited to the one-year period as specified for the express warranty. Some states do not allow limitation
on how long an implied warranty lasts, so the above limitation may not apply to you.
BROAN'S OBLIGATION TO REPAIR OR REPLACE, AT BROAN'S OPTION, SHALL BE THE PURCHASER'S SOLE AND EXCLUSIVE REMEDY UNDER THIS WARRANTY. BROAN SHALL NOT BE LIABLE FOR INCIDENTAL, CONSEQUENTIAL OR SPECIAL DAMAGES ARISING OUT OF OR IN CONNECTION WITH PRODUCT USE OR PERFORMANCE. Some states do not allow the exclusion or limitation of
incidental or consequential damages, so the above limitation or exclusion may not apply to you.
This warranty gives you specific legal rights, and you may also have other rights, which vary from state to state. This warranty supersedes all
prior warranties.
To qualify for warranty service, you must (a) notify Broan at the address stated below or telephone: 1-800-637-1453, (b) give the model number
and part identification and (c) describe the nature of any defect in the product or part. At the time of requesting warranty service, you must
present evidence of the original purchase date.
BROAN MFG. CO., INC., 926 West State Street, Hartford, WI 53027
93042445B