1
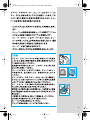
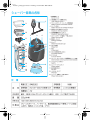
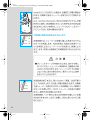
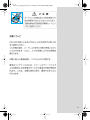
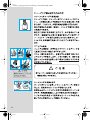
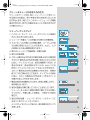
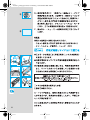
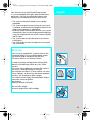
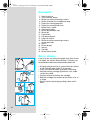
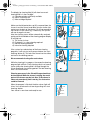
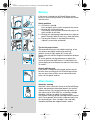
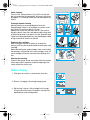
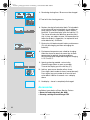
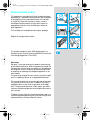
Activator 8595
JP
KURTZ DESIGN 19.02.04
Activator_8795_Japan Seite 1 Dienstag, 14. Dezember 2004 4:00 16
8795
1
auto s
elect
off
8795
clean
eco
normal
st art cle
a n in
g
cartridge
2
intensive
full
8795
3
empty
8795
Activator_8795_Japan Seite 2 Dienstag, 14. Dezember 2004 4:00 16
2
Activator_8795_Japan Seite 3 Dienstag, 14. Dezember 2004 4:00 16
STOP
3
Activator_8795_Japan Seite 4 Dienstag, 14. Dezember 2004 4:00 16
4
Activator_8795_Japan Seite 5 Dienstag, 14. Dezember 2004 4:00 16
5
Activator_8795_Japan Seite 6 Dienstag, 14. Dezember 2004 4:00 16
6
Activator_8795_Japan Seite 7 Dienstag, 14. Dezember 2004 4:00 16
7
Activator_8795_Japan Seite 8 Dienstag, 14. Dezember 2004 4:00 16
1
9
10
2
3
4
11
ct
clean
to
au
12
se
le
12
sta
intensive
e
ning
cartr
idg
13
14
clea
full
5
6
7
empty
2
1
off
rt
eco
normal
3
15
16
8795
17
8
18
19
8
Activator_8795_Japan Seite 9 Dienstag, 14. Dezember 2004 4:00 16
au
to
se
l
eco
normal
ca
rtr
idg
e
intensive
full
empty
se
lec
t
clean
au
to
eco
normal
intensive
ridg
e
1
cart
full
empty
2
au
to
se
lec
t
clean
eco
normal
cart
ridg
e
intensive
full
empty
au
to
se
lec
t
clean
eco
normal
ridg
e
intensive
cart
full
empty
ge
full
cartrid
ge
cartrid
full
empty
empty
ge
c
b
cartrid
a
full
empty
3
2
1
off
selec
t
clean
auto
eco
normal
intensive
rt cle a nin g
cartridge
s ta
full
empty
auto
sele
ct
clean
eco
normal
intensive
a
b
c
d
9
Activator_8795_Japan Seite 10 Dienstag, 14. Dezember 2004 4:00 16
3
2
1
auto
off
select
clean
eco
normal
start cle a nin g
cartridge
intensive
full
empty
auto
sele
ct
clean
eco
normal
intensive
a
b
c
d
auto
sele
ct
clean
eco
normal
intensive
10
Activator_8795_Japan Seite 11 Dienstag, 14. Dezember 2004 4:00 16
11
Activator_8795_Japan Seite 12 Dienstag, 14. Dezember 2004 4:00 16
12
8795
3
2
1
2
1
2
1
Activator_8795_Japan Seite 13 Dienstag, 14. Dezember 2004 4:00 16
13
Activator_8795_Japan Seite 14 Dienstag, 14. Dezember 2004 4:00 16
3
2
auto
off
selec
t
1
clean
eco
normal
cartridge
intensive
start cleaning
full
1
off
empty
old
new
14
8795
Activator_8795_Japan Seite 15 Dienstag, 14. Dezember 2004 4:00 16
1
2
3
4
5
6
7
8
9
15
Activator_8795_Japan Seite 16 Dienstag, 14. Dezember 2004 4:00 16
8595
j
1
8795
k
2
3
4
5
6
16
1 0
Activator_8795_Japan Seite 17 Dienstag, 14. Dezember 2004 4:00 16
17
Activator_8795_Japan Seite 18 Dienstag, 14. Dezember 2004 4:00 16
18
Activator_8795_Japan Seite 19 Dienstag, 14. Dezember 2004 4:00 16
19
Activator_8795_Japan Seite 20 Dienstag, 14. Dezember 2004 4:00 16
20
Activator_8795_Japan Seite 21 Dienstag, 14. Dezember 2004 4:00 16
21
Activator_8795_Japan Seite 22 Dienstag, 14. Dezember 2004 4:00 16
22
Activator_8795_Japan Seite 23 Dienstag, 14. Dezember 2004 4:00 16
Your Activator (shaver with Clean&Charge station)
is a system equipped with highly advanced electronic
processors. It ensures unsurpassed closeness and
comfort for you and optimum care for your shaver:
English
• The system automatically adapts to any voltage
worldwide.
• The system recognizes when cleaning of your shaver
is required, and automatically recognizes which of the
three cleaning programs is appropriate.
• While the shaver is connected to the mains, the system
automatically takes care of charging and discharging in
a way that is optimized for the shaver’s battery capacity
and life span.
• The system takes care of lubrication of the shaver’s
cutting parts.
• The system tells you when to replace the shaving foil
and cutter block.
Warning
Your shaver is provided with a special cord set with
integrated Safety Extra Low Voltage power supply.
Do not exchange or manipulate any part of it.
Otherwise there is a risk of electric shock.
STOP
In order to avoid any leakage of the cleaning fluid,
place the Clean&Charge station on a flat, stable
surface.
Do not tip, move suddenly or transport the station in
any way if a cleaning cartridge is installed.
Do not place the station in a mirror cabinet, nor store
it over radiators, nor place it on polished or laquered
surfaces. Do not expose to direct sunlight.
The station contains highly flammable liquid. Keep it
away from sources of ignition.
No smoking.
Keep out of reach of children.
Do not refill cartridge.
Use only original Braun refill cartridge.
23
Activator_8795_Japan Seite 24 Dienstag, 14. Dezember 2004 4:00 16
Description
1.
2.
3.
4.
5.
6.
7.
8.
9.
10.
11.
12.
13.
14.
15.
16.
17.
18.
19.
Special cord set
«start cleaning» button
Station-to-shaver connecting contacts
Station lift button for cartridge exchange
Display for cleaning programs
Display for cleaning fluid status
Station mains socket
Cleaning cartridge
Shaver foil protection cap
Shaver foil
Cutter block
Foil release buttons
Long hair trimmer
Shaver-to-station connecting contacts
(shaver backside)
Switch
Shaver display
Info key
Pilot light
Shaver mains socket
Before shaving
If you wish, you may start shaving right away (if the shaver
is charged, see section «Shaver display»). However, we
recommend to follow the procedure described here.
to
se
l
eco
au
normal
full
ca
rtr
idg
e
intensive
empty
au
to
t
se
lec
clean
eco
normal
intensive
cart
ridg
e
1
full
empty
2
au
to
se
t
lec
clean
eco
normal
cart
ridg
e
intensive
full
empty
au
to
se
t
lec
clean
eco
normal
cart
ridg
e
intensive
full
empty
24
• Using the special cord set (1), connect the mains socket
of the Clean&Charge station (7) to the mains.
• Press the station lift button (4) to open the housing.
• Hold the cleaning cartridge (8) down on a flat, stable
surface (e.g. table).
• Carefully remove the lid from the cartridge.
• Slide the cartridge into the base of the station as far as
it will go.
• Slowly close the housing by pushing it down until it
locks.
Activator_8795_Japan Seite 25 Dienstag, 14. Dezember 2004 4:00 16
c
cartrid
ge
b
full
full
empty
empty
full
empty
3
Make sure the foil protection cap (9) is removed from the
shaver. Insert the shaver head down into the station (the
contacts on the back of the shaver (14) will correspond to
the contacts in the station (3)). If necessary, the system
will now charge the shaver.
Also, the cleaning status will be automatically analyzed
and one of the four diodes of the cleaning program display
(5) will light up:
a) The shaver is clean
b) Eco(nomic), i.e. short cleaning required
c) Normal cleaning required
d) Intensive cleaning required
cartrid
ge
a
cartrid
ge
The display for cleaning fluid (6) will show how much
cleaning fluid is in the cartridge:
a) Cleaning solution sufficiently available
b) Up to 7 cleanings left
c) New cartridge required
2
ct
clean
auto
off
sele
1
normal
clean
selec
t
intensive
eco
auto
eco
a
b
c
d
normal
intensive
rt cle a nin g
cartridge
s ta
full
empty
If the system has selected one of the three cleaning
programs, it will not start until you push down the «start
cleaning» button (2). This locks the shaver into the station
and starts the cleaning process.
3
auto
sele
ct
clean
normal
intensive
2
1
We recommend cleaning after each shave.
eco
eco
normal
auto
off
select
clean
a
b
c
d
start cle a nin g
While the cleaning is in progress, the respective cleaning
program light will flash. Each cleaning consists of several
cycles (where the cleaning fluid is flushed through the
shaver head) and a heat drying period. The total cleaning
time is 33 to 50 minutes.
cartridge
intensive
full
empty
Cleaning processes in the Clean&Charge should not
be interrupted. While the shaver is drying, the metal
parts of the shaver may be hot. Also, if the shaver is
taken out prematurely and is not dry, its electronics
could be harmed.
sele
ct
clean
auto
When the program is finished, the blue «clean» light will
shine. You can release the shaver by pushing the «start
cleaning» button.
Your shaver is now clean and ready for use.
eco
normal
intensive
25
Activator_8795_Japan Seite 26 Dienstag, 14. Dezember 2004 4:00 16
Shaving
2
1
If the shaver is locked into the Clean&Charge station,
push the «start cleaning» button (2) to release the shaver
and take it out.
2
1
2
1
Switch positions
0 = Off (switch is locked)
Press and push up the switch to operate the shaver:
1 = Shaving with the pivoting head
The pivoting cutting system automatically adjusts to
every contour of your face.
2 = Shaving with the pivoting head locked at an angle (to
permit shaving in difficult areas, e.g. under the nose).
3 = The long hair trimmer is activated (for trimming
sideburns, moustache and beard).
8795
3
Tips for the perfect shave
We recommend that you shave before washing, as the
skin tends to be slightly swollen after washing.
Hold the shaver at right angles (90°) to the skin.
Stretch your skin and shave against the direction of beard
growth.
To ensure optimal shaving performance, replace the
shaver foil and cutter block when it is indicated on the
shaver display or when the parts are worn or at least every
18 months.
Shaving with the cord
If the shaver is completely discharged and you do not
have the time to recharge in the Clean&Charge station,
you may also shave with the shaver connected to the
mains via the special cord set.
After shaving
3
2
auto
off
selec
t
1
clean
eco
normal
cartridge
intensive
start cleaning
full
empty
26
Automatic cleaning
After each shave, return the shaver to the Clean&Charge
station and proceed as described above in the section
«Before shaving». All charging and cleaning needs are
then taken care of. With daily use, a cleaning cartridge
should be sufficient for about 30 cleaning cycles.
The hygienic cleaning solution cartridge contains alcohol
which, once opened, will naturally evaporate slowly into
the surrounding air. Each cartridge, if not used daily,
should be replaced after approximately 8 weeks.
Activator_8795_Japan Seite 27 Dienstag, 14. Dezember 2004 4:00 16
2
1
off
Quick cleaning
Press the foil release buttons (12) to lift the shaver foil
(do not remove the foil completely). Switch on the shaver
for approx. 5–10 seconds so that the shaved stubbles can
fall out.
1
off
Thorough manual cleaning
Manual cleaning is recommended only when the
Clean&Charge station is not available, e.g. when travelling. Never use water to clean the shaver.
Remove the shaver foil and tap it out on a flat surface.
Using the brush, clean the cutter block and the inner area
of the pivoting head. If you do not use the Clean&Charge
station for a longer period of time, you should apply a drop
of light machine oil onto the shaver foil.
Replacing the cartridge
After having pressed the lift button (4) to open the
housing, wait for a few seconds before removing the used
cartridge.
Before discarding the used cartridge, make sure to close
the openings using the lid of the new cartridge, since the
used cartridge will contain contaminated cleaning solution.
old
Cleaning the housing
Clean the housing of shaver and station from time to time
with a damp cloth, especially inside the opening of the
station where the shaver rests.
new
Shaver display
8795
1. Pilot light: the shaver is connected to the mains.
2. Shaver is charging / Remaining charging time.
3. Self testing / shaver is fully charged (a full charge
will give up to 50 minutes of cordless shaving time,
depending on your beard growth).
27
Activator_8795_Japan Seite 28 Dienstag, 14. Dezember 2004 4:00 16
4. Remaining shaving time / Shaver must be charged.
5.Time left in the cleaning process.
6. Replace shaving foil and cutter block. To help obtain
a new shaver foil and cutter block at your dealer or
Braun Service Center, the display shows the part
No. 8000. To reset the display, push the info key (17).
The shaver foil and cutter block are precision parts
that, in time, are subject to wear. We recommend to
follow the display’s suggestion, i.e. replace foil and
cutter block every 18 months.
7. System has initiated automatic battery maintenance
(it is fully discharging and then recharging the
batteries).
8. Environment temperature not suited for charging.
Allow the shaver to remain for some time at room
temperature for optimal charging conditions.
Best environmental temperature range for charging
is 15 °C to 35 °C.
8595
9. Intensive cleaning needed – return to the
Clean&Charge station as soon as possible.
To reset the display, push the info key (17).
10. Info key, press once: duration of last shave.
Press again: total number of shaves (cannot be reset).
Press again: key part number for shaver foil and
cutter block. Hold for 3 seconds: runs a display
demo.
11. No display – shaver is completely discharged.
Accessories
Available at your dealer or Braun Service Centres:
• Shaver foil and cutter block No. 8000
• Cleaning cartridge Clean&Charge CCR
28
Environmental notice
This appliance is provided with nickel-hydride rechargeable batteries. To protect the environment, do not dispose
of the appliance in the household waste at the end of
its useful life. Open the housing as shown, remove
and dispose of the batteries at your retail store or at
appropriate collection sites according to national or
local regulations.
1
8795
Activator_8795_Japan Seite 29 Dienstag, 14. Dezember 2004 4:00 16
2
3
4
5
6
The cartridge can be disposed with regular garbage.
Subject to change without notice.
This product conforms to the EMC-Requirements as
laid down by the Council Directive 89/336/EEC and to the
Low Voltage Regulation (73/23 EEC).
Guarantee
We grant 1 year guarantee on the product commencing
on the date of purchase. Within the guarantee period we
will eliminate, free of charge, any defects in the appliance
resulting from faults in materials or workmanship, either
by repairing or replacing the complete appliance as we
may choose.
This guarantee extends to every country where this appliance is supplied by Braun or its appointed distributor.
This guarantee does not cover: damage due to improper
use, normal wear or use as well as defects that have a
negligible effect on the value or operation of the appliance. The guarantee becomes void if repairs are undertaken by unauthorised persons and if original Braun parts
are not used.
To obtain service within the guarantee period, hand in or
send the complete appliance with your sales receipt to an
authorised Braun Customer Service Centre.
29
Activator_8795_Japan Seite 30 Dienstag, 14. Dezember 2004 4:00 16
30
Activator_8795_Japan Seite 31 Dienstag, 14. Dezember 2004 4:00 16
31
Activator_8795_Japan Seite 32 Dienstag, 14. Dezember 2004 4:00 16
5-643-455/01/XII-04