1
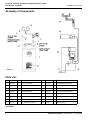
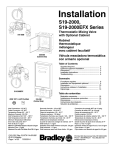
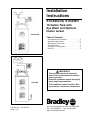
Installation
Instructions
S19-690LHS, S19-690H
10-Gallon Tank with
Eye Wash and Optional
Heater Jacket
S19-690LHS
Table of Contents
Pre-Installation Information . . . . . . . . . . . . . . .2
Installation Instructions . . . . . . . . . . . . . . . . .3–4
Maintenance Instructions . . . . . . . . . . . . . . . . .5
Troubleshooting . . . . . . . . . . . . . . . . . . . . . . . .5
Assembly of Components . . . . . . . . . . . . . . . .6
Parts List . . . . . . . . . . . . . . . . . . . . . . . . . . . . . .6
IMPORTANT
This equipment should be inspected,
tested, and recorded weekly to maintain
proper operation.
S19-690H
Read this installation manual thoroughly
before beginning installation.
This installation manual should be filed
by the owner’s maintenance department.
215-084 Rev. L; EN 02-586
Page 1 of 6
P.O. Box 309, Menomonee Falls, WI 53052-0309
TEL. 1-800-BRADLEY FAX 262-251-5817
http://www.bradleycorp.com
10-Gallon Tank with Eye Wash and Optional Heater Jacket
S19-690LHS, S19-690H
Installation Instructions
Pre-Installation Information
Operation
The Bradley 10-Gallon Tank provides emergency protection in areas where permanent water supply
is not available. After emergency use of the portable unit, further cleansing of the injury should be
administered at a conventional plumbed fixture.
Components
10-Gallon Tank: The stainless steel tank has built-in carrying handles. The tank has a tire filler
valve with 0-160 PSI air gauge. Pressure relief valve prevents accidental over-pressurization.
(NOTE: Do not exceed 130 PSI tank pressure.) Empty tank weighs 23 lbs., 86 lbs. full.
Eye Wash: The twin chrome-plated, soft flow eye wash heads have automatic flow control and stayopen valve. Flow maintained approximately 15 minutes from eye wash.
Optional Heater Jacket: The insulated heater jacket is made of yellow 200-Denier foam-backed
nylon and has a clear vinyl pocket to house the junction box. The eye wash yoke is wrapped with a
heat trace cable and lined with pipe insulation for further freeze protection. Silicone rubber drum
heaters have tension spring and hook fasteners. The heater jacket thermostatically controls water in
weather conditions down to -10°F (-23°C).
Supplies Required
• pipe sealant
• Air pressure equipment or supply
Check Contents
Separate all parts from packaging and check each part with Figure 2 and the parts list on page 6. Make sure
all parts are accounted for before discarding any packaging material. If any parts are missing, do not
attempt to assemble your Bradley 10-Gallon Tank until you obtain the missing parts.
Bradley 10 Gallon Tank Warranty
Bradley Corporation warrants to commercial and institutional purchasers only each fixture free from defects
in material and workmanship under normal use and service upon the following terms and conditions:
1. We will replace, without charge, any part which proves to be defective within one year from the date
of our invoice at our option, F.O.B. Menomonee Falls, Wisconsin.
2. This warranty does not cover installation or any other labor charge and does not apply to fixtures
which have been damaged by accident, abuse or improper maintenance.
3. The repair or replacement of the defective fixtures as stated in this warranty shall constitute the sole
remedy of the purchaser, and the sole liability of the Bradley Corporation under this warranty.
Bradley Corporation shall not otherwise be liable under any circumstances for incidental, consequential
or indirect charges caused by defects in fixtures or any delay in the repair or replacement thereof.
4. This warranty extends only to commercial and institutional purchases and does not extend to any
others, including consumer, customers of commercial and institutional purchasers.
5. This warranty is in lieu of all other warranties expressed or implied, including any implied warranty
of merchants ability or fitness for a particular purpose, or otherwise.
6. Bradley emergency fixtures are to be used as a supplement to first aid treatment. Bradley
Corporation cannot guarantee that when used this emergency equipment will prevent serious injury
or the aggravation of existing or prior injuries. No other warranties, expressed or implied are authorized,
provided or guaranteed by Bradley Corporation.
2
Bradley Corporation • 215-084 Rev. L; EN 02-586
Installation Instructions
10-Gallon Tank with Eye Wash and Optional Heater Jacket
S19-690LHS, S19-690H
Installation Instructions
Step 1: Install eye wash
1. Attach the eye wash to the tank
outlet with pipe sealant (supplied
by installer) (see Figure 1).
Back View
IMPORTANT: When attaching the
eye wash to the tank outlet, hold
the adapter (Item 3) with a
wrench to prevent stripping.
Failure to do so may damage
the seal and cause leakage.
2. Attach the pressure gauge to the
adapter on the pressure side of the
tank with pipe sealant (supplied
by installer) as shown in Figure
2 on page 6.
3. FOR OPTIONAL HEATER
JACKET:
• Secure the pipe insulation and
yellow jacket to the eye wash
assembly.
• Wrap the heater belt around
the tank at a height of four
inches from the bottom of the
tank and fasten securely.
• Connect the heat trace cable to
the junction box.
• Slide the jacket up the side of
the tank and pull the drawstring at the top of the jacket.
• Place the junction box in the
pocket on the inside of the
jacket.
Bradley Corporation • 215-084 Rev. L; EN 02-586
Figure 1
3
10-Gallon Tank with Eye Wash and Optional Heater Jacket
S19-690LHS, S19-690H
Installation Instructions
Installation Instructions continued . . .
Step 2: Fill tank and pressurize
1. If the tank is pressurized, relieve the tank pressure by pulling up on the relief tank tab in the
center of the cover until the pressure gauge reads “0.”
IMPORTANT: DO NOT open the cover until the pressure gauge reads “0”!
2. Open the tank by pulling up on the wire handle located on top of the Quicklock cover. Push
down, rotate and remove. Fill the container with 7 gallons of potable water. Replace the cover.
3. Pressurize the tank to 95 PSI by applying air pressure to the valve located beneath the pressure gauge.
NOTE: Relief valve is designed to automatically vent at 100-130 PSI to prevent the tank from over-
pressurizing.
Step 3: Flush tank
1. Discharge the water through the eye wash for at least five minutes to flush the system.
2. Refill the tank and pressurize as explained in Step 2 outlined above.
NOTE: Let unit stand for one hour. If there is a noticeable pressure drop, repressurize back to 95 PSI
and let stand for one hour. If problems persist, consult the Troubleshooting guide found on page 5.
NOTE: This unit will provide at least 15 minutes of cleansing action. Take the injured person immediately
to a normal emergency station for additional cleansing and treatment.
3. FOR OPTIONAL HEATER JACKET: Plug the jacket’s electrical cord into an electric outlet.
4
Bradley Corporation • 215-084 Rev. L; EN 02-586
Installation Instructions
10-Gallon Tank with Eye Wash and Optional Heater Jacket
S19-690LHS, S19-690H
Maintenance Instructions
WARNING: Water preservatives protect potable water from bacteria, fungi and algae
growth for up to four months. If a water preservative is not used with this eye wash, it is
recommended that the tank be cleaned weekly or as often as needed. Infection, loss of
vision or other serious injury may result from misuse of this eye wash. DO NOT use
expired, cloudy, colored or contaminated solution. DO NOT open preservative bottle if
safety seal is broken. DO NOT save unused solution.
Step 1: Inspect eye wash unit
1. Visually inspect the pressure gauge weekly to ensure the unit is maintaining the proper pressure.
If the unit is not working properly, remove it from the hazard area immediately and refer to the
troubleshooting instructions. For further assistance, contact the Bradley Corporation.
Step 2: Clean eye wash unit
When using potable water only:
1. Empty the tank any time from once per week to once per month, depending on the quality of
your water supply. The manufacturer is not responsible for variations in the water supply.
2. Clean the inside of the tank using warm water and mild soap. Rinse the tank thoroughly with
warm water.
3. Refill the eye wash tank following the procedure outlined in Step 2 found on page 4.
When using potable water and water preservative (recommended):
1. Empty the tank at least once every 120 days.
2. Clean the inside of the tank using warm water and mild soap. Rinse the tank thoroughly with
warm water.
3. Refill the eye wash tank with potable water and the contents of an 8-ounce bottle of water
preservative (refer to the procedure outlined in Step 2 found on page 4).
• To order potable water preservative, contact your Bradley representative or local distributor
and ask for part number S19-865.
Troubleshooting
1. If pressure relief valve relieves prior to the required pressure, do the following (when in the
unpressurized condition):
• Tighten the valve completely into the cap by turning the gray hex head portion of the pressure
relief valve clockwise. Do not use a wrench.
• Pull up on the relief valve ring and ensure that the ring is not preventing the valve from closing
completely. Push on the center pin of the relief valve to ensure that it is completely closed.
Repressurize tank to required pressure. This may have to be done several times to get the valve
to seat completely.
2. If the pressurized tank loses pressure over time, check the connections with diluted liquid dish
soap or children’s bubbles to identify the leak location. Tighten the connection slightly and test
again.
Bradley Corporation • 215-084 Rev. L; EN 02-586
5
10-Gallon Tank with Eye Wash and Optional Heater Jacket
S19-690LHS, S19-690H
Installation Instructions
Assembly of Components
Figure 2
Parts List
Item
Part No.
Qty
Description
Item
Part No.
Qty
Description
1
S27-252
1
TANK – 10 GALLON
9
107-371
2
TETHERED DUST COVER
2
153-429
1
ADAPTER
10
269-1671
1
PIPE WRAP
3
153-217
1
ADAPTER
11
261-007B
1
HEATER BELT, 4 "
4
169-786
1
PRESSURE GAUGE
12
S83-167
1
JUNCTION BOX ASSEMBLY
5
S27-161
1
TANK VALVE ASSY.
13
230-022
1
POWER SUPPLY CORD
6
204-095
1
OPERATING INSTR. LABEL
14
269-1669
1
HEATER JACKET
7
169-043
1
PIPE PLUG, 1-3/8"
15*
204-421
1
EMERGENCY TAG
8
S05-116
1
EYE WASH VALVE ASSY.
16*
114-051
1
SAFETY SIGN
* Not Shown
6
Bradley Corporation • 215-084 Rev. L; EN 02-586