Transcript
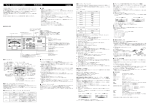
TU-12BW_1.fm
1 ページ 2008年10月9日 木曜日 午後6時23分
Calibrating the Meter's Needle
Owner’s Manual
Thank you, and congratulations on your choice of the BOSS TU-12BW Chromatic Tuner.
Before using this unit, carefully read the sections entitled: “USING THE UNIT SAFELY” and
“IMPORTANT NOTES” (supplied on a separate sheet).
These sections provide important information concerning the proper operation of the
unit. Additionally, in order to feel assured that you have gained a good grasp of every
feature provided by your new unit, this manual should be read in its entirety. The
manual should be saved and kept on hand as a convenient reference.
As shipped, the TU-12BW’s batteries are not yet installed. Be sure to read the section
“Changing the Batteries,“ and then follow the instructions to install the batteries.
Copyright © 2008 BOSS CORPORATION
All rights reserved. No part of this publication may be reproduced in any form
without the written permission of BOSS CORPORATION.
fig.01??????
AUTO/MANUAL
This changes the tuning mode.
Green Indicator: AUTO CHROMATIC mode
Red indicator: MANUAL mode
(for tuning a single specified pitch)
Indicators
These show the current note's name (C-B),
natural or sharp status (#), the master reference
pitch (438-445), and a warning when the
battery is low.
Needle Meter
DC IN jack
Connect the AC adaptor
(optional BOSS PSA series) here.
INPUT jack
Connect devices such as the
included piezo mic or a digital
instrument you want to tune here.
QUICK RESPONSE
This changes the meter
response speed.
Tuning Guide
The tuning indicator lights to show how close you
are to the target pitch.
lights: pitch is flat (low)
lights: pitch is sharp (high)
light simultaneously: in tune (± 3 cents)
(Sound button)
Use this to turn the reference tone's
sound on and off.
(Down)/ (Up)
These change various settings.
PITCH
This changes the settings for the reference
pitch.
POWER
Switches the power on and off.
Built-in Mic
Speaker
This allows you to tune an acoustic instrument
This plays the reference tone
when it's not convenient to use the included
and the Accu-Pitch sound.
piezo mic. For the best results with the built-in
mic, move the TU-12BW as close to the instrument
Batteries Compartment
as possible while tuning.
(bottom of the unit)
Insert two of the same type of AAA batteries.
Meter Adjustment Control (bottom of the unit)
メーター針の調整をする
Rarely, the meter's needle may drift out of calibration, causing the needle to point
slightly off from the 0 position even when the Tuning Guide's
and
indicators
light simultaneously. This can occur over time as the unit is transported, or if the unit is
handled in a rough fashion. If this occurs, you can recalibrate the needle using the
following procedure.
During normal use, the meter's needle almost never drifts out of
calibration. To adjust it, be sure to use a small Phillips screwdriver (a 2.3
mm precision screwdriver).
1. Hold down [PITCH] and turn the power on.
Confirm whether or not the needle is pointing at the 0 position.
2. If the needle is not pointing to 0, carefully turn the adjustment screw
with a small, precision phillips screwdriver (2.3 mm) until the needle
points to 0.
3. After completing calibration, press [POWER] to switch off the power.
Useful Features
fig.01??????
Preventing Battery Drain If You Forget to Switch Off the
Power (Auto Power Off Feature)
When the TU-12BW is turned on and powered by batteries, the power is turned off
automatically if approximately 30 minutes passes without any button being
pressed.
When the Accu-Pitch feature is on, a beeping sound is played when the pitch of the
instrument you’re tuning stabilizes within a range of three cents above or below
the correct pitch. This sound tells you that the pitch is in tune.
1. Hold down [
ON (enabled)
OFF (disable)
With the intended note name displayed, tune the instrument so that
and
on the Tuning Guide light simultaneously and the meter's needle points to 0 (the
center position).
When the Accu-Pitch feature is on, the tuner makes a beeping sound when the note
is stabilized at the correct pitch, informing you that the note is in tune.
Training for a Specific Pitch
(Tuning in MANUAL Mode)
To carry out tuning using the built-in microphone, connect nothing to the INPUT
jack and place the TU-12BW close to the instrument. If you have a digital wind
controller or an instrument with a built-in mic or pickup, plug its output into the
INPUT jack.
2. Press [POWER] to switch the power on.
3. Press [AUTO/MANUAL] to enable the "MANUAL" setting (lighting the
red indicator).
4. Press [ ] or [ ] to display the note name for the specific pitch you
want to practice and/or tune.
チューニング・ガイド
点灯:ピッチが低い
点灯:ピッチが高い
同時点灯:ピッチが合っている
(±3セント)
内蔵スピーカー
基準音、
アキュピッチ音を
発音します。
電池ボックス
(底面)
乾電池単4形
(2本)
を入れます。
1. 付属のピエゾ・マイクのプラグを INPUT ジャックに接続し、ピエゾ・
マイクをチューニングしたい楽器に取り付けます。
2. [POWER] を押して電源をオンにします。
3. [AUTO/MANUAL] を押して「AUTO」
(緑インジケーター点灯)に
設定します。
通常は自動的に音名を表示する「AUTO(オート・クロマチック・モード)」
で使用します。
特定の音を出す練習をしたいときは、音名を固定して表示することが
できる「MANUAL(マニュアル・モード)」が便利です。
1. Open the battery compartment (located
on the bottom of the unit) by sliding the
cover toward OPEN.
2. Remove the old batteries from the battery compartment.
4. 楽器を(単音で)鳴らします。
鳴らした音に近い音名がディスプレイに表示されます。正確な音程とのズレ
が、メーターとチューニング・ガイドで表示されます。
3. Insert two of the same type of fresh AAA batteries.
* Make sure the “+” and “-” ends of the batteries are oriented correctly.
* Do not mix fresh batteries with used ones, or mix batteries of different types. Doing so can result in
fluid leakage.
5. 楽器をチューニングします。
Specifications
Tuning
Accuracy
± 1 cent
Weight
Power Supply Dry battery R03 (carbon)
or LR03 (alkaline); (AAA)
type x 2; DC 3 V
AC adaptor DC 9V (PSA
series; optional)
Accessories
Current Draw
■ 特定の音程のトレーニングをする
(マニュアル・モードでのチューニングのしかた)
147.5 (W) x 54.0 (D) x 23.9 (H) mm
5-13/16 (W) x 2-1/8 (D) x 1 (H) inches
1. 付属のピエゾ・マイクのプラグを INPUT ジャックに接続し、ピエゾ・
マイクをチューニングしたい楽器に取り付けます。
205 g, 8 oz (including batteries)
内蔵マイクを使用したチューニングをするときは、INPUT ジャックには何も
接続しないで、楽器の近くに TU-12BW を置いてください。
Dry battery (R03 (AAA) type) x 2 (carbon),
piezo microphone, Owner’s Manual, Soft
Case, Holder, Leaflet (“USING THE UNIT
SAFELY” and “IMPORTANT NOTES”), Information
3. [AUTO/MANUAL] を押して「MANUAL」
(赤インジケーター点灯)
に設定します。
12 mA
5. 楽器を(単音で)鳴らします。
正確な音程とのズレが、メーターとチューニング・ガイドで表示されます。
チューニング・ガイドの
と
が両方点灯し、メーターの針が 0(中央)を
指すように楽器を鳴ら(チューニング)します。
安定してピッチが合うと、
「ピピッ」と鳴ってチューニング完了を知らせます。
(アキュピッチ機能)
The meter and Tuning Guide show how far the note is from the correct pitch.
6. Tune the instrument.
チューニングしている楽器が安定して± 3 セントの範囲に入ったときは、
チューニングしている音の高さに合わせて「ピピッ」音が聞こえます。この音
でチューニング完了を知らせます。
アキュピッチ機能を無効/有効にする
[ ]を押したまま[POWER]を押して電源をオンにします。
このとき、本体から何も音が出ない状態であれば、アキュピッチ機能は無効に
なっています。再度同じ操作で、電源オンと同時に「ピピッ」音が聞こえる
と、アキュピッチ機能は有効になります。
メモリー機能
本体に乾電池を入れておくと、電源をオフにしても以下の設定を記憶します。
乾電池を取り外すと、すべての設定は工場出荷時(下記)の状態に戻
ります。
工場出荷時
チューニング・モード(AUTO / MANUAL)の設定
AUTO
基準ピッチ
サウンド・モードで発音される音名
440Hz
C4
アキュピッチ機能のオン/オフの設定
クイック・レスポンス機能
オン
オフ
※ 本体を裏返す際は、パネルが破損しないように、
柔らかい布などの上に置いてください。
1. 本 体 底 面 の 電 池 ボ ッ ク ス の カ バ ー を
OPEN の方向にスライドさせて開けます。
2. 古い電池を取り出します。
3. 同じ種類の新しい単 4 形乾電池 2 本をセットします。
※ 電池の極性(+/ー)を間違えないように注意します。
※ 新しい電池と一度使用した電池や種類の違う電池を混ぜて使用しないでくだ
さい。液漏れの原因になります。
4. 電池ボックスのカバーを元通りに閉じます。
■ 主な仕様
E0(20.6Hz)∼
C8(4,186.0Hz)
測定範囲
連続使用時の 約 15 時間(マンガン)
電池の寿命 ※使用状態によって異なります
A4(438 ∼ 445Hz)
205g(乾電池を含む)
質量
付属品
(DC 3V)
、BOSS PSA
アダプター(別売)
消費電流
乾電池単 4 形(2 本)
、取扱説明書、
ソフト・ケース、ホルダー、ピエゾ・
マイク、安全上のご注意・使用上のご
注意チラシ
12mA
規格および外観は改良のために予告なく変更する場合があります。
ボス製品保証書
Products of Roland
〒
●保証期間中に故障が発生した場合は、お買
上げの販売店にご依頼ください。また、修理
の際は、本書をご提示ください。
ご住所
●修理についてご不明な点や、お買上げ販売
店に修理を依頼することができない場合は、
ローランドお客様相談センターにお問い合
せください。
取扱販売店名・住所・
●本書は再発行いたしません。所定事項の記
入し、内容をよくお読みの上、大切に保存し
てください。
保
証
期
間
お買い上げ日
本体は一年間
年 月 日より
ただし、
ソフトウェア、
付属品、消耗部品は除く
太枠内に記入または捺印の無い場合は、
必ず販売店発行の領収書またはそのお買い上
げ年月日・販売店等を証明するものを保証書に添えて大切に保存してください。
記入も
しくは添付の無い場合は無効となりますので、
ご注意ください。
型 名
クロマチック・チューナー TU-12BW
インジケーターが点滅します。希望の基準ピッチを点滅させます。
2. [PITCH]から指を離すと基準ピッチが設定されます。
基準音を聞きながらチューニングする(サウンド・モード)
1. 合わせたいチューニング・モード
(AUTO / MANUAL)
を選びます。
The indicator flashes. Choose the reference pitch you want by getting it to flash.
2. Release [PITCH] to set the selected reference pitch.
2. [
This setting is saved in memory when the TU-12BW is powered off.
]を押して、基準音を鳴らします。
3. [ ]または[ ]を押して、合わせたい音名のインジケーターを点
灯させます。
Tuning While Listening to the Reference Tone (Sound Mode)
インジケーターに表示された音名の音が鳴ります。
半音ごと C2 ∼ C7(5 オクターブ)の基準音が鳴ります。
1. Choose the tuning mode you want to use (AUTO or MANUAL).
] (Sound) to play the reference tone.
3. Press [ ] or [ ] to light the indicator for the note name you'd like to
use as a reference.
本社工場 〒431-1304 浜松市北区細江町中川2036-1
電話(053)523-0230
保証規定
1. [PITCH]を押したまま、
[ ]または[ ]を押して希望の基準ピッ
チを選びます。
1. Hold down [PITCH] and press [ ] or [ ] to choose the reference
pitch you want.
[持込修理]
●本保証書は、本書記載内容で無料修理をさ
せていただくことをお約束するものです。
様
ご芳名
お
客
チューニングの基準ピッチを変える
Changing the Reference Pitch for Tuning
147.5(幅)× 54.0(奥行き)×
23.9(高さ)mm
外形寸法
内部測定精度 ± 1 セント
乾電池単 4 形× 2 本
電源
■ TU-12BW の設定
TU-12BW Settings
4. 基準音に合わせて楽器をチューニングします。
4. 本製品は日本国内でご使用いただくことを前提に製造・販
売しております。従って本製品の保証は、
日本国外ではお受
けできませんので、
ご了承ください。
This warranty is valid only in Japan.
1. 保証期間内において、取扱説明書・本体貼付ラベルなどの
注意書に従った正常なご使用状態で発生した故障につい
ては、第3項に示す場合を除き、無料修理いたします。
2. 保証期間内に無料修理をお受けになる場合は、お買い上げ
の販売店にご依頼いただくか、
またはローランドお客様相
談センターにご相談ください。なお、修理の際に本書をご提
示ください。お客様のご事情により出張修理を依頼された
場合、保証期間中であっても出張料金を申し受けます。
修理メモ
3. 保証期間内でも、次の場合には有料修理となります。
(イ)本書のご提示が無い場合。
(ロ)本書にお買上げ年月日・販売店名の記入が無い場合、
また
は字句を書き換えられた場合。
(ハ)
ご使用上の誤り、又は当社の指定者以外の手により修理・
改造された場合。
(ニ)本製品に異常がなく、他の部分、他の機器に異常があり、
点検及び改善した場合。
(ホ)お買い上げ後の輸送、移動、落下等による故障や損傷お
よび使用中に生じたキズ・汚れなどの外観上の変化。
(ヘ)地震、落雷、風水害、その他の天災地変、火災、公害、
ガス、
異常電圧による故障や損傷。
(ト)消耗部品(例:電池など)の取り替えを要する場合、および
消耗部品の摩耗や劣化に起因する故障や損傷。
※ 本保証書は以上の保証規定により無料修理をお約束する
ものです。従ってこの保証書によってお客様の法律上の権
利を制限するものではありません。
※ 本製品の補修用性能部品(製品の機能を維持するために
必要な部品)の最低保有期間は製造打切後6年です。この
部品保有期間を修理可能の期間とさせていただきます。保
有期間経過後も、故障内容によっては修理可能の場合があ
りますので、
ローランドお客様相談センターまでお問い合
わせください。
※ 修理の際、交換した部品を再生、再利用、製品の品質向上
等の目的で回収させていただくことがありますので、
ご協
力願います。
サウンド・モード使用時は、内蔵マイクによるチューニングはできま
せん(メーターは動きません)
。
The sound of the note name shown by the indicator is played.
Pressing [ ] and [ ], you can play reference tones in half-step increments
over five octaves (C2 to C7).
5. 発音をとめるには再度[
]を押します。
メーターの反応スピードを切り替える(クイック・レスポンス機能)
4. Tune the instrument to the reference tone.
クイック・レスポンス機能を使用すると、メーターの反応速度が上がり
ます。
より高度なトレーニング時に使用します。
1. [QUICK RESPONSE]を押します。
When you're using Sound mode, tuning cannot be performed using the
built-in mic (the built-in mic is disabled).
5. Press [
チューニング完了を音で知らせる(アキュピッチ機能)
4. [ ][ ]を押して練習(チューニング)したい音名のインジケー
ターを点灯させます。
5. Play a single note on the instrument.
2. Press [
[ ]と[ ]を同時に押したまま[POWER]を押して電源をオンにすると、
オート・パワー・オフ機能は働きません。
通常の操作で電源を入れると、オート・パワー・オフ機能は有効になります。
様
2. [POWER] を押して電源をオンにします。
* In the interest of product improvement, the specifications and/or appearance of this unit are subject to
change without prior notice.
With the intended note name displayed, adjust the instrument's tuning so that
both
and
on the Tuning Guide are lit and the meter's needle points to 0
(center position).
When the Accu-Pitch feature is on, the tuner makes a beeping sound when the note
is stabilized at the correct pitch, informing you that the note is in tune.
電池使用時に電源をオンにした後、最後のボタン操作から何も操作せずに約
30 分以上経過すると、自動的に電源がオフになります。
基準ピッチ
目的の音名がディスプレイに表示され、チューニング・ガイドの
と
が
両方点灯し、メーターの針が 0(中央)を指すように楽器をチューニングしま
す。
安定してピッチが合うと、
「ピピッ」と鳴ってチューニング完了を知らせます。
(アキュピッチ機能)
4. Slide the cover of the battery compartment back into place.
Dimensions
電池使用時の電源の切り忘れを防ぐ(オート・パワー・オフ機能)
電池がなくなると BATT.インジケーターが点
滅します。このときは、すぐに電池を交換し
てください。
内蔵マイクを使用したチューニングをするときは、INPUT ジャックには何も
接続しないで、楽器の近くに TU-12BW を置いてください。
Expected battery Approximately 15 hours
life under
This figure will vary depending on the
continuous use actual conditions of use.
(carbon)
■ 便利な機能
■ 電池交換のしかた
■ 通常のチューニングのしかた
(オート・クロマチック・モード)
* When turning the unit upside-down, place it on a soft cloth or
the like so as to prevent damage to the panel.
E0 (20.6Hz) –
C8 (4,186.0Hz)
内蔵マイク
付属のピエゾ・マイクを使わずにチューニ
ングするときに使用します。本体をできる
限り楽器に近づけてください。
メーター調整ボリューム
(底面)
The BATT. indicator flashes when the batteries begin to
run down.
Replace the batteries as soon as possible.
Tuning Range
メーターの針が 0 を指しているかを確認します。
2. メーターの針が 0 を指していないときは、プラス(+)ドライバー
(精密ドライバー 2.3mm)でメーター調整ボリュームを回し、0 を
指すように調整します。
3. 調整が終了したら[POWER]を押して電源を切ります。
設定
Changing the Batteries
Reference Pitch A4 (438–445Hz)
1. Connect the plug of the included piezo mic to the INPUT jack and
mount the piezo mic on the instrument you want to tune.
(サウンド・ボタン)
基準音の発音をオン/オフ
します。
(ダウン)/ (アップ)
各種設定を変更します。
PITCH
基準ピッチの設定を変更します。
POWER
電源をオン/オフします。
チューニングの目安を表示します。
Once batteries are installed in the TU-12BW, the settings described below are
retained in memory even after the power is switched off.
Removing the batteries returns all settings to their factory defaults.
Accu-Pitch feature settings
Quick Response feature settings
5. Tune the instrument.
QUICK RESPONSE
メーターの反応スピード
を切り替えます。
Memory Features
440Hz
C4
While the note is sounding, the name for the note's current pitch is displayed.
The meter and Tuning Guide show how far the note is from the correct pitch.
INPUT
付属のピエゾ・マイクや
チューニングしたい電子
楽器などを接続します。
] (Sound) and press [POWER] to switch on the power.
1. [PITCH]を押したまま、
[POWER]を押して電源をオンにします。
オート・パワー・オフ機能を無効にする
DC INジャック
BOSS PSAアダプターを
接続します。
If no sound is heard from the unit as it's powered up, it means that the Accu-Pitch
feature has been deactivated. To enable the Accu-Pitch feature, perform the same
operation again; if you hear a beeping sound when the power comes on, it means
that Accu-Pitch has been enabled.
Reference pitch
Note name selected in Sound mode
4. Play a single note on the instrument.
音名表示
(C-B)、
#表示、
基準ピッチ表示、
電池残
警告表示をします。
針式メーター
Switching the Accu-Pitch Feature On and Off
1. Connect the plug of the included piezo mic to the INPUT jack and
mount the piezo mic on the instrument you want to tune.
In AUTO CHROMATIC Mode, the TU-12BW automatically displays a note's pitch (the
note name) as you play it on the instrument. Most of the time, AUTO is the most
convenient mode to use.
When you want to practice producing a specific pitch, you may want to
use MANUAL mode; in this mode, only the pitch that you specify is
detected and displayed.
チューニング・モードを切り替えます。
緑インジケーター:オート・クロマチック・モード
赤インジケーター:マニュアル・モード
(音名を指定)
Using a Tone to Indicate Tuning is Completed
(Accu-Pitch Feature)
Original factory settings
AUTO
3. Press [AUTO/MANUAL] to enable the "AUTO" setting (lighting the
green indicator).
インジケーター
You can temporarily deactivate the Auto Power Off feature when you power up the
TU-12BW. To do so, simultaneously hold down [ ] and [ ] while you press
[POWER] to turn on the power.
The Auto Power Off feature is always enabled when you switch on the power in the
usual way.
Setting
Tuning mode setting (AUTO or MANUAL)
2. Press [POWER] to switch the power on.
AUTO/MANUAL
Deactivating the Auto Power Off Feature
Normal Tuning (AUTO CHROMATIC Mode)
To carry out tuning using the built-in microphone, connect nothing to the INPUT
jack and place the TU-12BW close to the instrument. If you have a digital wind
controller or an instrument with a built-in mic or pickup, plug its output into the
INPUT jack.
取扱説明書
このたびは、BOSS チューナー TU-12BW をお買い上げいただきまし
て、まことにありがとうございます。
この機器を正しくお使いいただくために、ご使用前に別紙「安全上のご
注意」と「使用上のご注意」をよくお読みください。また、この機器の
優れた機能を十分ご理解いただくためにも、取扱説明書をよくお読みく
ださい。取扱説明書は必要なときにすぐに見ることができるよう、手元
に置いてください。
お買い上げ時、電池はセットされておりません。必ず「電池交換のしか
た」にしたがって電池をセットしてください。
© 2008 ボス株式会社 本書の一部、もしくは全部を無断で複写・転
載することを禁じます。
経年変化や衝撃等でメーター針のセンター位置がずれた場合、以下の操作でセ
ンター位置の調整ができます。
通常、メーター針のセンター位置がずれることはほとんどありませ
ん。
調整を行う場合には、必ず小さな(+)ドライバー(精密ドライバー
2.3mm)を使用してください。また、無理な力を加えないでくださ
い。故障の原因になります。
] (Sound) to stop playing the reference tone.
Changing the Meter Response Speed (Quick Response Feature)
赤インジケーターが点灯します。クイック・レスポンス機能がオンになります。
The Quick Response feature increases the speed of the meter's response to the incoming
pitch. You may find this handy for some advanced music practice applications.
1. Press [QUICK RESPONSE] to turn the Quick Response feature on/off.
Quick Response is activated when the red indicator lights.
Stimmen mit Hilfe von Referenztönen (Tonmodus)
Modification du temps de réponse du vumètre (fonction Quick
Response)
1. Wählen Sie den gewünschten Stimmmodus aus (AUTO oder MANUAL).
Bedienungsanleitung
2. Drücken Sie die [
Vielen Dank und herzlichen Glückwunsch zu Ihrer Wahl des chromatischen
Stimmgerätes BOSS TU-12BW.
Vor dem Betrieb des Gerätes lesen Sie bitte die folgenden aufgeführten Abschnitte
sorgfältig durch: „SICHERER BETRIEB DES GERÄTES“ und „WICHTIGE HINWEISE“ (auf
einem gesonderten Blatt beigefügt).
Diese Abschnitte enthalten wichtige Informationen über die korrekte Bedienung des
Gerätes. Um einen vollständigen Überblick über alle Funktionen des Gerätes zu erhalten,
sollten Sie diese Bedienungsanleitung vollständig durchlesen. Bewahren Sie die
Anleitung an einem sicheren Platz auf und verwenden Sie diese zu Referenzzwecken.
Bei Auslieferung sind die Batterien des TU-12BW noch nicht eingelegt. Lesen Sie sich
den Abschnitt „Auswechseln der Batterien“ durch, und folgen Sie dann den
Anweisungen zum Einlegen der Batterien.
Copyright © 2008 BOSS CORPORATION
Alle Rechte vorbehalten. Diese Publikation darf weder ganz noch teilweise ohne
schriftliche Genehmigung durch die BOSS CORPORATION reproduziert werden.
Abb. 01??????
AUTO/MANUAL
Ändert den Stimmmodus.
Grüne LED: AUTO-CHROMATIC-Modus
Rote LED: MANUAL-Modus
(zum Stimmen einer angegebenen einzelnen Tonhöhe)
LEDs
Zeigen den Namen des aktuellen Tons (C–B; deutsch:
C–H), den normalen oder erhöhten (#) Zustand,
die Gesamt-Referenztonhöhe (438–445) sowie eine
Warnung bei schwacher Batterie an.
Tonhöhenanzeige
DC-IN-Buchse
Schließen Sie hier den Netzadapter
(optional; PSA-Serie von BOSS) an.
INPUT-Buchse
Schließen Sie hier Geräte wie das
mitgelieferte Piezomikrofon oder
ein digitales Instrument an, das Sie
stimmen möchten.
QUICK RESPONSE
Ändert die Reaktionsgeschwindigkeit
der Tonhöhenanzeige.
Richtanzeige
Die Pfeile leuchten, um anzuzeigen, wie nah Sie
der Zieltonhöhe sind.
leuchtet: Tonhöhe zu niedrig
leuchtet: Tonhöhe zu hoch
leuchten gleichzeitig: richtig gestimmt
(± 3 Cents)
(Ton-Taste)
Hiermit schalten Sie die Tonausgabe
des Referenztons ein und aus.
(Auf)/ (Ab)
Zum Ändern verschiedener Einstellungen.
PITCH
Ändert die Einstellungen für die Referenztonhöhe.
4. Stimmen Sie das Instrument auf den Referenzton.
MERKE
Wenn Sie den Tonmodus verwenden, kann das Stimmen nicht mit Hilfe
des eingebauten Mikrofons erfolgen (dieses ist deaktiviert).
5. Drücken Sie die [
stoppen.
]-Taste (Ton), um die Referenzton-Wiedergabe zu
Ändern der Reaktionsgeschwindigkeit der Tonhöhenanzeige
(Quick-Response-Funktion)
Die Quick-Response-Funktion beschleunigt die Reaktion der Tonhöhenanzeige auf das
empfangene Signal. Dies kann bei bestimmten anspruchsvollen MusikÜbungsanwendungen praktisch sein.
1. Drücken Sie die [QUICK RESPONSE]-Taste, um die Quick-ResponseFunktion ein- oder auszuschalten.
fig.01??????
AUTO/MANUAL
Modifie le mode d’accordage.
Voyant vert : mode AUTO CHROMATIC
Voyant rouge : mode MANUAL
(pour le réglage de l’accord spécifié)
Voyants
Ils indiquent le nom de la note actuelle (C-B),
un état naturel ou aigu (#), le diapason de
référence principal (438-445) et un
avertissement si la charge des piles est faible.
Aiguille du vumètre
Prise DC IN
Branchez l’adaptateur secteur
(facultatif sur la série BOSS PSA) ici.
Quick Response ist aktiviert, wenn die rote LED leuchtet.
Kalibrieren der Nadel der Tonhöhenanzeige
Prise INPUT
Branchez ici un appareil tel
que le micro piézoélectrique
inclus ou l’instrument numérique
ou électrique à accorder.
QUICK RESPONSE
Modifie le temps de réponse
du vumètre.
In seltenen Fällen kann sich die kalibrierte Nadel der Tonhöhenanzeige verstellen und
zeigt dann nicht genau auf die Stellung 0, auch wenn die Pfeile
und
der
Richtanzeige gleichzeitig leuchten. Dies kann im Lauf der Zeit eintreten, wenn das Gerät
transportiert oder unsanft gehandhabt wird. In einem solchen Fall können Sie die Nadel
mit dem folgenden Vorgang neu kalibrieren.
MERKE
Bei normalem Gebrauch verliert die Nadel der Tonhöhenanzeige fast nie ihre
Kalibrierung. Verwenden Sie, um sie einzustellen, einen KreuzschlitzSchraubendreher (einen 2,3-mm-Präzisions-Schraubendreher).
1. Halten Sie die [PITCH]-Taste gedrückt, und schalten Sie das Gerät ein.
Sehen Sie nach, ob die Nadel genau auf die Stellung 0 zeigt.
2. Wenn die Nadel nicht auf 0 zeigt, drehen Sie vorsichtig mit einem
kleinen Präzisions-Kreuzschlitz-Schraubendreher (2,3 mm) die
Verstellschraube, bis die Nadel auf 0 zeigt.
La fonction Quick Response améliore le temps de réponse du vumètre pour l’accord entrant.
Cela peut s’avérer utile pour certaines applications de pratique musicale avancées.
Nous vous remercions d'avoir choisi l’accordeur chromatique BOSS TU-12BW et vous en
félicitons.
Avant d'utiliser cet appareil, lisez attentivement les sections suivantes : « UTILISATION DE
L’APPAREIL DE FAÇON SÉCURISÉE » et « REMARQUES IMPORTANTES » (livrées séparément).
Ces sections fournissent d’importantes informations relatives au bon fonctionnement de
l’appareil. En outre, pour vous garantir la maîtrise parfaite des différentes fonctions
proposées par votre appareil, il est nécessaire de lire ce manuel dans son intégralité.
Vous devez conserver ce manuel sous la main afin de pouvoir vous y reporter au besoin.
Les piles ne sont pas encore installées sur le TU-12BW livré. Veillez à lire la section
« Remplacement des piles » pour suivre la procédure d’installation des piles.
Copyright © 2008 BOSS CORPORATION
Tous droits réservés. Toute reproduction intégrale ou partielle de cette publication
est interdite sous quelque forme que ce soit sans l’autorisation écrite de BOSS
CORPORATION.
Der Ton, dessen LED leuchtet, wird gespielt.
MERKE
Mit den Pfeiltasten [ ] und [ ] können Sie über fünf Oktaven (C2 bis C7)
Referenztöne in Halbtonschritten spielen.
3. Drücken Sie nach Abschluss der Kalibrierung die [POWER]-Taste, um
das Gerät auszuschalten.
POWER
Schaltet das Gerät ein und aus.
Mode d'emploi
]-Taste (Ton), um den Referenzton zu spielen.
3. Drücken Sie die Pfeiltasten [ ] bzw. [ ], bis die LED des Tons
leuchtet, den Sie als Referenzton verwenden möchten.
Guide d’accord
Le voyant d’accord s’allume pour indiquer la
proximité avec l’accord cible.
s’allume : l’accord est trop bas (bémol)
s’allume : l’accord est trop haut (dièse)
s’allument simultanément : accord correct
(± 3 cents)
(bouton Sound)
Permet d’activer et de désactiver
le son de la note de référence.
(Bas) (Haut)
Permettent de modifier divers paramètres.
PITCH
Modifie les paramètres du diapason
de référence.
POWER
Met l’appareil sous/hors tension.
Eingebautes Mikrofon
Hiermit können Sie ein akustisches Instrument
stimmen, wenn dies praktischer ist, als das
mitgelieferte Piezomikrofon zu verwenden.
Um mit dem eingebauten Mikrofon die besten
Ergebnisse zu erzielen, stellen Sie das TU-12BW
beim Stimmen so nah wie möglich am
Instrument auf.
Normales Stimmen (AUTO-CHROMATIC-Modus)
1. Stecken Sie den Stecker des mitgelieferten Piezomikrofons in die
INPUT-Buchse und bringen Sie das Piezomikrofon an dem zu
stimmenden Instrument an.
Wenn Sie Instrumente ohne das eingebaute Mikrofon stimmen möchten, schließen
Sie nichts an der INPUT-Buchse an und stellen Sie das TU-12BW nah am Instrument
auf. Wenn Sie einen digitalen Wind-Controller oder ein Instrument mit
eingebautem Mikrofon oder Tonabnehmer besitzen, verbinden Sie dessen
Ausgang mit der INPUT-Buchse.
2. Drücken Sie die [POWER]-Taste um das Gerät einzuschalten.
3. Drücken Sie die [AUTO/MANUAL]-Taste, um die Einstellung „AUTO“
zu aktivieren (die grüne LED leuchtet).
Im AUTO-CHROMATIC-Modus zeigt das TU-12BW automatisch die Tonhöhe (den
Notennamen) an, wenn Sie einen Ton auf dem Instrument spielen. In den meisten
Fällen ist der AUTO-Modus am praktischsten.
Wenn Sie das Erzeugen bestimmter Tonhöhen üben möchten, empfiehlt
MERKE
sich die Verwendung des MANUAL-Modus. In diesem Modus wird nur die
von Ihnen angegebene Tonhöhe erkannt und angezeigt.
4. Spielen Sie einen einzelnen Ton auf dem Instrument.
Während der Ton erklingt, wird der Notenname (die aktuelle Tonhöhe) angezeigt.
Die Höhen- und die Richtanzeige zeigen an, wie weit der Ton von der richtigen
Tonhöhe entfernt ist.
5. Stimmen Sie das Instrument.
Stimmen Sie, während der beabsichtigte Notenname angezeigt wird, das
Instrument, bis die Pfeile
und
der Richtanzeige gleichzeitig leuchten und
die Nadel der Höhenanzeige auf 0 zeigt (mittlere Stellung).
Wenn die Accu-Pitch-Funktion eingeschaltet ist, ertönt ein Signalton, wenn der Ton
auf der richtigen Höhe stabilisiert ist. Daran erkennen Sie, dass der Ton richtig
gestimmt ist.
Trainieren bestimmter Tonhöhen (Stimmen im
MANUAL-Modus)
1. Stecken Sie den Stecker des mitgelieferten Piezomikrofons in die
INPUT-Buchse und bringen Sie das Piezomikrofon an dem zu
stimmenden Instrument an.
Wenn Sie Instrumente ohne das eingebaute Mikrofon stimmen möchten, schließen
Sie nichts an der INPUT-Buchse an und stellen Sie das TU-12BW nah am Instrument
auf. Wenn Sie einen digitalen Wind-Controller oder ein Instrument mit
eingebautem Mikrofon oder Tonabnehmer besitzen, verbinden Sie dessen
Ausgang mit der INPUT-Buchse.
2. Drücken Sie die [POWER]-Taste, um das Gerät einzuschalten.
3. Drücken Sie die [AUTO/MANUAL]-Taste, um die Einstellung
„MANUAL“ zu aktivieren (die rote LED leuchtet).
4. Wählen Sie mit den Pfeiltasten [ ] bzw. [ ] die Tonhöhe, die Sie
üben und/oder stimmen möchten.
Verhindern von Batterieverbrauch, wenn Sie das Ausschalten
vergessen (Auto-Power-Off-Funktion)
Wenn das TU-12BW eingeschaltet und über Batterie betrieben wird, schaltet es sich
automatisch aus, wenn etwa 30 Minuten vergehen, ohne dass eine Taste gedrückt wird.
Deaktivieren der Auto-Power-Off-Funktionen
Sie können die Auto-Power-Off-Funktion vorübergehend deaktivieren, wenn Sie
das TU-12BW einschalten. Halten Sie dazu die Pfeiltasten [ ] und [ ] gedrückt,
während Sie das Gerät mit der [POWER]-Taste einschalten.
Die Auto-Power-Off-Funktion ist immer aktiviert, wenn Sie das Gerät auf normale
Weise einschalten.
Verwenden eines Signals, um das Ende des Stimmvorgangs
anzuzeigen (Accu-Pitch-Funktion)
Wenn die Accu-Pitch-Funktion eingeschaltet ist, erklingt ein Signalton, wenn sich
die Tonhöhe des zu stimmenden Instruments im Bereich von drei Cent über oder
unter der richtigen Tonhöhe stabilisiert. Dieses Signal weist Sie darauf hin, dass die
Tonhöhe richtig ist.
Ein- und Ausschalten der Accu-Pitch-Funktion
1. Halten Sie die [ ]-Taste (Ton) gedrückt, und schalten Sie das Gerät
mit der [POWER]-Taste ein.
Wenn während des Einschaltens kein Signal ertönt, bedeutet das, dass die
Accu-Pitch-Funktion deaktiviert ist. Führen Sie zum Aktivieren der
Accu-Pitch-Funktion den gleichen Vorgang erneut aus; wenn Sie beim Einschalten
einen Signalton hören, bedeutet das, dass die Accu-Pitch-Funktion aktiviert ist.
Speicherfunktionen
Wenn in das TU-12BW Batterien eingelegt sind, bleiben die nachstehend
beschriebenen Einstellungen auch beim Ausschalten im Speicher erhalten.
MERKE
Beim Entfernen der Batterien werden alle Einstellungen auf ihre
Standardwerte zurückgesetzt.
Einstellung
Standardeinstellungen
Stimmmodus-Einstellung (AUTO oder MANUAL)
Referenztonhöhe
AUTO
440 Hz
Notennamen-Auswahl im Tonmodus
Einstellungen der Accu-Pitch-Funktion
C4
ON (aktiviert)
Einstellungen der Quick-Response-Funktion
OFF (deaktiviert)
Auswechseln der Batterien
Die BATT.-LED blinkt, wenn die Batteriespannung nachlässt.
Ersetzen Sie die Batterien so bald wie möglich.
Die Höhen- und die Richtanzeige zeigen an, wie weit der Ton von der richtigen
Tonhöhe entfernt ist.
Accordeur normal (mode AUTO CHROMATIC)
1. Branchez la fiche du micro piézoélectrique inclus sur la prise INPUT
et montez le micro piézoélectrique sur l’instrument à accorder.
Pour accorder à l’aide du microphone intégré, ne connectez aucun appareil à la
prise INPUT et placez le TU-12BW près de l’instrument. Si vous disposez d’un
contrôleur de souffle numérique ou d’un instrument équipé d’un micro intégré ou
d’un phonocapteur, branchez sa sortie sur la prise INPUT.
2. Pour mettre l’appareil sous tension, appuyez sur [POWER].
3. Appuyez sur [AUTO/MANUAL] pour activer le paramètre AUTO
(le voyant vert s’allume).
En mode AUTO CHROMATIC, le TU-12BW affiche automatiquement l’accord d’une
note (le nom de la note) lorsque vous la jouez sur l’instrument. La plupart du temps,
AUTO est le mode le plus pratique à utiliser.
Lorsque vous souhaitez vous entraîner à produire un accord spécifique, vous
pouvez utiliser le mode MANUAL ; ainsi, seul l’accord que vous spécifiez est
détecté et affiché.
4. Jouez une note sur votre instrument.
Lorsque vous jouez la note, le nom de l’accord actuel de la note s’affiche.
Le vumètre et le guide d’accord montrent l’écart de la note par rapport au diapason correct.
5. Accordez l’instrument.
Une fois que le nom de la note souhaitée est affiché, accordez l’instrument de sorte
que
et
s’allument simultanément sur le guide d’accord et que l’aiguille du
vumètre se place sur 0 (position centrale).
Lorsque la fonction Accu-Pitch est activée, l’accordeur émet un signal sonore
lorsque la note est accordée correctement.
Réalisation d’une note spécifique (accordage en
mode MANUAL)
1. Branchez la fiche du micro piézoélectrique inclus sur la prise INPUT
et montez le micro piézoélectrique sur l’instrument à accorder.
Pour accorder à l’aide du microphone intégré, ne connectez aucun appareil à la
prise INPUT et placez le TU-12BW près de l’instrument. Si vous disposez d’un
contrôleur de souffle numérique ou d’un instrument équipé d’un micro intégré ou
d’un phonocapteur, branchez sa sortie sur la prise INPUT.
3. Appuyez sur [AUTO/MANUAL] pour activer le paramètre MANUAL
(le voyant rouge s’allume).
1. Öffnen Sie das Batteriefach (an der
Unterseite des Geräts), indem Sie die
Abdeckung in Richtung OPEN (Öffnen) schieben.
2. Entnehmen Sie die alten Batterien aus dem Batteriefach.
3. Legen Sie zwei neue AAA-Batterien desselben Typs ein.
* Achten Sie darauf, die Pole „+“ und „-“ der Batterien richtig auszurichten.
* Verwenden Sie nicht gleichzeitig neue Batterien und gebrauchte Batterien oder Batterien
verschiedenen Typs. Dadurch könnte Batterieflüssigkeit austreten.
4. Schließen Sie die Abdeckung des Batteriefachs wieder.
5. Spielen Sie einen einzelnen Ton auf dem Instrument.
Haut-parleur
Micro intégré
Permet d’écouter la note de
Permet d’accorder un instrument acoustique
référence et le signal sonore
lorsqu’il n’est pas pratique d’utiliser le micro
Accu-Pitch.
piézoélectrique inclus. Pour obtenir de meilleurs
Compartiment à piles
résultats avec le micro intégré, placez le TU-12BW
aussi près que possible de l’instrument lors de l’accord.
(bas de l’appareil)
Insérez deux piles de même type (AAA).
Bouton de réglage du vumètre (bas de l’appareil)
2. Pour mettre l’appareil sous tension, appuyez sur [POWER].
* Legen Sie das Gerät, wenn Sie es umdrehen, auf ein weiches
Tuch oder etwas Ähnliches, um eine Beschädigung des
Bedienfelds zu vermeiden.
4. Appuyez sur [ ] ou [ ] pour afficher le nom de la note pour l’accord
spécifique que vous souhaitez réaliser et/ou régler.
5. Jouez une note sur votre instrument.
Le vumètre et le guide d’accord montrent l’écart de la note par rapport au diapason correct.
6. Accordez l’instrument.
Une fois que le nom de la note souhaitée est affiché, réglez l’accord de l’instrument
afin que
et
soient tous deux allumés sur le guide d’accord et que l’aiguille
du vumètre se place sur 0 (position centrale).
Lorsque la fonction Accu-Pitch est activée, l’accordeur émet un signal sonore
lorsque la note est accordée correctement.
Einstellungen am TU-12BW
Stimmbereich
Stimmgenauigkeit ± 1 Cent
Ändern der Referenztonhöhe für das Stimmen
Die entsprechende LED blinkt.
2. Lassen Sie die [PITCH]-Taste
Referenztonhöhe einzustellen.
MERKE
los,
um
die
ausgewählte
Diese Einstellung bleibt beim Ausschalten des TU-12BW gespeichert.
E0 (20,6 Hz) –
C8 (4.186,0 Hz)
Referenztonhöhe A4 (438–445 Hz)
Stromversorgung
1. Halten Sie die [PITCH]-Taste gedrückt, und wählen Sie mit den
Pfeiltasten [ ] bzw. [ ] die gewünschte Referenztonhöhe aus.
Calibrage de l’aiguille du vumètre
En de rares occasions, l’aiguille du vumètre peut être décalibrée et venir se placer
légèrement en dehors de la position 0 même lorsque les voyants
et
du guide
d’accord s’allument simultanément. Ce phénomène peut se produire au fil du temps si
l’appareil est transporté ou s’il est manipulé brutalement. Dans ce cas, vous pouvez
recalibrer l’aiguille à l’aide de la procédure suivante.
Lors d’une utilisation normale, l’aiguille du vumètre n’est presque jamais
décalibrée. Pour l’ajuster, veillez à utiliser un petit tournevis de précision
Phillips (de 2,3 mm).
1. Maintenez le bouton [PITCH] enfoncé et mettez l’appareil sous
tension.
Vérifiez que l’aiguille pointe vers la position 0.
2. Si ce n’est pas le cas, vissez avec soin la vis de réglage à l’aide d’un
petit tournevis de précision Phillips (2,3 mm) jusqu’à ce que l’aiguille
pointe vers 0.
3. Une fois le calibrage effectué, appuyez sur [POWER] pour mettre
l’appareil hors tension.
Fonctions utiles
Eviter la perte de charge des piles en cas d’oubli de mise hors
tension (fonction Auto Power Off)
Lorsque le TU-12BW est sous tension et alimenté par piles, le courant est
automatiquement coupé si aucun bouton n’est utilisé pendant 30 minutes environ.
Désactivation de la fonction Auto Power Off
Vous pouvez désactiver temporairement la fonction Auto Power Off lors de la mise sous
tension du TU-12BW. Pour ce faire, maintenez simultanément enfoncés les boutons [ ]
et [ ] tout en appuyant sur [POWER] pour mettre l’appareil sous tension.
La fonction Auto Power Off est toujours activée lors de la mise sous tension de
l’appareil.
Lorsque la fonction Accu-Pitch est activée, un signal sonore est émis lorsque le
diapason de l’instrument que vous accordez se stabilise dans une plage de trois
centièmes au-dessus ou en dessous du diapason correct. Ce signal vous avertit que
le diapason est réglé.
Activation et désactivation de la fonction Accu-Pitch
1. Maintenez le bouton [ ] (Sound) enfoncé et appuyez sur [POWER]
pour mettre l’appareil sous tension.
Si aucun son n’est émis par l’appareil lors de sa mise sous tension, la fonction
Accu-Pitch a été désactivée. Pour activer la fonction Accu-Pitch, renouvelez
l’opération. Si un signal sonore est émis lors de la mise sous tension, la fonction
Accu-Pitch a été activée.
Fonctions de mémoire
Une fois que les piles ont été installées dans le TU-12BW, les réglages décrits ci-dessous
sont conservés en mémoire même pendant que l’appareil est hors tension.
Le retrait des piles restaure les valeurs d’usine par défaut de tous les
paramètres.
Réglage
Mode d’accordage (AUTO ou MANUAL)
Paramètres d’usine
d’origine
AUTO
Diapason de référence
Nom de note choisi en mode Sound
440Hz
C4
Paramètres de la fonction Accu-Pitch
Paramètres de la fonction Quick Response
ON (activée)
OFF (désactivée)
Remplacement des piles
Le voyant BATT. clignote lorsque les piles commencent
à s’épuiser.
Remplacez-les dès que possible.
* Lorsque vous retournez l’appareil, placez-le sur un chiffon
doux pour éviter d’endommager le panneau.
1. Ouvrez le compartiment à piles (situé au
bas de l’appareil) en faisant glisser le
couvercle vers OPEN.
2. Retirez les piles usagées du compartiment à piles.
3. Insérez deux piles neuves de même type (AAA).
* Vérifiez que les signes « + » et « - » sont orientés correctement.
* Ne mélangez pas des piles neuves avec des piles usagées, ni des piles de types différents.
Vous risqueriez de provoquer une fuite de liquide.
4. Remettez en place le couvercle du compartiment à piles.
Fiche technique
Plage
d’accordage
E0 (Mi0 - 20,6 Hz) à
C8 (Do8 - 4 186 Hz)
Durée de vie
Environ 15 heures
prévisible des piles Ce chiffre varie en fonction des
en utilisation
conditions réelles d’utilisation.
continue (carbone)
Diapason de
référence
A4 (438–445 Hz)
Précision
d’accordage
± 1 centième
Alimentation
électrique
Pile sèche R03 (carbone)
ou LR03 (alcaline) ; type
AAA x 2; 3 V continu
Adaptateur secteur 9 V
continu (série PSA ;
facultatif )
Dimensions
147,5 (L) x 54,0 (P) x 23,9 (H) mm
Poids
205 g (piles comprises)
Accessoires
Pile sèche (type R03 (AAA)) x 2 (carbone),
microphone piézo, mode d’emploi, Abri,
détenteur, livret (« UTILISATION DE
L’APPAREIL DE FAÇON SÉCURISÉE » et
« REMARQUES IMPORTANTES »),
Information
Consommation 12 mA
Technische Daten
Paramètres du TU-12BW
6. Stimmen Sie das Instrument.
Ändern Sie, während der beabsichtigte Notenname angezeigt wird, die Stimmung
des Instruments so, dass beide Pfeile (
und
) der Richtanzeige leuchten und
die Nadel der Höhenanzeige auf 0 zeigt (mittlere Stellung).
Wenn die Accu-Pitch-Funktion eingeschaltet ist, ertönt ein Signalton, wenn der Ton
auf der richtigen Höhe stabilisiert ist. Daran erkennen Sie, dass der Ton richtig
gestimmt ist.
La fonction Quick Response est activée lorsque le voyant rouge est allumé.
Signal avertissant que l’accordage est terminé (Fonction
Accu-Pitch)
Nützliche Funktionen
Lautsprecher
Spielt den Referenzton und
den Accu-Pitch-Ton.
Batteriefach (an der Unterseite)
Legen Sie zwei AAA-Batterien
desselben Typs ein.
Verstellregler für die Tonhöhenanzeige
(an der Unterseite)
1. Appuyez sur [QUICK RESPONSE] pour activer/désactiver la fonction
Quick Response.
Durchflussstrom
2 Trockenbatterien R03
(Kohle) oder LR03 (Alkali)
des Typs AAA; DC 3V
9V-GleichstromNetzadapter (PSA-Serie;
optional)
Maximale
Batterielebensdaue
r bei Dauerbetrieb
(Kohlebatterie)
Abmessungen
Gewicht
Beigefügtes
Zubehör
Etwa 15 Stunden
Dieser Wert variiert je nach
den tatsächlichen
Betriebsbedingungen.
147,5 (B) x 54,0 (T) x 23,9 (H) mm
5-13/16 (B) x 2-1/8 (T) x 1 (H) Zoll
205 g, 8 oz
(einschließlich Batterien)
2 Trockenbatterien (R03, Typ AAA)
(Kohle), Piezomikrofon,
Bedienungsanleitung, Behälter,
Halter, Faltblatt („SICHERER BETRIEB
DES GERÄTES“ und „WICHTIGE
HINWEISE“), Seite „Information“
12 mA
* Änderungen der technischen Daten und des Designs sind möglich und bedürfen keiner vorherigen
Ankündigung.
* Für Druckfehler wird keine Haftung übernommen.
* En vue d’améliorer le produit, ses caractéristiques techniques et/ou son aspect peuvent être modifiés
sans avis préalable.
Changement du diapason de référence pour l’accordage
1. Maintenez le bouton [PITCH] enfoncé et appuyez sur [ ] ou [ ] pour
choisir le diapason de référence souhaité.
Le voyant clignote. Choisissez le diapason de référence voulu. Son voyant clignote
lorsqu’il est atteint.
2. Relâchez le bouton [PITCH] pour choisir le diapason de référence
sélectionné.
Ce paramètre est enregistré en mémoire lors de la mise hors tension du TU-12BW.
Accordage lors de l’écoute du son de référence (mode Sound)
1. Choisissez le mode d’accordage à utiliser (AUTO ou MANUAL).
2. Appuyez sur [
] (Sound) pour écouter la note de référence.
3. Appuyez sur [ ] ou [ ] pour allumer le voyant correspondant à la
note que vous souhaitez utiliser comme référence.
Le son de la note affichée par le voyant est joué.
Si vous appuyez sur [ ] et [ ], vous pouvez lire des notes de référence
par demi-tons successifs sur cinq octaves (C2 à C7).
4. Accordez l’instrument sur la note de référence.
Lorsque vous utilisez le mode Sound, l’accord ne peut pas être effectué à l’aide
du micro intégré (ce dernier est désactivé).
5. Appuyez sur [
] (Sound) pour arrêter l’écoute de la note de référence.
*
5
1
0
0
0
0
4
1
5
9
-
0
1
*