1
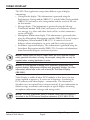
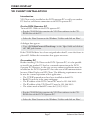
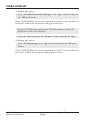
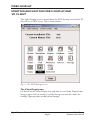
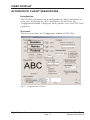
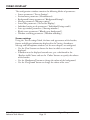
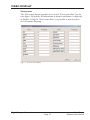
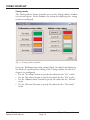
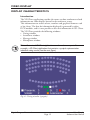
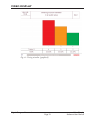
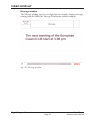
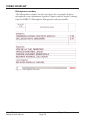
DCN Video Display
Security Systems
Software User Manual
en
LBB 3584
VIDEO DISPLAY
Video Display
Software User Manual
Digital Congress Network
Page 2
VIDEO DISPLAY
CONTENTS
Title
Page
1 - ABOUT VIDEO DISPLAY . . . . . . . . . . . . . . . . . . . . . . . . 5
1.1 What is Video Display? . . . . . . . . . . . . . . . . . . . . . . . . . . . .5
2 - VD CLIENT INSTALLATION . . . . . . . . . . . . . . . . . . . . .7
2.1 Introduction . . . . . . . . . . . . . . . . . . . . . . . . . . . . . . . . . . . .7
2.2 On the DCN Operator PC . . . . . . . . . . . . . . . . . . . . . . . .7
2.3 On another PC . . . . . . . . . . . . . . . . . . . . . . . . . . . . . . . . . .7
3 - STARTING AND EXITING VIDEO DISPLAY
AND VD CLIENT . . . . . . . . . . . . . . . . . . . . . . . . . . . . . . .9
3.1 The Video Display icon . . . . . . . . . . . . . . . . . . . . . . . . . . .9
3.2 Exiting Video Display . . . . . . . . . . . . . . . . . . . . . . . . . . . . .9
3.3 Starting VD Client . . . . . . . . . . . . . . . . . . . . . . . . . . . . . .10
3.4 Exiting VD Client . . . . . . . . . . . . . . . . . . . . . . . . . . . . . . .10
4 - ALTERING VD CLIENT PARAMETERS . . . . . . . . . . . .11
4.1 Introduction . . . . . . . . . . . . . . . . . . . . . . . . . . . . . . . . . . .11
4.1 Overview . . . . . . . . . . . . . . . . . . . . . . . . . . . . . . . . . . . . .11
4.2 Screen settings . . . . . . . . . . . . . . . . . . . . . . . . . . . . . . . . .12
4.2.1 Screen texts . . . . . . . . . . . . . . . . . . . . . . . . . . . . . . . .13
4.2.2 Voting results . . . . . . . . . . . . . . . . . . . . . . . . . . . . . . .14
4.2.3 Screen turn over time . . . . . . . . . . . . . . . . . . . . . . . .15
4.3 Environment . . . . . . . . . . . . . . . . . . . . . . . . . . . . . . . . . . .15
4.4 Background bitmap . . . . . . . . . . . . . . . . . . . . . . . . . . . . . .16
4.5 Message setting . . . . . . . . . . . . . . . . . . . . . . . . . . . . . . . . .16
4.6 Screen line display . . . . . . . . . . . . . . . . . . . . . . . . . . . . . .16
4.7 Individual voting results . . . . . . . . . . . . . . . . . . . . . . . . . .16
4.8 Start-up window . . . . . . . . . . . . . . . . . . . . . . . . . . . . . . . .17
4.9 Blank screen background . . . . . . . . . . . . . . . . . . . . . . . . .17
4.10 Window switching . . . . . . . . . . . . . . . . . . . . . . . . . . . . . .17
Digital Congress Network
Page 3
Video Display
Software User Manual
VIDEO DISPLAY
5 - DISPLAY CHARACTERISTICS . . . . . . . . . . . . . . . . . . .19
5.1 Introduction . . . . . . . . . . . . . . . . . . . . . . . . . . . . . . . . . . .19
5.2 Voting window . . . . . . . . . . . . . . . . . . . . . . . . . . . . . . . . .20
5.3 Attendance window . . . . . . . . . . . . . . . . . . . . . . . . . . . . .22
5.4 Message window . . . . . . . . . . . . . . . . . . . . . . . . . . . . . . . .23
5.5 Microphone window . . . . . . . . . . . . . . . . . . . . . . . . . . . .24
Video Display
Software User Manual
Digital Congress Network
Page 4
VIDEO DISPLAY
ABOUT VIDEO DISPLAY
What is Video Display?
The Video Display module is one of the DCN software modules designed
to be used in conferences and discussions using the DCN contribution
equipment.
Its function is to interface the DCN software with conference video
displays. The Video Display module provides a means of displaying
conference-related information on video displays located in the conference
venue. The information can consist of text, numbers and graphical elements
like bar charts. All the information displayed is generated by other DCN
modules, and it is not possible to alter this information in Video Display.
NOTE: If information is to be displayed on video displays, data must be
converted within the DCN control PC or transferred to a separate PC via an
ethernet link.
To use Video Display, it is necessary to have a Video Display (VD) Client
application. The VD Client application receives the information which is
passed to it from the Video Display (server) module. The user can change
settings related to how information is displayed on the video screens, such
as text or background colours. This can be carried out either during or after
installation of the VD Client software. The VD Client application is
supplied with the DCN installation disks.
NOTE: It is not possible to use VD Client running on Windows 95 or 98
when Video Display is running on Windows NT 4.0 or Windows 2000. It is
advisable to use the same operating system for both the VD Client and the
Video Display server.
NOTE: The VD Client must be started after the Video Display server has
been started.
NOTE: The source code for this application is supplied on the VD Client
installation disks. It is therefore possible to alter this application using a
Dynamic Data Exchange (DDE)-compatible package such as Visual Basic.
Digital Congress Network
Page 5
Video Display
Software User Manual
VIDEO DISPLAY
This VD Client application accepts four different types of display
information:
• Voting Results display. This information is generated using the
Parliamentary Voting module (LBB 3575) and the Multi Voting module
(LBB 3576) and consists of a voting motion and the results of the vote
on that motion.
• Message display. This information is generated using the Message
Distribution module (LBB 3582) and consists of a conference-related
text message (e.g. when and where lunch will be, or when tomorrow’s
session will begin).
• Microphone Information display. This information is generated either
using the Microphone Management module (LBB 3570) or the Synoptic
Microphone Control module (LBB 3571). It consists of a list of
delegates whose microphones are active and those waiting to speak.
• Attendance registration display. This information is generated using the
Attendance Registration module (LBB 3578). It consists of information
about how many delegates are absent or present.
NOTE: Display data can only be shown when the DCN software module
which generates the data is running. For example, voting data can only be
supplied when a voting application is active.
NOTE: It is also possible to display DCN conference information using
numeric displays, alphanumeric displays and geographic displays. For more
information, please refer to the user manual for Text/Status Display
(LBB 3583).
Video Display is unlike all other DCN modules in that there is no user
action required to operate it. It carries out its function - interfacing the
DCN software with video displays - automatically. This document is
therefore not a user manual but a reference manual. It gives information on
default settings, installation and examples of typical displays containing
microphone information, messages and voting results.
NOTE: The DDE information which is available within the DCN system is
described in the DCN External Interfaces document (3922 988 5101X).
Video Display
Software User Manual
Digital Congress Network
Page 6
VIDEO DISPLAY
VD CLIENT INSTALLATION
Introduction
VD Client can be installed on the DCN operator PC as well as on another
PC that has an Ethernet connection to the DCN operator PC.
On the DCN Operator PC
To install VD Client on the DCN operator PC:
• Put the CD-ROM that contains the VD Client software in the CDROM drive of the PC.
• Select the ‘Start’ button on the Windows Taskbar and click on ‘Run’.
A dialogue box appears.
• Type <D:\Video\Current\ClientSetup> in the ‘Open’ field and click on
the ‘OK’ push button.
If the CD-ROM drive has a letter assigned other than D, enter that letter in
place of D. Follow the instructions that appear on-screen.
On another PC
Besides installing VD Client on the DCN Operator PC, it is also possible
to install it on another PC that has a network connection to the DCN
Operator PC. However, in that case an extra software application must be
installed on the DCN Operator PC that takes care of the communication
between Video Display and VD Client. The following requirements must
be met for a correct operation of this application:
• The TCP/IP protocol must have been installed on both PCs.
• Both PCs must be in the same workgroup.
• The IP address of the DCN Control PC must be 192.168.100.1.
• The IP address of the VD Client PC must be 192.168.100.2.
• The subnet mask of both PCs must be 255.255.255.0.
• Put the CD-ROM that contains the VD Client software in the CDROM drive of the DCN Operator PC.
• Select the ‘Start’ button on the Windows Taskbar and click on ‘Run’.
Digital Congress Network
Page 7
Video Display
Software User Manual
VIDEO DISPLAY
A dialogue box appears.
• Type <D:\Video\Current\ServerSetup> in the ‘Open’ field and click on
the ‘OK’ push button.
If the CD-ROM drive has a letter assigned other than D, enter that letter in
place of D. Follow the instructions that appear on-screen.
• Put the CD-ROM that contains the VD Client software in the CDROM drive of the VD Client PC.
• Select the ‘Start’ button on the Windows Taskbar and click on ‘Run’.
A dialogue box appears.
• Type <D:\ClientSetup>in the ‘Open’ field and click on the ‘OK’ push
button.
If the CD-ROM drive has a letter assigned other than D, enter that letter in
place of D. Follow the instructions that appear on-screen.
Video Display
Software User Manual
Digital Congress Network
Page 8
VIDEO DISPLAY
STARTING AND EXITING VIDEO DISPLAY AND
VD CLIENT
The Video Display server is started from the DCN Startup screen of the PC
that will act as DDE server. This is shown below:
Fig. 1 - The DCN Startup screen.
The Video Display icon
For details on the Video Display icon and how to start Video Display from
Startup, please refer to section 3.2 of the Startup user manual, under the
heading ‘Opening other modules from Startup.’
Digital Congress Network
Page 9
Video Display
Software User Manual
VIDEO DISPLAY
Exiting Video Display
To exit Video Display:
• Click once with the right mouse button on the ‘Video’ icon.
• Select ‘Close’ from the menu which appears.
You will exit Video Display on the DDE server.
Starting VD Client
VD Client can be installed on the DCN operator PC as well as on another
PC that has an Ethernet connection to the DCN operator PC.
The procedure for starting VD Client depends on which PC the VD
Clients software has been installed. If VD Client has been installed on the
DCN Operator PC:
• Start Video Display.
• Select the ‘Start’ button on the Windows Taskbar and click on
‘Programs’. Then click ‘VD Client’ to start VD Client.
If VD Client has been installed on another PC than the
DCN Operator PC:
• Start Video Display on the DCN Operator PC.
• Select the ‘Start’ button on the Windows Taskbar of the DCN
Operator PC and click on ‘Programs’. Then click ‘VD Server’ to start
the application that enables communication between Video Display and
VD Client.
• Select the ‘Start’ button on the Windows Taskbar of the VD Client PC
and click on ‘Programs’. Then click ‘VD Client’ to start the VD Client.
Exiting VD Client
To exit VD Client:
• Press the <ESC> key of the VD Client PC.
Video Display
Software User Manual
Digital Congress Network
Page 10
VIDEO DISPLAY
ALTERING VD CLIENT PARAMETERS
Introduction
The VD Client parameters can be configured either during installation or,
at any time, by pressing the <F12> function key. In both cases, the
‘Configuration window’ is displayed, which provides access to all VD Client
parameters.
Overview
The next screen shows the ‘Configuration window’ of VD Client.
Fig. 2 - Configuration window.
Digital Congress Network
Page 11
Video Display
Software User Manual
VIDEO DISPLAY
The configuration windows contains the following blocks of parameters:
• Screen parameters (‘Screen Settings’).
• Environment parameters (‘Environment’).
• Background bitmap parameters (‘Background bitmap’).
• Message parameters (‘Message setting’).
• Screen line parameters (‘Screen line display’).
• Individual voting result parameters (‘Individual Voting results’).
• Start-up window parameters (‘Start-up window’).
• Blank screen parameters (‘Blank screen background’).
• Window switching parameters (‘Window switching’).
Screen settings
Using the ‘Screen settings’ block, the fonts and appearances of the headers,
footers and delegate information displayed in the Voting, Attendance,
Message and Microphone windows (see the next chapter) are configured:
• Use the ‘Font’ buttons to choose the fonts in which a text must be
displayed.
• If borders must be displayed around texts, put a checkmark in the
‘Borders visible’ boxes and use the ‘Colour’ buttons to specify the colours
of the borders.
• Use the ‘Background’ button to change the colour of the background.
• Use the ‘Foreground’ button to change the colour of the texts.
Video Display
Software User Manual
Digital Congress Network
Page 12
VIDEO DISPLAY
Screen texts
The ‘Screen text’ button provides access to the ‘Screen text editor’ (see the
next figure). By default, all information in headers and footers is displayed
in English. Using the ‘Screen text editor’, it is possible to translate these
texts in another language.
Fig. 3 - Screen text editor.
Digital Congress Network
Page 13
Video Display
Software User Manual
VIDEO DISPLAY
Voting results
The ‘Voting colours’ button provides access to the ‘Voting colours’ window
(see the next figure). In this window, the colours for displaying the voting
results are configured.
Fig. 4 - Voting colours window.
Using the ‘Parliamentary voting setting’ block, the colours for displaying
the results of a parliamentary voting in the Voting window (see the next
chapter) are configured.
• Use the ‘Yes colour’ button to specify the colour for the “Yes” results.
• Use the ‘No colour’ button to specify the colour for the “No” results.
• Use the ‘Abstain colour’ button to specify the colour for the “Abstain”
results.
• Use the ‘Not voted’ button to specify the colour for the “Not voted”
results.
Video Display
Software User Manual
Digital Congress Network
Page 14
VIDEO DISPLAY
Using the ‘Multiple voting setting’ block, the colours for displaying the
results of a multiple voting in the Voting window (see the next chapter) are
configured.
• Use the ‘Answer A/--’ button to specify the colour for the first answering
option.
• Use the ‘Answer B/-’ button to specify the colour for the second
answering option.
• Use the ‘Answer C/0’ button to specify the colour for the third answering
option.
• Use the ‘Answer D/+’ button to specify the colour for the fourth
answering option.
• Use the ‘Answer E/++’ button to specify the colour for the fifth
answering option.
Screen turn over time
The ‘Screen turn over time’ slider configures the screen turn over time when
a window contains more information than can be displayed on one screen.
For example, the Attendance window can display 10 lines of information.
When there are more delegates in the conference, the Attendance window
consists of multiple screens that are each diaplayed for the configured time.
Environment
Using the ‘Environment’ block, the environment in which VD Client is
running can be configured. VD Client runs either on the DCN operator
PC or on an external PC with a network connection to the DCN operator
PC.
• If VD Client is running on an external PC, click the ‘Program runs on
an external PC’ radio button and enter the network name of the DCN
operator PC in the ‘Network name of DCN PC’ field.
• If VD Client is running on the DCN operator PC, click the ‘Program
runs on DCN Operator PC’ radio button. If the DCN operator PC has a
dual video card, it is possible to use one video channel to display the
DCN software modules and one video channel to display VD Client
(tested for Matrox dualhead G550 video card).
Digital Congress Network
Page 15
Video Display
Software User Manual
VIDEO DISPLAY
Background bitmap
Using the ‘Background bitmap’ block, bitmaps (*.bmp or *.jpg) that are
displayed on the background of the Voting, Attendance, Message or
Microphone windows are defined. The bitmaps must have the same size as
the desktop area of the PC that runs VD Client (min. 800 x 600 pixels,
max. 1280 x 1024 pixels). Furthermore, the bitmap must be present in the
VD Client directory and always contain the correct file extension (*.bmp or
*.jpg).
Message setting
Using the ‘Message setting’ block, the font for displaying messages in the
Message window (see the next chapter) is configured.
• Use the ‘Message font’ button to choose the font for the messages.
Screen line display
Using the ‘Screen line display’ block, the layout for displaying delegate
information is configured. The delegate information originates from the
LBB3580 Delegate Database software module and consists of 30 characters
divided over two fields.
• The position of the slider must reflect the settings entered in the
‘Configure Screen Line’ window of the LBB3580 Delegate Database
software module.
• If only the first field of information must be displayed, click the ‘Display
item 1’ radio button.
• If only the second field of information must be displayed, click the
‘Display item 2’ radio button.
• If both fields of information must be displayed, click the ‘Display both
items’ radio button and enter the character that must be used to separate
the fields in the ‘Separation character’ field.
Individual voting results
Using the ‘Individual Voting results’ block, it is possible to configure the
contents of the individual voting screens:
• If the names of all delegates must be shown, choose ‘Always show all
names’.
• If only the names of the delegates that are present and have voted must
be shown, choose ‘Only show present/voted’.
Video Display
Software User Manual
Digital Congress Network
Page 16
VIDEO DISPLAY
Start-up window
Using the ‘Start-up window block’, the start-up window of VD Client is
configured. VD Client provides the following windows: Voting,
Attendance, Message and Microphone (see the next chapter).
• If the start-up window must be the Blank screen, select ‘Idle
window’.
• If the start-up window must be the Voting window, select ‘Voting
window’.
• If the start-up window must be the Attendance window, select
‘Attendance window’.
• If the start-up window must be the Message window, select ‘Message
window’.
• If the start-up window must be the Microphone window, select
‘Microphone window’.
Blank screen background
Using the ‘Blank screen background’ block, the background of the Blank
screen is configured. See the next section for information about the Blank
screen.
• If the background must have the same colour as specified in the ‘Screen
setting’ block, select ‘Colour as set in Screen setting’.
• If the background must be black, select ‘Black’.
Window switching
Using the ‘Window switching’ block, the window switching mode can be
configured. VD Client provides the following windows: Voting,
Attendance, Message and Microphone. These windows can be switched
either manually using function keys (see the next figure) or automatically.
In the automatic window switching mode, VD client always switches to the
window that was updated most recently.
• If the windows must only be switched manually using function keys,
click the ‘Function keys’ radio button.
• If the windows must only be switched automatically, click the ‘Function
keys & automatic’ button. It then still is possible to switch the windows
using the function keys.
• If a Blank screen must be shown after a certain time of inactivity, put a
checkmark in the ‘Blank screen after secs of inactivity’ and define the
number of seconds in the textbox.
Digital Congress Network
Page 17
Video Display
Software User Manual
VIDEO DISPLAY
Fig. 5 - Help window.
Note: This help window can be opened by pressing the <?> key.
When the option ‘Function keys & automatic’ is selected, two lists appear
to define priorities for the application windows. The ‘Application’ list shows
the names of the application windows (i.e. Voting, Attendance, Message
and Microphone), whereas the ‘Priority’ list shows the priorities for the
application windows. (The window with the highest priority is on top of
the ‘Priority’ list.). Double click an application window name to add it to
the priority list.
Video Display
Software User Manual
Digital Congress Network
Page 18
VIDEO DISPLAY
DISPLAY CHARACTERISTICS
Introduction
The VD Client application provides the means to show conference-related
information on video displays located in the conference venue.
This information can consist of text, numbers and graphical elements such
as bar charts. The data for information displayed is generated by other
DCN modules, and it is not possible to alter this information in VD Client.
The VD Client provides the following windows:
• Voting window
• Attendance window
• Message window
• Microphone window
Note: Customised VD Client applications can be made on request. For
example, a VD Client application that contains a synoptic representation
individual voting results (see the next figure).
Fig. 6 - Voting window (synoptic).
Digital Congress Network
Page 19
Video Display
Software User Manual
VIDEO DISPLAY
Voting window
The Voting window displays voting information coming from the
LBB3575 Parliamentary Voting and LBB3576 Multi Voting software
modules. Voting information can be displayed in textual form as well as in
graphical form (see the next figures for an example).
Fig. 7 - Voting window (text).
Video Display
Software User Manual
Digital Congress Network
Page 20
VIDEO DISPLAY
Fig. 8 - Voting window (graphical).
Digital Congress Network
Page 21
Video Display
Software User Manual
VIDEO DISPLAY
Attendance window
The Attendance window (see the next figure for an example) displays
attendance information coming from the LBB3578 Attendance
Registration software module.
Fig. 9 - Attendance window.
Video Display
Software User Manual
Digital Congress Network
Page 22
VIDEO DISPLAY
Message window
The Message window (see the next figure for an example) displays messages
coming from the LBB3582 Message Distribution software module.
Fig. 10 - Message window.
Digital Congress Network
Page 23
Video Display
Software User Manual
VIDEO DISPLAY
Microphone window
The Microphone window (see the next figure for an example) displays
microphone status information (speakers, request and last request) coming
from the LBB3570 Microphone Management software module.
Fig. 11 - Microphone window.
Video Display
Software User Manual
Digital Congress Network
Page 24
VIDEO DISPLAY
Digital Congress Network
Page 25
Video Display
Software User Manual
For more information please visit www.boschsecuritysystems.com
© 2003 Bosch Security Systems B.V.
Data subject to change without notice
Nov. 03 | 3922 988 5051
15en