1
User Guide
MD68HCS
DIGITAL HOME ENTERTAINMENT SYSTEM
MANUFACTURED FOR MITSUBISHI ELECTRIC
Ä1
0RGHO1DPH0'+&6
7KLVPRGHOKDVWKHIROORZLQJIHDWXUHV
'9'&''$&'5&'5:3OD\EDFN
9&'9LGHR&'3OD\EDFN
033OD\EDFN
-3(*3OD\EDFN
'ROE\3URORJLF,,
,03257$17
This user manual contains information about some optional features like,
Video CD* Playback (VCD*), RDS* (Radio Data System), optical digital
output*. These optional features are available in certain models only.
0DQXIDFWXUHG XQGHU OLFHQVH IURP 'ROE\ /DERUDWRULHV 'ROE\ DQG WKH
GRXEOH' V\PERO DUH WUDGHPDUNV RI 'ROE\ /DERUDWRULHV &RQILGHQWLDO
8QSXEOLVKHG:RUNV'ROE\/DERUDWRULHV,QF$OOULJKWVUHVHUYHG
7KLVSURGXFWLQFRUSRUDWHVFRS\ULJKWSURWHFWLRQWHFKQRORJ\WKDWLVSURWHFWHGE\
PHWKRG FODLPV RI FHUWDLQ 86 SDWHQWV DQG RWKHU LQWHOOHFWXDO SURSHUW\ ULJKWV
RZQHG E\ 0DFURYLVLRQ &RUSRUDWLRQ DQG RWKHU ULJKWV RZQHUV 8VH RI WKLV
FRS\ULJKW SURWHFWLRQ WHFKQRORJ\ PXVW EH DXWKRULVHG E\ 0DFURYLVLRQ
&RUSRUDWLRQ DQG LV LQWHQGHG IRU KRPH DQG RWKHU OLPLWHG YLHZLQJ XVHV RQO\
XQOHVV RWKHUZLVH DXWKRULVHG E\ 0DFURYLVLRQ &RUSRUDWLRQ 5HYHUVH
HQJLQHHULQJ RU GLVDVVHPEO\ LV SURKLELWHG
'76 DQG '76 'LJLWDO 2XW DUH WUDGHPDUNV RI 'LJLWDO 7KHDWHU 6\VWHPV ,QF
*This feature is only available in some models
INDEX
Ä2
ABOUT THIS MANUAL ......................................................................................................... 4
SAFETY INFORMATION ...................................................................................................... 4
WARNING ............................................................................................................................. 4
SAFETY PRECAUTIONS ..................................................................................................... 5
GENERAL PROPERTIES ..................................................................................................... 6
DISC TYPES COMPATIBLE WITH THIS UNIT ...................................................................... 7
NOTES ON DISCS ............................................................................................................... 8
FITTING BATTERIES IN YOUR REMOTE CONTROL ......................................................... 9
REMOTE CONTROL .......................................................................................................... 10
FRONT PANEL FUNCTIONS ............................................................................................. 12
FRONT PANEL DISPLAY (VFD) ......................................................................................... 13
REAR PANEL CONNECTIONS .......................................................................................... 14
CONNECTION OF YOUR AV RECEIVER WITH TV .......................................................... 15
SCART SOCKET ................................................................................................................ 16
VIDEO & AUDIO OUTPUT SOCKETS ................................................................................ 16
S-VIDEO OUTPUT SOCKETS ............................................................................................ 17
DIGITAL AUDIO OUTPUT SOCKET (OPTICAL) (OPTIONAL) ........................................... 17
CONNECTION OF YOUR AV RECEIVERS SPEAKERS ................................................... 18
BEST SPEAKER CONNECTION OF YOUR ROOM ........................................................... 19
CONNECTION OF YOUR AV RECEIVERS AM/FM ANTENNAS ...................................... 20
CONNECTION OF YOUR VIDEO SOURCES (AV OR SCART) ........................................ 20
PUTTING INTO OPERATION ............................................................................................. 20
SELECTING THE MODE .................................................................................................... 21
AV MODE ............................................................................................................................ 21
SCART MODE .................................................................................................................... 21
IN STANDBY MODE ........................................................................................................... 21
IN NORMAL MODE ............................................................................................................ 21
TV MODE ............................................................................................................................ 21
RADIO DATA SYSTEM (RDS)* ........................................................................................... 22
AUDIO FUNCTIONS .......................................................................................................... 23
DVD PLAYBACK .................................................................................................................. 24
RAPID ADVANCE / RAPID REVERSE ................................................................................ 24
SKIPPING AHEAD OR BACK TO CHAPTERS ................................................................... 25
STILL PICTURE (PAUSE) ................................................................................................... 25
FRAME ADVANCE (STEP FORWARD) ............................................................................. 25
FRAME BACK (STEP BACKWARD) ................................................................................... 25
SLOW- MOTION PLAY FORWARD .................................................................................... 25
SLOW- MOTION PLAY BACKWARD ................................................................................... 25
DIRECT SELECTION OF SCENES .................................................................................... 25
REPEAT PLAY ..................................................................................................................... 27
CONVENIENT FUNCTIONS .............................................................................................. 27
USING A DVD MENU ......................................................................................................... 29
VIDEO CD PLAYBACK* ....................................................................................................... 29
MENU PLAY ........................................................................................................................ 29
RAPID ADVANCE / RAPID REVERSE ................................................................................ 30
SKIPPING AHEAD OR BACK TO CHAPTERS ................................................................... 31
STILL PICTURE (PAUSE) ................................................................................................... 31
FRAME ADVANCE (STEP) ................................................................................................. 31
SLOW- MOTION PLAY ........................................................................................................ 31
DIRECT SELECTION OF SCENES .................................................................................... 31
REPEAT PLAY ..................................................................................................................... 32
CONVENIENT FUNCTIONS .............................................................................................. 32
AUDIO CD PLAYBACK ........................................................................................................ 33
RAPID ADVANCE / RAPID REVERSE ................................................................................ 33
DIRECT SELECTION OF TRACKS .................................................................................... 34
REPEAT PLAY ..................................................................................................................... 34
CONVENIENT FUNCTIONS .............................................................................................. 34
CD MENU ........................................................................................................................... 36
BASIC PLAY ........................................................................................................................ 36
PAUSE ................................................................................................................................. 36
STOPPING PLAY ................................................................................................................. 36
SKIPPING AHEAD OR BACK TO TRACKS ........................................................................ 36
IMAGE TRANSFORMATION .............................................................................................. 37
ZOOM ................................................................................................................................. 37
DIGEST MODE ................................................................................................................... 37
PROGRAM FUNCTION ..................................................................................................... 38
USING SETUP MENU ........................................................................................................ 39
MENU ITEMS ..................................................................................................................... 40
VIDEO SETUP .................................................................................................................... 40
TV DISPLAY ........................................................................................................................ 40
TV TYPE ............................................................................................................................. 41
GENELBLÝKLER
*This feature is only available in some models
INDEX
VIDEO OUTPUT .................................................................................................................
AUDIO SETUP ....................................................................................................................
DOWNMIX MODE ..............................................................................................................
DYNAMIC (DYNAMIC RANGE COMPRESSION ) ............................................................
LPCM OUTPUT ..................................................................................................................
NIGHT MODE .....................................................................................................................
SURROUND MODE ...........................................................................................................
SPEAKER SETUP ...............................................................................................................
CENTER .............................................................................................................................
REAR ..................................................................................................................................
SUBWOOFER .....................................................................................................................
CENTER DELAY .................................................................................................................
REAR DELAY ......................................................................................................................
TEST TONE ........................................................................................................................
LANGUAGE SETUP ............................................................................................................
OSD LANG ..........................................................................................................................
AUDIO .................................................................................................................................
DISC MENU .......................................................................................................................
SUBTITLE ...........................................................................................................................
PARENTAL SETUP .............................................................................................................
PARENTAL (PARENTAL LEVEL) .........................................................................................
PASSWORD ........................................................................................................................
CHANGE PASSWORD .......................................................................................................
PREFERENCES .................................................................................................................
ANGLE MARK .....................................................................................................................
STANDBY ............................................................................................................................
CD MENU ...........................................................................................................................
DEFAULT ............................................................................................................................
TRANSPARENCY ...............................................................................................................
TROUBLESHOOTING ........................................................................................................
SPECIFICATIONS ...............................................................................................................
DEFINITION OF TERMS ....................................................................................................
Ä3
41
42
42
42
42
42
43
44
44
44
44
44
44
44
45
45
45
45
45
46
46
46
46
47
47
47
47
47
47
48
49
50
Ä4
ABOUT THIS MANUAL
Instructions in this manual describe the controls on the player. You can also use the controls on the remote if they
have the same or similar names as those on the player.
Dear Customers
We would like to thank you for purchasing this DVD / VIDEO CD* / S-VCD / Audio CD / MP3 / JPEG player and with
built-in amplifier and integrated tuner.
We strongly recommend that you carefully study the operating instructions before attempting to operate the unit and
that you note the listed safety precautions.
SAFETY INFORMATION
CAUTION
&/$66
/$6(5352'8&7
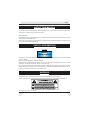
DVD Player is a class 1 laser product. However this product uses a visible laser beam which could cause hazardous
radiation exposure.
Be sure to operate the player correctly as instructed.
While this player is plugged to the wall outlet, do not place your eyes close to the opening of the disc tray or other
openings to look into the inside of this product for your own safety.
Use of controls or adjustments or performance of procedures other than those specified may result in hazardous
radiation exposure. Do not open covers and do not attempt to repair any damaged parts. Refer product to a service
technician or qualified professional for any necessary repair.
WARNING
To reduce the risk of fire or electric shock, do not expose this equipment to rain or moisture.
To reduce the risk of fire or electric shock, and any interference, use the recommended accessories only.
: $ 5 1 ,1 *
*This feature is only available in some models
Ä5
SAFETY PRECAUTIONS
Power Source:
The unit should be operated only from a 220-240V~ 50 Hz outlet. Please do not open the cover by yourself. There
is high voltage in the set, which will endanger your life. Please contact local service agent for help and advice. Repairs
to be carried out by a qualified technician only.
The player is not disconnected from the AC power source (mains) as long as it is connected to the wall outlet, even
if the player itself has been turned off.
If you are not going to use the player for a long time, be sure to disconnect the player from the wall outlet.
Power Cord:
Do not place the unit, a piece of furniture, etc., on the power cord (mains lead), or pinch the cord. Handle the power
cord by the plug. Do not pull out the plug by tugging the cord and never touch the power cord when your hands are
wet as this could cause a short circuit or electric shock. Never make a knot in the cord or tie it with other cords. The
power cords should be routed in such a way that they are not likely to be stepped on. A damaged power cord can
cause fire or give you an electrical shock. Check the power cord once in a while. When you find it damaged, ask
closest service agent for help. When the AC power cord need to be changed, it should be done at a qualified service
shop only.
Choice of Location:
Please do not place the set in a place subject to direct sun light, excessive dust or mechanical shock or in a location
near heat sources.
The set should be placed on a solid and safe base. Do not place the player on a soft surface such as a rug that
might block the ventilation holes on the bottom.
A location should not be selected such as a room with high humidity, as the condensation, arising in the kitchen for
example, may cause malfunction or damage the set.
Heating or other thermal radiation under the set also may cause malfunction or damage the set.
The hot air, which arises during the operation, should be ventilated with sufficient air circulation. Please do not put
the set into closed areas and do not cover it.
Please avoid the contact of the set with water or humidity. Do not put into operation near bath, swimming pools.
Take care to provide a good air circulation. Place the player in a location with adequate ventilation to prevent heat
build-up in the player.
Should any solid object or liquid fall into the cabinet, unplug the player and have it checked by qualified personnel
before operating it any further.
Ä6
GENERAL PROPERTIES
1) DVD/VCD*/S-VCD/CD/MP3/JPEG playback
2) NTSC/PAL playback (according to disc content)
3) User-friendly multilanguage OSD menu control
4) Vacuum Fluorescent Display (VFD)
5) Dolby Digital, DTS, MPEG Multichannel, LPCM audio via analog audio outputs ( 5.1 and left, right)
6) 60 (40 FM / 20 AM) preset radio stations
7) Built in digital amplifier - 20 W RMS output for surround speakers and 35 W RMS output for subwoofer
8) Test tone for easy speaker setup (Remote Control + Setup Menu)
9) Equalizer for DVD/VCD*/MP3/Radio (7 preset setting )
10) Total and seperate volume control for each speakers & mute function
11) Multiple Aspect Ratio support (16:9 Widescreen, 4:3 Letterbox, 4:3 PAN & SCAN)
12) Multi-Audio (up to 8) support (According to disc content)
13) Multi-Subtitle (up to 32) support (According to disc content)
14) Multi-Angle (up to 9) support (According to disc content)
15) 8 level parental control
16) Fast forward and rewind in 5 different speeds. (2x, 4x, 8x, 16x, 32x)
17) Smooth and seamless playback in 2x speed.
18) Slow motion playback in 4 different speeds. (1/2x, 1/4x, 1/8x, 1/16x forward and backward)
19) Frame by frame forward and backward playback (Step Forward & Step Backward)
20) Time Search
21) Repeat
22) A ®B repeat
23) Program function for Audio CD/MP3 CD
24) Scart input for DVB/VCR/DVD (optional)
25) AV input for DVB/VCR/DVD (optional)
26) Digital Optic Output (optional)
27) Scart output
28) Video output
29) S-Video output
30) Analog audio outputs & ( left, right)
31) 5.1 channel speaker outputs
*This feature is only available in some models
Ä7
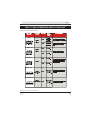
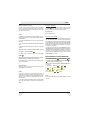
DISC TYPES COMPATIBLE WITH THIS UNIT
This player can play the following discs.
'LVF7\SHV
/RJRV
5HFRUGLQJ 'LVF6L]H 0D[
7\SHV
3OD\LQJ
7LPH
'9'
$XGLR
9LGHR
9,'(2&'
$XGLR
9LGHR
',*,7$/9,'(2
$8',2&'
FP
6LQJOH
VLGHGPLQ
'RXEOH
VLGHGPLQ
FP
6LQJOH
VLGHGPLQ
'RXEOH
VLGHGPLQ
FP
PLQ
'9'FRQWDLQVH[FHOOHQWVRXQGDQGYLGHR
GXHWR'ROE\'LJLWDODQG03(*6\VWHP
9DULRXVVFUHHQDQGDXGLRIXQFWLRQVFDQEH
HDVLO\VHOHFWHGWURXJKWKHRQVFUHHQ
PHQX
9LGHRZLWK&'VRXQG9+6TXDOLW\
03(*FRPSUHVVLRQWHFKQRORJ\
FP
PLQ
FP
PLQ
FP
PLQ
$XGLR
',*,7$/$8',2
&KDUDFWHULVWLFV
$Q/3LVUHFRUGHGDVDQDQDORJVLJQDOZLWK
PRUHGLVWRUWLRQ&'LVUHFRUGHGDVD
'LJLWDO6LJQDOZLWKEHWWHUDXGLRTXDOLW\
OHVVGLVWRUWLRQDQGOHVVGHWHULRUDWLRQRI
DXGLRTXDOLW\RYHUWLPH
03&'
5($'$%/(
$XGLR
[[[[PS
FP
03LVUHFRUGHGDVD'LJLWDO6LJQDOZLWK
EHWWHUDXGLRTXDOLW\OHVVGLVWRUWLRQDQG
OHVVGHWHULRUDWLRQRIDXGLRTXDOLW\
RYHUWLPH
3,&785(&'
-3(*
5($'$%/(
9LGHR
VWLOOSLFWXUH FP
*This feature is only available in some models
-3(*LVUHFRUGHGDVD'LJLWDO6LJQDOZLWK
EHWWHUSLFWXUHTXDOLW\RYHUWLPH
Ä8
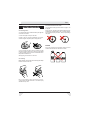
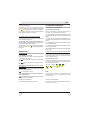
NOTES ON DISCS
On handling discs:
To keep the disc clean, handle the disc by its edge. Do
not touch the surface.
Discs that should not be used:
Only the discs including the marks shown on page 7 can
be played.
Note, however, that discs with special shapes (heartshaped discs, hexagonal discs, etc.) cannot be played.
Do not attempt to play such discs, as they may damage
the player.
Do not stick paper or tape on the disc.
If there is glue (or a similar substance) on the disc,
remove the glue completely before using the disc.
NOTE:
Do not use record spray or antistatic. Also do not use
volatile chemicals such as benzene or thinner.
Do not expose the disc to direct sunlight or heat
sources such as hot air ducts, or leave it in a car parked
in direct sunlight as there can be considerable rise in
temperature inside the car.
After playing, store the disc in its case.
On cleaning:
Before playing, clean the disc with a cleaning cloth. Wipe
the disc from the center out.
Do not use solvents such as benzine, thinner,
commercially available cleaners or anti-static spray
intended for vinyl LPs.
5(&25'
635(<
7+,11(5
%(1=(1(
Ä9
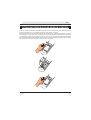
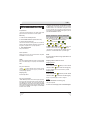
FITTING BATTERIES IN YOUR REMOTE CONTROL
First open the battery cover on the underside of the remote control. Fit both batteries 1.5Volt (R03/AAA) referring
to the imprinted symbols (+/-) in the battery case and put on the battery cover again.
While using the remote control, direct it towards the front of the AV receiver. If the remote control does not work or
the chosen function could not be made, the batteries are most probably exhausted and they should be replaced as
soon as possible. Please use only the leak proof batteries. If you will not be using your remote control for a long time,
it is recommended to take out the batteries from your remote control to avoid possible damage from battery leakage
and corrosion. Do not leave the remote in an extremely hot or humid place.
Ä10
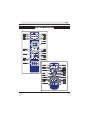
REMOTE CONTROL
67$1'%<
23(1&/26(
23(1&/26(
67$1'%<
6+8))/(
352*
6+8))/( 5(3($7
7,7/(
',63/$<
5(3($7
$%
$%
352*5$0
=220
0(18
0(18
7,7/(
',63/$<
6(783
=220
5(7851
5(7851
6(783
6(/(&7
6(/(&7
$0
)0
3/$<3$86(
6723
6.,3
6($5&+
6723
3/$<3$86(
6($5&+
6.,3
781(
92/80(
$552:%877216
63($.(5
92/
7(67
721(
087(
6281'
())(&76
63($.(592/
7(67721(
92/80(
6281'())(&76
68%7,7/(
087(
02'(
02'(
68%7,7/(
$8',2
6($5&+
02'(
$1*/(
6($5&+02'(
$8',2
$1*(/
&/($5
180%(5%877216
67$1'%<
23(1&/26(
67$1'%<
5(3($7
$%
23(1&/26(
5(3($7
$%
=220
352*5$0
6+8))/(
',63/$<
352*5$0
92/80(
6+8))/(
7(67721(
92/80(
63($.(592/
6281'())(&7
7,7/(
0(18
$552:%877216
6(/(&7
6(783
5(7851
5(7851
6(783
6.,3)5$0(
087(
0(18
7,7/(
6(/(&7
=220
',63/$<
6($5&+
6.,3
6723
3/$<3$86(
02'(
6($5&+6/2:
02'(
6723
3/$<3$86(
6($5&+02'(
68%7,7/(
$8',2
180%(5%877216
$1*/(
&
&/($5
´µ
Ä11
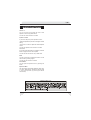
1. STANDBY button
16. ANGLE button
Using this button player is changed into Standby or normal mode.
Changes the angles when playing a DVD.
2. OPEN/CLOSE button
17.SEARCH MODE button
Opens or closes the disc tray.
Press to select the unit for search (title, chapter, track, time etc.)
3. TITLE button
18. PROGRAM button
Displays the title menu on the TV screen.
Press to enter the program menu in stop mode for audio CD and MP3 CD.
4. SETUP button
19. REPEAT button
Displays Setup menu on the TV screen.
Press to execute disk/title/chapter repeat.
5. MENU button
20. A®B button
Displays the DVD root menu on screen.
Press to execute the A®B repeat play.
6. ZOOM button
21. DISPLAY button
Zooms the picture by 2x, 3x, 4x, 1/2x, 1/3x, 1/4x while playing DVD/VIDEO CD*.
Displays the current playing status on TV screen or changes the playing time
display mode of the disc, title, track etc., on the OSD and front panel display for
VCD and CD.
7. RETURN button
Press to return to the main page in SETUP menu or to cancel some functions like
title/time search, Radio Memory Set etc.
8. Arrow buttons
Move to the items or settings.
In radio mode Left is used to switch AM mode. and Right is used to switch FM mode.
Up and Down is used for autotune operation.
9. SELECT button
Executes the items or settings.
In radio mode it used to switch to memory set mode.
10. PLAY/PAUSE button
Plays/pauses the disc. For any DVD title that has a root menu with still picture,
this button functions as button select (selects highlighted item) in the root menu.
Otherwise the disc will prohibit this functioning of play/pause button on the root
menu, and
symbol will appear.
11. STOP button
Stops playing disc.
12. SKIP/FRAME button
Press to go to the next chapter or track, or to go back to the preceding chapter or
track during playback and next/previous frame during pause.
In radio mode these buttons are used to switch to preset channels.
13.SEARCH/SLOW button
Press to adjust the forward and reverse playback speed x2, x4, x8, x16 and x32 times
during playback (rapid advance/reverse) and x32, x16, x8, x2 times during pause
(Slow motion).
22. Number buttons
Press to enter track/chapter/title/time/channel/etc
numbers directly.
23. C (Clear) button
Using this button you can delete the mistyped entries or you can cancel some
functions.
24. +10 button
Using this button you can enter the numbers greater than 9.
In radio mode it is used to enter two digits, cursor is appeared on the VFD.
25. Volume +/- buttons
Using this buttons you can adjust speaker volumes.
26. Speaker Vol button
Using this button you can select each speakers volume to be adjusted by Volume
+/- buttons.
27. Mute button
Using this button you can mute all the system volume.
28.Test Tone button
Using this button you can apply test tone to each speaker.
29. Shuffle button
Using this button you can shuffle the order of the MP3 playback.
30. MODE button
Using this button you can change the receiver mode between DVD/CD-RadioAV-SCART*/TV.
In radio mode these buttons are used to adjust radio frequency manually.
31. SOUND EFFECT BUTTON
14. SUBTITLE button
You can select the type of effect or turn on/off equalizer by pressing this button
consecutively.
Changes the language of the subtitle while playing a DVD.
15. AUDIO button
Changes the language of the sound while playing a DVD. In radio mode it is used
to enable or disable stereo property.
*This feature is only available in some models
Ä12
FRONT PANEL FUNCTIONS
1. STANDBY button
Turns on and off the standby of the player.
2. STOP button
Stops playing disc.
3. PLAY/PAUSE button
Plays/Pauses the disc. For any DVD title that has a root menu with still picture, this button functions as button select (selects
highlighted item) in the root menu. Otherwise the disc will prohibit this functioning of play/pause button on the root menu, and
symbol will appear on screen.
4. Front Panel Display (VFD)
Indicates the playing time, title, chapter/track, etc.
5. Disc Tray
Place a disc on the tray.
6. OPEN/CLOSE button
Opens or closes the disc tray.
7. SKIP buttons
Press to go back to the preceding chapter/track or to go to the next chapter/track.
8. SEARCH buttons
Used to search fast forward or backward at 2, 4, 6 or 8 times normal playback speed.
9. VOLUME + /- buttons
Using these buttons you can adjust speaker volumes.
10. MODE button
Using these button you can change the receiver mode between DVD/CD - Radio - SCART* - AV / TV.
11. Standby LED
Indicates Standby and normal operation modes.
RED: Stand-By
Ä13
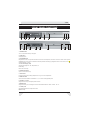
FRONT PANEL DISPLAY (VFD)
'9'$8',2
69&'&'
3%&=RRP5(3($76+8))/(352*5$0
7,7/(35(75.&+3$%$//5(0$,1$1*/(
NK]
0K]
G%
1. Current Disc
2. Play/Pause
3. Playing
4. Repeat mode
5. Title Number
6. Track/ Chapter Number or Preset Radio Channel Info
7. Remain
8. Shuffle
9. Program
10. Angle
11. Dolby Digital DTS audio
12. Zoom
13. Time or Radio Frequency Info
14. Speaker Outputs
15. PBC
GWV
/
F
5
/6
/)(
56
Ä14
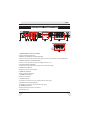
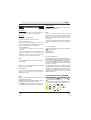
REAR PANEL CONNECTIONS
)0
$17(11$
$0
9,'(2
237,&$/
&2$;,$/
',*,7$/$8',2
5,*+7
$9,1387
7235(9(17) ,5(256+2&.+$=$5'
'2127(;326(7+,6$33/,$1&(72
5$,12502,6785(
:$51,1*
$/:$<65(029(0$,13/8*) 520
:$//62&.(7:+(1127,186(25
%()25($1<6(59,&(23(5$7,21
/()7
&/$66
/$6(5352'8&7
&$87,215,6.2)(/(&75,&6+2&.'212723(1
:$51,1*
9,'(2
/()7
6&$57 ,1387
69,'(2
5,*+7
$8',2287 9,'(2287
2)'2/%</$%25$725,(6/,&(16,1*
&25325$7,21
5($5
5,*+7
)5217
5,*+7
68%
&(17(5
:22)(5
)5217
/()7
5($5
/()7
5,*+75(6(59('
6&$57 287387
$33$5$786 &/$,06 2) 86
3$7(17126 $1' /,&(16(')25/,0,7('9,(:,1*
86(621/<
&21) ,'(17$/8138%/,6+(':25.6
'2/%</$%25$725,(6,1&$//
:$51,1*
1286(56(59,&($%/(3$576,16,'(
5()(56(59,&,1*7248$/,) ,('
6(59,&(3(56211(/1(9(55(029(
&29(5681/(6648$/,)('72'262
7+,681,7&217$,16'$1*(5286
92/7$*(6
0$18)$&785('81'(5/,&(16()520
'2/%</$%25$725,(6/,&(16,1*
&25325$7,21
'2/%<352/2*,&$1'7+(
'28%/('6<0%2/$5(75$'(0$5.6
5($5
5,*+7
)5217
5,*+7
68%
&(17(5
:22)(5
)5217
/()7
5($5
/()7
1. AM/FM ANTENNA connectors (Optional)
Connects to AM and/or FM Antenna .
2. DIGITAL OUT (OPTICAL) connector (Optional)
Connects an audio component using the optical digital connection cord or Outputs 5.1 Channel digital audio
3. DIGITAL (COAXIAL) connector(Optional)
Connects an audio component using the coaxial digital connection cord.
4. AV Input connector (Optional)
Connects audio & video component using Video, Audio Left and Audio Right.
5. AUDIO OUT connectors
Outputs Audio Left, Right Audio signals.
6. VIDEO OUT connector
Outputs a composite video signal.
7. S VIDEO OUT connector
Outputs an S video signal.
8. SCART connector
The standard 21-pin SCART connector outputs Audio and Video signals.
9. SCART Input connector (Optional)
A standard 21 pin SCART connects Audio and Video signals.
10. SPEAKER connectors
Outputs Amplified Audio signals to the speakers.
11. AC Power Cord
Ä15
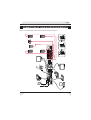
CONNECTION OF YOUR AV RECEIVER WITH TV
Be sure to turn off the standby of each component before making the connections.
5
(
. $
7
( +
3
6 ,*
7 5
1
2
5
)
5
(
. $ 7
(
3 +
,*
6 5
5 $
(
5
5
(
.
$
(
3
6
5
(
7
1
(
&
5
)(
2
2
:
%
8
6
6
8
)
2
6
0
,
$
/
&
6
78
$
5
$
3
3
$
$5( )7(
5/
17 7
25 ()
)/
5(
17(
&
5
%8 ()
6 22
:
7
7
215 +,*
)5
5 +7
($5 *,
5
6
.
5
$
0
(
'
$
5
7
(
5
$
/
2
%
0
<
6
'
(
/
%
8
2
'
6
.
5
2
:
'
(
+
,6
/
%
8
3
1
8
/
$
7
1
(
,'
)
1
2
&
*
,1
6
1
(
,&
/
6
,(
5
2
7
$
5
2 % 1
$
/ 7,2
< $
% 5
/ 2
2 3
' 5
) 2
2 &
//
$
&
1
,
6
(
,
5
2
7
$
5
2
%
$
/ '
< (
% 9
/ 5
2 (
' 6
(
5
7
+
,*
5
7
387
8
2
7
$5&
6
LEFT SPEAKER
873
1
,7
5$
&6
'
5
=$
$
+
.
&
2
+
6
5
2
(
5
,
2
7
(
&
1
,$
/
3
3
$
6
, + (
7 5
( 8
0
2
5
)
*
8
/
3
,1
$
0
(
9
5
2
(
6
8
1
,
7
2
1
1
(
+
:
1
2
,
7
$
5
(
3
2
(
&
,
9
5
(
(
(
9
'
,
2
6
0
,1
' (
6 ( 5
7 ), 5
5 /, (
$ $
9
3
8 (
1
/( 4 /
% 2 (
$ 7 1
( *
1
,& 1
, 2
6
5
(
3
(
,&
9
5
(
6
7
9 ,&
2 7 6
) 6 6
*1 17( ;32( 02, *1 5(0 &.( $1< *1 6(5 59(
1, 5(9 27 25 1, <6 62 5( 1, 6(5 56
$5: 372 1'2 ,15$ $5: :$$/ $//: )2%( $5: 812 )(5(
DVB, VCR, DVD PLAYER
7)
/(
$0
87
2
7
8
22
,
+7* '
8
5,
$
7
83
7+ ,1
* 9
5,
7)
/(
$
/$
;,
$
&2
,2'
8
$/
$7
,
*,
'
AM
ANTENNA
/
$
,&7
3
2
FM
ANTENNA
)0
6
8
2
5
(
*
1
$
'
6
1
,
7$
1
2
& 6
,7 (
1 *
8
7$
6
, /
2
+
7 9
2
(2 (
,'9 ,'
6 9
(2'
9,
2(
9,'
2
6
2
'
2
7
'
(
,)
/
$
8
4
6
6
(
/
1
8
6
5
(
9
2
&
$
11(
17$
&7
8'
2
53
65
$6/ 6($
&/
AMPLIFIER
*
,1
(
6
+
1
7
(
'
,&
1
/
$
6
(
,
&
,
5
*
72 /2
$ 1 5
2
2 ,2 5
% 7 3
$
$ 5 / 2
< 3 <
%
%
/
/ 5 2
2 2 '
' & RIGHT SPEAKER
VIDEO
JACK
0
2
5
)
(
6
1
(
,&
/
5
(
'
1
8
'
(
5
8
7
&
$
)
8
1
$
0
COMPUTER
TV
S-VIDEO
JACK
1
3(2
7
21
2
'
.&
2+
6&
,5
7&
(/
()
2.
6,
5
1
,27
8$
&
*
1
,
:
(
,
9
'
(
,7
0
,/
5
2
)' /<
( 1
6 2
1 6
( (
& 6
/, 8
TV
5
(
. $ 7
(
3 )(
6 /
5
$
(
5
'
1
$
DVB, VCR, DVD PLAYER
5
(
.
$ (
3 )7
(
6
7 /
1 2
)5
6
2
1
7
1
(
7
$
3
Ä16
SCART SOCKET
Connecting your DVD player to TV via scart socket with a scart cable gives you the best picture performance. If
your DVD player will not be connected to a hi-fi set or A/V amplifier to hear better sound, scart is enough for both
audio & video connections.
:$ 51,1*
0$18)$&785('81'(5/,&(16()520
7235(9(17),5(256+2&.+$=$5'
'2127(;326(7+,6$33/,$1&(72
5$,12502,6785(
:$ 51,1*
6&$57 ,1387
$/:$<65(029(0$,13/8*)520
:$//62&.(7:+(1127,186(25
%()25($1<6(59,&(23(5$7,21
&21),'(17$/8138%/,6+(':25.6
'2/%</$%25$725,(6,1&$//
5,*+75(6(59('
:$ 51,1*
1286(56(59,&($%/(3$576,16,'(
5()(56(59,&,1*7248$/,),('
6(59,&(3(56211(/1(9(55(029(
&29(5681/(6648$/,)('72'262
7+,681,7&217$,16'$1*(5286
92/7$*(6
'2/%</$%25$725,(6/,&(16,1*
&25325$7,21
'2/%<352/2*,&$1'7+(
'28%/('6<0%2/$5(75$'(0$5.6
2)'2/%</$%25$725,(6/,&(16,1*
&25325$7,21
6&$ 57 287387
DVB, VCR, DVD PLAYER
TV
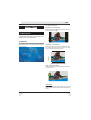
VIDEO & AUDIO OUTPUT SOCKETS
Video (yellow) & audio (Red: right, White: left) output sockets can be used to connect the DVD player to your TV
set via cables. To make this connection, your TV set must have Video & audio input connectors. This type of connection
is alternative to scart connection. Picture quality is not as good as Scart connection but audio performance is the
same.
TV
:$51,1*
9,'(2
5,*+7
:$51,1*
$/:$<65(029(0$,13/8*)520
:$//62&.(7:+(1127,186(25
%()25($ 1<6(59,&(23(5$7,21
/()7
$8',2287
7235(9(17),5(256+2&.+$= $5'
'2127(;326(7+,6$33/,$1&(72
5$ ,12502,6785(
:$51,1*
69,'(2
9,'(2287
1286(56(59,&($%/(3$576,16,'(
5()(56(59,&,1*7248$/,),('
6(59,&(3(56211(/1(9(55(029(
&29(5681/(6648$/,)('72'262
7+,681,7&217$,16'$1*(5286
92/7$*(6
Ä17
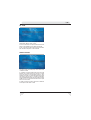
S-VIDEO OUTPUT SOCKETS
S-Video Output socket can be used to have a better picture quality than the video output. Your TV set must have
S-video input connector for this type of connection. This socket is used for only video connection. For audio, red
& white output sockets must be used. S-video picture quality is not as good as Scart connection.
TV
:$51,1*
7235(9(17),5(256+2&.+$=$5'
'2127(;326(7+,6$33/,$1&(72
5$ ,12502,6785(
9,'(2
:$51,1*
$/:$<65(029(0$,13/8*)520
:$//62&.(7:+(1127,186(25
%()25($1<6(59,&(23(5$7,21
/()7
5,*+7
$8',2287
:$51,1*
69,'(2
9,'(2287
1286(56(59,&($%/(3$576,16,'(
5()(56(59,&,1*7248$/,),('
6(59,&(3(56211(/1(9(55(029(
&29(5681/(6648$/,)('72'262
7+,681,7&217$,16'$1*(5286
92/7$ *(6
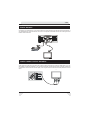
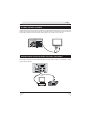
DIGITAL AUDIO OUTPUT SOCKET (OPTICAL) (OPTIONAL)
The unit can be connected via optical dijital audio output to recorder units or computer for recording 5.1 channel
surround sound. (optional)
)0
$17(11$
&/$66
/$6(5352'8&7
$0
237,&$/
&2$;,$/
',*,7$/$8',2
COMPUTER
RECORDER
Ä18
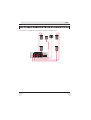
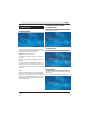
CONNECTION OF YOUR AV RECEIVERS SPEAKERS
You can connect 5.1 speaker set to the AV receiver as shown in the figure below.
)URQW6SHDNHU
/HIW
&HQWHU6SHDNHU
)URQW6SHDNHU
5LJKW
6XEZRRIHU
5HDU6SHDNHU
/HIW
5($5
5,*+7
5HDU6SHDNHU
5LJKW
&$87,215,6.2)(/(&75,&6+2&.'212723(1
)5217
68%
&(17(5
)5217
5($5
5,*+7 :22)(5
/()7
/()7
$ 33$ 5$ 786 &/$ ,06 2) 86
3$ 7(17126
$ 1'
/,&(16(')25/,0,7('9,(:,1*
86(621/<
Ä19
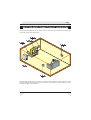
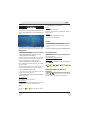
BEST SPEAKER CONNECTION OF YOUR ROOM
To get the best performance form your AV receiver system you have to arrange your speaker set according to your
room shape as shown in the figures below.
)URQW6SHDNHU
5LJKW
&HQWHU6SHDNHU
)URQW6SHDNHU
/HIW
5HDU6SHDNHU
5LJKW
6XEZRRIHU
5HDU6SHDNHU
/HIW
After finishing the speaker connection use Test Tone button to test if the speaker connection is right or not. A test
tone will be applied to each speaker (Left, Right, Surround Left, Surround Right, Center and Subwoofer). You can
press test tone again to stop this function.
Ä20
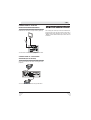
CONNECTION OF YOUR AV
RECEIVERS AM/FM ANTENNAS
To get the best radio performance connect the AM and
FM antenna as shown in the figure below. (Optional)
AM
ANTENNA
FM
ANTENNA
)0
$17(11$
&/$66
/$6(5352'8&7
$0
237,&$/
&2$;,$/
',*,7$/$8',2,13876
You can switch to Radio Mode by using MODE button.
CONNECTION OF YOUR VIDEO
SOURCES (AV OR SCART)
You can connect your Video Sources (DVB, VCR, VDP
etc) to your AV receiver as shown in the figure below.
(Optional)
DVB, VCR, DVD PLAYER
9,'(2
:$51,1*
9,'(2
/()7
5,*+7
$9,1387
5,*+7
$8',2287
7235(9(17),5(256+2&.+$=$5'
'2127(;326(7+,6$33/,$1&(72
5$,12502,6785(
:$51,1*
$/:$<65(029(0$,13/8*)520
:$//62&.(7:+(1127,186(25
%()25($1<6(59,&(23(5$7,21
/()7
6&$57 ,1387
:$51,1*
69,'(2
9,'(2287
1286(56(59,&($%/(3$57 6,16,'(
5()(56(59,&,1*7248$/,),('
6(59,&(3(56211(/1(9(55(029(
&29(5681/(6648$/,)('72'262
7+,681,7&217$,16'$1*(5286
92/7$*(6
6&$57 287387
DVB, VCR, DVD PLAYER
You can switch to AV or SCART using mode button.
PUTTING INTO OPERATION
After making the necessary connections stated above,
plug the power cord to the mains socket. Unit will be in
standby mode. Press standby to turn on the unit. Press
MODE to switch between Disc Player, Radio, AV and
SCART/TV.
Ä21
SELECTING THE MODE
You can select the DVD player, Radio, AV, TV or SCART
using the Mode button.
Radio
To get the best performance be sure that AM and FM
antenna is connected to the AV receiver. AUDIO VFD grid
will be highlighted in radio mode.
Adjusting the frequency :
Press on the left arrow for AM and Right Arrow for FM.
Band name text and MHz, kHz grids will be displayed on
the VFD.
Press Search Forward or Search Backward to
increase or decrease the frequency till you reach the
desired channel. VFD will display the frequency.
Storing the channel in the Memory :
After adjusting the desired channel you can store it in
the memory . In order to do that ;
Press on the Select button to enter Memory Set mode.
Program grid is displayed on the VFD. You can use
Return button to cancel Memory Set mode.
Press the number button that you want to store this
channel. Use 10+ button to enter two digits. VFD will
display the preset channel number and its frequency.
You can keep 20 AM channels and 40 FM channels in the
memory.
Selecting the preset channels:
Press on the left arrow for AM and Right Arrow for FM.
Press the number button of the desired preset channel.
VFD will display the preset channel number and its
frequency. Use 10+ button to enter two digits.
Press the Skip Next or Skip Previous button to increase
or decrease the preset channel number. VFD will display
the preset channel number and its frequency
AV MODE
You can use AV connection only in Normal operation.
You can switch to your connected Video Source using
mode button. In this connection you can use your Av
receiver as an Amplifier. Standby, Mute, Speaker Volume
and Mode buttons can be used in this mode .
SCART MODE
In this mode scart audio and video inputs are used. You
can use Scart connection in Standby and Normal
operation.
IN STANDBY MODE
If there is a Video and Audio signal in AV Input of
receiver, this signal will be given as a SCART output
automatically. Standby, Open/Close, and Play buttons
can be used in this mode.
IN NORMAL MODE
You can switch to your connected Video Source using
mode button. In this connection you can use your Av
receiver as an Amplifier. Standby, Mute, Speaker
Volume and Mode buttons can be used in this mode.
TV MODE
In this mode audio input signals from output scart are
amplified and sent to 5.1 speaker outputs.
Ä22
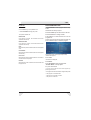
RADIO DATA SYSTEM (RDS)*
In TUNER mode, use DISPLAY key to change
following RDS modes :
Notes :
RDS is available only in FM Tuner Mode.
RDS information will be displayed if available.
cant get RDS information
plase check your antenna performance
station may not be sending data
RDS OFF
Frequency information is displayed.
PROGRAMME SERVICE NAME (PS)
This field is 8 characters long. Generally it is used for
static station name. But some stations broadcast longer
messages dynamically using this field.
RADIO TEXT (RT)
This message is at most 64 characters and will scroll
from right to left.
PROGRAMME TYPE (PTY)
There is about 30 different programme types (News,
Sport, Pop M, Classic,
)
In this mode use SEARCH MODE key to make PTY
SEARCH. Next channel with the same PTY will be
switched.
Note :
PTY search is done over prestored PTY information.
DATE
Date information is updated every one minute if available.
TIME
Time information is updated every one minute if available.
*This feature is only available in some models
If you
Ä23
AUDIO FUNCTIONS
Volume +/You can increase or decrease the total or each
speakers volume using these buttons.
You can use volume control in all modes.
Speaker Volume
If you want to adjust any of the speakers volume;
Select the speaker that you want to change the volume
setting.
Use Volume +/- button to adjust the selected speaker
volume
You can use speaker volume control in all modes.
Test Tone
If you want to test the operation of speakers press this
button to apply test tone to each speaker.
You can use test tone function only in DVD mode.
Mute
You can mute volume by pressing this button. You can
cancel mute by pressing it again.
You can use mute control in all modes.
Sound Effect
You can open the Equalizer menu by pressing this
button.
Equalizer Menu
You can select the type of effect (standart, classic, jazz,
rock, pops, ballad, dance), display the frequency bars
or turn on/off equalizer, by pressing this button
consecutively.
$77(17,21
$//2)7+(63($.(562)<2856<67(0:,//%($&7,9(21/<:+(1
7+($8',26285&($9$,/$%/(,6&+$11(/21/</,.('9'',6&6:,7+
'2/%< ',*,7$/ &+$11(/ $8',2 25 '76 &+$11(/ $8',2
,)7+($8',26285&(,6&+$11(/6&'$1''9'',6&:,7+67(5(2
'2/%< ',*,7$/ $8',2 25 5$',221/< )5217 /()75,*+7 $1'
68%:22)(563($.(56:,//%($&7,9(
Ä24
DVD PLAYBACK
After operation
When the unit is not in use, remove the disc and press
STANDBY to turn off the unit.
Preparations
Press on the standby button of your audio system if the
player has been connected to an audio system.
Basic Play
1. Press on the standby button
2. Press OPEN/CLOSE to open the disc tray.
3. Place a disc onto the tray
Hold the disc without touching either of its surfaces,
position it with the printed title side facing up, align it with
the guides, and place it in its proper position.
4. Press OPEN/CLOSE.
The disc tray is automatically closed and play
commences.
A menu may appear on the TV screen after a few
moments or the film may start immediately after the
introduction of the movie Company. This behaviour
depends on the disc content and may change.
NOTE:
The disc continues to rotate while the menu is
displayed even after the player has finished playing a
particular item. When no further selections are to be
played, be sure to press the STOP button to clear the
menu display.
If the disc is placed upside down (and it is a single sided
disc), the VFD display on the player will indicate NO
DISC.
For your reference:
If an action corresponding to a button is prohibited the
symbol appears.
Stopping Play
Press stop twice.
For your convenience:
NOTE:
Step 5 is available only when a menu is shown after the
disc is inserted.
Press 3465 or the number button(s) to select
the preferred menu item.
5. Press SELECT
Play of the selected items now starts. The played item
may be a movie, a still picture or another submenu
depending on the disc.
NOTE:
When STOP is pressed once, while the play continues,
the unit records the point where the play is stopped and
if the PLAY key is pressed, playback resumes from the
point where the STOP key was pressed. When the tray
is opened or the STOP is pressed again, the RESUME
function will be cleared.
To stop the play permanently, press STOP twice. When
the STOP button is pressed for the first time, a message
PRESS PLAY TO CONTINUE will appear on the screen
to remind you if you want to continue the play. To stop
the play, press the STOP button again or you can press
SELECT to continue.
RAPID ADVANCE / RAPID REVERSE
When using menus the disc controls the
behaviour of the player.
Press SEARCH/SLOW (
Fast reverse or
forward) on the remote control or Search
on the main unit during play.
Stopping play and returning to the menu screen
(when a menu is available on the disc)
Normal play is resumed when the SELECT button is
pressed or PLAY/PAUSE button is pressed twice.
Press MENU or TITLE button depending on the disc. Play
is suspended, and the Disc menu screen is displayed.
The speed of advance (
8x,
16x,
4x,
8x,
every press of the
2x,
4x,
32x) or reverse (
16x,
or
2x,
32x) changes for
button.
Fast
or
Ä25
SKIPPING AHEAD OR BACK TO
CHAPTERS
SLOW- MOTION PLAY FORWARD
Skipping ahead
The screen suspends.
Press SKIP/ FRAME
control or SKIP
(Next) on the remote
on the main unit during play.
A chapter is skipped forward each time the button is
pressed.
Press PLAY/PAUSE once during play.
on the remote control
Press SEARCH/SLOW
or Search
on the main unit
The unit starts playing the movie at four different
1/2,
1/4,
1/8,
1/16).
speeds (
Skipping back
You can increase or decrease the speed of the
.
slow-motion play by pressing SEARCH/SLOW
(Previous) on the remote
Press SKIP/ FRAME
on the main unit during play.
control or SKIP
The speed of slow motion play is displayed on the
screen each time you change it.
When the button is pressed once midway through a
chapter, play returns to the previous chapter.
To return normal play press PLAY/PAUSE.
SLOW- MOTION PLAY BACKWARD
STILL PICTURE (PAUSE)
Press PLAY/PAUSE once during play.
Press PLAY/PAUSE once during play.
The screen suspends.
To return to normal play press PLAY/PAUSE again.
FRAME ADVANCE (STEP FORWARD)
Press PLAY/PAUSE once during play.
The screen suspends.
(Next) on the remote
Press SKIP/ FRAME
control or SKIP
on the main unit.
The screen suspends.
on the remote control
Press SEARCH/SLOW
on the main unit
or Search
The unit starts playing the movie at four different
1/2,
1/4,
1/8,
1/16).
speeds (
You can increase or decrease the speed of the
.
slow-motion play by pressing SEARCH/SLOW
The speed of slow motion play is displayed on the
screen each time you change it.
To return normal play press PLAY/PAUSE.
The next frame of the movie is displayed.
You can press SKIP/ FRAME
following frames.
(Next) for the
FRAME BACK (STEP BACKWARD)
Press PLAY/PAUSE once during play.
NOTE:
The forward and backward slow-motion operations
are not recursive. The sequence for the slow-motion is
as follows:
(
1/16,
1/8,
1/4,
1/4,
1/8,
1/16)
1/2, PAUSE,
1/2,
The screen suspends.
(Previous) on the remote
Press SKIP/ FRAME
control or SKIP
on the main unit.
The previous frame of the movie is displayed.
You can press SKIP/ FRAME
preceding frames.
(Previous) for the
DIRECT SELECTION OF SCENES
Selecting Scenes by Chapter Number
Press SEARCH MODE on the remote control once
during playback.
The chapter/title search box is displayed on the screen.
You can see the currently playing and total number of
chapters on right hand side of the display bar as / xx.
Ä26
Enter the number of the chapter using number
buttons.
The selected chapter is played just after you enter the
chapter number.
If you wait five seconds without pressing any key for
selecting scenes by title number, the operation is
cancelled.
You can press RETURN key to cancel title search.
For your convenience:
Selecting Scenes by Time
If the chapter number you entered is between 0 and 9,
player will automatically jump to the related chapter. To
enter a chapter number which is more than 1 digit, press
+10 KEY and then enter the chapter number.
You can view the DVD starting from any time point you
want.
You can clear the field by pressing the C button if you
enter wrong number.
If you attempt to enter a number greater than the total
number of chapters on the current title, the search box
disappears and message is displayed on screen.
Press SEARCH MODE on the remote control
twice during playback.
The time search box is displayed on the screen You can
see the total runtime of the title on right side of the display
bar as Title xx/xx Time: : :
Enter the time using number buttons.
If you wait five seconds without pressing any key for
selecting scenes by chapter number, the operation is
cancelled.
The title is played beginning from the desired time just
after you enter the time. If not prohibited by the DVD.
Selecting Scenes by Title Number
The time search box is displayed on the screen. You can
see the total runtime of the Chapter on right side of the
display bar as Chapter xx/xx Time: : :
Press SEARCH MODE on the remote control once
during playback.
The chapter/title search box is displayed on the screen.
You can see the currently playing and total number of
titles in left hand side of the display bar as / xx.
Press 3 (Left) or 4(Right) button on the remote
control to select the title field in the search box
to change the title.
You can see the currently playing title and total title
numbers on the top-left side of the display as / xx.
Press SEARCH MODE on the remote control third
time during playback.
Enter the time using number buttons.
The Chapter is played beginning from the desired time
just after you enter the time. If not prohibited by the DVD.
For your convenience:
You can clear the fields by pressing the C button if you
enter wrong numbers.
Enter the number of the title using number
buttons.
If you attempt to enter a number greater than the total
time of the current title, the time search box disappears,
message is displayed on screen.
The selected title is played just after you enter the title
number.
If you wait five seconds without pressing any key to
enter time, selecting scenes by time option is cancelled.
You can press RETURN key to cancel time search.
For your convenience:
Enter the title number between 0 and 9, your request
will be acknowledged immediately without pressing any
other key. To select a title number which is more than 1
digit, press +10 KEY and then enter the title number.
You can clear the field by pressing the C button if you
enter wrong number.
If you attempt to enter a number greater than the total
number of titles, the search box disappears,
message appears.
Ä27
REPEAT PLAY
Repeat Viewing
Press REPEAT during play.
Each time this button is pressed, a different repeat box
is displayed on the screen.
CHAPTER is displayed, the current chapter
If
will be played again.
TITLE is displayed, the current title will be
If
played again.
ALL is displayed, all titles and chapters will be
If
played again.
NOTE:
Repeat play may be prohibited by some DVD titles.
Repeating sections between two specific points.
(A-B repeat)
Press A-B during play at the point where repeat
play is to commence (A).
A is displayed.
Press A-B again at the point where repeat play is
to be concluded (B).
AB is displayed and the repeat play of the
selection between points A and B starts, if not prohibited
by the DVD.
Time counter modes can be selected by pressing
DISPLAY key consecutively.
First hit to DISPLAY key: Line 4 -> CHAPTER ELAPSED
Mode
Second hit to DISPLAY key: Line 4 -> CHAPTER REMAIN
Mode
Third hit to DISPLAY key: Line 4 -> TITLE ELAPSED Mode
Fourth hit to DISPLAY key: Line 4 -> TITLE REMAIN Mode
If Time Display: TITLE ELAPSED is displayed, the
elapsed time for the title is being displayed.
If Time Display: TITLE REMAIN is displayed the
remaining time for the title is being displayed.
If Time Display: CHAPTER ELAPSED is displayed, the
elapsed time for the chapter is being displayed.
If Time Display: CHAPTER REMAIN is displayed, the
remaining time for the chapter is being displayed.
Pressing the DISPLAY key for the fifth time closes
display menu screen.
Displaying a scene with a larger and closer view
The zoom in function enables you to take a closer look
at the scene you are viewing that is especially a
considerate function when you are seeing science
fiction or adventure movie.
Press ZOOM during play.
2x is displayed on the screen and the
To return to normal play
picture is now larger. By pressing ZOOM key
Press A-B again.
consecutively you can reach
3x,
4x,
1/4x
CONVENIENT FUNCTIONS
1/2x ,
1/3x ,
modes.
Displaying the time information
Press DISPLAY during PLAY.
NOTE:
During playback, each time this button is pressed, some
information is displayed on TV screen to indicate the
current status of the disc. On the display screen you can
find the following information lines:
You can move in the picture i.e. change the zoomed
location by using the 3 (Left) /4(Right) /6(Down) /
5(Up) arrow keys.
Line 1: Title & Chapter Numbers
To return to normal play
Line 2: Audio Format, Number of Output Channels &
Audio Language
Press ZOOM again.
Line 3: Subtitle Language Number & Subtitle Language
Line 4: Time Counter Mode & Time Counter
Ä28
Displaying / Changing Subtitle Language
For your convenience:
It is possible to change the subtitle language from the one
selected at the initial settings to a different language, if
available.
When the preferred language is not selected even after
pressing the button several times, it means that the
language is not available on the disc.
(This operation works only with discs on which multiple
subtitle languages are recorded.)
When the power is turned on or the disc is removed,
the language heard is the one selected at the initial
settings. If this language is not recorded on the disc, only
the available language on the disc will be heard.
Press SUBTITLE during play.
When no subtitles are recorded
instead of the selected language.
will be displayed
Press SUBTITLE a number of times until the
preferred language is selected.
When this button is pressed once, the first subtitle
recorded on the disc will display. The rest of the subtitles
recorded will display in sequence for every press of the
SUBTITLE button.
NOTE:
In some cases, the subtitle language is not changed
immediately to the selected one.
Viewing From Another Angle
Some DVD discs may contain scenes, which have been
shot simultaneously from a number of different angles.
For these discs, the same scenes can be viewed from
each of these different angles using the ANGLE button.
The number of recorded angles differs depending on the
disc used.
y/x is displayed shortly on the screen during
playback. This indicates that the multi-angle scene has
just started. Also on units display ANGLE message
appears. From that moment on, the yth angle of total x
angles is played and you can change the viewing angle
until the end of the multi-angle scene.
For your convenience:
When the preferred language is not selected even after
pressing the button several times, it means that the
language is not available on the disc.
When the player is restarted or the disc is changed, the
subtitle selection is automatically changed back to the
initial settings.
NOTE:
In SETUP menu, an ANGLE MARK option exists,
which, if enabled, will display a continuous angle mark
on the screen as long as multi-angle scene is available.
If a language is selected, which is not supported by the
disc, the subtitle language will automatically be set to the
discs priority language.
Press ANGLE during play.
Usually a circulation will happen while switching to
another language, that is you can cancel the subtitle by
pressing this button a number of times until Subtitle Off
appears on the screen.
Press ANGLE a number of times until the
preferred viewing angle is selected.
The current angle is changed.
NOTE:
Changing Audio Soundtrack Language
This function will only work on discs where different
angles have been recorded.
It is possible to change the audio language from the one
selected at the initial settings to a different language, if
available.
The viewing angles are shown on the screen. You can
select one from them for viewing.
(This operation works only with discs on which multiple
audio soundtrack languages are recorded, if not
prohibited by the DVD.)
Press AUDIO during play.
Press AUDIO a number of times until the
preferred language is selected.
If you press ANGLE outside of a multi-angle scene on
a multi-angle title, you will see that is displayed.
This means that there are total x angles on that title and
the yth angle has been selected to be played, when the
multi-angle scene starts. means that there is only
one angle currently available.
Ä29
USING A DVD MENU
VIDEO CD PLAYBACK*
Some DVD discs have unique menu structures called
DVD menus. For example, DVDs programmed with
complex contents provide guide menus, and those
recorded with various languages provide menus for
audio and subtitle language. Although the DVD menus
contents and operation differ from disc to disc, the
following explains basic operation when this feature is
used.
Preparations
Press TITLE or MENU on the remote control or on
your unit during play.
3. Place a disc onto the tray
Press on the power button of your audio system if the
player has been connected to an audio system.
Basic Play
1. Press on the standby button
2. Press OPEN/CLOSE to open the disc tray.
The DVD menu available on the disc is now displayed.
Hold the disc without touching either of its surfaces,
position it with the printed title side facing up, align it with
the guides, and place it in its proper position.
NOTE:
4. Press OPEN/CLOSE.
If you press MENU, the root menu of DVD is displayed.
For Video CDs without playback control:
If you press TITLE, the menu of the current title is
displayed.
The disc tray is closed and play commences
Press 3465 to select the preferred item.
A menu screen will appear on the screen after a few
moments.
Press SELECT
For Video CDs provided with playback control:
The selected item is now executed.
MENU PLAY
For your convenience:
You can also use number keys to select a DVD menu
item. The player will automatically execute the item. To
enter an item number which is more than 1 digit, press
+10 key and then enter the item number.
NOTE:
Some DVDs may not contain root and/or title menus.
To resume the playback, select PLAY item in DVD
menu.
This function works only with video CDs with playback
control (version 2.0)
Follow the instructions on the menu screen for
interactive operations.
The details differ depending on the disc concerned.
Also refer to the instructions accompanying the disc.
After steps 1 to 4 above the menus are displayed on the
TV screen
5. Press the number button(s) to select the
preferred item.
The player now starts to play the selected item.
NOTE:
Use +10 button to enter two-digit-numbers.
3465 arrow buttons are not used for selecting
items for video CDs.
*This feature is only available in some models
Ä30
What is playback control?
For your reference:
If a video CD has playback control written on the jacket
of disc, it means that particular scenes or information
can be selected for viewing interactive with TV screen
using the menu screen.
When symbol appears while a button is being
operated on up-left corner of OSD, it means that the
player prohibits the corresponding operation.
Press stop twice.
NOTE:
TITLE button is dedicated to PBC playback control
during VCD* playback. You can change PBC mode with
TITLE button.
For using Repeat Modes you need to switch off PBC
manually.
If you use Search mode PBC automatically switches to
OFF.
PBC ON is default. Whenever you open the tray it will
be ON.
When the menu continues onto another screen
After step 4, press SKIP NEXT
Stopping Play
.
To return to the previous menu screen press SKIP
For your convenience:
When STOP is pressed once, while the play continues,
the unit records the point where the play stopped and
if the PLAY key is pressed, play resumes from the point
where STOP key was pressed. Press PLAY / PAUSE
again, and play will resume from this point. When the tray
is opened or the STOP is pressed again, the resume
function will be cleared.
To stop the play permanently, press STOP twice. When
the STOP button is pressed for the first time, a message
PRESS PLAY TO CONTINUE will appear on the screen
to remind you if you want to continue the play. To stop
the play, press the STOP button again or you can press
PLAY/ PAUSE to continue.
PREV
Stopping play and returning to the menu screen
(when a menu is available on the disc)
Press STOP. Play is suspended, and the disc menu
screen is displayed.
After operation
When the unit is not in use, remove the disc and press
STANDBY to turn off the unit.
RAPID ADVANCE / RAPID REVERSE
Press SEARCH/SLOW (
Fast reverse or
forward) on the remote control or Search
on the main unit during play.
Normal play is resumed when the PLAY/PAUSE button
is pressed.
The speed of advance (
8x,
16x,
4x,
NOTE:
The disc continues to rotate while the menu is
displayed even after the player has finished playing a
particular item. When no further selections are to be
played, be sure to press the STOP button to clear the
menu display.
If the disc is placed upside down (and it is a single sided
disc), the VFD display on the player will indicate NO
DISC.
Fast
or
8x,
2x,
32x) or reverse (
16x,
every press of the
4x,
2x,
32x) changes for
or
button.
Note:
No sound will be heard during Rapid advance or Rapid
reverse.
Ä31
SKIPPING AHEAD OR BACK TO
CHAPTERS
SLOW- MOTION PLAY
Skipping ahead
The screen suspends.
Press SKIP/ FRAME
control or SKIP
(Next) on the remote
on the main unit during play.
A track is skipped each time the button is pressed.
Skipping back
(Previous) on the remote
Press SKIP/ FRAME
control or SKIP
on the main unit during play.
When the button is pressed once midway through a
track, play returns to the start of previous track. When
it is pressed again, a track is skipped.
Press PLAY/PAUSE once during play.
on the remote control
Press SEARCH/SLOW
or Search
on the main unit
You can increase or decrease the speed of the
slow-motion play by pressing SEARCH/SLOW
or
. There are 4 slow motion modes as
1/
1/8,
1/4,
1/2.
16,
The speed of slow motion play is displayed on the
screen each time you change it.
To return normal play press PLAY/PAUSE again.
NOTE:
Reverse slow motion play is not available.
STILL PICTURE (PAUSE)
Press PLAY/PAUSE once during play.
DIRECT SELECTION OF SCENES
The screen suspends.
Selecting Scenes by Time
To return to normal play press PLAY/PAUSE again.
You can view the video CD, starting from any time point
you want.
Press SEARCH MODE on the remote control once
time during playback.
FRAME ADVANCE (STEP)
Press PLAY/PAUSE once during play.
The screen suspends.
Press SKIP/ FRAME
control or SKIP
(Next) on the remote
on the main unit.
The next frame of the movie is displayed.
You can press SKIP/ FRAME
following frames.
NOTE:
Reverse stepping is not available.
(Next) for the
The time search box is displayed on the screen as DISC
GOTO:_: _ _ : _ _
Player goes to entered time of the disc.
Press SEARCH MODE on the remote control two
times during playback.
The time search box is displayed on the screen as
TRACK GOTO:_: _ _ : _ _
Player goes to entered time of the current track.
Press SEARCH MODE on the remote control three
times during playback.
The time search box is displayed on the screen as
SELECT TRACK :_ _ / _ _
Player goes to entered track of the disc.
Enter the time using number buttons.
The title is played beginning from the desired time just
after you enter the time.
Ä32
For your convenience:
CONVENIENT FUNCTIONS
If you attempt to enter a number greater than the total
time of the current title, the time search box disappears
and message appears on up-left corner of screen.
Displaying the time information
If you give up entering the time simply press RETURN
button, and the operation is cancelled.
Each time this button is pressed, a different time
information box is displayed on the screen.
Accessing tracks using number buttons:
If Single elapsed is displayed, the VFD display on the
unit shows the elapsed time for the title which is being
played
You can play any track you want, just by pressing the
corresponding number button.
For the track numbers which are greater than 9
use +10 button. Press this button once and then
type the two digit track number.
Press DISPLAY during play.
If Single remain is displayed, the VFD display on the
unit shows the remaining time for the title which is being
played.
If Total Elapsed is displayed, the elapsed time for the
disc is being displayed.
If you attempt to enter a number greater than the total
number of tracks on disc, message is displayed on
the screen.
If Total remain is displayed the remaining time for the
disc is being displayed.
REPEAT PLAY
Displaying a scene with a larger and closer view
Repeat Viewing
Press REPEAT during play.
Each time this button is pressed, a different repeat box
is displayed on the screen.
If
again.
All is displayed, the whole disc will be played
Track is displayed, the current track will be
If
played again.
Repeating sections between two specific points.
(A B repeat)
Press A-B during play at the point where repeat
play is to commence (A).
A is displayed on screen.
Press A-B again at the point where repeat play is
to be concluded (B).
AB is displayed and the repeat-play of the selection
between points A and B starts.
Pressing the DISPLAY key for the fifth time closes display
menu screen.
This zoom-in function enables you to take a closer look
at the scene you are viewing. This is especially a
considerate function when you are watching science
fiction or adventure movie.
Press ZOOM during play.
Zoom On is displayed on the screen and the picture is
now larger. You can change the zooming ratio by
pressing ZOOM button more
than once. There are
1/2,
1/3 and
2,
3,
4,
1/4 zoom
modes.
NOTE:
You can move in the picture ie, change the zoomed
location by using the 3465 arrow keys. This is valid
for zoom-in only.
To return to normal play
To return to normal play
Press A-B again. A-B Repeat is disabled.
After zoom ratio is 1/4x, press ZOOM again. The picture
is now in its normal size.
Ä33
AUDIO CD PLAYBACK
Preparations
Press on the power button of your audio system if the
player has been connected to an audio system.
Basic Play
To stop the play permanently, press STOP twice. When
the STOP button is pressed for the first time, a message
PRESS SELECT TO CONTINUE will appear on the
screen to remind you if you want to continue the play.
To stop the play, press the STOP button again or you can
press PLAY/ PAUSE to continue.
RAPID ADVANCE / RAPID REVERSE
2. Press OPEN/CLOSE to open the disc tray.
Press SEARCH/SLOW (
Fast reverse or
Fast forward) on the remote control or Search
or
on the main unit during play.
3. Place a disc onto the tray
The speed of advance (
1. Press on the standby button
Hold the disc without touching either of its surfaces,
position it with the printed title side facing up, align it with
the guides, and place it in its proper position.
4. Press OPEN/CLOSE.
Play is commenced.
8x,
2x,
16x,
4x,
2x,
4x,
32x) or reverse (
8x,
16x,
32x)
or
button. You
changes for every press of the
can also resume normal play using these buttons.
Normal play is resumed when the SELECT button is
pressed or PLAY/PAUSE button is pressed again.
After operation
When the unit is not in use, remove the disc and press
STANDBY to turn the unit off.
NOTE:
No sound will be heard during rapid advance or
rapid reverse.
NOTE:
If the disc is placed upside down (and it is a single sided
disc), the VFD display on the player will indicate NO
DISC.
Skipping Ahead or Back to Tracks
Skipping ahead
Press SKIP/ FRAME
For your reference:
When symbol appears while a button is being
operated, it means that the player prohibits the
corresponding operation.
Stopping Play
Press stop twice.
For your convenience:
When STOP is pressed once, while the play continues,
the unit records the point where the play stopped and
if the PLAY key is pressed, play resumes from the point
where STOP key was pressed. Press PLAY / PAUSE
again, and play will resume from this point. When the tray
is opened or the STOP is pressed again, the RESUME
function will be cleared.
control or SKIP
(Next) on the remote
on the main unit during play.
A track is skipped each time the button is pressed.
Skipping back
Press SKIP/ FRAME
control or SKIP
(Previous) on the remote
on the main unit during play.
When it is pressed again, a track is skipped.
PAUSE
Press PLAY/PAUSE once during play.
The play suspends.
To return to normal play press PLAY/PAUSE again.
Ä34
DIRECT SELECTION OF TRACKS
REPEAT PLAY
Selecting by Time
Press REPEAT during play.
You can play the audio CD starting from any time point
you want.
Each time this button is pressed, a different repeat box
is displayed on the screen.
Press SEARCH MODE on the remote control once
time during playback.
Track is displayed, the current track will be
If
played again.
The time search box is displayed on the screen as DISC
GOTO:_: _ _ : _ _
If
again.
Player goes to entered time of the disc.
If SCAN is displayed, first 12 seconds of all tracks
on the disc are played sequentially.
Press SEARCH MODE on the remote control two
times during playback.
The time search box is displayed on the screen as
TRACK GOTO:_: _ _ : _ _
All is displayed, the whole disc will be played
If RANDOM is displayed, tracks on the disc are played
randomly and continously.
Player goes to entered time of the current track.
NOTE:
Press SEARCH MODE on the remote control three
times during playback.
If the play list is active, the playlist is repeated instead of
the whole disc in Repeat All case.
The time search box is displayed on the screen as
SELECT TRACK :_ _ / _ _
Player goes to entered track of the disc.
Enter the time using number buttons.
The track is played beginning from the desired time just
after you enter the time.
For your convenience:
If you attempt to enter a number greater than the total
time of the current track, the time search box disappears
and symbol is displayed.
If you give up entering the time simply press RETURN
button, and the operation is cancelled.
Accessing tracks using number buttons
You can play any track you want, just by pressing the
corresponding number button.
Repeating sections between two specific points
(A B repeat).
Press A-B during play at the point where repeat
play is to commence (A).
A is displayed.
Press A-B again at the point where repeat play is
to be concluded (B).
AB is displayed and the repeat-play of the
selection between points A and B starts.
To return to normal play
Press A-B again. A-B Repeat is disabled.
CONVENIENT FUNCTIONS
Displaying the time information
Press DISPLAY during play.
For the track numbers which are greater than 9
use +10 button. Press this button once and then
type the two-digit track number.
Each time this button is pressed, an information box is
displayed on TV screen to indicate the status of the time
displayed on the VFD display.
If you attempt to enter a number greater than the total
number of tracks on disc, symbol is displayed on
screen.
If Time Display: Single elapsed is displayed, the VFD
display on the unit shows the elapsed time for the track
which is being played.
If Time Display: Single remain is displayed, the VFD
display on the unit shows the remaining time for the track
which is being played.
Ä35
If Time Display: Total elapsed is displayed, the VFD
display on the unit shows the elapsed time for the disc
which is being played.
If Time Display: Total remain is displayed, the VFD
display on the unit shows the remaining time for the disc
which is being played.
Program Function
Press PROGRAM to select program mode
Program list appears.
Enter numbers of tracks that you want to add to program
list.
Select NEXT to go to the next program page.
Select PREV to go to the previous program page.
Select START to start program mode.
Screen is cleared and files in the program list are played
sequentially.
Press PROGRAM to see the program list.
Select STOP to stop program mode.
Select EXIT to stop program mode.
For your convenience:
You can remove the last track of the playlist by
pressing the C button.
You can clear screen when the program list is
displayed on screen by pressing PROGRAM button.
The program remains even after the Program Play ends
The program is cancelled when:
- The disc tray is opened or closed
- The power is turned off.
Ä36
CD MENU
7. Press SELECT on a file to play
MP3 File :
Selected MP3 starts to play.
To see the directory structure(menu) of JPEG/MP3 CDs
you should set CD MENU option to WITH MENU in setup
page.
Elapsed or Remaining Time is displayed according to
DISPLAY Mode.
JPEG File :
Selected JPEG is displayed in full screen.
Slide Show starts automatically.
PAUSE
Press PLAY/PAUSE once during play.
If CD MENU option is set to NO MENU, MP3 or JPEG
content is automatically played without displaying menu.
The play suspends. PAUSE message appears on
screen.
To return to normal play press PLAY/PAUSE again.
BASIC PLAY
1. Press on the STANDBY
STOPPING PLAY
2. Press OPEN/CLOSE to open the disc tray
Press STOP
3. Place a CD-R disc onto the tray
The play is stopped.
Hold the disc without touching either of its surfaces,
position it with the printed title side facing up, align it with
the guides, and place it in its proper position.
Rapid Advance / Rapid Reverse
4. Press OPEN/CLOSE to close the disc tray
/
Press
play speed.
DISC LOADING message appears on screen. Please
wait for a moment.
CD MENU appears. Directories are on the left part and
files in the selected directory are on the right part.
5. Press UP/DOWN to select files
In the stop mode or while playing MP3 the user can
navigate in the current directory.
6. Press SELECT,LEFT,RIGHT to switch between
directories & files
On the right part:
Press LEFT to switch to directories.
On the left part :
Press RIGHT to switch to files. Selected directory content
is displayed on the left after reading directory.
NOTE:
you can use
file list.
and
buttons for page up / down in
Only for MP3 :
4x,
during play to decrease/increase
32x,
16x,
8x,
4x,
2x, PLAY,
2x,
8x,
16x,
32x are the play speed modes.
SKIPPING AHEAD OR BACK TO
TRACKS
Press
/
during play to jump to the
previous/next file.
Next file in the current directory will be played.
Ä37
IMAGE TRANSFORMATION
DIGEST MODE
Only for JPEG :
Only for JPEG :
Press PLAY to start slide show
Press PLAY to start slide show
There are four modes of transformation:
press STOP button during JPEG slide show. Unit goes
into digest mode. 12 pictures are displayed on screen.
Invert
Using the arrow keys select menu icon on the screen.
Press select button.
Mirror
Left
Remote key Function screen appears. You can see help
information for digest mode.
Right
These operations are allowed only when a picture is
being displayed normally, and will be cancelled
automatically when a new picture is displayed. The
arrow keys are used to select different transformation
modes.
Press UP to invert/normal
Press DOWN to mirror/normal
Press LEFT to turn left
Press RIGHT to turn right
Program key
Each time you press program key transition effect is
changed. You can select one of the following transition
effects: Wipe top, Wipe bottom, Wipe left, Wipe right,
Diagonal wipe left top, Diagonal wipe right top, Diagonal
wipe left bottom, Diagonal wipe right bottom, Extend form
center H, Extend from center V, Compress to center H,
Compress to center V, Window H, Window V, Wipe from
edge to center, Random, None.
Press Skip frame
(next) key.
Next 12 pictures are displayed.
ZOOM
Press Skip frame
Only for JPEG :
Press PLAY to start slide show
It is provided both ZOOM in/out and Zoom pan functions
for JPEG pictures.
(previous) key.
Previous 12 pictures are displayed.
Press Menu key to cancel the digest mode.
Press ZOOM to turn on/off this function
Search Mode
When this mode is on, any picture will be displayed at the
last ratio selected by the user.
With SEARCH MODE key you can select the files in the
current folder or you can perform time search in
currently playing MP3 file.
A message will indicate the current ratio on screen.
If zoom mode is on,
Press
/
to control the ratio of zoom in/out.
The zoom ratios are %50 and %75 for zoom out and
%100, %125, %150 and %200 for zoom in. (The order
is: %50, %75, %100, %125, %150, %200)
With ZOOM mode off, a picture is scaled to fit the whole
screen.
NOTE:
During ZOOM function, slideshow transition and image
transformation are disabled.
Repeat Modes
In CD MENU it is displayed at the bottom.
Display Function
Press DISPLAY to change displayed time mode
There are two time modes :
Single Elapsed
Single Remain
Time is displayed only during MP3 playback.
Ä38
Play Modes
PROGRAM FUNCTION
1. Press STOP.
2. Press RIGHT to go to Play Modes menu.
Press PROGRAM to select program mode in stop
mode
3. Press UP/DOWN to change play mode.
PROGRAM LIST Message appears.
Press UP/DOWN keys to select files in the disc.
The options available are:
Press LEFT/RIGHT to change column.
REPEAT ONE:
Press SELECT to add selected file into the
program list.
If this option is chosen, the selected track will be
repeated continuously.
REPEAT FOLDER:
Choose any file from the program list and use
PLAY or SELECT keys to start the program.
If this option is chosen, the selected folder will be
repeated continuously.
DISC:
When this Play mode is selected, the disc will be played
once.
DISC REPEAT:
When this Play mode is selected, the disc will be played
continuously.
Files in the program list are played sequentially.
DISC SCAN:
If a MP3 file is played;
When this Play mode is selected, the first 12 seconds of
all tracks disc will be played.
Press STOP.
FOLDER:
When this Play mode is selected, the current folder will
be played once.
If a JPEG file is displayed;
Press MENU.
Press PROGRAM to quit program mode.
NORMAL MODE message appears.
For your convenience:
You can remove the last track of the playlist by
pressing the C button.
The program remains even after the Program Play ends
The program is cancelled when:
- The disc tray is opened or closed
- The power is turned off.
Ä39
USING SETUP MENU
In Play or (Pre-Stop) mode, some pages and some items
can not be accessed. On the MAIN page, you can not
access VIDEO SETUP and PARENTAL SETUP pages in
RESUME mode.
Press SETUP button on the remote control.
Note:
The setup menu-main page appears. This is the menu,
where you can change the devices settings.
In any submenu, to return to main page, select MAIN
PAGE and press SELECT button.
To close the setup menu, press SETUP.
USING MAIN PAGE
Select items using
buttons.
65v
up/down arrow
When selected, the item will be highlighted.
Press SELECT to enter the submenu for
highlighted item.
The submenu for the selected item appears on the
screen.
Note: To close the setup menu, select EXIT SETUP and
press SELECT, or press SETUP.
USING SUB MENUS
Once you enter any submenu,
Use 65 up/down arrow buttons to move the
highlighted position up and down.
Use 3 4 left/right arrow buttons to switch
between left and right menus.
Press SELECT to choose the highlighted option
on the right menu.
Some items on Setup Menu will only be
available when the player is not playing a disc.
Ä40
MENU ITEMS
The options available are:
Normal/PS Pan & Scan (4x3)
Allows the movie to fill the entire screen of your TV, but
not the right and left edges.
VIDEO SETUP
VIDEO SETUP page will not be available if the
player is Play or (Pre-Stop) mode.
TV DISPLAY
The aspect ratio of the picture provided by the DVD
player can be varied in line with the features available
on the TV in use.
Normal/LB Letterbox (4x3)
Allows you to see movies in their original aspect ratio.
You will see the entire frame of the movie, but it will
occupy a smaller portion of the screen.
Wide Widescreen (16x9)
Choose this setting if your DVD player is connected to
a widescreen TV.
Please Note:
Depending on the format of the DVD disc, e.g. 2.35:1 the
picture may still have black lines above and below the
picture.
Ä41
TV TYPE
The video standard of the DVD player output can be
selected from MULTI, NTSC or PAL.
If MULTI is selected, the output standard will be either
NTSC or PAL depending on the DVD being played.
If PAL is selected, the video output will be converted to
PAL standard irrespective of disc standard.
VIDEO OUTPUT
The video output of the DVD player can be selected as
S-VIDEO or RGB.
If S-VIDEO is selected, RGB output via scart will be
disabled, only CVBS will be active via Scart. S-Video
output will be active via MiniDIN connector. After
switching to S-Video, TV should be switched to S-Video
input with TV remote control. If S-Video is selected in
order to disable RGB via Scart and user prefers to watch
CVBS via scart, TV should be switched to Scart input
with TV remote control.
If RGB is selected, S-Video output will be disabled.
Scart output will be CVBS + RGB.
Ä42
AUDIO SETUP
DOWNMIX MODE
This mode allows the DVD player analog audio outputs
to be matched to the features available on the TV in use.
Analog audio outputs can be selected as
DYNAMIC (DYNAMIC RANGE
COMPRESSION )
Boosts frequency response. This item can be selected
between OFF and FULL.
LPCM OUTPUT
This item can be selected as LPCM 96K or LPCM 48K.
SURROUND: Surround sound output.
STEREO: Two channels stereo.
Use this option if you have a stereo TV or a stereo HIFI system.
OFF: Downmix mode off. Multichannel analog audio is
available.
Do not use this option if your DVD player is not connected
to a multichannel TV or multichannel AV receiver. It is
particularly important not to enable speakers, which are
not present. Otherwise serious sound quality problems
may occur..
NIGHT MODE
NOTE:
If downmix mode is enabled, that is, one of SURROUND,
STEREO or V SURR options are selected, SPEAKER
page in setup menu will be disabled since this page
contains speaker settings related with multi-channel
audio out. If you disable DOWNMIX mode, speaker page
will be activated again.
This item allows you to enable/disable the night time
listening mode.
In night time listening mode high volume levels are limited.
Ä43
SURROUND MODE
This mode allows to activate the speakers beyond the
left/right with two channel input.
Matrix: Six channel output with surround effect.
PL2 Music: Dolby Prologic II music mode.
PL2 Movie: Dolby Prologic II movie mode.
Off: Surround mode off.
NOTE:
Matrix and Pro Logic modes can be enabled only if the
downmix mode is off.
Ä44
SPEAKER SETUP
CENTER DELAY
Center speaker surround time delay. You can adjust the
delay times or you can disable delay for center speaker.
CENTER
This item allows you to enable/disable the CENTER
speaker.
REAR DELAY
You can adjust the delays of rear speakers or you can
disable delay for rear speakers.
REAR
This item allows you to enable/disable the REAR (Left
surround, right surround) speakers.
TEST TONE
You can test all your speakers using test tone function.
A noise signal will be sent to all speakers one by one.
SUBWOOFER
You can enable/disable the subwoofer by changing the
option to ON/OFF.
Ä45
LANGUAGE SETUP
OSD LANG
You can select the default OSD language of the player
menus.
AUDIO
You can select the default audio language if supported
by the DVD disc.
DISC MENU
You can select the DVDs disc menu language among
these languages. Disc menu appears in the selected
language, if supported by the DVD disc.
SUBTITLE
You can select the default subtitle language if supported
by the DVD disc.
Ä46
PARENTAL SETUP
CHANGE PASSWORD
Using this item you can change the current password.
Playing some DVDs can be limited depending on the age
of users. The Parental Control function allows
playback limitation level to be set by the parent.
To change the password you will be prompted to enter
your old password. After you have entered your old
password, you can now enter the new 4-digit
password.
PARENTAL (PARENTAL LEVEL)
Entering the new password once is not enough, it should
also be confirmed. Confirm pwd box is for confirming
new password.
Parental Level can be adjusted to one of the eight levels.
Level 8 ADULT adjustment let you watch all of the DVD
titles ignoring the DVD discs parental level. You can
watch the DVD discs, which has the same or lower
parental level than the players level only.
PASSWORD
Password to change the parental level can be set by
using this option. Factory preset of the password is
0000
You have to enter XXXX digital password every time you
want to change the parental level. If you forget your
password please contact technical service.
Press select to move to confirm password box.
You can use C key to delete the incorrect entry.
Ä47
PREFERENCES
CD MENU
This option allows you to enable or disable the CD MENU
which is used for playing MP3 or JPEG CDs.
ANGLE MARK
This option allows you to turn on /off the angle mark on
the screen, which is displayed to indicate that a multi
angle scene has started. It also shows which angle you
are currently watching.
DEFAULT
If you choose RESET and press SELECT, the factorypresets are loaded. Parental level and parental
password does not change.
STANDBY
Standby activation feature can be disabled or standby
activation time can be adjusted using this option. If one
of the time options is selected, standby is activated,
whenever no key is pressed for the selected time
duration in stop mode.
TRANSPARENCY
Using this option one of four transparency levels can be
selected for the on screen display.
Ä48
TROUBLESHOOTING
7KHSLFWXUHTXDOLW\LVSRRU'9'
Make sure the disc surface is not damaged. (Scratch, fingerprint etc.)
Clean the disc and try again.
-See instructions described in page 6 to clean your disc properly.
Ensure that the disc is in the drawer with the label uppermost.
A damp disc or condensation may effect the equipment. Wait for 1 to 2
hours in Stand-by to dry the equipment.
'LVFGRHVQRWSOD\
No disc in the machine.
-Place a disc onto the tray.
Disc incorrectly loaded.
-Ensure that the disc is in the drawer with the label uppermost.
Wrong type of disc.
-Use disc in supported formats described in page 2.
The region code of the disc must match the one of the player.
:URQJ26'ODQJXDJH
Select the language in the set-up menu.
7KHODQJXDJHIRUWKHVRXQGRUVXEWLWOHVRQD'9'FDQQRWEHFKDQJHG
Multilingual sound and/or subtitles not recorded on the disc.
Try to change the sound or subtitles using discs title menu. Some discs do
not allow the user to change these settings without using the disc’s menu
6RPHIXQFWLRQV$QJOH=RRPHWFGRQRWZRUN
These functions are not available on the disc.
Angle can only be changed when the angle symbol is displayed.
1RSLFWXUH
Check that the player is connected to TV properly and that all connections
between the DVD player and other attached equipment are secure.
Have you pressed the correct buttons on the remote control? Try once more.
1RVRXQG
Check the volume is set to an audible level.
Make sure you have not switched the sound off accidentally.
'LVWRUWHGVRXQG
Check that the appropriate listening mode setting is correct.
$XGLRLVQRWDYDLODEOH
Make sure that Disk contains 5.1 Audio and it is selected
Make sure that in Audio Setup, Downmix mode is OFF.
Check that speakers are on in Speaker Setup in Audio Setup.
Make sure that you connected the speakers correctly.
1RUHVSRQVHIURPUHPRWHFRQWURO
Make sure the remote control is in the correct mode.
Check batteries are fitted correctly.
Change the batteries.
,IQRWKLQJZRUNV
If you have tried the above solutions and none seem to work, try switching your
DVD player off and on again. If this does not work, contact your supplier or
DVD player repair technician.
1HYHUDWWHPSWWRUHSDLUDGHIHFWLYH'9'SOD\HU\RXUVHOI
Ä49
SPECIFICATIONS
DVD / VIDEO CD* / CD player/ Radio / Amplifier
3RZHU
5HTXLUHPHQWV
7\SHVRI'LVFV
6XSSRUWHG
9LGHR7\SH
9LGHR,QSXW
2SWLRQDO
9LGHR2XWSXW
$XGLR7\SH
$XGLR2XWSXW
$XGLR,QSXWV
'LJLWDO$XGLR
2XWSXW
2SWLRQDO
3RZHUDPSOLILHU
7XQHUVHFWLRQ
'LPHQVLRQV
*This feature is only available in some models
Ä50
DEFINITION OF TERMS
Angle
Recorded onto some DVDs are scenes, which have been simultaneously shot from a number of different angles (the same scene
is shot from the front, from the left side, from the right side, etc.). With such discs, the ANGLE button can be used to view the scene
from different angles.
Chapter Number
These numbers are recorded on DVDs. A title is subdivided into many sections, each of which are numbered, and specific parts of
video presentations can be searched quickly using these numbers.
DVD
This refers to a high-density optical disc on which high-quality pictures and sound have been recorded by means of digital signals.
Incorporating a new video compression technology (MPEG II) and high-density recording technology. DVD enables aesthetically pleasing
full-motion video to be recorded over long periods of time (for instance, a whole movie can be recorded).
DVD has a structure consisting of two 0.6-mm thin discs, which are adhered to each other. Since the thinner the disc, the higher the
density at which the information can be recorded, a DVD has a greater capacity than a single 1,2 mm thick disc. Since the two thin
discs are adhered to each other, there is the potential to achieve double-sided play sometime in the future for even longer duration
play.
Playback Control
This is recorded on a Video CD* (Version 2.0). The scenes or information to be viewed (or listened to) can be selected interactively
with the TV monitor by looking at the menu shown on the TV monitor.
Subtitles
These are printed lines appearing at the bottom of the screen, which translate or transcribe the dialogue. They are recorded on the
DVDs.
Time Number
This indicates the playtime, which has elapsed from the start of a disc or a title. It can be used to find a specific scene quickly. (Not
all discs permit the time search feature to be used. Availability is determined by the discs manufacturer.)
Title Number
These numbers are recorded on DVD. When a disc contains two or more movies, these movies are numbered as title 1, title 2, etc.
Track Number
These numbers are assigned to the tracks, which are recorded on AudioCDs. They enable specific tracks to be located quickly.
Video CD*
This contains recordings of pictures and sound whose quality is on a par with that of videotape. This player also supports Video CDs
with playback control (Version 2.0).
Dolby Digital
Many movie theatres are equipped with 5.1 channel surround systems. This same type of technology is available to you in your home.
To enjoy full 5.1-channel surround, your DVD player must be connected to an external Dolby Digital decoder via the digital outputs
(either coaxial or optical).
Dolby Pro Logic
This is Dolby Laboratories technology to decode Dolby Surround encoded programs actively. Dolby Surround programs have four
channels of audio (Left, Center, Right and Surround) encoded into a standard 2-channel stereo signal. The rear channel is monaural.
PCM
PCM stands for Pulse Code Modulation and is digital audio.
MPEG
Short for Moving Picture Experts Group. This is an international standard for compression of moving images. On some DVDs digital
audio has been compressed and recorded in this format.
*This feature is only available in some models
MANUFACTURED FOR MITSUBISHI ELECTRIC