1
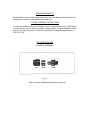
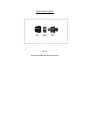
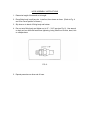
Technical Bulletin
Bulletin No.: PRO-07-01
Effective Date: 9/5/77
Subject: OBSOLESCENCE
Cancels: PRO-07-01 dated 11/10/76
Page: 1 of 7
3/8” AND 7/16” I.D. HOSE “SHORT”
FITTINGS
Effective October 1, 1977, this will announce the obsolescence of the “Short” hose fitting
(Ref. Fig. 1) and nut (Ref. Fig. 2). The “Short” sleeve will remain available under piece
numbers 292615 for 3/8” I.D. hose and 292753 for 7/16” I.D. hose. This will provide
availability of the “Short” sleeves for use with the “Short” nuts in the field. The “Old”
design “Long” fitting body, nut and sleeve again will be the standard H.V.S.G. hose fitting
and will retain their previous piece numbers.
INTERCHANGEABILITY
Combinations of new and old design components can be intermixed except that the old
design sleeve cannot be used with the new design nut.
FITTING ASSEMBLY INSTRUCTIONS
It is important that both new and old design sleeve be assembled correctly. While failure
to install sleeves correctly does not present a safety problem, incorrect installation of the
sleeve in the fitting may result in the hose assembly not meeting the requirements of
F.M.V.S.S. 106.
OLD SLEEVE DESIGN
(CORRECT ASSEMBLY)
Fig. 4
Sleeve must be installed with short slots toward nut.
NEW DESIGN SLEEVE
FIG. 5
Must be installed with slots toward nut.
HOSE ASSEMBLY INSTRUCTIONS
1. Determine length of hose and cut to length.
2. Place fitting body in soft jaw vice. Install nut, then sleeve on hose. (Refer to Fig. 4
and 5 for correct position of sleeve.)
3. Slip hose on to barrel of fitting body and bottom.
4. Run nut onto fitting body and tighten nut to “0” – 3/16” gap (see Fig. 6). Use wrench
on body nut hex and hold hose when tightening, being careful not to twist, bend, kink
or collapse hose.
FIG. 6
5. Repeat procedure on other end of hose.
HOSE ASSEMBLY (WITHOUT SWIVEL END)
INSTALLATION INSTRUCTIONS
NOTE: It is recommended that in such installations where two (2) stationary
components are to be connected by a hose assembly, that a swivel type connector be
used on one end. However, if a swivel connector is not available, it is recommended
that the following procedure be followed to eliminate twisting of hose.
1. Install hose assembly into one component and tighten. (Use pipe sealer if desired.)
2. Loosen hose nut on other end of hose assembly until hose is free to turn on barrel of
fitting.
3. Install fitting body into component and tighten securely. (Use pipe sealer if desired.)
4. To compensate for hose twist that will occur when hose nut is tightened, twist the
hose counterclockwise before tightening hose nut.