1
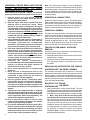
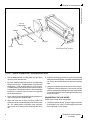
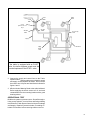
SD-08-2416
®
Bendix® Trailer System-Guard™ Air Dryer
3/8 - 16 UNC x .50 Deep
Mounting Holes (4)
21
CONTROL OUTLET
11
CONTROL INLET
22
SUPPLY OUTLET
12
SUPPLY INLET
ALL SUPPLY & CONTROL PORTS 1/4" NPT
FIGURE 1 - TRAILER SYSTEM-GUARD™ AIR DRYER
DESCRIPTION
The Bendix® Trailer System-Guard™ air dryer removes
moisture and contaminates from the trailer air system. It is
not intended to take the place of a dryer normally located
on the power unit. It acts as a buffer to remove moisture
during wet times and gives up water vapor during dry times.
It protects the trailer air brake system when, for short periods
of time, the trailer is pulled by vehicles without an air dryer
or during times when the trailer is disconnected from the
tractor.
The Trailer System-Guard™ air dryer consists of two
desiccant air dryers mounted in a single housing, one to
protect the trailer service system and the other to protect
the trailer supply system.
PREVENTIVE MAINTENANCE
Every 300 operating hours, 8,000 miles, or one (1)
month:
1. Visually inspect for physical damage or wear to the Trailer
System-Guard™ air dryer. This can include, but is not
limited to, chaffed or broken air hoses and or broken or
missing parts.
2. Check mounting bolts for tightness. If loose re-torque
per "Mounting the Trailer System-Guard™ Air Dryer".
Every 900 operating hours or 25,000 miles or every
three (3) months:
Check for moisture in the air brake system by opening
reservoirs, drain cocks, or valves and checking for the
presence of water. If moisture is present the tractor and
trailer should be checked for leaks. If leakage is not
excessive check the tractor air dryer for proper operation.
If defective, the tractor dryer should be repaired, rechecking
trailer reservoirs again after 3 months. If the tractor dryer
operates satisfactorily and the trailer has not been
connected to a tractor without an air dryer and the trailer
glad hands were not open to the atmosphere for some
extended period of time, the trailer dryer should be replaced.
If the trailer has been connected to a tractor without an air
dryer or the trailer has been parked for an extended period
of time, the trailer should be coupled to a tractor with an air
dryer. This will help the trailer air dryer remove moisture
from the trailer. Place the unit back in service and recheck
for moisture after 3 months.
1
WARNING! PLEASE READ AND FOLLOW
THESE INSTRUCTIONS TO AVOID
PERSONAL INJURY OR DEATH:
When working on or around a vehicle, the following
general precautions should be observed at all times.
1. Park the vehicle on a level surface, apply the
parking brakes, and always block the wheels.
Always wear safety glasses.
2. Stop the engine and remove ignition key when
working under or around the vehicle. When
working in the engine compartment, the engine
should be shut off and the ignition key should be
removed. Where circumstances require that the
engine be in operation, EXTREME CAUTION should
be used to prevent personal injury resulting from
contact with moving, rotating, leaking, heated or
electrically charged components.
3. Do not attempt to install, remove, disassemble or
assemble a component until you have read and
thoroughly understand the recommended
procedures. Use only the proper tools and observe
all precautions pertaining to use of those tools.
4. If the work is being performed on the vehicle’s air
brake system, or any auxiliary pressurized air
systems, make certain to drain the air pressure from
all reservoirs before beginning ANY work on the
vehicle. If the vehicle is equipped with an AD-IS™
air dryer system or a dryer reservoir module, be
sure to drain the purge reservoir.
5. Following
the
vehicle
manufacturer’s
recommended procedures, deactivate the electrical
system in a manner that safely removes all
electrical power from the vehicle.
6. Never exceed manufacturer’s recommended
pressures.
7. Never connect or disconnect a hose or line
containing pressure; it may whip. Never remove a
component or plug unless you are certain all
system pressure has been depleted.
8. Use only genuine Bendix ® replacement parts,
components and kits. Replacement hardware,
tubing, hose, fittings, etc. must be of equivalent
size, type and strength as original equipment and
be designed specifically for such applications and
systems.
9. Components with stripped threads or damaged
parts should be replaced rather than repaired. Do
not attempt repairs requiring machining or welding
unless specifically stated and approved by the
vehicle and component manufacturer.
10. Prior to returning the vehicle to service, make
certain all components and systems are restored
to their proper operating condition.
11. For vehicles with Antilock Traction Control (ATC),
the ATC function must be disabled (ATC indicator
lamp should be ON) prior to performing any vehicle
maintenance where one or more wheels on a drive
axle are lifted off the ground and moving.
2
Note: The Trailer System-Guard™ air dryer is intended to
remove moisture and other contaminants normally found in
the air brake system. Using alcohol, anti-freeze, oil or other
de-icing substances in the brake system can damage the
air dryer and will therefore void the Trailer System-Guard™
air dryer warranty.
OPERATION & LEAKAGE TESTS
Build the air system to governor cutout. Shut off the engine.
Using a soap solution, check all lines and fittings leading to
and from the Trailer System-Guard™ air dryer for leakage
and integrity. Repair any excessive leaks - exceeding a 1"
bubble in 5 seconds-before restoring vehicle to service.
OPERATION: GENERAL
The trailer dryer works as a buffer, removing moisture during
exposure to wet air (trailer hooked to a tractor without an air
dryer, or trailer is parked for extended periods with open
glad hands) and giving up water vapor when reconnected to
a tractor equipped with an air dryer. The Trailer SystemGuard™ air dryer depends on dry tractor air to remove water
vapor from the desiccant collected during wet times.
TRAILER SYSTEM-GUARD™ AIR DRYER
REMOVAL
This removal process is presented for the replacement of
the Trailer System-Guard™ air dryer.
1. Identify and disconnect the four air hoses from the Trailer
System-Guard™ air dryer.
2. Remove the locknuts, washers and grommets that secure
the Trailer System-Guard™ air dryer and remove it from
the vehicle.
REPLACING OR RETROFITTING THE TRAILER
SYSTEM-GUARD™ AIR DRYER: GENERAL
The following instructions are presented for reference
purposes only, since Bendix aftermarket replacement Trailer
System-Guard™ air dryers are packaged with the most upto-date installation instructions. The instructions packaged
with the Trailer System-Guard™ air dryers should be followed
in lieu of those presented here.
MOUNTING THE TRAILER
SYSTEM-GUARD™ AIR DRYER
1. After positioning the Trailer System-Guard™ air dryer
according to the location requirements, mark the position
of the predrilled mounting holes on the selected location.
A template for the mounting pattern is included on page
4. Note: Only three of the four mounting holes
must be used for securing the air dryer to the frame
rail. Securing the air dryer at all four mounting holes
can lead to damage and eventual failure of the air dryer.
Any three of the four mounting holes can be used for
installation. Selection is at the discretion of the installer.
If mounting the dryer on a trailer cross member center
the template to maximize clearance and facilitate
installation. Note: Check the vehicle manual before
drilling the selected location.
CONTROL
IN
SUPPLY LINE -CHARGING
CONTROL
OUT
SUPPLY
OUT
SUPPLY
IN
SUPPLY LINE - PARKING
CONTROL
IN
CONTROL
OUT
SUPPLY
IN
SUPPLY
OUT
CONTROL
IN
CONTROL LINE - BRAKE APPLICATION
SUPPLY
IN
CONTROL
IN
CONTROL
OUT
SUPPLY
OUT
CONTROL LINE - BRAKE RELEASE
SUPPLY
IN
FIGURE 2 - TRAILER SYSTEM-GUARD™ AIR DRYER OPERATION (VIEWED FROM MOUNTING HOLE SIDE)
CONTROL
OUT
SUPPLY
OUT
3
Template 10.25 inches
Template for mounting holes
Grommet
Vise Grip
Clamping Area
Grommet
Stud
Frame Rail
Washer
Locknut
Trailer System Guard™ Air Dryer
FIGURE 3 - TRAILER SYSTEM-GUARD™ AIR DRYER INSTALLATION
2. Drill the three marked mounting holes into the frame
rail using a 5/8" diameter drill.
3. By hand, install the studs into the three corresponding
holes on the air dryer. To tighten attach vise grips to the
studs within 1" of the air dryer and turn 1/4 to 1/2 turns.
Thread damage on the stud in the area near the air dryer
is acceptable. Care should be taken to prevent damage
to the last 1-1/2 inches of the stud at the end opposite
the air dryer end cover.
4. Place a rubber grommet with the flat side toward the air
dryer over each of the installed studs.
5. Align and insert the air dryer mounting studs with
grommets into the 3 mounting holes on the vehicle frame
rail. The raised portion or shoulder of the grommets
must fit into the mounting holes drilled into the frame
rail.
4
6. Install the remaining grommets on each of the mounting
studs with the raised portion or shoulder toward the frame
rail. Ensure the shoulder fits into the frame rail mounting
hole.
7. Using the flat washer and locknut secure the air dryer.
Tighten the locknuts using a 9/16" wrench turn until the
locknut, washer and outside grommet just make contact
(no actual compression of the rubber grommet) then turn
two(2) more turns.
CONNECTING THE AIR HOSES
Follow Figure 4 for air hose arrangement.
1. The Trailer System-Guard™ air dryer supply and control
line fittings are 1/4"-18 NPT. Cut the supply and control
lines and install 1/4 inch fittings.
Template for mounting holes
2.0 inches
"11 IN
CONT"
"12 IN
SUP"
Spring
Brake
Trailer
System-Guard™ Air
Dryer
"21 OUT
CONT"
"22 OUT
SUP"
R-12™ Relay
Valve
Supply
Spring
Brake
Valve
Reservoir
If the trailer is equipped with an R-12P™
valve, the trailer systems guard must be
mounted upstream of the R-12P™ valve.
FIGURE 4 -TRAILER SYSTEM-GUARD™ AIR DRYER PLACEMENT
2. Connect the supply and control lines to the Trailer
System-Guard™ air dryer making sure to keep the control
and supply circuits separate as shown. Do not switch
lines end to end. All ports are identified as indicated in
figures 1 and 2.
3. Affix the Alcohol Warning Decal to the trailer bulkhead.
Before applying the decal remove all oil and road
contaminants from the mounting location with a good
cleaning solvent.
OPERATIONAL TEST
Build the air system to governor cutout. Shut off the engine.
Using a soap solution, check all lines and fittings leading
to and from the Trailer System-Guard™ air dryer for leakage
and integrity. Repair any excessive leaks - exceeding a 1"
bubble in 5 seconds - before restoring vehicle to service.
5
TEMPLATE INCLUDED - DO NOT REDUCE THIS DOCUMENT
6
BW2083 © 2004 Bendix Commercial Vehicle Systems LLC All rights reserved. 7/2004 Printed in U.S.A.