1
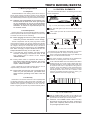
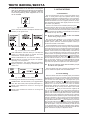
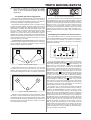
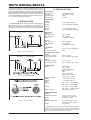
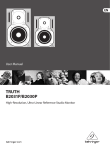
Version 1.0 August 2003 ENGLISH B2030A/B2031A TRUTH Users Manual TRUTH B2030A/B2031A IMPORTANT SAFETY INSTRUCTIONS DETAILED SAFETY INSTRUCTIONS: 1) Read these instructions. 2) Keep these instructions. 3) Heed all warnings. 4) Follow all instructions. CAUTION: WARNING: To reduce the risk of electric shock, do not remove the top cover (or the rear section). No user serviceable parts inside; refer servicing to qualified personnel. To reduce the risk of fire or electric shock, do not expose this appliance to rain and moisture. This symbol, wherever it appears, alerts you to the presence of uninsulated dangerous voltage inside the enclosurevoltage that may be sufficient to constitute a risk of shock. This symbol, wherever it appears, alerts you to important operating and maintenance instructions in the accompanying literature. Please read the manual. 5) Do not use this device near water. 6) Clean only with a dry cloth. 7) Do not block any ventilation openings. Install in accordance with the manufacturers instructions. 8) Do not install near any heat sources such as radiators, heat registers, stoves, or other apparatus (including amplifiers) that produce heat. 9) Do not defeat the safety purpose of the polarized or grounding-type plug. A polarized plug has two blades with one wider than the other. A grounding type plug has two blades and a third grounding prong. The wide blade or the third prong are provided for your safety. If the provided plug does not fit into your outlet, consult an electrician for replacement of the obsolete outlet. 10) Protect the power cord from being walked on or pinched particularly at plugs, extension cords, and the point at which they exit the unit. 11) Only use attachments/accessories specified by the manufacturer. 12) Use only with the cart, stand, tripod, bracket, or table specified by the manufacturer, or sold with the device. When a cart is used, use caution when moving the cart/ device combination to avoid injury from stumbling over it. 13) Unplug this device during lightning storms or when not used for long periods of time. 14) Refer all servicing to qualified service personnel. Servicing is required when the unit has been damaged in any way, such as power supply cord or plug is damaged, liquid has been spilled or objects have fallen into the device, the unit has been exposed to rain or moisture, does not operate normally, or has been dropped. 2 TRUTH B2030A/B2031A TRUTH High-Resolution, Active 2-Way Reference Studio Monitor B2030A/B2031A s Ultra-linear frequency response from 50 Hz to 21 kHz with individual frequency diagrams s Built-in 75- and 35-Watt (B2031A: 150- and 75-Watt) power amps with enormous power reserve s Ultra high-resolution ferrofluid-cooled tweeter s Long-throw 6 ¾" woofer (B2031A: 8 ¾") with special polypropylene diaphragm and deformation-resistant aluminum die-cast chassis s Controlled dispersion characteristics and extremely large sweet spot owing to the unique BEHRINGER wave guide technology s Active crossover network with 4th order Linkwitz-Riley filters s Adjustable to a wide range of acoustic conditions and subwoofer operation s Separately controlled limiter for low and high frequency overload protection s Automatic standby mode (defeatable, only B2031A) s Magnetic shielding allows placement near computer monitors s Delivered as matched pairs with individual frequency diagrams s Low-vibration and environment-friendly E1 MDF cabinet s Servo-balanced inputs with XLR and ¼" TRS connectors s Designed in Germany. Manufactured under ISO9000 certified management system 3 TRUTH B2030A/B2031A FOREWORD TABLE OF CONTENTS Dear Customer, welcome to the team of BEHRINGER users, and thank you very much for expressing your confidence in us by purchasing this studio monitor. Writing this foreword for you gives me great pleasure, because it represents the cul mination of many months of hard work delivered by our engineering team to achieve a very ambitious goal: to present two outstanding nearfield monitors, whose neutral sound makes them ideal for studio use. The task of designing our new B2030A and B2031A certainly meant a great deal of responsibility, which we assumed by focusing on you, the discerning user and musician. Meeting your expectations also meant a lot of work and night shifts. But it was fun, too. Developing a product usually brings a lot of people together, and what a great feeling it is when all who participated in such a project can be proud of what theyve achieved. It is our philosophy to share our enjoyment with you, because you are the most important member of the BEHRINGER team. With your highly competent suggestions for new products youve made a significant contribution to shaping our company and making it successful. In return, we guarantee you uncompromising quality as well as excellent technical and audio properties at an extremely reasonable price. All of this will enable you to give free rein to your creativity without being hampered by budget constraints. We are often asked how we manage to produce such highquality devices at such unbelievably low prices. The answer is quite simple: its you, our customers! Many satisfied customers mean large sales volumes enabling us to get better purchasing terms for components, etc. Isnt it only fair to pass this benefit on to you? Because we know that your success is our success too! I would like to thank all of you who have made the TRUTH possible. You have all made your own personal contributions, from the developers to the many other employees at this company, and to you, the BEHRINGER user. My friends, its been worth the effort! 1. INTRODUCTION ......................................................... 4 1.1 Before you get started ................................................... 5 1.1.1 Shipment ............................................................... 5 1.1.2 Initial operation ...................................................... 5 1.1.3 Warranty .............................................................. 5 2. CONTROL ELEMENTS ............................................... 5 3. APPLICATIONS .......................................................... 6 3.1 3.2 3.3 3.4 Connection ...................................................................... 6 Level setting ................................................................... 6 Speaker placement suggestions .................................... 7 Adapting the TRUTH to the room acoustics ................... 7 4. INSTALLATION ........................................................... 8 5. SPECIFICATIONS ....................................................... 8 6. WARRANTY ................................................................ 9 1. INTRODUCTION Congratulations! With our new BEHRINGER TRUTH you have purchased one of the best high-resolution active studio monitors available. It is a tool that reproduces your program material with highest fidelity and balance, positioning sound sources accurately on the stereo basis. The TRUTH features two separate amplifiers for bass and high frequencies, sporting loads of power reserve. On the bass end, a long-excursion woofer embedded in a sturdy castaluminum casing springs into action. The scope is broadened downward by using a special bass reflex system. In the upper frequency range, a specially developed dome tweeter provides for subtle signal reproduction. The chassis and the amplifiers are protected from overload using a sophisticated circuitry. The speakers are magnetically shielded, so you can use your TRUTH near computer monitors or TV sets. The audio signal is separated using an active crossover that guarantees accurate frequency separation and perfect tuning of both speakers among each other. We recommend that you experiment with your TRUTH away from the pressures of a recording session, in order to get a feel for it. It will be a good idea to listen to your favorite CDs over the TRUTH, so that you can get an impression of the neutral sound this speaker produceswhich might be somewhat unusual at first! + Thank you very much, The following users manual is intended to familiarize you with the units control elements, so that you can master all the functions. After having thoroughly read the users manual, store it at a safe place for future reference. Uli Behringer ATTENTION! + 4 The TRUTH is capable of producing extreme volumes. Please bear in mind, that high sound pressures do not only temporarily damage your sense of hearing, but can also cause permanent damage. Be careful to select a suitable volume. 1. INTRODUCTION TRUTH B2030A/B2031A 1.1 Before you get started 2. CONTROL ELEMENTS 1.1.1 Shipment The control elements described in the following are the same on both loudspeakers. The B2030A/B2031A was carefully packed at the factory to assure secure transport. Should the condition of the cardboard box suggest that damage may have taken place, please inspect the unit immediately and look for physical indications of damage. + Damaged units should NEVER be sent directly to us. Please inform the dealer from whom you acquired the unit immediately as well as the transportation company from which you took delivery of the unit. Otherwise, all claims for replacement/repair may be rendered invalid. Fig. 2.1: Front panel display elements (here: B2030A) ON. This LED lights up as soon as you switch on the speaker. 1.1.2 Initial operation LIMIT. Lights up as soon as one of the built-in protections is activated. Please make sure the unit is provided with sufficient ventilation, and never place the TRUTH on top of an amplifier or in the vicinity of a heater to avoid the risk of overheating. + Before plugging the unit into a power socket, please make sure you have selected the correct voltage: The fuse compartment near the power plug socket contains three triangular markings. Two of these triangles are opposite one another. The voltage indicated adjacent to these markings is the voltage to which your unit has been set up, and can be altered by rotating the fuse compartment by 180°. ATTENTION: This does not apply to export models that were for example manufactured only for use with 120 V! + + If you alter the units voltage, you must change the fuse accordingly. The correct value of the fuse needed can be found in the chapter SPECIFICATIONS. Fig. 2.2: Rear panel connectors All connectors of the TRUTH face downwards, so as to allow you to place the speaker as closely to a wall as possible. INPUT. These are the balanced inputs of your TRUTH, laid out as 1/4" TRS and XLR connectors. The mains connection is achieved via the standard IEC connector. A matching power cord is included. Faulty fuses must be replaced with fuses of appropriate rating without exception! The correct value of the fuses needed can be found in the chapter SPECIFICATIONS. FUSE COMPARTMENT/VOLTAGE SELECTION: Before plugging the unit into a power socket, please make sure you have selected the correct voltage. Faulty fuses must be replaced with fuses of appropriate rating without exception. Some units feature a fuse compartment that can be operated in two different positions, allowing alternating between 230 V and 120 V. Attention: when using the unit outside of Europe (running on 120 V), you have to implement a fuse with a higher rating. Power is delivered via the cable enclosed with the unit. All requiered safety precautions have been adhered to. + Please make sure that the unit is grounded at all times. For your own protection, you should never tamper with the grounding of the cable or the unit itself. 1.1.3 Warranty Please take a few minutes and send us the completely filled out warranty card within 14 days of the date of purchase. You may also register online at www.behringer.com. The serial number needed for the registration is located on the rear of the unit. Failure to register your product may void future warranty claims. Fig. 2.3: The POWER switch + Use the POWER switch to power up your TRUTH. The POWER switch should always be in the Off position when you are about to connect your unit to the mains. Attention: The POWER switch does not fully disconnect the unit from the mains. Unplug the power cord completely when the unit is not used for prolonged periods of time. 2. CONTROL ELEMENTS 5 TRUTH B2030A/B2031A + The TRUTH should be the last device in the signal chain to be switched on and the first to be switched off. This way, loud switch-on thumps that can occur when powering other equipment on or off can be avoided. Fig. 2.4: INPUT TRIM control INPUT TRIM. Use this control to adapt the TRUTHs input sensitivity to the signal source. 3. APPLICATIONS 3.1 Connection Use the enclosed power cord to connect the TRUTH to the mains. To avoid ground loops, both speakers and the mixing console should be fed from the same outlet. For your convenience, the B2031A features an automatic power-up system which activates the TRUTH as soon as a signal is present on its input, and deactivates the speaker after signal pauses of more than five minutes (only B2031A). Function: The switch for the automatic power-up system has three positions. When set to OFF, the speaker is completely switched off and cannot be activated with the POWER switch . Position AUTO allows the automatic operation as mentioned above. In position ON, the B2031 is activated all the time and can be switched off only with switch . + Be sure to switch the TRUTH off with the POWER switch during longer pauses. Now connect both speakers to your console by means of commercial XLR or TRS cables. Since the TRUTH is an active speaker system, instead of conventional speaker cables you will need normal TRS or XLR cables. Fig. 2.5: Rear panel control elements LOW FREQUENCY. With this switch you can adapt the woofer to a subwoofer system or emulate the sound characteristics of small speaker systems. ROOM COMPENSATION. For maximum flexibility the TRUTH features a switch that adjusts the speaker depending on its setup position. HIGH FREQUENCY. This switch adapts the speaker's frequency response to the damping characteristics of the control room. Connect the TRUTH to the control room outputs of your console, so as to be able to control the monitoring volume independently of the main mix level. If your console does not have such outputs, you can also use the main mix outputs. However, in this case the speaker volume cannot be set independently of the main mix level, i.e. you must adjust the monitoring volume on the TRUTH. Please consult the operating instructions accompanying your console to find out whether it has balanced or unbalanced outputs. Connect these outputs to the TRS or XLR input. If possible use the balanced connectors, so as to avoid interference and hum. It wont help, however, to connect unbalanced outputs with balanced inputs. The benefits mentioned above will apply only when both inputs and outputs are of the balanced type. + Be sure to mute the signal sources before you put the TRUTH into operation. Once the TRUTH has been connected as described above, you can activate the speaker with the POWER switch. 3.2 Level setting Fig. 2.6: Rear panel control elements The following control elements are found only on the B2031A: POWER MODE. This switch allows you to toggle between ON, OFF and AUTO power-up modes (see chapter 3.1). MUTE LOW. Disables the woofer for servicing and maintenance. MUTE HIGH. Disables the tweeter for servicing and maintenance. 6 When the TRUTH has been connected properly and switched on, you can now turn up the console output that feeds the B2030A/B2031A. Provided you have a signal source connected, you now hear the audio material as it is played back by the TRUTH. The INPUT TRIM control on the rear panel is set to 0 dB ex-factory, i.e. unity gain, which is okay when you feed the TRUTH from a pro-level console. In this case, the TRUTH automatically operates at maximum level, provided that your console has been set up correctly and its output is set to 0 dB. The LIMIT LED helps you control the level. It lights up as soon as overloading causes one of the internal protections to respond. The TRUTH doesnt get damaged when the LIMIT LED lights up with occasional signal peaks. However, please make sure that it wont light up all the time, because sooner or later this will activate the thermal protection system and temporarily mute the built-in amplifiers, to warn you that you are driving the TRUTH too hard. If so, you can reduce levels either on your console or using the INPUT TRIM control . If the outputs on your console dont provide studio-level signals, you can turn up the INPUT TRIM control. If you connect the TRUTH to the preamp output of your stereo system, it may also be necessary to raise the level on the TRUTH itself. To build up a rudimentary stereo system, you can directly connect the outputs of a CD player to the TRUTHs inputs, and use the CD player to adjust the volume. 3. APPLICATIONS + TRUTH B2030A/B2031A The TRUTH is capable of producing high volume levels. You should mix your recordings at moderate levels, so as to avoid listening fatigue and hearing impairment. 3.3 Speaker placement suggestions Fig. 3.3: TRUTH setup horizontally Since the sound of a speaker depends to a great extent on its surroundings, placing your TRUTH correctly is very important. Please try to follow these suggestions through. Your efforts will be rewarded with better sound and higher resolution. Not only the physical location of speakers but also the acoustic characteristics of the room have a substantial effect on the way your TRUTH sounds. Make sure that the room neither sounds too hall-like nor too dullbasically, neither like a bathroom nor totally without an echo. You can alter the room acoustics easily by installing or removing carpets, curtains or furniture. Fabric covering on the wall opposite the speakers might be a good idea if the room is too reflective. The next chapter describes how to adapt the TRUTH to the room acoustics, once it has been set up properly. Both speakers are built identically. There is no need to concern yourself with which speaker should be placed left and which speaker should be placed right. Place the TRUTH on a flat and stable surface, if possible use a dedicated speaker stand. In this way, the speaker is acoustically decoupled and wont induce vibrations in nearby objects, which would affect the bass response. If you cannot use a stand, put the TRUTH on spikes or damping foam material. Another aspect is the distance between speaker and wall: keep the speaker away from the wall, as this would emphasize the bass response, particularly in corners, where two walls form an angle. The BEHRINGER TRUTH B2030A/B2031A are so-called nearfield monitors, which means that the impact of the room acoustics on the sound will be reduced considerably owing to the short distance between speaker and listener. 3.4 Adapting the TRUTH to the room acoustics This chapter describes how you can use the switches on the rear of the B2030A/B2031A to adapt the speaker to the acoustics of your control room. However, you should try to improve a potentially impaired sound by optimizing the loudspeaker placement beforehand. Fig. 3.4: Rear panel legending Fig. 3.1: Incorrect speaker setup This illustration shows how you shouldnt do it: you can clearly see that a portion of the sound bounces back from the walls before it reaches the listeners ears. Thus, direct and reflected sound waves overlap which results in a coloration of the sound. Fig. 3.2: Correct speaker setup This effect can be reduced by turning the speakers towards the listener. To make reflections from ceiling or floor less likely, the tweeters should be on the same height as your ears. Please note that the TRUTH should be operated vertically. Where this is impossible, place it horizontally as shown in figure 3.3, to allow for an improved stereo image. If you are still having problems, you could try the following: allows you to lower the The ROOM COMPENSATION switch bass range, depending on the speaker position. Ex-factory, the switch is set to a neutral position. If youve set up the TRUTH close to the wall or in a corner, try reducing the low-frequency level in steps of 2 dB. Since every room and speaker setup are unique in their acoustic properties, we cannot provide more specific information here. The same applies to the HIGH FREQUENCY switch , which determines the tweeter level (between +2 dB and -4 dB). Here too, the best setting depends on the room acoustics. If you have an additional subwoofer installed, you can attenuate the TRUTHs lower cutoff frequency using the LOW FREQUENCY switch . This can be necessary when adapting the TRUTH to your subwoofer. Trust your own aural instinct, but dont forget: Listening at high volume levels over long periods leads to listening fatigue and thus reduces your ability to judge the sound. Consequently, we recommend regular pauses to keep your hearing healthy. As a general rule, you should set up and adjust the TRUTH with great care. Above all, you should take your time: unlike hi-fi speakers, the B2030A/B2031A is tuned to produce a neutral sound, which can be confusing when you are working for the first time with such a high-quality speaker. Dont try to adjust the TRUTH with its rear panel switches to produce a bombastic sound that impresses you or other listeners. To get a feeling for the TRUTHs sound, you should listen to as many records as possible that were produced in other studios. We also recommend that you listen to your own recordings over as many other systems as possible, for example, your car system. If you find that your mixes are somewhat dull in their overall sound, the reason might be too much treble from your TRUTH. On the other hand, if you set the bass level too high, you will find that your mixes lack bass power. Tuning a speaker can take several days time, so once again: take your time! 3. APPLICATIONS 7 TRUTH B2030A/B2031A It might be necessary to insert an equalizer between console and speaker, in particular, if you prefer extreme setups or sound images. The BEHRINGER ULTRACURVE PRO DEQ2496 has proven its usefulness in practice, as it is not only a simple equalizer but also features a real-time analyzer. You can use our measuring microphone ECM8000 to automatically adapt the TRUTH to your room or modify its frequency response. 4. INSTALLATION The BEHRINGER TRUTH features one balanced XLR and one balanced 1/4" TRS input. If connecting to other equipment is possible using balanced inputs, always make such connections because they offer maximal compensation of disturbing signals. Fig. 4.1: 1/4" TS connector 5. SPECIFICATIONS AUDIO INPUTS XLR connector 1/4" TRS Input impedance Max. input level servo-balanced input servo-balanced input 10 kΩ +22 dBu COMPONENTS B2030A Tweeter Woofer ¾" ferrofluid-cooled dome 6 ¾" polypropylene diaphragm B2031A Tweeter Woofer 1" ferrofluid-cooled dome 8 ¾" polypropylene diaphragm AMPLIFIERS B2030A Low frequency High frequency Noise max. 75 Watts max. 35 Watts <10 dBA @ 1 m (each) B2031A Low frequency High frequency Noise max. 150 Watts max. 75 Watts <10 dBA @ 1 m (each) CROSSOVER Type Crossover frequency active, 4th order Linkwitz-Riley 2 kHz SYSTEM SPECIFICATION B2030A Frequency response Sound pressure level 50 Hz to 21 kHz max. 113 dB SPL @ 1 m (pair) B2031A Frequency response Sound pressure level 50 Hz to 21 kHz max. 116 dB SPL @ 1 m (pair) POWER SUPPLY Voltage Fig. 4.2: 1/4" TRS connector Power consumption B2030A B2031A Fuse B2030A B2031A Mains connection DIMENSIONS/WEIGHT B2030A Dimensions (H x W x D) Fig. 4.3: XLR connectors Weight B2031A Dimensions (H x W x D) Weight USA/Canada 120 V~, 60 Hz Europe/U.K./Australia 230 V~, 50 Hz Japan 100 V~, 50 - 60 Hz General export model 120/230 V~, 50 - 60 Hz 0.5 A, standby 120 mA 1.1 A, standby 120 mA 100 - 120 V~: T 2 A H 250 V 200 - 240 V~: T 1 A H 250 V 100 - 120 V~: T 5 A H 250 V 200 - 240 V~: T 2.5 A H 250 V Standard IEC connector 12 1/2" (317 mm) x 8 2/5" (214 mm) x 8 1/3" (211 mm) 9 7/8 kg (21 2/3 lbs) 15 3/4" (400 mm) x 9 13/16" (250 mm) x 11 3/8" (290 mm) 15 kg (33 lbs) BEHRINGER is constantly striving to maintain the highest professional standards. As a result of these efforts, modifications may be made from time to time to existing products without prior notice. Specifications and appearance may differ from those listed or illustrated. 8 5. SPECIFICATIONS TRUTH B2030A/B2031A 6. WARRANTY § 1 WARRANTY CARD/ONLINE REGISTRATION To be protected by the extended warranty, the buyer must complete and return the enclosed warranty card within 14 days of the date of purchase to BEHRINGER Spezielle Studiotechnik GmbH, in accordance with the conditions stipulated in § 3. Failure to return the card in due time (date as per postmark) will void any extended warranty claims. Based on the conditions herein, the buyer may also choose to use the online registration option via the Internet (www.behringer.com or www.behringer.de). § 2 WARRANTY 1. BEHRINGER (BEHRINGER Spezielle Studiotechnik GmbH including all BEHRINGER subsidiaries listed on the enclosed page, except BEHRINGER Japan) warrants the mechanical and electronic components of this product to be free of defects in material and workmanship for a period of one (1) year* from the original date of purchase, in accordance with the warranty regulations described below. If the product shows any defects within the specified warranty period that are not excluded from this warranty as described under § 3 and 4, BEHRINGER shall, at its discretion, either replace or repair the product using suitable new or reconditioned parts. In the case that other parts are used which constitute an improvement, BEHRINGER may, at its discretion, charge the customer for the additional cost of these parts. 2. If the warranty claim proves to be justified, the product will be returned to the user freight prepaid. 3. Warranty claims other than those indicated above are expressly excluded. § 3 RETURN AUTHORIZATION NUMBER 1. To obtain warranty service, the buyer (or his authorized dealer) must call BEHRINGER (see enclosed list) during normal business hours BEFORE returning the product. All inquiries must be accompanied by a description of the problem. BEHRINGER will then issue a return authorization number. 2. Subsequently, the product must be returned in its original shipping carton, together with the return authorization number to the address indicated by BEHRINGER. 3. Shipments without freight prepaid will not be accepted. § 4 WARRANTY REGULATIONS 1. Warranty services will be furnished only if the product is accompanied by a copy of the original retail dealers invoice. Any product deemed eligible for repair or replacement under the terms of this warranty will be repaired or replaced. 2. If the product needs to be modified or adapted in order to comply with applicable technical or safety standards on a national or local level, in any country which is not the country for which the product was originally developed and manufactured, this modification/adaptation shall not be considered a defect in materials or workmanship. The warranty does not cover any such modification/adaptation, irrespective of whether it was carried out properly or not. Under the terms of this warranty, BEHRINGER shall not be held responsible for any cost resulting from such a modification/adaptation. 3. Free inspections and maintenance/repair work are expressly excluded from this warranty, in particular, if caused by improper handling of the product by the user. This also applies to defects caused by normal wear and tear, in particular, of faders, crossfaders, potentiometers, keys/buttons, tubes and similar parts. 4. Damages/defects caused by the following conditions are not covered by this warranty: s improper handling, neglect or failure to operate the unit in compliance with the instructions given in BEHRINGER user or service manuals. s connection or operation of the unit in any way that does not comply with the technical or safety regulations applicable in the country where the product is used. s damages/defects caused by force majeure or any other condition that is beyond the control of BEHRINGER. 5. Any repair or opening of the unit carried out by unauthorized personnel (user included) will void the warranty. 6. If an inspection of the product by BEHRINGER shows that the defect in question is not covered by the warranty, the inspection costs are payable by the customer. 7. Products which do not meet the terms of this warranty will be repaired exclusively at the buyers expense. BEHRINGER will inform the buyer of any such circumstance. If the buyer fails to submit a written repair order within 6 weeks after notification, BEHRINGER will return the unit C.O.D. with a separate invoice for freight and packing. Such costs will also be invoiced separately when the buyer has sent in a written repair order. § 5 WARRANTY TRANSFERABILITY This warranty is extended exclusively to the original buyer (customer of retail dealer) and is not transferable to anyone who may subsequently purchase this product. No other person (retail dealer, etc.) shall be entitled to give any warranty promise on behalf of BEHRINGER. § 6 CLAIM FOR DAMAGES Failure of BEHRINGER to provide proper warranty service shall not entitle the buyer to claim (consequential) damages. In no event shall the liability of BEHRINGER exceed the invoiced value of the product. § 7 OTHER WARRANTY RIGHTS AND NATIONAL LAW 1. This warranty does not exclude or limit the buyers statutory rights provided by national law, in particular, any such rights against the seller that arise from a legally effective purchase contract. 2. The warranty regulations mentioned herein are applicable unless they constitute an infringement of national warranty law. * Customers in the European Union please contact BEHRINGER Germany Support for further details. The information contained in this manual is subject to change without notice. No part of this manual may be reproduced or transmitted in any form or by any means, electronic or mechanical, including photocopying and recording of any kind, for any purpose, without the express written permission of BEHRINGER Spezielle Studiotechnik GmbH. BEHRINGER is a registered trademark. ALL RIGHTS RESERVED. © 2003 BEHRINGER Spezielle Studiotechnik GmbH. BEHRINGER Spezielle Studiotechnik GmbH, Hanns-Martin-Schleyer-Str. 36-38, 47877 Willich-Münchheide II, Germany Tel. +49 2154 9206 0, Fax +49 2154 9206 4903 6. WARRANTY 9