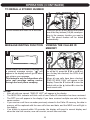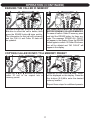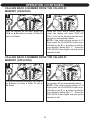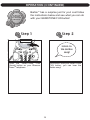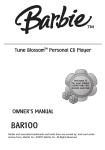
1
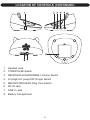
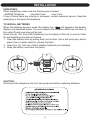
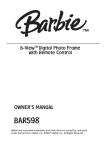
Blossom PhoneTM
Caller ID * Telephone
See page 19
for your hidden
GEMSTONE FUN
button surprise!
OWNER'S MANUAL
BAR550
(*Requires a subscription to the Caller ID service from your local telephone company.)
Barbie and associated trademarks and trade dress are owned by, and used
under license from, Mattel, Inc. ©2007 Mattel, Inc. All Rights Reserved.
SAFETY PRECAUTIONS
CAUTION
RISK OF ELECTRIC SHOCK
DO NOT OPEN
CAUTION: TO REDUCE THE RISK OF ELECTRIC SHOCK, DO NOT
REMOVE COVER (OR BACK). NO USER-SERVICEABLE PARTS INSIDE.
REFER SERVICING TO QUALIFIED SERVICE PERSONNEL.
DANGEROUS VOLTAGE:
The lightning flash with arrowhead symbol within an equilateral triangle is intended
to alert the user to the presence of uninsulated dangerous voltage within the product’s enclosure that may be of sufficient magnitude to constitute a risk of electric
shock to persons.
ATTENTION:
The exclamation point within an equilateral triangle is intended to alert the user to
the presence of important operating and maintenance (servicing) instructions in the
literature accompanying the appliance.
CAUTION–ELECTRICALLY
OPERATED PRODUCT:
TO PREVENT FIRE OR SHOCK HAZARD,
DO NOT USE THIS PLUG WITH AN EXTENSION CORD, RECEPTACLE OR OTHER
OUTLET UNLESS THE BLADES CAN BE
FULLY INSERTED TO PREVENT BLADE
EXPOSURE. TO PREVENT FIRE OR
SHOCK HAZARD, DO NOT EXPOSE THIS
APPLIANCE TO RAIN OR MOISTURE.
Not recommended for children under 5 years
of age. As with all electric products, precautions should be observed during handling
and use to prevent electric shock.
1.
2.
3.
4.
5.
6.
7.
Read and understand all instructions.
Follow all warnings and instructions marked on this product.
Unplug this product from the wall telephone jack and power outlet before cleaning. Do not use
liquid cleaners or aerosol cleaners. Use a damp cloth for cleaning.
Do not use this product near water–for example: near a bathtub, washbowl, kitchen sink or
laundry tub; in a wet basement; or near a swimming pool.
Do not place this product on an unstable cart, stand, tripod, bracket or table. This product may
fall, causing serious injury and serious damage to the product.
Slots and openings in the cabinet and in the back or bottom are provided for ventilation and to
ensure reliable operation of this product and to protect it from overheating. These openings
must not be blocked or covered. The openings should never be blocked by placing the product
on a bed, sofa, rug or other similar surface. This product should never be placed near or over
a radiator or heat source. This product should not be placed in an enclosed environment unless
proper ventilation is provided.
This product should be operated only from the type of power source indicated on the marking
label. If you are not sure of the type of power supply to your home, consult your dealer or local
power company.
1
8.
9.
10.
11.
12.
SAFETY PRECAUTIONS
Do not allow anything to rest on the power cord. Do not locate this product where the cord will
be abused by persons walking on it. Do not attach power cord to building surfaces.
Do not overload wall outlets and extension cords as this can result in the risk of fire or electric
shock.
Never push objects of any kind into this product through openings as they may touch dangerous voltage points or short out parts that could result in fire or electric shock. Never spill or
spray any type of liquid on this product.
To reduce the risk of electric shock, do not disassemble this product, but take it to a qualified
serviceman when some service or repair work is required. Opening or removing covers may
expose you to dangerous voltages or other risks. Incorrect reassembly can cause electric shock
when the appliance is subsequently used.
Unplug this product from the wall outlet and refer servicing to qualified service personnel under
the following conditions:
a. When the power-supply cord or plug is damaged or frayed.
b. If this product has been exposed to rain or water.
c. If this product does not operate normally by following the operating instructions. Adjust only
those controls that are covered by the operating instructions, as an adjustment of other controls
may result in damage and will often require extensive work by a qualified technician to restore
the product to its normal operation.
d. If this product has been dropped or the cabinet has been damaged.
13.
14.
15.
16.
17.
18.
19.
20.
e. If the product exhibits a distinct change in performance.
Avoid using a telephone (other than a cordless type) during an electrical storm. There may be
a remote risk of electric shock from lightning.
Do not use the telephone to report a gas leak in the vicinity of the leak.
Never install telephone wiring during a lightning storm.
Never install telephone jacks in wet locations unless the jack is specifically designed for wet
locations.
Never touch uninsulated telephone wires or terminals unless the telephone line has been disconnected at the network interface.
Use caution when installing or modifying telephone lines.
Use only the power cord and batteries indicated in this manual. Do not dispose of batteries in
a fire. They may explode. Check with local codes for possible special disposal instructions.
CAUTION: RISK OF EXPLOSION IF BATTERY IS REPLACED BY AN INCORRECT TYPE.
DISPOSE OF USED BATTERIES ACCORDING TO THE INSTRUCTIONS.
2
SAFETY PRECAUTIONS
CHANGES IN TELEPHONE COMPANY EQUIPMENT
The telephone company may make changes in its communications facilities, equipment, operations or procedures, where such action is reasonably required and proper
in its business. Should any such changes render the customer’s external equipment
incompatible with the telephone company facilities, the customer shall be given adequate notice to make modifications to maintain uninterrupted service.
GENERAL
The FCC prohibits customer-provided terminal equipment to be connected to party
lines or to be used in conjunction with a coin telephone service.
INSTALLATION
The device is equipped with a USOC RJ11C standard miniature modular jack and is
designed to plug directly into a modular jack.
CONSUMER INFORMATION
This equipment complies with Part 68 of the FCC rules and the requirements adopted
by the ACTA. On the bottom of this equipment is a label that contains, among other
information, a product identifier of US: HU4TE12BBAR550. If requested, this number
must be provided to the telephone company. The applicable jacks (i.e. RJ11C) for this
equipment are provided in the packaging with each piece of approved equipment. The
jacks are certified by Universal Service Order Codes (USOC). A plug and jack used to
connect this equipment to the premises wiring and telephone network must comply with
the applicable FCC Part 68 rules and requirements adopted by the ACTA. A compliant
telephone cord and modular plug are provided with this product. They are designed to
be connected to a compatible modular jack that is also compliant. See installation
instructions for details.
The REN is used to determine the number of devices that may be connected to a telephone line. Excessive RENs on a telephone line may result in the devices not ringing
in response to an incoming call. In most but not all areas, the sum of RENs should not
exceed five (5.0). To be certain of the number of devices that may be connected to a
line, as determined by the total RENs, contact the local telephone company. [For products approved after July 23, 2001, the REN for this product is part of the product identifier that has the format US:AAAEQ##TXXXX. The digits represented by ## are the
3
SAFETY PRECAUTIONS
REN without a decimal point (e.g., 03 is a REN of 0.3). For earlier products, the REN
is separately shown on the label.]
If this equipment causes harm to the telephone network, the telephone company will
notify you in advance that temporary discontinuance of service may be required. But if
advance notice isn’t practical, the telephone company will notify the customer as soon
as possible. Also, you will be advised of your right to file a complaint with the FCC if you
believe it is necessary. The telephone company may make changes in its facilities,
equipment, operations or procedures that could affect the operation of the equipment.
If this happens the telephone company will provide advance notice in order for you to
make necessary modifications to maintain uninterrupted service. If you experience
trouble with this equipment, disconnect it from the network until the problem has been
corrected or until you are sure that the equipment is not malfunctioning.
Please follow instructions for repairing if any (e.g. battery replacement section); otherwise do not alter or repair any parts of device except specified. Connection to party line
service is subject to state tariffs. Contact the state public utility commission, public service commission or corporation commission for information. This equipment is hearing
aid compatible.
NOTICE: If your home has specially wired alarm equipment connected to the telephone line, ensure the installation of this equipment does not disable your alarm equipment. If you have questions about what will disable alarm equipment, consult your telephone company or a qualified installer.
WARNING: Changes or modifications to this unit not expressly approved by the party
responsible for compliance could void the user’s authority to operate the equipment.
4
SAFETY PRECAUTIONS
FCC INFORMATION:
This equipment has been tested and found to comply with the limits for a Class
B digital device, pursuant to Part 15 of the FCC Rules. These limits are
designed to provide reasonable protection against harmful interference in a
residential installation. This equipment generates, uses and can radiate radio
frequency energy and, if not installed and used in accordance with the
instructions, may cause harmful interference to radio communications. However,
there is no guarantee that interference will not occur in a particular installation. If
this equipment does cause harmful interference to radio or television reception,
which can be determined by turning the equipment off and on, the user is
encouraged to try to correct the interference by one or more of the following
measures:
• Reorient or relocate the receiving antenna.
• Increase the separation between the equipment and receiver.
• Connect the equipment into an outlet on a circuit different from that to which
the receiver is connected.
• Consult the dealer or an experienced radio/TV technician for help.
FCC WARNING:
This equipment may generate or use radio frequency energy. Changes or
modifications to this equipment may cause harmful interference unless the
modifications are expressly approved in the instruction manual. The user could
lose the authority to operate this equipment if an unauthorized change or
modification is made.
5
WELCOME
Emerson Radio Corp. has produced this product under license from Mattel. We
have taken great care to make sure your unit was in perfect working order when it
left our factory.
It has been designed to give you many years of enjoyment and trouble-free operation. Read this manual before operating this unit to become familiar with its features. In the event you require technical assistance, please contact the Emerson
Radio Customer Service hotline at 1-800-898-9020. Retain this manual for
future reference.
0-5
WARNING
Choking Hazard–Small Parts and Packaging Materials. Not for children
under 5 years.
• All materials for fastening or packing purposes are not part of the unit and
should be discarded for children’s safety.
• Please keep all information for future reference.
• This is not a toy.
NOTES:
• Please avoid using this unit in places of high temperature or humidity over prolonged periods of time as damage may occur.
• Exposure to direct sunlight in places such as car interiors may cause the unit to
become warped and/or lead to malfunctioning.
• Avoid using or storing this unit in dusty or sandy locations.
6
LOCATION OF CONTROLS
15
1. Receiver
11. Key Buttons (0-9,*,#)
3. Display
13. FLASH Button
2. Transmitter
12. Handset Cord
4. CALL BACK Button
14. NEW CALL Indicator
5. STORE Button
15. GEMSTONE FUN
(Sound) Button
6. ERASE Button
7. REDIAL Button
8. MEMO Button
9. REVIEW UP π Button
10. REVIEW DOWN † Button
7
LOCATION OF CONTROLS (CONTINUED)
1. Handset Jack
2. TONE/PULSE Switch
3. RECEIVER (HIGH/NORMAL) Volume Switch
4. HI (High)/LO (Low)/OFF Ringer Switch
5. MELODY/REGULAR Ring Tone Switch
6. DC IN Jack
7. LINE In Jack
8. Battery Compartment
8
INSTALLATION
UNPACKING:
When unpacking, make sure the following are included:
• BAR550 Telephone
• Handset Cord
• Line Cord
If any of these items are missing or damaged, contact customer service. Keep the
packaging to transport the telephone.
TO INSTALL BATTERIES
When the batteries become weak, the battery icon (
) will appear in the display.
Replace as described below. You must replace the batteries within two minutes, or
the caller ID and memories will be lost.
Insert four (4) “AA” size (UM-3) batteries (not included) in this unit to use the Caller
ID and telephone functions as follows:
1. Open the battery door by pulling back on the latch. Use a ball point pen, pencil,
paper clip or similar object to release the latch.
2. Insert four (4) “AA” size (UM-3) alkaline batteries (not included).
3. Snap the battery door back into place.
CAUTION:
Disconnect the telephone line from the equipment before replacing batteries.
9
INSTALLATION (CONTINUED)
AC OPERATION
To operate the unit using AC power, connect an AC adapter to the DC jack on the
back of the base and to a wall outlet having 120V, 60Hz AC only. The batteries will
work as battery back-up in the event of power failure and will keep all of the functions without interruption. Make sure to only use the supplied adapter, 6V 300mA
with positive center (Z).
This unit can be used on a desk, or other level surface away from excessive heat or
direct sunlight.
1. Set the HI/LO/OFF Ringer switch to HI
or LO to have the ringer sound when
receiving a phone call.
2. Set the TONE/PULSE switch to TONE
or PULSE to match the service provided on your telephone line. If you are
not sure of your service, please contact your telephone company.
3. DO NOT CONNECT TO THE TELEPHONE LINE UNTIL CALLER ID
SETUP IS COMPLETED. Connect the
coiled cord to the handset and base.
Connect the line cord into the jack on
the back of the base.
10
Line Cord
SET-UP INSTRUCTIONS
DO NOT CONNECT the line cord to the wall outlet until the caller ID setup has
been completed. Set the language, contrast, time and date as follows:
TO RESET, press and hold both the †/π buttons simultaneously for four seconds until
“ENTER LANGUAGE” appears.
1
2
Press and hold the † and π button simultaneously for four seconds until "ENTER
LANGUAGE" appears, followed by ENG
(English), ESP (Spanish), FRA (French)
for 20 seconds.
SELECT THE LANGUAGE:
Press the † 1 or π 2 button to select
ENG (English), ESP (Spanish) or FRA
(French). Press the ERASE button 3
to confirm.
3
2
4
3
1
SELECT THE CONTRAST:
Press the † 1 or π 2 button to select
one of the five contrast levels (default is
three). Press the ERASE button 3
to confirm.
5
2
2
2
3
1
3
1
SELECT THE TIME AND DATE:
Press the † 1 or π 2 button to select the
present hour. Press the ERASE button 3 to
confirm. Repeat this step to set the minutes.
3
1
Press the † 1 or π 2 button to select the
present month. Press the ERASE button
3 to confirm. Repeat this step to set the
day. The settings are now complete.
11
PLACING A CALL
1
OPERATION
2
Lift the handset and listen for a dial
tone.
Press the Key buttons (0-9) to dial the
phone number you wish to call.
RECEIVING A CALL
Up to 64 incoming calls are saved in the Caller ID log.
1
2
Make sure that the Caller ID service is turned on by your
phone company. When you receive a call, the display
will show the name of the caller, number, time and date
of the call. The NEW icon will appear in the display and
the NEW CALL indicator will blink. To answer the call,
simply remove the handset from the base. To end a call,
simply return the handset to the base.
1
NOTES:
• If a call is received from an area which does not provide Caller ID service, the
display will show “UNAVAILABLE”.
• If a call is received from a caller that has blocked his/her information, the display
will show, “PRIVATE CALL”.
• If you subscribe to Caller ID, the time and date are automatically set when the
first call is received.
• Calls picked up on the first ring will not be logged in the Caller ID log.
• If there are new calls, the NEW icon will appear in the display and NEW CALL
indicator will blink.
• If a call was received incorrectly or only part of the data was received, the display will show “LINE ERROR”.
12
OPERATION (CONTINUED)
RINGER TONE SWITCH
Your phone features an optional BarbieTM
melody ring tone; the flashing flower petals
indicate incoming calls.
HI/LO/OFF RINGER SWITCH
1
Slide the RING TONE switch to the REGULAR position for the standard ring. Slide
to the MELODY position to hear the
Barbie melody ring; the flashing flower
petals indicate incoming calls.
TONE/PULSE SWITCH
1
1
Slide the HI/LO/OFF Ringer switch to the
HI or LO position to turn the ringer on.
Slide the HI/LO/OFF Ringer switch to the
OFF position to turn the ringer off.
RECEIVER VOLUME SWITCH
1
Slide the TONE/PULSE switch to TONE
or PULSE position to match the service
provided on your telephone line. If you are
not sure of your service, please contact
your telephone company.
To increase/decrease the handset’s volume, slide the RECEIVER Volume switch
to the HIGH or NORMAL position.
REDIAL BUTTON
FLASH BUTTON
1
Press the REDIAL button to automatically
redial the last number dialed.
NOTE: Please note that only the last number you called on this handset can be
stored in the Redial memory.
1
Press the FLASH button to hang up the
phone without having to return it to the
base. This is useful for using the phone
with the Call Waiting feature.
13
OPERATION (CONTINUED)
USING THE TONE BUTTON
1
If you are in the Pulse dialing mode you may still take advantage of touch-tone
services after dialing to respond to touch-tone prompts. To do this, press the
*/TONE button to temporarily change the dialing mode from Pulse to Tone after
dialing in the Pulse mode. This will enable Pulse users to access touchtone
services. It will revert back to Pulse after hanging up.
CALL WAITING
1
If you subscribe to Call Waiting through your local phone company, and you
receive another phone call, simply press the FLASH button to answer the new
call. Press the FLASH button again to return to the original call.
STORING AND DIALING NUMBERS IN THE SPEED-DIAL MEMORY
This telephone has ten speed-dial memories to store up to 10 of your most frequently called numbers for easy two-touch redialing. Each of the 10 memories can
store numbers of up to 16 digits. HOWEVER, ONLY THE LAST 14 DIGITS WILL
APPEAR IN THE DISPLAY.
IMPORTANT: You lift the handset from the cradle to store numbers in the memory.
After a few seconds off the cradle, you will hear the “off the hook/hang up” warning
signal from the phone company. Therefore, if you are going to store more than one
number at a time, please disconnect the line cord from the wall jack to avoid the “off
the hook/hang up” warning signal. REMEMBER TO RECONNECT THE LINE
CORD AFTER YOU FINISH STORING YOUR NUMBERS.
See page 15 for how to store numbers and page 16 for how to dial numbers in the
speed-dial memory.
14
TO STORE
1
OPERATION (CONTINUED)
2
Lift the handset and press the STORE
button. The “STORE” indicator will appear
in the display.
Use the Key buttons (0-9) to enter the first
area code and number that you wish to
store. Remember to enter the number “1”
if necessary. The numbers will appear in
the display as you dial them.
NOTE: If you make a mistake while entering the number, hang up or press the
Hook switch to clear the display and then
start with step 1 again.
3
4
Verify that the number on the display is
correct, then press the STORE button
again. The Memory indicator (“MEM”) will
appear in the display.
Press the number “1” button to store the
displayed number in memory location 1.
Repeat steps 1 through 4 to store up to
nine additional numbers in memories “2”
through “0”
TO CHANGE A STORED NUMBER:
To change one of the stored numbers, simply follow the procedures in steps 1
through 4 and enter a new phone number in the desired memory. The new phone
number will be memorized and the previous phone number will be erased from
the memory.
15
OPERATION (CONTINUED)
TO REDIAL A STORED NUMBER
1
2
1
2
Lift the handset and listen for a dial tone.
MESSAGE WAITING FUNCTION
1
Press the MEMO button 1 and then press
one of the Key buttons (0-9) 2, corresponding to the memory location you want to
dial. The stored number will be dialed
automatically.
VIEWING THE CALLER ID
MEMORY
1
When a caller has recorded a message on
a personal message service, “ ” will
appear in the display and will go out when
you retrieve your message.
This feature is only for subscribers of a
voice mail message waiting service
through the local phone company.
2
1
2
1
To view the new calls (NEW CALL indicator will be lit), press the † 1 or π 2 button. As they are checked, the CALL # will
decrease.
When all new calls have been checked,
“END OF NEW CALL” will appear in the
display. Press the † button 1 to view the
oldest calls or the π button 2 to view the
most recent calls.
NOTES:
• After all calls are viewed, “END OF LIST” will appear in the display.
• The NEW CALL indicator will blink until all new Caller ID information has been reviewed.
• The RPT icon will appear in the display if you have received multiple new calls from the
same number.
• If you receive a call from a number previously viewed in the Caller ID memory, the data in
memory will be replaced with the new call’s time and date, and the NEW icon will light in
the display.
• If no button is pressed within 20 seconds, the display will revert to normal display and
show the total call counter, new call counter, current time and date.
16
OPERATION (CONTINUED)
ERASING THE CALLER ID MEMORY
1
2
3
1
2
ALL NEW CALLS MUST BE REVIEWED
BEFORE ERASING CALLER ID MEMORY.
To erase all calls in Caller ID memory, press
and hold the ERASE button for three seconds. The message “ERASE ALL CALLS”
will appear in the display. Press the ERASE
button again to confirm. All Caller ID information will be deleted and “NO CALLS” will
appear in the display.
To erase a single call, press the † 1 or π
2 button to select the call to delete, then
press the ERASE button 3 twice quickly.
The information for that call will be erased
and the CALL # and Caller ID data will
be updated.
COPYING CALLER ID INFO TO A MEMORY PRESET
1
2
2
1
1
2
Press the STORE button 1 twice: “MEM”
will be displayed on the display. Press the
Key buttons (0-9) 2 to enter the desired
memory location.
Press the † 1 or π 2 button to locate a
caller ID call to be copied into a
memory preset.
Repeat these steps for additional presets.
17
OPERATION (CONTINUED)
CALLING BACK A NUMBER FROM THE CALLER ID
MEMORY (ON-HOOK)
1
2
2
1
With the handset on the base, press the
† 1 or π 2 button to locate a Caller ID
call to be dialed.
Press the CALL BACK button twice to
redial; the display will show “PICK UP
CALL”. Pick up the handset and the number will be automatically dialed.
NOTE: If the caller's phone number is 10
digits, press the CALL BACK button once,
followed by the † or π button to add the
long distance dialing digit "1". Press the
CALL BACK button again and pick up the
handset to dial.
CALLING BACK A NUMBER FROM THE CALLER ID
MEMORY (OFF-HOOK)
1
2
2
1
Press the CALL BACK button twice and
the number will be automatically dialed.
NOTE: If the caller's phone number is 10
digits, press the CALL BACK button once,
followed by the † or π button to add the
long distance dialing digit "1". Press the
CALL BACK button again and pick up the
handset to dial.
Pick up the handset and press the † 1 or
π 2 button to locate a Caller ID call to
be dialed.
18
OPERATION (CONTINUED)
See what you
can do with
your GEMSTONE
FUN button!
BarbieTM has a surprise just for you! Just follow
the instructions below and see what you can do
with your GEMSTONE FUN button!
Step 1
Step 2
Step 1
Step 2
Listen to
the Barbie
song!
Press the GEMSTONE FUN
(Sound) button on your Blossom
TM
Phone telephone.
SURPRISE! With your GEMSTONE
FUN button, you can hear the
Barbie song!
19
TROUBLESHOOTING GUIDE
SYMPTOM
No Dial Tone.
Phone does not
ring.
Voice level too
low.
Unit will not
memory dial.
Unit will not dial
out.
Caller ID not
working
POSSIBLE CAUSE
POSSIBLE SOLUTION
Line cord not connected
correctly.
Connect line cord correctly.
Line cord not connected
correctly.
Connect line cord correctly.
Ringer switch set to OFF
position.
Slide Ringer switch to the HI or
LO position.
Wall jack not working.
Try phone in another wall jack.
Memory locations not set
properly.
Reprogram memory location
numbers as per this manual.
NORM/HIGH switch set to
NORM position.
Loss of power/memory.
TONE/PULSE switch not
set properly.
Loss of Power.
You are not subscribed to
Caller ID service.
Set NORM/HIGH switch to
HIGH position.
Check batteries or AC.
Reprogram memories.
Set TONE/PULSE switch
properly.
Check batteries or AC.
Call your local phone company
to subscribe.
CARE AND MAINTENANCE
1. Clean your phone with a damp (never wet) cloth. Solvent
or detergent should never be used.
2. Avoid operating your unit under direct sunlight or in hot,
humid or dusty places.
3. Keep your unit away from heating appliances.
20
EMERSON RADIO CORP.
LIMITED WARRANTY (Valid in the United States)
Emerson Radio Corp. warrants manufacturing defects in original material, including original parts
and workmanship, under normal use and conditions, for a period of ninety (90) days from the date
of original purchase in the U.S. With your dated proof of purchase, we will provide repair service
at no charge for labor and parts at an authorized Depot Repair Facility, or replace the product in
our discretion. For repair or replacement, pack your unit in a padded box, enclose your check or
money order payable to Emerson Radio Corp. in the amount of $9.00 (not required by California
residents) to cover shipping and handling costs, and enclose a copy of your proof of purchase.
Send your unit to:
Emerson Radio Corp.
5101 Statesman Drive
Irving, TX 75063
This warranty does not cover damage from negligence, misuse, abuse, accident, failure to follow
operating instructions, commercial use, rental, repairs by an unauthorized facility, or products purchased, used, serviced or damaged outside of the United States.
THIS WARRANTY GIVES YOU SPECIFIC LEGAL RIGHTS, AND YOU MAY ALSO HAVE
OTHER RIGHTS WHICH VARY FROM STATE TO STATE.
AU898M
The serial number of your system is located on a label on the bottom cabinet. Please take a
moment now to locate the serial number and write the number in the space provided below. You
may be asked to provide this number when calling for product service.
Model Number:
Serial Number:
BAR550
__________________________________________
21
®
EMERSON WARRANTY (Valid in Canada)
Consumer Electronics, Home Appliances and Home Office Products
®
Thank you for choosing EMERSON !
SYNNEX Canada Limited gives the following express warranty to the original consumer purchaser or gift recipient for this
EMERSON product, when shipped in its original container and sold or distributed in Canada by SYNNEX Canada Limited
or by an Authorized EMERSON Dealer:
SYNNEX Canada Limited warrants that this product is free, under normal use and maintenance, from any defects in
material and workmanship. If any such defects should be found in this product within the applicable warranty period,
SYNNEX Canada Limited shall, at its option, repair or replace the product as specified herein. Replacement parts
furnished in connection with this warranty shall be warranted for a period equal to the unexpired portion of the original
equipment warranty.
This warranty shall not apply to:
a. Any defects caused or repairs required as a result of abusive operation, negligence, accident, improper
installation or inappropriate use as outlined in the owner’s manual.
b. Any EMERSON product tampered with, modified, adjusted or repaired by any party other than SYNNEX Canada
Limited or EMERSON’s Authorized Service Centres.
c. Damage caused or repairs required as a result of the use with items not specified or approved by SYNNEX
Canada Limited, including but not limited to head cleaning tapes and chemical cleaning agents.
d. Any replacement of accessories, glassware, consumable or peripheral items required through normal use of the
product including but not limited to earphones, remote controls, AC adapters, batteries, temperature probe, stylus,
trays, filters, cables, paper, cabinet, cabinet parts, knobs, buttons, baskets, stands, shelves, cookware and
cooking utensils.
e. Any cosmetic damage to the surface or exterior that has been defaced or caused by normal wear and tear.
f. Any damage caused by external or environmental conditions, including but not limited to transmission line/power
line voltage or liquid spillage.
g. Any product received without appropriate model, serial number and CSA /cUL /cULus /cETL /cETLus markings.
h. Any products used for rental or commercial purposes.
i. Any installation, setup and/or programming charges.
Should this EMERSON product fail to operate during the warranty period, warranty service may be obtained upon delivery
of the EMERSON product together with proof of purchase and a copy of this LIMITED WARRANTY statement to an
Authorized EMERSON Service Centre. This warranty constitutes the entire express warranty granted by SYNNEX
Canada Limited and no other dealer, service centre or their agent or employee is authorized to extend, enlarge or transfer
this warranty on behalf of SYNNEX Canada Limited. To the extent the law permits, SYNNEX Canada Limited disclaims
any and all liability for direct or indirect damages or losses or for any incidental, special or consequential damages or loss
of profits resulting from a defect in material or workmanship relating to the product, including damages for the loss of time
or use of this EMERSON product or the loss of information. The purchaser will be responsible for any removal,
reinstallation, transportation and insurance costs incurred. Correction of defects, in the manner and period of time
described herein, constitute complete fulfillment of all obligations and responsibilities of SYNNEX Canada Limited to the
purchaser with respect to the product and shall constitute full satisfaction of all claims, whether based on contract,
negligence, strict liability or otherwise.
CARRY-IN PARTS & LABOUR WARRANTY PERIODS:
• Audio Products: 1 Year (Remote Control, if applicable – 90 Days)
• Home Appliances: 1 Year
o Microwave Magnetron parts only additional 3 Years
o Refrigerator / Freezer Compressor parts only, additional 4 years
• Home Office Products: 1 Year
To obtain the name and address of the nearest Authorized EMERSON Service Centre or for more information on this warranty
visit www.emersonelectronics.ca
mail your inquiry to:
SYNNEX Canada Limited, EMERSON Customer Service
200 Ronson Drive, Toronto, ON M9W 5Z9; or
call toll free 1-800-663-5954, Monday to Friday 9:00am – 5:00pm Eastern Standard Time.
08.2007
22
®
BAR550-081207-02
Printed in China