1
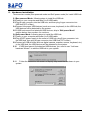
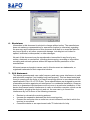
USER’S MANUAL
4 PORT USB HUB
BF-400
1. Introduction
Congratulations on your purchase of the 4-port USB hub. This hub allows you to
attach your computer and USB devices such as Digital Camera, Scanner, Mouse,
Keyboard, etc. through USB port. It will then make your work more efficient and more
flexible.
2. Package Content
§
Hardware: 4 -port USB hub, AC/DC adapter, 6 feet USB A to B type Cable
§
User’s Manual
3. Product Features
§
USB specification revision 1.1 compliant
§
Tiered star topology supports up to 6 tiers and 127 devices, reliable transmission
for 5 meter USB cable segment
§
Two power modes: Self-powered mode & Bus-powered mode
§
Protection against current overload
§
Support full-speed 12Mbps and low-speed 1.5Mbps operation
§
Warning LED indicator for fault or dummy USB port status
§
Fully compatible with all USB devices
4. System Requirements
PC
§ IBM PC 486DX4-100 MHz or higher or compatible system
§ Available USB port
§ CD-ROM drive
§ Windows ® 95 OSR2.1, Windows ® 98, Windows ® ME, Windows ® 2000
MAC
§ Power G3, G4, or I-Mac
§ Available USB port
§ CD-ROM drive
§ Mac OS 8.6 or higher
4-Port USB Hub User’s Manual 1
5. Hardware Installation
There are two modes (Bus-powered mode and Self-power mode) for install USB hub.
5.1 Bus-powered Mode: following steps to install the USB hub:
5.2 Power on your computer and take A to B USB cable.
5.3 Plug B type connector into the USB hub, and then plug A type connector into
USB host (PC or Mac).
5.4 Connect low power USB devices (such as mouse, keyboard) to the USB hub; the
USB devices will be detected by the system.
5.5 If USB host cannot find attached USB devices, skip to “Slef-power Mode”
section below, then number 4 to continue.
5.6 Self-power Mode: following steps to install the USB hub:
5.7 Power on your computer and take A to B USB cable.
5.8 Plug AC/DC power supply to the outlet of USB hub, plug B type connector into
the USB hub, then plug A type connector into USB host (PC or Mac)
5.9 Connect all USB devices (such as digital camera, scanner, mouse, keyboard, etc.)
to the USB hub; the USB devices will be detected by the system.
5.10
If USB host cannot find attached USB devices, you need to use “Add new
hardware Wizard” to add the USB hub to your system.
5.11
Follow the instruction on screen to step by step install the hardware to your
system.
4-Port USB Hub User’s Manual 2
6. Disclaimer
Information in this document is sub ject to change without notice. The manufacturer
does not make any representations or warranties (implied or otherwise) regarding
the accuracy and completeness of this document and shall in no event be liable for
any loss of profit or any other commercial damage, including but not limited to
special, incidental, consequential, or other damages.
No part of this document may be reproduced or transmitted in any form by any
means, electronic or mechanical, including photocopying, recording or information
recording and retrieval systems without the express written permission of the
manufacturer.
All brand names and product names used in this document are trademarks, or
registered trademarks of their respective holders.
7. FCC Statement
This device generates and uses radio frequency and may cause interference to radio
and television reception if not installed and used properly. This has been tested and
found to comply with the limits of a Class B computing device in accordance with the
specifications in Part 15 o f FCC Rules. These specifications are designed to provide
reasonable protection against such interference in a residential installation. However,
there is no guarantee that interference will not occur in a particular installation. If this
device does cause harmful interference to radio or television reception, which can be
determined by plugging the device in and out, the user can try to correct the
interference by one or more of the following measures:
§
§
§
§
Reorient or relocate the receiving antenna.
Increase the separation between the device and receiver.
Connect the computer into an outlet on a circuit different from that to which the
receiver is connected.
Consult the dealer or an experienced radio/TV technician for help.
4-Port USB Hub User’s Manual 3
8. Technical Support
If you encounter any technical problem, please contact us through:
Taiwan First Line Electronics Corp.
No. 40, Chung-Shan Road, Tu-Cheng Industrial Area, Taipei Hsian,
Taiwan, R.O.C.
Web site: www.bafo.com.tw
OR
Quality Computer Accessories Inc. NJ
70 Ethel Road West, Unit 1, Piscataway, NJ 08854, USA
Web site: www.bafo.com
4-Port USB Hub User’s Manual 4
Bedienungsanleitung - 4 Port USB-Hub
Einleitung
Wir wünschen Ihnen viel Freude an Ihrem neuen 4-Port USB-Hub. Dieser Hub
ermöglicht Ihnen den problemlosen Anschluss von USB-Geräten, wie zum Beispiel einer
digitalen Kamera, eines Scanners, einer Maus, Tastatur, usw. über den USB-Port an
Ihren Computer. Ihre Arbeit wird dadurch effektiver und flexibler.
Inhalt der Packung
• Hardware: 4 -Port USB-Hub, Netzgerät, 1,8 m USB-Kabel Typ AB
• Bedienungsanleitung
Merkmale
• Entspricht der USB-Spezifikation Revision 1.1
• Tiered star Topologie unterstützt bis zu 6 Stränge und 127 Geräte, zuverlässige
Übertragung über ein 5 Meter USB-Kabel
• Zwei Möglichkeiten der Spannungsversorgung: Extern mit Netzteil oder
Versorgung über den USB-Anschluss
• Überspannungsschutz
• Unterstützt Übertragung mit 12Mbps und 1.5Mbps
• Warn-LED für Fehler oder Dummy-Status des USB-Ports
• Voll kompatibel mit alle n USB-Geräten
Systemanforderungen
PC
§ IBM PC 486DX4-100 MHz or higher or compatible system
§ Available USB port
§ CD-ROM drive
§ Windows ® 95 OSR2.1, Windows ® 98, Windows ® ME, Windows ® 2000
MAC
§ Power G3, G4, or I-Mac
§ Available USB port
§ CD-ROM drive
§ Mac OS 8.6 or higher
Hardware Installation
Zwei Betriebarten des USB-Hubs sind möglich (Bus-gespeist und eigene
Spannungsversorgung).
Bus-gespeister Betrieb: der USB-Hub wird wie folgt installiert:
1. Schalten Sie Ihren Computer ein.
2. Stecken Sie den Stecker B des AB-USB-Kabels in den USB-Hub und dann den
Stecker A in den USB-Anschluss des Rechners (PC oder MAC).
3. Schliessen Sie USB-Geräte mit geringem Leistungsbedarf (z.B. Maus, Tastatur) an
den USB-Hub an. Die USB-Geräte werden dann vom System erkannt.
4-Port USB Hub User’s Manual 5
4. Ist der USB-Anschluss des Rechners nicht in der Lage, angeschlossene USBGeräte zu erkennen, fahren Sie mit dem Abschnitt “Eigene Spannungsversorgung”
weiter unten mit dem Schritt 4 fort.
Eigene Spannungsversorgung: der USB-Hub wird wie folgt installiert:
1. Schalten Sie Ihren Computer ein.
2. Schliessen Sie das Netzgerät an den USB-Hub an. Stecken Sie den Stecker B des
A-an-B-USB-Kabels in den USB-Hub und dann den Stecker A in den USB-Anschluss
des Rechners (PC oder MAC).
3. Schliessen Sie alle USB-Geräte (z.B. digitale Kamera, Scanner, Maus, Tastatur, usw.)
an den USB-Hub an. Die USB-Geräte werden dann vom System erkannt.
4. Ist der USB-Host nicht in der Lage angeschlossene USB-Geräte zu erkennen,
müssen Sie zur Anmeldung des Hubs bei Ihrem System den “Hardware Assistenten”
verwe nden.
5. Befolgen Sie dann bei der schrittweisen Installation der Hardware die Ihnen auf dem
Bildschirm dargestellten Anweisungen.
Hinweise
Die Angaben im Hinblick auf Genauigkeit und Vollständigkeit sind unverbindlich und
desweiteren haftet der Hersteller keinesfalls für entgangene Gewinne oder sonstige
kommerzielle Schäden, einschliesslich Sonder-, Neben oder Folgeschäden oder
sonstige Schäden.
Diese Unterlage darf ohne die vorherige schriftliche Genehmigung des Herstellers
weder teilweise noch insgesamt in irgendeiner Form mit irgendeinem Mittel, sei es
mechanisch elektrisch oder elektronisch, einschliesslich Fotokopieren, Aufzeichnen oder
mit einem Datenbanksystem aufgezeichnet, reproduziert oder übertragen werden.
Alle in dieser Unterlage verwendeten Handelsmarken und Produktnamen sind
Handelsmarken oder eingetragene Handelsmarken der jeweiligen Eigentümer.
FCC Erklärung
Diese Gerät erzeugt und verwendet hochfrequente Schwingungen und kann, wenn es
nicht einwandfrei installiert und betrieben wird, den Rundfunk - sowie den
Fernsehempfang stören. Dieses Gerät ist geprüft worden und hält die in den technischen
Daten von Teil 15 der FCC-Vorschriften für Computergeräte der Klasse B angegebenen
Grenzen ein. Diese technischen Daten sind so ausgelegt, dass sie in Wohnumgebungen
Schutz vor derartigen Störungen bieten. Dies stellt aber keinesfalls eine Garantie dafür
dar, dass es in einer bestimmten Installation keine Störungen gibt. Sollte dieses Gerät
schädliche Störungen des Radio- oder Fernsehempfangs verursachen, was sich leicht
durch Ein- und Ausschalten des Gerätes überprüfen lässt, kann der Anwender
versuchen, die Störungen durch eine oder mehrere der im Folgenden beschriebenen
Massnahmen zu beseitigen:
•
•
•
Andere Ausrichtung oder Aufstellung der Empfangsantenne.
Vergrössern des Abstandes zwischen Gerät und Empfänger
Anschliessen von Computer und Empfänger an verschiedene Stromkreise
4-Port USB Hub User’s Manual 6
•
Bitten Sie den Händler und/oder einen erfahrenen Rundfunk -/Fernsehtechniker
um Hilfe.
4-Port USB Hub User’s Manual 7
Manuel de l'utilisateur – hub (concentrateur) 4 ports USB
Introduction
Félicitations pour votre achat d'un hub 4 ports USB. Ce hub vous permet de relier votre
PC à des périphériques USB tels que: appareil photo numérique, scanner, souris, clavier,
etc.. par l'intermédiaire d'un port USB. Ceci rendra votre travail plus efficace et plus
flexible.
Contenu de l'emballage
• Matériel : hub 4 ports USB, adaptateur secteur (AC/DC), cordon USB de type AB, 6
pieds (1,80 m env.)
• Guide de l'utilisateur
Caractéristiques techniques
• Conforme à la spécification USB, révision 1.1
• Topologie en étoile à plusieurs niveaux permettant de relier jusqu'à 127
périphériques sur 6 niveaux, transmission par cordon USB fiable jusqu'à 5 mètres
• Deux modes d'alimentation: auto-alimenté & alimenté par bus
• Protection contre courant de surcharge
• Compatible avec les périphériques rapides 12Mbps et lents 1.5Mbps
• Avertissement par LED en cas d'erreur ou de mauvais fonctionnement du port USB
• Compatibilité totale avec tous les périphériques USB
Configuration requise
PC
§ IBM PC 486DX4-100 MHz or higher or compatible system
§ Available USB port
§ CD-ROM drive
§ Windows ® 95 OSR2.1, Windows ® 98, Windows ® ME, Windows ® 2000
MAC
§ Power G3, G4, or I-Mac
§ Available USB port
§ CD-ROM drive
§ Mac OS 8.6 or higher
Installation du matériel
Il y a deux modes d'installation du hub USB (alimentation par bus et auto-alimentation).
Alimentation par bus : installation du hub suivant les étapes indiquées ci-dessous:
1. Allumez votre ordinateur et prenez le cordon USB de type AB.
2. Branchez le connecteur de type B au hub USB, puis branchez le connecteur de type
A à l'hôte USB (PC ou MAC).
3. Connectez les périphériques USB à faible consommation (par ex. souris, clavier) au
hub USB, les périphériques USB sont automatiquement détectés par le système.
4-Port USB Hub User’s Manual 8
4. Au cas où l'hôte USB ne trouverait pas les périphériques USB, changez en “mode
auto-alimenté” décrit au chapitre suivant, reprenez l'installation à partir du point
numéro 4.
Mode auto-alimenté : installation du hub suivant les étapes décrites ci-dessous:
1. Allumez votre ordinateur et prenez le cordon USB de type AB.
2. Branchez la prise d'alimentation secteur à la sortie du hub USB, branchez le
connecteur de type B au hub USB, puis branchez le connecteur de type A à l'hôte
USB (PC ou MAC)
3. Connectez tous les périphériques USB (par ex. appareil photo numérique, scanner,
souris, clavier, etc.) au hub USB, les périphériques USB seront détectés
automatiquement par le système.
4. Au cas où l'hôte USB ne trouverait pas les périphériques USB utilisez “l'assistant
ajout de nouveau matériel” afin d'ajouter le hub USB à votre système.
5. Suivez les instructions portées à l'écran pour installer le matériel point par point à
votre système.
Réclamation
Les informations contenues dans ce document sont susceptibles de changer, sans que
ces changements ne fassent l'objet d'une notification. Le fabricant ne fait ni déclarations
ni n'accorde de garanties (implicites ou autres) concernant l'exactitude et l'exhaustivité
de ce document et ne peut en aucun cas être tenu responsable de pertes de profit ou
tout a utre dommage commercial, comprenant mais non limité aux dommages spéciaux,
incidents, directs, ou tous autres dommages.
Aucune partie de ce document ne peut être reproduite ou transmise sous quelque forme
ou par quelque moyen que ce soit, électronique ou mécanique, photocopie,
enregistrement, ou systèmes d'enregistrement et récupération d'information compris,
sans l’autorisation écrite expresse du fabricant.
Tous les noms de marques ou de produits évoqués dans ce document sont les marques
ou marques déposées de leurs détenteurs respectifs.
Déclaration FCC
Cet appareil est un émetteur et utilisateur de fréquence radio et peut provoquer des
interférences de réception radio ou télévision dans le cas d'une installation ou utilisation
incorrecte. Ce phénomène a été testé et est conforme aux limites fixées pour les
appareils informatiques de catégorie B en conformité avec les spécifications du chapitre
15 du règlement FCC. Ces spécifications sont conçues pour assurer une protection
raisonnable contre de telles interférences dans une installation résidentielle. Il n'y a
cependant pas de garantie que des interférences n'apparaitront pas dans une
installation particulière. Si cet appareil provoque des interférences graves pour la
réception radio ou télévision, ce qui peut être déterminé en branchant et débranchant
l'appareil, l'utilisateur peut essayer de corriger les interférences en appliquant une ou
plusieurs des mesures suivantes:
•
•
Réorienter ou déplacer l'antenne de réception.
Augmenter la distance entre l'appareil et le récepteur.
4-Port USB Hub User’s Manual 9
•
•
Brancher l'ordinateur à un circuit différent de celui sur lequel le récepteur est
branché.
Consulter le vendeur ou un technicien radio / TV expérimenté.
4-Port USB Hub User’s Manual 10