1
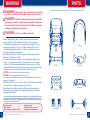
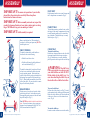
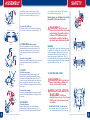
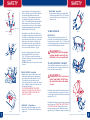
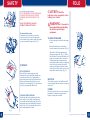
Read all instructions BEFORE assembly and USE of product.
KEEP INSTRUCTIONS FOR FUTURE USE.
Tag-A-Long Ta nde m St rolle r
®
IF YOU EXPERIENCE ANY DIFFICULTY IN USING THIS PRODUCT,
PLEASE CONTACT OUR CUSTOMER SERVICE DEPARTMENT AT
1-800-328-7363 BETWEEN THE HOURS OF 8:00 A.M. AND 4:30 P.M. PACIFIC
STANDARD TIME FOR ASSISTANCE. PLEASE HAVE YOUR MODEL NUMBER AND
MANUFACTURING DATE AVAILABLE WHEN YOU CALL. THIS INFORMATION CAN BE
FOUND ON A SMALL STICKER ON THE INSIDE OF THE STROLLER FRAME.
Instruction Manual
Convenience through innovation and thoughtful design
02.10
Contact us by mail:
Baby Trend, Inc.
1607 S. Campus Ave., Ontario, CA 91761
Contact us by phone:
1-800-328-7363 (8:00am ~ 4:30pm PST)
or online http://www.babytrend.com
Convenience through innovation and thoughtful design
www.babytrend.com
WARNING
PARTS
WARNING: Please follow all of these instructions to ensure
Check that you have all the parts for this model before assembling the stroller.
the safety of your child. Keep these instructions for future reference.
WARNING: Failure to follow these instructions could result in
serious injury or death. Avoid serious injury from falling or sliding out,
always use the safety harness and insure that the children are properly
positioned according to these instructions.
WARNING: Never leave children unattended.
• Purses, shopping bags, parcels, diaper bags or accessory items may
change the balance of the stroller and cause it to become unstable.
• The maximum weight that can be carried in the storage basket is 5 lbs,
parent tray and child tray is 3 lbs. Seat Belt storage pocket: To store
seat belt only, maximum weight is 1 lb. Excessive weight may cause a
hazardous unstable condition to exist.
• Be certain the stroller is completly opened and locked in place before
allowing a child near the stroller.
• The rear stand on platform / jump seat is designed for a child who is at
least 2 1/2 years old and is not over 40 inches tall. Use of the stroller
with two (2) children weighing more than 40 pounds each, or children
totaling more than 80 pounds, will cause excessive wear and stress on the
stroller and may cause a hazardous unstable condition to exist.
• NEVER use the stroller on stairways or escalators.
• NEVER allow your stroller to be used as a toy.
• To clean use only mild household soap or detergent and warm water on a
sponge or clean cloth.
• Check your stroller for loose screws, worn parts, torn material or stitching
on a regular basis. Replace or repair parts as needed.
• Discontinue use of stroller should it malfunction or become damaged.
Please contact our customer service department to arrange for repair or
obtain replacement parts.
Canopy
Stroller
Platform
Child Tray
Parent Tray
If you experience any difficulty with assembly, missing parts or use, please DO NOT return this
item to the store. Retail stores are unable to properly assist you. Contact our Customer Service
Department directly for assistance. Call toll-free 1-800-328-7363, Monday -Friday, between the
hours of 8:30 a.m. and 4:30 p.m. (PST). Contact us by mail:
Baby Trend, Inc.
1607 S. Campus Ave., Ontario, CA 91761
1
Copyright © 2009 - 2010, Baby Trend Inc., All Rights Reserved.
Contact us by phone:
1-800-328-7363 (8:00am ~ 4:30pm PST)
or online http://www.babytrend.com
Front Wheel
Rear Axle
Copyright © 2009 - 2010, Baby Trend Inc., All Rights Reserved.
2
ASSEMBLY
ASSEMBLY
IMPORTANT! To ensure safe operation of your stroller,
please follow these instructions carefully. Please keep these
instructions for future reference.
FOOT REST
Push downward on the foot rest until it snaps onto
the U-shaped frame cross member. (Fig. 4)
Push Down
IMPORTANT!
Before assembly and each use, inspect this
product for damaged hardware, loose joints, missing parts or sharp
edges. NEVER use if any parts are mssing or broken.
IMPORTANT! Adult assembly is required.
Remove stroller from box. The front wheels,
rear wheels, child tray, and parent tray MUST be
installed prior to use.
FRONT WHEELS
To attach the front wheels, unfold stroller as
described in the section following:
• Unlock the red release lever.
red release
lever
• Unfold stroller frame by pulling backward
on the stroller handle (Fig. 1)
Fig. 1
To attach the front wheels, lean the stroller back
so that it rests on the handle with the front and
rear legs pointing upward. Position the front
wheels over the front leg tubes so that the hole in
the housing lines up and will slide onto the legs.
(Fig. 2) Firmly push down until the wheels lock
securely into place. Tug on each wheel to ensure
they are both securely attached.
REAR WHEELS
Fig. 2
Position rear axle over the rear leg tubes, brake
pedals facing the back. At the same time, push
down applying equal pressure to both sides until
they lock into place. (Fig. 3)
Note: NEVER use stroller if wheels do not lock into
place. If you need assistance, please contact our
customer service department at 1-800-328-7363,
M-F, between 8am and 4:30pm, PST.
3
Fig. 3
Copyright © 2009 - 2010, Baby Trend Inc., All Rights Reserved.
PARENT TRAY
Snap On
Fig. 4
To attach the parent tray, position the tray so that
the hinges for the storage compartment are facing
foward. Snap the parent tray to the stand at the
top of the frame. Check that the tray is securely
latched in place. (Fig. 5)
CHILD TRAY
To attach the child tray:
Push the tray downward and onto each side of the
front armrests until both side snaps into place.
(Fig. 6) Check that tray is securely latched in
place. Repeat the above step for the rear child tray.
Fig. 5
WARNING:
The child’s tray
is not a restraint device: always secure
your child with the seat belt. DO NOT
lift the stroller by the child’s tray. Use
care when attaching the child’s tray on
the stroller with a child in the stroller.
To access the child seat:
Pull one side of the release lever (Fig. 7) located
on the underside of the child tray and lift upward.
Either side of the child tray will lift and rotate out
of the way to allow access to the front and rear
seats. (Fig. 8)
To rotate the child tray:
In order to attach an infant car seat to the stroller,
Fig. 6
release lever
Fig. 7
Fig. 8
Copyright © 2009 - 2010, Baby Trend Inc., All Rights Reserved.
4
ASSEMBLY
SAFETY
the child tray must be rotated to the vertical
position. Press red buttons on both sides of the
child tray to rotate down 90 degrees. (Fig. 9)
red button
Fig. 9
Underside of the child tray
release lever
Fig. 10
To remove the child tray:
Pull both release levers located on the underside
of each side of the tray and lift upward. (Fig. 10)
CUP HOLDER (sold separately)
This is an optional accessory item that can be
purchased online at www.babytrend.com. The
removeable child tray can be replaced with 2
individual cup holders. It is ideal for an older
child.
To attach the cup holder:
Push the cup holder downward and onto each side
of the front armrests until it snaps into place.
(Fig. 11)
Fig. 11
Fig. 12
CANOPY
To attach the canopy:
Line up the male fittings on the canopy with
the slots on the armrest and push both fittings
downward until snapped into place. (Fig.12) To
open the canopy, push forward on the front edge
of the canopy while holding the rear of canopy
in place. To fold the canopy, push forward on the
front edge.
To remove the canopy:
Press the snap button under the armrest and pull
to release the fitting from the slot. Repeat for the
other side.
PLATFORM
5
Fig. 13
To attach platform:
Squeeze both locking clips with both hands
while holding the platform vertically (Fig. 13).
Then slowly rotate the platform downward until
Copyright © 2009 - 2010, Baby Trend Inc., All Rights Reserved.
it rests in place on the axle rod. Once in place
release both locking clips. (Fig. 14)
Before placing your children in the stroller,
please follow the instructions below.
WARNING: Always set
brakes when the stroller is not being
pushed so that the stroller will not
roll away. NEVER leave stroller
unattended on a hill or incline as
the stroller may slide down the hill.
Fig. 14
BRAKES
To engage brakes, apply light downward pressure
to the brake lever located on each rear wheel. The
stroller may require slight forward or rearward
movement in order to line up the teeth on the
brake with each wheel brake cluster. (Fig. 15)
Check that the stroller will not move and that both
brakes are properly applied. To release, gently lift
up on the brake lever. (Fig. 16)
Fig. 15
Fig. 16
TO SECURE THE CHILD
WARNING: Avoid serious
injury from falling or sliding out.
Always use the safety harness.
STRANGULATION
HAZARD: Child can
strangle in loose straps. Never leave
child in seat when straps are loose
or undone.
TANDEM STOLLER - 5-Point Harness
• The shoulder straps of the 5-point harness
has 2 attachment positions. Select the loop
Fig. 17
Copyright © 2009 - 2010, Baby Trend Inc., All Rights Reserved.
6
SAFETY
Shoulder Strap
Waist Strap
Squeeze
Adjust for a snug fit
Crotch Strap
Fig. 18
Fig. 19
Fig. 20
7
Fig. 21
Copyright © 2009 - 2010, Baby Trend Inc., All Rights Reserved.
SAFETY
position that places the shoulder strap level
with, or below the top of the child’s shoulder
and feed the shoulder harness under the
correct loop. To adjust harness slot unhook
the shoulder strap from the crotch buckle.
(Fig. 17) Feed the shoulder strap through the
harness spread slots. You can access these
slots from the rear of the seat. Feed shoulder
strap through appropriate slot and reattach
shoulder strap to crotch buckle.
• Carefully place the child in the stroller seat
and bring the safety harness around the child’s
waist and over the shoulders. Place the crotch
strap and between the child’s legs. Insert the
male end of each shoulder / waist belt into
the buckle on the crotch strap. Tighten the
harness to be snug around the child’s waist
and over the child’s shoulders. (Fig.18)
• To release, apply pressure to both sides of
each male clip until the clip is released.
(Fig. 19) This process requires a moderate
amount of effort so as to prevent an accidental
release by your child.
NOTE: Buckles may be hard to release when
1st used.
TRAVEL SYSTEM - Safety Belt
• Strap the safety belt over the infant car seat
through the seat belt slots on the infant car
seat, connect the buckles together (Fig. 20).
The safety belts for the infant car seat is
located in small pockets on outer sides of seat
pads. Tighten the strap so the infant car seat
fits snug and can't move.
IT IS VERY IMPORTANT THAT THE
INFANT CAR SEAT STRAP IS ALWAYS
TIGHTLY FASTENED AROUND THE
INFANT CAR SEAT.
JUMP SEAT - 3-Point Harness
• Secure the child with the jump seat 3-point
harness (Fig. 21) when child is sitting on the
jump seat.
PLATFORM - Safety Belt
• Secure the stand feature safety belt behind
child and engate buckle (Fig. 22). This is the
same safety belt you use to secure the rear
infant car seat.
TO RECLINE SEAT
Fig. 22
FRONT SEAT
The front seat has a two position recline. To
recline the seat, rotate the recline bar and press
backward on the seat back. (Fig. 23) To place the
seat in the upright position, press upward on the
seat back while rotating the recline bar.
WARNING: The upright
Fig. 23
position should be used only for a
child that is at least 6 months old.
TO ATTACH INFANT CAR SEAT
To attach Baby Trend infant car seats (Fig. 24),
rotate child trays to the vertical postion first. See
rotate child tray for more details.
WARNING: Avoid serious
Fig. 24
injury from falling, ALWAYS use
the safety belt to secure the infant
car seat.
Recline the front seat back. Postion the infant car
seat, facing toward the rear of the stroller, so the
seat shell goes into the front child tray and latches
into place. (Fig. 25)
Check that the infant car seat is firmly locked onto
the child tray and STRAP THE SAFETY BELT
OVER THE CAR SEAT through the seat belt
slots on the infant car seat, connect the buckles
together. (Fig. 26) Tighten the strap so the infant
Fig. 25
Copyright © 2009 - 2010, Baby Trend Inc., All Rights Reserved.
8
SAFETY
FOLD
car seat fits snug and can't move.
IT IS VERY IMPORTANT THAT THE INFANT
CAR SEAT STRAP IS ALWAYS TIGHTLY
FASTENED AROUND THE INFANT CAR
SEAT.
Fig. 26
DO NOT USE INFANT CAR SEAT
WITHOUT THE SAFETY BELT.
To remove infant car seat:
Unfasten the safety belt and store in pocket
located on each side of seat, then squeeze the
release handle located at the foot-end of the infant
car seat and carefully lift upward. (Fig. 27)
CAUTION: Read the
following section completely before
folding your stroller!
WARNING: Care must be
taken when folding and unfolding
the stroller to prevent finger
entrapment.
TO FOLD STROLLER
• Close the canopy as described in the canopy
section.
•Pull stroller backward several inches to
rotate the front wheels to the front. (Fig. 30)
Fig. 27
JUMP SEAT
Fig. 28
Fig. 29
9
SIT ON JUMP SEAT
Have the child sit on the jump seat facing
backwards. Secure the child with the jump seat
3-point harness. Part of the 3-point harness is
stored in the pocket on the back of the front seat.
Put the seat belt around the child's waist, and
buckle to the crotch strap (Fig. 28). Adjust the seat
belt to be snug around the child's waist.
STAND ON THE PLATFORM
Position the child on the platform on the back
of the stroller. Be sure child is standing facing
foward and hands are holding frame. Secure the
stand feature safety belt behind child and engate
buckle (Fig. 29). Be sure that the child's feet are
fully on the platform at all times.
Copyright © 2009 - 2010, Baby Trend Inc., All Rights Reserved.
•The stroller is folded by simultaneously
pulling each trigger fold. (Fig. 31) When
the fold latches are released, the handle will
begin to fall toward the floor. Release the
fold buttons and press downward on the
stroller handle until the stroller is completely
folded. Secure the stroller in the folded
position by hooking the fold latch, located
on the right side of the stroller, over the rivet
that protrudes from the frame. (Fig. 32)
Fig. 30
Fig. 31
SEAT PAD
To clean the seat pad, use only mild household
soap or detergent and warm water on a sponge or
clean cloth.
OTHER
Check your stroller for loose screws, worn parts,
torn material or stitching on a regular basis.
Replace or repair parts as needed.
Fig. 32
Copyright © 2009 - 2010, Baby Trend Inc., All Rights Reserved.
10