1
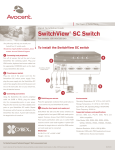
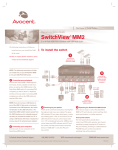
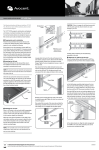
The Power of Being There®
Quick Installation Guide
Cybex SwitchView
®
®
SC8 DVI Switch
The following instructions will help you
install your SwitchView SC8 DVI switch.
To install the Cybex SwitchView SC8 DVI switch
Should you require further assistance, please
4
contact Avocent Technical Support.
1 Connecting local peripherals
Power down all servers that will be part of your
SwitchView SC8 DVI switching system. Locate
your PS/2 keyboard, DVI monitors and PS/2
mouse. Plug your DVI monitor cables into the
CONSOLE ports on the left side of the back
of your switch. Plug your PS/2 keyboard cable
and your PS/2 mouse cable into the keyboard
CONSOLE
H
G
F
E
D
C
B
A
Optional
RF ground
(not required
for safety)
and mouse ports respectively.
1
2
2 Connecting your servers
Locate your first cable set consisting of two
PS/2 cables and one or two DVI cables. The
3
SwitchView SC8 DVI switching system has
eight port sets labeled A-H on the rear of the
unit. Plug the two PS/2 cables (keyboard
and mouse) and the DVI cable (monitors)
into the corresponding ports on your server.
Plug the other ends into any available server port
4 Switching your servers
set on your SwitchView SC8 DVI switching system.
Press the appropriate front panel button labeled A-H to
Repeat this process until all servers are properly
access servers in your SwitchView switching system.
attached to the SwitchView SC8 DVI switch.
Input Power: 60 W; Operating Voltage 100-240 VAC
Power Frequency: 50-60 Hz
Supported Hardware
Server: IBM, PC/AT, PS/2 and 100% compatibles
LEDs
3 Turning on your system
Video Modes: VGA, SVGA, XGA, SXGA, UXGA, Each target port (A-H) has dual LEDs on the front panel. A
Locate the power cord that came with your switch.
green LED indicates the target device is on and connected
Maximum Resolution: 2048 x 1536 @ 75Hz
Plug one end into the IEC power connector on
to the switch. An amber LED indicates the target device
the SwitchView switch. Ensure the power switch
Peripherals: PS/2 keyboard, PS/2 mouse and is selected (KVM session).
is off, then plug the other end of the power cord
Environmental
into an AC wall outlet. Turn on your switch first,
Mechanical
Operating Temperature: 41˚ (5˚C) to 104˚ (40˚C)
H x W x D = 3.6” x 17.2” x 10.8” (9.1 x 43.7 x 27.4 cm)
then turn on all attached servers.
Storage Temperature: -4˚ (-20˚C) to 122˚ (50˚C)
Weight = 9.5 lbs (4.3 kg)
HDTV and QXGA
IntelliMouse (PS/2 only)
To Contact Avocent Technical Support: Visit www.avocent.com/support
Avocent, the Avocent logo, The Power of Being There, Cybex and SwitchView are registered trademarks of Avocent Corporation or its affiliates. ©2007Avocent Corporation. All rights reserved. 590-502-501D
USA Notification
Warning: Changes or modifications to this unit not expressly approved by the party responsible for compliance could
void the user’s authority to operate the equipment.
Note: This equipment has been tested and found to comply with the limits for a Class A digital device, pursuant to Part
15 of the FCC Rules. These limits are designed to provide reasonable protection against harmful interference when the
equipment is operated in a commercial environment. This equipment generates, uses and can radiate radio frequency
energy and, if not installed and used in accordance with the instruction manual, may cause harmful interference to radio
communications. Operation of this equipment in a residential area is likely to cause harmful interference in which case
the user will be required to correct the interference at his own expense.
Canadian Notification
This Class A digital apparatus complies with Canadian ICES-003.
Cet appareil numérique de la classe A est conforme à la norme NMB-003 du Canada.
Japanese Approval
Safety and EMC
Approvals and Markings
UL, FCC, cUL, ICES-003, CE, VCCI, C-Tick
Safety certifications and EMC certifications for this product are obtained under one or more of the following
designations: CMN (Certification Model Number), MPN (Manufacturer’s Part Number) or Sales Level Model
designation. The designation that is referenced in the EMC and/or safety reports and certificates are printed on the
label applied to this product.
Safety Precautions
DANGEROUS VOLTAGE
This symbol is intended to alert the user to the presence of uninsulated dangerous voltage within the product’s
enclosure that may be of sufficient magnitude to constitute a risk of electric shock to persons.
NOTE: The AC inlet is the main disconnect.
INSTRUCTIONS
This symbol is intended to alert the user to the presence of important operating and maintenance (servicing) instructions.
RACK MOUNT SAFETY CONSIDERATIONS
•
Elevated Ambient Temperature: If installed in a closed rack assembly, the operation temperature of the rack
environment may be greater than room ambient. Use care not to exceed the rated maximum operating temperature of
40° C for this product.
•
Reduced Air Flow: Installation of the equipment in a rack should be such that the amount of airflow required for safe
operation of the equipment is not compromised.
•
Mechanical Loading: Mounting of the equipment in the rack should be such that a hazardous condition is not
achieved due to uneven mechanical loading.
•
Circuit Overloading: Consideration should be given to the connection of the equipment to the supply circuit and
the effect that overloading of circuits might have on overcurrent protection and supply wiring. Consider equipment
nameplate ratings for maximum current.
•
Reliable Earthing: Reliable earthing of rack mounted equipment should be maintained. Pay particular attention to
supply connections other than direct connections to the branch circuit (for example, use of power strips).
WARNING: To reduce the risk of electric shock or damage to your equipment:
- Do not disable the power grounding plug. The grounding plug is an important safety feature.
- Plug the power cord into a grounded (earthed) outlet that is easily accessible at all times.
- Disconnect the power from the switch by unplugging the power cord from either the electrical outlet or the appliance.