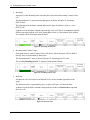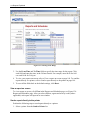
1
Reporting for Contact Center Setup and Operations Guide BCM50 3.0 Contact Center Document Number: NN40040-303 Document Status: Standard Document Version: 01.01 Date: August 2007 Copyright © 2006-2007 Nortel Networks, All Rights Reserved The information in this document is subject to change without notice. The statements, configurations, technical data, and recommendations in this document are believed to be accurate and reliable, but are presented without express or implied warranty. Users must take full responsibility for their applications of any products specified in this document. The information in this document is proprietary to Nortel Networks. Trademarks Nortel, the Nortel logo, and the Globemark are trademarks of Nortel Networks. Microsoft, MS, MS-DOS, Windows, and Windows NT are registered trademarks of Microsoft Corporation. Java is a trademark of Sun Microsystems Incorporated. All other trademarks and registered trademarks are the property of their respective owners. Table of Contents 3 Table of Contents List of Figures .............................................................................................................6 List of Tables...............................................................................................................9 How to Use this Guide.............................................................................................. 11 Introduction ....................................................................................................................................... 11 How this guide is organized .............................................................................................................. 11 How to get Help................................................................................................................................. 12 Getting Help from the Nortel Web site ......................................................................................... 12 Getting Help over the phone from a Nortel Solutions Center ...................................................... 12 Getting Help through a Nortel distributor or reseller .................................................................... 12 Introduction ...............................................................................................................13 Web-Based User Interface................................................................................................................ 13 Language Support ............................................................................................................................ 13 Administrators and Users.................................................................................................................. 14 Assigned Skillsets ............................................................................................................................. 14 SQL Historical Database................................................................................................................... 14 System Software............................................................................................................................... 15 PC Requirements.............................................................................................................................. 15 Recommended Minimum PC Specification for BCM50 3.0 ......................................................... 15 Operating System Compatibility ............................................................................................ 16 Installation .................................................................................................................17 Introduction ....................................................................................................................................... 17 Upgrading to Reporting for Contact Center ...................................................................................... 17 Uninstalling Reporting for Contact Center ........................................................................................ 17 Upgrading a Previous Version of Reporting for Contact Center....................................................... 18 Deleting Temporary Internet Files ............................................................................................... 18 Installation prerequisites ................................................................................................................... 20 Installing Microsoft Internet Information Services ........................................................................ 21 Port Numbers used by Nortel Reporting for Contact Center................................................. 26 Settings required for Windows Vista with IIS 7.0 ......................................................................... 26 Installing Nortel Reporting for Contact Center software ................................................................... 29 TCP/IP Protocol ........................................................................................................................... 29 Checking Installation of the Windows Networking Component ................................................... 29 Installing Nortel Reporting for Contact Center for a Business Communications Manager Installation ............................................................................................................................................. 30 Install Verification Utility......................................................................................................... 46 Print Caller Service................................................................................................................ 49 To quit the PCS ..................................................................................................................... 56 Reporting for Contact Center Setup and Operations Guide 4 Table of Contents Administration...........................................................................................................57 Logging In ..........................................................................................................................................57 Changing Default Password ..............................................................................................................58 Contact Center Connection ..........................................................................................................60 Administration Menu ..........................................................................................................................64 System Administration ..................................................................................................................65 System Admin Settings ..........................................................................................................66 User Admin.............................................................................................................................67 Skillset Assignment ................................................................................................................72 Maintenance .................................................................................................................................76 System Status ........................................................................................................................76 Logging...................................................................................................................................78 Company Details ..........................................................................................................................79 Reporting ......................................................................................................................................80 Using Reporting for Contact Center........................................................................81 Logging On ........................................................................................................................................81 Real Time...........................................................................................................................................84 Using the Real Time Options........................................................................................................84 Real Time Call Summary .......................................................................................................85 Real Time Agent Summary ....................................................................................................88 Real Time Call Detail..............................................................................................................90 Real Time Agent Detail ..........................................................................................................92 Agent Alarms .....................................................................................................................................98 Wallboard Setup ..............................................................................................................................102 Message Formats .......................................................................................................................102 Parameter Messages ...........................................................................................................102 Scrolling Messages ..............................................................................................................103 Summary Messages.............................................................................................................104 Using the Wallboard Options ......................................................................................................105 Wallboard Assignment .........................................................................................................106 Messages .............................................................................................................................112 Alarms ..................................................................................................................................117 Schedules.............................................................................................................................123 Instant Messages .................................................................................................................128 Time Bins Setup ..............................................................................................................................131 Answer Time Bins.......................................................................................................................131 Abandon Time Bins ....................................................................................................................131 Schedules ........................................................................................................................................135 Daily Schedules ..........................................................................................................................136 Skillset List Selection Methods ...................................................................................................141 Adding Selections to the Favorites List ......................................................................................141 Saving your Daily Schedule........................................................................................................143 Weekly Schedules ......................................................................................................................146 Weekly Schedules Skillsets ........................................................................................................149 Saving Your Weekly Schedule ...................................................................................................150 Monthly Schedules .....................................................................................................................153 Monthly Schedule Skillsets .........................................................................................................157 Saving your Monthly Schedule ...................................................................................................158 Reports ....................................................................................................................161 Reports Introduction ........................................................................................................................161 General .......................................................................................................................................161 NN40040-303 Table of Contents 5 Reports Explained........................................................................................................................... 161 Using the Reports ........................................................................................................................... 161 Generating reports ..................................................................................................................... 163 View a report on screen ............................................................................................................. 164 Send a report directly to the printer ........................................................................................... 164 Cancel reports to be printed....................................................................................................... 167 Selecting Skillsets ...................................................................................................................... 167 Selecting Agents ........................................................................................................................ 168 Selecting Activity Codes ............................................................................................................ 170 Get Latest Contact Center Data item......................................................................................... 171 Glossary ..................................................................................................................173 References ..............................................................................................................177 Index ........................................................................................................................ 178 Reporting for Contact Center Setup and Operations Guide 6 List of Figures List of Figures Figure 1: Internet Properties dialog box .................................................................................................................................19 Figure 2: Delete Files dialog box ...........................................................................................................................................19 Figure 3: Add or Remove Programs.......................................................................................................................................21 Figure 4: Windows Components Wizard ...............................................................................................................................22 Figure 5: Windows Components Wizard Installation ............................................................................................................23 Figure 6: Windows Components Wizard Installation Completed ..........................................................................................24 Figure 7 : Internet Information Services test page..................................................................................................................25 Figure 8: Windows features option in Programs and Features window .................................................................................27 Figure 9: Turn Windows features on or off dialog box ..........................................................................................................28 Figure 10: Download the Reporting for Contact Center Software .........................................................................................31 Figure 11: InstallShield Initialization dialog box ...................................................................................................................32 Figure 12: RCC Compatibility Check dialog box ..................................................................................................................32 Figure 13: RCC Compatibility Check – creating backup files ...............................................................................................33 Figure 14: RCC Compatibility Check – insufficient memory error message.........................................................................33 Figure 15: Choose Setup Language dialog box......................................................................................................................34 Figure 16: InstallShield Requirements dialog box .................................................................................................................34 Figure 17: MDAC 2.8 End User License Agreement dialog box...........................................................................................35 Figure 18: MDAC installation dialog box..............................................................................................................................36 Figure 19: Microsoft Data Access Components system restart dialog box ............................................................................37 Figure 20: InstallShield RCC requirements for SQL Server and Report Viewer dialog box .................................................38 Figure 21: InstallShield RCC requirements dialog box..........................................................................................................39 Figure 22: InstallShield Wizard RCC Welcome dialog box...................................................................................................40 Figure 23: License Agreement dialog box .............................................................................................................................41 Figure 24: Exit Setup warning message box ..........................................................................................................................41 Figure 25 : Choose Destination Location dialog box .............................................................................................................42 Figure 26: Setup Status dialog box.........................................................................................................................................43 Figure 27: Java installation dialog box...................................................................................................................................43 Figure 28: Installation Complete dialog box ..........................................................................................................................44 Figure 29: RCC Monitor splash screen ..................................................................................................................................45 Figure 30: RCC Database Installer Utility .............................................................................................................................45 Figure 31: RCC Install Verification Utility............................................................................................................................46 Figure 32: BCM Connection Data dialog box........................................................................................................................47 Figure 33: RCC Install Verification Utility verifying BCM connection ................................................................................48 Figure 34: Save BCM connection settings message box........................................................................................................48 Figure 35: RCC Install Verification Utility verification success............................................................................................49 Figure 36: Print Caller Service information balloon ..............................................................................................................50 Figure 37: Print Caller Service menu .....................................................................................................................................50 Figure 38: RCC Print Caller Service window ........................................................................................................................50 Figure 39: RCC Print Caller Service window – PCS stopped................................................................................................51 Figure 40: Print Caller Service warning balloon ....................................................................................................................51 Figure 41: Print Caller Service menu – Start function ...........................................................................................................51 Figure 42: RCC Print Caller Service window - Windows service mode................................................................................52 Figure 43: RCC Print Caller Service mode change message box...........................................................................................52 Figure 44: Set Service Login dialog box ................................................................................................................................53 Figure 45: RCC Print Caller Services settings changed message box....................................................................................53 Figure 46: Print Caller Service menu for Windows service ...................................................................................................54 Figure 47: RCC Print Caller Service mode change to background application message box ................................................54 Figure 48: RCC Print Caller Service window – Windows service mode ...............................................................................55 Figure 49: RCC Print Caller Service window – PCS stopped as a Windows service ............................................................55 Figure 50: Print Caller Service shut down warning message .................................................................................................56 Figure 51: Login page ............................................................................................................................................................58 Figure 52: Change Password page .........................................................................................................................................59 NN40040-303 List of Figures 7 Figure 53: Contact Center Connection page.......................................................................................................................... 60 Figure 54: Download Contact Center Data options ............................................................................................................... 62 Figure 55: Download Status window..................................................................................................................................... 62 Figure 56: Administration Menu page................................................................................................................................... 64 Figure 57: System Administration Menu page ...................................................................................................................... 65 Figure 58: System Administrator details page....................................................................................................................... 66 Figure 59: User Admin page.................................................................................................................................................. 67 Figure 60: Add User page...................................................................................................................................................... 68 Figure 61: Details for new User Mary Smith......................................................................................................................... 70 Figure 62: Edit User page ...................................................................................................................................................... 71 Figure 63: Skillset Assignment page ..................................................................................................................................... 73 Figure 64: Assigned Skillsets page........................................................................................................................................ 74 Figure 65: Skillsets Assigned to User Mary Smith................................................................................................................ 75 Figure 66: Maintenance Menu page ...................................................................................................................................... 76 Figure 67: System Status page............................................................................................................................................... 77 Figure 68: Logging Menu page ............................................................................................................................................. 78 Figure 69: Company Details page ......................................................................................................................................... 79 Figure 70: Main Menu page .................................................................................................................................................. 80 Figure 71: Change Password page......................................................................................................................................... 82 Figure 72: User Main Menu page .......................................................................................................................................... 83 Figure 73: Real Time page .................................................................................................................................................... 84 Figure 74: Call Summary Real Time screens ........................................................................................................................ 85 Figure 75: Agent Summary Real Time screen....................................................................................................................... 88 Figure 76: Real Time Call Detail Screen............................................................................................................................... 90 Figure 77: Agent Detail Real Time........................................................................................................................................ 92 Figure 78: Available state...................................................................................................................................................... 93 Figure 79: Break Time state .................................................................................................................................................. 93 Figure 80: All Calls Held state .............................................................................................................................................. 93 Figure 81: Incoming (PSTN) state......................................................................................................................................... 94 Figure 82: Incoming Non-CC state........................................................................................................................................ 94 Figure 83: Intercom state ....................................................................................................................................................... 94 Figure 84: Multimedia state................................................................................................................................................... 95 Figure 85: Monitoring state ................................................................................................................................................... 95 Figure 86: Not Available state............................................................................................................................................... 96 Figure 87: Not Ready state .................................................................................................................................................... 96 Figure 88: Outgoing Call state............................................................................................................................................... 96 Figure 89: Ringing state ........................................................................................................................................................ 96 Figure 90: Agent Alarms menu page..................................................................................................................................... 98 Figure 91: Agent Alarms Setup page..................................................................................................................................... 99 Figure 92: Agent Alarms Values page................................................................................................................................. 100 Figure 93: Wallboard Menu page ........................................................................................................................................ 105 Figure 94: Wallboard Assignment page .............................................................................................................................. 106 Figure 95: Add Wallboard page .......................................................................................................................................... 107 Figure 96: Wallboard Setup page with a wallboard listed ................................................................................................... 109 Figure 97: Edit Wallboard page........................................................................................................................................... 110 Figure 98: Edit Parameters page.......................................................................................................................................... 111 Figure 99: Assigned Messages page.................................................................................................................................... 113 Figure 100: Add Message page ........................................................................................................................................... 114 Figure 101: Add Message page – example text ................................................................................................................... 115 Figure 102: Assigned Messages list – example messages ................................................................................................... 116 Figure 103: Assigned Alarms page...................................................................................................................................... 117 Figure 104: Add Alarm page ............................................................................................................................................... 118 Figure 105: Example Settings for a Multi Alarm Period Alarm.......................................................................................... 121 Figure 106: Assigned Alarms page with an alarm configured............................................................................................. 123 Figure 107: Assigned Schedules page ................................................................................................................................. 124 Figure 108: Add Schedule page........................................................................................................................................... 125 Reporting for Contact Center Setup and Operations Guide 8 List of Figures Figure 109: Assigned Schedules page with schedule added.................................................................................................126 Figure 110: Edit Schedule page............................................................................................................................................127 Figure 111: Instant Messages page.......................................................................................................................................128 Figure 112: Composing an Instant Message.........................................................................................................................129 Figure 113: Time Bin Setup Skillset selection page.............................................................................................................132 Figure 114: Time Bins page .................................................................................................................................................133 Figure 115: Reports and Schedules page..............................................................................................................................136 Figure 116: Your Daily Schedules page...............................................................................................................................137 Figure 117: Add Daily Schedule page..................................................................................................................................138 Figure 118: Add Daily Schedule page – example settings ...................................................................................................139 Figure 119: Daily Schedule Skillsets page ...........................................................................................................................140 Figure 120: Save Favorites page ..........................................................................................................................................142 Figure 121: Your Daily Schedules with a Schedule in the List............................................................................................143 Figure 122: Edit Daily Schedules page ................................................................................................................................145 Figure 123: Your Weekly Schedules page ...........................................................................................................................146 Figure 124: Add Weekly Schedule page ..............................................................................................................................147 Figure 125: Calendar for September 2003 ...........................................................................................................................148 Figure 126: Add Weekly Schedule page – example schedule..............................................................................................149 Figure 127: Weekly Schedules - Skillsets ............................................................................................................................150 Figure 128: Your Weekly Schedule page with a Print Schedule in the list ..........................................................................151 Figure 129: Edit Weekly Schedule page ..............................................................................................................................152 Figure 130: Your Monthly Schedules page..........................................................................................................................154 Figure 131: Add Monthly Schedule Page.............................................................................................................................155 Figure 132: Add Monthly Schedule page with example schedule .......................................................................................156 Figure 133: Monthly Schedule - Skillsets page....................................................................................................................157 Figure 134: Your Monthly Schedules page with a Print Schedule in the list .......................................................................158 Figure 135: Edit Monthly Schedule page .............................................................................................................................160 Figure 136: Reports and Schedules page..............................................................................................................................162 Figure 137: Selecting a Date Range .....................................................................................................................................164 Figure 138: Print Status page ...............................................................................................................................................166 Figure 139: Select Skillsets page..........................................................................................................................................168 Figure 140: Select Agents or Skillsets page .........................................................................................................................169 Figure 141: Select Activity Codes page ...............................................................................................................................170 Figure 142: Get Latest Contact Center Data ........................................................................................................................171 NN40040-303 List of Tables 9 List of Tables Table 1: Administrator and User Permissions .............................................................................................................69 Reporting for Contact Center Setup and Operations Guide 10 List of Tables NN40040-303 How to Use this Guide 11 1 How to Use this Guide Introduction This guide is designed to allow an Administrator or User to set up and operate Nortel Reporting for Contact Center. How this guide is organized The Reporting for Contact Center Setup and Operations Guide is organized as follows: How to Use this Document Provides a brief overview identifying the organization of this guide. Details also given on how to get help from Nortel. Introduction Provides an overview of the conceptual organization of the Nortel Reporting for Contact Center product. Installation Describes the minimum specification for the Personal Computer (PC) required that hosts the Nortel Reporting for Contact Center software. It also describes how to install Nortel Reporting for Contact Center. Administration Describes the required administration duties and configuration to ensure that Nortel Reporting for Contact Center operates correctly. Using Reporting for Contact Center Describes the use and configuration of Nortel Reporting for Contact Center from a user’s perspective. Reports Describes the reports that are available within Nortel Reporting for Contact Center. Glossary Describes the terms used in this guide. References Lists documents referenced in this guide. Index Provides a cross-reference of topics in this guide. Reporting for Contact Center Setup and Operations Guide 12 How to Use this Guide How to get Help This section explains how to get help for Nortel products and services. Getting Help from the Nortel Web site The best source of support for Nortel products is the Nortel Support Web site: http://www.nortel.com/support This site enables customers to: • Download software and related tools • Download technical documents, release notes, and product bulletins • Sign up for automatic notification of new software and documentation • Search the Support Web site and Nortel Knowledge Base • Open and manage technical support cases Getting Help over the phone from a Nortel Solutions Center If you have a Nortel support contract and cannot find the information you require on the Nortel Support Web site, you can get help over the phone from a Nortel Solutions Center. In North America, call 1-800-4NORTEL (1-800-466-7835). Outside North America, go to the following Web site and look up the phone number that applies to your region: http://www.nortel.com/callus When you speak to the phone agent, you can reference an Express Routing Code (ERC) to route your call more quickly to the appropriate support specialist. To locate the ERC for your product or service, go to: http://www.nortel.com/erc Getting Help through a Nortel distributor or reseller If you purchased a service contract for your Nortel product from a distributor or authorized reseller, you can contact the technical support staff for that distributor or reseller. NN40040-303 Introduction 13 2 Introduction Nortel Reporting for Contact Center is a browser-based Real Time information and Historical Reporting tool for the Nortel Contact Center. Nortel Reporting for Contact Center provides: Real Time windows showing current Contact Center activity for calls and for agents Real Time information through hardware and software IP-enabled wallboards A comprehensive Historical Reporting package Note: In this document, the phrase the Contact Center platform is used to refer to either the Business Communications Manager or the CallPilot hardware, and the phrase the Contact Center is used to refer to the Contact Center application running on that platform. The platforms are referenced specifically by name in areas of this document such as those that describe the information concerning the configuration of the Contact Center Connection page (see Contact Center Connection on page 60). Web-Based User Interface All the administrative and user interactions with Nortel Reporting for Contact Center are conducted through a series of Web pages that are accessed through Internet Explorer browser sessions. The Web pages are hosted on a designated PC, referred to as the Web Host PC, on which the Nortel Reporting for Contact Center software is installed. The Web Host PC communicates directly with the Contact Center to retrieve Real Time updates (for the Real Time screens and wallboards) and Historical information (for the reports). Other PCs that have network access to the Web Host PC can access these Web pages. Multiple users can, therefore, use Nortel Reporting for Contact Center without having any software other than Internet Explorer installed on their PCs. (The Java Runtime Environment, if required, and the ActiveX Report Viewer are automatically downloaded to the client the first time they are required.) Language Support Each Administrator or User of Nortel Reporting for Contact Center can specify to view their Web user interface pages in one of the following 13 languages: North American English, United Kingdom English, Canadian French, Latin American Spanish, Brazilian Portuguese, Spanish, Dutch, French, German, Italian, Norwegian, Danish, and Swedish. Each Administrator or User can also view individual wallboards in any of these languages. Reporting for Contact Center Setup and Operations Guide 14 Introduction Administrators and Users The two types of Nortel Reporting for Contact Center users are Administrators and Users. In addition to having access to all the features of Nortel Reporting for Contact Center, Administrators can specify and change fundamental configuration settings within Nortel Reporting for Contact Center. For security purposes and to maintain system stability, only Users with Administrator capabilities can change the fundamental configuration settings. User interactions with Nortel Reporting for Contact Center are limited to using the features that it provides. While Users cannot modify the core setup of Nortel Reporting for Contact Center, they can specify and change some personal preferences. Users can also configure any aspects of Nortel Reporting for Contact Center that affect only themselves. Administrators and Users view different menus when they log in. Assigned Skillsets Administrators create Users by providing details, such as User Name and language, to Nortel Reporting for Contact Center. The Administrator must then assign Skillsets to Users. The process of assigning Skillsets defines the Skillsets that each User can view in the Real Time screens and for which the User can request Historical Reports. Skillsets can be assigned to more than one User. Users can choose to view the Real Time screens or Historical Reports for any of the Skillsets assigned to them, any combination of the allocated Skillsets, or all the assigned Skillsets. Users, including the Administrator, can save frequently used Selections of Skillsets as Favorites and assign names to the Favorites. The User can then, with a single mouse click, quickly locate a Skillset selection. Favorites are unique to each User. Users can create, modify, or delete their Favorites without affecting the Favorites of other Users. SQL Historical Database Historical Report information is stored in a standard Microsoft SQL Server 2005 Express database. If Users have reporting requirements that are not available through Nortel Reporting for Contact Center, they can analyze the data using third-party reporting packages. NN40040-303 Introduction 15 System Software The software that sends data to Nortel Reporting for Contact Center is integral to the Nortel Contact Center. Nortel Reporting for Contact Center software on the Web Host PC communicates directly with the Contact Center to request Contact Center Historical Report statistical data and Real Time data. Users on other PCs can access the Real Time and Historical Report data by pointing their Internet browsers to the Nortel Reporting for Contact Center Web pages on the Web Host PC. Only the Web Host PC needs to communicate with the Contact Center. Note: One PC on your network should be designated as the Web Host PC. Install the Nortel Reporting for Contact Center application software onto this designated PC only. If there are multiple Contact Centers on the network, multiple Web Host PCs are required. A single Web Host PC, with a particular version of Reporting for Contact Center installed, can only connect to a single Contact Center. All other network PCs from which Users access the Real Time screens, Historical Reports, or the Nortel Reporting for Contact Center user interface must be equipped with Internet Explorer. No other software is required on these PCs. PC Requirements The minimum recommended requirements for the PC designated as the Nortel Reporting for Contact Center Web Host PC for BCM50 3.0 are as follows: Recommended Minimum PC Specification for BCM50 3.0 IBM™ Compatible PC Microprocessor Intel® PentiumTM IV (or equivalent) minimum Microprocessor Speed 1.7 GHz minimum Memory 512 MB minimum Network Interface Card TCP/IP protocol SVGA display Reporting for Contact Center Setup and Operations Guide 16 Introduction Mouse (or other Windows®-compatible pointing device) Microsoft Internet Explorer version 6.0 Service Pack (SP) 1, or later Web Server Nortel Reporting for Contact Center has been verified with Microsoft Internet Information Services 5.0, or later. Nortel Reporting for Contact Center is supported on a single PC only and is not intended to run on Cluster Servers like those supported by Windows 2003 Enterprise. Hard Disk Space Required For installation and operation of application on Web Server: 1.4 GB Recommended storage space for Historical Data: 4 GB Operating System Compatibility Nortel Reporting for Contact Center is verified for correct operation on the following operating systems: Operating System Windows 2000 Windows XP Windows Server 2003 Windows Vista NN40040-303 Version 5.00.2195, SP4 Professional, Version 2002, SP2 Standard Edition, SP1 Business or Ultimate Edition Installation 17 3 Installation Introduction This chapter describes the installation prerequisites and the procedure for installing the Nortel Reporting for Contact Center software on the Windows Personal Computer that is designated as the Web Host PC. The Web Host PC communicates with the Nortel Contact Center. The Web Host PC also stores the Contact Center statistical database and the Nortel Reporting for Contact Center user interface, which is configured as a Web site. Users of other network PCs can use Internet Explorer to access the Nortel Reporting for Contact Center Web site on the Web Host PC. From the Web site, Users can access the software features and can obtain Real Time displays and Reports. Upgrading to Reporting for Contact Center This section describes the installation of Nortel Reporting for Contact Center from Nortel Networks Call Center Reporting on a Web Host PC. If you are upgrading from Call Center Reporting 2.5, 3.0, or 3.5, refer to the Upgrading from Call Center Reporting to Reporting for Contact Center (NN40010-400) document. If you are upgrading from a previous version of Nortel Reporting for Contact Center to a newer version of Nortel Reporting for Contact Center, refer to the following section, Upgrading a Previous Version of Reporting for Contact Center. Uninstalling Reporting for Contact Center Perform the following steps to uninstall Nortel Reporting for Contact Center: 1. From the Start menu select Settings > Control Panel to open the Control Panel window. 2. Double-click Add or Remove Programs. 3. From the list of programs select Reporting for Contact Center. 4. Click the Change/Remove button to open InstallShield Wizard. 5. Select the Remove option and click Next. 6. Follow the on-screen instructions of InstallShield Wizard to complete the un-installation. Reporting for Contact Center Setup and Operations Guide 18 Installation Note: The Reporting for Contact Center directory will be left behind along with folders and files required for log information for any saved Log files from activity in the uninstalled version of Reporting for Contact Center. To remove these files, the user must manually delete them using Windows Explorer. Upgrading a Previous Version of Reporting for Contact Center To upgrade a previous version of Nortel Reporting for Contact Center, perform the following steps: 1. Uninstall the current version of Nortel Reporting for Contact Center from the Web Host PC, refer to Uninstalling Reporting for Contact Center on page 17. 2. Install the latest version of Nortel Reporting for Contact Center from the location that this resides and double-click on the Reporting for Contact Center .exe file. 3. InstallShield Wizard will open up. Follow the on-screen instructions to be guided through the installation process. Note: You DO NOT need to uninstall Microsoft SQL Server 2005, Microsoft .NET Framework 2.0, or Java SE Runtime Environment 6. If required the Nortel Reporting for Contact Center databases are modified during the installation. There is no loss of statistical data, but new data, tables, columns, and/or indexes may be added to them. Deleting Temporary Internet Files To prevent Internet Explorer from caching old versions of the Nortel Reporting for Contact Center Web pages, delete the temporary Internet files on your computer. Follow these steps to delete temporary Internet files. 1. Click Start, then right-click the Internet Explorer icon, and select Internet Properties. See Figure 1: Internet Properties dialog box. NN40040-303 Installation 19 Figure 1: Internet Properties dialog box Note: If you do not see the dialog box shown in Figure 1: Internet Properties dialog box, you have clicked a shortcut to Internet Explorer. You must click the Internet Explorer icon in the Start menu. 2. When you see the window shown in Figure 1: Internet Properties dialog box, click Delete Files. The Delete Files dialog box shown in Figure 2: Delete Files dialog box appears. Figure 2: Delete Files dialog box 3. Select Delete all offline content, and then click OK. Reporting for Contact Center Setup and Operations Guide 20 Installation 4. Click OK to close the Internet Properties window. Proceed with the installation of Nortel Reporting for Contact Center, as described in Installation prerequisites. It may also be necessary to clear your Java Cache when upgrading Nortel Reporting for Contact Center. This is not strictly necessary but should any problems be seen after the upgrade consult the Reporting for Contact Center Troubleshooting and Maintenance Guide (NN40020-403). Installation prerequisites Before you install Nortel Reporting for Contact Center software, you must: Be familiar with the Contact Center and the WindowsTM operating system used by your Web Host PC. Ensure that the Contact Center is installed and configured. Ensure that the Contact Center platform is connected to, and is operational on, the network to which the Nortel Reporting for Contact Center Web Host PC is connected. Ensure that the full suite of Microsoft Internet Information Services is installed and operational on the Web Host PC, and that the Default Web Site is enabled. To install Microsoft Internet Information Services, refer to Installing Microsoft Internet Information Services. For BCM50 3.0, as the Nortel Reporting for Contact Center installation includes Microsoft .NET Framework 2.0, ensure Microsoft .NET Framework 1.2 or later, are uninstalled from the Web Host PC before installing Nortel Reporting for Contact Center. This is because Microsoft .NET Framework 1.2, or later, are not compatible with SQL Server 2005 Express which is included in the BCM50 3.0 Nortel Reporting for Contact Center installation. Note: Microsoft .NET Framework versions 1.0, 1.1 and 2.0 do not have to be uninstalled. To check and uninstall the incompatible versions of .NET Framework installed on the Web Host PC, perform the following: 1. From the Start menu, select Settings > Control Panel. 2. Double-click on Add or Remove Programs. 3. View the list of programs installed on the PC. If Microsoft .NET Framework 1.2, or a later version, is listed, click on the Remove button. NN40040-303 Installation 21 4. Follow the InstallShield Wizard instructions to uninstall the program. Installing Microsoft Internet Information Services You can install Microsoft Internet Information Services through the Add or Remove Programs dialog box, using the Add/Remove Windows Components icon. See Figure 3: Add or Remove Programs. Figure 3: Add or Remove Programs Follow these steps to install Microsoft Internet Information Services: 1. On the Windows taskbar, select Start > Settings and then click Control Panel. The Control Panel window appears. 2. Double-click the Add or Remove Programs icon. The Add or Remove Programs dialog box appears. 3. Click Add/Remove Windows Components. The Windows Components Wizard appears, as shown in Figure 4: Windows Components Wizard. Reporting for Contact Center Setup and Operations Guide 22 Installation Figure 4: Windows Components Wizard 4. Select Internet Information Services (IIS). The background of the check box turns grey, indicating that only the basic components of Internet Information Services will be installed. You do not need to install any additional components for Reporting for Contact Center to work properly. Installing additional components is optional, and additional components do not affect the operation of Reporting for Contact Center. 5. Click Next. The Configuring Components dialog box appears. See Figure 5: Windows Components Wizard Installation. NN40040-303 Installation 23 Figure 5: Windows Components Wizard Installation Windows now installs your Internet Information Services component. You may be prompted for additional installation files (typically from a CD). If you are prompted for additional files, insert the Windows operating system installation disk that was used to install the Windows operating system of the Web Host PC, and click OK. If you do not use the same disk, you cannot complete the installation. 6. When Internet Information Services installation is complete, you receive a message that confirms successful completion. See Figure 6: Windows Components Wizard Installation Completed. Reporting for Contact Center Setup and Operations Guide 24 Installation Figure 6: Windows Components Wizard Installation Completed Click Finish to return to the Add or Remove Programs dialog box. You can close the Add or Remove Programs dialog box and the Control Panel window. 7. To test that the Internet Information Service is properly installed, open Internet Explorer and in the Address bar enter: http://localhost/ If the installation is successful, a window similar to the window in Figure 7 : Internet Information Services test page appears. NN40040-303 Installation 25 Figure 7 : Internet Information Services test page This window also contains useful information regarding your Internet Information Services. You can see the current version number and additional information about where to find extended help for Internet Information Services. If you see a Page Cannot be Displayed screen, re-install the Internet Information Services and reboot the Web Host PC. Reporting for Contact Center Setup and Operations Guide 26 Installation To ensure correct operation of Nortel Reporting for Contact Center, observe the following points: The IP address setting for the default Web site should be All Unassigned, or the IP address setting for the default Web site should be 127.0.0.1 and the host header should be localhost. The port should be set to 80. Ports 3500, 6010, and 6011 must not be blocked by local firewalls. Port Numbers used by Nortel Reporting for Contact Center The list below gives all the port numbers used by Nortel Reporting for Contact Center on the Web Host PC: Port 80 – this is the standard port used by the Web Server (the Web Host PC) for Internet Information Services. Port 8088 – used for the Reporting Server in the Business Communications Manager. Port 3500 – used by ipView SoftBoard to listen for incoming data and to echo to other wallboards. For more information on the ipView SoftBoard, refer to ipView Software Wallboard Setup and Operation Guide (NN40010-500). Port 6010 – used for the Reporting for Contact Center Real Time (RCCRT) Server. Port 6011 – used for the Reporting for Contact Center Reporting (RCCRPT) Server. Note: Nortel recommends that you ensure your Web Host PC Internet Information Services installation is as secure as possible. Generally, a secure installation involves loading security patches and/or service packs for Internet Information Services and for the operating system of the Web Host PC. These patches and service packs are available free of charge by Microsoft. Contact your network administrator for further advice. You are now ready to install the Nortel Reporting for Contact Center software from the Contact Center platform. See Installing Nortel Reporting for Contact Center software. Settings required for Windows Vista with IIS 7.0 In order to install Reporting for Contact Center on a Windows Vista operating system some Windows Internet Information Services (IIS) features have to be turned on. Perform the following steps to enable Windows features on a Windows Vista operating system using IIS 7.0 that are required for a Reporting for Contact Center installation: 1. Click on the Start menu and select Program Files > Control Panel. NN40040-303 Installation 27 2. Double-click on Programs and Features. 3. From the left panel click on the Turn Windows features on or off option. See Figure 8: Windows features option in Programs and Features window. Figure 8: Windows features option in Programs and Features window The Windows Features window will open. 4. Expand the following: • Internet Information Services > Web Management Tools > IIS 6 Management Compatibility. Select the following check boxes: o IIS 6 WMI Compatibility o IIS Metabase and IIS 6 configuration compatibility • Internet Information Services > World Wide Web Services > Application Development Features. See Figure 9: Turn Windows features on or off dialog box. Select the following check boxes: o ASP Reporting for Contact Center Setup and Operations Guide 28 Installation o ASP.Net o ISAPI Extensions o ISAPI Filters • Internet Information Services > World Wide Web Services > Common Http Features. Select the following check boxes: o Default Document o HTTP Redirection o Directory Browsing o Static Content • Internet Information Services > World Wide Web Services > Security. Select the following check boxes: o Request Filtering o Windows Authentication Figure 9: Turn Windows features on or off dialog box NN40040-303 Installation 29 5. Click OK on the Windows Feature dialog box. IIS 7.0 will now allow Reporting for Contact Center to be installed on the Windows Vista operating system. Installing Nortel Reporting for Contact Center software Note: You must have Administrator rights for the installation to be successful. If you do not have Administrator rights for the PC on which you wish to install Nortel Reporting for Contact Center, the installation is halted and you are requested to log out and log back in with Administrator rights. By default, Nortel Reporting for Contact Center software creates a folder in the location \Program Files\Nortel\Nortel Reporting for Contact Center on the installation drive of the Web Host PC. This folder contains the application files used by Nortel Reporting for Contact Center. The folder also contains the Nortel Reporting for Contact Center configuration and statistical database. Note: Before Nortel Reporting for Contact Center will operate correctly, you must enable the Contact Center Reporting Software Keycode. For Software Keycode information, refer to the Software Keycode Installation Guide. TCP/IP Protocol The Contact Center platform and Nortel Reporting for Contact Center use the industry standard TCP/IP protocol for communication between the Contact Center and the Nortel Reporting for Contact Center Web Host PC. The Windows Network component is required for the Nortel Reporting for Contact Center Web Host PC. Refer to Checking Installation of the Windows Networking Component. The Nortel Reporting for Contact Center installation process does not install the Windows Network component. For instructions about installing the Windows Networking component, refer to your network or Windows documentation. Checking Installation of the Windows Networking Component Follow the steps in this section to check that the Windows Networking component is set up properly on the PC that will operate as the Web Host PC. Note: If your company has a network administrator, check with your administrator before changing any network configuration parameters. 1. Start the Windows system on the PC where the Nortel Reporting for Contact Center application is installed. Reporting for Contact Center Setup and Operations Guide 30 Installation 2. On the Windows taskbar, select Start > Settings and then click Control Panel. The Control Panel window appears. If you are using the Windows 2000 operating system, double-click Networking and Dial-up Connections. The Networking and Dial-up Connections window appears. If you are using the Windows XP operating system, select Start > Connect to and then click Show All Connections. The Networking Connections window appears. 3. Double-click the Network icon. The Network window appears with the Configuration tab displayed. If you are using the Windows 2000 or Windows XP operating system, right-click the Local Area Connection icon and then click Properties. 4. Check that TCP/IP appears on the list of installed network components. If TCP/IP is not on the list, click Add to install this protocol using the Windows installation instructions, or refer to your network administrator. Installing Nortel Reporting for Contact Center for a Business Communications Manager Installation Follow the steps in this section to install Nortel Reporting for Contact Center for a Business Communications Manager installation. 1. Close any Windows programs that are open. 2. Start your Internet browser (such as Internet Explorer or Netscape) and connect to the Business Communications Manager. In the browser Address Bar, enter the IP Address of the Business Communications Manager in the following format: https://10.10.10.1/ Remember to substitute the IP Address of your Business Communications Manager for the 10.10.10.1 shown in the example. Enter the username nnadmin and password in the BCM Login window. Consult your network administrator for the password, as this would have been changed from the default password of PlsChgMe! on first installation of Nortel Element Manager. The Welcome to BCM page appears. 3. Click Business Applications. The Business Applications page appears. 4. From the Contact Center Applications list, click Reporting for Contact Center. Information about the Nortel Reporting for Contact Center application appears. See Figure 10: Download the Reporting for Contact Center Software. NN40040-303 Installation 31 Figure 10: Download the Reporting for Contact Center Software 5. Click Download Reporting for Contact Center on the right side of the window. The File Download dialog box appears. 6. Select either Run to run this program from its current location, or Save to save this program to disk. Reporting for Contact Center Setup and Operations Guide 32 Installation If you select Save, the Reporting for Contact Center executable file is downloaded to your PC. Go to the location where you downloaded the file and double-click the file to run it. 7. The Install Wizard shown in Figure 11: InstallShield Initialization dialog box appears. The wizard extracts the installation files required to install the Nortel Reporting for Contact Center files on the Web Host PC. Wait until the files are extracted. Figure 11: InstallShield Initialization dialog box 8. The installation will perform a compatibility check for minimum PC requirements to install Nortel Reporting for Contact Center, as shown in Figure 12: RCC Compatibility Check dialog box, with an exception of a Windows 2000 operating system where the minimum memory (or Random Access Memory) and processor speed are not verified. Figure 12: RCC Compatibility Check dialog box 9. If the Web Host PC is compatible with Nortel Reporting for Contact Center, a RCC backup dialog box will be displayed, as shown in Figure 13: RCC Compatibility Check – creating backup files. NN40040-303 Installation 33 Figure 13: RCC Compatibility Check – creating backup files Go to step 12. If the Web Host PC is below the recommended minimum specification to install Nortel Reporting for Contact Center (for minimum specification requirements refer to Recommended Minimum PC Specification for BCM50 3.0 on page 15) an error message will be displayed. An example error message for when there is insufficient memory on the Web Host PC to install Nortel Reporting for Contact Center is shown in Figure 14: RCC Compatibility Check – insufficient memory error message. Figure 14: RCC Compatibility Check – insufficient memory error message Click OK on the error message displayed. The Nortel Reporting for Contact Center setup will stop and be rolled back. 10. To install Nortel Reporting for Contact Center increase the Web Host PC specification as requested in step 9. 11. Run the Nortel Reporting for Contact Center setup again as follows: • If the Reporting for Contact Center executable was saved to the Web Host PC, close any Windows programs and double-click on the executable file to run Nortel Reporting for Contact Center. Go to step 7. • If the Nortel Reporting for Contact Center download was run directly from the BCM50 3.0 Reporting for Contact Center download page, go back to step 1. 12. The Choose Setup Language dialog box will be displayed, as shown in Figure 15: Choose Setup Language dialog box, which allows you to select the default language for your installation of Nortel Reporting for Contact Center. Reporting for Contact Center Setup and Operations Guide 34 Installation Figure 15: Choose Setup Language dialog box Note: Each User of Nortel Reporting for Contact Center is assigned a language. You can have different languages in use by various Users at the same time. This dialog box allows you to define the default language for the Login page and for the default Administrator. Click on the down arrow to the right of the dropdown box to display a list of languages. When you have selected your language, click OK. To stop the installation, click Cancel. 13. If MDAC 2.8 is already installed on your PC, go to step 15. If you do not have Microsoft Data Access Components (MDAC) 2.8 already installed on your PC, you will be prompted to install it as a prerequisite for RCC, see Figure 16: InstallShield Requirements dialog box. Figure 16: InstallShield Requirements dialog box NN40040-303 Installation 35 Click OK to install MDAC 2.8. 14. The MDAC 2.8 End User License Agreement dialog box appears. See Figure 17: MDAC 2.8 End User License Agreement dialog box. Figure 17: MDAC 2.8 End User License Agreement dialog box Select the I accept all of the terms of the preceding license agreement check box and click Next. 15. The setup will check for disk space, then display the MDAC installation dialog box, as shown in Figure 18: MDAC installation dialog box. Reporting for Contact Center Setup and Operations Guide 36 Installation Figure 18: MDAC installation dialog box Click Finish to begin the MDAC 2.8 installation. 16. After MDAC 2.8 is installed you will be asked to restart your PC for MDAC to operate correctly, see Figure 19: Microsoft Data Access Components system restart dialog box. NN40040-303 Installation 37 Figure 19: Microsoft Data Access Components system restart dialog box Click Finish to restart your PC. Note: After the PC has rebooted, the Nortel Reporting for Contact Center installation will continue. 17. If you do not have Microsoft SQL Server 2005 Express with Advanced Services and Microsoft Report Viewer already installed on your PC you will be prompted to install them both as a prerequisite for RCC. See Figure 20: InstallShield RCC requirements for SQL Server and Report Viewer dialog box. Reporting for Contact Center Setup and Operations Guide 38 Installation Figure 20: InstallShield RCC requirements for SQL Server and Report Viewer dialog box Click OK to install both SQL Server 2005 Express with Advanced Services and Report Viewer automatically. Note: This process can take several minutes and will also install Microsoft .Net Framework 2.0 if required. See Figure 21: InstallShield RCC requirements dialog box. NN40040-303 Installation 39 Figure 21: InstallShield RCC requirements dialog box 18. After the RCC prerequisite software have been installed the InstallShield RCC Welcome dialog box appears, as shown in Figure 22: InstallShield Wizard RCC Welcome dialog box. Reporting for Contact Center Setup and Operations Guide 40 Installation Figure 22: InstallShield Wizard RCC Welcome dialog box To begin the RCC installation click Next. To cancel the installation procedure, click Cancel. 19. The License Agreement for Nortel Reporting for Contact Center dialog box appears, as shown in Figure 23: License Agreement dialog box. NN40040-303 Installation 41 Figure 23: License Agreement dialog box 20. Read the Software License Agreement before proceeding. To proceed with the installation, click Yes. To return to the Welcome dialog box, click Back. To cancel the installation, click No. A warning message will be displayed asking the user for confirmation to quit the RCC installation, as shown in Figure 24: Exit Setup warning message box. Figure 24: Exit Setup warning message box Click Yes to quit the installation. The InstallShield Wizard Completed dialog box appears. Click Finish to exit the Wizard. Reporting for Contact Center Setup and Operations Guide 42 Installation 21. The Choose Destination Location dialog box shown in Figure 25 : Choose Destination Location dialog box appears. Figure 25 : Choose Destination Location dialog box 22. Nortel recommends that you accept the location specified in the dialog box. If you do not wish to install Nortel Reporting for Contact Center on the default drive (C:\), click Browse to choose a new destination. To proceed with the installation, click Next. To cancel the installation, click Cancel. 23. The Setup Status dialog box shown in Figure 26: Setup Status dialog box appears. NN40040-303 Installation 43 Figure 26: Setup Status dialog box The Setup Status dialog box shows the progress of the installation. To cancel the installation at this stage, click Cancel. 24. The message shown in Figure 27: Java installation dialog box appears. Wait for the installation to complete. Figure 27: Java installation dialog box Note: The Java Runtime is not installed into the same folders as Nortel Reporting for Contact Center; it is installed into \Java on the target hard drive. 25. When installation is complete, the InstallShield Wizard Complete dialog box shown in Figure 28: Installation Complete dialog box appears. Reporting for Contact Center Setup and Operations Guide 44 Installation Figure 28: Installation Complete dialog box Note: Before Nortel Reporting for Contact Center can operate correctly, you must restart your Web Host PC. For the installation to restart the PC, select Yes, I want to restart my computer now, and then click Finish. To complete the installation without restarting your PC at this time, select No, I will restart my computer later, and then click Finish. 26. After you have rebooted your PC and logged back on the Reporting for Contact Center RCC Monitor splash screen will automatically appear, as shown in Figure 29: RCC Monitor splash screen. NN40040-303 Installation 45 Figure 29: RCC Monitor splash screen 27. The RCC Database Installer Utility (DBI) will then be launched. See Figure 30: RCC Database Installer Utility. The DBI launches and configures the database. It performs several steps and displays its status during each step. Figure 30: RCC Database Installer Utility Reporting for Contact Center Setup and Operations Guide 46 Installation Note: This utility can take several minutes to execute. During the Create Tables step, there will be a long pause of approximately five minutes while the strings.sql table is created. This is normal and is due to its large size. 28. When the RCC DBI has completed it will launch the Install Verification Utility (IVU), refer to Install Verification Utility on page 46, and also the Print Caller Service (PCS), refer to Print Caller Service on page 48. Install Verification Utility The Install Verification Utility, also known as IVU, checks all the components of RCC to ensure they have been installed and configured correctly. See Figure 31: RCC Install Verification Utility. Figure 31: RCC Install Verification Utility The IVU checks the following: • SQL Server installation • Database Status • Java Runtime Environment NN40040-303 Installation 47 • Microsoft .Net Framework • RCC Ports and Firewalls • Internet Information Services (IIS) • Report Service • BCM connection The last check in the IVU is to verify a BCM connection from the Web Host PC. The IVU will request BCM connection data. A BCM Connection Data dialog box will open, as shown in Figure 32: BCM Connection Data dialog box. Figure 32: BCM Connection Data dialog box The BCM connection details requested by IVU are as follows: 1. IP Address/Network Name – enter the IP Address or the Network name of the BCM, also known as Contact Center, platform. 2. Port – this should be defaulted to the correct port number of 8088. 3. CCRS Password – when Nortel Reporting for Contact Center requests Real Time or Historical Report data from the Contact Center, a password is included in the data request. This password is set within the Contact Center using CallPilot Manager. The default CCRS password is CCRS. Click OK to submit the BCM Connection data. To verify the BCM IP Address and CCRS password entered, the IVU will connect to the BCM to get some Real Time and Historical Report data, as shown in Figure 33: RCC Install Verification Utility verifying BCM connection. Reporting for Contact Center Setup and Operations Guide 48 Installation Figure 33: RCC Install Verification Utility verifying BCM connection After successful connection to the BCM, a message box will be displayed to confirm whether you want to save the BCM connection settings. See Figure 34: Save BCM connection settings message box. Figure 34: Save BCM connection settings message box Click Yes to save the settings to the RCC database. The IVU window will display a successful verification message and links at the bottom of the window, as shown in Figure 35: RCC Install Verification Utility verification success. NN40040-303 Installation 49 Figure 35: RCC Install Verification Utility verification success Click Click Here to launch RCC to launch Nortel Reporting for Contact Center. To re-run the IVU click Refresh. Otherwise, to close IVU, click the Close button on the top right hand corner of the IVU window. Print Caller Service The Print Caller Service, also known as PCS, can run as a desktop application or a Windows service. By default the PCS will run as a desktop application and a user must be logged on to the PC for it to operate normally. The user can change the settings of the PCS to allow it to run as a Windows service and consequently are not required to log on to the PC for their ad hoc reports and Print Schedules to be served. Note: For Microsoft Windows Vista users PCS must be set as a Windows service, refer to PCS as a Windows service on page 52, to allow Print Caller Service logs to be created. For more information on RCC logs refer to Logging on page 78. PCS as a desktop application When PCS is running as a desktop application it will run in the background and display a system tray icon. An information bubble will be displayed, as shown in Figure 36: Print Caller Service information balloon, indicating that PCS has successfully started up and is serving print requests. Reporting for Contact Center Setup and Operations Guide 50 Installation Figure 36: Print Caller Service information balloon Stopping the PCS desktop application To stop the Print Caller Service, right-click the RCC Print Caller Service icon from the system tray and choose Stop Print Caller Services, see Figure 37: Print Caller Service menu. Figure 37: Print Caller Service menu Alternatively, stop the PCS through the RCC Print Caller Service window by the following: 1. Double-click the RCC Print Caller Service system tray icon, or right-click over the icon and choose Open, see Figure 37: Print Caller Service menu. You can also click the Print Caller Service information balloon, as shown in Figure 36: Print Caller Service information balloon. The RCC Print Caller Service window will open, as shown in Figure 38: RCC Print Caller Service window. Figure 38: RCC Print Caller Service window 2. Click Stop to stop the PCS running. NN40040-303 Installation 51 3. The Status in the RCC Print Caller Service window will change and the Start button will be displayed in order for the user to restart the PCS, as shown in Figure 39: RCC Print Caller Service window – PCS stopped. Figure 39: RCC Print Caller Service window – PCS stopped The RCC Print Caller Service system tray icon will have a red line across it and a warning balloon informing the user that the PCS has stopped running and that print schedules can no longer print reports. See Figure 40: Print Caller Service warning balloon. Figure 40: Print Caller Service warning balloon Restarting the PCS desktop application Perform either option to restart the PCS: Option 1 • Right-click the RCC Print Caller Service system tray icon and choose Start Print Caller Services, as shown in Figure 41: Print Caller Service menu – Start function. Figure 41: Print Caller Service menu – Start function Reporting for Contact Center Setup and Operations Guide 52 Installation Or, Option 2 • Follow the steps in the section Stopping the PCS desktop application, on page 50, where step 2 will display the Start button to restart the PCS. PCS as a Windows service Perform the following steps to set the PCS operational mode to run as a Windows service: 1. Right-click the RCC Print Caller Service system tray icon and choose Run as Windows Service from the menu, see Figure 37: Print Caller Service menu. Alternatively, open the RCC Print Caller Service window and select the Run as Windows Service check box and click Apply, as shown in Figure 42: RCC Print Caller Service window - Windows service mode. Figure 42: RCC Print Caller Service window - Windows service mode To cancel the PCS Windows service mode selection click Close. 2. A confirmation message box will be displayed informing the user that the PCS operation mode will be changed from a background application to a Windows service. See Figure 43: RCC Print Caller Service mode change message box. Figure 43: RCC Print Caller Service mode change message box Click Yes to proceed with the mode change. NN40040-303 Installation 53 3. The Set Service Login dialog box will appear, as shown in Figure 44: Set Service Login dialog box. Enter the username and password used to access networked printers configured on the Web Host PC. Figure 44: Set Service Login dialog box 4. Click OK to install RCC Print Caller Services Windows service and to save the log on settings. 5. The user will be prompted to reboot their PC to enable the RCC Print Caller Services Windows service settings, as shown in Figure 45: RCC Print Caller Services settings changed message box. Figure 45: RCC Print Caller Services settings changed message box Click OK. After the PC has restarted, the user is not required to log on to the PC again for RCC Print Caller Services to run as a Windows service and for ad hoc reports and Print Schedules to be served. To uninstall the PCS as a Windows service and run it again as a desktop application, perform the following steps: 1. Right-click the RCC Print Caller Service system tray icon and choose Run as background application. See Figure 46: Print Caller Service menu for Windows service. Reporting for Contact Center Setup and Operations Guide 54 Installation Figure 46: Print Caller Service menu for Windows service 2. A confirmation message box will be displayed to verify the run mode change of the PCS from a Windows service to a background application, as shown in Figure 47: RCC Print Caller Service mode change to background application message box. Figure 47: RCC Print Caller Service mode change to background application message box Click Yes. The user does not have to restart their PC for PCS to run as a background application. Ensure that the Web Host PC is logged on for ad hoc and scheduled reports to print. Stopping the PCS Windows service To stop the Print Caller Service Windows service, perform either option, as follows: Option 1 • Using the RCC Print Caller Service window, as follows: 1. Right-click the RCC Print Caller Service system tray and choose Open. See Figure 46: Print Caller Service menu for Windows service. Alternatively, double-click the RCC Print Caller Service system tray icon, or click the Print Caller Service information balloon, see Figure 36: Print Caller Service information balloon. 2. The RCC Print Caller Service window will open, as shown in Figure 48: RCC Print Caller Service window – Windows service mode. NN40040-303 Installation 55 Figure 48: RCC Print Caller Service window – Windows service mode Note: The Run as Windows Service check box will be selected to indicate that the PCS is running as a Windows service. 3. Click Stop to stop the PCS running. 4. The Status in the RCC Print Caller Service window will change and the Start button will be displayed in order for the user to restart the PCS, as shown in Figure 49: RCC Print Caller Service window – PCS stopped as a Windows service. Figure 49: RCC Print Caller Service window – PCS stopped as a Windows service The RCC Print Caller Service system tray icon will have a red line across it and a warning balloon informing the user that the PCS has stopped running and that print schedules can no longer print reports. See Figure 40: Print Caller Service warning balloon. Or, Option 2 • Stop the PCS Windows service through the Services window, as follows: 1. From the Start menu, click on Settings > Control Panel > Administrative Tools > Services. 2. Right-click RCC Print Caller Services and choose Stop or, in the Extended window, select RCC Print Caller Services and click Stop. Reporting for Contact Center Setup and Operations Guide 56 Installation 3. Close the Services, Administrative Tools and Control Panel windows. Restarting the PCS Windows service To restart the PCS Windows service, perform either option, as follows: Option 1 • Follow the steps in the section Stopping the PCS Windows service, on page 54, where step 3 will display the Start button to restart the PCS; Or, Option 2 • Restart the PCS Windows service through the Services window, as follows: 1. From the Start menu, click on Settings > Control Panel > Administrative Tools > Services. 2. Right-click RCC Print Caller Services and choose Start, or in the Extended window, select RCC Print Caller Services and click Start. 3. Close the Services, Administrative Tools and Control Panel windows. To quit the PCS Perform the following steps to quit the PCS: 1. Right-click the RCC Print Caller Service system tray icon and choose Exit. 2. A message prompt will be displayed to confirm quitting the PCS program, as shown in Figure 50: Print Caller Service shut down warning message. Figure 50: Print Caller Service shut down warning message Click Yes. The PCS program will shut down and ad hoc reports and Print Schedules will no longer print reports. NN40040-303 Administration 57 4 Administration Logging In Follow the steps in this section to log on to Nortel Reporting for Contact Center as an Administrator: 1. Using Internet Explorer, go to your Nortel Reporting for Contact Center Web pages Login page. The URL is http://[Name of Web Host PC]/RCC Where NameOfWebHostPC is the network name or IP Address of the Web Host PC. The Login page appears. See Figure 51: Login page. Note: If you are using the browser on the Web Host PC, you can replace NameOfWebHostPC with localhost. Note: You can add the Login page to your Internet Favorites. To add this page to your favorites in Internet Explorer, press Ctrl+D when you are at the Login page, or from the menu bar select Favorites > Add to favorites. Reporting for Contact Center Setup and Operations Guide 58 Administration Figure 51: Login page 2. Enter the username admin and the default password 0000, and click Login. Note: After an upgrade from Nortel Reporting for Contact Center version 2.4 to 2.5, the password is defaulted back to 0000. You must change the default password the first time you log on, including after an upgrade from Nortel Reporting for Contact Center version 2.4 to 2.5. See Changing Default Password. Changing Default Password Perform the following steps to change the default password: 1. When you first log on, the Change Password dialog box appears. See Figure 52: Change Password page. Your password can be from 1 to 10 characters, including upper and lowercase letters, and digits. The password can be anything other than 0000. Enter your new password in the New password field. NN40040-303 Administration 59 Figure 52: Change Password page Your password can be from 1 to 10 characters, including upper and lowercase letters, and digits. The password can be anything other than 0000. Enter your new password in the New password field. 2. Re-enter your password in the Confirm password field. If the passwords you entered are not the same, you are informed that the password and confirmation do not match, and you must re-enter the password in both fields. 3. Click Submit. If you successfully entered the new password, the Contact Center Connection page as shown in Figure 53: Contact Center Connection page appears. Note: The Administrator will be re-directed to the Contact Center Connection page on first log on after a fresh installation of Nortel Reporting for Contact Center, or after an upgrade from Nortel Reporting for Contact Center version 2.4 to 2.5. Reporting for Contact Center Setup and Operations Guide 60 Administration Contact Center Connection The Contact Center Connection page allows you to specify the network identifier (IP address or Network name) of the Contact Center platform. Typically, the Contact Center Connection page appears only once, after you first log on as an Administrator . If the Contact Center Connection information is incomplete or incorrect, the Contact Center Connection page appears each time you log on as an Administrator. For example, if you add a new Network Card to the Web Host PC, you must select an IP address for the Web Host PC to communicate with the wallboards. In this case, the Contact Center Connection page appears so that you can select the IP address. If you do not select the Contact Center Connection option from the menu, the page automatically appears after you log on, as shown in Figure 53: Contact Center Connection page. Figure 53: Contact Center Connection page NN40040-303 Administration 61 Perform the following steps to configure the Contact Center Connection page: 1. In the IP Address/Network name field, enter the IP Address or the Network name of the Contact Center platform. If you do not know what information to enter, consult the Local Area Network Administrator for your site. Note: Check that Reporting for Contact Center is configured to point at the IP Address of the Contact Center. For BCM50 3.0 system this will be the network IP address of the BCM. 2. The Port field will be defaulted automatically to the correct port number of 8088 for connection to a BCM50 3.0 system. 3. When Nortel Reporting for Contact Center communicates with the Contact Center to request Real Time or Historical Report data, it includes a password in the data request. This allows the Contact Center to verify that the application requesting the data is authorized to receive it. This password is set within the Contact Center using CallPilot Manager. In the CCRS password field, enter the set password. Note: The default CCRS password is CCRS. If the default password is not accepted the password might have been changed in the Contact Center from within CallPilot Manager. 4. In the Confirm CCRS password field, re-enter the set password. 5. In the Make data requests every list specify how frequently the Web Host PC communicates with the Contact Center in order to obtain reporting data. The typical setting is 15 minutes. 6. In the Select an IP Address list, select the IP address (Network Interface Card) with which you wish to communicate with the wallboards. If the Web Host PC has more than one IP Address (because it has more than one Network Interface Card configured) the list is populated with the IP addresses configured for the Web Host PC. Select which Network Interface Card to use for communication with the wallboards. The Network Interface Cards are identified in the list by their configured IP Addresses. Select the IP Address that is configured on the Network Interface Card connected to the same network as the wallboards. Note that this IP Address is not the IP Address of the wallboard. This address is the IP Address configured for the Network Interface Card in the Web Host PC. Note: If you add a new Network Interface Card or other network device, such as a USB Bluetooth device, or if you enable a disabled Network Interface Card, then you must reboot your Web Host PC so that the new device is detected and presented in the Select An IP Address list. Reporting for Contact Center Setup and Operations Guide 62 Administration 7. From the Wallboard and Refresh Real Time Interval list, select your refresh interval for the Wallboard and Real Time displays. The two available options are 1 second (default) and 3 seconds. Note: This setting applies only to the refresh rate of the display. Wallboard and Real Time information is always calculated to the second. If, for example, you select 3 seconds as your refresh interval, your display updates every 3 seconds but your data is calculated to the second. Figure 54: Download Contact Center Data options 8. On first installation of Reporting for Contact Center the Download Contact Center Data options are given, see Figure 54: Download Contact Center Data options. The User can select whether to download all data from the Contact Center by selecting All Data, or the User can select Only Data starting from and click on the calendar icon to the right to select a start date from when data should be downloaded from the Contact Center. 9. Click Submit. The Download Status window appears. This displays the progress of the Contact Center download. See Figure 55: Download Status window. Figure 55: Download Status window Five parameters are provided in the Download Status window, as follows: i. Data download progress – this indicates the percentage of data download completion by way of a progress bar and a percentage. When 100% download completion is reached, the progress bar will display the text: RCC Database Update Complete NN40040-303 Administration 63 Note: After Reporting for Contact Center is installed, it queries the Contact Center for any Contact Center data that the Contact Center has accumulated. ii. Status – an indicator light will be displayed. A green indicator light shows the successful downloading of data from the Contact Center. The Status indicator will turn red if Reporting for Contact Center encounters problems downloading Contact Center data. An error message will be displayed directly below the Status field, indicating the problem. Refer to the Reporting for Contact Center Troubleshooting and Maintenance Guide (NN40020-403) on the type of error messages that can be displayed and how to troubleshoot them. iii. Time – this is the time in hours, minutes, and seconds that the current download has been running. This data is updated every 9-10 seconds. iv. Processing Calls From – this displays the start date and time of the current data being processed. Reporting for Contact Center will request data from the Contact Center from this date to the latest call data in the Contact center. This is the download period. Data download progress indicates how far through the download period the download process is in terms of time, not in terms of calls. v. Total Contact Center Calls in the Database – this indicates the total amount of calls stored in the Web Host PC database. Note: The time to download the historical data from the Contact Center and to store it in the Web Host PC database depends on the amount of time the Contact Center has been recording historical data prior to being connected to the Web Host PC and the amount of call traffic that your Contact Center handles. As a general guide, 30,000 calls take between 6 and 18 hours to download, depending on the level of network traffic and the speed of your Web Host PC. Note: You can use your PC as normal during the download, but do not reset it or power it off. When the download is complete, the Data download progress field shows a 100% complete status. Your browser page may time out before the download is complete. This is not an error. Microsoft Internet Information Services has a setting that dictates how long it waits before closing a web page. As the download completes, you are informed of the status in the Download Status field. The Administration Menu appears, refer to Administration Menu on page 64. Reporting for Contact Center Setup and Operations Guide 64 Administration Administration Menu When an Administrator logs in (unless they are logging in with the default password of 0000), they view the Administration Menu page. See Figure 56: Administration Menu page. Note: To remind you that you logged in as an Administrator, Administration appears in the blue bar at the top of each Administration page. Figure 56: Administration Menu page The available Administrator options appear in the navigation pane on the left side of the page. For information about the Contact Center Connection, refer to Contact Center Connection on page 60. The following sections describe the System Administration, Maintenance, Company Details, and Reporting options. NN40040-303 Administration 65 System Administration Select System Administration to view the System Administration Menu page shown in Figure 57: System Administration Menu page. Figure 57: System Administration Menu page The System Administration Menu provides the following options: System Admin Settings — change the username and the password for the default Nortel Reporting for Contact Center Administrator. User Admin — create Users. Skillset Assignment — assign Skillsets to Users. System Configuration report — view and print the System Configuration report. Reporting for Contact Center Setup and Operations Guide 66 Administration System Admin Settings System Admin Settings is a special utility that allows you to change the settings for the single, pre-defined Administrator that is supplied, ready-defined, with Nortel Reporting for Contact Center. You can use System Admin Settings to change the name of the System Administrator or change their password, or both. In either case, you must enter the current System Administrator password to confirm that you have authority to make these changes. Note: Do not use System Admin Settings to change the username and password of other Users who are configured as Administrators. To change the details of those Administrators, use the User Admin Edit feature, described in User Admin. Select System Admin Settings to view the System Administrator details page, shown in Figure 58: System Administrator details page. Figure 58: System Administrator details page To change the name of the System Administrator, provide a new name in the Please enter new username field, and the current Administrator password in the Please enter old password field. NN40040-303 Administration 67 To change the password, provide the new password in the Please enter new password field, and confirm the password by entering the same password in the Please confirm new password field. After you make the necessary changes, click Submit. The System Administration Menu page shown in Figure 57: System Administration Menu page appears. User Admin The User Admin option allows you to add, delete, edit the settings for, or reset the password for a User. Note: A User is not an Agent. A User is someone you wish to have access to the Nortel Reporting for Contact Center system, to monitor Skillsets through the Real Time screens and to be able to obtain Historical Reports on those Skillsets. You do not need to enter all your Contact Center Agents into Nortel Reporting for Contact Center (although you can, if you wish). Typically, you enter Skillset Supervisors and other Management personnel who need information about the performance of the Contact Center. Select User Admin to view the User Admin page, shown in Figure 59: User Admin page. Figure 59: User Admin page Reporting for Contact Center Setup and Operations Guide 68 Administration Add Users The first time you see this page, no Users are defined. To add users, click Add. The Add User page, as shown in Figure 60: Add User page appears. Figure 60: Add User page This page allows you to enter the details of the new User. Follow these steps: 1. In the First name and Last name fields, enter the User’s first and last names. 2. In the RCC Username field, enter the RCC Username, which is the name the User will use to log on to Nortel Reporting for Contact Center. 3. From the Language list, specify the User language preference, which dictates the language used to display the Nortel Reporting for Contact Center Web page. 4. If the User is able to configure wallboards (for their assigned Skillsets), select the Assign Wallboards check box. See Table 1: Administrator and User Permissions. NN40040-303 Administration 69 5. If the User is also an Administrator, select the Administrator check box whether the User is a regular User or an Administrator. Note: The System Administrator, Users created as Administrators, Users who can Assign Wallboard and Standard Users have different administration capabilities regarding other Users, Skillset Assignment, and Wallboard Assignment. See Table 1: Administrator and User Permissions. Table 1: Administrator and User Permissions Permission Level Regular Users (Standard Users) Users with the Assign Wallboard Box Checked (Wallboard Users) Users with the Administration Box Checked (User Administrators ) System Administrator Capabilities These are Users who were created without either the Administrator or the Assign Wallboards check boxes selected. These Users cannot perform configuration of other Users, and they cannot change their own settings. They also cannot assign or work with Wallboards. Regular Users have access only to the Skillsets that were assigned to them by the System Administrator. These are Users who were created without the Administrator check box selected. These Users cannot perform configuration of other Users, and they cannot change their own settings. They can assign and work with Wallboards. Wallboard Users have access only to the Skillsets that were assigned to them by the System Administrator. These are Users who were created with the Administrator check box selected. These Users can perform configuration and editing activities on other Users, including creating Users and assigning Skillsets to them. They cannot change their own settings, however, apart from resetting their own password. If the Wallboard check box was selected when their own account was created, they can assign and work with Wallboards. User Administrators have access only to the Skillsets that were assigned to them by the System Administrator. You should designate a User as an Administrator only if the designation is required so that the User can specify and change fundamental configuration settings within Nortel Reporting for Contact Center. This is the default Administrator account that is created when Nortel Reporting for Contact Center is installed. This User has full access to the system and to all configuration options. They can create, edit, and delete Users, and they can assign Skillsets to Users. They can also reset User passwords, including the System Administrator’s password. Note that they are the only user who can do this. The System Administrator has access to any Skillset. Reporting for Contact Center Setup and Operations Guide 70 Administration Note: The default password for all new Users is 0000. The first time they login to Nortel Reporting for Contact Center they are prompted to change their password. In the example shown in Figure 61: Details for new User Mary Smith, the new user Mary Smith has been added, with the RCC Username of MaryS, she is going to receive the Web pages in English, and, while she can configure wallboards for her assigned Skillsets, she is not a full Administrator. Figure 61: Details for new User Mary Smith 6. Click Submit to save the details of the newly entered User. 7. A dialog box asks whether you wish to add more Users. If you choose to add more users, click on the OK button, otherwise click on Cancel. If you had clicked on OK, the Add User fields are cleared and you can enter the details of your next new User. If you decide not to add more Users at this time, you are returned to the User Admin page shown in Figure 59: User Admin page. NN40040-303 Administration 71 The newly added User now appears in the list of configured users on the User Admin page. To view details about a specific User, select the User’s name from the list. Click the Edit button next to selected User to Edit the details of the user (see Edit Users). To Delete the User from the system click on the Delete button (see Delete Users). To reset their password to 0000 if they have forgotten their password click on the Reset Password button (see Reset Password). Edit Users To edit User details, select the User from the list of configured users and click Edit. The Edit user page, shown in Figure 62: Edit User page appears. Figure 62: Edit User page To edit User details, make any necessary changes, and then click Submit. For more information about the fields on the Edit User page, refer to Add Users. Delete Users To delete a User, select the User from the list of configured users and click Delete. Reporting for Contact Center Setup and Operations Guide 72 Administration Note: After you delete a User, you cannot retrieve the deleted User for later use. For any subsequent inclusion of that User, later you must use the Add User page (see Figure 60: Add User page) and re-enter User details. When you click Delete you are prompted to confirm that you wish to remove the User. If you do not wish to remove the User, click Cancel; if you are certain you wish to remove the User, click OK. In either case, the User Admin page appears. See Figure 59: User Admin page. If you removed a User, that User name no longer appears in the list of configured Users. Reset Password Use the Reset Password option when a User has changed their password and forgotten what the password is. This option allows you to reset the User password to 0000. When the User next logs on, they use the password 0000, and they must then select a new password. Select the User name from the list of configured users and click Reset Password. You are prompted to confirm that you wish to reset the password for the User. If you do not wish to reset the password, click Cancel. To reset the password, click OK. In either case, the User Admin page appears. See Figure 59: User Admin page. Skillset Assignment The Skillset Assignment option allows you to assign Skillsets to Users. Assigning Skillsets to a User allows the User to view those Skillsets in the Real Time screens and to obtain Historical Reports on those Skillsets. You can assign multiple Skillsets to a User, and a Skillset can be assigned to multiple Users. Select Skillset Assignment from System Administration Menu shown in Figure 57: System Administration Menu page. The Skillset Assignment page shown in Figure 63: Skillset Assignment page appears. NN40040-303 Administration 73 Figure 63: Skillset Assignment page The Skillset Assignment page lists each configured User. In Figure 63: Skillset Assignment page, Mary Smith is the only configured User. Follow the steps in this section to assign Skillsets. 1. Click Assign to view the Assigned Skillsets page, shown in Figure 64: Assigned Skillsets page. Reporting for Contact Center Setup and Operations Guide 74 Administration Figure 64: Assigned Skillsets page Note: The Skillset names shown in Figure 64: Assigned Skillsets page are intended as examples only. Your copy of Nortel Reporting for Contact Center displays the Skillset names you have set up in the Contact Center using CallPilot Manager. Note: The Skillset names are obtained automatically from the Contact Center. Your copy of Nortel Reporting for Contact Center must be connected to the Contact Center for a few moments in order for the Skillset names to appear. 2. To assign a single Skillset, select the Skillset in the Unassigned Skillsets list, then click the right arrow button (>). The assigned Skillset appears in the Assigned Skillsets list. 3. Continue assigning Skillsets until you assign all the Skillsets you wish to assign to this User. In the example shown in Figure 65: Skillsets Assigned to User Mary Smith, the User Mary Smith is assigned two Skillsets: SKILL1 and SKILL3. NN40040-303 Administration 75 Figure 65: Skillsets Assigned to User Mary Smith 4. To move a Skillset to the Unassigned Skillsets list, select the Skillset name in the Assigned Skillsets list and click the left arrow button ( < ) Note: Click the double right arrow button (>>) or the double left arrow button (>>) to assign or un-assign all the Skillsets. Note: To assign or un-assign more than one Skillset name in the Assigned Skillsets or Unassigned Skillsets list, hold down the Control (Ctrl) key and click different Skillset names in the list. Click the > or < button to assign or un-assign those selected Skillsets in one step. 5. When you have assigned (or unassigned) the Skillsets for a User, click Submit. The Skillset Assignment page shown in Figure 63: Skillset Assignment page appears. Reporting for Contact Center Setup and Operations Guide 76 Administration Maintenance The Maintenance option allows you to check the System Status and to start or stop the XML data feed logging. Select Maintenance to view the Maintenance Menu page, shown in Figure 66: Maintenance Menu page. Figure 66: Maintenance Menu page The Maintenance Menu provides the following options: System Status Logging System Status Select System Status to view the System Status page shown in Figure 67: System Status page. This page provides a variety of information relating to the current status of Nortel Reporting for Contact Center. NN40040-303 Administration 77 Figure 67: System Status page From this page you can see the Web Host PC’s Web Server details, RCC Database connection status and BCM System Information including version numbers and the Contact Center Status which refers to the connection status between Reporting for Contact Center and the BCM. You can also open the Download Status window from the link Click Here to open the Download Status window. The Current RCC Network Port Status information determines whether the current PC viewing this page can establish a connection to the ports listed. If any of the ports are blocked to the Web Host PC it will identify which ones and the next steps to take to resolve this. The Java coffee cup and status message indicate that the Java Runtime Environment is installed on this PC and what version is currently active. Under normal operation you need only to refer to this page upon instruction of Support Personnel. Reporting for Contact Center Setup and Operations Guide 78 Administration Logging Select Logging to view the Logging Menu page shown in Figure 68: Logging Menu page. Figure 68: Logging Menu page Various diagnostic logs are always running when Nortel Reporting for Contact Center is operational. The Logging Menu allows you to Archive the current log files and download any previously archived log files. To Archive the current log files click the Archive Logs button. This will create a single .zip archive file of the current log files. A new entry will appear in the list of archived files table, following the Log files location on the Logging Menu page. Recently created log file archives are indicated by a yellow star. To stamp the Real Time log click the Stamp Real Time Log button. This will stamp the Real Time log constantly for 15 seconds. As the Real Time log can be quite large this option is useful for tracking down a problem to a specific time. Clicking the Stamp Real Time Log button will disable the button for 15 seconds. Stamping cannot be initiated again in this time until 15 seconds have passed. After this time has elapsed the button will be enabled. NN40040-303 Administration 79 To download a log file archive click the Download Logs button next to the desired archive and save it to a location on your computer. Note: The maximum number of archives you can create is 5. When a 6th archive is created it will automatically delete the oldest archive. The file naming convention includes (in the same order) the year, month, day, hour, minute and second that the archive was created, this can be used to determine how old the log file archive is. To view the contents of the archive you will need to have either WinZip, WinRAR or any other compatible zip file viewer installed. The default compressed folder viewer that comes with Windows XP and above will not work with these archives. Company Details The Company Details page allows you to enter details about your company or site. See Figure 69: Company Details page. To view the page, select Company Details. Figure 69: Company Details page Completing this page is not a requirement for the correct operation of Nortel Reporting for Contact Center. The page provides a means of recording where the software is installed. Reporting for Contact Center Setup and Operations Guide 80 Administration After the company details are entered, click Submit to save the details. The company details will be available in the System Configuration report and the company name will be displayed on all report headers. From the Company Details page, the user will be returned back to the Administration Menu page. Reporting Click Reporting to view the Main Menu page, shown in Figure 70: Main Menu page. This is the page all regular Users (that is, non-Administrative Users) view when they log on. This option allows an Administrator to use the Nortel Reporting for Contact Center as though they were a User, to view Real Time screens, and to access the Historical Reports. For more information, refer to Using Reporting for Contact Center. Figure 70: Main Menu page NN40040-303 Using Reporting for Contact Center 81 Using Reporting for Contact Center 5 Logging On Follow the steps in this section to log on to Nortel Reporting for Contact Center for all Users. 1. Use Internet Explorer to go to the URL of your Nortel Reporting for Contact Center Web pages Login page. The URL is http://NameOfWebHostPC/RCC Where NameOfWebHostPC is the network name or, IP Address of the Web Host PC. The Login page appears. See Figure 51: Login page. Note: If you are using the browser on the Web Host PC, you can replace NameOfWebHostPC with localhost. Note: You can add the Login page URL to your Internet Favorites. To add this page to your favorites in Internet Explorer, press Ctrl+D when you are at the Login page, or click Favorites, Add to favorites. 2. You must provide a valid username and a password to gain access to the features of Nortel Reporting for Contact Center. Before you attempt to log on, ensure that an Administrator has created a username for you. The first time you log on, your password is set to the default of 0000. 3. In the Username field, enter the Username you have been assigned. In the Password field, enter the default password of 0000.You must change your password after you first log on. The Change Password page shown in Figure 71: Change Password page appears. Reporting for Contact Center Setup and Operations Guide 82 Using Reporting for Contact Center Figure 71: Change Password page In the New password field, enter a new password. The password can be from 1 to 10 characters, including upper and lowercase letters and digits. It can be anything other than 0000. 4. In the Confirm password field, re-enter your password. 5. Click Submit. If the two passwords do not match, you receive a message that the password and confirmation do not match. Re-enter your password in both fields. If you entered the new password correctly in both fields, the Main Menu page shown in Figure 72: User Main Menu page appears. NN40040-303 Using Reporting for Contact Center 83 Figure 72: User Main Menu page The page shown in Figure 72: User Main Menu page is the Main Menu for all regular (nonAdministrator) Users. Note that the word Administrator is not displayed in the blue bar at the top of each page. Also note that Nortel Reporting for Contact Center recognizes who logs on and greets the User accordingly. In the example shown in the figure, User Mary Smith logged on, and the page displays the Welcome Mary message. The options available to Users appear in the navigation pane on the left of the Main Menu page. The options are as follows: Real Time Agent Alarms Wallboard Setup Time Bins Setup Reports and Schedules Reporting for Contact Center Setup and Operations Guide 84 Using Reporting for Contact Center Real Time From the User Main Menu page shown in Figure 72: User Main Menu page, select Real Time to view the Real Time page, shown in Figure 73: Real Time page. Figure 73: Real Time page Using the Real Time Options To view the Real Time screens, the minimum screen resolution should be at least 1024 x 768 pixels. Note: The maximum recommended number of Client PC connections that can view all four Real Time screens concurrently at a one second refresh rate are 4 PCs. At a three second refresh rate up to 12 PC’s can view all four Real Time screens concurrently. Perform the following steps to use the Real Time options: NN40040-303 Using Reporting for Contact Center 85 1. To select the Real Time screens you want to view, select a Real Time screen name. • • For information about using Skillset selection lists, see page 141. For information about using Favorites, see page 141. 2. Click Submit to view your Real Time selections in a new window. To reset your selections, click Cancel at any time. Note: A Java coffee cup icon will appear in the bottom left hand side of the screen (beneath the menu) displaying the version of the Java Runtime Environment (JRE) installed on the PC (or the version being should there be multiple JRE installations). If this is not displayed you will automatically be presented with an option to download and install the JRE, in addition the submit button will also not be displayed and you wont be able to launch any Real Time screens. Please follow the instructions on screen to successfully install the JRE. The following sections describe the available Real Time screens: Real Time Call Summary Figure 74: Call Summary Real Time screens shows the Call Summary Real Time screen. Figure 74: Call Summary Real Time screens The information in the Call Summary screen updates as call activity changes in your Contact Center. Each row in each screen represents a single Skillset. The Skillsets that you see are the skillsets you selected on the Real Time page shown in Figure 73: Real Time page. Reporting for Contact Center Setup and Operations Guide 86 Using Reporting for Contact Center The summary provides information about calls that are in the Skillset queues waiting to be answered, together with some statistics regarding calls that are completed. These statistics update in real time. The following sections describe the available information for each of the selected Skillsets. Waiting Waiting indicates the number of calls that are currently waiting in the Skillset queues to be answered. Delayed Delayed indicates the number of calls that are currently in a delayed state, that is, having reached the contact center but have not been forwarded to a skillset. Primary Alert Primary indicates the number of currently waiting Calls that have waited in excess of the Contact Center Primary Alert. (Note that this is mutually exclusive with the Secondary Alert). If any calls have waited in excess of the Primary Alert, the background to this cell changes to yellow. Secondary Alert Secondary Alert indicates the number of currently waiting Calls that have waited in excess of the Contact Center Secondary Alert. (Note that this is mutually exclusive with the Primary Alert). If any calls have waited in excess of the Secondary Alert, the background to this cell changes to red. Overflow Overflow indicates the number of currently waiting Calls that have waited in excess of the Contact Center Overflow Threshold. Note that this does not mean the call has overflowed, but the Contact Center is actively looking through the overflow rules that have been defined for this Skillset to find a means of answering the call. That is, this call is liable to overflow shortly. If any calls have waited in excess of the Overflow Threshold, the background to this cell changes to red. Note: If a call had passed the overflow threshold in one Skillset and was then moved to another Skillset due to the call routing that was configured, the call appears in the new Skillset. The cell background will be red because this call has already passed the overflow threshold of its original Skillset. Abandoned Hour/Day Abandoned Hour/Day indicates the number of calls that were abandoned in the Skillsets, in the current hour and in the current day. NN40040-303 Using Reporting for Contact Center 87 Answered Hour/Day Answered Hour/Day indicates the number of calls that were answered by the Agents in the Skillsets, in the current hour and in the current day. Disconnected Hour/Day Disconnected Hour/Day indicates the number of calls that were disconnected by the call center in the current hour and in the current day. Longest Waiting Time Longest Waiting Time indicates the waiting time of the call that has waited the longest, of the list of currently waiting calls. Unread Skillset Messages Indicates the number of voice mail messages in the Skillset Mailbox which have not be listened to. If any messages have not been listened to, the cell background is red. Service Level Indicates the level of service currently offered to incoming callers. Skillset Mode Indicates whether the mode of operation of the Skillset. Grouping The first row in the Call Summary Real Time screen is labeled Grouping. This row shows values generated from the data presented for each of the included skillsets. Note that the values might not include all the skillsets in the System because the User viewing the Call Summary screen might not be assigned all the skillsets, or they may be viewing only a selection of their assigned skillsets. The Service Level figure in the Grouping row is a means average of the Service Level values of the skillset rows displayed below the Grouping row. For example, three skillsets are in the view, and they had the following individual skillset values: Skill 1 Service Level = 0% Skill 2 Service Level = 100% Skill 3 Service Level = 100% The Grouping row shows a Service Level of 66%, calculated as follows: Service Level = (0 + 100 + 100) / 3 = 66% This value shows the User what their average Service Level is over all the selected skillsets. This figure is different from the Service Level for the System (which includes all the skillsets). The System Service Level is not calculated as an average for the skillsets; it is calculated as a single figure Service Level for the System. Reporting for Contact Center Setup and Operations Guide 88 Using Reporting for Contact Center This is the calculation that is used in the System wallboard parameters SH and SD and in the Call Detail real time. In the Call Detail Real Time screens and in the System SH and SD wallboard fields, the Service Level is calculated using the following formula: (This formula is also described in the Glossary on page 173) Presented = Total Number of Direct Call transactions Presented to the Skillset(s) Abandoned = Calls which Abandoned >Secondary = Calls transactions answered after the Secondary Alert has elapsed Service Level % = Presented – Abandoned – >Secondary x 100 Presented Real Time Agent Summary Figure 75: Agent Summary Real Time screen shows the Agent Summary Real Time screen. Figure 75: Agent Summary Real Time screen The information shown in the Agent Summary screen updates as Agent activity changes in your Contact Center. Each row in each screen represents a single Skillset. The Skillsets that displayed are the skillsets selected on the Real Time page, as shown in Figure 73: Real Time page. NN40040-303 Using Reporting for Contact Center 89 This Real Time screen indicates the numbers and states (current activities) of the logged-in Agents, for each of the selected Skillsets. Note: The state of an Agent who has multiple calls on their handset is taken from their active call. For example, if an Agent has an Incoming Contact Center Call on hold and they are active on an Outgoing Call, then the Agent is shown to be in the Outgoing Call state. The following sections describe the available information. Skillset Indicates which Skillset the information in this row represents. Logged In Logged In indicates the number of Agents who are logged into this Skillset. Supervising Supervising indicates the number of Agents (Supervisors) who are currently supervising other Agents. Available Available indicates the number of Agents who are Available to take Incoming Contact Center Calls. Not Ready Not Ready indicates the number of Agents who are in the Not Ready State. They might have invoked the Make Not Ready feature. Or they might have been placed in the Not Ready state because a Contact Center Call was presented ringing to their handset but the Agent did not answer it, and Nortel Reporting for Contact Center automatically took the call back to the Skillset queue and made them Not Ready. Not Available Not Available indicates the number of Agents who are in the Not Available State. An agent may enter the Not Available state through actions like F981 voice mail, lifting the receiver (while not answering a call) and any other action that removes their ability to receive a call. Ringing Ringing indicates the number of Agents who have calls currently ringing on their handset. On Contact Center Calls On Contact Center Calls indicates the number of Agents who are currently handling Incoming Contact Center Calls. Break Time Break Time indicates the number of Agents who are in Break Time following clear down of an Incoming Contact Center Call. Reporting for Contact Center Setup and Operations Guide 90 Using Reporting for Contact Center On Non-Contact Center Calls On Non-Contact Center Calls indicates the number of Agents who are currently handling calls that have not arrived through the Contact Center. These calls could be calls that arrived directly at their handset because someone rang their Direct Inward Dialing (DID) line, for example, or a non-Contact Center Call was transferred to them from another handset. On Outgoing Calls On Outgoing Calls indicates the number of Agents who are currently on Outgoing Calls. On Internal Calls On Internal Calls indicates the number of Agents who have placed or answered internal (intercom) calls. With All Calls Held With All Calls Held indicates the number of Agents who have all of their current calls on hold. Real Time Call Detail Figure 76: Real Time Call Detail Screen shows the Call Detail screen. Figure 76: Real Time Call Detail Screen The Call Detail Real Time screen presents a detailed display of the status of waiting calls together with statistics relating to completed calls. These statistics update in real time. The screen displays a separate line of information for Multimedia Calls and for Voice (Public Switched Telephone Network (PSTN)) Calls and a total for both types of calls. The following sections describe the available information. Media Type Media Type indicates whether the line of statistics relates to Multimedia Call or Voice (PSTN) Calls or a total for both types of call. NN40040-303 Using Reporting for Contact Center 91 Waiting Waiting indicates the number of calls that are currently waiting in the Skillset queues to be answered. Delayed Delayed indicates the number of calls that are currently in a delayed state that is having reached the contact center but have not been forwarded to a skillset. Primary Alert Primary Alert indicates the number of currently waiting Calls that have waited in excess of the Contact Center Primary Alert. (Note that this is mutually exclusive with the Secondary Alert). If any calls have waited in excess of the Primary Alert, the background to this cell changes to yellow. Secondary Alert Secondary Alert indicates the number of currently waiting Calls that have waited in excess of the Contact Center Secondary Alert. (Note that this is mutually exclusive with the Primary Alert.) If any calls have waited in excess of the Secondary Alert, the background to this cell changes to red. Overflow Overflow indicates the number of currently waiting Calls that have waited in excess of the Contact Center Overflow Threshold. Note that this does not mean the call has overflowed, but the Contact Center is actively looking through the overflow rules that were defined for this Skillset to find a means of answering the call. That is, this call is likely to overflow shortly. If any calls have waited in excess of the Overflow Threshold, the background to this cell changes to red. Note that if a call had passed the overflow threshold in one Skillset and was then moved to another Skillset due to the call routing that was configured, the call appears in the new Skillset and the cell background is red because this call has already passed the overflow threshold of the original Skillset. Abandoned Hour/Day Abandoned Hour/Day indicates the number of calls that were abandoned in the Skillsets, in the current hour and in the current day. Answered Hour/Day Answered Hour/Day indicates the number of calls that were answered by the Agents in the Skillsets, in the current hour and in the current day. Disconnected Hour/Day Disconnected Hour/Day indicates the number of calls that were disconnected by the call center in the current hour and in the current day. Reporting for Contact Center Setup and Operations Guide 92 Using Reporting for Contact Center On Hold Indicates how many calls are placed on hold. Longest Waiting Time Longest Waiting Time indicates the waiting time of the call that has waited the longest, of the list of currently waiting calls. Unread Skillset Mailbox Msgs Indicates the number of voice mail messages in the Skillset Mailbox that have not be listened to. If any messages have not been listened to, the cell background is red. Service Level Service Level indicates the level of service being offered to incoming callers. The higher the value, the better the service. Real Time Agent Detail Figure 77: Agent Detail Real Time shows a detailed display of the individual status of the logged-in Agents, together with statistics relating to calls answered and made by the Agents. These statistics update in real time. Figure 77: Agent Detail Real Time Each line of the Agent Detail Real Time screen represents a single Agent. NN40040-303 Using Reporting for Contact Center 93 The following sections describe the available information. ID Indicates the Contact Center ID of the Agent. Agent and Status The Agent column displays the agent name and indicates the state the agent is in by coloring the cell background. The state of the agent depends on their current activity. Further detail on the Agent state is provided in the Status column, as follows: Available These are agents who are available to answer incoming Contact Center calls. Blue represents Available agents, as shown in Figure 78: Available state. The word Available is displayed in the Status column. Figure 78: Available state Break Time Break Time is the term used to describe the period of time allocated to each agent to allow post-call completion work, also called Wrap-up. Break Time is represented by dark green, as shown in Figure 79: Break Time. The wording Break Time is displayed in the Status column. Figure 79: Break Time state All Calls Held All Calls Held is the state when an agent has placed all of their calls on hold. All Calls Held is represented by pink, as shown in Figure 80: All Calls Held state. The wording Calls Held is displayed in the Status column. Figure 80: All Calls Held state Reporting for Contact Center Setup and Operations Guide 94 Using Reporting for Contact Center Incoming An agent is in the Incoming state when they have answered an Incoming Contact Center call. The Incoming state is represented by light green, as shown in Figure 81: Incoming (PSTN) state. The information in the Status column indicates the type of call this is, that is, a voice (PSTN) call. A phone icon in the Status column represents the voice call. This is accompanied with the skillset associated with the call, in the format SS n, where n is the number of the skillset. For example, SS 2 which represents Skillset 2. Figure 81: Incoming (PSTN) state Incoming Non-Contact Center If an agent answers a non-Contact Center call, that is, where the agent’s DN is dialled directly, they are represented by dark green. The Incoming non-CC state is shown in Figure 82: Incoming Non-CC state. The wording Incoming non CC is displayed in the Status column. Figure 82: Incoming Non-CC state Intercom An Intercom call, also known as an Internal call, is where another agent dials to the agent. The Intercom state is represented by grey, as shown in Figure 83: Intercom state. A phone icon in the Status column is displayed next to the word Intercom to represent the voice call. Figure 83: Intercom state NN40040-303 Using Reporting for Contact Center 95 Multimedia A Multimedia voice or browser call is when an agent has received a Multimedia Contact Center call. This is represented by bright green, as shown in Figure 84: Multimedia state. Different icons are displayed in the Status column along with the skillset number to represent different Multimedia calls, as follows: o A globe icon accompanying the skillset number – this represents a Multimedia browser-only call. The skillset number is in the format SS n, where n is the number of the skillset. For example, SS 2 which represents Skillset 2. o A phone and a globe icon accompanying the skillset number - represents a Multimedia voice and browser call. Figure 84: Multimedia state Supervisory Monitoring When an agent who is created in the Contact Center as a Supervisor undertakes a monitoring session with another agent, they are represented by orange. See Figure 85: Monitoring state. A Supervisor can be in different Agent Status’ in a Supervisory Monitoring session. The words displayed in the Status column are as follows: o Asked – when an agent presses F906 to request help from the supervisor. o Helping – from Asked, the supervisor presses YES on the handset to accept the agent request for help. The supervisor begins monitoring the agent and can either: • view the agent details of the call state they are in; or • join the call. o Monitoring – pressing F905. o Observing – from Viewing, enter the Agent ID of the agent to monitor. In the Observing state the supervisor can select different options on the handset to: • view the agent details of the call state they are in; • start to monitor the agent; or • join the call. o Viewing – from Monitoring, selecting the skillset of the agent to monitor. Figure 85: Monitoring state Reporting for Contact Center Setup and Operations Guide 96 Using Reporting for Contact Center Not Available Agents who are unavailable to answer Incoming calls are in the Not Available state. Gold represents Not Available agents, as shown in Figure 86: Not Available state. The wording Not Available is displayed in the Status column. Figure 86: Not Available state Not Ready An agent who is in the Not Ready state is represented by dark grey. See Figure 87: Not Ready state. The wording Not Ready is displayed in the Status column. Figure 87: Not Ready state Outgoing Call When an agent makes an Outgoing call, the agent is in the Outgoing Call state. The Outgoing Call state is represented by yellow. See Figure 88: Outgoing Call state. A phone icon in the Status column accompanies the wording Outgoing Call to represent this voice call. Figure 88: Outgoing Call state Ringing These are agents who currently have a call ringing at their handset. Purple represents the agent’s Ringing state, as shown in Figure 89: Ringing state. The word Ringing is displayed in the Status column. Figure 89: Ringing state NN40040-303 Using Reporting for Contact Center 97 Logged In SS Indicates the Skillsets the Agent is currently logged in to. Either the skillset number is provided if the agent is logged in to one skillset, or Multi is displayed if the agent is logged in to more than one skillset. Duration Displays a timer that represents the time the Agent has spent in the current state. If the Agent has been in the current state for a period in excess of the associated Agent Alarm, the background of this cell turns red. See Agent Alarms. Answered Call Center Calls Hour / Day Answered Call Center Calls Hour/Day indicates the number of Contact Center Calls that this Agent has answered in the current hour and in the current day. Outgoing Calls Hour / Day Outgoing Calls Hour/Day indicates the number of Outgoing Calls that this Agent has made in the current hour and in the current day. This does not include internal calls. Non-Contact Center Calls Hour / Day Non-Contact Center Calls Hour/Day indicates the number of Non-Contact Center Calls that this Agent has conducted in the current hour and in the current day. Check Agent Alarms Click Check Agent Alarms to update any Agent Alarms that had been set through Reporting for Contact Center after the Agent Detail Real Time screen had been opened. Reporting for Contact Center Setup and Operations Guide 98 Using Reporting for Contact Center Agent Alarms The Agent Alarms option allows you to set Real Time thresholds that operate with reference to the Contact Center activity of the Agents. For example, you can specify average durations of Incoming or Outgoing calls, and Nortel Reporting for Contact Center will highlight Agents who have been on a call longer than the specified threshold. From the User Main Menu page shown in Figure 72: User Main Menu page, select Agent Alarms to view the Agent Alarms page shown in Figure 90: Agent Alarms menu page. Figure 90: Agent Alarms menu page NN40040-303 Using Reporting for Contact Center 99 Select Agent Alarm Setup to view the Agent Alarm Setup Skillset selection page shown in Figure 91: Agent Alarms Setup page. This page allows the User to select their assigned Skillsets for which they wish to establish the Agent Alarms settings. In the example shown in Figure 91: Agent Alarms Setup page, the Skillset list shows the Skillsets that User Mary Smith selected. In a previous example, User Mary Smith saved SKILL1 and SKILL3 to her favorites list and named the favorite Skill1&3. See Figure 120: Save Favorites page. To select these skillsets for Agent Alarms Setup, she selected Skill1&3 from her favorites list, and Nortel Reporting for Contact Center automatically selected the Skill1 and Skill3. • • For a discussion of using Skillset selection lists see page 141. For a discussion on using Favorites, see page 141. Figure 91: Agent Alarms Setup page Reporting for Contact Center Setup and Operations Guide 100 Using Reporting for Contact Center When you select your Skillset, click Assign values to view the Agent Alarms Values page shown in Figure 92: Agent Alarms Values page. The Agent Alarms Values page allows you to specify threshold values for the following Agent activities (also called Agent states): Available Internal Call Outgoing Call Incoming Contact Center Call Incoming Multimedia Call Incoming Non-Contact Center Not Ready Agent is free to take a call Agent is on an intercom call Agent has placed a call to an external party Agent has answered a Contact Center Call Agent has answered a Multimedia Call Center Call Agent has answered a non-Contact Center Call from an external party The Agent is in the Not Ready state Figure 92: Agent Alarms Values page NN40040-303 Using Reporting for Contact Center 101 Select the value for each Agent State. To save the Agent Alarms Values settings, click Submit. The Agent Alarms Setup page appears. See Figure 91: Agent Alarms Setup page. To leave the Agent Alarms Values page without saving any changes, click Cancel. The Agent Alarms Setup page appears. See Figure 91: Agent Alarms Setup page. Reporting for Contact Center Setup and Operations Guide 102 Using Reporting for Contact Center Wallboard Setup If your supervisor has assigned you the rights to the Wallboard Setup option (see Add Users), you can use the Wallboards option to assign wallboards to your assigned Skillsets. You can also configure the wallboards with features such as wallboard alarms and messages, schedules, and summaries. If your Administrator has not assigned you the rights to assign wallboards, the Wallboard Setup option is unavailable on the User Main Menu page. See Figure 72: User Main Menu page. Nortel Reporting for Contact Center can support both hardware and software IP-enabled wallboards. The wallboards that are supported are the ipView Wallboards (hardware tri-color wallboards) and the ipView SoftBoard (software-based personal wallboard). They are updated approximately every 1 (default) or 3 seconds depending on the settings on the Contact Center Connection page, see Contact Center Connection on page 60. Message Formats The information sent to the wallboards is in one of three different formats: Parameter Messages, Scrolling Messages, or Summary Messages. The following sections describe these message formats. Parameter Messages Parameter Messages are the regular display messages sent to the wallboard. Parameter Messages show six statistical parameters, each of which appears beside a two-letter mnemonic abbreviation. (If the wallboard is configured to have a title, then only three parameters can be displayed.) The following parameters are available for display on the wallboards: ID IH AD AH OD OH SD SH AO AI AA AN AL NN40040-303 Number of Incoming calls received in the current Day Number of Incoming calls received in the current Hour Number of Abandoned calls in the current Day Number of Abandoned calls in the current Hour Number of Outgoing calls made in the current Day Number of Outgoing calls made in the current Hour Service Level offered in the current Day (%) Service Level offered in the current Hour (%) Number of Agents on Outgoing calls Number of Agents on Incoming calls Number of Agents Available to receive calls Number of Agents in the Not Ready state Number of Agents Logged in Using Reporting for Contact Center 103 QL QT Current Queue Length – number of calls queuing for this Skillset Current Queue Time for the longest waiting Call for this Skillset measured in seconds. On the wallboards, the numerical values are displayed in yellow, and the abbreviations are displayed in green. If one of the parameter values has an associated Alarm threshold configured for it, it appears in red when the threshold is broached. An audible alert for alarms is optional, see page 108. Scrolling Messages The wallboards also support Scrolling Messages (also known as rolling messages). Scrolling Messages are either manually dispatched messages, Alarm messages, or Scheduled messages. Scrolling messages move from right to left across the wallboard until the whole message has been displayed at least two times. An audible alert for scrolling messages is optional. Note: On the ipView SoftBoard, the scrolling messages do not scroll; they are displayed in their entirety in a window, for the duration that it would take for that message to scroll at least two times on the hardware wallboard. Also note that the numerical parameter display is removed from ipView SoftBoard’s for the duration of the message display. Note: The User must ensure that spaces are placed at the end of each word when creating messages for the ipView SoftBoard otherwise the full message can not display the full message if it is a long string of characters without any spaces. Scrolling messages are displayed on the wallboards under the following three circumstances: A Contact Center statistic has entered an Alarm state (generating an Alarm message). A predefined time has arrived (generating a scheduled message). A User has generated and dispatched a message (Instant [manual] message). Nortel Reporting for Contact Center can be configured to provide an audible alert for any of these scrolling messages. A scrolling message can be up to 64 characters in length and can contain parameter values that are automatically replaced by the numerical equivalent when they are displayed. For example, if a message contained the text: There are (QL) calls waiting… The Contact Center statistic QL currently has a value of 4; the following message would be displayed: There are 4 calls waiting… Alarm Messages Nortel Reporting for Contact Center can be configured to automatically provide a scrolling text message when a parameter enters an Alarm condition by passing a defined Alarm Threshold. Reporting for Contact Center Setup and Operations Guide 104 Using Reporting for Contact Center A profile of six different Alarm Thresholds can be set across a day, for a single Alarm. For example, a 24-hour Contact Center that has 25 Agents active during the day might have an Alarm Message set to be triggered if 6 Agents are Not Ready concurrently. At Night, however, the Contact Center has a staff of 4 Agents, and they want to have the same Alarm Message triggered when only 2 Agents make themselves Not Ready. Alarm messages scroll at least twice on the wallboards. If the alarm is still valid when the message has scrolled at least twice, the normal numerical display is shown for 5 seconds before the alarm message is re-scrolled. If several alarms are triggered at once they are scrolled to the wallboard as follows. 1. Assume three alarms are triggered concurrently. The first alarm message is scrolled at least twice, and then the normal numerical display is shown for 5 seconds. The second alarm message is then scrolled at least twice, and the normal numerical display is shown again for 5 seconds. 2. If the third alarm is still valid, then the third alarm message is scrolled at least twice and the display then returns to the usual numerical display for 5 seconds. 3. If the first alarm is valid, it is scrolled again. If it is not valid, then the second alarm is checked to see whether it is valid. If the second alarm is valid, it is scrolled again. 4. If it is not valid, then the third alarm is checked to see whether it is valid. In this way, all alarms are rotated and displayed with a numerical display of 5 seconds in between them. Scheduled Messages Wallboard Messages that need to go out at the same time every day or on a particular day can be associated with a schedule. For example, weekly fire alarm tests or a start of shift greeting or an end of shift message could be configured so that they automatically trigger at the specified time. Schedules can be configured to trigger on single days, groups of days, or every day. Scheduled messages take priority over Alarm messages. Instant Messages System Administrators or Users can manually enter and dispatch an Instant Message to the wallboards. Instant messages take priority over Alarm messages. Summary Messages Nortel Reporting for Contact Center can be configured to provide predefined hourly summaries on the wallboards. Summaries can be configured to have an audible alert. The values displayed in the summary messages are as follows: Incoming Calls for previous Hour and Day so far Outgoing Calls for previous Hour and Day so far Answered Calls for previous Hour and Day so far NN40040-303 Using Reporting for Contact Center 105 Service Level for previous Hour and Day so far Using the Wallboard Options To use the Wallboard Options, select Wallboard Setup from the User Main Menu page (see Figure 72: User Main Menu page). The Wallboard Menu page shown in Figure 93: Wallboard Menu page appears. Figure 93: Wallboard Menu page The Wallboard Setup options are as follows: Wallboard Assignment Messages Alarms Schedules Instant Messages Reporting for Contact Center Setup and Operations Guide 106 Using Reporting for Contact Center The following sections describe the Wallboard Setup options. Wallboard Assignment From the Wallboard Setup menu, select Wallboard Assignment option to view the Wallboard Assignment page shown in Figure 94: Wallboard Assignment page. This page displays a list of the configured wallboards. It displays the configured wallboards for each of the Skillsets you are assigned and any Skillsets that are configured as System wallboards. Figure 94: Wallboard Assignment page You can delete wallboards or edit their settings. In the example shown above in Figure 94: Wallboard Assignment page there are no wallboards assigned to the selected Skillsets. In the example, User Mary Smith can only add wallboards. Perform the following to add a wallboard: 1. Click Add to assign wallboards. The Add Wallboard page shown in Figure 95: Add Wallboard page appears. NN40040-303 Using Reporting for Contact Center 107 Figure 95: Add Wallboard page 2. In the IP/Network Name field, enter the IP Address or Network Name. (If the wallboard is an ipView SoftBoard, enter the IP Address or the Network Name of the PC on which the SoftBoard will be running.) 3. The value in the Port is usually left at the default value of 3500. This value might be changed for an ipView SoftBoard if an Agent wishes to have several copies of ipView SoftBoard running on the same PC to, for example, display different Skillset statistics to a multi-Skillset Agent. Each copy of ipView SoftBoard would be installed on the Agent’s PC with a different Port number. In that case, the corresponding wallboard entry in Nortel Reporting for Contact Center must be configured with the appropriate port number. 4. The Wallboard Skillset selection specifies the Skillset the wallboard is to report on. That is, the named Skillset is the Skillset from which Nortel Reporting for Contact Center extracts the statistical information to display on the wallboard. If you wish to display system-wide totals Reporting for Contact Center Setup and Operations Guide 108 Using Reporting for Contact Center (that is, to have the information displayed represent totals derived from all Skillsets) select System from the list. In other words, assigning a wallboard to be a System wallboard causes Nortel Reporting for Contact Center to send statistics to that wallboard which represent the system totals. For example, the parameter AN (Agents Not Ready) on a System wallboard shows the total figure for the AN values of all Skillsets added together. Notice that the only Skillsets available in this list are the ones that our example User Mary Smith was assigned by the Administrator. 5. In the Language list, select the language in which wallboard should be driven. Individual wallboards can be driven in any of the supported languages that appear in the list. 6. Select a Type option (Hardware or Software) to indicate whether the wallboard is a hardware wallboard or software SoftBoard. Any of the available parameters can be used on either the hardware or the software wallboards. The parameter spacing on the hardware wallboard allows for the display of two 3-digit and one 4-digit parameter per line, giving six parameters in total. The two parameters at the right hand end of the wallboard can display up to 4 digits at a time. Those parameters that are able to reach 4 digits cannot be configured for the positions that can display only 3 digits. 7. Select Title if the wallboard is to be configured with a title. A title is a string of text up to 16 characters in length, which is displayed on the top line of a hardware wallboard and above the parameter list on a SoftBoard. In both cases, the title reduces the number of parameters that can be displayed by the wallboard to 3. 8. If you selected Title in the previous step, enter the title in the Title Text field. 9. Select Buzzer if you want the wallboard to emit a short buzzing sound when a Summary Message or a Scrolling message is sent to it. If Buzzer is selected, you will also hear a buzzing sound when a parameter goes into alarm even if no Alarm Message is associated with the alarm (a static alarm). 10. Select Summary to send Hourly Summaries to the wallboard when each hour passes and when the Skillset enters Out Mode (that is, there are no Agents Logged In to the Skillset). 11. To save the changes, click Submit. The Wallboard Setup page appears, see Figure 96: Wallboard Setup page with a wallboard listed. As shown in the figure, after you assign a wallboard, the wallboard appears on the page. To leave the Add Wallboard page without saving any changes, click Cancel. The Wallboard Setup page appears. NN40040-303 Using Reporting for Contact Center 109 Figure 96: Wallboard Setup page with a wallboard listed Click Edit to view the Edit Wallboard page shown in Figure 97: Edit Wallboard page. Reporting for Contact Center Setup and Operations Guide 110 Using Reporting for Contact Center Figure 97: Edit Wallboard page The Edit Wallboard page is set up exactly like the Add Wallboard page shown in Figure 95: Add Wallboard page, except the data fields are populated with the values of the wallboard you selected to edit. To save the changes, click Submit. The Wallboard Setup page appears. See Figure 93: Wallboard Menu page. To leave the Add Wallboard page without saving any changes, click Cancel. The Wallboard Setup page appears. See Figure 93: Wallboard Menu page. Click Parameters to view the Edit Parameters page, shown in Figure 98: Edit Parameters page. NN40040-303 Using Reporting for Contact Center 111 Figure 98: Edit Parameters page The Edit Parameters page allows you to specify which six (or three, if you specified that the wallboard is going to have a title, as described on page 108) parameters are displayed on the wallboard. The list of available parameters is shown on page 108. Select the parameters from the lists on the page. Note: If the wallboard for which you are specifying parameters is a hardware wallboard, some parameters appear only in positions 3 and 6. The lists for positions 1, 2, 4, and 5 do not show those parameters because the parameters that are restricted to positions 3 and 6 are capable of displaying up to 4 digits. Positions 3 and 6 on the hardware wallboard are larger than positions 1, 2, 4, and 5. Any parameter can occupy any position on a software wallboard. When you have selected your parameters, click Submit. The Wallboard Setup page appears. See Figure 93: Wallboard Menu page. Reporting for Contact Center Setup and Operations Guide 112 Using Reporting for Contact Center To return to the Wallboard Setup page without saving any changes, click Cancel. You are prompted to confirm that you do not wish to save your changes. Click Delete to remove the wallboard definition from the system and to remove its listing from the Wallboard Setup page. You are prompted to confirm the deletion. After you confirm the deletion, the Wallboard Setup page appears. See Figure 93: Wallboard Menu page. Messages The Messages option allows you to create and store messages that can be used as Alarm or Scheduled messages. Select the Wallboard Setup Messages option to view the Assigned Messages page shown in Figure 99: Assigned Messages page. This page lists all the messages that are configured. Any message can be used by any Skillset. Initially, the list of Assigned Messages is empty (as shown in Figure 99: Assigned Messages page). NN40040-303 Using Reporting for Contact Center 113 Figure 99: Assigned Messages page Click Add to view the Add Messages page shown in Figure 100: Add Message page. Reporting for Contact Center Setup and Operations Guide 114 Using Reporting for Contact Center Figure 100: Add Message page Type your message text in the blank field. Note that if you include a parameter abbreviation in round brackets ‘(’ and ‘)’ in the text of the message, the appropriate numerical value of that Contact Center statistic replaces the parameter abbreviation when the message is displayed. See the list of available parameters on page 108, and the discussion of parameter abbreviations being replaced with numerical values on page 103. Figure 101: Add Message page – example text shows an Add Message page with a message example. NN40040-303 Using Reporting for Contact Center 115 Figure 101: Add Message page – example text In the example, User Mary Smith entered the following message in the Add Message text field: There are (AN) Agents Not Ready please return to available The parameter abbreviation AN represents Agents Not Ready. When this message is displayed on a wallboard the current numerical value of “AN” is inserted in the message instead of the (AN) symbol. If there are 6 Agents Not Ready at the time the message was displayed on the wallboard, the following text is displayed: There are 6 Agents Not Ready please return to available Click Submit to save the message text you typed. The Assigned Messages page shown in Figure 102: Assigned Messages list – example messages appears. Reporting for Contact Center Setup and Operations Guide 116 Using Reporting for Contact Center To leave the Add Messages page without saving any changes, click Cancel. The Assigned Messages page shown in Figure 102: Assigned Messages list – example messages appears. Figure 102: Assigned Messages list – example messages User Mary Smith clicked Submit to save her new message. Her Assigned Messages List now includes the message she saved, as shown in the example. Mary Smith also entered a message that will be used in a schedule. This message is a text message only and does not include any parameter abbreviations. This message will be use later in a Schedule. The text of the other message is: Morning Shift Logout, Afternoon shift Login After messages are assigned to these Skillsets, they can be used in Alarms or Schedules. NN40040-303 Using Reporting for Contact Center 117 You can use the Edit button to edit the details of a message, and you can use the Delete button to remove a message from the list. Alarms Select the Wallboard Setup Alarm option to view the Assigned Alarms page shown in Figure 103: Assigned Alarms page. Figure 103: Assigned Alarms page The Assigned Alarms list is empty initially. To create an Alarm, click Add. The Add Alarm page shown in Figure 104: Add Alarm page appears. Reporting for Contact Center Setup and Operations Guide 118 Using Reporting for Contact Center Figure 104: Add Alarm page Follow these steps to specify an alarm: 1. In the Wallboard Skillset list, select a skillset that is specific to the alarm. Note: When you assign an Alarm, the alarm is specific to a particular Skillset (or the System, if you select the System list item). An Alarm Message can be used by many Skillsets, but an Alarm is specific to a single Skillset. 2. In the Parameter name list, select the alarm parameter that triggers the alarm. Refer to the list of available parameters on page 108. Note: You can specify the same alarm conditions for different Skillsets, and these different alarms can use the same Alarm message, but they are separate and distinct alarms, and they must be created separately. Note: If you configure an Alarm to be a System Alarm, the Alarm appears on all wallboards that have been configured as System wallboards. You can specify the same alarm conditions for different Skillsets, and these different alarms can use the same Alarm NN40040-303 Using Reporting for Contact Center 119 message, but they are separate and distinct alarms, and they operate independently, with no interaction. 3. In the Period Start Time list, specify the start time for the period of the day in which the Alarm is operational. For more information, refer to Alarm Periods. Note: Alarm Periods allow you to specify different Thresholds, Comparisons, and Messages for different periods of the day, for a single Alarm. An Alarm period is in operation after its start time has passed and before the start time of the next period has been reached. You can specify different Alarm conditions for a single Alarm for up to six Alarm Periods throughout a single day. To define an Alarm Period, specify the start time for that period. If only one Alarm Period is configured, that Alarm Period is in operation 24 hours a day. 4. In the Comparison list, select the type of comparison that determines if the alarm condition is triggered. The types of comparisons are as follows: <= Less than or equal to. Use this type of comparison to monitor a parameter against some lower limit. That is, you wish to be informed if the parameter value ever drops to or decreases below the Threshold you supply. For example if you wish an alarm to be triggered if the Service Level for the Current Hour (SH) falls below 50, you would use SH <= 50. = Equals. Use this type of comparison to monitor a parameter against an exact figure. That is, you wish to be informed if the parameter value ever exactly matches a figure, perhaps a target. Note that in this type of comparison, if the parameter value is higher than the threshold, the alarm condition is not triggered. The parameter must exactly match the threshold in order to trigger the alarm. For example, you may wish to have a congratulatory message sent to the wallboards if you exceed your highest number of incoming calls for the day. If your highest number of incoming calls for the day was 1200, you could set an Alarm for the parameter ID. However, if you use “>= “, the Alarm would be triggered for each and every call from 1200 on. Instead, you would use the format ID = 1201. This means that the alarm message will be sent only when the number of incoming calls in the day equals 1201 (one higher than your previous highest total). This avoids the message being repeatedly sent as calls continue to come in and the ID figure rise. (At the end of that day, you would then note your n highest ID figure and edit the Alarm to reflect your new record Incoming Calls in the Day total.) >= Greater than or equals to. Use this type of comparison to monitor a parameter against some upper limit. That is, you wish to be informed if the parameter value ever meets the Threshold you supply. For example, if you wish an alarm to be triggered if the number of Agents who have made themselves Not Ready rises above 4, you would use AN >= 4. Reporting for Contact Center Setup and Operations Guide 120 Using Reporting for Contact Center 5. In the Threshold field, enter a numerical threshold against which the parameter value is compared. Nortel Reporting for Contact Center automatically understands whether the figure you supply represents: Agents (for parameters such as AN and AO) Calls (for parameters such as ID and OD) Seconds (for parameters such as QT) Percentages (for parameters such as SD) 6. In the Message list, select the message that is sent when the alarm is triggered. Note: A Static Alarm does not have an alarm message. In the case of a Static Alarm, the parameter value is displayed in flashing red on the wallboard. For this type of Alarm to be effective, the parameter must be one of the parameters you chose to have displayed on your wallboard (see Parameters button on page 110). To specify a Static Alarm, select No Message from the Message list. Alarm Periods You can specify different Alarm conditions for a single Alarm for up to six Alarm Periods throughout a single day. You define the Alarm Periods by specifying start times for each period. Alarm Periods allow you to specify different Thresholds, Comparisons, and Messages for different periods of the day, for a single Alarm. An Alarm period is in operation when its start time has passed and before the start time of the next period has been reached. Note: If only one Alarm Period is configured, then that Alarm Period is in operation 24 hours a day. In the example shown in Figure 105: Example Settings for a Multi Alarm Period Alarm, User Mary Smith configured an Alarm with three time periods for one of her Skillsets. NN40040-303 Using Reporting for Contact Center 121 Figure 105: Example Settings for a Multi Alarm Period Alarm The Alarm is triggered when the parameter AN (number of Agents Not Ready) passes beyond the thresholds. The Skillset applies to three shifts of Agents: a morning shift, the evening shift, and the late shift, which consists of a smaller number of Agents. Because the Skillset has a different number of Agents Logged in during each shift, an Alarm based on Agents Not ready must have different thresholds to allow for the different numbers of Agents Logged in at the various periods throughout the 24-hour cycle. In the example shown in Figure 105: Example Settings for a Multi Alarm Period Alarm, the first Alarm Period begins at 08:30 in the morning. The comparison is “>= “, so the Alarm is triggered when the AN parameter meets or exceeds the threshold. The threshold is 5. When the AN parameter reaches 5 or above, the selected message is sent to the wallboards that are assigned to this Skillset. Reporting for Contact Center Setup and Operations Guide 122 Using Reporting for Contact Center The second Alarm Period begins at 17:30 in the evening. The comparison is “>=”, so the Alarm is triggered when the AN parameter meets or exceeds the threshold. The threshold is 3. When the AN parameter reaches 3 or above, the selected message is sent to the wallboards that are assigned to this Skillset. Because there are fewer Agents in the Afternoon Shift, the threshold is lowered to 3. The third Alarm Period begins at 22:30. Note that this Alarm Period operates until the next Alarm Period starts, which in this example is Alarm Period One, at 08:30 the following morning. Because of the smaller staff in Mary Smith’s Skillset during the late shift, the Threshold is lowered to 2. In all cases, the same Alarm Message is used. Because the (AN) symbol is replaced by the appropriate value of the AN parameter when the message is displayed (which is when the Alarm is triggered), a single message can be flexible enough to be used in different situations. However, if Mary Smith wants to, she can use a different message for each Alarm Period, or she can configure any of the Alarm Periods to use a Static Alarm. 7. Click Submit to save your settings. The Assigned Alarms page shown in Figure 106: Assigned Alarms page with an alarm configured appears. Click Cancel to view the Assigned Alarms page without saving your changes. NN40040-303 Using Reporting for Contact Center 123 Figure 106: Assigned Alarms page with an alarm configured Schedules Schedules allow you to automatically send a message to the wallboards of a Skillset (or the System) at a pre-defined time on a specified day or range of days. Select the Wallboard Setup Schedule option to view the Assigned Schedules page shown in Figure 107: Assigned Schedules page. Reporting for Contact Center Setup and Operations Guide 124 Using Reporting for Contact Center Figure 107: Assigned Schedules page The Assigned Schedules page displays a list of the assigned Schedules. Initially, this list is empty. Click Add to create a new Schedule. The Add Schedule page shown in Figure 108: Add Schedule page appears. NN40040-303 Using Reporting for Contact Center 125 Figure 108: Add Schedule page Follow these steps to configure the Schedule: 1. In the Wallboard Skillset list, select a skillset that is specific to the schedule. Note: When you add a schedule, the alarm is specific to a particular Skillset (or the System, if you select the System list item). A Schedule Message can be used by many Skillsets, but a Schedule is specific to a single Skillset. . Note: If you configure a Schedule to be a System Schedule, that Schedule appears on all wallboards that are configured as System wallboards. Note: You can specify the same Schedule settings for different Skillsets, and these different Schedules can use the same Schedule message, but they are all separate and distinct Schedules, and they must be created separately. Reporting for Contact Center Setup and Operations Guide 126 Using Reporting for Contact Center 2. From the Day list, select the day on which the Schedule operates. You can set a Schedule to operate on a specific day of the week, every day from Monday to Friday, every day from Monday to Saturday, or Daily (every day). 3. From the Time list, select the time, in hours and minutes, that the Schedule is triggered. Note: The Time list uses the 24-hour clock. Our example User Mary Smith has created a schedule which will operate on each day of the working week, Monday to Friday 4. From the Message list, select the message to send at the specified time on the specified range of days. The list includes all messages that are assigned to this skillset. 5. Click Submit to save your changes. The Assigned Schedules page shown in Figure 109: Assigned Schedules page with schedule added appears. Click Cancel to leave the Add Schedules page without saving your changes. Figure 109: Assigned Schedules page with schedule added NN40040-303 Using Reporting for Contact Center 127 The example Assigned Schedules page shows the newly created Schedule. As shown in the example, Mary Smith wants the Morning Shift Log Out, Afternoon Shift Login message sent to the Skillset 3 wallboards at 13:00, each day of her working week, which runs from Monday to Friday. Click Edit to change any details of a Schedule. The Edit Schedule page shown in Figure 110: Edit Schedule page appears. Figure 110: Edit Schedule page This Edit Schedule page is set up exactly like the Add Schedule page shown in Figure 108: Add Schedule page. Click Submit to save your edits. The Assigned Schedule page shown in Figure 109: Assigned Schedules page with schedule added appears. Reporting for Contact Center Setup and Operations Guide 128 Using Reporting for Contact Center Click Cancel to leave the Edit Schedules page without saving any edits. The Assigned Schedule page shown in Figure 109: Assigned Schedules page with schedule added appears. Instant Messages Instant messages allow Users to manually select any one of the stored wallboard messages and to send them to the wallboards at will. Users can also type any text and have it sent to the wallboards, for one-off requirements. These messages are sent to the wallboards and then discarded. They are not saved. If you wish to save a message, use the Wallboard Message options on page 112 to add the message to the list of stored messages. Select Wallboard Setup Instant Messages option to view the Instant Messages page shown in Figure 111: Instant Messages page. Figure 111: Instant Messages page NN40040-303 Using Reporting for Contact Center 129 From the Instant Messages page, you can select the Skillsets to which you wish to dispatch the instant message. The available Skillsets are those that your Administrator assigned to you. • • For more information about using Skillset selection lists see page 141. For more information about using Favorites, see page 141. In the example shown in Figure 111: Instant Messages page, User Mary Smith used her Skill1&3 Favorite to select the Development and Training Skillsets. Click Instant Messages to view the Instant messages page that allows you to compose an instant message. See Figure 112: Composing an Instant Message. Figure 112: Composing an Instant Message You can send an existing stored message or create a new message. Follow these steps to create and send an Instant Message. Reporting for Contact Center Setup and Operations Guide 130 Using Reporting for Contact Center 1. To send an existing message, select the stored message from the Existing messages list. To create a new message, type the new message in the New Message field. . 2. Click Send to send the message to the wallboards. • • If the New message field does not contain any text, the displayed message in the Existing messages list is sent to the wallboards. If the New message field contains text, that text is sent to the wallboards. In either case, the Instant Messages page appears after you click Send. Click Cancel to return to the Instant Messages page without sending an Instant Message. Note: You can include parameter abbreviations in brackets in the text of the new message. When the message is displayed, the abbreviations are replaced with the correct numerical value for the parameter. (For more information about parameter substitution, refer to page 103.) NN40040-303 Using Reporting for Contact Center 131 Time Bins Setup The Time Bins option allows you to specify the settings for the Answer and Abandon Time Bins for the Skillsets that are assigned to you. Answer and Abandon Time Bins are collectively known as the Time Bins. Answer Time Bins The Answered Time Bins are a series of six time steps used in the statistical analysis of Answered Calls. Nortel Reporting for Contact Center provides statistical reports on the percentage of incoming calls answered within each of the periods specified in the chosen Answered Time Bins. A seventh Answer period is also used in the reports. The seventh period gathers information about all calls that are answered after the period specified by the sixth Answered Time Bin. Abandon Time Bins The Abandon Time Bins are a series of six time steps used in the statistical analysis of Abandoned Calls. Nortel Reporting for Contact Center provides statistical reports about the percentage of incoming calls abandoned within each of the periods specified in the chosen Abandoned Time Bins. A seventh abandoned period is also used in the reports. The seventh period gathers information about all calls that are abandoned after the period specified by the sixth Abandoned Time Bin. Note: If other Users have been assigned these Skillsets, they can change these settings. Select the Time Bins Setup option to view the Time Bin Setup page, shown in Figure 113: Time Bin Setup Skillset selection page. Reporting for Contact Center Setup and Operations Guide 132 Using Reporting for Contact Center Figure 113: Time Bin Setup Skillset selection page The Time Bin Setup Skillset selection page allows you to select a Skillset for which you wish to set Time Bin values. Note that the list of available Skillsets in Figure 113: Time Bin Setup Skillset selection page contains only those Skillsets that the Administrator assigned to the User. Follow these steps to set Time Bin values for Skillsets. 1. In the Skillsets list, click any Skillsets to select the Skillset for which you wish to set the Time Bin values. 2. Click Assign Time Bins. The Time Bins values page shown in Figure 114: Time Bins page appears. NN40040-303 Using Reporting for Contact Center 133 Figure 114: Time Bins page 3. In the Answered Time Bins and Abandoned Time Bins lists, enter the time required to define the periods into which you wish to have calls that are answered or abandoned in these Skillsets categorized. The steps in the Time Bin periods need not be the same, but you must set the Time Bin periods in ascending order. For example, if you want to have Nortel Reporting for Contact Center report on Answered calls, grouping together the calls that were answered within 10 seconds, the calls that were answered between 10 and 20 seconds, the calls that were answered between 20 and 30 seconds, the calls that were answered between 30 and 40 seconds, the calls that were answered between 40 and 50 seconds, the calls that were answered between 50 seconds and one minute, you would set the Time Bins as 00:10, 00:20, 00:30, 00:40, 00:50, and 01:00. Note that Nortel Reporting for Contact Center also includes a category for anything greater than the last time period, which in this example would be ‘anything answered after 01:00’. Reporting for Contact Center Setup and Operations Guide 134 Using Reporting for Contact Center 4. Click Submit to save your settings. To close the Time Bins page without saving your changes, click Cancel. The Time Bin Setup page shown in Figure 113: Time Bin Setup Skillset selection page appears. NN40040-303 Using Reporting for Contact Center 135 Schedules You can configure Print Schedules so that Nortel Reporting for Contact Center automatically prints a set of requested reports at a specified time. You can specify Print Schedules to print Daily, Weekly, or Monthly reports. You can configure multiple Daily, Weekly, and Monthly Schedules. For example, you may wish to print a set of reports each day before you arrive at your desk. In this case, you configure a Daily Schedule which prints at, for example, 08:00. You can also have a different Daily Schedule report that refers to Agent Activity. You can configure Nortel Reporting for Contact Center to print these reports at, for example, 16:30 so that you can review the reports before the end of the day. Note: If the Web Host PC is powered off over the period in which the Schedule print is due to take place, the Schedule Print not produced. You can obtain the same reports by using the Reports options. For more information, refer to Reports. Note: If you select the Agent Audit by Agent, Agent Average by Agent, Agent Profile by Agent, Agent Activity by Agent, Activity Code by Skillset, the Activity Code by Agent, or the Activity Code by Pegs Reports to be included in your Print Schedule, you are prompted for the Agents and/or the Activity Codes you wish to include in these Reports. These steps are described on pages 172 (Agent reports), 172 (Activity Code by Skillset), 172 (Activity Code by Agents) and 172 (Activity Code by Pegs). From the User Main Menu page shown in Figure 72: User Main Menu page, select Reports and Schedule to view the Report’s page shown in Figure 115: Reports and Schedules page. As shown in Figure 115: Reports and Schedules page, the Print Schedules options are as follows: Daily Schedules (see Daily Schedules) Weekly Schedules (see Weekly Schedules) Monthly Schedules (see Monthly Schedules) Reporting for Contact Center Setup and Operations Guide 136 Using Reporting for Contact Center Figure 115: Reports and Schedules page Daily Schedules Select Daily Schedules to view the Your Daily Schedules page, shown in Figure 116: Your Daily Schedules page. Initially the page does not display any schedules. NN40040-303 Using Reporting for Contact Center 137 Figure 116: Your Daily Schedules page Follow the steps in this section to add a Daily Schedule. 1. Click Add. The Add Daily Schedules page shown in Figure 117: Add Daily Schedule page appears. Reporting for Contact Center Setup and Operations Guide 138 Using Reporting for Contact Center Figure 117: Add Daily Schedule page The Add Daily Schedule page allows you to specify which reports you wish to have included in the Schedule, which days are to be included in the Schedule, and when to print the reports. 2. To set a name for your Schedule, type the name in the Schedule Name field. This is to help you identify, and distinguish between, the different Schedules you create. 3. To select a report to be included in the Schedule, select the check box beside the report name. Each selected report has a check mark in the check box beside its name. You can select multiple reports. 4. To include the reports from a particular day in the Schedule, select the check box beside that day. You can select multiple days. NN40040-303 Using Reporting for Contact Center 139 Note: Daily Reports print on the day following the day which is being reported. That is, if you select a Daily Report Schedule for Monday, it prints on Tuesday. This ensures that the report day has completely elapsed when the reports are generated. 5. To specify which printer generates the reports, select a printer name from the Select printer list. This list includes all the printers that are accessible from the Web Host PC. (The reports are generated from the databases held in the Web Host PC.) 6. The Report Period Start Time and Report Period End Time lists allow you to specify the period within each day for which the reports are generated. For example, if your Contact Center has a working day that starts at 08:30 and finishes at 17:30, you may wish to specify the Start Time as 08:00 (to see if you have early calls that you are missing by not having the Contact Center open) and 18:00 (to see if a late surge of calls occurs). Figure 118: Add Daily Schedule page – example settings shows example settings that User Mary Smith configured for her Daily Schedule. Figure 118: Add Daily Schedule page – example settings Reporting for Contact Center Setup and Operations Guide 140 Using Reporting for Contact Center Mary Smith selected the Answered Calls by Skillset, Abandoned Calls by Skillset and Abandoned CLID/DNIS reports to be printed at 08:30 each morning, for Monday through Friday. Her printouts will be generated on Tuesday for Monday, on Wednesday for Tuesday, and so on until Friday’s reports are printed on Saturday morning. Her schedule is called AnswAband, and the reports start to be generated at 08:30, on the Cannon iT5000-6000 PCL5e printer. The reports cover the period from midnight to midnight for each day. 7. To save your Daily Schedule, click Submit. The Daily Schedule Skillsets page, shown in Figure 119: Daily Schedule Skillsets page appears. To close the Add Daily Schedule page without saving your changes, click Cancel. The Your Daily Schedules page shown in Figure 116: Your Daily Schedules page appears. Figure 119: Daily Schedule Skillsets page NN40040-303 Using Reporting for Contact Center 141 The Daily Schedule Skillsets page allows you to select which Skillsets you wish to include in the generated reports that are produced by the Daily Schedule. Skillset List Selection Methods You can use the following techniques to select Skillsets from the Skillset List. Click an unselected Skillset name once to select it (it will be highlighted) and remove the highlight from any other currently selected Skillsets. Click a selected (highlighted) Skillset name once to unselect it. Note that if other Skillsets are selected and you click a Skillset name, you unselect all the other Skillsets. To select multiple Skillsets, press Ctrl and click on multiple Skillsets. Press and hold down the Shift key, then click a Skillset to select all the Skillsets between the currently highlighted Skillset and the Skillset you clicked. You can use Select All to select all the Skillsets at once. Adding Selections to the Favorites List If there are collections of the assigned Skillset for which you frequently need to review the Daily Schedules, you can add the selection of Skillsets to the Favorites list. When you add the selection to the Favorites list, instead of having to select a particular collection of Skillsets each time you wish to use them, you can click Select beside the appropriate Favorite, and the collection of Skillsets is highlighted at once. You do not need to select a particular collection of Skillsets each time you wish to use them. Follow these steps to add a Favorite to the Favorite List. 1. Select the Skillsets you wish to include in the Favorite List and then click Create Favorite. The Save Favorites page appears, as shown in Figure 120: Save Favorites page. Reporting for Contact Center Setup and Operations Guide 142 Using Reporting for Contact Center Figure 120: Save Favorites page 2. Enter a name in the Favorite Name field, and then click Submit to save the name. (Click Cancel to return without saving the Favorite.) In the example shown in Figure 120: Save Favorites page, Mary Smith created a favorite that contains the Skillsets SKILL1 and SKILL3 called “Skill1&3”. When a Favorite is created, it appears in the Favorite List at the top of the page. Note: Many pages within Nortel Reporting for Contact Center allow you to use S lists and Favorites, and the techniques described here apply also to all those other pages. All the Favorites you create are accessible from any point within Nortel Reporting for Contact Center that allows you to use Favorites. Mary Smith clicked Select beside her new Favorite (Skill1&3), and the two associated Skillsets are selected for her. NN40040-303 Using Reporting for Contact Center 143 Saving your Daily Schedule 1. To save your Daily Schedule, click Submit. The Your Daily Schedules page shown in Figure 121: Your Daily Schedules with a Schedule in the List appears. The page shows the Daily Schedule that you created. To leave the Daily Schedule Skillsets page without saving any changes, click Cancel. The Your Daily Schedules page appears. See Figure 116: Your Daily Schedules page. Note: If you included the Agent Audit by Agent, Agent Profile by Agent, Agent Activity by Agent, Agent Average by Agent, Activity Code by Skillset, Activity Code by Agent, or the Activity Code Report by Pegs Reports in your Print Schedule, you are prompted for the Agents and/or the Activity Codes you wish to include in these Reports. These steps are described on pages 172 (Agent Reports), 172 (Activity Code by Skillset), 172 (Activity Code by Agents) and 172 (Activity Code by Pegs). Figure 121: Your Daily Schedules with a Schedule in the List Reporting for Contact Center Setup and Operations Guide 144 Using Reporting for Contact Center Note that each Schedule can be identified by the Schedule Name that was provided when the Schedule was created. . Deactivate Click Deactivate to disable the Print Schedule so that the schedule is no longer printed when the schedule is due to run. When a schedule is disabled, the button changes from Deactivate to Activate, and a red cross replaces the green check mark, similar to the following illustration. Activate Click Activate to enable the Print Schedule so that the schedule is printed when the schedule is due to run. Once a schedule is enabled, the button changes from Activate to Deactivate and a green check mark replaces the red cross, similar to the following illustration. Edit Click Edit to change the settings for a Schedule. The Edit Daily Schedule page, shown in Figure 122: Edit Daily Schedules page appears. NN40040-303 Using Reporting for Contact Center 145 Figure 122: Edit Daily Schedules page This page is set up exactly like the Add Daily Schedule page, except the fields and check boxes are populated with the settings of the Schedule you are editing. In the example, you are editing the AnswAban schedule. Make any necessary changes and click Submit. Your Daily Schedules page appears. See Figure 121: Your Daily Schedules with a Schedule in the List To leave the Edit Daily Schedule page without saving any changes, click Cancel. The Your Daily Schedules page appears. See Figure 121: Your Daily Schedules with a Schedule in the List. Delete Click Delete to remove the Schedule from the system and to remove its listing from the Your Daily Schedules page. Reporting for Contact Center Setup and Operations Guide 146 Using Reporting for Contact Center You are prompted to confirm the deletion. When you confirm the deletion, the Your Daily Schedules page appears Weekly Schedules On the Print Schedules page shown in Figure 115: Reports and Schedules page, select Weekly Schedules to view the Your Weekly Schedules page. See Figure 123: Your Weekly Schedules page. Initially, the page does not show any schedules. The Add Weekly Schedule page allows you to specify which reports you wish to include in the Schedule and when to print the scheduled reports. You can also specify which period of the day the reports contain. You must specify a name for your Schedule and the printer on which you wish to generate the reports. Figure 123: Your Weekly Schedules page Follow the steps in this section to add a Weekly Schedule: NN40040-303 Using Reporting for Contact Center 147 1. Click Add. The Add Weekly Schedules page shown in Figure 124: Add Weekly Schedule page appears. Figure 124: Add Weekly Schedule page 2. To set a name for your Schedule, enter the name in the Schedule Name field. The name helps you identify and distinguish between the different Schedules you create. 3. To select a report to include in the Schedule, click the check box beside the report name. Selected reports have a check mark in the check box beside their name. You can select multiple reports. 4. The reports are generated for a calendar week. From the list, select the day on which the Weekly Schedule reports are generated. Reporting for Contact Center Setup and Operations Guide 148 Using Reporting for Contact Center Note: Weekly Schedules generate reports on the specified day at the specified time. However, the generated reports contain information from the previous calendar week. For example, a User creates a Weekly Schedule to print on a Saturday. They create this Schedule on September 10th, 2003. See Figure 125: Calendar for September 2003. On Saturday September 13, the Weekly Schedule generates Weekly reports. These Reports contain information relating to the week September 1st –September 7th. Reports containing the information relating to the week September 8th – September 14th are printed on Saturday, 20 September, and so on. September 2003 Mon Tue Wed Thu Fri Sat Sun 1 2 3 4 5 6 7 8 9 10 11 12 13 14 15 16 17 18 19 20 21 22 23 24 25 26 27 28 29 30 Figure 125: Calendar for September 2003 5. In the Select printer list, select the printer on which the reports will be generated. This list includes all the printers that are accessible from the Web Host PC. (The reports are generated from the databases held in the Web Host PC.) 6. In the Report Period Start Time and Report Period End Time fields, specify the period in each day for which the reports are generated. For example, if your Contact Center has a working day that starts at 08:30 and finishes at 17:30, you may wish to specify the Start Time as 08:00 (to see if you have early calls that you are missing by not having the Contact Center open) and 18:00 (to see if there is a late surge of calls). Figure 126: Add Weekly Schedule page – example schedule shows how User Mary Smith configured her Weekly Schedule. NN40040-303 Using Reporting for Contact Center 149 Figure 126: Add Weekly Schedule page – example schedule Mary Smith selected the Answered Calls by Skillset, Abandoned Call by Skillset, Abandoned CLID/DNIS, and Call Average by Skillset reports to be printed at 08:30 on Mondays. Her schedule is called WeeklyCalls. The reports start generating at 08:30 on the Canon iR5000-6000 PCL5e printer. The reports cover the period from midnight to midnight for each day. 7. Click Submit to save your Weekly Schedule. The Weekly Schedules – Skillsets page shown in Figure 127: Weekly Schedules - Skillsets appears. Weekly Schedules Skillsets The Weekly Schedule - Skillsets page allows you to select which Skillsets you wish to include in the generated reports that the Weekly Schedule produces. Reporting for Contact Center Setup and Operations Guide 150 Using Reporting for Contact Center Figure 127: Weekly Schedules - Skillsets • • For information about using Skillset selection lists, see page 141. For information about using Favorites, see page 141. In the example shown in Figure 127: Weekly Schedules - Skillsets, User Mary Smith used her Skill1&3 Favorite to select the Development and Training Skillsets. To save your Weekly Schedule Skillsets selections, click Submit. The Your Weekly Schedules page appears. To leave the Weekly Schedule – Skillsets page without saving any changes, click Cancel. The Your Weekly Schedules page appears. Saving Your Weekly Schedule To save your Weekly Schedule, click Submit. The Your Weekly Schedules page shown in Figure 128: Your Weekly Schedule page with a Print Schedule in the list appears. The page shows the schedule you created. In the example, the schedule name is Weekly Calls. NN40040-303 Using Reporting for Contact Center 151 To leave the Add Weekly Schedule page without saving any changes, click Cancel. You are prompted to confirm that you do not wish to save your changes. After you confirm the deletion, the Your Weekly Schedules page appears. See Figure 123: Your Weekly Schedules page. Note: If you include the Agent Audit by Agent, Agent Profile by Agent, Agent Average by Agent, Agent Activity by Agent, Activity Code by Skillset, Activity Code by Agent, or the Activity Code by Pegs Reports in your Print Schedule, you are prompted for the Agents and/or the Activity Codes you wish to include with these Reports. These steps are described on pages 172 (Agent Reports), 172 (Activity Code by Skillset), 172 (Activity Code by Agents) and 172 (Activity Code by Pegs). Figure 128: Your Weekly Schedule page with a Print Schedule in the list Note that each Schedule can be identified by the Schedule Name that was provided earlier when the Schedule was created. Deactivate Click Deactivate to disable the Print Schedule so that the schedule no longer prints when the schedule is due to run. When a schedule is disabled, the Deactivate button changes from Deactivate to Activate and a red cross replaces the green check mark, similar to the following illustration. Reporting for Contact Center Setup and Operations Guide 152 Using Reporting for Contact Center Activate Click Activate to enable the Print Schedule so that the schedule prints when the schedule is due to run. When a schedule is enabled, the Activate button changes from Activate to Deactivate and a green check replaces the red cross, similar to the following illustration. Edit Click Edit to view the Edit Weekly Schedule page, shown in Figure 129: Edit Weekly Schedule page. Figure 129: Edit Weekly Schedule page NN40040-303 Using Reporting for Contact Center 153 This page is set up exactly like the Add Weekly Schedule page, except the fields and check boxes are populated with the settings of the Schedule you are editing. In the example, you are editing the Weekly Calls schedule. Make any necessary changes and click Submit. The Your Weekly Schedules page shown in Figure 123: Your Weekly Schedules page appears. To leave the Edit Weekly Schedule page without saving any changes, click Cancel. The Your Weekly Schedules page shown in Figure 123: Your Weekly Schedules page appears. Delete Click Delete to remove the Schedule from the system and remove its listing from the Your Weekly Schedules page. You are prompted to confirm the deletion. When you confirm the deletion, the Your Weekly Schedules page shown in Figure 123: Your Weekly Schedules page appears. Monthly Schedules On the Print Schedules page shown in Figure 115: Reports and Schedules page, select Monthly Schedules to view the Your Monthly Schedules page. See Figure 130: Your Monthly Schedules page. Initially, the page does not show any schedules. The Add Monthly Schedule page allows you to specify which reports you wish to include in the Schedule and when to print the scheduled reports. You can also specify which period of the day the reports contain. You must specify a name for your Schedule and the printer on which you wish to generate the reports. Reporting for Contact Center Setup and Operations Guide 154 Using Reporting for Contact Center Figure 130: Your Monthly Schedules page Follow the steps in this section to add a Monthly Schedule: 1. Click Add. The Add Monthly Schedules page shown in Figure 131: Add Monthly Schedule Page appears. NN40040-303 Using Reporting for Contact Center 155 Figure 131: Add Monthly Schedule Page 2. To set a name for your Schedule, enter the name in the Schedule Name field. This name helps you identify and distinguish between the different Schedules you create. 3. To select a report to include in the Schedule, select the check box beside the report name. You can select multiple reports. 4. To specify the printer on which the reports are generated, select a printer from the Select printer list. The list includes all the printers that are accessible from the Web Host PC. (The reports are generated from the databases held in the Web Host PC.) 5. The reports are generated for a calendar month. You must specify the time you wish to have the Monthly Schedule reports generated. They are generated on the first day of each Month, at the specified time. Reporting for Contact Center Setup and Operations Guide 156 Using Reporting for Contact Center In the Report Period Start Time and Report Period End Time lists, specify the period in each day for which the reports are generated. For example, if your Contact Center has a working day that starts at 08:30 and finishes at 17:30, you may wish to specify the Start Time as 08:00 (to see if you have early calls that you are missing by not having the Contact Center open) and 18:00 (to see if there is a late surge of calls). Figure 132: Add Monthly Schedule page with example schedule shows an example Monthly Schedule that User Mary Smith configured. Figure 132: Add Monthly Schedule page with example schedule Mary Smith selected the Answered Calls by Skillset, Abandoned Calls by Skillset, Abandoned CLID/DNIS, and Call Average by Skillset reports to be printed at 08:30 (on the first day of each new month). Her schedule is called MonthlyCalls. The reports start to generate at 08:30 on the Cannon iR5000-6000 PCL5e printer. The reports cover the period from midnight to midnight for each day. NN40040-303 Using Reporting for Contact Center 157 6. To save your Monthly Schedule click Submit. The Monthly Schedules – Skillsets page, shown in Figure 133: Monthly Schedule - Skillsets page appears. To leave the Add Monthly Schedule page without saving any changes, click Cancel. The Your Monthly Schedules page shown in Figure 130: Your Monthly Schedules page appears. Monthly Schedule Skillsets The Monthly Schedule - Skillsets page allows you to select which Skillsets you wish to include in the generated reports that the Monthly Schedule produces. Figure 133: Monthly Schedule - Skillsets page • • For information about using Skillset selection lists, see page 141. For information about using Favorites, see page 141. In the example shown in Figure 133: Monthly Schedule - Skillsets page, User Mary Smith used her Skill1&3 Favorite to select the Development and Training Skillsets. Reporting for Contact Center Setup and Operations Guide 158 Using Reporting for Contact Center Note: If you include the Agent Audit by Agent, Agent Profile by Agent, Agent Average by Agent, Agent Activity by Agent, Activity Code by Skillset, Activity Code by Agent, or the Activity Code by Pegs Reports in your Print Schedule, you are prompted for the Agents and/or the Activity Codes you wish to have included within these Reports. These steps are described on pages 172 (Agent Reports), 172 (Activity Code by Skillset), 172 (Activity Code by Agents) and 172 (Activity Code by Pegs). To save your Monthly Schedule Skillsets, click Submit. The Your Monthly Schedules page shown in Figure 134: Your Monthly Schedules page with a Print Schedule in the list appears. To leave the Monthly Schedule – Skillsets page without saving any changes, click Cancel. The Your Monthly Schedules page appears, as shown in Figure 130: Your Monthly Schedules page. Saving your Monthly Schedule To save your Monthly Schedule, click Submit. The Your Monthly Schedules page shown in Figure 134: Your Monthly Schedules page with a Print Schedule in the list appears. The page shows the schedule you created. In the example, the schedule name is Monthly Calls. Figure 134: Your Monthly Schedules page with a Print Schedule in the list NN40040-303 Using Reporting for Contact Center 159 Note: Each Schedule can be identified by the Schedule Name that was provided earlier when the Schedule was created. Deactivate Click Deactivate to disable the Print Schedule so that the schedule no longer prints when the schedule is due to run. When a schedule is disabled, the button changes from Deactivate to Activate, and a red cross replaces the green check mark, similar to the following illustration. Activate Click Activate to enable the Print Schedule so that the schedule prints when the schedule is due to run. When a schedule is enabled, the button changes from Activated to Deactivate, and a green check mark replaces the red cross, similar to the following illustration. Edit Click Edit to view the Edit monthly Schedule page, shown in Figure 135: Edit Monthly Schedule page. Reporting for Contact Center Setup and Operations Guide 160 Using Reporting for Contact Center Figure 135: Edit Monthly Schedule page This page is set up exactly like the Add Monthly Schedule page, except the fields and check boxes are populated with the settings of the Schedule you are editing. In the example, you are editing the Monthly Calls schedule. Make any necessary changes and click Submit. The Your Monthly Schedules page appears. See Figure 130: Your Monthly Schedules page. To leave the Edit Monthly Schedule page without saving any changes, click Cancel. The Your Monthly Schedules page appears. See Figure 130: Your Monthly Schedules page. Delete Click Delete to remove the Schedule from the system and to remove its listing from the Your Monthly Schedules page. You are prompted to confirm the deletion. After you confirm the deletion, the Your Monthly Schedules page appears. See Figure 130: Your Monthly Schedules page. NN40040-303 Reports Explained 161 Reports 6 Reports Introduction General Nortel Reporting for Contact Center provides a set of flexible and easy-to-understand reports. The reports contain information about the call traffic in and out of your Contact Center and about the activities of your Contact Center Agents. Reports Explained Detailed information on the Reports within Reporting for Contact Center can be found in the Reporting for Contact Center – Reports Explained (NN40010-626) guide (installed along with this guide on the Web Host PC). This guide details how to use the report viewer, the terms used within Reporting for Contact Center reports, what statistics and formulas are used to calculate each field in the reports (where applicable) and frequently asked questions. Using the Reports From the Main Menu shown in Figure 72: User Main Menu page, select Reports and Schedules to view the Reports and Schedules page, see Figure 136: Reports and Schedules page. Reporting for Contact Center Setup and Operations Guide 162 Reports Explained Figure 136: Reports and Schedules page NN40040-303 Reports Explained 163 Under Report Names each report is grouped according to its type, these are in order: Agents: reports related to Agent activity and traffic Calls: reports related to calls Activity Codes: reports related to activity codes Miscellaneous: all other reports, such as the System Configuration report Single only reports, reports that can only be generated on their own. Generating reports Perform the following steps to obtain a report: 1. From the Report Names list of reports, select the appropriate check box for each report you wish to generate. Note: Most reports require selecting Skillsets, Agents, Activity Codes, or any combination of these. The only reports that do not require these selections are Help Request by Supervisor, Unanswered Help Request by Agent, and System Configuration. For information about selecting Skillsets, refer to Selecting Skillsets. For information about selecting Agents, refer to Selecting Agents. For information about selecting Activity Codes, refer to Selecting Activity Codes. 2. Next to the From Date and To Date fields click the calendar icon and specify a date. See Figure 137: Selecting a Date Range. A maximum date range of one year can be selected. Use the arrows buttons, such as <<Year, to change the year and month of the calendar. Reporting for Contact Center Setup and Operations Guide 164 Reports Explained Figure 137: Selecting a Date Range 3. Use the From Time and To Time fields to specify the time range for the report. Click each field and enter the time, in the 24-hour format. For example, enter 08:00 for 8:00 a.m. and 14:00 for 2:00 p.m. 4. To view your reports on screen, refer to View a report on screen on page 164. To send the reports directly to a printer, refer to Send a report directly to the printer on page 164. 5. To reset all the fields back to the default settings, click Reset. View a report on screen To view reports on screen, click View in the Reports and Schedules page, see Figure 136: Reports and Schedules page. After you select skillsets, agents and activity codes (where applicable) each report will open in its own window. Send a report directly to the printer Perform the following steps to send reports directly to a printer: 1. Select a printer from the Send to Printer list. NN40040-303 Reports Explained 165 Note: You can only print to printers that are configured and connected to the Web Host PC. 2. Enter a print delay time in the Print Delay field, in the format hh:mm. The print delay time can be up to 24 hours in the future. For example, if the current time is 12:30 and you specify 3:30 in the Print Delay field, your reports will print at 16:00 that day. If you specify 23:00, your reports will print at 11:30 the following day. Note: 23:59 is the maximum print delay time you can enter in the Print Delay field and 00:01 is the minimum. 3. Click Print to send the report to the selected printer. The Print Status page will open, as shown in Figure 138: Print Status page. This page lists all the ad hoc report print requests, the date and time they are due to be printed and a link, called Cancel Print, to cancel each report print job. For more information on cancelling report print jobs, refer to Cancel reports to be printed on page 167. If there are more reports than can be displayed in this window a scroll bar will appear on the right hand side. Use this to scroll through all reports waiting to print. Reporting for Contact Center Setup and Operations Guide 166 Reports Explained Figure 138: Print Status page 4. If you click on the Close button to close this window, you can re-open the Print Status page to view print jobs by clicking on View/Cancel print jobs from the Reports and Schedules page. NN40040-303 Reports Explained 167 Cancel reports to be printed Perform one of the following to cancel report print jobs before they are due to print: • From the Print Status page, click Cancel Print next to each report print job. To cancel all print jobs, click Cancel All; or • If the Print Status page is already closed, re-open the Print Status page to view all ad hoc print requests by clicking on View/Cancel print jobs from the Reports and Schedules page. Click Cancel Print next to each report print job to cancel, or click Cancel All to cancel all print jobs. Selecting Skillsets If you select to generate any of the following reports, you must choose the Skillsets for which you want the reports generated: Agent Capacity by Skillset Abandoned Calls by Skillset Abandoned CLID/DNIS Answered Calls by Skillset Answered CLID/DNIS Call Average by Skillset Call Profile Incoming Call by Skillset Summary Activity Code by Agent Activity Code by Pegs Activity Code by Skillset If you select to generate one of the reports in the list, the Select Skillsets page shown in Figure 139: Select Skillsets page appears. Reporting for Contact Center Setup and Operations Guide 168 Reports Explained Figure 139: Select Skillsets page • • For information about using Skillset selection lists, see page 141. For information about using Favorites, see page 141. Selecting Agents If you select to generate any of the following reports, you must choose the Skillsets for which you want the reports generated: Agent Activity by Agent Agent Audit by Agent Agent Average by Agent Agent Profile by Agent The Select Agents page shown in Figure 140: Select Agents or Skillsets page appears. NN40040-303 Reports Explained 169 Figure 140: Select Agents or Skillsets page Use the following techniques to select items from the Agents and Skillsets lists: Click an unselected item name once to select it (it will be highlighted) and remove the highlight from any other currently selected items in the list box. Click a selected (highlighted) item once to unselect it. Note that if other items are selected and you click an item, you unselect all the other items except the item you clicked in the same list box. To select multiple items, press Ctrl and select multiple items in the list box. To select a range of items, click an item at the beginning (or end) of the range, press the Shift key, and click the item at the end (or beginning) of the range. You can also click Select All to select all the items in the list box above at once. Although you can select Skillsets on this page when you submit the page it is the Agents you’ve selected that are used to generate your reports. By selecting a Skillset and clicking the > arrow box you will automatically highlight all agents who have logged into that Skillset, by selecting Reporting for Contact Center Setup and Operations Guide 170 Reports Explained an Agent and clicking the < arrow box you will automatically highlight any skillsets that the agent has logged into. In cases where you want to view only the agents who logged into a particular skillset you can use the technique above. Selecting Activity Codes If you select to generate any of the following reports, you must choose the Activity Codes for which you want the reports generated: Activity Code by Skillset Activity Code by Agent The Select Activity Codes page shown in Figure 141: Select Activity Codes page appears. Figure 141: Select Activity Codes page Use the following techniques to select Activity Codes from the Activity Codes list: NN40040-303 Reports Explained 171 Click an unselected Activity Code once to select it (it will be highlighted) and remove the highlight from any other currently selected Activity Code. Click a selected (highlighted) Activity Code once to unselect it. Note: If any other Activity Codes are selected and you click an Activity Code, you unselect all the other Activity Codes except the Activity Code you clicked. To select multiple Activity Codes, press Ctrl while you select multiple Activity Codes. To select a range of Activity Codes, click an Activity Code at the beginning (or end) of the range, hold down the Shift key, and click the Activity Code at the end (or beginning) of the range. You can also click Select All to select all the Activity Codes at once. Get Latest Contact Center Data item From the Reports menu, choose the Get Latest Contact Center Data item, see Figure 136: Reports and Schedules page (page 162), to request the most recent report data from the Contact Center. For example, if you specified that Nortel Reporting for Contact Center should poll the Contact Center every 30 minutes for report data, clicking Get Latest Contact Center Data ensures that the most recent data is received from the Contact Center before the reports are generated. Any Contact Center activity that has occurred since the last Report Data update is included in the reports. When you click Get Latest Contact Center Data, the screen shown in Figure 142: Get Latest Contact Center Data appears. This screen shows the number of seconds remaining until the latest data is obtained from the Contact Center. Figure 142: Get Latest Contact Center Data Reporting for Contact Center Setup and Operations Guide 172 Reports Explained To reset the timer, click Get Latest Contact Center Data again while the screen is open. By having the data request timer reset in the same screen prevents the User from making multiple repeated and rapid data requests from the Contact Center. NN40040-303 Glossary 173 Glossary 9 Abandoned Calls........ Abandoned Calls are calls that ring in to the system and the incoming caller clears down the call because they do not wish to wait any longer before they are answered. These calls have not been handled by humans or by voice mail. Abandon Time Bins ... A series of six time steps used in the statistical analysis of Abandoned Calls. Nortel Reporting for Contact Center will provide statistical reports on the percentage of incoming calls abandoned within each of the periods specified in the Abandoned Time Bins. A seventh period is also used in the reports, which gathers information on all calls which abandoned after the period specified by the sixth Abandoned Time Bin. Administrator ............. A Nortel Reporting for Contact Center User who has been awarded Administration rights. These Users can configure core elements of Nortel Reporting for Contact Center that regular Users can not, and they can perform such actions as creating other Users. Alarm Threshold ........ Alarms may be set to trigger an alert on the wallboards, to inform your Agents of some event or circumstance. The value that a parameter must reach, match or exceed to trigger an Alarm is the Alarm Threshold. All Calls Held ............ If an Agent has placed all of their calls on hold, so that they have no active calls, they will be shown in pink in the Real Time screens. Answered Time Bins.. A series of six time steps used in the statistical analysis of Answered Calls. Nortel Reporting for Contact Center will provide statistical reports on the percentage of incoming calls answered within each of the periods specified in the Answered Time Bins. A seventh period is also used in the reports, which gathers information on all calls that were answered after the period specified by the sixth Answered Time Bin. Available State ........... The Agent is ready to take Incoming calls. The Available State is shown as blue in the Real Time screens. Break Time................. The period allocated to Agents following clear down of an Incoming Contact Center Call (also known as Wrap Up and Post Call Completion). Break Time is displayed in the Real Time screens as green. Calls Answered .......... ‘Answered’ means the Call was not abandoned, and it did not require the involvement of another Skillset in the handling of the call. Reporting for Contact Center Setup and Operations Guide 174 Glossary Calls Handled In Another Skillset ......... Calls that have left a Skillset and entered another Skillset because of an Overflow Rule or any other Routing Condition or Step. The fate of these calls is then recorded in the reports for the Skillset they have moved to – not in the Skillset they leave. Calls Presented........... The counts all of the calls that were presented to a Skillset, both Direct (a ‘regular Contact Center call’ delivered straight into the Skillset,) and Indirect, which means the call arrived in the Skillset in some other way. Direct Call.................. From the point of view of any given Skillset, Direct Calls are calls that were presented directly to that Skillset. That is, the incoming caller was handled by the Call Routing and was presented by the Call Routing directly to the Skillset in question. Incoming State ........... The Agent is engaged on an Incoming Contact Center Call, either a PSTN or a Multimedia call. The Incoming State is shown as light green for a PSTN call, or bright green for a Multimedia call in the Real Time screens. If an Agent has been on an Incoming Call in excess of the Incoming Call Duration Threshold their timer will be displayed against a red background. Indirect Call ............... From the point of view of any given Skillset, Indirect Calls arrived in the Skillset after being handled by the Call Routing or Agents of another Skillset. For example, they may have overflowing from another Skillset or may have been manually transferred to the Skillset queue by an Agent from another Skillset. Any way a Call can arrive into a Skillset other than being a regular Contact Center Call presented directly to the Skillset (as described above) is counted as an Indirect Call. Whether the call overflowed to the Skillset in question, or was moved to the Skillset by the Move to Queue Call Routing step, or whether it was manually transferred to the Skillset Control DN, it is counted as an Indirect Call. Multimedia Call ......... A call generated and conducted through the use of Nortel Multimedia Contact Center. This call would be initiated by a caller clicking a button on a Web page. Non-Contact Center Call State .................... Dark green is used for non-Contact Center calls. Not Available State…. Agents who are Not Available may enter this state through actions like F981 voice mail, lifting the receiver (while not answering a call) and any other action that removes their ability to receive a call. NN40040-303 Glossary 175 Not Ready State .......... Either the Agent has invoked the Make Not Ready feature (Feature 908) to indicate they are not available to take calls or the Contact Center has placed them in the Not Ready state because a call was unanswered at their handset or the Agent is active on an internal call. The Not Ready State is shown as dark grey in the Real Time ccreens. If an Agent has been Not Ready in excess of the Not Ready Duration Threshold their timer will be displayed against a red background. Outgoing State ........... The Agent is engaged on an Outgoing Call. The Outgoing State is shown as yellow in the Real Time screens. If an Agent has been on an Outgoing Call in excess of the Outgoing Call Duration Threshold their timer will be displayed against a red background. PSTN Call .................. Public Switched Telephone Network Call – a ‘regular’ voice call. Real Time................... Information is available that displays the current states of Skillset Calls and Agents. This information is refreshed approximately every 3 seconds. These displays are called the Real Time screens. Information can also be displayed on hardware and software TCP/IP enabled wallboards, to provide Real Time information to the Contact Center Agents. Ringing....................... Agents who have calls currently ringing on their handset. Service Level ............. The Service Level is a figure that is used to represent the level of service provided to incoming callers, based upon Contact Center response times. It is calculated as follows: Presented = Total Number of Direct Call transactions Presented to the Skillset Abandoned = Calls which Abandoned >Secondary = Calls transactions answered after the Secondary Alert Service Level % = Presented – Abandoned – >Secondary x 100 Presented Stat Time Bins............ A collective term for the Abandoned Time Bins and the Answered Time Bins. Supervisor Monitoring If a Supervisor is monitoring an Agent the Supervisor is displayed in the Agent Detail Real Time screen with an orange background and the Status column displaying Monitoring. Reporting for Contact Center Setup and Operations Guide 176 Glossary TCP/IP........................ Transmission Control Protocol/Internet Protocol: a protocol developed by the US Department of Defense for communications between computers. It has become the de facto standard for data transmission over networks, including the Internet. TCP and IP are transport and address protocols; TCP is used to establish a connection for data transmission, and IP defines the method for sending the data in packets. Title ............................ A string of text displayed on the top line of a wallboard. This restricts the wallboard to being able to display 3 parameters only. User ............................ A User is a person who has been allocated a Username and Password to allow them to use Nortel Reporting for Contact Center. Users can configure some elements of their usage of Nortel Reporting for Contact Center, but they do not have the same scope for configuration as an Administrator. Unstaffed Calls........... Calls that were presented to the Skillset when there were no Agents logged in to handle those calls. Wallboard................... This is a device that is used to display Contact Center statistics and messages to the Agents and other Contact Center staff. Nortel Reporting for Contact Center TCP/IP enabled hardware Wallboards and SoftBoard’s from the ipView range of wallboards. NN40040-303 References 177 References 1 2 3 4 5 6 10 Contact Center Set Up and Operation Guide (NN40040-301) Keycode Installation Guide (NN40010-301) ipView Software Wallboard Setup and Operation Guide (NN40010-500) Reporting for Contact Center – Reports Explained (NN40010-626) Reporting for Contact Center Troubleshooting and Maintenance Guide (NN40020-403) Upgrading from Call Center Reporting to Reporting for Contact Center (NN40010-400) Reporting for Contact Center Setup and Operations Guide 178 Index 11 Index A Abandon Time Bins, 131, 173 Abandoned, 86, 88, 91, 102, 131, 133, 140, 149, 156, 167, 173, 175 Abandoned Call, 131, 140, 149, 156, 167, 173 Abandoned Calls by Skillset report, 140, 156, 167 Abandoned CLID/DNIS report, 140, 149, 156, 167 Abandoned Time Bins, 131, 133, 173, 175 Activity Code, 135, 143, 151, 158, 163, 167, 170, 171 Activity Code by Agent report, 135, 143, 151, 158, 167, 170 Activity Code by Pegs report, 135, 143, 151, 158, 167 Activity Code by Skillset report, 135, 143, 151, 158, 167, 170 Add Alarm, 117, 118 Add Message, 113, 114, 115, 116 Add User, 68, 70, 71, 72, 102 Add Wallboard, 106, 107, 108, 110 Administration Menu, 64, 65, 67, 72, 80 Administrator, 11, 13, 14, 29, 30, 34, 57, 60, 61, 64, 65, 66, 68, 69, 70, 80, 81, 83, 102, 104, 108, 129, 132, 173, 176 Agent, 67, 83, 88, 89, 92, 93, 94, 95, 96, 97, 98, 99, 100, 101, 107, 135, 143, 151, 158, 163, 167, 168, 169, 170, 173, 174, 175 Agent Activity by Agent report, 135, 143, 151, 158, 168 Agent Alarms, 83, 97, 98, 99, 100, 101 Agent Audit by Agent report, 135, 143, 151, 158, 168 Agent Average by Agent report, 135, 143, 151, 158, 168 Agent Capacity by Skillset report, 167 Agent Detail, 92, 97, 175 Agent Profile by Agent report, 135, 143, 151, 158, 168 Alarm Messages, 103 Alarm Periods, 119, 120, 122 Alarm Thresholds, 104 Answer Time Bins, 131 Answered Call, 97, 104, 131, 140, 149, 156, 167, 173 Answered Calls by Skillset report, 140, 149, 156, 167 Answered CLID/DNIS report, 167 Assigned Skillsets, 14, 73, 74, 75 Available, 89, 93, 96, 100, 102, 173, 174 B BCM 4.0, 61 BCM50 3.0, 15, 20, 61 Brazilian Portuguese, 13 Break Time, 89, 93, 173 Business Communications Manager, 13, 26, 30 Buzzer, 108 C Call Average by Skillset report, 149, 156, 167 Call Detail, 88, 90 Call Profile report, 167 Call Routing, 174 CallPilot, 13, 47, 61, 74 NN40040-303 Canadian French, 13 Company Details, 64, 79, 80 Contact Center, 13, 15, 17, 20, 26, 29, 30, 47, 59, 60, 61, 62, 63, 64, 67, 74, 77, 86, 90, 91, 93, 95, 98, 104, 139, 148, 156, 171, 172, 175 Contact Center Connection, 13, 59, 60, 61, 64, 102 Contact Center Reporting Server, 47, 61 Control key, Ctrl, 57, 75, 81, 141, 169, 171 Control Panel, 17, 20, 21, 24, 26, 30, 55, 56 D Daily Schedules, 135, 136, 137, 138, 139, 140, 141, 143, 144, 145, 146 Danish, 13 Direct Call, 88, 174, 175 Dutch, 13 E Edit Parameters, 110, 111 Edit User, 71 Edit Wallboard, 109, 110 Element Manager, 30 F Favorites, 14, 57, 81, 85, 99, 129, 141, 142, 150, 157, 168 French, 13 G German, 13 H Help Request by Supervisor report, 163 I IBM, 15 Incoming Call by Skillset report, 167 Indirect Call, 174 Installation, 11, 17, 20, 22, 23, 24, 29, 30, 43, 44, 45, 46, 47, 48, 49, 177 InstallShield, 17, 18, 21, 32, 34, 37, 38, 39, 40, 41, 43 Instant Messages, 104, 105, 128, 129, 130 Intel, 15 Internet Explorer, 13, 15, 16, 17, 18, 19, 24, 30, 57, 81 Internet Information Services, 16, 20, 21, 22, 23, 24, 25, 26, 27, 28, 47, 63 Introduction, 11, 13, 17, 161 IP Address, 30, 57, 61, 81, 107 ipView Softboard, 26, 102, 103, 107, 176 Italian, 13 Index 179 J R Java Runtime Environment, 18, 46, 77, 85 Real Time screens, 13, 14, 15, 17, 26, 61, 62, 67, 72, 78, 80, 83, 84, 85, 87, 88, 89, 90, 92, 93, 94, 97, 98, 173, 174, 175 Report Viewer, 37, 38 Reset Password, 71, 72 Ringing, 89, 96, 175 L Language Support, 13 Latin American Spanish, 13 License Agreement, 35, 40, 41 Log on, 81 Logging Menu, 78 Login, 30, 34, 53, 57, 58, 81, 116, 127 Longest Waiting Time, 87, 92 S M Maintenance, 20, 63, 64, 76, 177 Microprocessor, 15 Microsoft, 14, 16, 18, 20, 21, 26, 34, 36, 37, 38, 46, 63 Microsoft SQL Server, 14, 18, 37 Minimum PC Requirements, 15 Monitoring, 95, 175 Monthly Schedules, 135, 153, 154, 155, 156, 157, 158, 159, 160 Mouse, 16 Multimedia Call, 90, 100, 174 N Network Name, 107 Nortel Call Center Reporting, 17, 177 Nortel Multimedia Contact Center, 95, 174 Nortel Networks Call Center Reporting, 17 Nortel Reporting for Contact Center, 11, 13, 14, 15, 16, 17, 18, 20, 22, 26, 29, 30, 31, 32, 33, 34, 37, 40, 42, 43, 44, 57, 61, 62, 63, 65, 66, 67, 68, 69, 70, 74, 76, 77, 78, 79, 80, 81, 83, 89, 97, 98, 99, 102, 103, 104, 107, 108, 120, 131, 133, 135, 142, 161, 171, 173, 176, 177 North American English, 13 Norwegian, 13 Not Available, 89, 96, 174 Not Ready, 89, 96, 100, 102, 104, 108, 115, 119, 121, 175 O On Contact Center Calls, 89 On Internal Calls, 90 On Non-Contact Center Calls, 90 On Outgoing Calls, 90 Operating System, 16 Overflow, 86, 91, 174 Scheduled Messages, 104 Scrolling Messages, 102, 103 Secondary Alert, 86, 88, 91, 175 Service Level, 87, 88, 92, 102, 105, 119, 175 Skillset Assignment, 65, 69, 72, 73, 75 Skillset selection, 14, 85, 99, 107, 129, 131, 132, 134, 150, 157, 168 Spanish, 13 Statistical Data, 14, 16 Summary Messages, 102, 104 Supervisor, 95, 163, 175 Supervisor Monitor, 175 SVGA, 15 Swedish, 13 System Admin Settings, 65, 66 System Administration Menu, 65, 67, 72 System Status, 76, 77 T TCP/IP, 15, 29, 30, 175, 176 Time Bins, 83, 131, 132, 133, 134, 173, 175 Time Bins Setup, 83, 131 Title, 108, 176 Troubleshooting, 20, 63, 177 U Unanswered Help Request by Agent report, 163 United Kingdom English, 13 Unread Skillset Messages, 87 Upgrading, 17, 18, 177 URL, 57, 81 User, 11, 13, 14, 15, 17, 34, 35, 62, 65, 66, 67, 68, 69, 70, 71, 72, 73, 74, 75, 80, 81, 82, 83, 84, 87, 98, 99, 102, 103, 104, 105, 106, 108, 115, 116, 120, 126, 128, 129, 131, 132, 135, 139, 148, 150, 156, 157, 161, 172, 173, 176 User Admin, 65, 66, 67, 69, 70, 71, 72 V P Parameters, 110, 111, 120 Password, 58, 59, 71, 72, 81, 82, 176 Port Number, 26, 61, 77, 107 Primary Alert, 86, 91 Print Schedules, 49, 53, 56, 83, 135, 146, 153 Printer, 164 Voice (PSTN) Call, 90, 94, 174, 175 W Wallboard, 62, 69, 83, 102, 104, 105, 106, 107, 108, 109, 110, 111, 112, 117, 118, 123, 125, 128, 176 Wallboard Assignment, 69, 105, 106 Reporting for Contact Center Setup and Operations Guide 180 Index Web Host, 13, 15, 17, 18, 20, 23, 25, 26, 29, 32, 44, 53, 54, 57, 60, 61, 63, 77, 81, 135, 139, 148, 155, 161, 165 Web Host PC, 13, 15, 17, 18, 20, 23, 25, 26, 29, 32, 44, 53, 54, 57, 60, 61, 63, 77, 81, 135, 139, 148, 155, 161, 165 Web page, 68, 70, 174 Weekly Schedules, 135, 146, 147, 148, 149, 150, 151, 152, 153 Windows, 16, 17, 18, 21, 22, 23, 24, 26, 27, 28, 29, 30, 47, 49, 52, 53, 54, 55, 56, 79 Windows 2000, 16, 30 Windows 2003, 16, 148 NN40040-303 Windows 95, 98, 123, 124, 147 Windows Networking Component, 29 Windows Vista, 16, 26, 29 Windows XP, 16, 30, 79 With All Calls Held, 90 X XML, 76