1
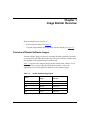
Modifying Software Images for
Routers
Router Software Version 10.0
Site Manager Software Version 4.0
Part No. 112954 Rev. A
January 1996
4401 Great America Parkway
Santa Clara, CA 95054
8 Federal Street
Billerica, MA 01821
Copyright © 1988–1996 Bay Networks, Inc.
All rights reserved. Printed in the USA. January 1996.
The information in this document is subject to change without notice. The statements, configurations, technical data, and
recommendations in this document are believed to be accurate and reliable, but are presented without express or implied
warranty. Users must take full responsibility for their applications of any products specified in this document. The
information in this document is proprietary to Bay Networks, Inc.
The software described in this document is furnished under a license agreement and may only be used in accordance with the
terms of that license. A summary of the Software License is included in this document.
Restricted Rights Legend
Use, duplication, or disclosure by the United States Government is subject to restrictions as set forth in subparagraph
(c)(1)(ii) of the Rights in Technical Data and Computer Software clause at DFARS 252.227-7013.
Notice for All Other Executive Agencies
Notwithstanding any other license agreement that may pertain to, or accompany the delivery of, this computer software, the
rights of the United States Government regarding its use, reproduction, and disclosure are as set forth in the Commercial
Computer Software-Restricted Rights clause at FAR 52.227-19.
Trademarks of Bay Networks, Inc.
ACE, AFN, BCN, BLN, BN, CN, FRE, LN, Optivity, SynOptics, SynOptics Communications, Wellfleet and the Wellfleet
logo are registered trademarks and AN, ANH, ASN, BaySIS, BayStack, BCNX, BLNX, BNX, EZ Internetwork, EZ LAN,
FN, PathMan, PhonePlus, PPX, Quick2Config, RouterMan, SPEX, Bay Networks, Bay Networks Press, the Bay Networks
logo and the SynOptics logo are trademarks of Bay Networks, Inc.
Third-Party Trademarks
All other trademarks and registered trademarks are the property of their respective owners.
Statement of Conditions
In the interest of improving internal design, operational function, and/or reliability, Bay Networks, Inc. reserves the right to
make changes to the products described in this document without notice.
Bay Networks, Inc. does not assume any liability that may occur due to the use or application of the product(s) or circuit
layout(s) described herein.
Portions of the code in this software product are Copyright © 1988, Regents of the University of California. All rights
reserved. Redistribution and use in source and binary forms of such portions are permitted, provided that the above copyright
notice and this paragraph are duplicated in all such forms and that any documentation, advertising materials, and other
materials related to such distribution and use acknowledge that such portions of the software were developed by the
University of California, Berkeley. The name of the University may not be used to endorse or promote products derived from
such portions of the software without specific prior written permission.
SUCH PORTIONS OF THE SOFTWARE ARE PROVIDED “AS IS” AND WITHOUT ANY EXPRESS OR IMPLIED
WARRANTIES, INCLUDING, WITHOUT LIMITATION, THE IMPLIED WARRANTIES OF MERCHANTABILITY
AND FITNESS FOR A PARTICULAR PURPOSE.
In addition, the program and information contained herein are licensed only pursuant to a license agreement that contains
restrictions on use and disclosure (that may incorporate by reference certain limitations and notices imposed by third parties).
Bay Networks Software License
Note: This is Bay Networks basic license document. In the absence of a
software license agreement specifying varying terms, this license — or the
license included with the particular product — shall govern licensee’s use of
Bay Networks software.
This Software License shall govern the licensing of all software provided to licensee by Bay Networks (“Software”).
Bay Networks will provide licensee with Software in machine-readable form and related documentation
(“Documentation”). The Software provided under this license is proprietary to Bay Networks and to third parties from
whom Bay Networks has acquired license rights. Bay Networks will not grant any Software license whatsoever, either
explicitly or implicitly, except by acceptance of an order for either Software or for a Bay Networks product
(“Equipment”) that is packaged with Software. Each such license is subject to the following restrictions:
1.
Upon delivery of the Software, Bay Networks grants to licensee a personal, nontransferable, nonexclusive license
to use the Software with the Equipment with which or for which it was originally acquired, including use at any
of licensee’s facilities to which the Equipment may be transferred, for the useful life of the Equipment unless
earlier terminated by default or cancellation. Use of the Software shall be limited to such Equipment and to such
facility. Software which is licensed for use on hardware not offered by Bay Networks is not subject to restricted
use on any Equipment, however, unless otherwise specified on the Documentation, each licensed copy of such
Software may only be installed on one hardware item at any time.
2.
Licensee may use the Software with backup Equipment only if the Equipment with which or for which it was
acquired is inoperative.
3.
Licensee may make a single copy of the Software (but not firmware) for safekeeping (archives) or backup
purposes.
4.
Licensee may modify Software (but not firmware), or combine it with other software, subject to the provision
that those portions of the resulting software which incorporate Software are subject to the restrictions of this
license. Licensee shall not make the resulting software available for use by any third party.
5.
Neither title nor ownership to Software passes to licensee.
6.
Licensee shall not provide, or otherwise make available, any Software, in whole or in part, in any form, to any
third party. Third parties do not include consultants, subcontractors, or agents of licensee who have licensee’s
permission to use the Software at licensee’s facility, and who have agreed in writing to use the Software only in
accordance with the restrictions of this license.
7.
Third-party owners from whom Bay Networks has acquired license rights to software that is incorporated into
Bay Networks products shall have the right to enforce the provisions of this license against licensee.
8.
Licensee shall not remove or obscure any copyright, patent, trademark, trade secret, or similar intellectual
property or restricted rights notice within or affixed to any Software and shall reproduce and affix such notice on
any backup copy of Software or copies of software resulting from modification or combination performed by
licensee as permitted by this license.
Bay Networks, Inc.
4401 Great America Parkway, Santa Clara, CA 95054
8 Federal Street, Billerica, MA 01821
Bay Networks Software License (continued)
9.
Licensee shall not reverse assemble, reverse compile, or in any way reverse engineer the Software. [Note: For
licensees in the European Community, the Software Directive dated 14 May 1991 (as may be amended from time
to time) shall apply for interoperability purposes. Licensee must notify Bay Networks in writing of any such
intended examination of the Software and Bay Networks may provide review and assistance.]
10. Notwithstanding any foregoing terms to the contrary, if licensee licenses the Bay Networks product “Site
Manager,” licensee may duplicate and install the Site Manager product as specified in the Documentation. This
right is granted solely as necessary for use of Site Manager on hardware installed with licensee’s network.
11. This license will automatically terminate upon improper handling of Software, such as by disclosure, or Bay
Networks may terminate this license by written notice to licensee if licensee fails to comply with any of the
material provisions of this license and fails to cure such failure within thirty (30) days after the receipt of written
notice from Bay Networks. Upon termination of this license, licensee shall discontinue all use of the Software
and return the Software and Documentation, including all copies, to Bay Networks.
12. Licensee’s obligations under this license shall survive expiration or termination of this license.
Bay Networks, Inc.
4401 Great America Parkway, Santa Clara, CA 95054
8 Federal Street, Billerica, MA 01821
Contents
About This Guide
Audience ........................................................................................................................... xi
Before You Begin .............................................................................................................. xi
Bay Networks Customer Support ..................................................................................... xi
CompuServe ..............................................................................................................xii
InfoFACTS .................................................................................................................xiii
World Wide Web ........................................................................................................xiii
How to Get Help ..............................................................................................................xiii
Conventions .....................................................................................................................xiii
Ordering Bay Networks Publications ............................................................................... xv
Acronyms ......................................................................................................................... xv
Chapter 1
Image Builder Overview
Overview of Router Software Images .............................................................................1-1
Using the Image Builder to Modify Router Software Images ..........................................1-2
Chapter 2
Loading Router Software
Loading Router Software onto a PC or UNIX Workstation .............................................2-1
Loading the Software from MS-DOS Diskettes ........................................................2-1
Loading the Software from CD-ROM .......................................................................2-2
PC ......................................................................................................................2-2
UNIX Workstation ..............................................................................................2-3
Loading Router Software into the Image Builder ............................................................2-5
Chapter 3
How to Use the Image Builder
Modifying a Router Software Image ...............................................................................3-1
Image Builder Window .............................................................................................3-3
v
Component Information Box ..............................................................................3-3
Partial Component Asterisk ...............................................................................3-3
Details Buttons ..................................................................................................3-4
Removing Software Components ............................................................................3-5
Adding Software Components .................................................................................3-6
Saving a Modified Image ................................................................................................3-8
Creating a New Image ..................................................................................................3-10
Converting an Image for Other Types of Routers .........................................................3-12
Proceeding When an Image Format Is Not Available .............................................3-12
Converting an Image for Other Software Versions .......................................................3-13
Proceeding When a Software Version Is Not Available ..........................................3-14
Saving the Contents of the Current Component List to a File ......................................3-14
Chapter 4
Loading the Modified Image on a Router
Connecting to a Bay Networks Router ...........................................................................4-1
Loading a Modified Image onto the Router’s File System ..............................................4-5
When Space Is Available .........................................................................................4-6
When Space Is Not Available ...................................................................................4-7
Removing the Old Image from the Router .........................................................4-7
Saving the Modified Image to the Router ..........................................................4-9
Booting the Router with a Modified Image ......................................................................4-9
Verifying that the Router Booted Successfully ..............................................................4-10
Appendix A
Executable Files
Index
vi
Figures
Figure 2-1.
Figure 2-2.
Figure 3-1.
Figure 3-2.
Figure 3-3.
Figure 3-4.
Figure 3-5.
Figure 3-6.
Figure 3-7.
Figure 3-8.
Figure 3-9.
Figure 3-10.
Figure 4-1.
Figure 4-2.
Figure 4-3.
Figure 4-4.
Figure 4-5.
Figure 4-6.
Figure 4-7.
Figure 4-8.
Open Window ...........................................................................................2-5
Image Builder Window with Current Components ...................................2-6
Image Builder Window with Current Components ...................................3-2
Component Information Box in the Image Builder Window ......................3-3
Partial Components .................................................................................3-4
Remove Button ........................................................................................3-5
Add Button ...............................................................................................3-7
Save As Window ......................................................................................3-9
Image Information Box in the Image Builder Window ............................3-10
Confirmation Window .............................................................................3-10
New Image Window ...............................................................................3-11
CONTENTS.TXT File .............................................................................3-16
Router Connection Options Window ........................................................4-2
Site Manager Window ..............................................................................4-3
Multiple Router Connection Window ........................................................4-4
Adding Routers to the Current Routers List .............................................4-5
TFTP Put File Selection Window .............................................................4-6
TFTP Get Files Window ...........................................................................4-8
Boot Router Window ................................................................................4-9
Boot Confirmation Window ......................................................................4-9
vii
Tables
Table 1-1.
Table A-1.
Router Software Image Types ..................................................................1-1
Executable File Descriptions ................................................................... A-1
ix
About This Guide
This guide describes how to customize a Bay Networks router software image
using a tool called the Image Builder. You access the Image Builder using the Bay
Networks Site Manager.
Use this guide when you receive router software from Bay Networks and you
want to do the following:
•
Remove nonessential executable files from the router software image (or add
executable files that you inadvertently removed).
•
Reduce the size of a router software image so that it fits on a single diskette (if
you received the image on more than one diskette).
Audience
Written for system and network managers, this guide describes how to use Image
Builder to customize router software images.
Before You Begin
Before using this guide, you must load the Bay Networks Site Manager
application using the instructions provided in Quick-Starting Routers.
Bay Networks Customer Support
Bay Networks provides live telephone technical support to our distributors,
resellers, and service-contracted customers from two U.S. and three international
support centers. If you have purchased your Bay Networks product from a
distributor or authorized reseller, contact the technical support staff of that
distributor or reseller for assistance with installation, configuration,
troubleshooting, or integration issues.
xi
Modifying Software Images for Routers
Customers also have the option of purchasing direct support from Bay Networks
through a variety of service programs. The programs include priority access
telephone support, on-site engineering assistance, software subscription, hardware
replacement, and other programs designed to protect your investment.
To purchase any of these support programs, including PhonePlus™ for 24-hour
telephone technical support, call 1-800-2LANWAN. Outside the U.S. and
Canada, call (408) 764-1000. You can also receive information on support
programs from your local Bay Networks field sales office, or purchase Bay
Networks support directly from your reseller. Bay Networks provides several
methods of receiving support and information on a nonpriority basis through the
following automated systems.
CompuServe
Bay Networks maintains an active forum on CompuServe. All you need to join us
online is a computer, a modem, and a CompuServe account. We also recommend
using the CompuServe Information Manager software, available from
CompuServe.
The Bay Networks forum contains libraries of technical and product documents
designed to help you manage and troubleshoot your Bay Networks products.
Software agents and patches are available, and the message boards are monitored
by technical staff and can be a source for problem solving and shared experiences.
Customers and resellers holding Bay Networks service contracts can visit the
special libraries to acquire advanced levels of support documentation and
software.
To open an account and receive a local dial-up number, call CompuServe at
1-800-524-3388 and ask for Representative No. 591.
•
In the United Kingdom, call Freephone 0800-289378.
•
In Germany, call 0130-37-32.
•
In Europe (except for the United Kingdom and Germany), call
(44) 272-760681.
•
Outside the U.S., Canada, and Europe, call (614) 529-1349 and ask for
Representative No. 591, or consult your listings for an office near you.
Once you are online, you can reach our forum by typing the command GO
BAYNETWORKS at any ! prompt.
xii
About This Guide
InfoFACTS
InfoFACTS is the Bay Networks free 24-hour fax-on-demand service. This
automated system contains libraries of technical and product documents designed
to help you manage and troubleshoot your Bay Networks products. The system
can return a fax copy to the caller or to a third party within minutes of being
accessed.
World Wide Web
The World Wide Web (WWW) is a global information system for file distribution
and online document viewing via the Internet. You need a direct connection to the
Internet and a Web Browser (such as Mosaic or Netscape).
Bay Networks maintains a WWW Home Page that you can access at
http://www.baynetworks.com. One of the menu items on the Home Page is the
Customer Support Web Server, which offers technical documents, software
agents, and an E-mail capability for communicating with our technical support
engineers.
How to Get Help
For additional information or advice, contact the Bay Networks Technical
Response Center in your area:
United States
Valbonne, France
Sydney, Australia
Tokyo, Japan
1-800-2LAN-WAN
(33) 92-966-968
(61) 2-903-5800
(81) 3-328-005
Conventions
This section describes the conventions used in this guide.
angle brackets (< >)
Indicate that you choose the text to enter based on the
description inside the brackets. Do not type the
brackets when entering the command. Example: if
command syntax is ping <ip_address>, you enter ping
192.32.10.12
xiii
Modifying Software Images for Routers
arrow character (➔)
Separates menu and option names in instructions.
Example: Protocols➔AppleTalk identifies the
AppleTalk option in the Protocols menu.
bold text
Indicates text that you need to enter and command
names in text. Example: Use the dinfo command.
brackets ([ ])
Indicate optional elements. You can choose none, one,
or all of the options.
italic text
Indicates variable values in command syntax
descriptions, new terms, file and directory names, and
book titles.
quotation marks (“ ”)
Indicate the title of a chapter or section within a book.
screen text
Indicates data that appears on the screen. Example: Set
Bay Networks Trap Monitor Filters
ellipsis points
vertical line (|)
.
Horizontal (. . .) and vertical ( .. ) ellipsis points indicate
omitted information.
Indicates that you enter only one of the parts of the
command. The vertical line separates choices. Do not
type the vertical line when entering the command.
Example: If the command syntax is
show at routes | nets, you enter either
show at routes or show at nets, but not both.
xiv
About This Guide
Ordering Bay Networks Publications
To purchase additional copies of this document or other Bay Networks
publications, order by part number from Bay Networks Press™ at the following
numbers. You may also request a free catalog of Bay Networks Press product
publications.
Phone:
FAX - U.S./Canada:
FAX - International:
1-800-845-9523
1-800-582-8000
1-916-939-1010
ASCII
American Standard Code for Information Interchange
DOS
Disk Operating System
PCMCIA
Personal Computer Memory Card International Association
Acronyms
xv
Chapter 1
Image Builder Overview
Read this chapter for an overview of
•
Router software images (see page 1-1)
•
Using the Image Builder to modify router software images (see page 1-2)
Overview of Router Software Images
A router software image is a group of executable files that operates the protocols
on your network with a Bay Networks router. The type of software image a router
uses depends on the particular Bay Networks router.
Table 1-1 lists the router software images for the current router software. If you
are using a lower version of Bay Networks router software, refer to the
appropriate version of this guide for details on router software images.
Table 1-1.
Router Software Image Types
Router
Router Software
Image
Device That Image
Runs On
AFN® (Flash)
afn.exe
Flash card
IN
in.exe
Flash card
™
asn.exe
Flash card
BLN®
bn.exe
Flash card
®
bn.exe
Flash card
ASN
BCN
(continued)
1-1
Modifying Software Images for Routers
Table 1-1.
Router Software Image Types (continued)
Router
Router Software
Image
Device That Image
Runs On
AN™
an.exe
Flash Single Inline
Memory Modules
(SIMMs)
CN®, FN™, LN® (VME)
ace.out
Flash card
Appendix A lists all of the executable files that are available from Bay Networks.
You can modify a router software image as follows:
•
Remove a protocol that you do not use. You might want to remove protocols
to make more space available on the medium that contains the router software
image.
•
Add a protocol that you removed inadvertently.
•
Consolidate the software image. Sometimes Bay Networks supplies the
software image on two diskettes. You might want to consolidate the two parts
into one image.
•
Replace an existing image with an entirely new one.
To perform these tasks, you use the Image Builder, as the following section
describes.
Using the Image Builder to Modify Router Software Images
The Image Builder tool lets you customize the router software images that you
receive from Bay Networks. You access the Image Builder from the Tools menu in
the main Site Manager window.
To customize a router software image, you must do the following:
1-2
1.
Order the new router software from Bay Networks. This software comes
on CD-ROM or on 3 1/2-inch MS-DOS diskettes.
2.
Load the router software onto the local hard drive of your UNIX
workstation or PC (refer to Chapter 2).
3.
Load the router software into the Image Builder (refer to Chapter 2).
4.
Remove or add executable files as necessary (refer to Chapter 3).
Image Builder Overview
5.
Save the customized software image (refer to Chapter 3).
6.
Load the customized router software image onto the router’s file system.
You can use the Router Files Manager tool to remotely transfer the image
to the router (refer to Chapter 4).
Note: Be sure that you use only executable files from the same router software
version. For example, you cannot mix files from Version 8.00 with files from
Version 8.10.
7.
Boot the router using the customized software image (refer to Chapter 4).
In addition to modifying a router software image by removing or adding
executable files, you can use the Image Builder to do the following:
•
View information about the components that appear in the Image Builder
window (refer to Chapter 3). The Image Builder displays a router software
image as a list of individual components. You can view information about the
components such as
— Component name and order number
— Router software version
— Compressed size of files
— Uncompressed size of files
•
Display all the files that make up a list of components (refer to “Image Builder
Window” in Chapter 3).
•
Convert an image you created to an equivalent image for a different type of
router (refer to “Converting an Image for Other Types of Routers” in
Chapter 3).
•
Convert an image you created to an equivalent image for a different software
version (refer to “Converting an Image for Other Software Versions” in
Chapter 3).
•
Create an entirely new router software image. For example, you might want to
make an entirely new image from several custom images that you created
(refer to “Creating a New Image” in Chapter 3).
1-3
Chapter 2
Loading Router Software
Read this chapter for information on the following topics:
•
Loading router software onto a PC or UNIX workstation (see page 2-1)
•
Loading router software into the Image Builder (see page 2-5)
Loading Router Software onto a PC or UNIX Workstation
Bay Networks router software is available on the following media:
•
MS-DOS diskettes
•
CD-ROM
The following sections present information on how to load the router software.
Loading the Software from MS-DOS Diskettes
Follow these steps to load the router software from MS-DOS diskettes onto the
PC that serves as the Site Manager workstation:
1.
Enter the following command to create the directory in which to store the
new router software on the Site Manager workstation:
mkdir \wf\xxx
xxx is the version of router software.
For version 9.00, you would type
mkdir \wf\900
2-1
Modifying Software Images for Routers
2.
Insert the first diskette into the diskette drive of the PC, and enter the
following command:
restore <diskette_drive> <drive>:\wf\xxx\*.*
diskette_drive is the drive containing the router software diskette and drive is
the hard drive where you created the directory in which to store the router
software.
The operating system extracts the files to the subdirectory you created in
Step 1 and prompts you for the next diskette.
3.
Insert the next router software diskette (when prompted) and press any
key to continue.
4.
Repeat Step 3 for the remaining diskettes.
5.
Start up Site Manager.
For instructions, refer to Using Site Manager Software.
You can now load the router software into the Image Builder, as described in
“Loading Router Software into the Image Builder.”
Loading the Software from CD-ROM
The steps that you follow to load the router software from CD-ROM depend on
whether you use a PC or a UNIX workstation. The next section describes how to
load the software on a PC. If you use a UNIX workstation, proceed to the section
“UNIX Workstation.”
PC
To load the router software from CD-ROM to your PC, follow these steps:
1.
Insert the CD-ROM into your CD-ROM drive.
2.
Bring up Windows.
3.
Double-click on the File Manager icon.
4.
Click on the CD-ROM drive icon in the File Manager window.
5.
Click on the rtr_xxx directory, where xxx is the router software version.
For example, for Version 9.00, you would click on the rtr_900 directory.
You see the following directories in the rtr_xxx directory.
2-2
Loading Router Software
afnflash
an
asn
bn
in
vme
6.
Click on the directory for your router platform (refer to Table 1-1).
7.
Select File➔Copy.
8.
Specify the destination directory as follows:
\wf\xxx
xxx is the version of the router software.
For Version 9.00, type
\wf\900
9.
Click on OK.
The system then loads the router software for the platform you selected. When
the process is complete, you can load the router software for any of the other
platforms by repeating Steps 6 through 9.
UNIX Workstation
To load the router software from CD-ROM to your UNIX workstation, follow
these steps:
1.
Insert the CD-ROM into your CD-ROM drive.
2.
If you have not already created a CD-ROM mountpoint, log in as root
and create a root-level directory.
For example, to create a directory named cdrom, enter
mkdir /cdrom
3.
Mount the CD-ROM drive.
a.
If you use SunOS on a SPARCstation, enter
mount -r -t hsfs /dev/<device> /cdrom
2-3
Modifying Software Images for Routers
b.
If you use Solaris on a SPARCstation, enter
mount -F hsfs -o ro /dev/<device> /cdrom
Note: If you use Solaris and you are running the vold daemon, the CD-ROM
will automatically be mounted as /cdrom/release_xxx_yyy (where xxx is the
router software version and yyy is the Site Manager version), rather than
/cdrom. For example, for router software Version 900 and Site Manager
Version 3.00, the CD-ROM will automatically be mounted as
/cdrom/release_900_300.
c.
If you use an IBM RS/6000, enter
mount -o ro -v cdrfs /dev/<device> /cdrom
d. If you use an HP 9000, enter
mount -r /dev/<device> /cdrom
4.
Change directories by entering
cd /cdrom
5.
Run the script to load the router software using one of the following
procedures:
a.
On a SPARCstation, enter
./COPY.SH
b.
On an HP 9000, enter
./COPY.SH\;1
c.
On an IBM RS/6000, enter
./copy.sh
2-4
Loading Router Software
During the load procedure, you must specify the following:
•
The directory where you want to load the router software
•
The router platform (AFNFLASH, AN, ASN, BN, IN, or VME)
The system then loads the software for the platform you select. When the
process is complete, you can choose to load the router software for another
platform, or you can quit.
Loading Router Software into the Image Builder
To load the router software into the Image Builder, follow these steps:
1.
Select File➔Open from the Image Builder window.
The Open window appears (Figure 2-1).
Figure 2-1.
2.
Open Window
Select the directory and filename of the router software image that you
want to open. Then click on OK.
2-5
Modifying Software Images for Routers
The directory and filename that you specify depend on the following:
•
The computer platform (UNIX workstation or PC)
•
The router platform
If you loaded the router software from CD-ROM onto a UNIX workstation,
the system stored the image in the directory for the appropriate router
platform. For example, you would find the image ace.out for the VME
platform in the vme directory.
If you loaded the router software onto a PC, the system stored the router
software image in the directory you created for the router software (\wf\xxx).
Once you enter the pathname of the image, the Image Builder window lists
the current components of the image (Figure 2-2).
Figure 2-2.
Image Builder Window with Current Components
You can now modify the router software image. For instructions, refer to
“Modifying a Router Software Image” in Chapter 3.
2-6
Chapter 3
How to Use the Image Builder
Read this chapter for information on the following tasks:
•
Modifying a router software image (see page 3-1)
•
Saving a modified image (see page 3-8)
•
Creating a new image (see page 3-10)
•
Converting an image for other types of routers (see page 3-12)
•
Converting an image for other software versions (see page 3-13)
•
Saving the contents of the current component list to a file (see page 3-14)
For specific information about using the windows, buttons, and other features of
Site Manager, refer to Using Site Manager Software; for information about the
Image Builder, refer to Chapter 1.
Modifying a Router Software Image
When you load your router software image into the Image Builder (refer to
Chapter 2), you see the router software you loaded in the Current Components list
of the Image Builder window (Figure 3-1).
3-1
Modifying Software Images for Routers
Figure 3-1.
Image Builder Window with Current Components
You can modify the router software image as follows:
•
Remove nonessential files from the Current Components list. For example,
you might want to make more space available on the router software medium.
•
Add components to the Current Components list. For example, you might
have removed files that you decide you want in the router software image.
The following sections describe the Image Builder features that let you remove
and add software components. The next section describes the features of the
Image Builder window that allow you to modify the router software image.
3-2
How to Use the Image Builder
Image Builder Window
The Image Builder window provides several features that you can use to
determine the files that make up a software image and to track changes. These
features include the following:
•
A Component Information box that gives details about a selected component
•
A special symbol (an asterisk) that identifies components from which you
removed a file
•
A Details button that you can use to display all the files that make up a list of
components
The following sections provide information on these features.
Component Information Box
The bottom of the Image Builder window contains a Component Information box
(Figure 3-2). When you select a component from the Available Components or
Current Components list, the following information appears in the Component
Information box:
•
Order number and name of component
•
Router software version
•
Compressed size of files
•
Uncompressed size of files
Figure 3-2.
Component Information Box in the Image Builder Window
Partial Component Asterisk
The Image Builder uses an asterisk (*) to denote a partial component (Figure 3-3).
The asterisk indicates that you removed a file from a component.
3-3
Modifying Software Images for Routers
Figure 3-3.
Partial Components
Details Buttons
A Details button appears below each list of components. You can click on the
Details button to display all the executable files that make up a list of components.
To return to the list of components, click on the Details button again.
For example, if you click on the Details button for current components, all the
components in that list open to reveal the executable files that make up those
components. Most protocol components contain only one software file. The
Baseline Router Software component, however, contains many files, including the
Operating System Kernel.
You can also use the options on the View menu to display details about a list of
components.
3-4
How to Use the Image Builder
Removing Software Components
To remove components from the Current Components list, follow these steps:
1.
Double-click on the item in the Current Components list that you want to
remove.
The Remove button appears in the Image Builder window (Figure 3-4).
Note: The Remove button does not appear when you select essential files. This
protects the most important files that make up your router software image. For
example, you cannot remove the Operating System Kernel file from the
Baseline Router Software component. Also, because the Baseline Router
Software component contains essential files, you cannot remove it from the list
of current components.
Figure 3-4.
Remove Button
3-5
Modifying Software Images for Routers
2.
Click on Remove.
The Image Builder removes the component from the Current Components list
and adds it to the Available Components list.
You can also select Edit➔Remove Component in the Image Builder window. You
can remove all components from the Current Components list by selecting
Edit➔Remove All Components. You do not need to select all the components
before you choose this option.
The Edit menu in the Image Builder window also contains Undo and Redo
options that let you cancel your last action or redo your last cancelled action.
Adding Software Components
When you remove a component from the Current Components list, the Image
Builder adds it to the Available Components list. If you decide you want to keep
that component in the router software image, you must add it to the Current
Components list. To do so, follow these steps:
1.
Double-click on the item in the Available Components list that you want
to add to the current components.
The Add button appears in the Image Builder window (Figure 3-5).
3-6
How to Use the Image Builder
Figure 3-5.
2.
Add Button
Click on the Add button.
The component moves from the Available Components list to the Current
Components list.
You can also add components by selecting Edit➔Add from the Image Builder
window. To add all components that appear in the Available Components list,
select Edit➔Add All Components. You do not need to select all the components
before you choose this option.
Note: In Figure 3-3, the word EDITED appears in parentheses beside the
ace.out filename. EDITED appears whenever you load a previously modified
file into the Image Builder.
3-7
Modifying Software Images for Routers
Saving a Modified Image
The Image Builder automatically archives router software images in the
$HOME/.builder_dir directory, which is created during the Site Manager
installation process. (Refer to Quick-Starting Routers for information on creating
the $HOME/.builder_dir directory.)
The Image Builder archives only individual components in this directory. We
recommend that you archive new router software images in a different directory.
You should also use different image names for different routers on your network,
and keep a record of which images are running on which routers.
If you loaded the router software onto your Site Manager workstation using the
procedure in the section “Loading Router Software onto the PC or UNIX
Workstation” in Chapter 2, you may want to use the directory you created during
that procedure for archiving the image. To save the modified image, follow these
steps:
1.
After you modify a list of current components, select File➔Save from the
Image Builder window.
This saves the image to your current directory and archives all components
displayed in the Image Builder window in the Image Builder directory.
Note: A confirmation window does not appear after you select File➔Save, so
make sure you compiled your list correctly before you select this option.
2.
To archive an image, select File➔Save As from the Image Builder
window.
The Save As window appears (Figure 3-6).
3-8
How to Use the Image Builder
Figure 3-6.
3.
Save As Window
Select a directory for archiving images and type a filename in the
Selection field. Then click on OK.
Information about the new image replaces the information about the image
you loaded into the Image Builder. The updated information appears in a box
at the top of the Image Builder window (Figure 3-7). If you are copying the
new image to a diskette, use the image information to check the size of the
image to make sure that it will fit on the diskette.
3-9
Modifying Software Images for Routers
Figure 3-7.
Image Information Box in the Image Builder Window
Note: The confirmation window (Figure 3-8) appears if you select File➔Exit
without saving your changes.
Figure 3-8.
Confirmation Window
After you save the new image, refer to Chapter 4 for information on loading the
new image on your router.
Creating a New Image
Creating an entirely new image is usually not necessary. However, the Image
Builder provides the option in case you need it. For example, you might want to
completely reconfigure the router software image or perform a major upgrade
(such as from 7.60 to 9.00). To create a new image, follow these steps:
3-10
How to Use the Image Builder
1.
Select File➔New from the Image Builder window.
Note: You will be unable to select the New command unless the router
software files are archived in the Image Builder’s directory
($HOME/.builder_dir).
The New Image window appears (Figure 3-9).
Figure 3-9.
New Image Window
Note: The image formats that appear in the New Image window are for router
images that you loaded into the Image Builder. For example, in Figure 3-9,
only the BN/BNX and VME formats appear in the New Image window. If the
format you need is not listed in this window, refer to “Proceeding When an
Image Format Is Not Available.”
2.
Select the appropriate image format; then click on OK.
An empty Image Builder window appears.
You are now ready to build a new image using the router software on your
workstation. Refer to Chapter 2 for information on loading router software into
the Image Builder.
3-11
Modifying Software Images for Routers
Converting an Image for Other Types of Routers
Note: You can only use this feature to convert to image formats that you
previously loaded into the Image Builder.
If you want to run the same image on different types of Bay Networks routers in a
network, you can create an image for one type of router and convert the image to
run on other types of routers. For example, you might want to run the same
protocols on AN™ and BN™ routers in a network. You can customize an image
for the BN routers and then convert that image to run on the AN routers.
To convert an image to run on a different type of router:
1.
Select File➔Change Format in the Image Builder window.
A list of image formats appears. The possible image formats are
•
AFN
•
AN
•
ASN
•
BN
•
IN
•
VME
•
One board (AFN Flash for software versions lower than 8.10)
If the image format you want is grayed out, you have not loaded that image
into the Image Builder. Refer to “Proceeding When an Image Format Is Not
Available.”
2.
Select a format from the list.
The image changes to the format you selected.
3.
Save the modified image (refer to “Saving a Modified Image”).
Proceeding When an Image Format Is Not Available
If you cannot choose the image format you want when you try to create a new
image or convert an image for another type of router, you need to load the image
for that format into the Image Builder.
3-12
How to Use the Image Builder
To load the image:
1.
2.
Check that the software image for the format (refer to Table 1-1) appears
in the directory where you loaded the router software.
a.
If the image does appear in that directory, load the files into the
Image Builder (refer to “Loading Router Software into the Image
Builder” in Chapter 2).
b.
If the image does not appear in the directory where you loaded the
router software, you must load the image onto your workstation
(refer to “Loading Router Software onto a PC or UNIX Workstation”
in Chapter 2) and then load the image in the Image Builder.
Repeat the procedure for creating a new image or converting an image
for another type of router.
Converting an Image for Other Software Versions
Note: You can only use this feature to convert to software versions that you
previously loaded into the Image Builder.
In a network, you may have Bay Networks routers that use different versions of
Bay Networks software. If you want to run the same image on those routers, you
can create an image for a router running one software version and convert the
image for routers running other software versions. For example, you might want
to run the same image on routers running Version 7.60 software and routers
running Version 9.00 software. You can create an image with Version 9.00 files
and convert the image to use Version 7.60 files.
To convert an image to a different software version:
1.
Select File➔Change Release.
A list of software versions appears. If you cannot select the version you want,
you need to load that version into the Image Builder. Refer to “Proceeding
When a Software Version Is Not Available.”
2.
Select a version from the list.
The image changes to the software version you selected.
3.
Save the modified image (refer to “Saving a Modified Image”).
3-13
Modifying Software Images for Routers
Proceeding When a Software Version Is Not Available
If you cannot choose the software version you want when you try to convert an
image for another software version, you need to load the image with the
appropriate format and software release into the Image Builder.
To load the image:
1.
2.
Check that the software image for the relevant format (refer to
“Overview of Router Software Images” in Chapter 1) appears in the
directory where you loaded the appropriate version of the router
software. For example, if you want to convert an image for an AN router
to Software Version 9.00, check that the AN router software image
appears in the directory where you loaded the Version 9.00 software.
a.
If the image does appear in that directory, load the files into the
Image Builder (refer to “Loading Router Software into the Image
Builder” in Chapter 2).
b.
If the image does not appear in the directory where you loaded the
router software, you must load the image onto your workstation
(refer to “Loading Router Software onto a PC or UNIX Workstation”
in Chapter 2) and then load the image in the Image Builder.
Repeat the procedure for converting an image for another software
version.
Saving the Contents of the Current Component List to a File
You can save to an ASCII file the contents of the Current Components list in the
Image Builder window. To do so, select Options➔Generate CONTENTS.TXT.
(By default, the option is already selected.)
When you save an image by selecting File➔Save or File➔Save As, an ASCII file
named CONTENTS.TXT is created and saved to the same directory you specified
for the image.
3-14
How to Use the Image Builder
The CONTENTS.TXT file lists all the order numbers, components, filenames, and
descriptions shown in the Current Components window. Figure 3-10 shows a
portion of a sample CONTENTS.TXT file.
Note: If you do not specify a directory, by default your image and
CONTENTS.TXT file are saved to the Image Builder's directory.
3-15
Modifying Software Images for Routers
Image File: /extra/smgr/has/image
Created on: Wed Jan 4 16:40:04 1995
Archive Format: VME Format
Release: int/8.10/40
File Size: 2,273,875 (2.17M)
CONTENTS
--------------*4001x Baseline Router Software
dcmp.out Decompressor Program
krnl_ace.exe Operating System Kernel
dmap.exe VME Backplane DMA Processor Driver
arp.exe
ARP Protocol Application
debug.exe DEBUG Protocol Application
ds2180.exe MK2180 Dual Sync Interface Driver
ds2181.exe MK2181 Dual Sync Interface Driver
dsde2.exe Dual Sync/Ethernet2 Link Module Driver
dst.exe
Dual Sync Token Link Module Driver
dtok.exe Dual Token Ring Link Module Driver
dvmrp.exe DVMRP Multicast Protocol Application
e1.exe
E1 Link Module Driver
enet2.exe Ethernet2 Link Module Driver
fddi.exe FDDI Link Module Driver
fsi.exe
FDDI SMT Driver
ftp.exe
FTP Protocol Application
hdlc.exe HDLC Protocol Application
hfsi.exe HSSI SMT Driver
hssi.exe HSSI Link Module Driver
hwf.exe
Hardware Filter Driver
igmp.exe IGMP Multicast Protocol Application
ilacc.exe ILACC Ethernet Interface Driver
ip.exe
IP Protocol Application
lance.exe LANCE Ethernet Interface Driver
lm.exe
Line Manager Protocol Application
mct1e1.exe Multi-Channel T1E1 Link Module Driver
munich.exe Munich Multi-Channel T1E1 Driver
nbip.exe NetBIOS/IP Protocol Application
pcap.exe Packet Capture Procotol Application
ping.exe
Ping Protocol Application
ppp.exe
PPP Protocol Application
Figure 3-10. CONTENTS.TXT File
3-16
Chapter 4
Loading the Modified Image on a Router
Read this chapter for information on the following topics:
•
Connecting to a Bay Networks router (see page 4-1)
•
Loading a modified image on the router’s file system (see page 4-5)
•
Booting the router with a modified image (see page 4-9)
•
Verifying that the router booted successfully (see page 4-10)
Connecting to a Bay Networks Router
You must specify the routers onto which you will load the modified router
software image. You can load an image onto more than one router at a time.
1.
From the Site Manager window, select Options➔Router Connection.
The Router Connection Options window appears (Figure 4-1).
4-1
Modifying Software Images for Routers
Figure 4-1.
2.
Router Connection Options Window
In the Node Name/IP Address field, type the IP address of the Bay
Networks router to which you want to connect. Then click on OK.
Note: You do not need to change the default values that appear in the Identity,
Timeout, and Retries fields.
Information on the router you specified appears in the Site Manager window
(Figure 4-2).
4-2
Loading the Modified Image on a Router
Figure 4-2.
3.
4.
Site Manager Window
Depending on whether you want to load the image onto more than one
router, do the following:
a.
If you want to load the image onto only one router, refer to the next
section.
b.
If you want to load the image onto more than one router, repeat Steps
1 and 2 for each router.
Select Options➔Multiple Router Setup. The Multiple Router Connection
window appears (Figure 4-3).
4-3
Modifying Software Images for Routers
Figure 4-3.
Multiple Router Connection Window
The Default Routers window lists the routers to which you are currently
connected. The Current Routers window lists the routers whose files you want
to manage simultaneously.
5.
4-4
In the Default Routers list, select each router to which you want to
transfer the same image at the same time. Then click on Add. The
selected routers appear in the Current Routers list (Figure 4-4).
Loading the Modified Image on a Router
Figure 4-4.
Adding Routers to the Current Routers List
If you inadvertently add a router to the Current Routers list, you can remove it
from that list. To do so, select the router (in the Current Routers list) and click
on Remove.
6.
Click on Save.
Loading a Modified Image onto the Router’s File System
Use the Router Files Manager tool to load an image onto the router’s file system.
To access this tool, select Tools➔Router Files Manager in the Site Manager
window.
The Router Files Manager window appears.
•
If space is available, you should keep the old router software image on the
router’s file system until you succeed in booting the router using the new
image. In this case, refer to the next section, “When Space Is Available.”
•
If space is not available, refer to “When Space Is Not Available.”
4-5
Modifying Software Images for Routers
When Space Is Available
If space is available on the router’s file system, use the Router Files Manager to
save the new image to the router’s file system:
1.
In the Router Files Manager window, select the router volume where you
want the image saved.
2.
Select File➔TFTP➔Put File(s).
The TFTP Put File Selection window appears (Figure 4-5).
Figure 4-5.
3.
TFTP Put File Selection Window
In the Path box, enter the pathname of the directory on the Site Manager
workstation that contains the image.
The files in that directory appear in the Files window.
4-6
Loading the Modified Image on a Router
4.
In the Files window, click on the image filename; then click on Add. The
selected file appears in the Files to Put window.
If you inadvertently add files that you do not want to transfer to the router,
select those files in the Files to Put window. Then click on Remove.
5.
If you selected multiple routers (refer to “Connecting to a Bay Networks
Router”) and you want to transfer the image to all of the routers you
selected, click on Yes in the Multiple Routers field.
If you selected only one router, or if you do not want to transfer the image to
all of the routers you set up in the Multiple Router Connection window, click
on No in the Multiple Routers field. In this case, if you previously set up
multiple routers, the Router Files Manager transfers the image only to the
router to which you are currently connected.
6.
Click on OK.
When the transfer (to each of the routers) is complete, the TFTP Put File
Selection window closes and you return to the Router Files Manager window.
7.
Refer to the section “Booting the Router with a Modified Image.”
When Space Is Not Available
If space is not available on the router’s file system, use the Router Files Manager
to remove the old image from the router’s file system before you save the new
image there. The following sections provide information on how to remove the old
image and save the new image.
Removing the Old Image from the Router
To remove the old router software image, proceed as follows:
1.
From the Router Files Manager window, select the router volume and
filename of the old software image.
2.
Select File➔TFTP➔Get File(s).
The TFTP Get Files window appears (Figure 4-6).
4-7
Modifying Software Images for Routers
Figure 4-6.
TFTP Get Files Window
3.
In the Destination Directory field, enter the directory on your Site
Manager workstation where you want to store the old software image file.
4.
Click on Yes to proceed.
The Router Files Manager transfers the image to the Site Manager
workstation.
If a file with the same name already exists in the destination directory on the
Site Manager workstation, the file you are “getting” replaces it.
5.
Remove the copy of the old image still residing on the router’s file system.
To do so, select the file in the Router Files Manager window. Then select
Commands➔Delete.
A window prompts you to confirm your delete request.
6.
Click on Yes to delete the file.
Note: If the old router software image resided on a memory card in the router,
select Commands➔Compact after you remove the old image to reformat the
memory card. Compacting typically takes several minutes.
4-8
Loading the Modified Image on a Router
Saving the Modified Image to the Router
To save the modified image to the router,
1.
Follow the directions in “When Space Is Available.”
2.
Proceed to the section “Booting the Router with a Modified Image.”
Booting the Router with a Modified Image
1.
From the Site Manager window, select Administration➔Boot Router.
The Boot Router window appears (Figure 4-7).
Figure 4-7.
2.
Boot Router Window
Specify the correct router volume and type the name of the new router
software image. Then specify the configuration file you want to boot
from, and click on Boot.
A confirmation window appears (Figure 4-8).
Figure 4-8.
Boot Confirmation Window
4-9
Modifying Software Images for Routers
3.
Click on OK.
4.
Proceed to the next section to verify that the router booted successfully.
Verifying that the Router Booted Successfully
You should verify that the router booted correctly with the modified software
image. From the Site Manager window, select View➔Refresh Display.
If Site Manager displays system information (such as the system name, contact,
location, description, and MIB version), the router booted successfully.
If you did not remove the old router software image from the router’s file system,
use the directions provided in the section “When Space Is Not Available” to
remove the image.
If Site Manager does not display system information in its main window, the
router did not boot successfully. If possible, load the image back into the Image
Builder and call your local Bay Networks Technical Response Center for further
assistance.
If you can no longer access the router with Site Manager, refer to Using
Technician Interface Software for instructions on using the xmodem command to
access the router. Call your local Bay Networks Technical Response Center for
further assistance.
4-10
Appendix A
Executable Files
This appendix provides a description of the executable files available from Bay
Networks.
Table A-1.
Executable File Descriptions
Executable Files
Descriptions
appn_cp.exe
APPN Control Point
appn_ls.exe
APPN Link Service
arp.exe
ARP Protocol
asn_mod.exe
ASN Link Module Driver
at.exe
AppleTalk Protocol
atm.exe
ATM Level 2
atm_dxi.exe
ATM DXI Protocol
atmalc.exe
ATM Link Module Line Driver
atmalcop.exe
Co-processor code for ATM Link Module
bgp.exe
BGP
chipcom.exe
Chipcom INs Module Driver
dcmp.exe
Decompression Code
debug.exe
Debug Protocol
dls.exe
DLSw Protocol
dmap.exe
Direct Memory Access Processor
drs.exe
DECnet IV Protocol
ds2180.exe
T1 Framer Driver
ds2181.exe
E1 Framer Driver
dsde2.exe
Dual Sync Dual Ethernet Link Module
(continued)
A-1
Modifying Software Images for Routers
Table A-1.
Executable File Descriptions (continued)
Executable Files
Descriptions
dst.exe
Dual Sync Token Ring Link Module
dtok.exe
Dual Token Ring Link Module
e1.exe
E1 Link Module
efddi.exe
Fibermux INs Module Driver
egp.exe
EGP Protocol
enet2.exe
Ethernet2 Link Module Driver
fddi.exe
FDDI Driver
fmpb.exe
FastMac Plus (Quad Token Ring)
fr.exe
Frame Relay Protocol
fsi.exe
FDDI Link Module
ftp.exe
FTP Protocol
hdlc.exe
SYNC Driver
hfsi.exe
HSSI Link Module
hilance.exe
Hilance Ethernet Interface Driver
hls_in.exe
Hughes INs Module Driver
hssi.exe
HSSI Driver
hwf.exe
Hardware Filters
igmp.exe
IGMP Multicast Protocol
ilacc.exe
ILACC Driver
ip.exe
Internet Protocol
ipx.exe
Internet Packet Exchange Protocol
isac.exe
ISAC Protocol
isdn.exe
ISDN Protocol
krnl_ace.exe
Advanced Communications Engine Kernel
krnl_an.exe
Access Node Kernel
krnl_asn.exe
Access Stack Node Kernel
krnl_bn.exe
Fast Routing Engine Kernel
krnl_in.exe
Integrated Node Kernel
lance.exe
LANCE Driver
(continued)
A-2
Executable Files
Table A-1.
Executable File Descriptions (continued)
Executable Files
Descriptions
lapb.exe
LAPB Protocol
llc.exe
LLC Protocol
lm.exe
Line Manager Protocol
lnm.exe
LNM Protocol
mct1e1.exe
Multi-Channel T1E1 Link Module Driver
munich.exe
Munich Multi-Channel T1E1 Interface Driver
nbase.exe
APPN/SDLC Support Environment
nbip.exe
NetBIOS/IP Protocol
netboot.exe
NETBOOT Decompression
osi.exe
OSI Protocol
ospf.exe
OSPF Protocol
pcap.exe
Packet Capture
ping.exe
Ping Protocol
ppp.exe
Point-to-Point Protocol
qenet.exe
QUAD Ethernet Link Module
qsync.exe
QUAD Sync Link Module
quicsync.exe
Quick Sync Link Module Driver
rarp.exe
Reverse Address Resolution Protocol
sdlc.exe
SDLC Protocol
snmp.exe
SNMP Protocol
t1.exe
T1 Link Module
tcp.exe
Transmission Control Protocol
tftp.exe
TFTP Protocol
tms380.exe
Token Ring Driver
tn.exe
Telnet Protocol
tnc.exe
Telnet Client Protocol
vines.exe
VINES Protocol
vmeboot.exe
Upgrade Bootstrap for Flash System Controller
wan.exe
SMDS Protocol
(continued)
A-3
Modifying Software Images for Routers
Table A-1.
A-4
Executable File Descriptions (continued)
Executable Files
Descriptions
wcp.exe
Bay Networks Compression Protocol
x25.exe
X.25 Protocol
xns.exe
XNS Protocol
Index
A
ace.out, 1-2
Add button, 3-6
afn.exe, 1-1
an.exe, 1-2
analyzing components
component information box, 3-3
Details buttons, 3-4
partial component asterisk, 3-3
asn.exe, 1-1
asterisk, partial component, 3-3
available components, 3-6
C
commands
xmodem, 4-10
component information box, 3-3
CompuServe, Bay Networks forum on, xii
connecting to a router, 4-1
current components, 3-1
customer support. See getting help
D
Details buttons, 3-4
B
Bay Networks
CompuServe forum, xii
customer support, xi
Home Page on World Wide Web, xiii
InfoFACTS service, xiii
publications, ordering, xv
Technical Response Center, xiii
bn.exe, 1-1
booting with modified image
booting router, 4-9 to 4-10
loading modified image onto file system, 4-5
to 4-9
overview, 4-1
verifying successful boot, 4-10
buttons
Add, 3-6
Details, 3-4
Remove, 3-5
E
Edit menu options, 3-6
executable files, A-1 to A-4
G
getting help
from a Bay Networks Technical Response
Center, xiii
through CompuServe, xii
through InfoFACTS service, xiii
through World Wide Web, xiii
H
hardware formats, 3-11
Index-1
I
loading
modified image onto file system, 4-5 to 4-9
with available space, 4-6 to 4-7
without available space, 4-7 to 4-9
router software into Image Builder, 2-5
removing software components, 3-5
router files
executable files, A-1 to A-4
Router Files Manager, 1-3
router software images
analyzing components, 3-3 to 3-8
copying to a PC, 2-1, 2-2
definition of, 1-1
loading
from CD, 2-2
from MS-DOS diskettes, 2-1
into Image Builder, 2-5
onto router, 4-5 to 4-9
removing software components, 3-5
saving, 3-8 to 3-10
types of, 1-1
M
S
modifying router software images
adding software components, 3-7
analyzing components, 3-3 to 3-4
removing software components, 3-5
saving modified images, 3-8 to 3-10
saving modified images, 3-8 to 3-10
Site Manager
booting router, 4-9 to 4-10
O
Technician Interface, 4-10
Image Builder
loading router software into, 2-5
overview, 1-1 to 1-3
saving images, 3-8 to 3-10
in.exe, 1-1
InfoFACTS service, xiii
L
overview of Image Builder, 1-1 to 1-3
P
partial component asterisk, 3-3
PC
loading router software images on
from CD, 2-2
from diskette, 2-1
protocols, A-1 to A-4
T
U
Undo command, 3-6
UNIX workstation
loading router software images on
from CD, 2-2
V
verifying successful boot, 4-10
R
W
Redo command, 3-6
Remove button, 3-5
World Wide Web, Bay Networks Home Page on,
xiii
Index-2