1
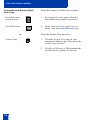
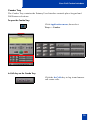
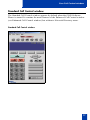
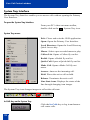
Title page
Meridian 1, Succession 1000, Succession 1000M
Succession 3.0 Software
i2050 Software Phone Call Center
User Guide
Revision history
Revision history
October 2003
Standard 2.00. This document is up-issued to support
Succession 3.0 Software.
September 2002
Standard 1.00. This document is issued to support Meridian 1
Release 25.40 and Succession Communication Server for
Enterprise 1000, Release 2.0.
3
Contents
Contents
i2050 Software Phone
6
i2050 Software Phone features ............................................................... 6
Your Call Control window
7
i2050 Software Phone Call Control windows ........................................... 7
Enhanced Call Control window ............................................................... 7
Primary User Interface ...................................................................... 8
Local Directory Quick Access Tray ................................................. 13
Combo Tray .................................................................................... 15
Number Pad and DN Feature Key Trays ........................................ 16
Standard Call Control window.............................................................. 17
System Tray Interface ........................................................................... 18
Local Directory Interface ....................................................................... 19
The i2050 Software Phone display
22
i2050 display areas............................................................................. 22
Agent and Supervisor features
23
Agent Login......................................................................................... 23
Login with Agent ID and Multiple Queue Assignments ............................ 23
Agent Logout....................................................................................... 26
Agent features
27
Answer ACD Calls ...............................................................................
Call forcing .........................................................................................
Activity code .......................................................................................
Emergency ..........................................................................................
Not Ready...........................................................................................
Answer or Make Non-ACD calls ...........................................................
Contact your Supervisor .......................................................................
Supervisor features
27
28
28
29
29
30
30
31
Answer Agent ..................................................................................... 31
Agent key ........................................................................................... 32
4
4
Draft 0.01
Contents
Answer Emergency ..............................................................................
Call Agent ..........................................................................................
Interflow .............................................................................................
Night Service ......................................................................................
Observe..............................................................................................
Display Agent Status............................................................................
Display Queue ....................................................................................
32
33
33
34
35
36
36
5
i2050 Software Phone
i2050 Software Phone
The i2050 Software Phone is a Windows-based application that enables voice to
make your computer a powerful tool. The i2050 Software Phone provides most of the
attributes and features of the i2004 Internet Telephone.
i2050 Software Phone features
The i2050 Software Phone supports the following features:
• Twelve programmable feature keys: six Programmable Line (DN)/Feature Keys
(self-labeled) and six lines/features accessed by pressing the shift key.
• Four Soft Keys (self-labeled) providing access to ten features.
• Multi-field display.
• Powerful directory capabilities: locally stored on the PC or linked to external
directories such as LDAP, Microsoft Outlook, and ACT! contact management
software.
• “One-click” direct dialing from various windows and applications.
• Six specialized fixed keys:
—
—
—
—
—
—
DN/ Feature Tray selection
Directory
Inbox (Message)
Shift
Services
Expand to PC
• Dedicated call processing indication keys:
—
—
—
—
—
—
—
Hold
Goodbye
Answer
Volume
Mute
Navigation
Message waiting
• User-selectable ringer that enables the PC speakers or the headset to ring for
incoming calls.
• Macro functions for programming lengthy dialing patterns.
6
Your Call Control window
Your Call Control window
i2050 Software Phone Call Control windows
To open the i2050 Software Phone
window:
From the Start button on your computer’s
desktop, click Start > Programs > Nortel
Networks > i2050 Software Phone.
The i2050 Software Phone uses the Enhanced and Standard Call Control window
modes, a System Tray Interface, and a Local Directory.
Enhanced Call Control window
To open the Enhanced Call Control
window:
On the Standard Window Interface, click
Application menu> Select Skin >
Enhanced.
The Enhanced Call Control window contains the following window interfaces:
•
•
•
•
•
Primary User Interface contains the main Call Window controls.
Local Directory Quick Access Tray contains lists for local directory, redial, and
callers.
Combo Tray contains a dial pad and DN/Features selections.
DN/Feature Key Tray contains DN/Features selections.
Number Pad Tray contains a dial pad for making calls.
7
Your Call Control window
Primary User Interface
The Primary User Interface is the default window mode for the Enhanced Call
Control window and contains the main controls for managing calls. The Services
menu containing programmable features such as language selection or date
formatting. The DN/Feature Key Tray and Number Pad Tray modes are also accessed
through this interface.
Primary User Interface
Goodbye
8
Your Call Control window
Primary User Interface controls
The Application Menu key (top left-hand
corner) accesses the Configuration Utility
that configures the i2050 Software Phone.
Consult your system administrator before
changing the configuration.
The Message Lamp displays a solid light to
indicate that a message is waiting for the
user; a flashing light indicates an incoming
call.
The Minimize key minimizes the Call
Control window.
The Exit key closes the Call Control window
while still receiving telephone calls. The
i2050 remains running in the background.
There are four soft-labeled feature keys:
Transfer for connecting calls to other
people, Conference for group calls,
Forward, and More... for accessing
additional features.
The DN/Feature Tray Selection key opens
the DN/Feature Key Tray mode that accesses
up to 12 DNs or features (six feature keys
display and six additional features can be
accessed with the Shift key).
The Copy key is not used in this release.
The Quit key is used to quit from the option
menu.
The Navigation keys enable scrolling
through menus and lists in the display area.
9
Your Call Control window
Click the Mute key to listen to the receiving
party without transmitting. Click the Mute
key again to return to a two-way
conversation. The Mute key applies to
Headset microphones.
The Volume keys increase or decrease the
headset volume.
The Hold key places an active call on hold.
The feature key label for the held line
displays a flashing icon to indicate the call
hold status. Return to the call by clicking the
DN key that corresponds to the feature key
for the line on hold.
The Handsfree (Answer call/Make call)
key is used to answer and make calls. Calls
can also be answered or made by clicking a
DN key in the Lines or Combo trays.
The Goodbye key terminates calls (only
applicable to active calls).
The Tray menu key opens and closes the
displayed tray.
10
Your Call Control window
Network Services Menu
Use the Network Services menu to access features such as e-mail and Network
Directory lists. The Network Services menu is Primary User Interface’s default menu
view.
The Tray Menu List key scrolls through an
opened directory menu.
The Network Directory key is a
fixed-feature key that provides access to
network directory options.
The Inbox (Message) key is a fixed-feature
key that accesses voice messages.
The Shift key toggles between two feature
key displays.
The Service key accesses the following
features:
•
Telephone Option:
- Language
- Date/Time Format
- Ring type
- Call timer
- Set Information
•
Virtual Office Login and Virtual Office
Logout (if Virtual Office is configured)
•
Test Local Mode and Resume Local
Mode (if Branch Office is configured)
11
Your Call Control window
The Expand to PC key is not used in this
release.
The Local Directory Quick Access key
opens the Local Directory Quick Access
menu.
The Information/Help key opens a help file
for the i2050 Software telephone.
Local Directory Quick Access menu
Use the Local Directory Quick Access menu to open up lists in the Local Directory.
To open the Local Directory Quick
Access menu:
From the Network Services menu, click the
Local Directory Quick Access key (right
side of the Network Services menu).
The Network Services key returns to the
Network Services view.
The Quick Dials key opens the Quick Dials
directory.
The Redial key opens the Redial list.
12
Your Call Control window
The Callers List key opens the Callers list.
The Local Directory (or Main directory)
key opens the Local Directory menu.
Hot Keys
Within the Primary User Interface, the computer keyboard provides hot keys for one
press access to common features:
•
•
•
•
•
•
•
answer (Enter)
release (F12)
hold (F5)
softkeys/interactive keys (F1-F4)
alphabetic keys map to numbers as per dial-pad mapping
arrow keys map to navigation keys
Alt-V will paste/insert data to the interface (For example, you can copy a
phone number from Microsoft Outlook and paste it into the Software Phone
interface.)
Local Directory Quick Access Tray
The Local Directory Quick Access Tray maintains quick dial, redial, and callers lists.
Ten items in a list can be viewed.
13
Your Call Control window
To open the Local Directory Quick
Access Tray:
From the Primary User Interface window:
Local Directory
Quick Access
1.
In Network Services menu, click the
Local Directory Quick Access key.
Local Directory
2.
In the Local Directory Quick Access
menu, click the Local Directory key.
or
System Tray
14
From the System Tray Interface:
1.
Click the System Tray icon on your
computer’s Shortcut bar. This opens the
System Tray Interface.
2.
Click Local Directory. This launches the
Local Directory Quick Access tray
Your Call Control window
Combo Tray
The Combo Tray contains the Primary User Interface controls plus a keypad and
DN/Feature selections.
To open the Combo Tray:
Click Application menu, then select
Trays > Combo.
In-Calls key on the Combo Tray
Click the In-Calls key to log in and answer
call center calls.
15
Your Call Control window
Number Pad and DN Feature Key Trays
Number Pad Tray.
DN Feature Key Tray
To open the Number Pad Tray:
To open the DN Feature Key Tray:
Click Application menu, then
select Trays > Number Pad.
Click Application menu, then select
Trays > Combo.
The Number Pad Tray contains the
Primary User Interface controls plus
a keypad. The numeric keypad
mimics a regular phone’s dialpad.
The DN/Feature Tray contains the Primary
User Interface controls plus six feature keys.
An additional six features are accessed with
the Shift key.
In-Calls key on the DN/Feature Tray
Click the In-Calls key to log in and answer
call center calls.
16
Your Call Control window
Standard Call Control window
The Standard Call Control window appears by default when the i2050 Software
Phone is started. It contains the main features of the Enhanced Call Control window
(see Enhanced Call Control window) but without a Network Directory menu.
Standard Call Control window
17
Your Call Control window
System Tray Interface
The System Tray Interface enables you to answer calls without opening the Primary
User Interface.
To open the System Tray Interface:
From your PC’s short cut menu toolbar,
double-click on the
System Tray icon.
System Tray menu:
Exit: Closes and exits the i2050 application.
Open: Opens the Primary User Interface.
Local Directory: Opens the Local Directory
Quick Access tray.
Macro: Select a pre-recorded macro to play.
Callers List: Opens a Callers fly-out list.
Redial: Opens a Redial fly-out list.
Quick Call: Opens a Quick dial fly-out list.
Make Call: Opens a Make Call fly-out
menu.
Answer: Answers the incoming call.
Hold: Places the active call on hold.
Release: Terminates the active call.
Line State icons: Displays the status of the
line through changing icon images.
The System Tray icon changes images to reflect the call state.
In-Calls key on the System Tray
Click the In-Calls key to log in and answer
call center calls.
18
Your Call Control window
Local Directory Interface
The i2050 Software Phone's Directory Interface maintains the personal directory for
placing calls. The directory can be stored within the i2050 application (by default in a
local file named Directory.mdb) or linked to external directories such as LDAP,
Outlook, Windows Address Book (WAB) and ACT!.
Entries are created, modified, and deleted in the local directory. Entries from external
directories, the redial list, and the caller lists can be copied into the local directory.
Directory lists can be “filtered” in simple or complex ways to show, for example,
people whose last name starts with 'B' and work for “Nortel Networks”.
Local Directory Interface
19
Your Call Control window
To open the Local Directory Interface:
Click Application menu, then select
Local Directory > Local Directory.
or
Click Application menu, then select
View > Local Directory.
Directory Lists
The Directory Interface contains customized directories and lists located on the left
side of the window.
Local Directory
A shortcut that returns to the Local Directory
view.
Call Logs
Redials and Callers lists (these are also
viewable from the Primary User Tray and
the System Tray Interface).
Integrated External Directories
Outlook, LDAP, Windows Address Book
(WAB), and ACT!
20
Your Call Control window
Entry Management
The Directory Interface features management functions for entries located on a
toolbar above the display screen.
New Contact
The New Contact key enables new contact
entries.
Properties
The Properties key enables changes of
information for a contact entry (e-mail,
address, company information).
Delete
The Delete key enables the removal of a
contact entry.
Find Contact
The Find Contact enables automatic search
and find of a contact entry.
Filtered List
The Filter key enables sorting of
information for a contact entry.
Call Contact
The Call Contact key enables the dialing of
a contact entry.
21
The i2050 Software Phone display
The i2050 Software Phone display
The display is shown in the figure below.
i2050 display areas
The i2050 Software Phone has two display areas:
• The upper display area contains a three-line information display for
items such as party and set information.
• The lower display area provides Soft key labels.
22
Agent and Supervisor features
Agent and Supervisor features
This section describes the following login features that are common to the Call Center
Agent and Supervisor:
• Agent Login
• Login with Agent ID and Multiple Queue Assignments
• Agent Logout
Agent Login
Use the Agent Login to enter a ACD queue. If an Agent ID is assigned to you, the
Display screen prompts you to enter a four-digit code.
In-Calls
1.
Lift the Handset.
2.
Click the In-Calls key.
3.
If “Enter Agent ID” appears on the
screen, use the keypad to enter your ID.
4.
Click the # key. The phone goes into a
Not Ready state.
5.
To join the ACD queue, click the
In-Calls key or the Not Ready key.
Enter Agent ID
#
In-Calls
or
Not Ready
Login with Agent ID and Multiple Queue Assignments
A Multiple Queue Assignment (MQA) login consists of entering a four-digit Agent
ID and up to five ACD DNs, with an option to add a Supervisor ID and up to five
Priority values.
Choose one of the following Login procedures:
• Agent ID and MQA Login Option
• Default Login
23
Agent and Supervisor features
ogin
Agent ID and MQA Login Option
Use an Agent ID login with one of the following four MQA login options to enter
ACD queues.
Note: A Supervisor logging in to accept ACD calls is prevented by the system from
entering a Supervisor ID (including logins where agents are required to enter a
Supervisor ID).
Login Option Entries
To Login: I
In-Calls
The login options require the following
entries:
1.
a four-digit Agent ID,
2.
followed by a Supervisor ID (if your
queue requires one),
3.
followed by up to five ACD DNs and
priority values (if priority values are
being used), terminated by ##
D, No Priority
1.
Click the In-Calls key.
2.
Choose one of the following four login
options:
Note: To choose the default Priority or
Supervisor ID, enter # instead of a
Priority entry or a Supervisor ID entry.
The Priority or Supervisor ID for your
set is used.
No Supervisor ID, No Priority
Dial your Agent ID # ACD DN 1 #
ACD DN 2 # ACD DN 3 #
ACD DN 4 # ACD DN 5 # #.
Supervisor ID, No Priorityvisor I
Dial your Agent ID # Supervisor ID #
ACD DN 1 # ACD DN 2 #
ACD DN 3 # ACD DN 4 #
ACD DN 5 # #.
24
Agent and Supervisor features
No Supervisor ID, With Priority
Dial your Agent ID # ACD DN 1 #
Priority 1 # ACD DN 2 # Priority 2 #
ACD DN 3 # Priority 3 # ACD DN 4 #
Priority 4 # ACD DN 5 # Priority 5 ##.
Supervisor ID, With Priority:Prioty
Dial your Agent ID # Supervisor ID #
ACD DN 1 # Priority 1 # ACD DN 2 #
Priority 2 # ACD DN 3# Priority 3 #
ACD DN 4 # Priority 4 # ACD DN 5 #
Priority 5 ##.
3.
Default Login
Click the In-Calls Key or the Not
Ready Key to enter the ACD queue.
n
If you normally use the same telephone, use the Default Login to login once at the
beginning of a shift. The Default Login uses your previous shift’s login to place you
in the same ACD queues and with the same Supervisor.
In-Calls
1.
Lift the Handset.
2.
Click the In-Calls key.
3.
When “Enter Agent ID” appears on the
screen, use the keypad to enter your ID.
4.
Choose one of the following:
Enter Agent ID
Supervisor ID Required
###
a.
If your queue requires a Supervisor
ID, click the # key three times.
b.
If your queue does not require a
Supervisor ID, click the # key two
times.
or
Supervisor ID not Required
##
25
Agent and Supervisor features
5.
In-Calls
To join the ACD queue, click the
In-Calls key or the Not Ready key.
or
Not Ready
Agent Logout
You can logout of the system either completely or temporarily (Not Ready state):
MakeSetBusy
or
Not Ready
To log out, choose one of the following:
1.
To log out completely, click the
MakeSetBusy key.
2.
To logout temporarily, click the Not
Ready key.
Note: If you click the Make Busy key
while on an ACD call, you are logged
out automatically when the call is
finished.
26
Agent features
Agent features
The following sections describe features that are available to Agents:
• Answer ACD Calls
• Activity code
• Call forcing
• Emergency
• Not Ready
• Answer or Make Non-ACD calls
• Contact your supervisor
Answer ACD Calls
Use the In-Calls key to answer the next queued ACD call on the primary DN. The
In-Calls key is located in the lower right-hand of the programmable line/feature keys.
To answer the call:
1.
In-Calls
When the indicator next to the In-Calls
key flashes, click the In-Calls key or
press the Enter key on your PC’s
keyboard.
Note: The indicator remains lit as long
as you are still on the call.
To terminate the call:
To end a call, choose one of the following:
•
Click the Goodbye key.
•
Click the In-Calls key.
•
Click the individual DN line key. (This
removes you from the queue).
or
In-Calls
or
1234
or
27
Agent features
NotReady
•
Click the NotReady key (this removes
you from the queue but keeps you
logged in as an agent position) or wait
for the caller to terminate the call.
•
Press F12 on your PC’s keyboard.
or
F12
Call forcing
Use the Force Call feature to automatically connect an incoming ACD call. A time
interval is set by your system administrator between each incoming call.
When calls come in, a short tone
indicates the new call. The In-Calls
indicator lights continuously and the
ACD call automatically goes to your
agent position.
In-Calls
Clicking the In-Calls key with Call
forcing (Auto Answer) on disconnects
an active ACD call.
Activity code
Use the Activity code to record the type of activity you are performing.
Activity
Activity
1.
When the Activity indicator flashes,
click the Activity key.
2.
Use the keypad to enter the Activity
code.
3.
Click the Activity key again.
4.
If performing multiple tasks, repeat
these steps.
If configured, Activity codes can be
entered while in the Not Ready state.
28
Agent features
Emergency
Use the Emergency feature to contact your supervisor immediately in an emergency
situation.
Emergency
1.
During an active call, click the
Emergency key.
Note: The Emergency indicator remains
lit as long as the feature is active.
When the supervisor picks up, a
three-way call commences with you, the
supervisor, and the caller.
Emergency
2.
Click the Emergency key again to
transfer the caller to the supervisor and
terminate your access to the caller and
supervisor.
Not Ready
Use the Not Ready feature to take your telephone out of the call queue while
completing post-call work.
1.
NotReady
Click the NotReady key to temporarily
logout of the system.
Note: The NotReady indicator remains
lit as long as the feature is active.
2.
NotReady
Click the NotReady or In-Calls key to
return to the queue.
or
In-Calls
29
Agent features
Answer or Make Non-ACD calls
This feature enables you to use your individual line to receive and place calls.
To place a call:
1234
1.
Click your individual DN key.
2.
Use the keypad to dial the telephone
number.
Note: The indicator remains lit as long
as you are still on the call.
To answer the call:
1234
When the indicator next to your
individual DN key flashes, click the DN
key.
Note: The indicator remains lit as long
as you are still on the call.
Contact your Supervisor
Use the Supervisor feature to talk to your supervisor in the following ways:
• Answer a call from your supervisor.
• Answer a call from your supervisor when on another call.
• Place a call to your supervisor.
• Conference your supervisor in when on another call.
• Transfer a call to your supervisor.
Answer a call from your supervisor
Supervisor
When the indicator next to the
Supervisor key flashes, click the
Supervisor key.
The indicator remains lit as long as you
are still on the call.
30
Supervisor features
Supervisor features
The following sections describe features that are available to Supervisors:
• Answer Agent
• Agent key
• Answer Emergency
• Call Agent
• Interflow
• Night Service
• Observe
• Display Agent Status
• Display Queue
Answer Agent
Use the Answer Agent to receive calls from Agents in a non-emergency situation.
AnsAgent
1.
When the indicator next to the Answer
Agent key flashes, click the Answer
Agent key.
Note 1: The Agent ID of the individual
contacting you displays on your
telephone.
Note 2: The indicator remains lit as long
as you are on the call and your status
changes to NotReady.
2.
Click the Goodbye key to end the call.
31
Supervisor features
Agent key
Use the Agent feature to connect, observe, or monitor the status of each agent
position. Each Agent key links to a particular agent position and can be used along
with the Call Agent or Observe Agent keys.
Click the Agent key. The Agent’s status
displays as follows:
Agentkey
Indicator Display
Meaning
Off
Agent is not
logged in.
On
Agent is logged
in but is either
Not Ready or on
a call.
Slow Flashing
Agent is waiting
for an ACD call.
Fast Flashing
Agent is on a
non-ACD call.
Answer Emergency
Use the Answer Emergency feature to receive calls from agents in an emergency
situation.
AnsEmreg
1.
When the indicator next to the
Answer Emergency key flashes, click
the Answer Emergency key.
Note 1: The Agent ID of the individual
contacting you displays on your
telephone.
Note 2: The indicator remains lit as long
as you are on the call and your status
changes to NotReady.
2.
32
Click the Goodbye key to end the call.
Supervisor features
Call Agent
Use the Call Agent feature to contact an Agent.
CallAgt
1.
Click the Call Agent key.
Agentkey
2.
Click a selected Agent key or dial the
agent’s Position ID.
3.
Click the Goodbye key to end the call.
or
Interflow
Use the Interflow feature to redirect calls when the backlog or wait time exceeds a
pre-defined threshold.
Interflow
1.
Click the Interflow key.
Note 1: The Interflow indicator flashes
while the feature is active.
Interflow
2.
Click the Interflow key again to
deactivate the feature and resume
normal call flow.
33
Supervisor features
Night Service
Use the Night Service feature to define how calls are handled outside of business
hours.
Activate Night Service
NightSvc
1.
Click the Night key.
2.
Click the 6 key (6=N for Night) to go
into Night Service.
The Night Service indicator lights
continuously. All calls in the queue and
new calls receive night service.
Transition to Night Service
NightSvc
1.
Click the Night key.
2.
Click the 8 key (8=T for Transition) to
activate Transition mode.
The Night Service indicator flashes. All
calls in the queue remain in the queue
and new calls receive night service.
Deactivate Night Service
NightSvc
1.
Click the Night key.
2.
Click the 3 key (3=D for Day) to resume
Day mode.
The Night Service indicator flashes.
New calls enter the queue.
34
Supervisor features
Observe
Use the Observe feature to monitor an agent in a call.
ObvAgent
1.
Click the Observe key.
Agentkey
2.
Click a selected Agent key or dial the
agent’s Position ID.
CallAgt
3.
Click the Call Agent to talk to the agent
you are monitoring.
ObvAgent
4.
Click the Observe key to terminate the
observation.
or
Positions busy on
ACD calls
Vacant Agent
positions
Positions waiting
for ACD calls
Positions busy on
non-ACD calls
35
Supervisor features
Display Agent Status
Use the Display Agent feature to view a summary of current status for all agents that
have an agent Position ID key assigned on the Supervisor’s telephone.
DisplayAgt
Click the Display Agent key. The display
summary information displays for twelve
seconds or until another feature key is
clicked.
Agent positions in the Not Ready state are
counted as busy on either ACD calls or
non-ACD calls, as specified by your system
administrator.
Display Queue
Use the Display Queue feature to view the status of the number of calls waiting in the
queue.
DisplayQue
Click the Display Queue key.
The queue’s status appears on your
telephone display:
36
Calls Waiting
Length of time first
call has waited
Number of
manned positions
Calls time overflowed
into this queue
Supervisor features
The indicator beside the Display Queue key gives a visual indication of the number of
calls in the ACD queue. The following table lists the four states for this indicator:
Indicator
Queue Status
Meaning
Off
Light
There are few or no calls
waiting.
On
Normal
An acceptable number of calls
are waiting.
Slow Flashing
Busy
Calls are backing up in the
queue. Calls overflowing to this
queue are not being accepted.
Fast Flashing
Overloaded
Too many calls in this queue.
New calls are being overflowed
to another queue.
37
Supervisor features
38
Meridian 1, Succession 1000, Succession 1000M
i2050 Software Phone Call Center User Guide
Copyright © 2001 – 2003 Nortel Networks
All Rights Reserved
Information is subject to change without notice. Nortel
Networks reserves the right to make changes in design or
components as progress in engineering and manufacturing
warrant. This equipment has been tested and found to comply
with the limits for a Class A digital device pursuant to Part 15
of the FCC rules, and the radio interference regulations of the
Industry Canada. These limits are designed to provide
reasonable production against harmful interference when the
equipment is operated in a commercial environment. This
equipment generates, uses and can radiate radio frequency
energy, and if not installed and used in accordance with the
instruction manual, may cause harmful interference to radio
communications.
Operation of this equipment in a residential area is likely to
cause harmful interference in which cast the user will be
required to correct the interference at their own expense.
SL-1, Meridian 1, and Succession are trademarks of Nortel
Networks.
Publication Number: P1002825
Document Release: Standard 2.00
Date: October 2003
Produced in Canada
Internet address
http://www.nortelnetworks.com