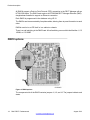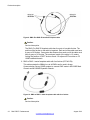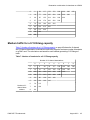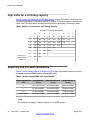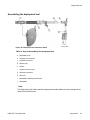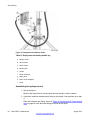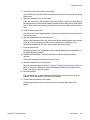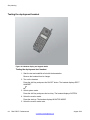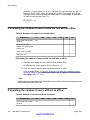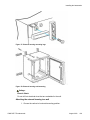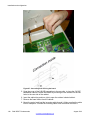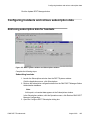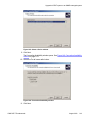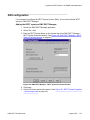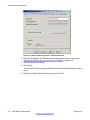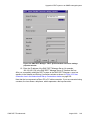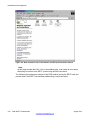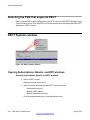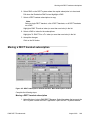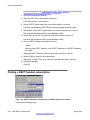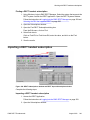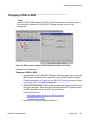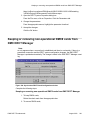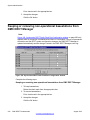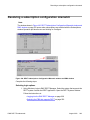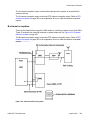
1
DMC DECT Fundamentals
Avaya Communications Server 1000
Release 7.5
NN43120-114, 02.07
August 2012
© 2012 Avaya Inc.
Copyright
All Rights Reserved.
Except where expressly stated otherwise, no use should be made of
materials on this site, the Documentation, Software, or Hardware
provided by Avaya. All content on this site, the documentation and the
Product provided by Avaya including the selection, arrangement and
design of the content is owned either by Avaya or its licensors and is
protected by copyright and other intellectual property laws including the
sui generis rights relating to the protection of databases. You may not
modify, copy, reproduce, republish, upload, post, transmit or distribute
in any way any content, in whole or in part, including any code and
software unless expressly authorized by Avaya. Unauthorized
reproduction, transmission, dissemination, storage, and or use without
the express written consent of Avaya can be a criminal, as well as a
civil offense under the applicable law.
Notice
While reasonable efforts have been made to ensure that the
information in this document is complete and accurate at the time of
printing, Avaya assumes no liability for any errors. Avaya reserves the
right to make changes and corrections to the information in this
document without the obligation to notify any person or organization of
such changes.
Documentation disclaimer
“Documentation” means information published by Avaya in varying
mediums which may include product information, operating instructions
and performance specifications that Avaya generally makes available
to users of its products. Documentation does not include marketing
materials. Avaya shall not be responsible for any modifications,
additions, or deletions to the original published version of
documentation unless such modifications, additions, or deletions were
performed by Avaya. End User agrees to indemnify and hold harmless
Avaya, Avaya's agents, servants and employees against all claims,
lawsuits, demands and judgments arising out of, or in connection with,
subsequent modifications, additions or deletions to this documentation,
to the extent made by End User.
Third-party components
Certain software programs or portions thereof included in the Product
may contain software distributed under third party agreements (“Third
Party Components”), which may contain terms that expand or limit
rights to use certain portions of the Product (“Third Party Terms”).
Information regarding distributed Linux OS source code (for those
Products that have distributed the Linux OS source code), and
identifying the copyright holders of the Third Party Components and the
Third Party Terms that apply to them is available on the Avaya Support
Web site: http://support.avaya.com/Copyright.
Link disclaimer
Preventing Toll Fraud
Avaya is not responsible for the contents or reliability of any linked Web
sites referenced within this site or documentation provided by Avaya.
Avaya is not responsible for the accuracy of any information, statement
or content provided on these sites and does not necessarily endorse
the products, services, or information described or offered within them.
Avaya does not guarantee that these links will work all the time and has
no control over the availability of the linked pages.
“Toll fraud” is the unauthorized use of your telecommunications system
by an unauthorized party (for example, a person who is not a corporate
employee, agent, subcontractor, or is not working on your company's
behalf). Be aware that there can be a risk of Toll Fraud associated with
your system and that, if Toll Fraud occurs, it can result in substantial
additional charges for your telecommunications services.
Avaya Toll Fraud Intervention
Warranty
Avaya provides a limited warranty on its Hardware and Software
(“Product(s)”). Refer to your sales agreement to establish the terms of
the limited warranty. In addition, Avaya’s standard warranty language,
as well as information regarding support for this Product while under
warranty is available to Avaya customers and other parties through the
Avaya Support Web site: http://support.avaya.com. Please note that if
you acquired the Product(s) from an authorized Avaya reseller outside
of the United States and Canada, the warranty is provided to you by
said Avaya reseller and not by Avaya.
Licenses
THE SOFTWARE LICENSE TERMS AVAILABLE ON THE AVAYA
WEBSITE, HTTP://SUPPORT.AVAYA.COM/LICENSEINFO/ ARE
APPLICABLE TO ANYONE WHO DOWNLOADS, USES AND/OR
INSTALLS AVAYA SOFTWARE, PURCHASED FROM AVAYA INC.,
ANY AVAYA AFFILIATE, OR AN AUTHORIZED AVAYA RESELLER
(AS APPLICABLE) UNDER A COMMERCIAL AGREEMENT WITH
AVAYA OR AN AUTHORIZED AVAYA RESELLER. UNLESS
OTHERWISE AGREED TO BY AVAYA IN WRITING, AVAYA DOES
NOT EXTEND THIS LICENSE IF THE SOFTWARE WAS OBTAINED
FROM ANYONE OTHER THAN AVAYA, AN AVAYA AFFILIATE OR AN
AVAYA AUTHORIZED RESELLER; AVAYA RESERVES THE RIGHT
TO TAKE LEGAL ACTION AGAINST YOU AND ANYONE ELSE
USING OR SELLING THE SOFTWARE WITHOUT A LICENSE. BY
INSTALLING, DOWNLOADING OR USING THE SOFTWARE, OR
AUTHORIZING OTHERS TO DO SO, YOU, ON BEHALF OF
YOURSELF AND THE ENTITY FOR WHOM YOU ARE INSTALLING,
DOWNLOADING OR USING THE SOFTWARE (HEREINAFTER
REFERRED TO INTERCHANGEABLY AS “YOU” AND “END USER”),
AGREE TO THESE TERMS AND CONDITIONS AND CREATE A
BINDING CONTRACT BETWEEN YOU AND AVAYA INC. OR THE
APPLICABLE AVAYA AFFILIATE ( “AVAYA”).
2
If you suspect that you are being victimized by Toll Fraud and you need
technical assistance or support, call Technical Service Center Toll
Fraud Intervention Hotline at +1-800-643-2353 for the United States
and Canada. For additional support telephone numbers, see the Avaya
Support Web site: http://support.avaya.com. Suspected security
vulnerabilities with Avaya products should be reported to Avaya by
sending mail to: [email protected].
Trademarks
The trademarks, logos and service marks (“Marks”) displayed in this
site, the Documentation and Product(s) provided by Avaya are the
registered or unregistered Marks of Avaya, its affiliates, or other third
parties. Users are not permitted to use such Marks without prior written
consent from Avaya or such third party which may own the Mark.
Nothing contained in this site, the Documentation and Product(s)
should be construed as granting, by implication, estoppel, or otherwise,
any license or right in and to the Marks without the express written
permission of Avaya or the applicable third party.
Avaya is a registered trademark of Avaya Inc.
All non-Avaya trademarks are the property of their respective owners,
and “Linux” is a registered trademark of Linus Torvalds.
Downloading Documentation
For the most current versions of Documentation, see the Avaya
Support Web site: http://support.avaya.com.
Contact Avaya Support
See the Avaya Support Web site: http://support.avaya.com for product
notices and articles, or to report a problem with your Avaya product.
For a list of support telephone numbers and contact addresses, go to
the Avaya Support Web site: http://support.avaya.com, scroll to the
bottom of the page, and select Contact Avaya Support.
DMC DECT Fundamentals
August 2012
Comments? [email protected]
Contents
Chapter 1: New in this release........................................................................................... 11
Revision History........................................................................................................................................ 11
Chapter 2: Product description......................................................................................... 13
Contents.................................................................................................................................................... 13
Overview................................................................................................................................................... 13
Clock requirements.......................................................................................................................... 14
CS 1000E......................................................................................................................................... 14
Synchronization port......................................................................................................................... 17
Mobility card (DMC8)................................................................................................................................ 17
DMC8 options................................................................................................................................... 18
DMC8 - Expander (DMC8-E)........................................................................................................... 19
Faceplate features............................................................................................................................ 19
DMC Faceplate cables..................................................................................................................... 21
IPE Shelves Faceplate Cabling........................................................................................................ 23
Inter-shelf faceplate connections...................................................................................................... 23
MG1000E Chassis faceplate cabling............................................................................................... 25
Basestations.............................................................................................................................................. 25
Basestation housing......................................................................................................................... 27
Basestation cell................................................................................................................................ 27
DECT handset subscription and de-subscription...................................................................................... 28
DMC DECT Manager................................................................................................................................ 29
DECT Application features............................................................................................................... 29
Common Services............................................................................................................................ 30
Remote Access Service (RAS)........................................................................................................ 30
Multi-site Mobility Networking subscriptions.............................................................................................. 32
Multi-site Mobility Networking.................................................................................................................... 33
Operating parameters...................................................................................................................... 34
Call forward from a MADN handset.................................................................................................. 34
Card audit......................................................................................................................................... 34
Network Message Service................................................................................................................ 34
Feature packaging............................................................................................................................ 34
Messaging and Alarms.............................................................................................................................. 35
Chapter 3: Engineering guidelines.................................................................................... 37
Contents.................................................................................................................................................... 37
System capabilities and limits................................................................................................................... 37
System concentration traffic...................................................................................................................... 37
Blocking............................................................................................................................................ 37
Traffic definitions.............................................................................................................................. 38
Traffic assumptions used for table calculations................................................................................ 38
System hardware parameters.......................................................................................................... 39
System software parameters............................................................................................................ 41
DMC8 engineering guidelines................................................................................................................... 41
Netprice Order Tool.......................................................................................................................... 43
DECT on Large Systems.................................................................................................................. 43
DMC DECT Fundamentals
August 2012
3
DECT on Cabinet system................................................................................................................. 44
DECT on Chassis system................................................................................................................ 44
DECT on CS 1000E......................................................................................................................... 44
Rules with new basestations............................................................................................................ 44
Basestation combinations for handsets on a DMC8................................................................................. 44
Low traffic for a 0.1 Erlang capacity................................................................................................. 44
Medium traffic for a 0.15 Erlang capacity......................................................................................... 45
High traffic for a 0.2 Erlang capacity................................................................................................. 46
Superloop and IPE shelf calculations............................................................................................... 46
Chapter 4: Site planning..................................................................................................... 49
Contents.................................................................................................................................................... 49
Overview................................................................................................................................................... 49
Site survey................................................................................................................................................ 50
Customer requirements.................................................................................................................... 50
Site survey example......................................................................................................................... 52
Site planning example: Able-Studio................................................................................................. 53
Deployment............................................................................................................................................... 58
Identifying initial critical points on the floor plan............................................................................... 58
Locating cell centres......................................................................................................................... 59
Determining cell boundaries............................................................................................................. 61
Identifying critical points and cell boundaries................................................................................... 62
Marking the points, centres, and boundaries on the floor plan......................................................... 63
Deployment illustrations................................................................................................................... 66
Deployment terms............................................................................................................................ 74
Coverage terms................................................................................................................................ 75
Deployment tool........................................................................................................................................ 76
Preparing the tool for deployment.................................................................................................... 78
How the deployment tool works....................................................................................................... 85
How to use the deployment tool................................................................................................................ 86
Interpreting handset tones................................................................................................................ 86
Rules for outdoor deployment.......................................................................................................... 87
DECT Deployment Kit 2............................................................................................................................ 87
Deploying DECT....................................................................................................................................... 91
Correcting problems with audio quality..................................................................................................... 94
Deploying an external basestation............................................................................................................ 95
Single and multiple floor deployment........................................................................................................ 96
Single-floor deployment.................................................................................................................... 97
Multiple floor deployment................................................................................................................. 102
Cell re-engineering for high traffic areas................................................................................................... 106
Traffic volume................................................................................................................................... 106
About the 12-channel basestation.................................................................................................... 106
The cell re-engineering process................................................................................................................ 107
Estimating traffic within a cell........................................................................................................... 107
Separating the coverage area and recording the number of offices................................................ 108
Creating an estimate table............................................................................................................... 108
Calculating the number of users with an office outside the cell who walk into the cell..................... 109
Calculating the number of users inside the cell with an office.......................................................... 110
4
DMC DECT Fundamentals
August 2012
Calculating the number of users without an office............................................................................ 110
Totalling the estimate for users in a cell........................................................................................... 111
Calculating the data for all remaining cells....................................................................................... 112
Creating a table to document telephone types in a cell.................................................................... 112
Determining cell re-engineering....................................................................................................... 113
Cell division requirements in special cases.............................................................................................. 114
No office information......................................................................................................................... 115
A mix of users with and without wired telephones in a cell.............................................................. 115
High handset density deployment............................................................................................................. 117
Limiting the anticipated number of handsets.................................................................................... 117
Subdividing a cell............................................................................................................................. 117
Deployment review.................................................................................................................................... 119
Completing a floor plan.................................................................................................................... 119
Checking system capacity................................................................................................................ 120
Review with the customer................................................................................................................ 121
Record floor plan information........................................................................................................... 121
Record provisioning record information............................................................................................ 121
Review the work............................................................................................................................... 122
Chapter 5: Installation and configuration......................................................................... 123
Contents.................................................................................................................................................... 123
Before you begin....................................................................................................................................... 123
Unpacking the equipment......................................................................................................................... 124
Provisioning records.................................................................................................................................. 125
System information record............................................................................................................... 125
Provisioning information record........................................................................................................ 126
Installation record............................................................................................................................. 127
TN to DECT TN assignment............................................................................................................. 127
System programming record............................................................................................................ 128
Handset user information record...................................................................................................... 128
Installing the basestation.......................................................................................................................... 128
Rules and guidelines........................................................................................................................ 129
Compatibility..................................................................................................................................... 129
C4610E and external antenna.......................................................................................................... 129
Installing C4600, C4610, and C4610E basestations........................................................................ 130
Installing the wiring to the MDF........................................................................................................ 131
Installing the external power supply................................................................................................. 135
Installing the external housing.......................................................................................................... 136
Attaching the external housing to a wall........................................................................................... 138
Connecting the external housing wiring to the MDF......................................................................... 140
Installing the external housing.................................................................................................................. 142
Mounting the cabinet........................................................................................................................ 149
Installing additional IPE shelves or CS 1000E cabinets........................................................................... 152
Installing additional IPE modules..................................................................................................... 152
Installing IPE module wiring to the MDF.......................................................................................... 153
Installing CS 1000E cabinet wiring to the MDF................................................................................ 157
Expander installation........................................................................................................................ 158
Installing DMC8 and faceplate cables....................................................................................................... 158
DMC DECT Fundamentals
August 2012
5
Compatibility..................................................................................................................................... 158
Cross-connecting basestations to the DMC8 positions.................................................................... 158
Cross-connecting basestations to the DMC8 Relay card................................................................. 160
Installing DMC8 and DMC8-E in an IPE shelf.................................................................................. 162
Installing DMC8 and DMC8-E in an IPE Module Controlled by MGXPEC (CS 1000E)................... 168
Installing DMC8 and DMC8-E in an Avaya Communication Server 1000E...................................... 170
Chassis installation........................................................................................................................... 176
Installing faceplate cables and inter-shelf/cabinet cable.................................................................. 177
Installing the DMC DECT application........................................................................................................ 179
Connecting to a DECT system......................................................................................................... 179
Synchronizing the DECT Application to a DECT system................................................................. 179
Installing the DME on the DMC8 Relay card.................................................................................... 183
Changing the DMC8 Relay card default IP address......................................................................... 184
Launching the DECT application.............................................................................................................. 187
Adding DECT............................................................................................................................................ 188
Adding General System Properties.................................................................................................. 188
Setting the DECT system IP address to match the DMC8 Relay card............................................. 189
Adding the upstream manager IP address, if required..................................................................... 190
Synchronizing data with DECT................................................................................................................. 191
Synchronizing DECT PARI and SARI............................................................................................... 192
Synchronizing DECT parameters..................................................................................................... 193
Synchronizing DECT Upstream Manager IP address...................................................................... 194
Configuring handsets and retrieve subscription data................................................................................ 195
Retrieving subscription data for handsets........................................................................................ 195
Enabling subscription....................................................................................................................... 196
Activating the PIN on the handsets.................................................................................................. 197
Handset subscription........................................................................................................................ 197
Basestation Powering and Muting............................................................................................................ 198
Opening RFP window....................................................................................................................... 198
Setting basestation alarm muting, line power, and comments......................................................... 199
Upgrade a DECT system to an SNMP-managed system......................................................................... 200
Configure a local connection............................................................................................................ 200
Dial-up configuration........................................................................................................................ 201
Network and dial-up connections configuration................................................................................ 210
Change the DMC4 relay card default IP address............................................................................. 214
Reset the DMC4 relay card to the server IP address....................................................................... 214
Launch the DMC DECT Manager back-end process....................................................................... 215
DAS configuration............................................................................................................................ 217
Synchronize data with the DECT system......................................................................................... 221
Activate the firmware on all DMC4 cards......................................................................................... 222
Implementing and operating MSMN......................................................................................................... 224
Implementing the MSMN feature...................................................................................................... 224
Operating the MSMN feature........................................................................................................... 228
Chapter 6: System administration..................................................................................... 229
Contents.................................................................................................................................................... 229
Logging into the DMC DECT Manager..................................................................................................... 229
Selecting the PBX that supports DECT.................................................................................................... 230
6
DMC DECT Fundamentals
August 2012
DECT Systems window............................................................................................................................. 230
Opening Subscriptions, Boards, and RFP windows......................................................................... 230
Connecting to a DECT system......................................................................................................... 231
Establishing a permanent connection to a DECT system................................................................ 232
Deleting DECT systems............................................................................................................................ 233
Retrieving subscription data for DECT handsets...................................................................................... 234
Enabling subscriptions.............................................................................................................................. 235
Activating the PIN on the DECT handsets................................................................................................ 236
Working with DECT handset subscriptions............................................................................................... 236
Disabling a DECT handset subscription........................................................................................... 237
Copying a DECT handset subscription............................................................................................ 238
Moving a DECT handset subscription.............................................................................................. 239
Finding a DECT handset subscription.............................................................................................. 240
Importing a DECT handset subscription........................................................................................... 241
Exporting a DECT handset subscription.......................................................................................... 243
Force disabling a DECT handset subscription................................................................................. 244
Deleting TNs that are not on the switch.................................................................................................... 245
Updating data on DMC DECT Manager or updating data on a DECT system......................................... 246
Provisioning a DECT system remotely...................................................................................................... 247
Remote DMC8 provisioning where the customer site has a DECT manager.................................. 248
Remote DMC8 provisioning where the customer site does not have a DECT manager.................. 249
Subscribing a DECT system remotely...................................................................................................... 249
Remote DECT handset subscription where the customer site has a DECT manager..................... 250
Remote DECT handset subscription where the customer site does not have a DECT manager.... 251
Modifying system properties..................................................................................................................... 251
Changing passwords........................................................................................................................ 252
Changing the DECT system name................................................................................................... 253
Changing the IP address on DMC DECT manager.......................................................................... 254
Changing the IP address on the DECT system DMC8 Relay card.................................................. 255
Changing a PARI or SARI................................................................................................................ 257
Changing the Upstream Manager IP address.................................................................................. 258
Changing the time and date............................................................................................................. 259
Changing parameters....................................................................................................................... 260
Keeping or removing non-operational DMC8 cards from DMC DECT Manager...................................... 261
Keeping or removing non-operational basestations from DMC DECT Manager...................................... 262
Resolving a subscription configuration mismatch..................................................................................... 263
Troubleshooting........................................................................................................................................ 264
Disconnecting................................................................................................................................... 264
Chapter 7: System maintenance........................................................................................ 267
Contents.................................................................................................................................................... 267
Alarm Code maintenance actions............................................................................................................. 268
Windows Alarm Snapshot................................................................................................................ 268
LED status for DMC8/DMC8-E and basestation....................................................................................... 273
Removing and inserting a DMC8 for maintenance................................................................................... 275
Backing up a DMC8 card configuration and subscription information.............................................. 276
Removing a faulty DMC8 card......................................................................................................... 277
Inserting a serviceable DMC8 card.................................................................................................. 278
DMC DECT Fundamentals
August 2012
7
Restoring subscription data to the serviceable DMC8 card............................................................. 279
Adding a DMC8 card to a DECT system................................................................................................... 279
Reusing a DMC8 card in another DECT system.............................................................................. 281
Removing and reinstalling a basestation for maintenance....................................................................... 281
Muting alarms on a basestation....................................................................................................... 281
Canceling mute alarms on a basestation......................................................................................... 282
Disconnecting and reinstalling a basestation................................................................................... 283
Uploading and activating firmware............................................................................................................ 284
Recovering from a firmware upload failure............................................................................................... 286
Retrieving current RSSI data.................................................................................................................... 287
RSSI file format................................................................................................................................ 289
Performance Collection............................................................................................................................. 289
DECT Performance Manager installation......................................................................................... 291
Set date and time on DMC DECT Manager..................................................................................... 293
Retrieve upm and epm files.............................................................................................................. 294
Creating a new directory structure................................................................................................... 295
Rename upm and epm files............................................................................................................. 296
Creating a database......................................................................................................................... 298
Using the database.......................................................................................................................... 299
Previously created databases.......................................................................................................... 300
DECT Performance Manager data................................................................................................... 301
Top-down analysis............................................................................................................................ 306
Setting parameters.................................................................................................................................... 309
Recovering a password............................................................................................................................. 310
Chapter 8: Changing the DMC8 jumper setting after DECT system upgrade to Release
5.0......................................................................................................................................... 313
Changing the DMC8 jumper setting.......................................................................................................... 313
Connecting a DECT system to DMC DECT Manager using remote modems and Windows 2000.......... 315
Cable setup...................................................................................................................................... 315
DECT relay board to remote modem............................................................................................... 316
Configuring NetBEUI Protocol.......................................................................................................... 317
Configuring a dial-up network on the DMC DECT Manager server................................................. 318
Setting the properties of the new connection................................................................................... 319
Modem setup.................................................................................................................................... 320
Modem requirements....................................................................................................................... 320
Setting the modems to factory defaults............................................................................................ 320
Adding a new DECT system to DMC DECT Manager..................................................................... 321
Changing an existing DECT system on DMC DECT Manager from an Ethernet connection to a
modem connection........................................................................................................................... 323
Chapter 9: Adding a DMC8 to a non-SNMP DECT system.............................................. 325
Adding a DMC8......................................................................................................................................... 325
Chapter 10: DMC8 debug port........................................................................................... 327
Overview................................................................................................................................................... 327
DMC card......................................................................................................................................... 327
Items to monitor................................................................................................................................ 328
Monitor port physical connection.............................................................................................................. 328
DMC8 debug port............................................................................................................................. 328
8
DMC DECT Fundamentals
August 2012
Connecting a modem....................................................................................................................... 329
Terminal configuration............................................................................................................................... 330
Successful connection.............................................................................................................................. 330
Information collection................................................................................................................................ 331
Messages on an idle system..................................................................................................................... 333
IPC interface..................................................................................................................................... 333
DS30 interface.................................................................................................................................. 334
Message examples................................................................................................................................... 334
Chapter 11: Performance Collection file samples............................................................ 337
Equipment Performance Collection file sample........................................................................................ 337
User Performance Collection file sample.................................................................................................. 337
Index..................................................................................................................................... 339
DMC DECT Fundamentals
August 2012
9
10
DMC DECT Fundamentals
August 2012
Chapter 1: New in this release
The following sections detail what is new in DMC DECT Fundamentals, NN43120–114 for Release 7.5:
Feature changes
• All DECT Messenger material has been removed. See DECT Messenger Fundamentals
(NN43120-120).
• DSP provisioning information has been added to System hardware parameters on page 39 and
Installing DMC8 and DMC8-E in an Avaya Communication Server 1000E on page 170 and now
aligns with the provisioning rules implemented in the ordering tools.
• Configuration information has been added to Installing DMC8 and DMC8-E in an IPE Module
Controlled by MGXPEC (CS 1000E) on page 168 for IPE shelves upgraded to the MG XPEC
controller.
Revision History
August 2012
Standard 02.07. This document has been up-issued to update the
compatible operating systems for DMC DECT Manager 2.0.
May 2012
Standard 02.06. This document is up-issued to update location of
DMC slot in Communication Server Release 7.5.
DMC DECT Fundamentals
August 2012
11
New in this release
12
DMC DECT Fundamentals
August 2012
Comments? [email protected]
Chapter 2: Product description
Contents
This section contains information on the following topics:
Overview on page 13
Mobility card (DMC8) on page 17
Basestations on page 25
DECT handsets
DMC DECT Manager on page 29
Multi-site Mobility Networking on page 33
Messaging and Alarms on page 35
Overview
Avaya Integrated DECT (DECT) allows users to move freely about their work sites while
conducting telephone conversations using wireless handsets. DECT is an acronym for Digital
Enhanced Cordless Telecommunications.
DMC DECT Fundamentals
August 2012
13
Product description
Figure 1: Main parts of the DECT system
The DECT system is in a CS 1000M IPE shelf or a CS 1000E cabinet or chassis. DECT has
four main components:
a
DECT mobility cards
b
Basestation
c
Handsets
d
DMC DECT Manager with DECT application
Clock requirements
The following clock controller cards are mandatory:
• NTRB53 Clock Controller card for a CS 1000M SG or MG
• NTAK20BD Clock Controller daughterboard or NTAK79AA card with a built-in clock
controller for an Option 11C and CS 1000E Media Gateways
If there is no digital connection to the network, the appropriate clock controller must be installed
and operated in free run mode.
Note:
On EMC-hardened Cabinet systems, the clock controller must be in one of the first three
slots of the CPU cabinet.
CS 1000E
The NTDW63AAE5 Ethernet & Clock Reference Breakout Adapter for Option 11C cabinet used
with MGC and the NTDW67AAE5 MGC DECT clock reference cable, used to synchronize the
14
DMC DECT Fundamentals
August 2012
Comments? [email protected]
Overview
backplane clock between two MG1000 chassis, MG 1010 chassis, or Option 11C cabinets, are
shown in the figures below.
For CS 1000E DECT installations that span more than 1 cabinet, the NTDW63AAE5 (Option
11C Cabinet Ethernet & Clock Reference Breakout Adapter) is used with the NTDW67AAE5
(Clock Reference Cable) to synchronize the backplane clock between two Option 11C
cabinets. For DECT installations that span more than 1 MG 1000 or MG 1010 main and
expander chassis, the NTDW67AAE5 cable is used to synchronize the backplane clock
between two MG 1000 or MG 1010 chassis. This is in addition to the clock controller
requirement identified above.
DMC DECT Fundamentals
August 2012
15
Product description
Figure 2: MGC Breakout Adapter for Option 11C
Figure 3: MGC DECT Clock Reference Cable
16
DMC DECT Fundamentals
August 2012
Comments? [email protected]
Mobility card (DMC8)
Synchronization port
Figure 4: DECT synchronization
Where multiple DECT systems share the same radio coverage area, the DECT
synchronization port must be used. The DECT synchronization port is accessed through a
Main Distribution Frame (MDF) connection. Failure to connect the DECT synchronization ports
of each system can lead to service interruptions.
Mobility card (DMC8)
The NTCW00AB DMC8 DECT Mobility Card provides an interface between the basestations
and the Meridian 1, or CS 1000M.
Figure 5: DECT Mobility Card
The DECT system supports a mix of DMCs and DMC8s. A DMC8 supports up to eight
basestations.
DMC DECT Fundamentals
August 2012
17
Product description
All DMC8s support a Point-to-Point Protocol (PPP) connection to the DECT Manager with an
NTCW12DA cable. The DMC8 card requires a NTCW25AA DECT Manager Ethernet (DME)
daughterboard installed to support an Ethernet connection.
Each DMC8 is programmed in the database using LD 10.
The DMC8s are interconnected by faceplate cables, allowing them to pass information to each
other.
DMC8s must be in an IPE shelf or in a cabinet or chassis.
There is no call switching in the DMC8 card. All call switching occurs within the Meridian 1, CS
1000M, or CS 1000E.
DMC8 options
Figure 6: DMC8 options
The component side of the DMC8 contains jumpers J1, J2, and J3. The jumpers indicate card
status.
18
DMC DECT Fundamentals
August 2012
Comments? [email protected]
Mobility card (DMC8)
DMC8 - Expander (DMC8-E)
The NTCW01AB DMC8-E DECT Mobility Card – Expander provides the same functions as a
DMC card.
The DMC8-E has additional circuitry required to regenerate faceplate cable signals when a
system contains more than eight DMC8s. The DMC8-E connects two shelves or cabinets in a
DECT system.
Figure 7: DECT Mobility Card - Expander
If the DMC8-E is used in an IPE module, it must be located in card slot 8. Do not install a DMC8
in slot 8 of an IPE module.
If the DMC8-E is used in a CS 1000E cabinet or chassis, it must be located in card slot 8. Do
not install a DMC8 in slot 8 of a CS 1000E cabinet or chassis.
An NTCW25AA DME daughterboard is required to provide Ethernet DMC DECT Manager
access. The daughterboard is also required to enable DECT Messaging. The DME
daughterboard is not required for serial DMC DECT Manager access. Only one DME
daughterboard is required per system.
Faceplate features
Figure 8: DMC8 and DMC8-E faceplate features on page 20 shows the following DMC8 and
DMC8-E faceplate features:
a
Red LED (indicates the same status as all IPE cards)
b
Yellow LED (indicates DECT sub-system status)
DMC DECT Fundamentals
August 2012
19
Product description
c
Green LED (indicates DECT sub-system status)
d
DMC8 to DMC8 faceplate cable port
e
DMC8 bypass faceplate cable port
f
DMC8-E to DMC8-E faceplate cable port
g
For future use
Figure 8: DMC8 and DMC8-E faceplate features
20
DMC DECT Fundamentals
August 2012
Comments? [email protected]
Mobility card (DMC8)
DMC Faceplate cables
The faceplate cables form the 20 Mb/s bus that connects all DMCs in a DECT system. The
faceplate cables meet the standard for Unshielded Twisted-Pair category of performance 5
(UTP CAT 5).
Signaling and PCM are sent to all DMCs over the faceplate cables, allowing a DMC8 to pass
a call to another DMC8.
The following faceplate cables are used in DECT systems:
1. DMC to DMC faceplate cable (NTCW11AA)
The cable extends the 20Mb/s bus to all DMCs.
2. DMC to DMC-E faceplate cable (NTCW11BA)
The DMC to DMC-E cable extends the 20Mb/s bus past the XPEC card in the IPE
shelf.
3. DMC bypass faceplate cable (NTCW11CA)
The DMC bypass faceplate cable bypasses DMCs to be inserted in or removed from
an operational DECT system.
4. DMC faceplate termination (NTCW11DA)
The DMC faceplate termination balances the impedance at either end of the 20Mb/
s bus.
5. DMC-E to DMC-E intershelf faceplate cable (NTCW11EA)
This faceplate cable connects DMC-Es in two shelves or two cabinets.
DMC DECT Fundamentals
August 2012
21
Product description
Figure 9: DMC-E to DMC-E intershelf faceplate cable
Caution:
Service Interruption
The DMC-E to DMC-E faceplate cable has four sets of movable ferrites. The
position of the ferrites on the cable is important. Each end of the cable must have
a group of 20 ferrites. One quarter the distance from each end of the cable must
have a group of 10 ferrites. The maximum length of the cable is 1.5 meters,
limiting the position of DECT shelves 0 and 1 to adjacent IPE modules or CS
1000E cabinets/chassis.
6. DMC to DMC 1-meter faceplate cable with four ferrites (NTCW11FA)
This cable extends the 20Mb/s bus to all DMCs and is used in Avaya
Communication Server 1000E systems to connect DMC cards in MG1000E Main
Chassis and MG1000E Expander Chassis.
Figure 10: DMC to DMC 1 meter faceplate cable with four ferrites
Caution:
Service Interruption
22
DMC DECT Fundamentals
August 2012
Comments? [email protected]
Mobility card (DMC8)
Customers must use UTP Cat 5 faceplate cables supplied by Avaya. Faceplate
termination must be used on the DMCs at both ends of the faceplate cabling.
Faceplate cabling between DMC(-E) cards is slightly different for different Avaya CS 1000
system types. The following are the examples:
IPE Shelves Faceplate Cabling
The following figure describes the faceplate cabling within one IPE shelf.
Figure 11: Faceplate cabling within one IPE shelf
Faceplate cables shown in the picture are:
a
DMC to DMC faceplate cable (NTCW11AA)
b
DMC to DMC-E faceplate cable (NTCW11BA)
c
DMC faceplate termination (NTCW11DA)
d
DMC bypass faceplate cable (NTCW11CA
Inter-shelf faceplate connections
The following figure describes the IPE inter-shelf faceplate cabling.
DMC DECT Fundamentals
August 2012
23
Product description
Figure 12: IPE inter-shelf faceplate cabling
The above figure shows:
24
a
IPE DECT shelf 0
b
IPE DECT shelf 1
c
DMC-E to DMC-E faceplate cable connection between DMC-Es on DECT IPE
shelves (NTCW11EA)
DMC DECT Fundamentals
August 2012
Comments? [email protected]
Basestations
MG1000E Chassis faceplate cabling
The following figure describes the MG1000E Chassis faceplate cabling.
Figure 13: MG1000E Chassis faceplate cabling
Faceplate cables shown on the figure are:
a
DMC to DMC faceplate cable (NTCW11AA)
b
Faceplate termination (NTCW11DA)
c
DMC to DMC 1-meter faceplate cable with four ferrites (NTCW11FA)
d
DMC-E to DMC-E faceplate cable connection between two shelves (NTCW11EA)
Basestations
There are three basestation models available:
• C4600 – supports six active call radio links
• C4610 – supports 12 active call radio links
• C4610E (with external antenna) – supports 12 active call radio links
DMC DECT Fundamentals
August 2012
25
Product description
Basestations are IP40-compliant wall-mounted transceivers that provide digital radio links to
handsets.
Caution:
Service Interruption
For maximum line length before signal degradation occurs, use UTP Cat 5 cabling between
the basestation and the shelf or cabinet. If the line length exceeds 100 ohms for the 4610
basestation, an external power supply must be used. The maximum distance when using
external power with UTP Cat 5 cabling is approximately 1.7 km.
The basestation has the following features:
• RJ45 socket connection to a one meter UTP Cat 5 cable
• RJ45 socket connection to an external or local power supply
• Green LED (C4600) or a yellow LED (C4610), indicates synchronization to its DMC8
• One meter UTP Cat 5 cable connected through an RJ45 Connect Box and MDF to an
IPE I/O panel or CS 1000E cabinet I/O panel
Two sources can power the basestation:
• The DMC8 and DMC8-E feeding phantom power over the UTP Cat 5 cable signaling
pairs, connected to (a) in Figure 14: Basestation on page 26
• A local power supply, connected to (b) in Figure 14: Basestation on page 26
Figure 14: Basestation
Basestations connected to a DMC8 or DMC8-E card can use phantom power in some
conditions, and must use local power in other conditions. An application on the DMC DECT
Manager can enable or disable phantom power.
Note:
The maximum line length for a twelve-channel basestation using phantom power is 1.0 km.
The maximum line length for a six-channel basestation, regardless of power, or a twelvechannel basestation using external power, is 1.7 km.
26
DMC DECT Fundamentals
August 2012
Comments? [email protected]
Basestations
Basestation housing
The basestation environmental housing is IP66 compliant. The housing must be used indoors
if a basestation is subject to conductive pollution, or outdoors if basestations are mounted
externally.
Figure 15: Basestation environmental housing
The environmental housing kit includes all of the relevant cables and installation material. The
environmental housing mounts to existing walls. Signaling lines provide power to the external
basestations.
Basestation cell
A basestation cell is the radio signal area covered by a single basestation. The basestations
are positioned so the cells overlap. A DECT handset can make and receive calls when within
a basestation cell. When the handset moves from one cell to another, the cell overlap allows
the handset to move without interruptions.
DMC DECT Fundamentals
August 2012
27
Product description
Figure 16: Basestation cell
The cell radius varies from 20m to 100m.
The number of basestations required to cover a certain area depends on many factors, such
as the following:
• Size of the area of coverage
• Radio propagation characteristics of the buildings
• Materials used for walls, floors, lift shafts, reinforced glass, doors
• Strong magnetic fields from radar, welding equipment, manufacturing equipment, and
high energy electronic devices
• Density of telephone users in an area, and amount of telephone traffic
DECT handset subscription and de-subscription
Subscription is the process of adding a handset to a DECT system. The handset can then
make and receive calls.
A user can subscribe a handset to more than one DECT system. This feature is useful for a
company that has multiple DECT sites.
De-subscription is the process of removing a handset from a DECT system. The handset user
is then prevented from making and receiving calls.
28
DMC DECT Fundamentals
August 2012
Comments? [email protected]
DMC DECT Manager
Note:
Refer to each DECT Handset User Guide for a detailed description of how to use handset
features and system features.
DMC DECT Manager
The DMC DECT Manager provides a point of access and control to manage DECT system on
an Avaya CS system. DMC DECT Manager 2.0 runs on Windows 2000 Server, Windows 2000
Professional, Windows XP Professional, Windows Server 2003, and Windows 7.
Note:
For an overview of the DMC DECT Manager, see Using the DMC DECT Manager Avaya
Communication Server 1000 (NN43001-142).
DECT Application features
The DECT Application allows a user to:
• Launch the Application from DMC DECT Manager using Windows and Web navigators
• View DECT provisioning using the DECT Systems window
• View the DMC8 configuration using the Boards window
• View basestation configuration using the Radio Fixed Part window
• View subscription information using the Subscriptions window
• Upgrade firmware using the DECT Systems window
• Subscribe handsets using the Subscription window
• Support DMC8 and DMC (serial only) cards
• Synchronize (update) the DECT Application database to the DECT system configuration
when the DMC DECT Manager connects to the DECT system
• Collect performance data using the Performance Collection window
• View On-line Help
DMC DECT Fundamentals
August 2012
29
Product description
Common Services
The following DECT management features are provided by DMC DECT Manager Applications:
• DMC DECT Manager Alarm Management provides alarm collection and alarm
processing, as well as the following:
- a Windows-based alarm browser to view alarms that occur while the browser is open
- an Alarm Notification application to notify personnel of an alarm occurrence by pager
or e-mail. This application can forward the alarm to an upstream processor
- a PC Event log and Viewer to view events and alarms generated from the DECT
Application in a report layout
• Backup and restore to create and restore a DMC DECT Manager backup file of the DECT
application data
• User profiles to enable configuration of different types of DECT users
• On-line help to provide help for common services features
For more information about the Common Services features, see Using the DMC DECT
Manager Avaya Communication Server 1000 (NN43001-142).
Remote Access Service (RAS)
A computer in a network provides access to remote users through analogue modem or ISDN
connections. The computer includes the dial-up protocols and access control (authentication),
and can be a regular file server with remote access software or a proprietary system. The
modems can be internal or external to the device.
ISDN is an international telecommunications standard for providing a digital service from the
customer's premises to the dial-up telephone network.
30
DMC DECT Fundamentals
August 2012
Comments? [email protected]
DMC DECT Manager
Figure 17: Local DMC DECT Manager server access to a DECT system by V.24
DMC DECT Fundamentals
August 2012
31
Product description
Figure 18: Local DMC DECT Manager server access to a DECT system by dedicated LAN
Multi-site Mobility Networking subscriptions
In Multi-site Mobility Networking (MSMN), users can take their DECT handsets to other sites
in the network, and make and receive calls as if they were at their home location. A handset
is subscribed in a given DECT system and can be used in one or many DECT systems.
For information on MSMN feature description, feature interaction, feature packaging, and
operating parameters. For information on MSMN feature implementation and operation.
Every handset has a Portable Access Rights Key (PARK). Every DECT system has a Primary
Access Rights Identifier (PARI), and can have a Secondary Access Rights Identifier (SARI).
The handset PARK and DECT system PARI and SARI are used by the handset and DECT
system to identify each other. The PARK and PARI/SARI match allow the handset to work with
a DECT system.
In an MSMN network, for example, DECT system A" has a PARI matching a handset PARK
while DECT systems B," C," and D" have a SARI matching the handset PARK.
32
DMC DECT Fundamentals
August 2012
Comments? [email protected]
Multi-site Mobility Networking
The DECT Manager user programs the SARI in the DECT system. The DECT Manager
provides the PARK during the on-air subscription, and the PARK is programed into the handset
at subscription time.
For example, a handset can be subscribed to a DECT system on the premises of a distributor,
where the handset is not to be in operation. Then the subscription data is downloaded to a
DECT system where the handset is to be in operation. The PARI, where the handset is
subscribed, and the SARI, where the handset is used, are not always the same. The PARK
matching the destination DECT system to the handset is provided during the on-air
subscription.
Figure 19: DECT Default Subscription ARI dialog box
The DECT Manager provides the ability to specify the ARI given to the handset, to support
Multi-site Mobility Networking and Subscription on the distributor premises. The ARI normally
defaults to the ARI of the system where the on-air subscription occurs. For MSMN, the default
ARI must be equal to the network SARI value for any subscription activity to take place.
Multi-site Mobility Networking
Multi-site Mobility Networking (MSMN) allows a DECT handset user to make and receive calls
at any MCDN node. When the handset user visits a MCDN node, the MSMN feature
automatically performs the following actions:
• Detects the visiting handset when it is on.
• Forwards calls to the visiting handset from the users home node.
The Call Forward dial tone indicates when MSMN activation was not successful. Turn the
handset off and on again to re-activate the MSMN feature.
The MSMN feature requires concentrated DMCs. A concentrated system has each handset
configured to a Virtual TN (VTN) on phantom loops. Concentration allows up to 510 handsets
to share the DMCs 32 time slots and is a blocking system. See System concentration traffic on
page 37.
DMC DECT Fundamentals
August 2012
33
Product description
Operating parameters
All DMCs, either new, empty for redundancy, or used for basestation coverage, must have at
least one handset configured to ensure system operation.
Call forward from a MADN handset
A MADN handset at a remote node can activate Call Forward (CFW) at the home node. When
the handset shares a DN with another sets, the CFW lamp lights on the shared DN sets. If the
handset is not the MARP, the shared DN MARP set can cancel call forward. If the handset is
the MARP, the handset overrides any call forward that is set up from other shared DN sets.
Card audit
Card audit does not work with VTNs.
Network Message Service
The MSMN feature does not change the handling of unanswered network calls. The Avaya
CallPilot® network mail service does not change with multiple DNs configured against a single
mailbox. The visiting DN receives the Message Waiting Indication (MWI) at the visited site.
Feature packaging
The MSMN feature requires the following packages:
• Multi-site Mobility Networking (MSMN) package 370.
• Meridian 1 Companion Option (MCMO) package 240.
• Phantom TN (PHTN) package 254.
• Meridian Companion Enhanced Capacity (MC32) package 350.
• Flexible Feature Codes (FFC) package 139.
34
DMC DECT Fundamentals
August 2012
Comments? [email protected]
Messaging and Alarms
Messaging and Alarms
DECT Messenger provides text messaging from many different sources to various output
devices, including DECT handsets. Messages can be sent from the following sources:
• external alarm systems, for example nurse call, building alarms, process control
• a mechanical system
• the web or email
• a DECT handset
• contact panels, door switches etc.
It is possible to send the messages to e-mail, pagers and GSM handsets as well as to DECT
handsets, either as escalations if the DECT handset is not available or in parallel.
Figure 20: DECT Messager connections
DMC DECT Fundamentals
August 2012
35
Product description
36
DMC DECT Fundamentals
August 2012
Comments? [email protected]
Chapter 3: Engineering guidelines
Contents
This section contains information on the following topics:
System capabilities and limits on page 37
DMC8 engineering guidelines on page 41
System capabilities and limits
This section examines several issues surrounding DECT capabilities and limits. Information
about system hardware and software parameters is also provided.
System concentration traffic
A DECT system without concentration supports a maximum number of 1024 handsets. With
the concentration feature, in theory, the handset limit is 510 per DECT Mobility Card x 32 cards
= 16320 handsets. However, in practice, traffic limits the number of handsets per card.
Each IPE card slot supports 32 channels of voice and data at the same time through the DS30X
interface. Concentration removes the existing fixed ratio of 32 handsets per DMC.
Blocking
Calls in DECT can be blocked at many stages, including the following:
• At the basestation – when all channels (6 or 12) of an basestation are in use, calls through
that basestation (both to and from a Portable Part [PP]) are rejected.
• At the Backbone interface – when the basestations of one DMC together have 32 radio
connections, calls through those basestations (both to and from a handset) are
rejected.
DMC DECT Fundamentals
August 2012
37
Engineering guidelines
• At the IPE backplane interface – when all 32 speech channels to the DS30X interface on
the a DMC8 are occupied, calls to and from handsets that have that specific DMC8 as
their home DMC8 are rejected.
• At the Network interface – usually the IPE shelf connectivity is a blocking configuration,
where the number of network timeslots provided for a shelf is less than the actual number
of terminals configured on that shelf.
Traffic definitions
Busy hour traffic – Busy hour traffic is the hour of the day during which a telephone system
carries the most calls, voice or data. The unit for busy hour traffic is the Erlang or Centi Call
Second (CCS).
Erlang – One Erlang is equal to the continuous use of a circuit for one hour.
CCS – One hundred Call Seconds (CCS) or 100 seconds of continuous use of a circuit.
Normally referred to as CCS per hour. For example, a call on a circuit for one hour is equal to
36 CCS. (60 minutes x 60 seconds = 3600/100 = 36 CCS)
Blocking – A condition when a telephone call does not complete, and the calling party normally
hears a busy signal.
Grade of Service – Grade of Service, given as a decimal fraction, indicates the probability of
call blocking. For most applications, acceptable figures for blocking are between 0.01 and
0.03.
Traffic assumptions used for table calculations
The following are traffic assumptions used for table calculations:
• A handset that always has good radio contact with a basestation assumes that the radio
deployment is acceptable.
• The Grade of Service used in all calculations is 1%.
• There is little or no overlap between basestations. (In practice, there is overlap, but to
apply standard traffic calculations, it is necessary to simplify the calculation). For example,
two 6-channel basestations in the same cell deliver a higher traffic flow.
• Ignore radio channels for handover. The traffic calculations allocate a slightly higher traffic
capability to a basestation than it can have in practice.
• Blocking occurs at three main areas: the basestations, the backplane, and the network
loops. The traffic calculations only use the Erlang values where blocking occurs. For
example, if there are three areas each delivering 10 Erlangs, traffic calculations take the
total traffic capability as 10 Erlangs, not as 30 Erlangs. Real traffic capacity in this example
is possibly more than 10 Erlangs.
38
DMC DECT Fundamentals
August 2012
Comments? [email protected]
System concentration traffic
• Handset handover continues without interruption.
• Handsets are distributed equally between the system DMC cards.
• All calculations are based on resident handset users. Visiting handset users have a
negligible effect on traffic. In unusual circumstances where a site has a large number of
visiting handset users, traffic capacity can require adjustments.
System hardware parameters
The tables in this section detail the minimum and maximum configurations for DECT with the
Concentration feature.
Table 1: Minimum configuration
System type
Cabinets
All systems
1
DMC8
1
DMC8-E
0
Basestation
1 to
8††
Handset
1 to 510†
† Due to the maximum number of DCS sets per DMC card. Subject to
engineering rules and constraints.
†† Due to the maximum number of basestations per DMC card. Subject
to engineering rules and constraints.
Table 2: Maximum CS 1000M (Large System) configuration
System type
Cabinets
DMC8
DMC8-E
Basestation
Handset
CS 1000M
2
30
2
256††
16 320†
† Due to the maximum number of DCS sets per DMC card. Subject to
engineering rules and constraints.
†† Due to the maximum number of basestations per DMC card. Subject
to engineering rules and constraints.
Table 3: Maximum CS 1000E configuration
System type
Cabinet
s
DMC8
MG 1000E
Cabinet / MG
1010E Chassis
(one-shelf
configuration)
1
5
MG 1000E
Cabinet / MG
1010E Chassis
(two-shelves
configuration)
2**
11
DMC DECT Fundamentals
DMC8- Basestatio Handse
E
n
t
PRI
Cards
MC32
Cards
1
48††
3060†
1
3
2
104††
6630†
1
6
August 2012
39
Engineering guidelines
System type
Cabinet
s
DMC8
DMC8- Basestatio Handse
E
n
t
PRI
Cards
MC32
Cards
MG 1000E
Chassis with
Expander (oneshelf
configuration)
2
4
1
40††
2550†
1
2
MG 1000E
Chassis with
Expander (twoshelves
configuration)
4**
9
2
88††
5610†
1
4
MG 1000E IPE
shelf –MG XPEC
(one-shelf
configuration)
1
13
1
112††
7140†
0
2
MG 1000E IPE
shelf –MG XPEC
(two-shelves
configuration)
2**
26
2
224††
14280†
0
4
** Clock synchronization with the main cabinet or MG is
mandatory. ** Clock synchronization with the main
cabinet or MG is mandatory. See section “Overview
Avaya Communication Server 1000E” for details.
† Due to the maximum number of DCS sets per DMC
card. Subject to engineering rules and constraints.
†† Due to the maximum number of basestations per
DMC card. Subject to engineering rules and
constraints.
For CS 1000E systems (MGC based), a clock controller must be installed in the cabinet.
Therefore you must install a PRI card with a NTAK20 Clock Controller Daughterboard.
A Media Gateway Card (MGC) installed in an MG 1000 chassis (with MG 1000E Expander),
or an MG 1010E chassis provides 128 DSP ports. The maximum number of simultaneous calls
between the trunks or lines connected to this Media Gateway, including DECT sets subscribed
to DMC cards in this chassis, and any endpoints outside the Media Gateway is limited to
128.
Each DMC card supports up to 32 DSP ports. For a non-blocking call solution, the maximum
number of DMC cards that can be installed in an MG 1000 / MG 1010E is limited to four. If four
are not sufficient, an extra MC 32 card is required for each additional DMC card. A non-blocking
solution for a DECT system requires special planning in terms of the available channels on the
basestations covering certain areas as well as the distribution of DCS blocks among the DMC
cards available in the system.
If a cabinet or Media Gateway has a number 9 slot, it must be provisioned with a DMC8-E card.
All other cards are DMC8s.
40
DMC DECT Fundamentals
August 2012
Comments? [email protected]
DMC8 engineering guidelines
The DECT system components have the following capacities:
• One NTCW00AB DMC8 or one NTCW01AB DMC8-E can support up to 8 basestations.
• One C4600 basestation can support 6 active calls.
• One C4610 basestation can support 12 active calls.
• One C4610E basestation can support 12 active calls.
Multiple DECT systems can co-exist in the same PBX system if they are synchronized to the
same clock source. However, from a user perspective, the DECT systems are separate.
System software parameters
The software that operates the DECT system resides as firmware in the DMCs. The firmware
consists of an operating program and a system database configuration. The operating program
controls basestation and handset functions. The operating program also communicates with
the system and the DMC DECT Manager. The system data defines hardware and hardware
addressing.
The DMC8/DMC8-E with the ensuing software releases supports the following:
• Release 23 can support basic configuration, CLID and CPND, DECT card addressing
within OA&M, and 16 users on each card.
• Release 24.2x can support up to 32 handsets on each card.
Release 25.xx can support up to 510 handsets with Concentration and MSMN.
The firmware on the DMCs will support CLID, but there is no official way in DECT to tell that
the connected party or CLID has changed. This is a limitation to the DECT standard.
DMC8 engineering guidelines
This section describes the recommended engineering guidelines for the installation of phantom
powered basestations.
The optimum capacity mix of 6-channel and 12-channel basestations is six 6-channel and two
12-channel basestations. Using three or more 12-channel basestations per DMC8 is possible
but is not an efficient use of the 32 channels of the DMC8.
Avaya recommends that the 12-channel basestations be distributed over the DMC8s.
Table 4: DMC8 engineering guidelines for 6-channel RFP (basestation) and 12-channel RFP
(basestation) on page 42 The following table lists engineering guidelines for various
deployments of phantom-powered basestations.
DMC DECT Fundamentals
August 2012
41
Engineering guidelines
Table 4: DMC8 engineering guidelines for 6-channel RFP (basestation) and 12-channel
RFP (basestation)
System
Large System
Cabinet
Chassis
CS 1000E
Number of basestations that can be phantom powered
per shelf or cabinet
Total
eight 6-channel or six 6-channel + two 12-channel @ 0.5
km
128
seven 6-channel or five 6-channel + two 12-channel @1.0
km
112
seven 6-channel @ 1.7 km
112
new basestations – any mix at 1.7 km
128
seven 6-channel or five 6-channel + two 12-channel @ 0.5
km
70
six 6-channel or four 6-channel + two 12-channel @1.0 km
60
six 6-channel @ 1.7 km
60
new basestations – any mix at 1.7 km
80
eight 6-channel or six 6-channel + two 12-channel @ 0.5
km
32
eight 6-channel or six 6-channel + two 12-channel @ 1.0
km
32
eight 6-channel @ 1.7 km
32
new basestations – any mix at 1.7 km
32
eight 6-channel or six 6-channel + two 12-channel @ 0.5
km
32
eight 6-channel or six 6-channel + two 12-channel @ 1.0
km
32
eight 6-channel @ 1.7 km
32
new basestations – any mix at 1.7 km
32
Using the maximum of eight basestations on a DMC8 imposes engineering restrictions on the
remaining slots, as listed in Table 5: DMC8 Ordering Tool - system slot restrictions for different
basestation lengths on page 42.
Table 5: DMC8 Ordering Tool - system slot restrictions for different basestation lengths
System
Large System
42
Basestation
average line
length
Required number of unoccupied slots
0.5 km
no restrictions
1.0 km
for every 1 – 15 slots, one slot must be unoccupied
DMC DECT Fundamentals
August 2012
Comments? [email protected]
DMC8 engineering guidelines
System
Cabinet
Chassis
CS 1000E
Basestation
average line
length
Required number of unoccupied slots
1.7km
for every 1 – 6 slots, one slot must be unoccupied
0.5 km
for every 1 – 9 slots, one slot must be unoccupied
1.0 km
for every 1 – 8 slots, one slot must be unoccupied
1.7km
for every 1 – 15 slots, one slot must be unoccupied
0.5 km
no restrictions
1.0 km
no restrictions
1.7km
no restrictions
0.5 km
no restrictions
1.0 km
no restrictions
1.7km
no restrictions
Netprice Order Tool
The Netprice Order Tool makes certain approximations in provisioning DMC8. This provides
a simplified configuration that meets the needs of most sites.
DECT on Large Systems
The Order Tool allows the first 80 basestations to be phantom powered. When more than 80
basestations are requested, the extra basestations are assumed to be local powered. Power
adapters are provided as follows:
• C4610 AC adapters = (sum of 6-channel and 12-channel basestations) – 80
• Adapters must be purchased separately
Note:
Because it is not possible to determine how the cards are spread over the two shelves,
it is assumed that there are 80 phantom powered basestations per system.
DMC DECT Fundamentals
August 2012
43
Engineering guidelines
DECT on Cabinet system
The Order Tool allows the first 40 basestations to be phantom powered. When more than 40
basestations are requested, the extra basestations are assumed to be local powered. Power
adapters are provided as follows:
• C4610 AC adapters = (sum of 6-channel and 12-channel basestations) – 80
• Adapters must be purchased separately
DECT on Chassis system
All basestations can be powered from the cabinet power supply.
DECT on CS 1000E
All basestations can be powered from the Media Gateway power supply.
Rules with new basestations
With the new basestations, the provisioning rules are relaxed to allow the maximum number
of basestations to be provisioned for each shelf, without the requirements.
Basestation combinations for handsets on a DMC8
Low traffic for a 0.1 Erlang capacity
Table 6: Number of handsets for a 0.1 Erlang capacity on page 44 shows the 6-channel and
12-channel basestation combinations required to support a maximum number of handsets on
a DMC card. The calculations are based on each handset generating 0.1 Erlangs of traffic.
Table 6: Number of handsets for a 0.1 Erlang capacity
Number of 6channel base
stations
44
Number of 12-channel basestations
0
1
2
3
4
DMC DECT Fundamentals
5
6
7
8
August 2012
Comments? [email protected]
Basestation combinations for handsets on a DMC8
0
0
58
117
176
176
220
220
220
1
19
77
136
195
220
220
220
220
2
38
97
155
214
220
220
220
3
57
116
174
220
220
220
4
76
135
194
220
220
5
95
154
213
220
6
114
173
220
7
133
192
8
152
220
Medium traffic for a 0.15 Erlang capacity
Table 7: Number of handsets for a 0.15 Erlang capacity on page 45 shows the 6-channel
and 12-channel basestation combinations required to support a maximum number of handsets
on a DMC card. The calculations are based on each handset generating 0.15 Erlangs of
traffic.
Table 7: Number of handsets for a 0.15 Erlang capacity
Number of 12-channel basestations
Number of 6channel base
stations
DMC DECT Fundamentals
0
1
2
3
4
5
6
7
8
0
0
0
39
78
117
146
146
146
146
1
12
51
91
130
146
146
146
146
2
25
64
103
143
146
146
146
3
38
77
116
146
146
146
4
50
90
129
146
146
5
30
102
146
146
6
76
115
7
89
128
8
101
August 2012
45
Engineering guidelines
High traffic for a 0.2 Erlang capacity
Table 8: Number of handsets for a 0.2 Erlang capacity on page 46 shows the 6-channel and
12-channel basestation combinations required to support a maximum number of handsets on
a DMC card. The calculations are based on each handset generating 0.2 Erlangs of traffic.
Table 8: Number of handsets for a 0.2 Erlang capacity
Number of 12-channel basestations
Number of 6channel base
stations
0
1
2
3
4
5
6
7
8
0
0
0
29
58
88
110
110
110
110
1
9
38
68
97
110
110
110
110
2
19
48
77
107
110
110
110
3
28
58
87
110
110
110
4
38
67
97
110
110
5
47
77
106
110
6
57
86
110
7
66
96
8
76
Superloop and IPE shelf calculations
Table 9: Handset capacity/DMC8 for Superloop/IPE on page 46 shows the maximum number
of handset users on a DMC8 card for varying traffic levels.
Table 9: Handset capacity/DMC8 for Superloop/IPE
Superloops per IPE
shelf
Low traffic 0.1
Erlang
Medium traffic 0.15
Erlang
High traffic 0.2
Erlang
2
138 handsets/DMC
92 handsets/DMC
69 handsets/DMC
1
69 handsets/DMC
46 handsets/DMC
34 handsets/DMC
0.5
34 handsets/DMC
23 handsets/DMC
17 handsets/DMC
Cabinet system
220 handsets/DMC
146 handsets/DMC
110 handsets/DMC
Note:
Superloops do not apply to Chassis systems or CS 1000E systems.
46
DMC DECT Fundamentals
August 2012
Comments? [email protected]
Basestation combinations for handsets on a DMC8
Simplified guidelines
Use Table 9: Handset capacity/DMC8 for Superloop/IPE on page 46 to calculate the superloop
capacity.
Low traffic example of one superloop on each IPE shelf
• Sixty-nine (69) handsets per DMC8 card x 16 DMC8 cards per shelf = 1104 (1000)
Medium traffic example of one superloop on each IPE shelf
• Forty-six (46) handsets per DMC8 card x 16 DMC8 cards per shelf = 736 (750)
High traffic example of one superloop on each IPE shelf
• Thirty-four (34) handsets per DMC8 card x 16 DMC8 cards per shelf = 544 (500)
DMC DECT Fundamentals
August 2012
47
Engineering guidelines
48
DMC DECT Fundamentals
August 2012
Comments? [email protected]
Chapter 4: Site planning
Contents
This section contains information on the following topics:
Overview on page 49
Site survey on page 50
Deployment on page 58
Deployment tool on page 76
How to use the deployment tool on page 86
DECT Deployment Kit 2 on page 87
Deploying DECT on page 91
Correcting problems with audio quality on page 94
Deploying an external basestation on page 95
Single and multiple floor deployment on page 96
Cell re-engineering for high traffic areas on page 106
Cell division requirements in special cases on page 114
High handset density deployment on page 117
Deployment review on page 119
Overview
Site planning starts with a site survey and ends with deployment. The site survey process is
an information gathering process. The information received in the site survey determines
customer requirements and the number of cells required to support traffic.
Deployment is the process of locating basestations at the site. The module titled Installing the
basestation on page 128 contains general information about the deployment process. This
DMC DECT Fundamentals
August 2012
49
Site planning
module includes information about a key piece of deployment equipment, the DECT Radio
Deployment Tool. The section titled Preparing the tool for deployment on page 78 explains
how to prepare equipment for deployment.
Other modules describe in detail the procedures related to deployment. These procedures vary
according to site details and user requirements.
Site survey
The site survey begins by researching the customer requirements. The research identifies a
variety of information such as contact names, the number of handset users, and building
details.
Customer requirements
The customer must provide:
1. a site contact name and telephone number;
2. site plans;
3. building details;
4. information on available house cabling;
5. radio coverage requirements; and,
6. number of users.
On-site contact
The on-site contact provides:
1. time and date scheduling;
2. access to restricted or locked areas; and,
3. additional information when required.
Site plans
A complete set of site plans are required. Dimensions must be clearly stated on the plans.
50
DMC DECT Fundamentals
August 2012
Comments? [email protected]
Site survey
Building details
System deployment and installation depends upon the following building details.
• Building identification
• Construction materials, such as walls, floors, ceilings
• Type of use, such as an office, hotel, factory, or store
• Dimensions
• Number of floors
• Height of floors
• Partitioning of floors
Position and use of available cabling
Cables that connect the basestation to the DECT system must meet or exceed the UTP Cat
3 standard. Avaya recommends UTP Cat 5, as it provides a greater line length before signal
degradation occurs. New cabling is required if the existing cabling does not meet the
standard.
Radio coverage
A basestation coverage list is required to indicate:
a
areas where radio coverage is required;
b
areas excluded from radio coverage due to the proximity of sensitive electronic
equipment;
c
areas where radio coverage is not required;
d
areas where radio coverage is not feasible or requires specific basestations;
e
objects inside buildings; and,
f
details of furniture, cupboards, and machinery on every floor of the building
Basestation installations can be required to be out of sight. A customer can request
basestations to be mounted in unsuitable locations, such as stone columns, air ducts or
horizontally on the ceiling. Radio coverage cannot be guaranteed when basestations are
mounted in unsuitable locations.
DMC DECT Fundamentals
August 2012
51
Site planning
Know in advance where coverage is required. Some examples of coverage areas are:
• elevators
• stairwells
• toilets
• outdoor areas
Number of handset users
The following information must be available.
1. The number of handset users
2. The potential growth of handset users
3. The areas of above average and below average traffic density Number of cells
required to support traffic
Traffic requirements are determined for each cell. The deployer calculates system
requirements to support user traffic.
Customer review
After the site survey and before the deployment process, the person deploying the site must
review coverage requirements with the customer representative. The person deploying the site
must explain to the customer representative how the survey is conducted. The customer
representative must tell fellow employees that a person deploying the site is taking
measurements in their work place.
Site survey example
The site survey process is an information gathering process. The information received in the
site survey determines customer requirements and the number of cells required to support
traffic.
A normal site survey
The site survey process includes gathering:
1. Survey materials
2. Site contact information
3. Site plans or maps
52
DMC DECT Fundamentals
August 2012
Comments? [email protected]
Site survey
4. Building information
5. Existing cable information
6. Basestation radio coverage information
7. Handset user information
8. Reviewing the work
Methods and examples for surveying more detailed sites are shown in the Detailed Site
Planning section of this guide. Use one or more of the following surveying methods in the site
survey:
• Single floor
• Subsequent system installation
• High handset density area
• Multiple systems installation
Site planning example: Able-Studio
This section describes a site survey for Able-Studio, a fictitious company. Follow this example
to conduct the site survey.
The facts for Able-Studio
• The contact is Rolf Sundby at 555-0000. A guest lab coat is necessary to be on the site.
Get this lab coat from Rolf.
• The sales representative has recommended DECT.
• The location of the user offices (and their wired telephones) often changes within the
coverage area.
• Not all users have offices and desk telephones. Some users only have handsets.
• The customer does not need coverage in the toilet facility.
• The telephone switch room is next to the toilet facility.
• The customer has no installation restrictions.
The site survey process for Able-Studio
The technician must gather the following information to conduct a site survey:
1. Gather survey items on page 54
2. Identifying site contacts on page 54
DMC DECT Fundamentals
August 2012
53
Site planning
3. Obtaining site plans on page 55
4. Gathering building information on page 55
5. Identifying existing cabling on page 56
6. Profiling handset use on page 57
Gather survey items
Obtain the following items before beginning the site survey. The items are not customer
supplied.
• Pick up the DECT tool kit (consisting of tripod and deployment tool kit).
• Get the appropriate DECT Provisioning Record.
• Gather a pencil, an eraser, a ruler, and coloured pencils.
Identifying site contacts
Gather the following information and enter it into the work-order and the Provisioning records.
The installer requires the following information.
Identifying site contacts
1. Get the company name.
Record this information.
2. Get the company address.
Record this information.
3. Contact name.
Record this information.
4. Obtain the contact telephone number.
Record this information.
5. Obtain scheduling times and date.
Record this information.
6. Access to controlled areas.
Record this information.
7. Obtain any keys or codes needed for secured site areas where radio coverage is
required.
8. Obtain additional contact information, if required.
Record this information.
9. Obtain any required safety equipment, such as a hard hat or safety glasses.
10. Find out if there is an another DECT system within the radio coverage area.
Record this information.
54
DMC DECT Fundamentals
August 2012
Comments? [email protected]
Site survey
Obtaining site plans
Obtain two scaled plans. The scale is required to check wiring distances from the controller to
the basestations. The scale is in the form of a measured line so that it remains in proportion
to the floor plan through reduction copiers.
Figure 21: Example of a site coverage floor plan
Obtaining site plans
Obtain two site plans/maps, with dimensions marked.
One working copy to identify critical points, cell centres, and cell boundaries. One clean
copy to attach to the site Provisioning Record for the installer, customer, or
maintenance.
Gathering building information
Gather the following information and enter it into the work-order.
Gathering building information
1. Obtain building identification.
Record this information.
2. Obtain information on construction materials, such as walls, floors, ceilings.
Record this information.
3. Note the type of use of facilities, such as office, hotel, factory, store.
Record this information.
4. Find the number of floors.
DMC DECT Fundamentals
August 2012
55
Site planning
Record this information. If the building contains atriums, multiple floors, floors not
all the same shape or any unusual conditions, see Multiple floor deployment on
page 102.
5. Find the height of floors.
Record this information.
6. Ask about the partitioning of floors.
Record this information.
7. Discuss the details of furniture, cupboards, and machinery in the interior of buildings
on every floor.
Record this information.
8. Ask about other building details, as necessary.
Record this information.
Identifying existing cabling
Gather the following information and enter it into the work-order.
Identifying existing cabling
1. Obtain the location of the telephone switching room.
Determine the total length of the cable.
2. Ask about the existing cabling for basestation to MDF wiring.
Wiring from the basestation to the shelf or cabinet must be at least UTP Cat 3. Avaya
recommends UTP Cat 5, as it provides greater line length before signal degradation
occurs.
3. Review the possibility of new UTP Cat 5 cabling required.
If the cabling is not at least UTP Cat 3, have UTP Cat 5 installed.
Assessing radio coverage
Note:
If the customer requires the basestations be installed out of sight, this can reduce the
coverage capability of each basestation. It can limit the performance of the system and
substantially increase the cost.
Gather the following information and enter it into the work-order.
Assessing radio coverage
1. Inquire about areas where radio coverage is required.
Record this information.
2. Ask about areas where radio coverage is not required.
Record this information.
56
DMC DECT Fundamentals
August 2012
Comments? [email protected]
Site survey
3. Ask about external or outdoor radio coverage.
Record this information.
4. Discuss areas where radio coverage is not feasible or requires specific
basestations.
Record this information.
5. Discuss areas excluded from radio coverage due to the proximity of sensitive
electronic equipment.
Record this information.
6. Ask about objects inside buildings that can affect radio coverage.
Record this information.
7. Discuss unsuitable basestation locations, such as stone columns, air ducts or
horizontally on the ceiling.
8. Discuss what basestations are to be installed out of sight.
Discuss with the customer. See the preceding note.
9. Inquire about areas of special coverage, such as, elevators, stairwells, toilets.
Profiling handset use
Areas of above average traffic density can have a low number of incumbent users but many
incoming users. These can include areas such as cafeterias, restaurants, canteens, and
meeting room areas where handset users tend to gather.
A further example of above average traffic density is an environment where all occupants of a
given area are provided with handsets. This area requires special planning.
Areas of below average traffic density are areas infrequently accessed by users, such as store
rooms and maintenance areas.
Obtain the following information and enter it into the work-order.
Profiling handset users
1. Document the number of handset users.
Record this information.
2. Get an estimate of the potential growth of handset users.
Record this information.
3. Locate areas of above average and below average traffic density.
Record this information. See the preceding note.
4. Determine which users have a wired telephone in their office.
Record this information.
5. Determine the locations of user offices.
DMC DECT Fundamentals
August 2012
57
Site planning
Record this information.
6. Ask about the mobility of the users. For example, do the users move from cell to
cell, or is the area of movement restricted, such that the users remain within one
cell?
Record this information.
Deployment
A deployment determines the locations of basestations and cells. The deployment process
consists of the following steps.
• Identifying initial critical points on the floor plan on page 58.
• Locating cell centres on page 59.
• Determining cell boundaries on page 61.
• Identifying critical points and cell boundaries on page 62.
• Marking the points, centres, and boundaries on the floor plan on page 63.
Identifying initial critical points on the floor plan
A critical point is a place that can be difficult for the radio signal to reach, such as a corner of
a room, lifts and stairwells. Initial critical points are shown in Figure 22: Critical points on
page 59 as P1, P2, P3, and P4.
Figure 22: Critical points on page 59 shows the following:
• stairwell
• second floor plan
58
DMC DECT Fundamentals
August 2012
Comments? [email protected]
Deployment
Figure 22: Critical points
Locating cell centres
Figure 23: Cell centres on page 60 shows the following:
• stairwell
• second floor plan
A cell centre is located by placing the deployment tool at one critical point, for example P1,
then using the deployment handset to obtain a change in audio quality. The audio quality
change determines the cell boundary contour. This process is repeated at an adjacent critical
point, for example P2. Where the cell boundaries of both critical points meet is the cell centre.
The cell centre position is marked on a floor plan. The cell centre determines the location of a
basestation, shown in Figure 23: Cell centres on page 60, as arc 2C1.
DMC DECT Fundamentals
August 2012
59
Site planning
Figure 23: Cell centres
Rules and guidelines for selecting cell centres
Comply with the following when selecting cell centres.
• Ensure that the installation complies with local electrical codes.
• Install basestations indoors where there is no condensation and the temperature remains
between 0°C and 50°C.
• Install basestations within 1500 metres of the MDF. Wiring from the basestation to the
shelf or cabinet must be at least UTP Cat 3. Avaya recommends UTP Cat 5, as it provides
a greater line length before signal degradation occurs.
• Position basestations upright on walls. Basestations must be at least 30 centimeters from
the ceiling.
• Position basestations at least 1 m from large concrete or stone columns and from any
major building structural members such as support beams or columns.
• Position the basestations high enough to clear obstructions between the basestations
and the cell edge close to the ceiling.
• Mount the basestations clear of obstacles such as pipes or ducts.
• Do not install basestations in spaces that transport air, such as ducts or plenums.
• Do not mount basestations on the ceiling.
60
DMC DECT Fundamentals
August 2012
Comments? [email protected]
Deployment
Determining cell boundaries
A specific RSSI value on the handset defines the cell boundary range. Links can be made
outside the cell boundary but the audio quality of the link is poor. The link drops when the
handset and the basestation are too far apart.
As shown in Figure 24: Cell boundary terminology on page 61, the cell boundary is the
furthest point from the cell centre where a clear radio signal can be heard.
The range from the cell centre to the cell boundary, or the distance to a potential cell centre
from a critical point, is determined by using the cell boundary value and the deployment tool.
Figure 24: Cell boundary terminology
Figure 25: Cell boundaries on page 62 shows the following:
A cell boundary for the cell centre is determined by placing the deployment tool at the cell
centre, for example 2C1, and using the deployment handset to establish the cell boundary.
The cell boundary contour is marked on the floor plan, and shown in Figure 25: Cell
boundaries on page 62 by a dash-dot line.
DMC DECT Fundamentals
August 2012
61
Site planning
Figure 25: Cell boundaries
Identifying critical points and cell boundaries
Figure 26: Additional critical points and cell boundaries on page 63 shows the following:
• stairwell
• second floor plan
Additional critical points, shown in Figure 26: Additional critical points and cell boundaries on
page 63 as P5, P6, P7, and P8, are identified to ensure basestation radio coverage for the
entire area.
62
DMC DECT Fundamentals
August 2012
Comments? [email protected]
Deployment
Figure 26: Additional critical points and cell boundaries
Marking the points, centres, and boundaries on the floor plan
This section describes how to label critical points, cell centres, and cell boundaries on the floor
plan.
Mark the information clearly on the floor plans during the survey. The customer, the sales group,
the installer, and maintenance personnel must read these floor plans.
Use a different colour for each cell. Use the same colour for each cell centre and its
corresponding cell boundaries. Indicate the information on the floor plan as follows:
• critical points – mark the following on the floor plan:
Figure 27: Critical point marker
• cell centres – mark the following on the floor plan:
Figure 28: Cell centres marker
• cell centre - label each as xCn where x is the floor and n is the next sequential cell
centre.
• cell boundaries – mark wide, coloured lines on the floor plan.
DMC DECT Fundamentals
August 2012
63
Site planning
For example, label a cell centre on the second floor as 2C3. The 2 before the C indicates that
the cell centre is on the second floor. The 3 after the C indicates that this cell is the third cell
in sequence in the site planning process.
Table 10: Example cell labels
Floor
64
Cell label
First floor
2C1, 2C2, 2C3
Ground floor
1C1, 1C2, 1C3
Basement level one
–1C1, –1C2, –1C3
Basement level two
–2C1, –2C2, –2C3
DMC DECT Fundamentals
August 2012
Comments? [email protected]
Deployment
Figure 29: Example cell boundaries
Figure 30: Points, centres, and boundaries on the floor plan
Figure 30: Points, centres, and boundaries on the floor plan on page 65 shows a typical floor
plan marked-up after determining subsequent cell boundaries. The completed floor plan would
appear as follows:
• Initial critical points are shown at P1, P2, P3, and P4.
• Cell centres are located where arcs from P1/P2, P3/P4 intersect.
• 2C1 and 2C2 show cell centres or basestation locations.
• Dashed and dotted lines show cell boundaries.
• Additional critical points are shown at P5 P6 P7 P8.
• 2C3 and 2C4 cell centres provide full coverage of the floor.
DMC DECT Fundamentals
August 2012
65
Site planning
Two copies of the floor plan are required. One copy is used during the site planning. The second
copy is marked with the information from the site planning copy and attached to Provisioning
records on page 125 for the installer.
Deployment illustrations
The illustrations in this section represent the deployment process from start to finish.
66
DMC DECT Fundamentals
August 2012
Comments? [email protected]
Deployment
Figure 31: Example of initial critical points
Figure 32: Cell contour of the initial critical point
DMC DECT Fundamentals
August 2012
67
Site planning
Figure 33: Cell contour of the closest adjacent critical point to the initial critical point
Figure 34: Example of a cell centre
68
DMC DECT Fundamentals
August 2012
Comments? [email protected]
Deployment
Figure 35: Example of a cell centre boundary
Figure 36: Example of new critical points (P8 and P9)
DMC DECT Fundamentals
August 2012
69
Site planning
Figure 37: Example of deployment for cell centre 1C2
Figure 38: Example of deployment for cells 1C3 and 1C4
70
DMC DECT Fundamentals
August 2012
Comments? [email protected]
Deployment
Figure 39: Identify new critical points (P11, P12, P13, P14, P15, P16, P17)
Figure 40: Contours formed by critical points P11, P13 and P16
DMC DECT Fundamentals
August 2012
71
Site planning
Figure 41: Cell centre 1C5 formed by critical points P11, P13 and P16
Figure 42: Cell boundary 1C5 formed by critical points P11, P13 and P16
72
DMC DECT Fundamentals
August 2012
Comments? [email protected]
Deployment
Figure 43: Example of critical point cell boundaries
Figure 44: Example of cell centre boundary 1C6
DMC DECT Fundamentals
August 2012
73
Site planning
Figure 45: Example of a floor plan showing complete radio coverage
Deployment terms
Terms associated with deployment are listed in the following table.
Table 11: Deployment terms
Term
Definition
Coverage area
An area where a handset can be used to make and receive
calls.
Cell
The coverage area provided by the basestation antennas.
Cell boundary
The parameter of a cell coverage area.
Critical point
A point or location defined as the extreme corner of a coverage
area that can be difficult for the radio signal to reach.
Cell centre
The installation point of the basestation serving the cell.
Range
The distance from a cell centre to its cell boundary.
Traffic table
Traffic tables record site traffic information from the floor plan
and the customer. The traffic table helps to determine the
required number of basestations for each cell.
The following figure illustrates these terms.
74
DMC DECT Fundamentals
August 2012
Comments? [email protected]
Deployment
Figure 46: Example showing deployment terms
Coverage terms
The terms used in this guide are described in Table 12: Coverage terms on page 75 and
illustrated in Coverage terms.
Table 12: Coverage terms
Term
Definition
Estimated number of
handsets
The average number of handsets expected in a particular cell.
Cell
The coverage area provided by a basestation.
Cell boundary
The edge of a cell showing the cell coverage area.
Cell centre
The place where all the basestations are installed.
DECT Radio
Deployment Tool
The tool used to determine the radio range of a basestation.
Critical point
A point or location defined as an outer corner of a coverage area,
or points that can be difficult for the radio signal to reach.
Coverage area
The area defined by the customer in which a handset user can
expect to be able to make and receive calls.
Link
When a handset and a basestation are in radio communication
with each other.
Range
The distance from a cell centre to the cell boundary.
Office
The location where a handset user spends the majority of their
day.
DMC DECT Fundamentals
August 2012
75
Site planning
Term
Traffic table
Definition
Traffic tables record site traffic information from the floor plan and
the customer. The traffic table helps to determine the required
number of basestations for each cell.
Figure 47: Coverage terms
Deployment tool
The DECT Deployment Tool (deployment tool) determines cell centres and cell boundaries.
See Figure 56: Deployment Kit 2 and carrying case on page 88 and Figure 57: Assembled
Deployment Kit 2 and DeTeWe handsets on page 90.
76
DMC DECT Fundamentals
August 2012
Comments? [email protected]
Deployment tool
Figure 48: Deployment tool carrying case and packing details
DMC DECT Fundamentals
August 2012
77
Site planning
Figure 49: Assembled deployment tool
Preparing the tool for deployment
Preparing the tool for deployment involves:
1. Charging the deployment tool battery on page 79
2. Charging the deployment handset battery on page 80
3. Assembling the deployment tool on page 81
4. Testing the deployment handset on page 84
78
DMC DECT Fundamentals
August 2012
Comments? [email protected]
Deployment tool
Charging the deployment tool battery
Charge the deployment tool battery for at least six hours before using.
Caution:
Equipment Damage
Use the Avaya battery charger. This charger is a separately ordered item. Failure to use an
automatic shut-off battery charger can damage the battery.
Do not use the battery supplied with the CT2 deployment tool. The CT2 and DECT batteries
are not interchangeable.
Figure 50: Deployment tool battery charger
Table 13: Deployment tool battery charger key
a
battery charger (must be ordered separately)
b
battery charger cable
Charging the deployment tool battery
1. Set up the deployment tool battery charging equipment.
Remove the deployment tool battery, charger, and charger cord from the yellow
case.
2. Charge the deployment tool battery.
Connect the charger cord plug into the battery. Connect the red alligator clip to the
positive lead of the charger, and the black clip to the negative lead of the charger.
Connect the battery charger to the AC mains.
3. Remove the deployment tool battery from the charger after it is charged.
The battery must charge for at least six hours.
DMC DECT Fundamentals
August 2012
79
Site planning
Charging the deployment handset battery
Figure 51: Deployment handset battery charger
Charging time
Charge the deployment handset battery for at least 12 hours before using the first time. Charge
the handset at least six hours before any subsequent use.
Charging the deployment handset battery
1. Set up the deployment handset battery charging equipment.
Remove the deployment handset battery, charger and charger cord from the yellow
case.
2. Charge the deployment tool battery.
Connect the charger cord to the charging stand. Connect the charger cord to the
AC mains. Place the handset into the charging stand. The red LED flashes while
the handset is charging.
3. Remove the handset from the charger when it is ready for use.
80
DMC DECT Fundamentals
August 2012
Comments? [email protected]
Deployment tool
Assembling the deployment tool
Figure 52: Deployment tool extension details
Table 14: Key for Assembling the deployment tool
a
adjustable tripod
b
extender arm connector
c
extender arm swivel
d
detente stop
e
detente
f
extension thumb screw
g
telescopic extension
h
Allen key
i
basestation attaching thumb screw
j
basestation
Note:
The deployment tool battery and the deployment handset battery must be charged for at
least six hours before use.
DMC DECT Fundamentals
August 2012
81
Site planning
Figure 53: Deployment tool battery details
Table 15: Deployment tool battery details key
a
battery mount
b
Allen screws
c
thumb screw
d
battery pack
e
guides
f
thumb screw nut
g
power cord
h
power cord receptacle
i
tripod
Assembling the deployment tool
1. Set up the tripod.
Remove the tripod from its carrying case and set upright. Lock the casters.
2. If required, install the extension arm fitting on the tripod. If not required, go to step
4.
Place the extension arm fitting, shown in Figure 56: Deployment Kit 2 and carrying
case on page 88, onto the brass fitting on the top of the tripod.
82
DMC DECT Fundamentals
August 2012
Comments? [email protected]
Deployment tool
3. If required, secure the extension arm fitting.
Use the Allen key attached to the extender arm to secure the extension arm fitting
Allen screw.
4. Mount the extension arm on the tripod.
Place the brass end of the extension arm into the fitting, so that the keying hole of
the extension arm mates with the retaining thump screw locking device of the tripod
fitting. The thumb screw locking device clicks into the keying hole of the extension
arm.
5. Position the extension arm.
Orient the arm into the proper position. Secure the tripod fitting and the extension
arm thumb screw.
6. Affix the basestation to the extension arm.
Remove the basestation from the yellow case. Mount the basestation onto the end
of the arm. Screw the brass thumb screw on the arm into the bottom of the
basestation and secure it in place with the grey lock thumb screw.
7. Position the antenna.
Rotate the antenna from its stowed position, against the body of the basestation, to
its upright operating position.
8. Position the basestation. The normal position is with the antenna pointing
upwards.
Secure the basestation with the arm thumb screw.
9. Mount the battery fixture on the tripod.
Remove the battery bracket, shown in Figure 53: Deployment tool battery details on
page 82, from the yellow case. Screw the battery bracket onto the tripod caster
brace, with the two machine screws.
10. Mount the battery.
Pull the release pin on the bracket back and slide the battery grooves on to the
bracket. Ensure the bracket pin locks into the battery.
11. Connect the basestation to the battery.
Plug the basestation power cord connector into the upper right edge of the
battery.
DMC DECT Fundamentals
August 2012
83
Site planning
Testing the deployment handset
Figure 54: Handset display and keypad details
Testing the deployment tool handset
1. Start the test and establish a link with the basestation.
Remove the handset from its charger.
2. Turn on the handset.
Press the shift key and press the ON/OFF button. The handset displays DECT
HANDSET.
3. Select system mode.
Press the shift key and press the local key. The handset displays SYSTEM.
4. Select the monitor mode.
Press the star key. The handset displays MONITOR MODE.
5. Select the monitor mode code.
84
DMC DECT Fundamentals
August 2012
Comments? [email protected]
Deployment tool
Press the lock button. The handset displays CODE.
6. Enter the monitor mode code.
On the dial pad, enter 2530. Press the lock button.
7. Interpret the handset RSSI display and test tone.
Follow the explanation in How the deployment tool works on page 85 and How to
use the deployment tool on page 86.
How the deployment tool works
The deployment tool basestation and the deployment handset establish a radio link when:
• the handset is in the deployment mode; and,
• the handset and basestation are within range of one another.
The closer the handset is to the basestation the stronger the link. As the handset moves away
from the basestation, a point is reached where the signal is no longer reliable for telephone
conversations.
When a link is established, the handset emits a continuous 1.4kHz tone and displays a Radio
Signal Strength Indication (RSSI).
Figure 55: Deployment handset link display
The display, shown in Figure 55: Deployment handset link display on page 85, means as
follows:
• A circle and dot indicates a locked signal.
• The antenna symbol indicates a link establishment.
• The number 10 indicates an RSSI value.
• The dash, equal sign and shaded box icons indicate signal strength.
The maximum RSSI is 10. As signal strength diminishes, the number 10 decreases and the
icons disappear. For example, at signal strength 7, the three shaded boxes that are on the
right side of the display disappear. At signal strength 5, all the shaded boxes and one of the
equal sign icons disappear.
DMC DECT Fundamentals
August 2012
85
Site planning
The signal strength diminishes as the distance between the handset and the basestation
increases. The tone remains unchanged until the handset is out of range of the basestation.
How to use the deployment tool
The deployment tool is assembled as shown in Figure 49: Assembled deployment tool on
page 78, with the extension arm parallel to the floor. Position the basestation antenna upwards.
Place the basestation as close to the wall as possible and at the height recommended for
basestations.
To test the deployment tool, stand in an open area approximately three to five metres away
from the deployment tool on its tripod. Establish a link between the basestation and the
handset. Keep the deployment tool basestation in plain view. Ensure there are no obstructions
(including people).
Walk away from the basestation and observe the deployment handset link display. As the
deployment handset moves away from the basestation, the RSSI value changes. When the
RSSI value changes from 7 to 6 and the last shaded block disappears, the cell boundary has
been reached.
When the cell boundary is reached, stop and listen to the tone. Ensure the tone is clear with
no tone changes, tone breakup, modulation, mutes or clicks.
Do not select a cell edge that has an RSSI reading of less than 6. However, keep the following
in mind.
• There can be environments that cause poor tone at a RSSI meter reading of between 7
and 10. In this case, contact Avaya support team for assistance.
• The tone stops when the radio link is lost.
Interpreting handset tones
The handset tones indicate how close the handset is to the deployment tool basestation.
• Steady tone – the handset is within the cell boundary, or at the cell boundary edge.
• Tone change, tone break-up, modulation, mute or click – the handset is beyond cell
boundary edge.
86
DMC DECT Fundamentals
August 2012
Comments? [email protected]
DECT Deployment Kit 2
Rules for outdoor deployment
1. Cover outdoor areas before covering indoor areas. Use the deployment tool to
determine outdoor cell centres.
2. Use the deployment handset to determine the outdoor coverage provided by a
basestation located indoors.
3. External housings for outdoor basestations must be mounted directly on walls or
similar vertical surfaces.
4. When using the deployment tool outdoors, ensure that the deployment tool does
not fall over or come in contact with electrical wires and cables.
5. If an outdoor critical point cannot be reached, inform the customer.
6. Do not use the deployment tool on windy days.
7. Do not use the deployment tool in bad weather.
8. Keep all personnel away from the apparatus.
9. Follow all safety requirements.
10. Use batteries to power the deployment tool.
11. Charge the batteries indoors.
DECT Deployment Kit 2
The DECT Deployment Kit 2 is shown in Figure 56: Deployment Kit 2 and carrying case on
page 88. Refer to the DeTeWe User Manual that accompanies each kit for additional
information.
DMC DECT Fundamentals
August 2012
87
Site planning
Figure 56: Deployment Kit 2 and carrying case
The following information can be used in conjunction with the DeTeWe User Manual that
accompanies the deployment tool.
1. The two DeTeWe handsets with the kit are subscribed to the basestation and are
numbered 13 and 15. Refer to Figure 57: Assembled Deployment Kit 2 and DeTeWe
handsets on page 90 to view the assembled basestation and the DeTeWe
handsets.
2. The key on the handset is the Off-Hook key.
3. To enter Site Survey Mode on the handset:
• Press Menu
• Scroll to System
• Dial ***76#
• Scroll to Site Survey
• Press OK
4. The FE value for the PP is the number of detected Sync/ACRC errors within the last
100 receiving frames (i.e., 1 sec.). For proper deployment, the FE value must not
exceed 5.
88
DMC DECT Fundamentals
August 2012
Comments? [email protected]
DECT Deployment Kit 2
5. The FE value is for the FP is the number of received Q1/Q2 bit information within
the last 100 receiving frames (i.e., 1 sec.). For proper deployment, the FE value
must not exceed 5.
6. An RSSI value of -70dBm is used to indicate the cell boundary.
7. Use the following procedure to subscribe a handset that has de-subscribed in error:
a. Long-press the button on the basestation to open the DECT system.
b. On the handset, navigate to Menu > System > Subscription > New.
c. Enter the PARK number provided at the bottom of the basestation.
d. Enter the authorization code (the last 4 digits of the serial number located
at the bottom of the basestation).
The handset subscribes with the basestation.
DMC DECT Fundamentals
August 2012
89
Site planning
Figure 57: Assembled Deployment Kit 2 and DeTeWe handsets
90
DMC DECT Fundamentals
August 2012
Comments? [email protected]
Deploying DECT
Figure 58: Deployment Kit 2 basestation
Deploying DECT
To deploy a DECT system follow Deploying a DECT system on page 91.
Deploying a DECT system
1. Identify and mark initial critical points.
Mark critical initial points on the floor plan with the symbol:
Figure 31: Example of initial critical points on page 67 shows the initial critical points:
P1, P2, P3, P5, P6 and P7.
2. Demarcate the cell contour for the critical point farthest from the centre of the full
coverage area.
To demarcate a cell contour:
a. Set up the deployment tool basestation. Raise the deployment tool
basestation as high as possible, or until it is at the height recommended
for basestations.
b. Establish a link. See Deployment tool on page 76 for details.
c. Measure the range into the coverage area in a few directions to
determine where a cell centre can be located and still be within range of
DMC DECT Fundamentals
August 2012
91
Site planning
the critical point. Listen to the deployment tool handset while moving
away from the basestation. When the RSSI value changes from 7 to 6,
the cell boundary has been detected.
d. Mark the cell boundary on the floor plan with a small x.
e. Repeat step c and step d until there are enough Xs to draw a thin contour
arc through the Xs.
In Figure 32: Cell contour of the initial critical point on page 67, P1 is the initial critical
point.
3. Demarcate the cell contour of the closest adjacent critical point to the first critical
point.
See step 2 on page 91 for details. In Figure 33: Cell contour of the closest adjacent
critical point to the initial critical point on page 68, P2 is the closest adjacent critical
point to the first critical point.
4. Use the cell contours to locate a cell centre.
Locate the cell centre where the cell contours meet. Choose a position on the floor
plan that:
• is furthest from the critical points,
• still provides good audio quality at the critical point,
• complies with the Rules and guidelines for selecting cell centres on page 60,
and
• is in the coverage area.
With a pencil, label the cell centre on the floor plan with the symbol: xCn, where x
= the floor and n = is the cell number in sequence of the entire plan.
In Figure 34: Example of a cell centre on page 68, IC1 is a cell centre.
5. Demarcate a cell boundary.
To demarcate a cell boundary:
a. Set up the deployment tool basestation at the cell centre.
b. Establish a link.
c. Refer to the floor plan and check audio quality in user offices within the
cell. If a user office is in a zone where audio quality deteriorates, relocate
the cell centre closer to the critical point or the office.
d. Walk into all of the areas (rooms) necessary to demarcate the complete
cell boundary. Radio signals travel further in uncluttered areas than in
cluttered areas. Record the cell boundary.
e. Find the cell boundary by measuring the range and marking it on the floor
plan with a small x. Repeat steps 5.c on page 92 and step 5.d on page 92
until there are enough Xs so that a contour arc can be drawn around the
cell centre.
92
DMC DECT Fundamentals
August 2012
Comments? [email protected]
Deploying DECT
See Figure 35: Example of a cell centre boundary on page 69 for an example of a
cell boundary.
6. Mark and label the cell boundary on the floor plan
Follow these steps:
a. Mark each office within the cell that is isolated from the office area.
b. Label any subsequent critical point on the floor plan the following symbol:
c. Mark the cell contour on the floor plan. Trace a contour line through the
Xs with a marker.
d. Trace the cell boundaries and cell centres with coloured markers.
7. Identify new critical points.
Follow these steps:
a. Identify one new critical point slightly inside of where the cell boundary
meets the outside wall. In Figure 36: Example of new critical points (P8
and P9) on page 69, this new critical point is P9.
b. Identify another new critical point which is adjacent to the first new critical
point. Locate this critical point on the opposite side of the cell boundary
area. In Figure 36: Example of new critical points (P8 and P9) on
page 69, the cell boundary area is IC1 and the new critical point is P8.
8. Mark and label these new critical points on the floor plan with the symbol:
See step 6 on page 93 for details.
9. Using the critical points from step 7 on page 93, demarcate new cell contours, a
new cell centre and a new cell boundary.
See step 2 on page 91 to step 5 on page 92 starting on step 2 on page 91 for
details.
Note:
Cell contour arcs must pass near the cell boundary of adjacent cells. For an
example of this, see Figure 37: Example of deployment for cell centre 1C2 on
page 70.
10. Demarcate additional cell contours, centres and boundaries at the other end of the
building.
Repeat step 1 on page 91 to step 8 on page 93 as necessary to demarcate new
cell boundaries at the other end of the building. In Figure 38: Example of deployment
for cells 1C3 and 1C4 on page 70, new cells are formed around cell centres IC3
and IC4.
11. Identify new critical points:
DMC DECT Fundamentals
August 2012
93
Site planning
These critical points must be:
• adjacent to a critical point and on the opposite side of the cell boundary area.
(critical point = P11 in Figure 39: Identify new critical points (P11, P12, P13,
P14, P15, P16, P17) on page 71, where cell boundary area = IC2),
• just inside of where the cell boundary meets the outside wall (P12, P13, P14
and P15 in Figure 39: Identify new critical points (P11, P12, P13, P14, P15,
P16, P17) on page 71), and
• where cell boundaries meet (P16 and P17 in Figure 39: Identify new critical
points (P11, P12, P13, P14, P15, P16, P17) on page 71).
12. Demarcate additional cell boundaries to cover all areas of the building.
Repeat step 1 on page 91 to step 8 on page 93 as necessary to demarcate new
cell boundaries in the middle of the building.
Refer to Figure 40: Contours formed by critical points P11, P13 and P16 on
page 71, Figure 41: Cell centre 1C5 formed by critical points P11, P13 and P16 on
page 72, and Figure 42: Cell boundary 1C5 formed by critical points P11, P13 and
P16 on page 72. Critical points P11, P13 and P16 form:
• contours in Figure 40: Contours formed by critical points P11, P13 and P16 on
page 71
• the cell centre 1C5 in Figure 41: Cell centre 1C5 formed by critical points P11,
P13 and P16 on page 72
• a new cell boundary in Figure 42: Cell boundary 1C5 formed by critical points
P11, P13 and P16 on page 72
Refer to Figure 43: Example of critical point cell boundaries on page 73 and Figure
44: Example of cell centre boundary 1C6 on page 73. Critical points P11, P12 and
P17 form:
• contours in Figure 43: Example of critical point cell boundaries on page 73
• a new boundary based on cell centre 1C6 in Figure 44: Example of cell centre
boundary 1C6 on page 73
Figure 40: Contours formed by critical points P11, P13 and P16 on page 71 shows
a floor plan with complete radio coverage. The floor plan is made complete by cell
boundary 1C7.
Correcting problems with audio quality
If a user office is near the critical point and the audio quality deteriorates within the user office,
then the deployment tool and the cell centre are not properly located.
94
DMC DECT Fundamentals
August 2012
Comments? [email protected]
Deploying an external basestation
Correcting problems with audio quality
1. Move the cell centre closer to the office or work area in question.
2. Repeat the coverage test in that area and ensure that coverage is sufficient.
This can impact the coverage at other points, and you must ensure that all critical
points are still properly covered by the new location.
3. Go into every location where users make and receive calls.
This includes washrooms, coffee areas, and meeting rooms. Do not speculate
where users can make calls.
Deploying an external basestation
To deploy an external basestation follow Deploying an external basestation on page 95 to
deploy an external basestation.
Deploying an external basestation
1. On the site plan, note each of the critical points that are to be reached.
2. Position the deployment tool at the potential location for a cell centre that is closest
to the critical point.
3. Check for outdoor coverage to the critical point with the deployment handset.
4. If the critical point is reached, your cell centre is at the position of the deployment
tool. Determine the cell boundary. If you cannot reach the critical point, determine
and record the cell boundary that you did reach on the site plan.
5. For each critical point, determine the potential location of external basestations. The
location must be:
a. outdoors,
b. as close as possible to the critical point that you need to reach, and
c. more than 4 m above the highest ground to be covered.
DMC DECT Fundamentals
August 2012
95
Site planning
Figure 59: Elevation of external basestation and terrain
Key
a
External housing positioned at least 4 m from the ground.
b
Clear line of sight to the external housing at the cell boundary.
c
The range does not encompass any structures or earth mounds more than
2 m tall and more than 2 m wide.
6. If the critical point cannot be reached, inform the customer to determine if planning
must continue.
7. Repeat this procedure until all of the outdoor areas have been completely
covered.
Single and multiple floor deployment
Whether the deployment situation involves a single floor or multiple floors, the deployment
process uses basic rules:
96
DMC DECT Fundamentals
August 2012
Comments? [email protected]
Single and multiple floor deployment
1. Deploy the external or outdoor areas first.
2. Deploy from one side of the coverage area, then deploy the opposite side of the
coverage area.
3. Finish by deploying the middle of the coverage area.
Follow these rules to prevent cell centres from clustering at one end of the site.
Check the floor plan to be sure that there are no areas where a handset in the required
coverage area can be outside the range of a cell centre.
Defining a cell typically takes 25 to 40 minutes.
Single-floor deployment
Deploying a single floor coverage area involves methods that apply to all other applications of
coverage. For multi-floor deployment, see Multiple floor deployment on page 102.
Use one or all of the following methods of deploying cells.
When determining a cell centre, one or all of the following methods of deploying cells are used:
• Single cell deployment on page 97 – covers the distance between two outside corners
at the end of a coverage area with one cell.
• Double cell deployment on page 99 – covers the distance between two outside corners
at the end of a coverage area with two cells.
• Multi cell deployment on page 100 – covers the distance between two outside corners
at the end of a coverage area with more than two cells.
Always begin with the single-cell method, because the range is not always known; therefore,
it is not known how many cells are needed to cover the area between the critical points.
Start at the short" side of the coverage area. First cover the corners, then the side between
those corners, and finally inward to the centre of the coverage area. Repeat the process for
the other end of the coverage area.
By deploying the site using this method, cell centres are distributed throughout the site. If the
site is deployed from one end to the other, cell centres can be clustered at one end of the
site.
Single cell deployment
Always start with the single-cell technique regardless of the width between the two critical
points. using this technique, one cell centre is found that serves two critical points, as shown
in Figure 60: Single cell distance on page 98.
DMC DECT Fundamentals
August 2012
97
Site planning
Figure 60: Single cell distance
Single cell deployment
1. Identify the initial critical points. Mark them on thefloor plan with a . Use different
colour pencils for each critical point.
2. Choose the first critical point at the edge of the coverage area furthest away from
the centre of the coverage area. Place the deployment tool at this critical point.
3. Establish a link. Refer to Deployment tool on page 76 for details.
4. Measure the range into the coverage area in a few directions to determine where a
cell centre can be located, and still remain within range of the critical point. Observe
the deployment tool handset RSSI value while moving away from the basestation.
When the display value changes from 7 to 6, the cell boundary has been
detected.
5. Record the cell boundary by marking a small X on the floor plan where the cell
boundary value was reached. Use a pencil that is the same colour as the critical
point where the deployment tool is located.
6. Repeat step 4 and 5 several times, walking in different directions to determine where
the cell centre can be located and still remain within range of the critical point.
7. Draw a thin contour line through the Xs to mark an arc on the floor plan.
8. Choose the other critical point adjacent to the first critical point and repeat steps 3
to 7.
9. If the contour lines do not cross, or cross close to the edge of the coverage area
between the two critical points, then see Double cell deployment on page 99.
Choose a position on the floor plan for the cell centre that:
a. is furthest from the critical points and still provides good audio quality at
the critical point,
b. complies with the Rules and guidelines for selecting cell centres on
page 60, and
98
DMC DECT Fundamentals
August 2012
Comments? [email protected]
Single and multiple floor deployment
c. is in the coverage area.
10. With a pencil, label the cell centre on the floor planwith xCn. The x is the floor, and
n is the cell number in sequenceof the entire plan.
11. Place the deployment tool at each cell centre to locate the cell boundary.
12. Mark the cell boundary on the floor plan.
13. Repeat this task for the remaining coverage area from the extremes of the coverage
area toward the centre until the entire floor has been covered.
14. If the cell boundary covers any other critical points, ignore these critical points when
proceeding with coverage deployment.
Note:
If it is not possible to place the basestation at the exact crossover points of the
arcs, place the basestation as close as possible to the crossover.
Double cell deployment
Use the double cell technique only if referred here from the single-cell technique. Before
beginning this technique, there must be two critical points that one cell centre cannot serve.
Using the double cell technique, find two locations for cell centres that cover three critical
points, as shown in Figure 61: Double cell distance on page 99.
Figure 61: Double cell distance
Double cell deployment
1. Mark a third critical point mid-way between the two critical points already
identified.
2. Place the deployment tool at this mid-way critical point.
3. Establish a link.
DMC DECT Fundamentals
August 2012
99
Site planning
4. Walk briskly into the coverage area within range of either of the first two critical
points until the cell boundary is reached.
5. Record the cell boundary by marking a small X on the floor plan where the cell
boundary is located.
6. Repeat step 4 and 5 several times, walking in different directions to determine where
the cell centre can be located and still be within range of the critical point.
7. Draw a thin contour line through the Xs to mark an arc on the floor plan.
8. Repeat steps 2 through 5 walking into the coverage area of the other of the first two
critical points.
9. If the contour lines do not cross, or if the amount of overlap between the cells is less
than 1/2 the distance between the cell centre and the cell boundary, then see Multi
cell deployment on page 100.
10. Choose a position on the floor plan for the cell centre that:
a. is furthest from the critical points and still provides good audio quality at
the critical point,
b. complies with the Rules and guidelines for selecting cell centres on
page 60, and
c. is in the coverage area.
11. Mark each cell centre on the floor plan and label them 1C1 and 1C2.
12. Place the deployment tool at each cell centre to find the cell boundary and mark it
on the floor plan.
13. Repeat this technique for the remaining coverage area from the outer extremes of
the coverage area toward the centre until the entire floor has been covered. If the
cell boundary covers any other critical points, ignore these critical points when
proceeding with coverage deploying.
Multi cell deployment
Use the multi cell technique only if referred here from the double cell technique. Before
beginning this technique, there must be two critical points that one cell centre cannot serve.
Using the multi cell technique, two cell centres, each one serving one of the two critical points,
are found, as shown in Figure 62: Multi-cell distance on page 101.
100
DMC DECT Fundamentals
August 2012
Comments? [email protected]
Single and multiple floor deployment
Figure 62: Multi-cell distance
Multi-cell deployment
1. Choose a position on the floor plan for the cell centre that:
a. is furthest from the critical points and still provides good audio quality at
the critical point,
b. complies with the Rules and guidelines for selecting cell centres on
page 60, and
c. is in the coverage area.
2. Place the deployment tool at critical point P1.
3. Establish a link.
4. Walk briskly into the coverage area away from the critical point until the cell
boundary is reached.
5. Mark a small X on the floor plan where the cell boundary is found.
6. Repeat step 4 and 5 several times, walking in different directions from the critical
point to establish an arc. The arc is at the cell boundary and is within range of the
critical point.
7. Draw a thin contour line to mark an arc through the Xs on the floor plan.
8. Repeat steps 4 through 7 walking into the coverage area of critical point P2.
9. Locate the cell centre on the arc along a line from the critical point that is equal
distant from the adjacent walls.
10. Mark each cell centre on the floor plan and label them 1C1 and 1C2.
11. Place the deployment tool at each cell centre.
12. Locate the cell boundary and mark it on the floor plan. (Mark the contours in different
colours for easy differentiation of cell centres.)
13. Define and mark on the plan any subsequent critical points, where each cell
boundary crosses the edge of the coverage area.
DMC DECT Fundamentals
August 2012
101
Site planning
14. If the cell boundary covers any other critical points, ignore these critical points when
proceeding with coverage deploying.
15. Repeat the multi cell technique for the remaining area to be covered, from the
extremes of the coverage area toward the centre, until all of the floor is covered.
Figure 63: Multi cell distance using the single cell technique
16. Use the subsequent critical points to fill in the coverage area between the first two
cells using the Single cell deployment on page 97. An example of this is shown in
Figure 63: Multi cell distance using the single cell technique on page 102.
Multiple floor deployment
This applies to deployment scenarios in the following situations:
• The coverage area is on more than one floor.
• The floors are not adjacent to each other.
Checking for through-the-floor coverage
The first step in covering a multi-floor building is assessing the availability of through-the-floor
coverage. In buildings mainly constructed of wood, through-the-floor coverage can be used.
However, due to the construction of most modern buildings with raised floors, high metal
content, and reinforced concrete, through-the-floor coverage with DECT is limited.
Checking for through-the-floor coverage
1. Place the deployment tool in a middle floor of the site.
2. Go to the floor above the deployment tool and establish a link with the deployment
handset.
Follow the procedure on Testing the deployment tool handset on page 84.
3. Measure the deployment contour as if the basestation was on this floor, instead of
the floor below.
102
DMC DECT Fundamentals
August 2012
Comments? [email protected]
Single and multiple floor deployment
If only a small area is covered (less than 10 metres radius), then there is effectively
no through-the-floor coverage on the floor above an installed basestation.
4. Go to the floor below the deployment tool and repeat the above process.
If the area that can be covered is small, then there is no through-the-floor coverage
below a basestation location.
5. If there is no through-the-floor coverage or coverage is restricted to a small area.
Deploy each floor using critical points, or if the floors are exactly similar, deploy as
multi floors with the same layout.
Assess floor layout
The deployment procedure changes according to the similarities and differences of the
floors.
All floors have the same layout
To begin a multi-floor deployment when all of the floors have the same layout, deploy one floor
and enter the data on the floor plan. Use the data from the deployed floor for other identical
floors.
For example, if floor 2 of an office tower is laid out with cubicle style offices with a perimeter
of enclosed offices, and floor 3 is designed and laid out in the exact same manner, then both
floors can have the exact same installation profile for basestations.
All floors do not have the same layout
If there are any deviations in the floor plan from floor to floor, use the critical point method to
deploy each distinct floor. For more information, see Preparing the tool for deployment on
page 78.
Note:
Do not underestimate the importance of changes in floor layout. Simple changes in a room
from a meeting room to a storage room can have significant impact on the coverage from a
basestation.
Multi-floor coverage situations
The following situations require multi-floor coverage:
1. Atriums on page 104.
2. High rise buildings on page 104.
3. Unusual conditions on page 104.
Use Multi-floor coverage procedure, if instructed to do so, from Gathering building
information on page 55.
DMC DECT Fundamentals
August 2012
103
Site planning
Atriums
Cells in an atrium, as shown in Figure 64: An atrium on page 104, are usually larger than the
cells of the rest of the building. This section gives guidelines on how to plan an atrium. There
are no precise steps to follow when deploying an atrium, however there are points to consider.
Also see Unusual conditions on page 104.
Figure 64: An atrium
Consider the following when deploying an atrium:
• Plan atriums to their full height.
• Plan an atrium as one full size room, not floor by floor.
• Place cell centres within an atrium only when you intend for them to cover the atrium.
• Do not put cell centres in an atrium if you intend for them to serve adjacent areas.
• To serve adjacent areas, put the cell centres into these areas.
• Deploy the atrium first if the atrium is more than a third the size of the building, or more
than one cell in size.
• If cell centres in adjacent dense areas serve one floor of an atrium, check the coverage
of the cell on all of the floors that meet with the atrium.
High rise buildings
Deploy high rises buildings as unusual conditions of multi-floor deployment.
Test through-the-floor coverage first. If there is no through-the-floor coverage, then deploy each
floor. Repeat as many floors as possible where the floor layout is the exact same as any other,
in all other cases deploy floor by floor. A floor with many meeting rooms deploys differently
from a building with cubicle style offices.
Unusual conditions
There are no precise steps to follow when deploying for an unusual condition; however, there
are points to be considered.
To plan an unusual condition, consider the following situations:
104
DMC DECT Fundamentals
August 2012
Comments? [email protected]
Single and multiple floor deployment
1. Cell centres are too close on page 105
2. Cell centres are too far apart on page 105
3. Too many cell centres on page 105
Cell centres are too close
If cell centres are deployed less than 10 metres apart, the handsets can initiate unnecessary
hand over. Unnecessary hand over result in excessive internal messaging and degraded
speech quality.
Cell centres are too far apart
If cell centres are deployed too far apart, the edge of a cell does not overlap the coverage from
another cell.
Cell centres must be located within the edge of other cell centres to provide satisfactory
overlap.
Overlap can be difficult to achieve where coverage is received from the floor above or the floor
below. Internal structures can cause overlap deficiencies.
It is not necessary that the cell centre be on the same floor or an adjacent floor of the area that
it is covering. It is only necessary to be within the cell boundary, as indicated by the deployment
tool.
The installation of basestations in places other than the location shown on the plan can cause
coverage problems; for example, if the basestation is mounted on the opposite side of a wall
from its planned location.
Consider the following when choosing basestation locations:
• Choose locations only where it is possible to mount basestations.
• Install basestations as close as possible to planned locations.
• Follow safety codes or aesthetic considerations.
• Allow sufficient access for installation of basestations.
• Provide clear installation instructions.
• Test the coverage during post-deployment checks.
Too many cell centres
The primary concern with deploying too many cell centres is cost. To deploy the correct number
of cell centres and reduce cost, do the following:
• Check the coverage and traffic volume before adding additional cells.
• Remove a cell served by other cells unless it is required for high handset density.
• Check the coverage area of each cell.
• Verify that there is at least one area that each cell serves that is not served by another
cell.
In the example shown in Figure 65: Locating redundant cells on page 106, cell 1C3 is
redundant unless required for high handset density.
DMC DECT Fundamentals
August 2012
105
Site planning
Figure 65: Locating redundant cells
Cell re-engineering for high traffic areas
To accommodate the demand in high traffic areas, follow the The cell re-engineering
process on page 107.
Traffic volume
The deployment process ensures coverage throughout the service area. It does not, however,
take into account the effect of traffic. In a high traffic area, a shortage of radio channels at the
basestation can cause calls to be blocked.
Two options are available to support the volume of telephone calls in cells that carry heavy
traffic:
• increase the number of cells deployed
• use 12-channel basestations
The calculation of expected telephone traffic includes an allowance for the user population in
a cell, and the roaming user.
About the 12-channel basestation
An optional 12-channel basestation must be used where telephone traffic levels exceed those
that can be carried on the standard 6-channel basestation. The radio performance of the 12channel unit is the same as that of the 6-channel unit so the cell sizes are the same for both
units.
106
DMC DECT Fundamentals
August 2012
Comments? [email protected]
The cell re-engineering process
Do not connect more than two 12-channel basestations to a DMC card. Two 6-channel
basestations can also be attached to a DMC serving two 12-channel units. If loop resistance
exceeds 100 ohms, external power must be used.
The cell re-engineering process
The cell re-engineering process involves:
1. Estimating traffic within a cell on page 107.
2. Separating the coverage area and recording the number of offices on page 108.
3. Creating an estimate table on page 108.
4. Calculating the number of users inside the cell with an office on page 110.
5. Calculating the number of users with an office outside the cell who walk into the
cell on page 109.
6. Calculating the number of users without an office on page 110.
7. Totalling the estimate for users in a cell on page 111.
8. Calculating the data for all remaining cells on page 112.
9. Creating a table to document telephone types in a cell on page 112.
10. Determining cell re-engineering on page 113.
Estimating traffic within a cell
Modify the previous deployment procedure to adjust the estimated number of users. To carry
out this procedure:
• Determine the number of handset users with an office within each cell.
• Determine how many of these users have wired sets.
• Determine how many users without an office are normally in each cell.
Some users have both wired and handset telephones; other users rely on handsets only.
Re-engineered cells for high traffic areas are represented by an adjusted estimate for the two
groups: handset and wireless, and handset only. Use the adjusted estimate to determine
whether the cell sizes, indicated by the earlier deployment procedure, can handle the telephone
traffic.
If the traffic handling capacity of the cells is not adequate, use 12-channel basestations and
subdivide them into smaller cells to ensure the traffic is handled properly in accordance with
these instructions.
DMC DECT Fundamentals
August 2012
107
Site planning
Separating the coverage area and recording the number of offices
Figure 66: Example of dividing the coverage area and recording offices
Separating the coverage area and record the number of offices
1. Divide the floor plan into cell areas.
Mark the cell areas on the floor plan, one area for each cell, splitting cell overlap
areas in half. Shown in Figure 66: Example of dividing the coverage area and
recording offices on page 108 as heavy dotted lines.
2. Count the number of user offices in each cell area.
Record the number of user offices on the floor plan in each cell area.
Creating an estimate table
Use this table later to estimate the number of handset users for each cell.
Table 16: Estimate users in a cell
Estimate for:
1C1
1C2
1C3
1Cn
Users inside the cell with an office
Users with an office outside of a cell
who walk into the cell
108
DMC DECT Fundamentals
August 2012
Comments? [email protected]
The cell re-engineering process
Estimate for:
1C1
1C2
1C3
1Cn
Users without an office
Users in a cell
Creating an estimate table
1. Make an estimate table.
Include as many columns as there are cell centres.
2. Label the rows.
Example shown in Table 16: Estimate users in a cell on page 108.
3. Label each column heading with the cell centre indicator.
Use this table to determine how many times to subdivide each cell to carry the
handset telephone traffic.
Calculating the number of users with an office outside the cell who
walk into the cell
Table 17: Example of the table second row calculation
Estimate for:
1C1
Users inside the cell with
an office
8.4
Users with an office
outside of a cell who walk
into the cell
3.2
1C2
1C3
1C4
1C5
1C6
1C7
Users without an office
Users in a cell
Calculating the number of users with an office outside the cell who walk into the
cell
1. Calculate the estimate for users in the first cell with an office outside of the cell who
walk into the cell.
2. Use the formula:
3. Enter the result in the row, users with an office outside the cell who walk into the
cell.
For the example shown in Figure 66: Example of dividing the coverage area and
recording offices on page 108, there are a total of 75 telephone users in Able-Studio,
DMC DECT Fundamentals
August 2012
109
Site planning
minus the 12 users already in cell 1C1. Therefore, 63 users can walk into cell 1C1.
However, the 63 walk in users only spend 30% of their time outside their offices.
There are seven cells on the floor plan minus cell 1C1. Accordingly, an estimate of
3.2 walk-in users can be in cell 1C1.
Calculating the number of users inside the cell with an office
Table 18: Example of the table first row calculation
Estimate for:
1C1
Users inside the cell with
an office
8.4
1C2
1C3
1C4
1C5
1C6
1C7
Users with an office
outside of a cell who walk
into the cell
Users without an office
Users in a cell
Calculating the number of users inside the cell with an office
1. Calculate the estimate for users in the first cell with an office.
Use the formula: (Users with an office in the cell × 0.7)
2. Enter the result in the row, users inside the cell with an office.
In the example shown in Figure 66: Example of dividing the coverage area and
recording offices on page 108, twelve users in cell 1C1 spend 70% of their time in
their offices. (12 × 0.7 = 8.4)
Note:
Traffic engineering has determined that handset users with an office spend seventy percent
of their time within their home cell.
Calculating the number of users without an office
Table 19: Example of the table third row calculation
110
Estimate for:
1C1
Users inside the cell with
an office
8.4
1C2
1C3
1C4
DMC DECT Fundamentals
1C5
1C6
1C7
August 2012
Comments? [email protected]
The cell re-engineering process
Estimate for:
1C1
Users with an office
outside of a cell who walk
into the cell
3.2
Users without an office
1C2
1C3
1C4
1C5
1C6
1C7
0
Users in a cell
Calculating the number of users without an office
1. Calculate the estimate for users in the first cell without an office.
Use the formula:
2. Enter the result in the row, users without an office".
In the example shown in Figure 66: Example of dividing the coverage area and
recording offices on page 108, there are no users without an office.
Totalling the estimate for users in a cell
Table 20: Example of the table first column total
Estimate for:
1C1
Users inside the cell with
an office
8.4
Users with an office
outside of a cell who walk
into the cell
3.2
Users without an office
Users in a cell
1C2
1C3
1C4
1C5
1C6
1C7
0
11.6
Totalling the estimate for users in a cell
1. Total the estimate for the number of users in the first cell by adding the three rows
in the first column.
2. Enter the result in the bottom row users in a cell.
For the example shown in Figure 66: Example of dividing the coverage area and
recording offices on page 108, the 1C1 handset estimate equals 11.6.
8.4 + 3.2 + 0 = 11.6.
DMC DECT Fundamentals
August 2012
111
Site planning
Calculating the data for all remaining cells
Table 21: Example of a completed estimate table
Estimate for:
1C1
1C2
1C3
1C4
1C5
1C6
1C7
Users inside the cell with
an office
8.4
0.7
21.0
14.7
0.7
4.9
2.1
Users with an office
outside of a cell who walk
into the cell
3.2
3.7
2.3
2.7
3.7
3.4
3.6
0
0
0
0
0
0
0
11.6
4.4
23.3
17.7
4.4
8.3
5.7
Users without an office
Users in a cell
Calculating the data for all remaining cells
1. Repeat the last four tasks to calculate all the remaining user cell estimates.
2. Enter the result in the estimate table.
The information contained in Figure 66: Example of dividing the coverage area and
recording offices on page 108, is shown entered into Table 21: Example of a
completed estimate table on page 112. This table is used to note the results of the
calculations for cells that require re-engineering.
Creating a table to document telephone types in a cell
Use a table like Table 22: Telephone types in a cell on page 112 to record the different
telephone types in each cell.
Table 22: Telephone types in a cell
Telephone type
1C1
1C2
1C3
1Cn
User telephone types
Use the following symbols in each cell to denote the type of telephones in use in the cell:
• H&W refer to a cell in which all the users have both wired and handsets (wireless sets).
• H refers to a cell in which users have only handsets (wireless sets).
• M refers to a mix of H and H&W users
112
DMC DECT Fundamentals
August 2012
Comments? [email protected]
The cell re-engineering process
Creating a table to document telephone types in a cell
1. Make a Telephone types table.
2. Label the row, User telephone types and include as many columns as there are cell
centres.
3. Label each column heading with the cell centre indicator.
The information in this table is used to determine the number of cells that require
re-engineering.
Determining cell re-engineering
Table 23: Example of a completed estimate table
Estimate for:
1C1
1C2
1C3
1C4
1C5
1C6
1C7
Users inside the cell with
an office
8.4
0.7
21.0
14.7
0.7
4.9
2.1
Users with an office
outside of a cell who walk
into the cell
3.2
3.7
2.3
2.7
3.7
3.4
3.6
0
0
0
0
0
0
0
11.6
4.4
23.3
17.7
4.4
8.3
5.7
Users without an office
Users in a cell
Table 24: Example of a completed telephone types table
Telephone type
1C1
1C2
1C3
1C4
1C5
1C6
1C7
User telephone types
H&W
H&W
M
M
H&W
H&W
H&W
Table 25: Cell re-engineering
Estimate for:
Users with both a
handset and a wired
telephone
Users with only a handset
Action
From 0 up to 20
From 0 up to 12
Keep cell size as deployed.
Greater than 20 but no
more than 80
Greater than 12, but no more
than 40
Install a 12-channel
basestation or sub divide the
cella.
Greater than 80
Greater than 40
Sub divide the cella to meet the
above conditions.
DMC DECT Fundamentals
August 2012
113
Site planning
Estimate for:
Users with both a
handset and a wired
telephone
Users with only a handset
Action
a. For details on how to subdivide cells, refer to High handset density deployment on
page 117. Use a 12-channel basestation in areas of high traffic capacity. Cell subdivision
is appropriate when it helps to improve coverage where the loop resistance exceeds 100
ohms or when a DMC cannot support more than two 12-channel units.
Note:
Use Table 25: Cell re-engineering on page 113 only for user types H&W and H. For user
type M see A mix of users with and without wired telephones in a cell on page 115.
Determining cell re-engineering
1. Locate the estimate for users in the first cell.
In the example shown in Table 23: Example of a completed estimate table on
page 113, the handset estimate is 11.6.
2. Determine the telephone types in the first cell.
In the example shown in Table 23: Example of a completed estimate table on
page 113, the telephone type is H&W.
3. Locate the telephone type column in Table 23: Example of a completed estimate
table on page 113.
In the example H&W is the users with both a handset and a wired telephone.
4. Find the handset estimate range in Table 25: Cell re-engineering on page 113.
In the example, 11.6 falls within the From 0 up to 20 category.
5. Determine if a cell requires division or uses a 12-channel basestation.
In the example From 0 up to 20, division is not required.
6. Repeat the above steps to determine the required number of cells that need
subdivision, except for telephone types M. For M see A mix of users with and without
wired telephones in a cell on page 115.
7. Transfer the results into the Provisioning records.
Cell division requirements in special cases
This section describes how to determine cell division in the following special cases where:
1. no office information is available; and,
2. there is a mix of handset users with and without wired telephones.
114
DMC DECT Fundamentals
August 2012
Comments? [email protected]
Cell division requirements in special cases
No office information
If it is not known where any of the users offices are, calculate the estimated number of handsets
for each cell using this formula:
The formula assumes that users are located evenly throughout the cells. However, most users
offices are clustered in specific areas of a building.
The formula has limitations, as cells can vary in size. The method described starting on The
cell re-engineering process on page 107 gives more accurate cell division results.
A mix of users with and without wired telephones in a cell
Use this procedure for mixed handset users. This procedure then enables the telephone traffic
generated by handset users, to be equated to that of handset and wired users. Combine the
two groups for cell size recalculation purposes.
Table 26: Adjustment for users without wired telephones
Estimated number of handsets for users
without wired telephones
Adjusted estimated number of handsets
for each cell
0
0
1
2
2
3
3
5
4
7
5
9
6
11
7
12
8
14
9
16
10
18
11
20
12
22
13
24
14
25
DMC DECT Fundamentals
August 2012
115
Site planning
Estimated number of handsets for users
without wired telephones
Adjusted estimated number of handsets
for each cell
15
27
16
29
17
31
18
34
19
36
20
38
21
40
22
42
23
44
24
46
25
48
26
49
27
50
28
53
29
55
30
57
31
60
32
62
33
64
34
66
35
69
36
71
37
73
38
76
39
78
40
80
Adjusting for users without wired telephones
1. Count the number of user offices that have handsets and wired telephones (H&W),
and record the number.
2. Count the number of user offices that have only wireless handsets, (H).
116
DMC DECT Fundamentals
August 2012
Comments? [email protected]
High handset density deployment
3. Use Table 26: Adjustment for users without wired telephones on page 115 to
determine the equivalent number of H&W users and record this number.
4. Add the numbers received from steps 1 and 3 to determine and adjust the value for
the number of users with wired telephones.
5. Use Table 26: Adjustment for users without wired telephones on page 115 to
determine the criteria shown in the left column to determine if the cell has to be
resized in the same manner described in the section Determine cell reengineering.
High handset density deployment
The high handset density deployment includes limiting the expected number of handsets for
each cell centre.
Note:
Use the high handset density procedure if instructed to do so from Table 25: Cell reengineering on page 113. Do not use more than one basestation for each cell centre.
Limiting the anticipated number of handsets
Limit the anticipated number of handsets for each cell centre to the limits shown in Table 25:
Cell re-engineering on page 113. Only subdivide high handset density areas. If a cell falls into
the category of a high density area, use the procedure on the following page to subdivide the
cell.
Subdividing a cell
To subdivide the area for smaller cells, divide the cell into as many smaller cells as necessary
to provide for the number of users in the area.
DMC DECT Fundamentals
August 2012
117
Site planning
Figure 67: Example of a subdivided cell
In Figure 67: Example of a subdivided cell on page 118, cell 1C1 has 140 handset users and
cell 1C2 has 100 handset users. For example, Table 25: Cell re-engineering on page 113
indicates the following:
• If the handset users in cell 1C1 are all handset only users, one cell can support 39 handset
only users. Therefore, four cells are needed to support 140 users (140÷39 = 3.5 cells).
• If the handset users in cell 1C1 are handset and wired telephone users, and one cell can
support 83 users, then two cells are needed to support 140 handset and wired telephone
users (140÷83 = 1.6 cells)
High handset density deployment
1. Determine the number of handset users in the high handset density cell.
Count the number of users. Include users served by through-the-floor coverage of
this cell.
2. Calculate the cell subdivisions as required.
Divide the number of users by the appropriate value (12 or 20) shown in Table 25:
Cell re-engineering on page 113. Round up the result to the next whole number.
The result equals the number of cells required after subdividing the cell.
3. Divide the cell.
Draw lines from the cell centre to the critical points on the cell boundary. Shown in
Figure 67: Example of a subdivided cell on page 118, the cell 1C1 divides into four
sectors and cell 1C2 divides into three sectors.
4. Relocate new cell centres.
Mark new cell centres within the sectored areas.
5. Check the number of handset users in the new cell areas.
Count the number of user offices within each smaller sector. Ensure there are fewer
user offices within the cell than the traffic limit.
6. Check the locations.
118
DMC DECT Fundamentals
August 2012
Comments? [email protected]
Deployment review
Take the deployment tool to the locations that have been calculated on the floor
plan. Ensure that there is a location that meets the guidelines on Rules and
guidelines for selecting cell centres on page 60.
7. Check the new cells for complete coverage.
Use the deployment handset to check coverage.
8. Repeat the anticipated handsets for each cell calculation to ensure that each smaller
cell provides appropriate traffic coverage to the users in the area.
Deployment review
Review the plan to ensure that the sales group can use it. The plan must be complete for the
installer, legible for maintenance purposes, and acceptable to the customer.
Completing a floor plan
Completing a floor plan
1. Record the name and telephone number of the planner on the floor plans.
2. Record the name of the customer company on the floor plans.
3. Record the site contact name and telephone number on the floor plans.
4. Record any installation restrictions.
5. Record the details of the installation of an identified cell on the floor plans, recording
any 12-channel basestations.
6. Record the positions of user offices on the floor plans.
DMC DECT Fundamentals
August 2012
119
Site planning
Figure 68: Example of a completed floor plan
Checking system capacity
Checking system capacity
1. Check that the system does not exceed the DECT system capacity: that is, no more
than 512 handsets or 128 basestations for the system with no more than sixty-four
12-channel basestations.
2. Check that there is no cell limit for a DECT system. The limit is the total count of the
basestations.
3. Check that the limits on basestations and handsets are independent of each other.
Increasing the handset count does not decrease the number of basestations
available to install.
4. If more than 128 basestations are deployed, it is necessary to replan the site with
multiple systems. See the Detailed Site Planning section.
5. Ensure that the location of the controller is not more than 1500 m (wiring length for
Category 5 UTP) from all 6-channel basestations or 1000 m from 12-channel
basestations (unless external power is used). If the location is farther than the
allowed distance, the customer must examine other installation and equipment
configurations with the sales representative and Avaya support personnel.
120
DMC DECT Fundamentals
August 2012
Comments? [email protected]
Deployment review
Review with the customer
When the planning is finished, show the customer:
1. the final positions of the basestations with a walk-about; and,
2. the areas, if any, where the coverage requirements cannot be met.
Record floor plan information
Provide the planning information to the installer or the sales group. It is important that this
information be communicated in a clear and accurate way.
Neatly transfer the information from the working copy to the clean copy of the floor plan. Use
the coloured markers to mark the cell boundaries and matching cell centres.
Record or attach the following information to the floor plans.
1. All areas needing coverage.
2. The location of the controller.
3. The total number of all basestations.
4. All the named cell centres (for example, 2C5) and their matching cell boundaries.
5. All the critical points that were used.
6. Any installation restrictions.
7. Any notes detailing the installation at a identified cell, recording any 12-channel
basestations.
8. The location of any basestation servicing outdoor areas, and the current restrictions
on the placing of those basestations.
9. Attach a completed traffic table with the floor plans.
Record provisioning record information
Record the following information on the applicable provisioning record.
1. The date prepared
2. The Customer information
3. The Deployer information (name)
4. The cell numbers
5. The location of the basestations (cell centres)
DMC DECT Fundamentals
August 2012
121
Site planning
6. The calculated number of users in each cell
7. Include some notes on the agreed coverage area of the site and any information
for the installer
Review the work
At the completion of the site plan, ensure that you have:
1. a customer, satisfied with the plan for a DECT system;
2. a clean floor plan with all the information, as shown in Figure 68: Example of a
completed floor plan on page 120;
3. a traffic table; and,
4. a completed provisioning record.
122
DMC DECT Fundamentals
August 2012
Comments? [email protected]
Chapter 5: Installation and configuration
Contents
This chapter contains information on the following topics:
Before you begin on page 123
Unpacking the equipment on page 124
Provisioning records on page 125
Installing the basestation on page 128
Installing additional IPE shelves or CS 1000E cabinets on page 152
Installing DMC8 and faceplate cables on page 158
Installing the DMC DECT application on page 179
Configuring handsets and retrieve subscription data on page 195
Basestation Powering and Muting on page 198
Implementing and operating MSMN on page 224
Before you begin
The following three tasks must be completed before DECT is installed.
1. The site survey
2. The deployment
3. The installation of the house wiring for basestations
After these tasks have been completed, the following information and materials are required
before continuing with DECT installation.
• Site work order
• List of equipment to be installed, showing quantities
• A marked-up floor plan
DMC DECT Fundamentals
August 2012
123
Installation and configuration
• A volt/ohm meter
• Hand tools and hardware, such as:
- screwdrivers and pliers
- spanners and socket wrenches
- drill and drill bits
- screws and screw anchors
- punch-down tools for MDF and RJ45 Connect Box
- cable continuity checking equipment
Unpacking the equipment
To unpack the equipment, complete the steps in the following table.
Unpacking and examining the equipment
1. Check the items shipped for discrepancies against the list of equipment required
for the installation.
If any items are missing, take the action that is appropriate for this situation.
2. Carefully unpack and examine the equipment for damage.
If any items are missing, take the action that is appropriate for this situation.
Note:
Store the equipment containers away from the installation area. Use the containers to return
damaged equipment.
Using the Provisioning Records, marked-up floor plans, and the site work order, the installation
proceeds in this sequence:
1. Install basestation
2. Install additional IPE shelves or cabinets
3. Install DMC8 cards and faceplate cables
4. Install DMC DECT Manager application
5. Configure DECT on the DMC DECT Manager server
6. Configure handsets and retrieve subscription data
7. Handset subscription
8. Basestation Power and Muting
9. Add a V.24 serial connection
124
DMC DECT Fundamentals
August 2012
Comments? [email protected]
Provisioning records
Provisioning records
The DECT Provisioning Records consist of the following:
• System Site Information Record
• Provisioning Information Record
• Installation Record
• System Programming Record
• Handset User Information Record
A copy of these records must be kept at the customer site. Vendors involved in maintaining
DECT must also have a copy of these records.
Note:
Use a pencil to record information that can vary. Make photocopies of the tables as
necessary.
System information record
Contacts
Table 27: System information record - contacts
Client
Company name
Address
Contact name
Telephone number
Billing number
Date received
Table 28: System information record - supplier sheet
Supplier
Company name
DMC DECT Fundamentals
August 2012
125
Installation and configuration
Supplier
Address
Contact name
Telephone number
Invoice number
Date shipped
Table 29: Installer sheet
Installer
Name
Installation date
Provisioning information record
Basestation cell
Sheet ______
Table 30: Basestation cell sheet
Cell label
126
Basestation
location
Number of
Basestation
DMC DECT Fundamentals
Basestation
number
August 2012
Comments? [email protected]
Provisioning records
Installation record
Basestation connection
Sheet ______
Table 31: Basestation connection sheet
Basestation number
MDF designator or I/O panel
label
MDF RJ45 number
TN to DECT TN assignment
Sheet ______
Table 32: TN to DECT TN assignment sheet
TN
DMC DECT Fundamentals
DECT TN
TN
DECT TN
August 2012
127
Installation and configuration
System programming record
System name: __________________________
PARI licence string: __________________________
Handset user information record
Sheet_________
Table 33: Handset user information record sheet
username
DN
WRLS TN
MCRD/
MCRA
CLS
CNDD/
CNDA
Installing the basestation
Following the DECT basestation rules, installation involves the following tasks:
• Install C4600 and C4610 basestations:
- Install basestation wiring to the MDF.
- Install the C4610 basestation external power supply.
• Install basestation in the external housing.
• Attach the external housing to a wall.
• Connect the external housing wiring to the MDF.
128
DMC DECT Fundamentals
August 2012
Comments? [email protected]
Installing the basestation
Rules and guidelines
The following rules and guidelines apply to basestation installation.
• For DC-powered systems, an input voltage of at least –48 volts is required for maximum
basestation line length.
• One hundred ohms is the maximum line length for a C4610 high traffic basestation. If the
line measurement approaches 100 ohms, use an external power supply.
• If the exact location is not accessible, mount the basestation as close as possible to the
location in the site survey.
• Mount the basestation in a vertical position, not horizontally, on a ceiling.
• Lead the basestation cable directly away from the basestation. Surplus cable can cause
basestation malfunctions.
• Place the basestation where it is unlikely to be damaged. For example, a basestation in
a warehouse must be placed where it cannot be damaged by a forklift truck.
• Surrounding objects must not affect the basestation. For example, a basestation in a car
park must be placed higher than any vehicle parked next to it.
• The minimum distance between two basestations must be greater than two metres.
• Do not mount basestations on large concrete or stone columns, air ducts or large metal
objects.
• The external basestation is powered from the line connection and does not require a
mains connection.
• Use the external housing kit to mount any basestation out-of-doors.
• Use the external housing kit for any basestation subject to conductive pollution or dust
that can become conductive due to condensation.
Compatibility
The C4600, C4610, and C4610E basestations are compatible with all software releases for
DECT, Meridian 1, CS 1000E and CS 1000M systems. The basestations are backward
compatible.
C4610E and external antenna
The C4610E 12-channel basestation has an adaptor to support an external antenna. The
external antenna increases the operating distance between the basestation and the DECT
handset. Avaya recommends the use of a Huber & Suhner dual-planar directional antenna.
Directional antennas are suitable for use in places such as large halls, outside parking lots,
DMC DECT Fundamentals
August 2012
129
Installation and configuration
and between buildings. See Figure 69: A Huber and Suhner dual-planar directional antenna on
page 130.
Note:
The Huber & Suhner 8.0dBi and 10.5dBi antenna packages were tested with the C4610E
basestation. Other third-party directional antenna are available, but have not been tested
with this basestation.
Figure 69: A Huber and Suhner dual-planar directional antenna
Installing C4600, C4610, and C4610E basestations
Consult the work order and marked-up floor plan to determine the position of the basestation,
then perform the steps in Installing C4600, C4610, and C4610E basestation on page 131.
130
DMC DECT Fundamentals
August 2012
Comments? [email protected]
Installing the basestation
Figure 70: Basestation mounting details
Table 34: Basestation mounting details key
a
screw mounting slot
b
screw and cable tie retaining washer hole
c
cable tie grooves
Installing C4600, C4610, and C4610E basestation
1. Locate the basestation mounting position.
2. Install the basestation mounting screw.
If required, drill the holes for a screw anchor and install the anchor.
3. Fasten the basestation on the wall or a building protrusion.
Hang the basestation on the screw or use cable ties to mount the basestation. Insert
the cable ties in the vertical or horizontal grooves on the back of the basestation.
Secure the cable ties to the basestation with the retaining washers and screws
provided. Fasten the cable ties to the building protrusion.
4. If installing the C4610E basestation, install the external antenna according to the
instructions provided by the manufacturer.
Installing the wiring to the MDF
Consult the work order and marked-up floor plan to determine the basestation to MDF
connections, then follow the steps in Installing basestation wiring to the MDF on page 132.
Caution:
Service Interruption
DMC DECT Fundamentals
August 2012
131
Installation and configuration
For maximum line length before signal degradation occurs, use UTP Cat 5 cabling between
the basestation and the shelf or cabinet. If the line length exceeds 100 ohms for the 4610
basestation, an external power supply must be used.
The maximum distance when using external power with UTP Cat 5 cabling is approximately
1.7 km.
Figure 71: Basestation, MDF, and I/O panel details
Key
a
RJ45 Connection Box
b
MDF
c
recommended UTP Cat 5 cable
d
IPE shelf I/O connector panel
Installing basestation wiring to the MDF
1. Connect one end of the NTCW10 cable into the basestation RJ45 jack.
Use the supplied cable.
2. Install the RJ45 Connection Box.
Use the NTCW10 cable length to measure the location of the RJ45 Connection
Box.
3. See Table 35: Basestation RJ45 to BIX MDF connections on page 133 for
connection details.
Note:
Ensure that the cable is twisted pair from beginning to end.
132
DMC DECT Fundamentals
August 2012
Comments? [email protected]
Installing the basestation
Note:
If there are other twisted pairs available then ensure that the other pairs in the
cable are not used for analogue interfaces.
4. Connect the free end of the NTCW10 cable into the RJ45 Connection Box.
Note:
The BIX tip and ring connections shown in Table 35: Basestation RJ45 to BIX MDF
connections on page 133 correspond to standard BIX designation. The first pair are labeled
T0 and R0. See Communication Server 1000M and Meridian 1: Large System Installation
and Commissioning (NN43021-310), chapter Planning and designating the Modular
Distribution Frame (MDF).
Figure 72: RJ45 Connection Box pin-out
Table 35: Basestation RJ45 to BIX MDF connections
Basestation number
RJ45 Connection Box
MDF connection
5
T8
4
R8
6
T9
3
R9
5
T10
Basestation 1
Basestation 2
DMC DECT Fundamentals
August 2012
133
Installation and configuration
Basestation number
RJ45 Connection Box
MDF connection
4
R10
6
T11
3
R11
5
T12
4
R12
6
T13
3
R13
5
T14
4
R14
6
T15
3
R15
5
T16
4
R16
6
T17
3
R17
5
T18
4
R18
6
T19
3
R19
5
T20
4
R20
6
T21
3
R21
5
T22
4
R22
6
T23
3
R23
Basestation 3
Basestation 4
Basestation 5
Basestation 6
Basestation 7
Basestation 8
134
DMC DECT Fundamentals
August 2012
Comments? [email protected]
Installing the basestation
Installing the external power supply
For the C4600, C4610, and C4610E basestations, an external power supply must be installed
if the UTP Cat 5 line resistance exceeds 100 ohms.
Figure 73: C4610 basestation external power
Figure 74: C4610E external power and external antenna connectors
Installing the C4610 basestation external power supply
1. Remove the plastic stopper from the C4610 basestation power socket.
DMC DECT Fundamentals
August 2012
135
Installation and configuration
The power socket is located next to the yellow LED.
2. Plug the external power supply jack into the C4610 basestation power socket.
3. Connect the external power supply to the ac mains outlet.
Installing the external housing
Consult the work order, then perform the steps in Installing the basestation in the external
housing on page 137.
Figure 75: External housing details
Key
136
a
component mounting plate
b
power transformer (not used)
c
cable connecting box
d
basestation
e
plate retaining nuts
f
cable outlet
g
external housing cabinet
DMC DECT Fundamentals
August 2012
Comments? [email protected]
Installing the basestation
Figure 76: Basestation mounting details
Caution:
Equipment Damage
The following procedure requires the removal of the basestation cover. The circuit board is
attached to the basestation cover. Do not damage the circuit board or bend the two antennas
on the bottom of the circuit board.
Installing the basestation in the external housing
1. Open the external housing cover.
Insert the external housing key and turn clockwise.
2. Remove the basestation mounting plate.
Unscrew the four nuts securing the plate and pull the plate from the cabinet.
3. Remove the basestation cover. See the preceding caution note.
Carefully pry one corner of the cover from the basestation, then the other corner.
4. Remove the basestation lower screw hole cover.
Push the screw hole cover out of the basestation.
5. Mount the basestation to the housing plate.
Affix with the screws as shown in Figure 70: Basestation mounting details on
page 131.
6. Replace the basestation cover.
Snap the cover in place.
7. Connect the connecting box cable to the basestation.
DMC DECT Fundamentals
August 2012
137
Installation and configuration
Snap the connecting box cable into the basestation RJ45 Connection Box. Lead
the cable away from the basestation for optimal performance of the antennas.
8. Replace the basestation mounting plate.
Secure the plate with the four nuts.
Attaching the external housing to a wall
Consult the work order and marked-up floor plan to determine the mounting position of the
basestation external housing, then perform the steps listed in Installing the basestation in the
external housing on page 137.
138
DMC DECT Fundamentals
August 2012
Comments? [email protected]
Installing the basestation
Figure 77: External housing mounting lugs
Figure 78: External housing wall mounting
Voltage:
Electric Shock
Do not drill into electrical wires that are embedded in the wall.
Attaching the external housing to a wall
1. Choose the vertical or horizontal mounting position.
DMC DECT Fundamentals
August 2012
139
Installation and configuration
See Figure 77: External housing mounting lugs on page 139 for details. Reposition
mounting lugs if necessary.
2. Drill mounting holes in the wall.
Use the drilling jig to align the holes.
3. Mount the external housing to the wall.
See Figure 78: External housing wall mounting on page 139 for details. Use the
screws, and appropriate inserts, to fasten the housing to the wall.
Connecting the external housing wiring to the MDF
Consult the work order, then perform the steps in Connecting the external housing wiring to
the MDF.
Figure 79: External housing MDF connection details
Note:
The BIX tip and ring connections shown in Table 36: External housing basestation to BIX
MDF connections on page 141 correspond to standard BIX designation. The first pair are
labelled T0 and R0. See Avaya Communication Server 1000M and Meridian 1: Large
System Installation and Commissioning (NN43021-310), chapter Planning and designating
the Modular Distribution Frame (MDF).
Connecting the external housing wiring to the MDF
1. Lead the building cable into the external housing.
Route the cable through the cable outlet in the external housing.
2. Secure the cable in the connecting box.
Use a cable tie-wrap.
3. Connect the external housing wiring from the connecting box to the MDF.
Note:
See Figure 79: External housing MDF connection details on page 140 and Table
36: External housing basestation to BIX MDF connections on page 141 for wiring
140
DMC DECT Fundamentals
August 2012
Comments? [email protected]
Installing the basestation
connections. For DMC8 types NTCW00AB and NTCW01AB, connect from
basestation 1 to basestation 8.
Note:
To support basestations 5, 6, 7, and 8 on NT8D37 (AA and DC) IPE modules
requires 24 tip and ring pair backplane to I/O panel connections. To re-cable
NT8D37 from 16 pair to 24 pair, see Avaya Communication Server 1000M and
Meridian 1: Large System Installation and Commissioning (NN43021-310),
Appendix B.
Table 36: External housing basestation to BIX MDF connections
External housing base
station number
External housing connector
box in number
MDF connection
3
T8
4
R8
2
T9
5
R9
3
T10
4
R10
2
T11
5
R11
3
T12
4
R12
2
T13
5
R13
3
T14
4
R14
2
T15
4
T16
5
R16
6
T17
3
R17
4
T18
5
R18
6
T19
3
R19
Basestation 1
Basestation 2
Basestation 3
Basestation 4
Basestation 5
Basestation 6
DMC DECT Fundamentals
August 2012
141
Installation and configuration
External housing base
station number
External housing connector
box in number
MDF connection
4
T20
5
R20
6
T21
3
R21
4
T22
5
R22
6
T23
3
R23
Basestation 7
Basestation 8
Installing the external housing
Consult the work order, then perform the steps in this section as required.
The section provides the following procedures:
• Installing C4600 and C4010 basestations in the external housing
• Installing a C4010E basestation in external housing with an external antenna
• Mounting the cabinet
Installing C4600 and C4010 basestations in the external housing
1. Open the cabinet by inserting the cabinet key and turn right.
2. Remove the foam from the cabinet as far as is shown Figure 110
3. Mount the swivel, and lead the incoming cable through it. Make sure that the cable
inlet is waterproof. Connect the incoming cable to the connection box that is
delivered with the outdoor cabinet. Also connect the CAT5 cable that is inside the
outdoor cabinet to the connector box. See pictures below.
142
DMC DECT Fundamentals
August 2012
Comments? [email protected]
Installing the external housing
Figure 80: Connector box
Figure 81: Diagram of connector box
4. Place the foam below the foam blocks.
DMC DECT Fundamentals
August 2012
143
Installation and configuration
Figure 82: Foam placement
5. Connect the Ethernet CAT5 to the C4600/C4010 basestations as shown.
144
DMC DECT Fundamentals
August 2012
Comments? [email protected]
Installing the external housing
Figure 83: Ethernet connection
6. Push the C4600/C4010 basestations in the foam as shown.
DMC DECT Fundamentals
August 2012
145
Installation and configuration
Figure 84: Basestations foam installation
7. Place the cover foam into position.
146
DMC DECT Fundamentals
August 2012
Comments? [email protected]
Installing the external housing
Figure 85: Foam cover installation
8. Close and lock the cabinet.
Installing a C4010E basestation in external housing with an external antenna
1. Unpack the C4010E basestation.
2. Open the cabinet of the C4010E basestation.
To open the cabinet remove the two screws at the rear side of the cabinet. Then
separate the cover and the rear side from each other.
The cabinet is closed by four 'click' parts, two at each long side of the cabinet. If
necessary, use a small screwdriver to carefully open the click parts one-by-one.
3. Drill two holes (10 mm in diameter) in the rear side of the cabinet.
Figure 86: Hole placement
4. Connect the antenna cables to the connectors on the printed circuit board. Secure
the nuts with an SMA Torque Wrench.
DMC DECT Fundamentals
August 2012
147
Installation and configuration
Figure 87: Connecting and securing the board
5. Snap the cover of the C4010E basestation to the rear side, to close the C4010E
basestation cabinet. Fasten the cabinet by mounting the two screws into the two
holes in the rear side of the cabinet.
6. Insert the cabinet key and turn right to open the outdoor isolated cabinet.
7. Remove the foam blocks from the cabinet.
8. Mount the swivel, and lead the incoming cable through it. Make sure that the cable
inlet is waterproof. Connect the incoming cable to the connection box that is
148
DMC DECT Fundamentals
August 2012
Comments? [email protected]
Installing the external housing
delivered with the outdoor cabinet. Also connect the CAT5 cable that is inside the
outdoor cabinet to the connector box.
9. Connect the Ethernet CAT5 cable to the C4010E basestation. Place the C4010E
basestation in the outdoor cabinet and install the foam.
10. Connect the antenna cables to the antenna.
11. Place the cover foam in position then place the antenna in the foam.
12. Close and lock the outdoor cabinet.
Important:
Ensure that the C4010E basestation is line powered through the Ethernet cable.
Local power provision is not possible in this outdoor cabinet.
Mounting the cabinet
This section describes the following procedures:
• Mounting the cabinet to the wall
• Mounting the cabinet to a pole
Mounting the cabinet to the wall
1. Mount the wall mount set on the back of the cabinet.
Choose for horizontal or vertical mounting of the wall mount set.
2. Use the drilling jig (suitable for horizontal or vertical configuration) for the position
of the drill holes.
3. Mount the cabinet to the wall.
DMC DECT Fundamentals
August 2012
149
Installation and configuration
Figure 88: Mounting the cabinet
Mounting the cabinet to a pole
1. Mount the bracket to the back of the cabinet.
2. Connect the metal strip with the special bolt to the bracket.
3. Place the cabinet against the pole.
150
DMC DECT Fundamentals
August 2012
Comments? [email protected]
Installing the external housing
4. Lead the strip around the pole and connect the metal strip to the other side of the
bracket (also with a special bolt).
5. Keep the cabinet at the right height and tighten the metal strip around the pole by
twisting the special bolt.
6. Secure the metal strip with the lock-nuts.
Figure 89: Installing the cabinet
DMC DECT Fundamentals
August 2012
151
Installation and configuration
Installing additional IPE shelves or CS 1000E cabinets
Installing additional IPE shelves or cabinets includes the following tasks:
• Install additional IPE modules.
• Install additional cabinets:
- Install IPE module wiring to the MDF.
- Install cabinet wiring to the MDF.
Installing additional IPE modules
Consult the work order and marked-up floor plan to determine if additional IPE modules are
required, then perform the steps in Installing additional IPE modules on page 152.
Note:
If unfamiliar with this process, refer to Avaya Communication Server 1000M and Meridian
1: Large System Installation and Commissioning (NN43021-310).
Installing additional IPE modules
1. Remove the IPE module front and rear covers.
Remove the covers from the module on which the DECT module will sit.
2. Remove the air grills.
Release the air grill tabs or Southco® fasteners and lift the air grill off.
3. Remove the top cap.
Loosen and remove the three front and rear top cap bolts. Lift off top cap.
4. Unfasten the column LED.
Remove the LED bracket bolts.
5. Remove the I/O back panel cover.
Unlock the four Southco fasteners.
6. Disconnect the column LED.
Unlock LED wiring connector latches on the module backplane. Detach the LED
wiring connector.
7. Disconnect the thermal sensor connector.
152
DMC DECT Fundamentals
August 2012
Comments? [email protected]
Installing additional IPE shelves or CS 1000E cabinets
Unlock the sensor connector latches on the 36 pin orange/brown coloured
connector, located to the left of the LED connector. Unplug the sensor connector.
8. Remove the EMI perf panel.
Lift directly up.
9. Place the new module on top of the column.
Keep hands and fingers out from under the module when placing the module on top
of the equipment column.
10. Connect the new module wiring.
Install the sensor connector of the new module into the vertical connector housing
of the module below.
11. Secure the new module.
Insert the five bolts and lock washers into the base of the new module. Tighten the
bolts into the original module.
12. Attach the power cable.
Connect the ribbon cable of the new module to J2 of the module below.
13. Reinstall the EMI perf panel and the LED.
Install the LED connector and the sensor connector on the new module.
14. Replace the air grills and covers.
Reverse the procedure for steps 1 to 4.
Installing IPE module wiring to the MDF
Consult the work order to determine the layout of the module I/O panel to MDF cabling route,
then perform the steps in Installing IPE module wiring to the MDF on page 155.
Caution:
Service Interruption
The existing MDF cabling can be used; however, Avaya recommends UTP Cat 5 – NTCW15,
NTCW16, or NTCW17 MDF to PBX cabling, as it provides a greater line length before signal
degradation occurs.
DMC DECT Fundamentals
August 2012
153
Installation and configuration
Figure 90: IPE I/O cable to BIX MDF termination
Note:
The BIX connectors shown in Figure 90: IPE I/O cable to BIX MDF termination on page 154
are not used in NT8D11AC or NT8D11DC CE/PE and NT8D37AC or NT8D37DC IPE
modules, but are used in the NT8D11BC or NT8D11EC CE/PE and NT8D37BA or NT8D37
EC IPE modules.
154
DMC DECT Fundamentals
August 2012
Comments? [email protected]
Installing additional IPE shelves or CS 1000E cabinets
Figure 91: IPE I/O cable to Krone MD termination
Installing IPE module wiring to the MDF
1. Identify the UTP Cat 5 twenty-five pair MDF cable.
Label both ends of the cable with the IPE module number and the I/O panel letter
designation.
2. Connect the IPE or cabinet end of the cable.
Insert the Amphenol ® connector on the cable into the appropriate I/O panel
connector. See Table 37: Colour code for 25 pair cable on page 156.
3. Run the cable to the MDF.
4. Terminate the cable on the MDF.
For BIX MDF, refer to Figure 90: IPE I/O cable to BIX MDF termination on page 154
to locate the BIX connectors and Table 37: Colour code for 25 pair cable on
page 156 to locate the cable colour code.
DMC DECT Fundamentals
August 2012
155
Installation and configuration
For Krone MDF, refer to Figure 91: IPE I/O cable to Krone MD termination on
page 155 to locate the Krone connectors and Table 37: Colour code for 25 pair
cable on page 156 to locate the cable colour code.
Table 37: Colour code for 25 pair cable
Tip
Ring
Body/Band
Body/Band
26/1
White/Blue
Blue/White
27/2
White/Orange
Orange/White
28/3
White/Green
Green/White
29/4
White/Brown
Brown/White
30/5
White/Slate
Slate/White
31/6
Red/Blue
Blue/Red
32/7
Red/Orange
Orange/Red
33/8
Red/Green
Green/Red
34/9
Red/Brown
Brown/Red
35/10
Red/Slate
Slate/Red
36/11
Black/Blue
Blue/Black
37/12
Black/Orange
Orange/Black
38/13
Black/Green
Green/Black
39/14
Black/Brown
Brown/Black
40/15
Black/Slate
Slate/Black
41/16
Yellow/Blue
Blue/Yellow
42/17
Yellow/Orange
Orange/Yellow
43/18
Yellow/Green
Green/Yellow
44/19
Yellow/Brown
Brown/Yellow
45/20
Yellow/Slate
Slate/Yellow
46/21
Violet/Blue
Blue/Violet
47/22
Violet/Orange
Orange/Violet
48/23
Violet/Green
Green/Violet
49/24
Violet/Brown
Brown/Violet
50/25
Violet/Slate
Slate/Violet
Amphenol pin number
156
DMC DECT Fundamentals
August 2012
Comments? [email protected]
Installing additional IPE shelves or CS 1000E cabinets
Installing CS 1000E cabinet wiring to the MDF
Consult the work order to determine the CS 1000E cabinet-to-MDF cabling route, then perform
the steps in Installing CS 1000E cabinet wiring to the MDF on page 157.
Figure 92: Meridian 1 PBX 11C Cabinet
Installing CS 1000E cabinet wiring to the MDF
1. Identify the UTP Cat 5 twenty five pair MDF cable.
Label both ends of the cable with the cabinet jack number.
2. Connect the cabinet end of the cable.
Insert the Amphenol connector on the cable into the appropriate cabinet connector
jack.
3. Run the cable to the MDF.
4. Terminate the cable on the MDF.
DMC DECT Fundamentals
August 2012
157
Installation and configuration
For BIX MDF, refer to Figure 92: Meridian 1 PBX 11C Cabinet on page 157 to locate
the BIX connectors and Table 37: Colour code for 25 pair cable on page 156 to
locate the cable colour code.
Expander installation
For information on installing an Expander, refer to Avaya Communication Server 1000M and
Meridian 1: CS 1000E Installation and Commissioning (NN43011-310).
Installing DMC8 and faceplate cables
Installing the DMC8 cards and faceplate cables involves the following tasks:
1. Cross-connect basestations to the DMC8 positions.
2. Cross-connect basestations to the DMC8 Relay card.
3. Install DMC8 and DMC8-E in an IPE shelf.
4. Install DMC8-E in a Cabinet system.
5. Install faceplate cables and inter-shelf/cabinet cable.
Compatibility
The NTCW00AB DMC8 and NTCW01AB DMC8-E are compatible with the following software
releases:
• Release 23 and later supports basic configuration, CLID and CPND, DECT card
addressing within OA&M, 16 users per card.
• Release 24B and later supports 32 users per card.
• Release 25 and later supports MSMN and Concentration.
Cross-connecting basestations to the DMC8 positions
Consult the work order to determine the cross-connect details and perform the following
steps.
Caution:
Service Interruption
158
DMC DECT Fundamentals
August 2012
Comments? [email protected]
Installing DMC8 and faceplate cables
The jumper wire on the MDF must be at least UTP Cat 3. Avaya recommends UTP Cat 5,
as it provides a greater line length before signal degradation occurs.
Cross-connecting basestations to the DMC8 positions
1. Cross-connect from the basestation house side connector to the DMC8 equipment
side connector.
Connect a jumper wire from the tip and ring of the house side connector to the tip
and ring of the equipment side connector. Refer to Table 38: Basestation tip and
ring connections on page 159 for the tip and ring designators. For DMC8s type
NTCW00AB and NTCW01AB, connect from basestation 1 to basestation 8.
Note:
To support basestations 5, 6, 7, and 8 on NT8D37 (AA and DC) IPE modules,
use 24 tip and ring pair backplane to I/O panel connections. To re-cable NT8D37
from 16 pair to 24 pair, see Avaya Communication Server 1000M and Meridian
1: Large System Installation and Commissioning (NN43021-310).
2. Cross-connect the remaining basestations.
Repeat step one until all basestations are cross-connected.
Note:
The BIX tip and ring connections shown in Table 38: Basestation tip and ring connections on
page 159 correspond to standard BIX designation. The first pair are labeled T0 and R0.
See Avaya Communication Server 1000M and Meridian 1: Large System Installation and
Commissioning (NN43021-310), chapter Planning and designating the Modular Distribution
Frame (MDF).
Table 38: Basestation tip and ring connections
Basestation number
Basestation MDF connection
DMC8 MDF connection
T8
T8
R8
R8
T9
T9
R9
R9
T10
T10
R10
R10
T11
T11
R11
R11
T12
T12
R12
R12
T13
T13
Basestation 1
Basestation 2
Basestation 3
DMC DECT Fundamentals
August 2012
159
Installation and configuration
Basestation number
Basestation MDF connection
DMC8 MDF connection
R13
R13
T14
T14
R14
R14
T15
T15
R15
R15
T16
T16
R16
R16
T17
T17
R17
R17
T18
T18
R18
R18
T19
T19
R19
R19
T20
T20
R20
R20
T21
T21
R2
R21
T22
T22
R22
R22
T23
T23
R23
R23
Basestation 4
Basestation 5
Basestation 6
Basestation 7
Basestation 8
Cross-connecting basestations to the DMC8 Relay card
Consult the work order to determine the cross-connect details, then perform the steps in Crossconnecting basestations to the DMC8 positions on page 161.
160
DMC DECT Fundamentals
August 2012
Comments? [email protected]
Installing DMC8 and faceplate cables
Figure 93: DMC8 Relay card to basestation connections
Cross-connecting basestations to the DMC8 positions
1. Connect the NTCW12DA cable to the DMC8 Relay card.
Insert P1 into the DMC8 Relay card backplane connector located on the PBX shelf/
module or the Cabinet.
2. Connect the MDF cable to the NTCW12DA cable.
Insert the MDF cable connector into P2.
3. Connect the MDF cable to the equipment side MDF cross-connect terminal block.
See the chapter in Avaya Communication Server 1000M and Meridian 1: Large
System Installation and Commissioning (NN43021-310) that discusses cabling
lines and trunks. See the chapter in Avaya Communication Server 1000M and
Meridian 1: CS 1000E Installation and Commissioning (NN43011-310) that
discusses installing and connecting cross-connect terminal to cabinets.
4. Cross-connect from the basestation house-side connector to the DMC8 Relay card
equipment side connector.
Connect a jumper wire from the tip and ring of the house-side connector to the tip
and ring of the equipment-side connector. Refer to Table 38: Basestation tip and
ring connections on page 159 for the tip and ring designators. For DMC8s, type
NTCW00AB and NTCW01AB connect from basestation 1 to basestation 8.
To support basestations 5, 6, 7, and 8 on NT8D37 (AA and DC) IPE modules
requires 24 tip and ring pair backplane to I/O panel connections. To re-cable
DMC DECT Fundamentals
August 2012
161
Installation and configuration
NT8D37 from 16 pair to 24 pair, see Avaya Communication Server 1000M and
Meridian 1: Large System Installation and Commissioning (NN43021-310).
Installing DMC8 and DMC8-E in an IPE shelf
Refer to the work order and marked-up floor plan to determine the position of the DMC8 and
DMC8-E, then perform the steps in Installing DMC8 and DMC8-E in an IPE shelf on
page 163.
Voltage:
Electrostatic Sensitive Device
Wear a properly connected antistatic wrist strap to handle circuit cards. Only touch the
edges. Do not touch the contacts or components. Set the cards on a protective antistatic
bag, whenever possible. If an antistatic bag is not available, hand-hold the card, or set it in
a card cage removed from the connectors.
Caution:
Service Interruption
Only install DMC8-Es in slot 8.
Note:
Install the DMC8s next to each other so the faceplate cables connect to the ports.
Note:
See System software parameters on page 41 for DMC8 and DMC8-E software package
compatibility.
162
DMC DECT Fundamentals
August 2012
Comments? [email protected]
Installing DMC8 and faceplate cables
Figure 94: DMC8/DMC8-E jumper details
See Installing DMC8 and DMC8-E in an IPE shelf on page 163 for card jumper settings.
Caution:
Service Interruption
Ensure that the DMC8/DMC8-E Relay card jumpers J6 to J9 are in the ETH position for
operation on a dedicated LAN.
Ensure that the DMC8/DMC8-E Relay card jumpers J6 to J9 are in the V.24 position for
operation on a serial connection to the DMC DECT Manager server.
Installing DMC8 and DMC8-E in an IPE shelf
1. Install J1 jumper straps on the DMC8 and the DMC8-Es for Card ID.
For pre-Release 23 software, strap A B. For post-Release 23 software, and MultiSite Mobility Networking, strap B C.
2. Install J2 jumper straps on the DMC8 and the DMC8-Es for the system type.
Strap A B for IPE shelf.
3. Install J3 jumper straps on the DMC8 and the DMC8-Es for cabinet or IPE shelf
number.
DMC DECT Fundamentals
August 2012
163
Installation and configuration
For shelf 0, the lower TN IPE shelf, strap B C. For shelf 1, the higher TN IPE shelf,
strap A B.
4. Install J6 to J9 jumper straps on the DMC8 and the DMC8-Es used as the Relay
card for either V.24 connection or Ethernet connection.
For the V.24 connection, strap jumpers J6 to J9 to the V24 position. For the Ethernet
connection, strap jumpers J6 to J9 to the ETH position.
5. Insert DMC8-Es, if required.
Place DMC8-Es in slot 8.
6. Insert DMCs.
Place DMC8s in the slots as indicated on the work order. Do not place DMC8s in
slot 8.
164
DMC DECT Fundamentals
August 2012
Comments? [email protected]
Installing DMC8 and faceplate cables
Figure 95: Example of a full system housed in two IPE shelves
DMC DECT Fundamentals
August 2012
165
Installation and configuration
Figure 96: Example of a 16 card system housed in two IPE shelves
166
DMC DECT Fundamentals
August 2012
Comments? [email protected]
Installing DMC8 and faceplate cables
Figure 97: Example of a 17 card system housed in two IPE shelves
Figure 98: Example of an eight card system housed in one IPE shelf
DMC DECT Fundamentals
August 2012
167
Installation and configuration
Installing DMC8 and DMC8-E in an IPE Module Controlled by
MGXPEC (CS 1000E)
The MG XPEC is a double wide, dual card Gateway Controller assembly based on the MGC
hardware. It is used to control line cards in an NT8D37 IPE module. The MG XPEC features
a motherboard and daughterboard architecture. The two halves of the MG XPEC card act
independently to control separate Media Gateway shelves, providing the same hardware
functionality of an MGC.
The MG XPEC can be thought of as two separate MGC cards bolted together. The left board
(motherboard) controls the left half of the IPE module and the right board (daughterboard)
controls the right half of the IPE module.
Each board of the dual card assembly controls eight slots of the IPE module, for a total of 16
slots. The motherboard controls the 8 IPE slots to the left of the MG XPEC and the
daughterboard controls the 8 IPE slots to the right of the MG XPEC. Card slots are numbered
from 0 to 7 for the motherboard and 0 to 7 for the daughterboard.
Voltage:
Electrostatic Sensitive Device
Wear a properly connected antistatic wrist strap when handling circuit cards. Handle cards
by the edges only. Do not touch the contacts or components. Set the cards on a protective
antistatic bag, whenever possible. If an antistatic bag is not available, hand-hold the card,
or set it in a card cage unseated from the connectors.
Caution:
Service Interruption
Do not install DMC8-Es into any slot except slots 9, 19, or 29.
Note:
The DMC8s must be adjacent to each other so the faceplate cables can be connected to
the ports.
To install DECT in an IPE module controlled by MGXPEC follow the guidelines.
1. Configure DMC TN (DMC prompt in LD 10/11) in DCS blocks according to the new
slot numbering.
2. Insert a DMC-E card in slot 8 according to the old numbering or in slot 0 of the right
half of the IPE module according to the new numbering.
3. Install J3 jumper straps on the DMC8 and the DMC8-Es for IPE module number.
For shelf 0, the lower TN IPE shelf, strap B C. For shelf 1, the higher TN IPE shelf,
strap A B.
168
DMC DECT Fundamentals
August 2012
Comments? [email protected]
Installing DMC8 and faceplate cables
Note:
Note: all DMC8 (DMC8-E) cards in one IPE module should have the same
configuration for J3 jumpers.
For example, it’s possible to configure:
• IPE shelf 0 (all DMC8 cards J3 jumper B C)
• left half of the shelf – 8 0 (superloop shelf)
• right half of the shelf – 12 0 (superloop shelf)
• IPE shelf 1 (all DMC8 cards J3 jumper A B)
• left half of the shelf – 8 1 (superloop shelf)
• right half of the shelf – 12 1 (superloop shelf)
4. Use the old numbering of the cards for configuring devices in DECT Messenger if
required.
Strap B C for Cabinet, Chassis, MG 1000E, or MG 1000E Expander.
5. Connect a Cat-5 or Cat-5e straight through cable to the faceplate CLK-OUT port of
the MG XPEC in IPE module 0 (clock master), route this cable to the MG XPEC in
the IPE module 1 and connect to the CLK-IN port.
Note:
Avaya recommends you to use Ethernet cables shorter than 5 meters for clock
referencing.
The MG XPEC motherboard and daughterboard each provide 192 DSP ports. It means that
the maximum number of simultaneous calls between the trunks or lines connected to each half
of the IPE module, including DECT sets subscribed to DMC cards, and any endpoints outside
the this half of the IPE module is limited to 192.
If you upgrade a Controller in the IPE module with DECT system to MG XPEC, the following
recommendations can be taken into consideration:
1. Configure the left half of the IPE module with the same TN as it was configured for
the Controller card – in this case you won’t need any configuration changes for
handsets (DCS blocks) subscribed on DMC cards in this half of the IPE module.
2. For the right part of the IPE module configure a new superloop and shelf number
and change the DMC prompt in every DCS block according to the new slot
numbering.
3. After making changes in DCS blocks perform the synchronization from DMC cards,
so that existing subscription become available.
4. Do not change the order of the cards (e.g. DMC-E card slot) and jumper settings.
5. If DECT system is installed in 2 IPE modules, connect the MG XPEC cards with a
cable for clock referencing.
DMC DECT Fundamentals
August 2012
169
Installation and configuration
Installing DMC8 and DMC8-E in an Avaya Communication Server
1000E
Consult the work order and marked-up floor plan to determine the position of the DMC8 and
DMC8-Es, then perform the steps in Installing DMC8 and DMC8-E in a Cabinet or Chassis on
page 171.
Voltage:
Electrostatic Sensitive Device
Wear a properly connected antistatic wrist strap when handling circuit cards. Handle cards
by the edges only. Do not touch the contacts or components. Set the cards on a protective
antistatic bag, whenever possible. If an antistatic bag is not available, hand-hold the card,
or set it in a card cage unseated from the connectors.
Caution:
Service Interruption
Do not install DMC8-Es into any slot except slot 8.
Note:
The DMC8s must be adjacent to each other so the faceplate cables can be connected to
the ports.
Note:
See System software parameters on page 41 for DMC8 and DMC8-E software package
compatibility.
170
DMC DECT Fundamentals
August 2012
Comments? [email protected]
Installing DMC8 and faceplate cables
Figure 99: DMC8/DMC8-E jumper details
See Installing DMC8 and DMC8-E in an IPE shelf on page 163 for card jumper settings.
Caution:
Service Interruption
Ensure that the DMC8/DMC8-E Relay card jumpers J6 to J9 are in the ETH position for
operation on a dedicated LAN.
Ensure that the DMC8/DMC8-E Relay card jumpers J6 to J9 are in the V.24 position for
operation on a serial connection to the DMC DECT Manager server.
Installing DMC8 and DMC8-E in a Cabinet or Chassis
1. Avaya CS 1000E cabinet installation only - install MGC Breakout Adapter
2. CS 1000E only -- install clock sync cable if you use a two-shelf configuration. For
an example see Figure 105: Example of two-shelf 15-card system in two MG1000E
Chassis and Expanders on page 175
3. Install J1 jumper straps on the DMC8 and the DMC8-Es for Card ID.
For pre Release 23 software strap A B. For post Release 23 software, and MultiSite Mobility Networking, strap B C.
4. Install J2 jumper straps on the DMC8 and the DMC8-Es for system type.
Strap A B for Cabinet, Chassis, MG 1000E, or MG 1000E Expander, or MG 1010E
DMC DECT Fundamentals
August 2012
171
Installation and configuration
5. Install J3 jumper straps on the DMC8 and the DMC8-Es for shelf number.
For the lower TN cabinet, strap B C. For the higher TN cabinet, strap A B.
6. Insert DMC8-Es, if required.
Place DMC8-Es in slot 8. See examples in:
Figure 100: Example of full CS 1000E on page 173
Figure 101: Example of an 8-card system in two Cabinets on page 173
Figure 104: Example of one-shelf 7-card system in MG1000E Chassis and
Expander on page 175
Figure 105: Example of two-shelf 15-card system in two MG1000E Chassis and
Expanders on page 175
A Media Gateway Card (MGC) installed in an MG 1000 chassis (with an MG 1000E
Expander) or an MG 1010E Chassis provides 128 DSP ports. The maximum
number of simultaneous calls between the trunks or lines connected to the Media
Gateway, including DECT sets subscribed to DMC cards in the chassis, and any
endpoints outside the Media Gateway is limited to 128. Each DMC card requires up
to 32 DSP ports. For a non-blocking call solution the maximum number of DMC
cards that can be installed in an MG 1000 / MG 1010E is limited to four. If four are
not sufficient, an extra MC 32 card is required for each additional DMC card. A nonblocking solution for a DECT system requires special planning in terms of the
available channels on the basestations covering certain areas, as well as the
distribution of DCS blocks among the DMC cards available in the system. Refer to
System hardware parameters on page 39 for details.
7. Install J6 to J9 jumper straps on the DMC8 and the DMC8-Es used as the Relay
card for either V.24 connection or Ethernet connection.
For the V.24 connection strap jumpers J6 to J9 to the V24 position. For the Ethernet
connection strap jumpers J6 to J9 to the ETH position.
8. Insert DMC8s.
Place DMC8s in the slots as indicated on the work order. Do not place DMC8s in
slot 8. See examples given in Step 6 and Figure 103: Example of one-shelf 3-card
system in one MG1000E Chassis on page 174.
172
DMC DECT Fundamentals
August 2012
Comments? [email protected]
Installing DMC8 and faceplate cables
Figure 100: Example of full CS 1000E
Figure 101: Example of an 8-card system in two Cabinets
DMC DECT Fundamentals
August 2012
173
Installation and configuration
Figure 102: Example of an 8-card system in one Cabinet
Figure 103: Example of one-shelf 3-card system in one MG1000E Chassis
174
DMC DECT Fundamentals
August 2012
Comments? [email protected]
Installing DMC8 and faceplate cables
Figure 104: Example of one-shelf 7-card system in MG1000E Chassis and Expander
Figure 105: Example of two-shelf 15-card system in two MG1000E Chassis and Expanders
DMC DECT Fundamentals
August 2012
175
Installation and configuration
Figure 106: Example of one-shelf 8-card system with clocking taken from another shelf
Chassis installation
For information on installing circuit cards, refer to Avaya Communication Server 1000M and
Meridian 1: CS 1000E Installation and Commissioning (NN43011-310).
176
DMC DECT Fundamentals
August 2012
Comments? [email protected]
Installing DMC8 and faceplate cables
Figure 107: Chassis and Expander connected with 2 NTDK95 and CE-MUX/DS-30SX bus cables
Figure 108: MG 1000S and MG 1000S Expander cabling
Installing faceplate cables and inter-shelf/cabinet cable
Consult the work order to determine the position of the faceplate cable layout and NTCW11EA
DMC8-E to DMC8-E inter-shelf cables, then perform the steps in Installing faceplate cables
and inter-shelf/cabinet cable on page 178.
DMC DECT Fundamentals
August 2012
177
Installation and configuration
Figure 109: NTCW11EA DMC8-E to DMC8-E faceplate cable
Caution:
Service Interruption
The NTCW11EA DMC8-E to DMC8-E faceplate cable has four sets of movable ferrites. The
position of the ferrites on the cable is important.
Each end of the cable must have a group of 20 ferrites. One quarter of the distance from
each end of the cable must have a group of 10 ferrites. The maximum length of the cable is
1.5 meters, limiting the position of DECT shelves 0 and 1 to adjacent IPE modules or CS
1000E cabinets.
Consult the work order to determine the position of the terminator plugs, then perform the
following steps.
Installing faceplate cables and inter-shelf/cabinet cable
1. Connect the DMC8 to DMC8 faceplate cables.
Arrange the NTCW11AA DMC8 to DMC8 cables so that the DMC8 to DMC8-E cable
is connected into the ports shown in:
Figure 95: Example of a full system housed in two IPE shelves on page 165 and
Figure 98: Example of an eight card system housed in one IPE shelf on
page 167.
2. If required, connect the NTCW11FA DMC8 to DMC8 1m faceplate cable between
MG1000E Chassis and Expander.
For examples see Figure 104: Example of one-shelf 7-card system in MG1000E
Chassis and Expander on page 175 and
Figure 105: Example of two-shelf 15-card system in two MG1000E Chassis and
Expanders on page 175.
3. If required, connect the NTCW11BA DMC8 to DMC8-E cable on the IPE shelf. Not
required on Option 11C Cabinet.
178
DMC DECT Fundamentals
August 2012
Comments? [email protected]
Installing the DMC DECT application
Plug the cable into the lower port of the DMC8 in slot 7. Plug the other end of the
cable into the arrow pointing left port of the DMC8-E in slot 8. See the following
examples:
Figure 95: Example of a full system housed in two IPE shelves on page 165
Figure 96: Example of a 16 card system housed in two IPE shelves on page 166,
and
Figure 97: Example of a 17 card system housed in two IPE shelves on page 167.
4. Connect the NTCW11EA DMC8-E to DMC8-E inter-IPE shelf or inter-cabinet cable,
if required.
Plug the DMC8-E to DMC8-E cable into each DMC8-E lower port. See the examples
given in the previous step as well as the following examples:
Figure 101: Example of an 8-card system in two Cabinets on page 173, and
Figure 105: Example of two-shelf 15-card system in two MG1000E Chassis and
Expanders on page 175.
Installing the DMC DECT application
Refer to Using the DMC DECT Manager Avaya Communication Server 1000 (NN43001-142)
for information about installing DMC DECT Manager.
Connecting to a DECT system
Refer to section PBX system configuration of the NTP Using the DMC DECT Manager Avaya
Communication Server 1000 (NN43001-142).
for information about connecting DMC DECT Manage to a DECT system.
Synchronizing the DECT Application to a DECT system
When the DECT Manager connects to DECT, synchronization occurs. Synchronization
compares the database on the DECT Manager to the DECT system. Database mismatches
are flagged by dialog boxes. The opportunity is then given to change either the system data
or manager data.
A number of synchronization steps occur during connection. The Synchronization process
flags changes made to a DECT system database by other managers.
Two types of synchronization occur when the connection state goes from Disconnected to
Connected:
DMC DECT Fundamentals
August 2012
179
Installation and configuration
1. When the File menu or tool button is used to connect. The synchronization can be
controlled through dialog boxes.
2. When the DMC DECT Manager re-establishes a permanent connection to DECT.
A synchronization report is available in the Event log in the DMC DECT Manager
server.
When connecting to a DECT system that has data that does not match the DMC DECT
Manager Application data, do one of the following:
• Update the DMC DECT Manager Application database from DECT data.
• Update DECT data with the DMC DECT Manager Application database.
Figure 110: Synchronize DECT PARI and SARI Mismatch dialog box
If there is a PARI or SARI mismatch between the DMC DECT Manager Application database,
and the DECT database, the mismatch dialog box enables the update of PARI and SARI
parameters on both the connected DECT system and the DMC DECT Manager Application.
See Figure 110: Synchronize DECT PARI and SARI Mismatch dialog box on page 180.
180
DMC DECT Fundamentals
August 2012
Comments? [email protected]
Installing the DMC DECT application
Figure 111: Synchronize DECT Parameters Mismatch dialog box
If there is a Parameter mismatch between the DMC DECT Manager Application database, and
the DECT system database, the mismatch dialog box enables the update of Parameters on
both the connected DECT system and the DMC DECT Manager Application. See Figure 111:
Synchronize DECT Parameters Mismatch dialog box on page 181.
Figure 112: Synchronize DECT Board Configuration Mismatch dialog box
Figure 112: Synchronize DECT Board Configuration Mismatch dialog box on page 181 shows
DMC TNs (Boards) listed in the DMC DECT Manager Application database that are not
operational on the DECT system. Delete the check in the check boxes. This allows the DMCs
that are no longer required in the DMC DECT Manager Application database to be removed.
DMC DECT Fundamentals
August 2012
181
Installation and configuration
Figure 113: Synchronize DECT Radio Fixed Part Configuration Mismatch dialog box
Figure 113: Synchronize DECT Radio Fixed Part Configuration Mismatch dialog box on
page 182 shows Radio Fixed Parts (basestations) listed in theDMC DECT Manager Application
database that are not operational on DECT. Delete the check in the check boxes. This allows
the basestations no longer required in the DMC DECT Manager Application database to be
removed.
Figure 114: Synchronize Radio Fixed Part Settings Mismatch dialog box
A Power Source/Alarm Muting setting was changed by another manager. Figure 114:
Synchronize Radio Fixed Part Settings Mismatch dialog box on page 182 says that the DMC
DECT Manager Application database automatically updates to match the changed settings.
Figure 115: Synchronize DECT Upstream Manager IP Address Mismatch dialog box
If there is an Upstream Manager IP address mismatch between the DMC DECT Manager
Application database and the DECT system database, the mismatch dialog box enables an
update of the Upstream Manager IP address on both the connected DECT system and the
182
DMC DECT Fundamentals
August 2012
Comments? [email protected]
Installing the DMC DECT application
DMC DECT Manager Application. See Figure 115: Synchronize DECT Upstream Manager IP
Address Mismatch dialog box on page 182.
Figure 35 DECT Subscription Configuration Mismatch dialog box
The dialog box warns of a DMC mismatch between DECT and the DMC DECT Manager server
database. The manager cannot automatically solve the mismatch. The mismatch must be
solved manually.
Installing the DME on the DMC8 Relay card
Figure 116: NTCW25AA DECT Manager Ethernet (DME) daughterboard location
The NTFZ38AA Ethernet Management Connection package is available, containing the
following:
1. one NTCW25AA DECT Mobility Ethernet (DME) card, and
2. one NTCW12DA DMC8 I/O cable.
Installing the DME on the DMC8 Relay card
1. Unpack the NTCW25AA DECT Manager Ethernet (DME) daughterboard.
DMC DECT Fundamentals
August 2012
183
Installation and configuration
Remove the packing material.
2. Install the DME.
Carefully position the daughterboard over the four standoff posts and press onto
the DMC8 relay card.
Changing the DMC8 Relay card default IP address
Connecting the DMC8 Relay card to a configuring PC
Caution:
Service Interruption
The DMC8 is shipped with a default IP address 192.168.1.1. The default address must be
changed to conform to the network IP address plan.
Figure 117: NTCW12DA Ethernet cable to configuring PC connections
Note:
The configuring PC can be the DMC DECT Manager server or another PC. If the configuring
PC is the DMC DECT Manager server, the Captive LAN shown in Figure 117: NTCW12DA
Ethernet cable to configuring PC connections on page 184 is the DMC DECT Manager
Server Dedicated LAN shown in Figure 93: DMC8 Relay card to basestation connections on
page 161.
184
DMC DECT Fundamentals
August 2012
Comments? [email protected]
Installing the DMC DECT application
Consult the work order to determine the DMC8 Relay card location, then perform the steps in
Connecting the DMC8 Relay card to a configuring PC on page 185.
Note:
The Relay card can be any of the DMC8 or DMC8-E cards. Usually, the lowest-numbered
card is used.
Connecting the DMC8 Relay card to a configuring PC
1. Connect the NTCW12DA cable to the connector on the backplane of the DMC8
Relay card.
Insert P1 into the DMC8 Relay card backplane connector located on the PBX shelf/
module or Cabinet.
2. If the Configuring PC is on a captive LAN, link the DMC8 Relay card to the
Configuring PC.
Insert P3 into the captive LAN RJ45 connector.
3. If the Configuring PC is on the DMC DECT Manager server dedicated LAN,
Insert P3 into the DMC DECT Manager server dedicated LAN RJ45 connector. See
Connecting the DMC8 Relay card to the DMC DECT Manager server on
page 186.
Resetting the DMC8 Relay card default IP address to the LAN IP address
The DMC8 Relay card default IP address 192.168.1.1 must be changed to conform to the
server network IP address plan.
Figure 118: Telnet 192.168.1.1
Complete the following steps.
Resetting the DMC8 Relay card default IP address to the LAN IP address
1. Open the Telnet dialog box.
Click Start on the Windows taskbar and choose Accessories > Telnet.
2. Enter username and password.
DMC DECT Fundamentals
August 2012
185
Installation and configuration
Type username dasuser and password dasuser.
3. When the connection prompt local appears, change the DMC8 Relay card
address.
Enter the following command:
ipconfig xxx.xxx.xxx.xxx yyy.yyy.yyy.yyy zzz.zzz.zzz.zzz
xxx.xxx.xxx.xxx = new IP address of the DMC8 Relay card.
yyy.yyy.yyy.yyy = subnet mask, usually 255.255.255.0
zzz.zzz.zzz.zzz = IP address if this is the gateway for the network.
Note:
zzz.zzz.zzz.zzz must be set to the IP address of the DMC DECT Manager server
Ethernet interface. If there are two Ethernet interfaces on the DMC DECT
Manager server, zzz.zzz.zzz.zzz must be set to the IP address of the interface
that is on the same network as the DMC8 Relay card.
Connecting the DMC8 Relay card to the DMC DECT Manager server
Figure 119: NTCW12DA Ethernet cable to DMC DECT Manager Server LAN connections
Complete the following steps.
186
DMC DECT Fundamentals
August 2012
Comments? [email protected]
Launching the DECT application
Connecting the DMC8 Relay card to a Captive LAN
1. If the DMC8 Relay card was configured on a captive LAN, remove the NTCW12DA
Ethernet cable from the captive LAN.
Disconnect P3 from the captive LAN RJ45 connector.
2. Connect the NTCW12DA cable to the DMC DECT Manager Server Dedicated
LAN.
Insert P3 into the Dedicated LAN RJ45 connector.
Launching the DECT application
Launching the DECT application
1. Launch the DMC DECT Manager
2. Select an existing PBX and click OK.
DMC DECT Fundamentals
August 2012
187
Installation and configuration
Adding DECT
Adding General System Properties
Figure 120: DECT Systems and DECT System Properties windows
Complete the following steps.
Adding DECT
1. Open the DECT System Properties dialog box.
Pull down File > Properties.
2. Enter the DECT system name.
Type the system name in the DECT System Name box.
3. Accept the changes.
Click the Apply button.
188
DMC DECT Fundamentals
August 2012
Comments? [email protected]
Adding DECT
Setting the DECT system IP address to match the DMC8 Relay card
Figure 121: System Properties - Communication
Complete the following steps.
Setting the IP address of the DMC8 Relay card in the manager
1. Open the Communications dialog box.
Click the Communications tab.
2. Enter the IP address.
Type the IP address that was entered in Resetting the DMC8 Relay card default IP
address to the LAN IP address on page 185.
3. If the communication link is Ethernet, select Ethernet.
Click the Ethernet radio button.
4. If the communication link is Serial, select Serial.
Click Serial radio button.
5. Accept the changes.
Click the OK button.
DMC DECT Fundamentals
August 2012
189
Installation and configuration
Note:
When the OK button or Apply button is clicked at this point, the manager attempts
to connect to the DECT system to write the MIB2 system name.
6. If required, program an Upstream Manager.
Go to Adding the upstream manager IP address, if required on page 190.
7. If an Upstream Manager is not required.
Go to Synchronizing data with DECT on page 191.
Adding the upstream manager IP address, if required
Figure 122: System Properties - Alarm
Complete the following steps.
Adding the upstream IP address, if required
1. Open the DECT System Properties dialog box.
Pull down File>Add.
2. Open the Alarm dialog box.
190
DMC DECT Fundamentals
August 2012
Comments? [email protected]
Synchronizing data with DECT
Click the Alarm tab.
3. Enter the IP address.
Type the Upstream manager IP address.
4. Accept the changes.
Click the OK button.
Synchronizing data with DECT
When the DECT manager connects to DECT, synchronization occurs. Synchronization
compares the database on the manager to the database of the DECT system. Database
mismatches are flagged by dialog boxes. The opportunity to change either the DECT system
data or the manager data is given.
Figure 123: DECT Systems
Complete the following steps:
Synchronizing data with the DECT system
1. If the toolbar icon is red, the connection to the DECT system is enabled. Disconnect
from the DECT system.
Double-click the icon, or use File>Disonnect. Go to Synchronizing DECT PARI and
SARI on page 192.
2. If the toolbar icon is green, re-connect to the DECT system
Double-click the red icon, or use File>Connect.
DMC DECT Fundamentals
August 2012
191
Installation and configuration
Synchronizing DECT PARI and SARI
Figure 124: Synchronize DECT PARI and SARI Mismatch dialog box
Complete the following step:
Synchronizing DECT PARI and SARI
Store the DECT system PARI SARI parameters in the DMC DECT Manager
database.
192
DMC DECT Fundamentals
August 2012
Comments? [email protected]
Synchronizing data with DECT
Click the Update DECT Manager button.
Synchronizing DECT parameters
Figure 125: Synchronize DECT Parameters Mismatch dialog box
Complete the following step:
Synchronizing DECT Parameters
Store the DECT system DECT Parameters in the DMC DECT Manager database.
Click the Update DECT Manager button.
DMC DECT Fundamentals
August 2012
193
Installation and configuration
Synchronizing DECT Upstream Manager IP address
Figure 126: Synchronize DECT Upstream Manager IP address mismatch dialog box
Complete the following step:
Synchronizing DECT Upstream Manager IP address
Store the DECT system Upstream Manager IP address in the DMC DECT Manager
database.
194
DMC DECT Fundamentals
August 2012
Comments? [email protected]
Configuring handsets and retrieve subscription data
Click the Update DECT Manager button.
Configuring handsets and retrieve subscription data
Retrieving subscription data for handsets
Figure 127: DECT Systems window and Subscriptions window
Complete the following steps.
Subscribing handsets
1. Launch the Subscriptions window from the DECT Systems window.
Click the Applications menu, click Subscriptions.
2. Retrieve the subscription configuration data from the DMC DECT Manager Station
Administration database.
Note:
At this point, no handset data appears in the Subscriptions window.
In the Subscriptions window, click the Operations menu, click Retrieve DMC DECT
Manager Configuration.
3. Open the Configure DECT Subscription dialog box.
DMC DECT Fundamentals
August 2012
195
Installation and configuration
Note:
At this point, all handsets configured on DMC DECT Manager Station
Administration are shown in the Subscriptions window
Click the File menu, click Add or click:
Enabling subscription
Figure 128: Subscriptions window
Complete the following steps for each handset
Configuring handsets
1.
Note:
At this point, there are no PINs shown in the Subscriptions window.
Select a handset from the list.
Click a handset in the list to highlight a row.
2. Enable handsets.
Click the Operations menu, click Enable or click:
196
DMC DECT Fundamentals
August 2012
Comments? [email protected]
Configuring handsets and retrieve subscription data
Activating the PIN on the handsets
Figure 129: Subscriptions window
Complete the following step:
Obtaining the PIN
Note:
At this point, in the Subscriptions window, the PINs are shown and the Status is
Enabled.
Subscribe the DECT handsets.
See Handset subscription on page 197.
Note:
When a handset is subscribed, the Subscription window shows the Status column as
Subscribed and does not show a PIN.
Handset subscription
For detailed information on subscribing a handset, refer to the DECT Handset user guides.
DMC DECT Fundamentals
August 2012
197
Installation and configuration
Basestation Powering and Muting
Opening RFP window
Figure 130: DECT Systems main window and RFP window
Complete the following steps:
Opening RFP window
1. Launch the DECT Systems window.
2. Launch the Boards window.
On the DECT Systems window, click the Applications menu, click Boards.
3. Select a basestation from the list.
Click RFP in the list to highlight a row.
4. Open the Radio Fixed Part properties dialog box.
Click the File menu, click Properties.
198
DMC DECT Fundamentals
August 2012
Comments? [email protected]
Basestation Powering and Muting
Setting basestation alarm muting, line power, and comments
Figure 131: DECT Radio Fixed Parts
Complete the following steps:
Setting alarm muting, line power, and comments for basestations
1. Set alarm muting. Select No to deny alarm muting or Yes to allow alarm muting.
Click No or Yes.
2. Enter up to 80 characters for comments.
Type comments.
3. Select local powered or line powered for the selected basestation.
Click the Line Powered or Local Powered radio button.
4. Apply the selections.
Click the OK button.
DMC DECT Fundamentals
August 2012
199
Installation and configuration
Upgrade a DECT system to an SNMP-managed system
There are two types of managers for DECT systems:
• Windows Manager
• DMC DECT Manager application
The Windows Manager, a non-SNMP device, is used to manage the first generation of DECT
systems. A DMC DECT Manager manages the present generation of DECT systems.
The following terms are used:
• The DMC (NTCW00AA) and DMC-E (NTCW01AA) are referred to as DMC4 and DMC4E.
• A DECT system equipped with both DMC4/DMC4-E and DMC8/DMC8-E is referred to
as a Mixed DECT system.
An DMC DECT Manager can manage a DMC4/DMC4-E DECT system or a Mixed DECT
system.
In a DMC4/DMC4-E DECT system, or a Mixed DECT system managed by an DMC DECT
Manager, the DMC cards must run SNMP software.
A Mixed DECT system must be managed by a DMC DECT Manager. In a Mixed DECT system,
a DMC8/DMC8-E must be the relay card.
In a DMC4/DMC4-E DECT system, or a Mixed DECT system managed by DMC DECT
Manager, the DMC4 cards must run 45100xxx.dwl software, and the DMC8 cards/ DMC8-E
cards must run 47000xxx.dwl software.
Connecting a DMC DECT Manager to a DMC4 relay card using an Ethernet connection is not
supported. Only a V.24 connection can be used.
Configure a local connection
Complete the following steps to configure a local connection.
Configuring a local connection
1. Connect the NTCW12AA cable to the DMC4 relay card MDF connector.
2. Choose the DMC DECT Manager Server COM port.
3. Install the null modem plug.
200
DMC DECT Fundamentals
August 2012
Comments? [email protected]
Upgrade a DECT system to an SNMP-managed system
Connect the DB-25 connector end and the NTCW12AA cable end into the
A0773252 null modem adapter.
4. Connect the DB-9 end into the chosen PC COM port.
Refer to Table 39: NTCW12AA cable to MDF connections on page 201 when connecting the
NTCW12AA cable to the MDF.
Table 39: NTCW12AA cable to MDF connections
DMC Relay card
MDF connection
Cable colour
DB-25 connector
pin number
Signal designator
T1
Gray
8
V.24DCD
R2
Yellow
4
V.24RTS
T3
Blue
2
V.24TXD
R3
Red
3
V.24RXD
T4
Pink
7
V.24GND
Note:
The BIX tip and ring connections shown in Table 39: NTCW12AA cable to MDF
connections on page 201 correspond to standard BIX designation. The first pair is labeled
T0 and R0.
Dial-up configuration
For the DMC DECT Manager to communicate over PPP with the DECT system, a RAS service
must be configured for dial-out using the appropriate modem.
Note:
The DECT system can also communicate directly over a modem to a remote DMC DECT
Manager.
Note:
It is also possible to connect to DMC8 relay cards using PPP (serial connect). When
connecting to a DMC8 relay board using PPP, Avaya recommends that jumpers J6, J7, J8,
and J9 be strapped for V.24 on the DMC.
Complete the following steps to configure the dial-up connection.
Configuring a dial-up connection
1. Open Control Panel > Phone and Modem Options. Click the Modems tab, if not
selected. See Figure 132: Phone and Modem Options window on page 202.
DMC DECT Fundamentals
August 2012
201
Installation and configuration
Figure 132: Phone and Modem Options window
2. Click Add.
The Install New Modem window opens. See Figure 133: Modem detection on
page 203.
3. Select the Don't detect my modem check box.
202
DMC DECT Fundamentals
August 2012
Comments? [email protected]
Upgrade a DECT system to an SNMP-managed system
Figure 133: Modem detection
4. Click Next.
The Wizard displays a list of modem manufacturers and a list of the corresponding
modem models. See Figure 134: Manufacturers and Models lists on page 203.
5. From the Manufacturers list:, select (Standard Modem Types).
Figure 134: Manufacturers and Models lists
6. From the Models list:, select Communications cable between two computers.
DMC DECT Fundamentals
August 2012
203
Installation and configuration
7. Click Next.
The Wizard requests information about the ports on which the selected modem is
installed. See Figure 135: Port selection on page 204.
8. Select a COM port that your PC supports.
Note:
Choose the COM port where you made the DB-9 connection.
Figure 135: Port selection
9. Click Next.
The Wizard states that modem installation is successful. See Figure 136:
Successful modem installation window on page 205.
204
DMC DECT Fundamentals
August 2012
Comments? [email protected]
Upgrade a DECT system to an SNMP-managed system
Figure 136: Successful modem installation window
10. Click Finish.
Once installed, the properties of the modem must be configured to communicate serially to the
DECT system.
Configuring the modem
1. Open Control Panel > Phone and Modem Options. Click the Modems tab, if not
selected. See Figure 137: Control Panel - Phone and Modem Options - Modems
tab on page 206.
DMC DECT Fundamentals
August 2012
205
Installation and configuration
Figure 137: Control Panel - Phone and Modem Options - Modems tab
2. Select Communications cable between two computers.
3. Click Properties.
The Communications cable between two computers Properties window opens. See
Figure 138: Properties window - General tab on page 207.
206
DMC DECT Fundamentals
August 2012
Comments? [email protected]
Upgrade a DECT system to an SNMP-managed system
Figure 138: Properties window - General tab
4. Select 38400 from the Maximum Port Speed drop-down list.
5. Click the Advanced tab. See Figure 139: Properties window - Advanced tab on
page 208.
DMC DECT Fundamentals
August 2012
207
Installation and configuration
Figure 139: Properties window - Advanced tab
6. Click Change Default Preferences.
The Communications cable between two computers Default Preferences window
opens. See Figure 140: Change Default Preferences - General tab on page 209.
208
DMC DECT Fundamentals
August 2012
Comments? [email protected]
Upgrade a DECT system to an SNMP-managed system
Figure 140: Change Default Preferences - General tab
7. Select None from the Flow control: drop-down list in Data Connection
Preferences.
8. Click the Advanced tab. See Figure 141: Change Default Preferences - Advanced
tab on page 210.
DMC DECT Fundamentals
August 2012
209
Installation and configuration
Figure 141: Change Default Preferences - Advanced tab
9. Define Hardware Settings on the Advanced tab:
a. Set the Data bits to 8.
b. Set the Parity bits to None.
c. Set the Stop bits to 1.
10. Click OK.
The modem configuration windows close.
Network and dial-up connections configuration
Configuring the network and dial-up connections
1. Select Control Panel > Network and Dial-up Connections.
2. Double-click the Make New Connection icon.
The Connection Wizard starts. See Figure 142: Network Connection Wizard on
page 211.
210
DMC DECT Fundamentals
August 2012
Comments? [email protected]
Upgrade a DECT system to an SNMP-managed system
Figure 142: Network Connection Wizard
3. Click Next.
The Network Connection Type window opens. See Figure 143: Network Connection
Type window on page 211.
4. Select the Connect directly to another computer radio button.
Figure 143: Network Connection Type window
5. Click Next.
DMC DECT Fundamentals
August 2012
211
Installation and configuration
The Host or Guest window opens. See Figure 144: Host or Guest window on
page 212.
6. Select the Guest radio button.
Figure 144: Host or Guest window
7. Click Next.
The Select a Device window opens. See Figure 145: Select a Device window on
page 213.
8. Select Communications cable between two computers from the Select a device:
drop-down list.
212
DMC DECT Fundamentals
August 2012
Comments? [email protected]
Upgrade a DECT system to an SNMP-managed system
Figure 145: Select a Device window
9. Click Next.
The Connection Availability window opens. See Figure 146: Connection Availability
window on page 213.
10. Select the For all users radio button.
Figure 146: Connection Availability window
11. Click Next.
DMC DECT Fundamentals
August 2012
213
Installation and configuration
The Completing the Network Connection Wizard window opens. See Figure 147:
Completing the Network Connection Wizard on page 214.
12. Type a name for the connection.
Figure 147: Completing the Network Connection Wizard
13. Click Finish.
14. Choose a username and password for the connection.
15. Click Close.
16. Restart the PC.
Change the DMC4 relay card default IP address
Important:
The DMC4 card has a default IP address of 192.168.1.1. This DMC4 address must be
changed to conform to the network IP address plan.
Reset the DMC4 relay card to the server IP address
Open Telnet on the PC that is used for configuring. Connect to the default DMC4 IP address
(192.168.1.1). Figure 148: Telnet to 192.168.1.1 on page 215 shows the Telnet session.
214
DMC DECT Fundamentals
August 2012
Comments? [email protected]
Upgrade a DECT system to an SNMP-managed system
Figure 148: Telnet to 192.168.1.1
Complete the following steps to reset the DMC4 relay card to the server IP address.
Resetting the DMC4 relay card to the server IP address
1. Open the Telnet dialog box.
Click Start on the Windows taskbar and choose Accessories > Telnet.
2. Enter the username and password.
Username: dasuser Password: dasuser
3. Change the relay DMC4 card address when the connection prompt local appears.
Enter the following command:
ipconfig xxx.xxx.xxx.xxx yyy.yyy.yyy.yyy zzz.zzz.zzz.zzz
xxx.xxx.xxx.xxx
= new IP address of the DMC4 relay card
yyy.yyy.yyy.yyy
= subnet mask (usually 255.255.255.0)
zzz.zzz.zzz.zzz
= IP address if this is the gateway for the network.
Note:
Set zzz.zzz.zzz.zzz to the IP address of the DMC DECT Manager server Ethernet
interface. If there are two Ethernet interfaces on the DMC DECT Manager server,
set zzz.zzz.zzz.zzz to the IP address of the interface that is on the same network
as the DMC4 relay card.
Launch the DMC DECT Manager back-end process
The back-end process must be visible to establish a connection. If the back-end is closed in
error, DMC DECT Manager does not run.
DMC DECT Fundamentals
August 2012
215
Installation and configuration
Important:
Always ensure the Windows Registry is backed up before opening the Registry and Registry
keys.
Complete the following steps to launch the DMC DECT Manager back-end process.
Launching the DMC DECT Manager back-end process
1. Open the registry window.
Click Start on the Windows taskbar, and select Run > regedit.
2. Copy the value of the key to the clipboard.
Highlight HKEY_LOCAL_MACHINE\SOFTWARE\NorMat\SMP\OTMServices
\DECT\Args, right-click the highlighted text, and select Copy.
3. Paste the value of the registry key (that you copied in Step 2) to the Command
Prompt window.
Open the Command Prompt window. At the command prompt, type java, press the
space bar once (to enter a space), and then paste the text you copied from the
registry. See Figure 149: Command Prompt window with registry key value
entered on page 216.
4. Press Enter.
The DMC DECT Manager back-end is launched.
Figure 149: Command Prompt window with registry key value entered
216
DMC DECT Fundamentals
August 2012
Comments? [email protected]
Upgrade a DECT system to an SNMP-managed system
DAS configuration
It is necessary to configure the DECT Access System (DAS). You must first add the DECT
system to DMC DECT Manager.
Adding the DECT system to DMC DECT Manager
1. Launch the DMC DECT Manager application.
2. Select File > Add.
3. Enter the DECT System Name on the General tab of the DMC DECT Manager DECT System Properties window. See Figure 150: DMC DECT Manager - DECT
System Properties window on page 217.
Figure 150: DMC DECT Manager - DECT System Properties window
4. Click Apply.
5. Click the Communication tab to select it. See Figure 151: DECT System Properties
- communication tab on page 218.
DMC DECT Fundamentals
August 2012
217
Installation and configuration
Figure 151: DECT System Properties - communication tab
6. Enter the IP address of this DMC4 card (use the address that you configured in
Resetting the DMC4 relay card to the server IP address on page 215).
7. Select the Serial radio button.
8. Click Details.
The DMC DECT Manager System Detailed Connection settings properties window
opens.
9. Select the COM port that DAS uses to connect to the PC.
218
DMC DECT Fundamentals
August 2012
Comments? [email protected]
Upgrade a DECT system to an SNMP-managed system
Figure 152: DMC DECT Manager - DECT System Detailed Connection settings
properties window
10. Enter the IP address of the DMC DECT Manager Server (for example,
192.168.100.179) in the DMC DECT Manager Server IP Interface text box.
After you successfully added the DECT system to the DMC DECT Manager, a new icon
appears in the Network and Dial-up Connections window as shown in Figure 153: New
connection icon in the Network and Dial-up Connections window on page 220.
Note that the icon represents a Direct PC to PC cable connection. If you are connected using
a modem, the icon shows a telephone, which represents a dial-up connection.
DMC DECT Fundamentals
August 2012
219
Installation and configuration
Figure 153: New connection icon in the Network and Dial-up Connections window
Note:
At this stage, disable the LAN. If it is in the enabled state, it can cause an error when
attempting to connect to the DECT system using the RAS connection.
The following figure shows an example of the DOS window running the DECT back-end
process after a new DECT site has been added using a serial connection.
220
DMC DECT Fundamentals
August 2012
Comments? [email protected]
Upgrade a DECT system to an SNMP-managed system
Figure 154: DOS window running the back-end process - new DECT site using serial connection
You can now connect to the new DECT system.
When connecting, the following sequence of messages appear at the bottom of the DECT
systems window:
Connecting
The connection to the remote MODEM has been established successfully
Connecting
Authenticating onto the DECT system
Connected
Connections opened
Connected
Synchronization with the DECT System completed
Note:
If there is a problem connecting to the system and the error seen on the back-end process
window is related to the Authentication process, try resetting the DMC4 relay card password
to correct the error.
Synchronize data with the DECT system
When the DMC DECT Manager connects to the DECT system, synchronization occurs. The
DMC DECT Manager database can be updated with the DECT system data.
When the DECT system is connected, there is a red icon on the toolbar. See Figure 155: DECT
Systems window and a synchronize dialog box on page 222.
DMC DECT Fundamentals
August 2012
221
Installation and configuration
Figure 155: DECT Systems window and a synchronize dialog box
With the DMC DECT Manager connected to the system, store the system data in the DMC
DECT Manager database by clicking the Update DECT Manager button on all synchronization
dialog boxes.
Activate the firmware on all DMC4 cards
Confirm the active software package on the DMC4 relay card (see Figure 156: DMC window
and DECT Board properties dialog box on page 223). This must be the same 45100xxx.dwl
firmware that was loaded earlier.
If it is not the 45100xxx.dwl firmware, you must reload the firmware by selecting Upload from
the Firmware menu on the DECT Systems window (see Figure 157: DECT Systems
window on page 224). Choose the file you want to upload. The DMC4 card reboots. You must
then re-connect to the DECT system.
222
DMC DECT Fundamentals
August 2012
Comments? [email protected]
Upgrade a DECT system to an SNMP-managed system
Figure 156: DMC window and DECT Board properties dialog box
When you have confirmed that the software package on the DMC4 relay card is correct,
activate this firmware on all DMC4 cards. Complete the following steps to activate the firmware
on the DMC4 cards.
Activating the firmware on DMC4 cards
1. Re-connect the faceplate cables from the relay card to the adjoining DMC4 cards.
2. From the Firmware menu, select Activation.
After the firmware has been activated, ensure that the Active Software Package on
all DMC4 cards corresponds to the 45100xxx.dwl firmware. See Figure 158: DMC
window on page 224.
DMC DECT Fundamentals
August 2012
223
Installation and configuration
Figure 157: DECT Systems window
Figure 158: DMC window
Your DECT system is now complete and fully configured.
Implementing and operating MSMN
Implementing the MSMN feature
The sequence of actions required to configure this feature are as follows:
224
DMC DECT Fundamentals
August 2012
Comments? [email protected]
Implementing and operating MSMN
1. Configure a phantom superloop using LD 97, if required.
2. Create the new DCS sets in LD 10.
3. Configure the RCFW data in LD 57 and LD 15 for handsets assigned as a visitor.
4. Use the DECT manager to configure sets on the DMC8.
5. Pre-subscribe the visiting handset one time at the MCDN node.
Note:
Subscription includes both overlay configuration and DECT Manager
configuration. For DECT Manager configuration.
Table 40: LD 10 - Add/Change DCS data block or data blocks.
Prompt
Response
Description
REQ:
NEW NEW 1-255
CHG ECHG
NEW = Add a Digital Cordless Set
NEW X = The generation of new DCS units stop when
the maximum Index of 509 is reached on a single
DMC8 or VTNs on the system run out or WRLS
Licence limits reached. All new DCS must be on the
same DMC8.
CHG = Allows the DCS configuration to change to
another DMC8. All new DCS must be on the same
DMC8.
ECHG = This command can change either the VSIT
response or the HMDN response.
TYPE:
DCS
Digital Cordless Set. Differentiates between analogue
sets and concentrated digital DECT handsets.
If TYPE=DCS, the system allocates the next available
VTN, and WRLS defaults to YES and WTYP defaults
to DECT. If package #350 is included, MWUN defaults
to 32.
CLS defaults to ERCA, allowing the Enhanced RCFW
feature.
TN
Terminal Number
lscu
Format for Large System and CS 1000E system,
where l = loop, s = shelf, c = card, u = unit
The system provides the Virtual TN for the handset.
CDEN
(4D)
Card Density. Only valid value for IPE is 4D. Normal
input is <CR>.
WRLS
YES
WiReLess analogue Set – entry defaults to YES with
no user input; value cannot be CHG'ed.
WTYP
DECT
Wireless TYPe – entry defaults to DECT with no user
input; value cannot be CHG'ed.
DMC DECT Fundamentals
August 2012
225
Installation and configuration
Prompt
MWUN
Response
32
Description
Maximum number of Wireless UNits – entry defaults
to 32 with no user input – value cannot be CHG'ed.
Note:
If MWUN = 32, CDEN automatically changes to 8D,
and prints as an 8D unit.
Location of the actual DMC8. Assigns a TN to a DECT
Mobility Card located on an IPE shelf or cabinet.
DMC8
lsc
Format for Large System and CS 1000E system,
where l = loop, s = shelf, c = card
INDX
0. 509
DMC8 index to map the Virtual TN to a DMC8 TN.
Starting index on DMC8, each unit increments to the
next available unit.
VSIT
(NO) YES
ViSITing DECT set. Determines the difference
between a local handset and a visiting handset. VSIT
available if the MSMN Package is unrestricted. YES =
visiting DECT set. NO = local DECT set.
HMDN
x...x
HoMe Directory Number. Sets the DN as a valid
MCDN network DN. NMDN available if VSIT = YES.
Table 41: LD 10 - Copy DCS data block or data blocks.
Prompt
Response
Description
REQ:
CPY 1 – 32
CPY n = The generation of new units stop when the
following occurs:
maximum index of 509 is reached on a single DMC8
or
VTNs on the system run out or
WRLS Licence limits reached.
All DCS must be on the same DMC8.
DMC8
lscl
Location of the actual DMC8 to copy on an IPE shelf
or cabinet.
Table 42: LD 10 - Remove DCS data block or data blocks.
Prompt
226
Response
Description
REQ:
OUT 1-255
OUT X = Removing units stops when the maximum
index of 509 is reached on a single DMC8. All new
DCS must be on the same DMC8.
DMC8
lscl
Location of the actual DMC8 to out on an IPE shelf or
cabinet.
DMC DECT Fundamentals
August 2012
Comments? [email protected]
Implementing and operating MSMN
Table 43: LD 10 - Convert handset type 500 to DCS
Prompt
REQ
Response
CDCS
Description
Convert Digital Cordless Set – always convert from a
non-concentrated to a concentrated system after
software upgrade. Non-concentrated mode is not
supported now. The conversion routine converts the
500 units to DCS units and moves them from the
actual TN to a virtual TN.
The CDCS conversion routine prints each TN as it is moved, in the following format:
500 TN l s c 00 = DCS TN L S C Index#.
where: L S C = virtual TN
Example
Index# = default of the unit number of the 500 type set.
Table 44: LD 20 - Print actual DMC8 TN and virtual DMC8 TN list.
Prompt
Response
Description
REQ
PRT
Request.
TYPE
DCS
Digital Cordless Set.
TN
lsc
l
lscu
Terminal Number for DMC8 card on IPE shelf or
Cabinet
Virtual Terminal Number on an IPE shelf or Cabinet
Format for Large System and CS 1000E system,
where l = loop, s = shelf, c = card, u = unit
The print routine outputs the following format:
INDX
Index #
VTN lll s cc uu
where: Index # = Index number of virtual TN.
Example
lll s cc uu = Virtual TN of unit.
Table 45: LD 81 - Print DCS features.
Prompt
Response
Description
REQ
LST
Request.
FEAT
VSIT
Feature Request - DECT visitors.
HMDN
Xx / <cr>
HoMe Directory Number. Specify a single HMDN or
print all HMDN on system.
DMC DECT Fundamentals
August 2012
227
Installation and configuration
The LD 81 output format is as follows:
DCS
Cust#
Local DN
TN lll s cc uu
HMDN
Home DN
Last Activity Date.
where:
• Cust# = Customer Number
• Local DN = Local Directory Number of user
• lll s cc uu = TN of unit
• Home DN = Home directory number of user
• Last Activity Date = Last date of service change activity for user
LD 83 – Prints DCS terminal numbers with a unit type of DCS instead of 500.
Operating the MSMN feature
To activate the MSMN feature, perform the following steps.
1. Turn the handset on within the coverage range of a visited DECT system.
2. Enter the coverage range of a visited DECT system from another DECT system
with the handset turned on.
To deactivate the MSMN feature, perform the following steps.
1. Turn the handset off within coverage range of the visited DECT system. (The
handset must have the DECT Detach feature.)
2. Turn the handset on at the home DECT system. (Any CFW related to the handset
is cancelled.)
3. Enter the coverage range of the home DECT system with the handset on. (Any CFW
related to the handset is cancelled.)
228
DMC DECT Fundamentals
August 2012
Comments? [email protected]
Chapter 6: System administration
Contents
This section contains information on the following topics:
DECT Systems window on page 230
Deleting DECT systems on page 233
Retrieving subscription data for DECT handsets on page 234
Enabling subscriptions on page 235
Activating the PIN on the DECT handsets on page 236
Working with DECT handset subscriptions on page 236
Deleting TNs that are not on the switch on page 245
Updating data on DMC DECT Manager or updating data on a DECT system on page 246
Provisioning a DECT system remotely on page 247
Subscribing a DECT system remotely on page 249
Modifying system properties on page 251
Keeping or removing non-operational DMC8 cards from DMC DECT Manager on page 261
Keeping or removing non-operational basestations from DMC DECT Manager on page 262
Resolving a subscription configuration mismatch on page 263
Troubleshooting on page 264
Logging into the DMC DECT Manager
Refer to section PBX system configuration of the NTP Using the DMC DECT Manager Avaya
Communication Server 1000 (NN43001-142).
for information about connecting DMC DECT Manager to a DECT system.
DMC DECT Fundamentals
August 2012
229
System administration
Selecting the PBX that supports DECT
Refer to section PBX system configuration of the NTP Using the DMC DECT Manager Avaya
Communication Server 1000 (NN43001-142) for information about connecting the DMC DECT
Manager to a DECT system.
DECT Systems window
Figure 159: DECT Systems window
Opening Subscriptions, Boards, and RFP windows
Opening Subscriptions, Boards, and RFP windows
1. Select a DECT system.
Highlight a system from the list.
2. Open one of the following from the DECT Systems window:
• Subscriptions window
• Boards (DMC) window
• Radios (basestation) window
Click on the appropriate entry in the Applications menu.
230
DMC DECT Fundamentals
August 2012
Comments? [email protected]
DECT Systems window
Connecting to a DECT system
Complete the following steps.
Connecting to a DECT system
1. Select a DECT system from the DECT Systems window list.
Highlight a DECT system.
2. Perform one of the following actions from the DECT Systems window:
a. connect to a DECT system
b. disconnect from a DECT system
c. lock a connection to a DECT system
d. unlock a connection from a DECT system
From the Applications menu click on the following items, or click on the following
icon:
a. Connect or (green)
b. Disconnect or (yellow)
c. Lock or (red)
d. Unlock or (yellow)
Note:
While the Connection status is Connecting or Disconnecting, the Connect/Disconnect tool
is disabled. The status bar shows the connection progress.
DMC DECT Fundamentals
August 2012
231
System administration
Establishing a permanent connection to a DECT system
Figure 160: DECT Systems window and DECT System Properties window
Complete the following steps.
Establishing a permanent connection to a DECT system
1. Select a DECT system from the DECT Systems window list.
Highlight a DECT system.
2. Connect to a DECT system.
From the Applications menu, click on Connect or click on the(green) icon.
3. Open the Properties dialog box.
From the File menu, click on Properties.
4. Select Permanent Connection.
Check the Permanent Connection box.
5. Accept the changes.
Click on the OK button.
232
DMC DECT Fundamentals
August 2012
Comments? [email protected]
Deleting DECT systems
Deleting DECT systems
Figure 161: DECT Systems window
Complete the following steps.
Deleting DECT systems
1. Using Windows, log in to DMC DECT Manager. Select the system that supports
DECT. Launch the DECT application. Open the DECT Systems window.
Follow the instructions in Logging into the DMC DECT Manager on page 229 and
Selecting the PBX that supports DECT on page 230.
2. Select a DECT system to delete.
Highlight a DECT system from the list.
3. Delete the DECT system.
From the File menu, click on Delete.
DMC DECT Fundamentals
August 2012
233
System administration
Retrieving subscription data for DECT handsets
Figure 162: DECT Subscriptions window, Synchronize DECT and Administration Config window
Complete the following steps.
Retrieving subscription data for DECT handsets
1. Using Windows, login to DMC DECT Manager. Select the system that supports the
DECT system. Launch the DECT application. Open the DECT Systems window.
Follow the instructions in Logging into the DMC DECT Manager on page 229 and
Selecting the PBX that supports DECT on page 230.
2. Open the Subscriptions window.
Follow the instructions in DECT Systems window on page 230.
3. Retrieve the subscription configuration data from the DMC DECT Manager Station
Administration database.
In the Subscriptions window, click on the Operations menu, click on Retrieve DMC
DECT Manager Configuration.
Note:
At this point, all DECT handsets configured on DMC DECT Manager Station
Administration are shown in the Subscriptions window.
4. Open the Configure DECT Subscription dialog box.
234
DMC DECT Fundamentals
August 2012
Comments? [email protected]
Enabling subscriptions
5. Click the File menu.
6. Click Add or
.
Enabling subscriptions
Figure 163: Subscriptions window
Complete the following steps for each DECT handset:
Enabling DECT handsets
Note:
At this point, there are no PINs shown in the Subscriptions window.
1. Select a DECT handset from the list.
Click on one DECT handset in the list to highlight a row.
2. Enable DECT handsets.
Click on the Operations menu. Click Enable or click
.
DMC DECT Fundamentals
August 2012
235
System administration
Activating the PIN on the DECT handsets
Figure 164: Subscriptions window
Complete the following step:
Obtaining the PIN
Note:
At this point, in the Subscriptions window, the PINs are shown and the Status is Enabled.
Subscribe the DECT Handsets.
For information on subscribing and provisioning handsets refer to the DECT Handset user
guides.
Note:
When a DECT handset is subscribed, the Subscription window shows the Status column as
Subscribed and does not show a PIN.
Working with DECT handset subscriptions
Procedures are available for:
1. Disabling a DECT handset subscription on page 237
2. Copying a DECT handset subscription on page 238
3. Moving a DECT handset subscription on page 239
4. Finding a DECT handset subscription on page 240
5. Importing a DECT handset subscription on page 241
6. Exporting a DECT handset subscription on page 243
7. Force disabling a DECT handset subscription on page 244
236
DMC DECT Fundamentals
August 2012
Comments? [email protected]
Working with DECT handset subscriptions
Disabling a DECT handset subscription
Figure 165: DECT Subscriptions window and Disable DECT Subscription window
Note:
For further information, refer to Multi-site Mobility Networking subscriptions on page 32.
Complete the following steps.
Disabling DECT handset subscription
1. Using Windows, login to DMC DECT Manager. Select the system that supports the
DECT system. Launch the DECT application. Open the DECT Systems window.
Follow the instructions in Logging into the DMC DECT Manager on page 229 and
Selecting the PBX that supports DECT on page 230.
2. Open the Subscriptions window.
Follow the instructions in DECT Systems window on page 230.
3. Select a DECT handset subscriptions for disabling.
Note:
A single DECT handset, a list of DECT handsets, or all DECT handsets on a DMC
can be selected.
Highlight a DMC TN and an Index, or several indexes in the list.
4. Disable the DECT handset subscriptions.
DMC DECT Fundamentals
August 2012
237
System administration
From the Operations menu, click Disable.
5. Disable from this system only.
Click OK.
6. Disable from all systems where the portable set is subscribed.
Click OK.
Copying a DECT handset subscription
Figure 166: DECT Subscriptions window and DECT Copy Subscription window
Complete the following steps.
Copying a DECT handset subscription
1. Using Windows, login to DMC DECT Manager. Select the system that supports the
DECT system. Launch the DECT application. Open the DECT Systems window.
Follow the instructions in Logging into the DMC DECT Manager on page 229 and
Selecting the PBX that supports DECT on page 230.
2. Select the source DECT system to copy the subscription.
Highlight the DECT system in the DECT Systems window.
3. Open the Subscriptions window.
4. Open the DECT Copy Subscription dialog box.
From the Edit menu, click on Copy.
5. Select a DECT system where the copied subscription is to be stored
Pull-down the Destination DECT System list and highlight a system name.
238
DMC DECT Fundamentals
August 2012
Comments? [email protected]
Working with DECT handset subscriptions
6. Select DMC on the DECT system where the copied subscription is to be stored.
Pull-down the Destination DMC list and highlight a DMC.
7. Select a DECT handset subscriptions to copy.
Note:
Select a single DECT handset, a list of DECT handsets, or all DECT handsets
on a DMC.
Highlight a DMC TN and an Index (or more than one index) in the list.
8. Select a DMC or Index for the subscriptions.
Highlight a To: DMC TN or a To: Index (or more than one index) in the list.
9. Accept the changes.
Click on the OK button.
Moving a DECT handset subscription
Figure 167: DECT Subscriptions window and DECT Move Subscription window
Complete the following steps.
Moving a DECT handset subscription
1. Using Windows, login to DMC DECT Manager. Select the system that supports the
DECT system. Launch the DECT application. Open the DECT Systems window.
DMC DECT Fundamentals
August 2012
239
System administration
Follow the instructions in Logging into the DMC DECT Manager on page 229 and
Selecting the PBX that supports DECT on page 230.
2. Open the Subscriptions window.
3. Open the DECT Move Subscription dialog box.
From the Edit menu, click on Move.
4. Select a DECT system where the moved subscription is to be put.
Pull-down the Destination DECT System list and highlight a system name.
5. Select DMC on the DECT system where the moved subscription is to be put.
Pull-down the Destination DMC list and highlight a DMC.
6. Select DMC on the DECT system the moved subscription is to be put.
Pull-down the Destination DMC list and highlight a DMC.
7. Select a DECT handset subscriptions to move.
Note:
Select a single DECT handset, a list of DECT handsets, or all DECT handsets
on a DMC.
Highlight a DMC TN and an Index (or more than one index) in the list.
8. Select a DMC or Index for the subscriptions.
Highlight a To: DMC TN or a To: Index (or more than one index) in the list.
9. Accept the changes.
Click OK.
Finding a DECT handset subscription
Figure 168: DECT Subscriptions window and Find DECT Subscription window
Complete the following steps.
240
DMC DECT Fundamentals
August 2012
Comments? [email protected]
Working with DECT handset subscriptions
Finding a DECT handset subscription
1. Using Windows, login to DMC DECT Manager. Select the system that supports the
DECT system. Launch the DECT application. Open the DECT Systems window.
Follow the instructions in Logging into the DMC DECT Manager on page 229 and
Selecting the PBX that supports DECT on page 230.
2. Open the Subscriptions window.
3. Open the Find DECT Subscription dialog box.
From the Edit menu, click on Find.
4. Select find criteria.
Click on Find IPUI or Find Home DN, enter the value, and click on the Find
button.
5. View the results.
Importing a DECT handset subscription
Figure 169: DECT Subscriptions window and DECT Import Subscription window
Complete the following steps.
Importing a DECT handset subscription
1. Access the DECT Application.
Follow the instructions in Logging into the DMC DECT Manager on page 229
2. Open the Subscriptions window.
DMC DECT Fundamentals
August 2012
241
System administration
3. Open the DECT Import Subscription dialog box.
From the File menu, click on Import.
4. Select a DECT system where the imported subscription is to be put.
Pull-down the Destination DMC list and highlight a DMC.
5. Select DMC to be imported.
Pull-down the Destination DMC list and highlight a DMC.
6. Select a DECT handset subscriptions to import.
Note:
Select a single DECT handset, a list of DECT handsets, or all DECT handsets
on a DMC.
Highlight a DMC TN and an Index, or several indexs in the list.
7. Select a DMC or Index for the subscriptions.
Highlight a To: DMC TN or a To: Index, or several To: indexs in the list.
8. Accept the changes.
Click OK.
242
DMC DECT Fundamentals
August 2012
Comments? [email protected]
Working with DECT handset subscriptions
Exporting a DECT handset subscription
Figure 170: DECT Subscriptions window and Export Subscription window
Complete the following steps.
Exporting a DECT handset subscription
1. Using Windows, login to DMC DECT Manager. Select the system that supports the
DECT system. Launch the DECT application. Open the DECT Systems window.
Follow the instructions in Logging into the DMC DECT Manager on page 229 and
Selecting the PBX that supports DECT on page 230.
2. Open the Subscriptions window.
3. Open the Export DECT Subscription dialog box.
From the Find menu, click on Export.
4. Select a DECT handset subscriptions to export.
Note:
A single DECT handset, a list of DECT handsets, or all DECT handsets on a DMC
can be selected.
Highlight a DMC TN and an Index, or several indexes in the list.
5. Select a DMC or Index for the subscriptions.
Highlight a To: DMC TN or a To: Index, or several To: indexes in the list.
DMC DECT Fundamentals
August 2012
243
System administration
6. Accept the changes.
Click on the OK button.
7. Paste the subscriptions into a file.
Force disabling a DECT handset subscription
Figure 171: DECT Subscriptions window and Force disable DECT Subscription window
Complete the following steps.
Force disabling a DECT handset subscription
1. Using Windows, login to DMC DECT Manager. Select the system that supports the
DECT system. Launch the DECT application. Open the DECT Systems window.
Follow the instructions in:
• Logging into the DMC DECT Manager on page 229
• Selecting the PBX that supports DECT on page 230
• Launching the DECT application on page 187
2. Open the Subscriptions window.
3. Open the Force Disable DECT Subscription dialog box.
From the Operations menu, click on Force Disable.
4. Select a DECT handset subscriptions for Force Disabling.
244
DMC DECT Fundamentals
August 2012
Comments? [email protected]
Deleting TNs that are not on the switch
Note:
Select a single DECT handset, a list of DECT handsets, or all DECT handsets
on a DMC.
Highlight a DMC TN and an Index (or more than one index) in the list.
5. Disable the DECT handset subscriptions.
From the Operations menu, click on Force Disable.
6. Disable from this system only.
Click on OK button.
7. Disable from all systems where the portable set is subscribed.
Click OK.
Deleting TNs that are not on the switch
To remove configured sets (TRN status) that are no longer on the switch, perform the following
steps
Removing configured sets
1. Using Windows, log in to DMC DECT Manager. Select the system that supports the
DECT system. Launch the DECT application. Open the DECT Systems window.
Follow the instructions in Logging into the DMC DECT Manager on page 229 and
Selecting the PBX that supports DECT on page 230.
2. Open the Subscriptions window.
3. Open the DECT Move Subscription dialog box.
From the Edit menu, click Global update.
4. Select the sync status SSTAT.
Set Old value to the current status. Set New value to NEW.
5. Delete the TNs from the switch.
Note:
Perform this procedure after 500 analogue TNs have been converted to concentrated
TNs.
DMC DECT Fundamentals
August 2012
245
System administration
Updating data on DMC DECT Manager or updating data on
a DECT system
Figure 172: Mismatch dialog boxes
When the DECT manager connects to a DECT system, synchronization flags any differences
between the DECT manager database and the DECT system database with mismatch dialog
boxes. These dialog boxes are useful when provisioning DECT systems off-site.
See Provisioning a DECT system remotely on page 247 and Subscribing a DECT system
remotely on page 249.
Complete the following steps.
246
DMC DECT Fundamentals
August 2012
Comments? [email protected]
Provisioning a DECT system remotely
Updating data on DMC DECT Manager
1. Using Windows, login to DMC DECT Manager. Select the system that supports the
DECT system. Launch the DECT application. Open the DECT Systems window.
Follow the instructions in:
• Logging into the DMC DECT Manager on page 229
• Selecting the PBX that supports DECT on page 230
• Launching the DECT application on page 187
2. Using a web-based navigator, open the Administrator login screen and login. Select
the System Navigator. Select the system that supports the DECT system. Launch
the DECT application. Open the DECT Systems window.
Follow the instructions in:
• Web-based browser access to the DECT application
• Web Administrator Login
• Opening the Web current Status
• Opening the web System navigator
3. Select a DECT system.
Highlight a DECT system from the list.
4. Connect to a DECT system.
From the Applications menu, click Connect or click the (green) icon:
5. If any of the dialogs in appear, it is necessary to decide to update either the DECT
Manager or the DECT system.
Click on either the Update DECT Manager button, or Update DECT System
button.
Provisioning a DECT system remotely
A distributor can use a DECT system to configure a system and subscribe sets on it. If the
DECT Access System and board configuration are the same on both the distributor and the
customer DECT systems, and if the DECT handsets are properly programmed on the
customer-PBX-side, then the DMCs can be placed in the customer system and the DECT
handsets function properly.
DMC DECT Fundamentals
August 2012
247
System administration
Remote DMC8 provisioning where the customer site has a DECT
manager
Figure 173: Remote DMC8 provision where the customer site has a DECT manager
Complete the following step.
Provisioning remotely - the customer site has a DECT manager
Remotely provision DMC8s for a customer site.
Follow steps 1 to 6a/6b shown in Figure 173: Remote DMC8 provision where the customer
site has a DECT manager on page 248.
248
DMC DECT Fundamentals
August 2012
Comments? [email protected]
Subscribing a DECT system remotely
Remote DMC8 provisioning where the customer site does not have
a DECT manager
Figure 174: Remote DMC8 provision where customer site does not have a DECT manager
Complete the following step.
Provisioning remotely - the customer site does not have a DECT manager
Remotely provision a customer site.
Follow steps 1 to 6 shown in Figure 174: Remote DMC8 provision where customer site
does not have a DECT manager on page 249.
Subscribing a DECT system remotely
A DECT handset can subscribe itself to any DECT system, regardless of the DECT system
Primary Access Rights Identifier (PARI) and Secondary Access Rights Identifier (SARI). In
other words, from the DECT handset itself, the DECT handset can be subscribed to a DECT
system where the DECT handset is not necessarily intended to be operational. The customer
does not always have a DECT manager on site.
DMC DECT Fundamentals
August 2012
249
System administration
Remote DECT handset subscription where the customer site has a
DECT manager
Figure 175: Remote DECT handset subscription where the customer site has a DECT manager
Complete the following step.
Updating IP address on DMC DECT Manager
Remotely provision a customer site.
Follow steps 1 to 7 shown in Figure 175: Remote DECT handset subscription where the
customer site has a DECT manager on page 250.
250
DMC DECT Fundamentals
August 2012
Comments? [email protected]
Modifying system properties
Remote DECT handset subscription where the customer site does
not have a DECT manager
Figure 176: Remote DECT handset subscription where customer site does not have a DECT
manager
Complete the following step.
Updating IP address on DMC DECT Manager
Remotely provision a customer site.
Follow steps 1 to 4 shown in Figure 176: Remote DECT handset subscription where
customer site does not have a DECT manager on page 251.
Modifying system properties
Several system properties can be modified. Procedures are included for:
• Changing passwords on page 252
• Changing the DECT system name on page 253
• Changing the IP address on DMC DECT manager on page 254
• Changing the IP address on the DECT system DMC8 Relay card on page 255
• Changing a PARI or SARI on page 257
DMC DECT Fundamentals
August 2012
251
System administration
• Changing the Upstream Manager IP address on page 258
• Changing the time and date on page 259
• Changing parameters on page 260
Changing passwords
Note:
For lost passwords, see Recovering a password on page 310.
Figure 177: DECT Systems window and Change DECT Password
Complete the following steps.
Changing passwords
1. Using Windows, login to DMC DECT Manager. Select the system that supports the
DECT system. Launch the DECT application. Open the DECT Systems window.
Follow the instructions in Logging into the DMC DECT Manager on page 229 and
Launching the DECT application on page 187.
2. Using a web-based navigator, open the Administrator login screen and login. Select
the System Navigator. Select the system that supports the DECT system. Launch
the DECT application. Open the DECT Systems window.
Follow the instructions in:
• Web-based browser access to the DECT application
• Web Administrator Login
• Opening the Web current Status
252
DMC DECT Fundamentals
August 2012
Comments? [email protected]
Modifying system properties
• Opening the web System navigator
3. Open the DECT Systems Properties dialog box.
From the File menu, click on Properties, and click on the General tab.
4. Select Change Password.
Click on the Change Password button.
5. Change the password.
Enter the Old Password, enter the New Password, confirm the New Password, and
click OK.
Changing the DECT system name
Figure 178: DECT Systems window and DECT System Properties - General tab
Complete the following steps.
Changing the DECT system name
1. Using Windows, login to DMC DECT Manager. Select the system that supports the
DECT system. Launch the DECT application. Open the DECT Systems window.
Follow the instructions in Logging into the DMC DECT Manager on page 229 and
Launching the DECT application on page 187.
2. Using a web-based navigator, open the Administrator login screen and login. Select
the System Navigator. Select the system that supports the DECT system. Launch
the DECT application. Open the DECT Systems window.
DMC DECT Fundamentals
August 2012
253
System administration
Follow the instructions:
• Web-based browser access to the DECT application
• Web Administrator Login
• Opening the Web current Status
• Opening the web System navigator
3. Open the DECT Systems Properties dialog box.
From the File menu, click on Properties, and click on the General tab.
4. Change the DECT system name.
Enter the new name in the DECT System Name box.
Changing the IP address on DMC DECT manager
Before changing the IP address on the DMC DECT manager, close the connection. After the
change on the DECT system, open the connection as a safety check.
Figure 179: DECT Systems window and DECT System Properties - Communication tab
Complete the following steps.
Changing the IP address on the DECT system
1. Using Windows, login to DMC DECT Manager. Select the system that supports the
DECT system. Launch the DECT application. Open the DECT Systems window.
254
DMC DECT Fundamentals
August 2012
Comments? [email protected]
Modifying system properties
Follow the instructions in Logging into the DMC DECT Manager on page 229 and
Launching the DECT application on page 187.
2. Using a web-based navigator, open the Administrator login screen and login. Select
the System Navigator. Select the system that supports the DECT system. Launch
the DECT application. Open the DECT Systems window.
Follow the instructions:
• Web-based browser access to the DECT application
• Web Administrator Login
• Opening the Web current Status
• Opening the web System navigator
3. Open the DECT Systems Properties dialog box.
From the File menu, click on Properties, and click on the Communication tab.
4. Select Ethernet.
Click on the Ethernet radio button.
5. Accept the changes.
Click OK.
Changing the IP address on the DECT system DMC8 Relay card
Before changing the IP address of the DMC8 Relay card through Telnet, close the connection.
After the change on the DECT system, open the connection as a safety check.
DMC DECT Fundamentals
August 2012
255
System administration
Figure 180: Telnet 192.168.1.1
Complete the following steps.
Changing the IP address on DECT system DMC8 Relay card
1. Open the Telnet dialog box.
Click Start on the Windows taskbar and choose Accessories > Telnet.
2. Enter username and password.
Type username dasuser and password dasuser.
3. When the connection prompt local appears, change the DMC8 Relay card
address.
Enter the following command:
ipconfig xxx.xxx.xxx.xxx yyy.yyy.yyy.yyy zzz.zzz.zzz.zzz
xxx.xxx.xxx.xxx = new IP address of the DMC8 Relay card.
yyy.yyy.yyy.yyy = subnet mask, usually 255.255.255.0
zzz.zzz.zzz.zzz = IP address if this is the gateway for the network.
Note:
Set zzz.zzz.zzz.zzz to the IP address of the DMC DECT Manager server Ethernet
interface. If there are two Ethernet interfaces on the DMC DECT Manager server,
set zzz.zzz.zzz.zzz to the IP address of the interface, which is on the same
network as the DMC8 Relay card.
256
DMC DECT Fundamentals
August 2012
Comments? [email protected]
Modifying system properties
Changing a PARI or SARI
Note:
When the PARI or SARI changes, the DECT system resets and the connection closes. If
the connection is permanent, the DMC DECT Manager attempts to open in the
background.
Figure 181: DECT Systems window and DECT System Properties - Access tab
Complete the following steps.
Changing a PARI or SARI
1. Using Windows, login to DMC DECT Manager. Select the system that supports the
DECT system. Launch the DECT application. Open the DECT Systems window.
Follow the instructions in Logging into the DMC DECT Manager on page 229 and
Launching the DECT application on page 187.
2. Using a web-based navigator, open the Administrator login screen and login. Select
the System Navigator. Select the system that supports the DECT system. Launch
the DECT application. Open the DECT Systems window.
Follow the instructions:
• Web-based browser access to the DECT application
• Web Administrator Login
3. Open the DECT Systems Properties dialog box.
DMC DECT Fundamentals
August 2012
257
System administration
From the File menu, click on Properties, and click on the Access Right Identification
tab.
4. Change the PARI or SARI.
Enter the PARI or SARI.
5. Accept the changes.
Click on the OK button.
Changing the Upstream Manager IP address
Note:
An upstream manager IP address can only be programmed on the DMC8 Relay card.
Figure 182: DECT Systems window and DECT System Properties - Alarm tab
Complete the following steps.
Changing the Upstream Manager IP address
1. Using Windows, login to DMC DECT Manager. Select the system that supports the
DECT system. Launch the DECT application. Open the DECT Systems window.
Follow the instructions in Logging into the DMC DECT Manager on page 229 and
Launching the DECT application on page 187.
2. Using a web-based navigator, open the Administrator login screen and login. Select
the System Navigator. Select the system that supports the DECT system. Launch
the DECT application. Open the DECT Systems window.
258
DMC DECT Fundamentals
August 2012
Comments? [email protected]
Modifying system properties
Follow the instructions:
• Web-based browser access to the DECT application
• Web Administrator Login
• Opening the Web current Status
• Opening the web System navigator
3. Open the DECT Systems Properties dialog box.
From the File menu, click on Properties. Click the Alarm tab.
4. Change the Upstream Manager IP address.
Enter the Upstream Manager IP address.
5. Accept the changes.
Click on the OK button.
Changing the time and date
The time and date is used to time stamp the alarms.
Note:
The time and date must be changed when the DECT system reboots or a DMC resets.
Complete the following steps.
Changing time and date
1. Using Windows, login to DMC DECT Manager. Select the system that supports the
DECT system. Launch the DECT application. Open the DECT Systems window.
Follow the instructions in Logging into the DMC DECT Manager on page 229 and
Launching the DECT application on page 187.
2. Using a web-based navigator, open the Administrator login screen and login. Select
the System Navigator. Select the system that supports the DECT system. Launch
the DECT application. Open the DECT Systems window.
Follow the instructions in:
• Web-based browser access to the DECT application
• Web Administrator Login
• Opening the Web current Status
• Opening the web System navigator
3. Connect to a DECT system.
From the Applications menu click Connect or the green icon:
DMC DECT Fundamentals
August 2012
259
System administration
4. Open the DECT Systems Properties dialog box.
From the File menu, click on Properties. Click the Alarm tab.
5. Change the time and date.
Enter the Date and Time.
6. Accept the changes.
Click the OK button.
Changing parameters
Figure 183: DECT Systems window and DECT System Properties - Parameters tab
Complete the following steps.
Changing parameters
1. Using Windows, log in to DMC DECT Manager Select the system that supports the
DECT system. Launch the DECT application. Open the DECT Systems window.
Follow the instructions in Logging into the DMC DECT Manager on page 229 and
Launching the DECT application on page 187.
2. Using a web-based navigator, open the Administrator login screen and login. Select
the System Navigator. Select the system that supports the DECT system. Launch
the DECT application. Open the DECT Systems window.
Follow the instructions:
260
DMC DECT Fundamentals
August 2012
Comments? [email protected]
Keeping or removing non-operational DMC8 cards from DMC DECT Manager
https://voffice.innovatia.net/PWA/Avaya%20UC%202011%20-%20Sustaining
%20WIs/Project%20Documents/Forms/AllItems.aspx
3. Open the DECT System Properties dialog box.
From the File menu, click on Properties. Click the Parameters tab.
4. Change the parameters.
From the appropriate menus, highlight the parameter time/level.
5. Accept the changes.
Click the OK button.
Keeping or removing non-operational DMC8 cards from
DMC DECT Manager
Note:
xx only appears when a connection is established and there is a mismatch. If there is a
permanent connection and the DECT system configuration changes, the DMC DECT
Manager is updated automatically. The change is noted in the DMC DECT Manager event
log.
Figure 184: Synchronize DECT Board Configuration window
Complete the following steps.
Keeping or removing non-operational DMC8 cards from DMC DECT Manager
1. To keep DMC8 cards,
Delete the check mark from the appropriate box.
2. To remove DMC8 cards,
DMC DECT Fundamentals
August 2012
261
System administration
Put a check mark in the appropriate box.
3. Accept the changes.
Click the OK button.
Keeping or removing non-operational basestations from
DMC DECT Manager
Note:
Figure 185: Synchronize DECT Radio Fixed Part Configuration window on page 262 only
appears when a connection is established and there is a mismatch. If there is a permanent
connection and the DECT system configuration changes, the DMC DECT Manager is
updated automatically and the change is noted in the DMC DECT Manager event log.
Figure 185: Synchronize DECT Radio Fixed Part Configuration window
Complete the following steps.
Keeping or removing non-operational basestations from DMC DECT Manager
1. To keep basestations,
Delete the check mark from the appropriate box.
2. To remove basestations,
Put a check mark in the appropriate box.
3. Accept the changes.
Click the OK button.
262
DMC DECT Fundamentals
August 2012
Comments? [email protected]
Resolving a subscription configuration mismatch
Resolving a subscription configuration mismatch
Note:
The window shown in Figure 186: DECT Subscriptions Configuration Mismatch window and
DMC window on page 263 opens when subscriptions are enabled with the Subscriptions
window Operation pull-down menu and clicking on Configure.
Figure 186: DECT Subscriptions Configuration Mismatch window and DMC window
Complete the following steps.
Selecting login options
1. Using Windows, login to DMC DECT Manager. Select the system that supports the
DECT system. Launch the DECT application. Open the DECT Systems window.
Follow the instructions in:
• Logging into the DMC DECT Manager on page 229
• Selecting the PBX that supports DECT on page 230
DMC DECT Fundamentals
August 2012
263
System administration
• Launching the DECT application on page 187
2. Using a web-based navigator, open the Administrator login screen and login. Select
the System Navigator. Select the system that supports the DECT system. Launch
the DECT application. Open the DECT Systems window.
Follow the instructions:
• Web-based browser access to the DECT application
• Web Administrator Login
• Opening the Web current Status
• Opening the web System navigator
3. Open the DMC window.
4. Store DMC changes from the DECT system in the DMC DECT Manager server,
From the Synchronization menu, click on Synchronize From.
5. Make DMC DECT Manager server changes to the DMCs in the DECT system,
From the Synchronization menu, click on Synchronize To.
Troubleshooting
This section provides information to help solve common problems.
Disconnecting
The passwords on a DMC8 Relay card and a system on the DMC DECT Manager must
match.
The default password for both a DMC8 Relay card and an DMC DECT Manager system is
Arsenal.
If the password on a DMC8 Relay card is not the same as the DMC DECT Manager password,
DMC DECT Manager is not able to connect to the relay card. If the DMC8 Relay card is
rebooted, the mismatched password is accepted for only five minutes. Then the card
disconnects again.
To solve the problem, ensure the password on the system in DMC DECT Manager and the
password on the DMC8 Relay card are the same.
Avaya recommends that the passwords be reset to the default Arsenal.
To change the DMC DECT Manager password, see Changing passwords on page 252.
264
DMC DECT Fundamentals
August 2012
Comments? [email protected]
Troubleshooting
Note:
Select the option Do not change password on the DECT system.
To change the password on the DMC8 relay card, see Recovering a password on
page 310.
Note:
Do not select the option Do not change password on the DECT system."
DMC DECT Fundamentals
August 2012
265
System administration
266
DMC DECT Fundamentals
August 2012
Comments? [email protected]
Chapter 7: System maintenance
Contents
This section contains information on the following topics:
Alarm Code maintenance actions on page 268
LED status for DMC8/DMC8-E and basestation on page 273
Removing and inserting a DMC8 for maintenance on page 275
Adding a DMC8 card to a DECT system on page 279
Removing and reinstalling a basestation for maintenance on page 281
Uploading and activating firmware on page 284
Recovering from a firmware upload failure on page 286
Retrieving current RSSI data on page 287
Performance Collection
Setting parameters on page 309
Recovering a password on page 310
DMC DECT Fundamentals
August 2012
267
System maintenance
Alarm Code maintenance actions
Alarm Codes can be viewed with one of the following:
• Windows Alarm Snapshot on page 268
Windows Alarm Snapshot
Figure 187: Alarm Snapshot window and Alarm Properties window
Note:
The Alarm Snapshot window is a static display. The Alarm Snapshot window only shows
the alarms present at the time the window was opened. The window must be refreshed for
an up-to-date display. The web-based alarm browser displays alarm history and occurring
alarms.
Complete the following steps.
268
DMC DECT Fundamentals
August 2012
Comments? [email protected]
Alarm Code maintenance actions
Alarm Code maintenance actions
1. Using Windows, and login to DMC DECT Manager. Select the system that supports
the DECT system. Launch the DECT application. Open the DECT Systems window.
Open the Current Alarms window.
Follow the instructions in:
• Logging into the DMC DECT Manager on page 229
• Selecting the PBX that supports DECT on page 230
• Launching the DECT application on page 187
2. Refresh the Alarm Snapshot window.
Click on the icon:
3. Examine the alarm code, and take the appropriate maintenance action.
See Alarm Code maintenance actions on page 268.
Note:
The Windows Alarm Notification only displays alarms that have occurred since the window
was opened. The Web Alarm Browser has a circular log that provides information on a limited
history of alarms. The Web Alarm browser records alarms at all times.
Table 46: Alarms
Alarm code
Alarm description
Maintenance action
DMC8 operational state Synthesis
DCT001
Information only, no action needed.
All DMC8 cards are operational.
(DCT001 only displayed in the Alarm
browsers. DCT001 does not show in
the Alarm Snapshot list.)
DCT002
At least one DMC8 card is not
Remove the DMC8 and insert the
operational. (DCT002 only displayed DMC8 again to reboot. If the reboot
in the Alarm browsers. DCT002 does fails, replace the DMC8.
not show in the Alarm Snapshot list.)
Note:
When at least one DMC8 card becomes inoperable, DCT002 appears in the alarm
browser history. When all the DMC8 cards become operational again, DCT001 appears
in the browser history.
Presence of an alarm
DCT101
DMC DECT Fundamentals
No alarms. (DCT101 only displayed
in the Alarm browsers).
Information only, no action needed.
August 2012
269
System maintenance
Alarm code
DCT102
Alarm description
1. DCT102 displayed in the Alarm
browsers is an alarm on a
DMC8.
2. DCT102 displayed in the Alarm
Snapshot is an alarm on a
basestation.
Maintenance action
1. Open the Alarm Snapshot
window for alarm details and
perform the corresponding
maintenance actions.
2. Look for one or more DCT202 to
DCT215 alarms in the Alarm
Snapshot window, and perform
the corresponding maintenance
actions.
DCT103
Basestation alarm muted when no
Configure the basestation using the
alarms. Look for one or more
DMC DECT Manager, or disconnect
DCT501 alarms for details. (DCT103 the basestation.
only displayed in the Alarm Snapshot
window.)
DCT104
Perform the DCT302 to DCT307
Faceplate cable alarms on DMC8.
Look for one or more DCT302 to
maintenance action.
DCT307 alarms for details. (DCT104
only displayed in the Alarm Snapshot
window.)
DCT105
Software alarms on DMC8. Look for
one or more DCT401 to DCT403
alarms for details. (DCT105 only
displayed in the Alarm Snapshot
window.)
Perform the DCT402 to DCT407
maintenance action.
Basestation alarms
DCT201
No basestation alarm. (DCT201 only Information only, no action needed.
displayed in the Alarm browsers.)
DCT202
Local receiver signal missing
Disconnect the basestation for 30
(basestation disconnected).
seconds.
If a re-connection does not solve the
1. Replace the basestation.
problem, check:
2. Replace the DMC8 cards in the
1. the basestation
basestation.
2. the DMC8 cards in the
3. Check the faceplate cabling.
basestation
3. for a cable problem between the
basestation and a DMC8 card.
270
DCT203
Local loss of receiver slot
synchronization.
Perform the DCT202 maintenance
action.
DCT204
Local loss of receiver frame
synchronization.
Perform the DCT202 maintenance
action.
DMC DECT Fundamentals
August 2012
Comments? [email protected]
Alarm Code maintenance actions
Alarm code
Alarm description
Maintenance action
DCT205
Local bit error rate bad.
Perform the DCT202 maintenance
action.
DCT206
Remote receiver signal missing.
Perform the DCT202 maintenance
action.
DCT207
Remote loss of receiver slot
synchronization.
Perform the DCT202 maintenance
action.
DCT208
Remote loss of receiver frame
synchronization.
Perform the DCT202 maintenance
action.
DCT209
Remote bit error rate bad.
Perform the DCT202 maintenance
action.
DCT210
Synthesizer out of synchronization.
Perform the DCT202 maintenance
action.
DCT211
Power amp out of order.
Perform the DCT202 maintenance
action.
DCT212
Round-trip delay changed.
Perform the DCT202 maintenance
action.
DCT213
RFP synthesizer type changed.
Perform the DCT202 maintenance
action.
DCT214
LFC out of synchronization with
BMC.
Disconnect and reinsert the DMC8.
DCT215
Error due to synchronization-port
mutation.
Can affect the interpretation of the
alarm snapshot or alarm browser
applications; however, the alarm
must clear automatically within 200
seconds.
Faceplate cable alarms
DCT301
No faceplate cable alarm. (DCT301
only displayed in the Alarm
browsers.)
DCT302
The DMC8 card is working; however, Remove all the DMC8s. Check the
there is a loss of faceplate cable
strap setting on the DMC8s. Check
synchronization.
the faceplate cabling. Reinsert all the
DMC8 cards.
If the above procedure does not solve
the problem, try to find which DMC8
card gives the error condition by
inserting the DMC8 cards one at a
time with a minute in between
insertions.
DMC DECT Fundamentals
Information only, no action needed.
August 2012
271
System maintenance
Alarm code
Alarm description
Maintenance action
If needed, replace the defective
DMC8 card or the defect faceplate
cables.
DCT303
No faceplate cable synchronization
Perform the DCT302 maintenance
found.
action.
The DMC8 card responsible for this
alarm cannot pass the alarm on to the
DMC8 Relay card.
DCT304
The DMC8 card is working; however, Do not connect faceplate cables to a
DMC8 on an active DECT system.
a user connected a faceplate cable
section to the DMC8, causing a
counter difference.
DCT305
The DMC8 card is working; however, Perform the DCT302 maintenance
there is a timing signal loss within the action.
DMC8.
DCT306
The DMC8 card is working; however, Perform the DCT302 maintenance
action.
the input of the faceplate cable
controller is locked.
DCT307
The DMC8 card is working; however,
the processor is overloaded with too
many faceplate cable messages,
causing an I/O transmit overflow.
Perform the DCT302 maintenance
action. If the DCT302 action does not
solve the problem, try provisioning an
additional DMC8.
Software alarms
DCT401
The DMC8 card is working; however, In the Boards window, Synchronize
From the DMC8, then Synchronize
there is a subscription database
corruption.
To the DMC8.
DCT402
The DMC8 card is located in a card Perform the DCT401 maintenance
slot position that does not match the action.
DMC8 card subscription data card
slot address. The mismatch is due to
one of the following:
• the DMC8 card is placed in the
wrong card slot position
• the DMC8 card does not come into
service
DCT403
272
Duplicate subscription in the
system.
A subscription is moved from a
source DMC8 card to a destination
DMC8 card; however, the original
subscription is still present on the
source DMC8 card.
Perform the DCT401 maintenance
action. If the problem does not clear,
look for duplicated subscription IPUI
in the Subscription Property dialog
box. Delete the unnecessary
subscription from the source DMC8.
DMC DECT Fundamentals
August 2012
Comments? [email protected]
LED status for DMC8/DMC8-E and basestation
Alarm code
Alarm description
Maintenance action
The DCT403 alarm must always
come from both the source and
destination DMC8 cards.
DCT404
(DCT404 only displayed in the Alarm If this alarm was caused by a
software exception, examine the
browsers.) One of the following
alarm browsers for details.
events occurred:
• the power was turned on
• the DMC8 was inserted into the
shelf backplane
• a software exception restarted the
DMC8
Radio Fixed Part alarm muted
DCT501
Alarms are muted in the RFP window, Use the RFP window to Cancel Mute
however the basestation does not
Alarms.
have any intrinsic alarms.
Backplane controller unit
DCT601
This alarm is used by Avaya
designers.
Information only, no action needed.
LED status for DMC8/DMC8-E and basestation
The system LED status indicates the functioning of the DMC8/DMC8-E, basestation power
and card subsystem operation.
Table 47: DMC8/DMC8-E red LED status
Red LED
State
On
Description
Action
The card is in one of the following states:
1. Program the card. See
Resolving a subscription
configuration
mismatch on page 263.
1. not programmed
2. disabled
3. has faults
2. Re-enable the card. Use
LD 32 ENLC l s c.
3. Replace the card. See
Removing and inserting a
DMC8 for maintenance on
page 275.
DMC DECT Fundamentals
August 2012
273
System maintenance
Red LED
State
Description
Flashes three Card is doing a self test.
times
Off
1. The card is in service if the yellow LED
is off and the green LED is on.
Action
Wait.
1. No action.
2. Restore power.
2. The card has no power if all LEDs are
off.
Table 48: DMC8/DMC8-E yellow/green LED status
Yellow
LED
Status
Green
LED
Status
Description
Action
Off
Off
Power down.
Restore power.
On
Off
Hardware testing by boot
program.
Wait.
On
On
Wait for download command by
the boot program.
Wait.
On
Loop‡
No valid main program found by
the boot program. Card is
continuously restarting.
Start firmware distribution with
the DECT Manager.
Slow
flash†
On
Faults caused by one of the
following:
Wait.
Do not remove the card,
removal corrupts the
flashROM data.
• software download in progress
• software distribution in progress
• subscription or configuration
data is saving to the flash ROM
274
Off
Fast
flash††
Off
Slow
flash†
Card is synchronizing to the
faceplate cable bus.
Wait.
1. Card has no PARI, or has an
incomplete PARI.
1. Contact the technical
support group.
2. Card has detected an error.
2. Replace the card. See
Removing and inserting a
DMC8 for maintenance on
page 275.
Off
On
Card is in service.
No action required.
Slow
flash†
Slow
flash†
Simultaneous occurrence of:
Contact the technical support
group.
DMC DECT Fundamentals
August 2012
Comments? [email protected]
Removing and inserting a DMC8 for maintenance
Yellow
LED
Status
Green
LED
Status
Description
Action
• card has no PARI, or incomplete
PARI and
• either software distribution is in
progress or subscription or
configuration data is saving to
the flashROM
Legend for LED action:
†Slow flash = 2 seconds On and 2 seconds Off
††Fast flash = 1 second On and 1 second Off
‡Loop for no program = 3 seconds On and 0.25 seconds Off
‡Loop for corrupted program = 12 seconds On and 0.25 seconds Off
Table 49: Basestation LED status
Green
Description
Action
Off
No power.
Check DMC8 to basestation
cables.
Flashes
Input power present but no output power.
Check DMC8 LED Status and
Alarm Reports.
Check DMC8 to basestation
cables.
On
Power present and communication with
DMC8 established.
No action required.
Removing and inserting a DMC8 for maintenance
Caution:
Service Interruption
Do not bypass the DMC8-E or the DMC8 immediately to the left of the DMC8-E. A bypassed
DMC8-E cannot regenerate the faceplate bus signals in the left half of the shelf.
Although the separated left half of the shelf remains in synchronization, system performance
decreases as follows:
• Any calls passing through the separated part of the faceplate bus are dropped.
• Handsets configured on a DMC in the separated half cannot make or receive calls
through a basestation in the other half.
DMC DECT Fundamentals
August 2012
275
System maintenance
To remove, re-seat, or insert DMC8 card, perform the following actions:
• Backup the data from the DMC8 card to be removed.
• Remove the faulty DMC8 card.
• Insert a working DMC8 card.
• Restore the data to the DMC8 card that was replaced.
Backing up a DMC8 card configuration and subscription
information
Figure 188: DMC window
Complete the following steps.
Backing up a DMC8 card configuration and subscription information
1. Using Windows, login to DMC DECT Manager. Select the system that supports the
DECT system. Launch the DECT application. Open the DECT Systems window.
Open the Boards window.
Follow the instructions:
• Logging into the DMC DECT Manager on page 229
• Selecting the PBX that supports DECT on page 230
• Launching the DECT application on page 187
2. Select the DMC8 card.
Highlight the DMC8 card in the list.
3. Save the DMC8 data on the DMC DECT Manager.
From the Synchronization menu, click on Synchronize From.
276
DMC DECT Fundamentals
August 2012
Comments? [email protected]
Removing and inserting a DMC8 for maintenance
Removing a faulty DMC8 card
Figure 189: DMC8 card removal
Complete the following steps.
Removing a faulty DMC8 card
1. Connect the maintenance bypass cable.
Plug the maintenance bypass cable into the Maint port of the DMC8 cards on either
side of the DMC8card to be removed.
2. Disconnect the faceplate cables.
Detach the faceplate cables from the DMC8 card to be removed and from the cards
on either side of it.
3. Remove the DMC8.
Release the card locking devices and lever the card out of the shelf backplane.
DMC DECT Fundamentals
August 2012
277
System maintenance
Inserting a serviceable DMC8 card
Figure 190: DMC8 card insertion
Complete the following steps.
Inserting a serviceable DMC8 card
1. Insert the DMC8 card.
Lever the card into the shelf backplane and latch the card locking devices.
2. Connect the faceplate cables.
Insert the faceplate cables into the DMC8 card, and into the cards on either side of
it.
3. Disconnect the maintenance bypass cable.
Remove the maintenance bypass cable from the Maint port of the DMC8 cards on
either side of the replaced DMC8 card.
278
DMC DECT Fundamentals
August 2012
Comments? [email protected]
Adding a DMC8 card to a DECT system
Restoring subscription data to the serviceable DMC8 card
Figure 191: DMC window
Complete the following steps.
Restoring subscription data to the serviceable DMC8 card
1. Using Windows, login to DMC DECT Manager. Select the system that supports the
DECT system. Launch the DECT application. Open the DECT Systems window,
and open the Boards window.
Follow the instructions in:
• Logging into the DMC DECT Manager on page 229
• Selecting the PBX that supports DECT on page 230
• Launching the DECT application on page 187
2. Select the DMC8.
Highlight the DMC8 in the list.
Save the DMC8 data on the DMC DECT Manager.
From the Synchronization menu, click on Synchronize To.
Note:
Restore only one DMC (Board) at a time.
Adding a DMC8 card to a DECT system
DMC DECT Fundamentals
August 2012
279
System maintenance
Figure 192: Add a DMC8 card to the system
Complete the following steps.
Adding a DMC8 card to a DECT system
1. Connect the bypass cable.
Plug the bypass cable into the Maint port of the existing DMC8.
2. Insert the DMC8 card, with a terminating plug installed,into the top port.
Lever the card into the shelf backplane and latch the card locking devices.
3. Connect the bypass cable to the added DMC8 card.
Plug the bypass cable into the Maint port of the added DMC8 card.
4. Remove the terminating plug from the existing card.
Remove the terminating plug from the bottom port of the existing DMC8 card.
5. Connect the faceplate cable.
Insertthe faceplate cables into the bottom port of the existing DMC8 card and the
added DMC8 card.
6. Disconnect the bypass cable.
Remove the maintenance bypass cable from the Maint port of the existing DMC8
card and the added DMC8 card.
7. Add the DMC8 card to the database.
Use the procedure: Inserting a serviceable DMC8 card on page 278.
280
DMC DECT Fundamentals
August 2012
Comments? [email protected]
Removing and reinstalling a basestation for maintenance
Reusing a DMC8 card in another DECT system
Open the DMC window.
Complete the following steps.
Reusing a DMC8 card in another DECT system
1. Select the DMC8card to be reused.
Highlight the DMC8 in the list.
2. Delete the subscriptions from the DMC8 card memory.
From the File menu, click on Clear.
Removing and reinstalling a basestation for maintenance
Removing and reinstalling a basestation for maintenance involves:
1. Muting alarms on a basestation on page 281
2. Canceling mute alarms on a basestation on page 282
3. Disconnecting and reinstalling a basestation on page 283
Muting alarms on a basestation
DMC DECT Fundamentals
August 2012
281
System maintenance
Figure 193: RFP window and DECT Radio Fixed Parts properties window
Complete the following steps.
Muting alarms on a basestation
1. Using Windows, login to DMC DECT Manager. Select the system that supports the
DECT system. Launch the DECT application. Open the DECT Systems window,
and open the RFP window.
Follow the instructions in:
• Logging into the DMC DECT Manager on page 229
• Selecting the PBX that supports DECT on page 230
• Launching the DECT application on page 187
2. Select the DMC8 to mute.
Highlight the DMC8 in the list.
3. Mute the alarms.
From the File menu, click Mute Alarms.
Canceling mute alarms on a basestation
Complete the following steps.
282
DMC DECT Fundamentals
August 2012
Comments? [email protected]
Removing and reinstalling a basestation for maintenance
Canceling mute alarms on a basestation
1. Using Windows, login to DMC DECT Manager. Select the system that supports the
DECT system. Launch the DECT application. Open the DECT Systems window,
and open the RFP window.
Follow the instructions in:
• Logging into the DMC DECT Manager on page 229
• Selecting the PBX that supports DECT on page 230
• Launching the DECT application on page 187
2. Select the DMC8 to cancel mute alarms.
Highlight the DMC8 in the list.
3. Cancel mute alarms.
From the File menu, click Cancel Mute Alarms, or click:
Disconnecting and reinstalling a basestation
Figure 194: Disconnect reinstall the basestation
Note:
After disconnecting the cable to the basestation, wait for 60 seconds before reconnecting
another basestation.
Complete the following steps.
DMC DECT Fundamentals
August 2012
283
System maintenance
Disconnecting/reinstalling a basestation
1. Disconnect the RJ45 cable, MDF side.
Unplug the RJ45 cable from the wall socket of the RJ45 Connection Box.
2. Disconnect the RJ45 cable, basestation side.
3. Remove the unserviceable basestation from the mounting plate.
4. Reinstall a serviceable basestation on the mounting plate.
5. Re-connect the RJ45 cable to the basestation.
6. Re-connect the RJ45 cable, MDF side.
Uploading and activating firmware
284
DMC DECT Fundamentals
August 2012
Comments? [email protected]
Uploading and activating firmware
Figure 195: DECT systems, DECT Firmware Upload, DECT Firmware Activation Upload
Complete the following steps.
Uploading and activating firmware
1. Using Windows, login to DMC DECT Manager. Select the system that supports the
DECT system. Launch the DECT application. Open the DECT Systems window.
Follow the instructions in:
• Logging into the DMC DECT Manager on page 229
• Selecting the PBX that supports DECT on page 230
• Launching the DECT application on page 187
2. Open the Firmware upload dialog box.
DMC DECT Fundamentals
August 2012
285
System maintenance
Select the Firmware menu, and click on Upload.
Recovering from a firmware upload failure
It is possible to upload DMC firmware with the V.24 port of a DMC8 card using a PC equipped
with Z-modem protocol. During the upload, the DMC8 card deletes the active and standby
firmware, and stores the uploaded firmware as the active firmware. When the upload
completes, the boot program starts the uploaded firmware.
Figure 196: Recovery upload to a DMC8 card
Complete the following steps.
Recovering from a firmware upload failure
1. Configure the COM port settings.
baud rate = 19200
data bits = 8
parity = no parity
stop bit = no flow control
2. Connect the NTCW12AA cable to the DMC8 card to be uploaded.
Refer toTable 39: NTCW12AA cable to MDF connections on page 201 for the
NTCW12AA cable tip and ring connections.
3. Locate the DMC DECT Manager server COM port.
Connect the NTCW12AA cable connector into the PC COM port.
286
DMC DECT Fundamentals
August 2012
Comments? [email protected]
Retrieving current RSSI data
4. Unseat the DMC8 card.
Disconnect the DMC8 card from the shelf backplane.
5. Access Z-modem application; for example, Windows HyperTerminal.
Click Start on the Windows taskbar and choose Programs > Accessories >
HyperTerminal.
6. Initiate the file transfer.
Start the Z-modem application on the PC.
7. Activate the boot program.
Insert the DMC8 card into the shelf backplane.
Note:
The BIX tip and ring connections shown in Table 39: NTCW12AA cable to MDF
connections on page 201 correspond to standard BIX designation. The first pair are labeled
T0 and R0. See the section in Avaya Communication Server 1000M and Meridian 1: Large
System Installation and Commissioning (NN43021-310) that deals with planning and
designating the MDF.
Table 50: NTCW12AA cable to MDF connections
DMC8 Relay card
MDF connection
Cable colour
DB25 connector pin
number
Signal designator
T1
Grey
8
V.24DCD
R2
Yellow
4
V.24RTS
T3
Blue
2
V.24TXD
R3
Red
3
V.24RXD
T4
Pink
7
V.24GND
Retrieving current RSSI data
The Radio Signal Strength Indication (RSSI) shows interference and usage by a certain
basestation. A snapshot of the RSSI data is retrieved and stored in a file when the user requests
it. If the file already existed, the new snapshot data is appended to the last snapshot data in
the file.
DMC DECT Fundamentals
August 2012
287
System maintenance
Figure 197: Retrieve Current RSSI window, and Retrieve Current RSSI maps window
Complete the following steps.
Retrieving current RSSI data
1. Using Windows, login to DMC DECT Manager. Select the system that supports the
DECT system. Launch the DECT application. Open the DECT Systems window,
and open the Current RSSI Data window.
Follow the instructions in:
• Logging into the DMC DECT Manager on page 229
• Selecting the PBX that supports DECT on page 230
• Launching the DECT application on page 187
2. Select a DMC8 card or cards for RSSI information retrieval.
Scroll and highlight a TN in the Select DMCs for RSSI Retrieval: box.
3. Retrieve the RSSI data.
Click on the Retrieve RSSI now button.
4. Store the RSSI data.
288
DMC DECT Fundamentals
August 2012
Comments? [email protected]
Performance Collection
Select a file location.
RSSI file format
The data for each RFP is a nibble for indication of the RSSI value for each slot (24) for each
carrier (10). This results in 10 (number of carriers) times 24 (number of slots) nibbles equal to
240 nibbles (120 octets).
Figure 198: RSSI file format
Performance Collection
The DECT Performance Manager is an application developed specifically to help with
investigations in the following areas:
• deployment
• engineering
• configuration
• traffic
• call and non-call associated issues
The DECT Performance Manager does not work on non-SNMP firmware. Users of the
Performance Manager must have a basic understanding of the DECT product.
Every DMC board has two performance files, the Equipment Performance Management (epm)
file and the User Performance Management (upm) file. The epm file contains the counters and
timers for DMC board and RFP information. The upm files contain the counters and timers for
PP information.
The DECT Performance Manager uses a database created from upm and epm files retrieved
from the DMC boards on the DECT system. Using the database, the DECT Performance
Manager can generate Reports and Trends. The upm and epm files are collected from the
DMC DECT Fundamentals
August 2012
289
System maintenance
boards on the DECT system using the Performance collection application on DMC DECT
Manager. See Figure 199: Performance Collection window and Select location dialog box on
page 290.
Figure 199: Performance Collection window and Select location dialog box
The DECT Performance Manager is capable of generating Reports and Trends for the
following:
• B-channel occupation
• S-channel occupation
• basestation (RFP) channel occupation
• board statistics
290
DMC DECT Fundamentals
August 2012
Comments? [email protected]
Performance Collection
• portable statistics
• basestation statistics
For more information on the Reports, see DECT Performance Manager installation on
page 291.
Complete the following steps in sequence:
1. DECT Performance Manager installation on page 291
2. Set date and time on DMC DECT Manager on page 293
3. Retrieving upm and epm files on page 294
4. Creating a new directory structure on page 295
5. Rename upm and epm files on page 296
6. Creating a database on page 298
7. Using the database on page 299
8. DECT Performance Manager data on page 301
Note:
Omit the steps in Creating a new directory structure on page 295 and Rename upm and
epm files on page 296 if you are using DMC DECT Manager 2.2 (the directory structure
and file names are correct).
Caution:
Service Interruption
Check to ensure the Performance Collection is not using all the DMC DECT Manager server
storage space.
DECT Performance Manager installation
You must have Windows Internet Explorer™ 6.x installed to run the DECT Performance
Manager. The application software zip file is 14.5 Mbits. The extracted file is 54 Mbits.
Installing DECT Performance Manager
1. Download the DECT Performance Manager application software from the Avaya
technical support website: www.avaya.com/support
2. Extract the application software.
Use the application installed on your computer for extracting files and directories
from a zip file.
3. Open the folder labeled Disk 1. See Figure 200: DECT Performance Manager
application software on page 292.
DMC DECT Fundamentals
August 2012
291
System maintenance
Double-click the folder labeled Disk 1.
4. Run Setup.exe.
Double-click the Setup.exe icon. See Figure 201: DECT Performance Manager
installation file on page 292.
5. Follow the Install Wizard.
After installation is complete, open the DECT Performance Manager by doubleclicking the DECT Performance Manager icon located in the Programs folder
(accessed through the Start menu).
Figure 200: DECT Performance Manager application software
Figure 201: DECT Performance Manager installation file
292
DMC DECT Fundamentals
August 2012
Comments? [email protected]
Performance Collection
Set date and time on DMC DECT Manager
You must set the date and time on the DMC DECT Manager before retrieving upm and epm
files from the DECT system. This ensures a more accurate Report or Trend when using the
DECT Performance Manager.
Setting the date and time on the DMC DECT Manager
1. Connect to the DECT system.
2. Select File > Properties.
Select File on the toolbar, and select Properties from the File menu. The Properties
window opens. See Figure 202: DMC DECT Manager-DECT System Properties
window - Alarm tab on page 293.
3. Click the Alarm tab.
4. Change the date and time.
5. Save changes.
Click the Apply button, then click OK.
Figure 202: DMC DECT Manager-DECT System Properties window - Alarm tab
DMC DECT Fundamentals
August 2012
293
System maintenance
Retrieve upm and epm files
Use the Performance Collection application on DMC DECT Manager to retrieve upm and epm
files.
Note:
The Performance Collection application (used with DMC DECT Manager up to and including
Release 2.0) allows files to be collected from a single board only at one time. However, it is
possible to collect from multiple boards on the DECT system if the DMC DECT Manager
patch 20050su1 is installed. The patch is available on the MPL.
Retrieving upm and epm files
1. Create a folder to be the Collection Location.
Use this folder to store the retrieved upm and epm files.
2. Connect to the DECT system.
Follow the instructions on Logging into the DMC DECT Manager on page 229 to
Connecting to a DECT system on page 179.
3. Select Applications > Performance Collection.
Select Applications on the toolbar, and select Performance Collection from the
Applications menu.
4. Browse for the folder in which to store the upm and epm files.
Click the Browse button under Collection Location and navigate to the folder you
created in Step 1.
5. Select the Retrieve User Performance Collection data, per portable and Retrieve
Equipment Performance Collection data, per DECT System check boxes.
6. Select the board or boards from which to collect the upm and epm files.
Enter the DMC TNs of the boards.
7. Select the collection period from the Collection Period: drop-down list.
Use a 15-minute collection period for the most detailed results. For less detailed
results, use a longer collection period. A minimum of two files is required for the
Performance Manager to work.
8. Click the Start button.
When the Performance Collection starts, upm and epm files are stored in the
Collection Location at intervals specified in the Collection Period.
To close the Performance Collection window, click the Cancel button. (The
Performance Collection continues while the window is closed.)
9. Click the Stop button to stop the Performance Collection.
294
DMC DECT Fundamentals
August 2012
Comments? [email protected]
Performance Collection
Figure 203: DMC DECT Manager Start/Stop Performance Collection window
Creating a new directory structure
A database must be created before using the DECT Performance Manager. To create the
database, the upm and epm files must be located in a defined directory format (see Figure
204: Directory structure on page 296).
DMC DECT Fundamentals
August 2012
295
System maintenance
Figure 204: Directory structure
Figure 205: Directory example on page 296 is an example of a directory.
Figure 205: Directory example
Rename upm and epm files
With some versions of DMC DECT Manager, the upm and epm files exist in a format that is
not compatible with the Performance Manager. Therefore, all upm and epm files collected must
be renamed before either a database can be created, or Reports and Trends can be generated.
All the files must be renamed correctly, using the proper format, to create a database for the
generation of Reports.
Important:
Place all the upm and epm files in the new directory structure before renaming takes
place.
296
DMC DECT Fundamentals
August 2012
Comments? [email protected]
Performance Collection
The upm file name format is upm_ddmmyy_hhmm.xml, where:
• ddmmyy=PC date the performance data was requested (day, month, year)
• hhmm=PC time the performance data was requested (hour, minute)
Figure 206: Upm file renamed on page 297 shows an original upm file name and the file
renamed.
Figure 206: Upm file renamed
The epm file name format is epm_ddmmyy_hhmm.xml, where:
• ddmmyy=PC date the performance data was requested (day, month, year)
• hhmm=PC time the performance data was requested (hour, minute)
Figure 207: Epm file renamed on page 298 shows an original epm file name and the file
renamed.
DMC DECT Fundamentals
August 2012
297
System maintenance
Figure 207: Epm file renamed
Creating a database
You must first create a database as part of the process to generate Reports and Trends. Create
the database using the DECT Performance Manager.
Retrieving upm and epm files
1. Open the Performance Manager application.
Double-click the DECT Performance Manager icon located in the Programs
folder.
2. Select Database > New Database.
Select Database on the toolbar, and select New Database from the Database
menu.
3. Enter a description for the database. See Figure 208: New DECT Performance
Manager Database description dialog box on page 299.
Enter the Customer or System name.
4. Click the OK button.
5. Select a location in which to store the database.
6. Name the database.
Enter the Customer or System name as the database name.
7. Click the Save button.
298
DMC DECT Fundamentals
August 2012
Comments? [email protected]
Performance Collection
8. Select File > Import.
Select File from the toolbar, and select Import from files from the File menu.
9. Select the folder where the upm and epm files are located.
The upm and epm file folders are at the top of the directory structure. Ensure that
both the epm data and upm data check boxes are selected. See Figure 209: Select
DECT performance data window on page 299 (DMC is in slot 9).
10. Click the Import Button.
11. Click the Done button.
The database is created with the name entered in Step 3. The database has a .mbd
extension, and is now ready to use for generating Reports and Trends.
Figure 208: New DECT Performance Manager Database description dialog box
Figure 209: Select DECT performance data window
Using the database
You can generate Reports and Trends after the database is created.
The DECT information contained in the database is very detailed and can be very complex.
The Help files included with the DECT Performance Manager application are very
comprehensive, and explain in detail all aspects of this tool.
DMC DECT Fundamentals
August 2012
299
System maintenance
Generating Reports or Trends
1. Select Reports on the toolbar of the DECT Performance Manger application.
2. Select Reports or Trends from the Reports menu.
The Select A Report window opens (see Figure 210: Select A Report window on
page 300). You can now generate Reports and Trends.
Figure 210: Select A Report window
Previously created databases
It is also possible to use databases previously created to generate Reports and Trends.
Retrieving upm and epm files
1. Open the Performance Manager application.
Double-click the DECT Performance Manager icon located in the Programs
folder.
2. Select a database.
300
DMC DECT Fundamentals
August 2012
Comments? [email protected]
Performance Collection
Click the button to the right of the DECT PM Database: field, or select Database on
the toolbar, and then Select Database from the Database menu. See Figure 211:
Select an existing database on page 301.
3. Open a database.
Click on a database to select it, and click the Open button.
4. Select Reports > Reports or Trends.
Select Reports on the toolbar, and select Reports or Trends from the Reports
menu.
You can now generate Reports and Trends.
Figure 211: Select an existing database
DECT Performance Manager data
This section describes the most relevant performance data. The data is collected during
operation of a DECT system. The performance data is statistical and can be used to identify
potential problems. The performance data consists of counters that represent a number of
events.
The DECT manager retrieves the data from the DECT system within a defined interval period.
During this interval, the Performance Manager measures objects by retrieving events
(counters).
Important:
Counters represent a number of events. For example, the 'voice call' counter increments
when a PP successfully sets up a voice call. During the voice call, the PP does not increment
the counter. If a voice call (in progress) extends beyond the performance data retrieval
period, the voice call is not marked in the new retrieval period. It is only marked in the period
in which it began. In the new retrieval period, a dropped call can appear, but the continuing
voice call is not identified. Avaya recommends making the retrieval period long enough to
allow most voice calls to finish within one retrieval period (minimum value is 15 minutes).
DMC DECT Fundamentals
August 2012
301
System maintenance
The following events are the most relevant performance data:
• paging
• dropped voice call
• dropped message
• handover
• RFP-channel occupation
• S-channel occupation
• B-channel occupation
• degradation of service
• grade of page failures
• grade of page retries
• grade of page rejects
Paging
Paging is the process of broadcasting a message from an RFP to one or more PPs. Paging
messages are used to alert a PP (a call setup attempt). The paging message contains the
system information and the identifier of a PP. A PP enters the alert phase when it recognizes
its own identifier.
The following events (performance data) are associated with paging messages:
• Request: number of call setup attempts
• Retries: number of call setup attempts after the PP did not respond on a page request
• Failure: after a number of page retries (default is two attempts), the call setup attempt is
aborted (that is, the paging procedure failed)
• Reject: the PP responds to the request, but rejects the call setup attempt
Dropped voice call
A dropped voice call occurs when the PP loses the connection with the RFP. The PP is no
longer able to make or receive a call.
A dropped call can occur during either of the following phases:
• Active phase: the PP loses the synchronization with the RFP with a call in progress
• Call setup phase: the PP loses the synchronization with the RFP, but there is no call in
progress
302
DMC DECT Fundamentals
August 2012
Comments? [email protected]
Performance Collection
Dropped message
A dropped message occurs when the PP loses the connection with the RFP. The PP is no
longer able to receive messages from the RFP.
Handover
Handover is the process of switching a call in progress from one physical channel to another
physical channel.
There are two types of handover:
• Inter-cell: A call in progress switches from one RFP to another RFP. This type of handover
generally occurs because the user is roaming.
• Intra-cell: A handover that is completely internal to one RFP. This type of handover is
generally caused by interference on the carrier frequency to which the call is locked.
RFP-channel occupation
The RFP-channel occupation report indicates how many RFPs are installed and can be helpful
when determining if enough RFPs are installed.
The RFP-channel occupation report contains tables that show the number of seconds that RFP
channels are free. Figure 212: RFP channel occupation report - 6-channel RFP on page 304
shows an example of an RFP-channel occupation report from a 6-channel RFP. The
performance retrieval period is 15 minutes (900 seconds).
DMC DECT Fundamentals
August 2012
303
System maintenance
Figure 212: RFP channel occupation report - 6-channel RFP
The report indicates the following:
• 6 channels were free for 417 seconds. Therefore, at least 1 channel was occupied for
483 seconds (900 - 417 = 483 seconds).
• 5 channels were free for 302 seconds. Therefore, at least 2 channels were occupied for
181 seconds (483 - 302 = 181 seconds).
• 4 channels were free for 139 seconds. Therefore, at least 3 channels were occupied for
42 seconds (181 - 139 = 42 seconds).
• 3 channels were free for 37 seconds. Therefore, at least 4 channels were occupied for 5
seconds (42 - 37 = 5 seconds).
• 2 channels were free for 2 seconds. Therefore, at least 5 channels were occupied for 3
seconds (5 - 2 = 3 seconds).
• 1 channel was free for 0 seconds. Therefore, at least 1 channel was free at any
moment.
S-channel occupation
The backbone bus of a DECT system is the interface between the DMC boards. The DMC
boards communicate through the bus for the re-routing of calls.
A PP can be synchronized with an RFP that is not connected to the DMC board that contains
the subscription information for this PP. The DMC board to which this RFP is connected is
called the visitor DMC. The DMC board that contains the subscription information is called the
home DMC. The (visitor) DMC board to which the PP is locked (or synchronized) re-routes the
PP to the home DMC board.
The DMC board has 32 internal channels between the PRI block and the RFP interfaces. These
channels are named S-channels (see Figure 213: Channels within the system on page 305).
304
DMC DECT Fundamentals
August 2012
Comments? [email protected]
Performance Collection
The S-channel occupation report contains tables that show the number of seconds that Schannels are free.
The S-channel occupation report mimics the RFP-channel occupation report. Refer to RFPchannel occupation on page 303 for an explanation of how to read the channel occupation
reports.
B-channel occupation
There are 32 channels that connect the DMC board to a switching network circuit (Host PBX).
These 32 channels are named B-channels or speech-channels. See Figure 213: Channels
within the system on page 305.
The B-channel occupation report mimics the RFP-channel occupation report. Refer to RFPchannel occupation on page 303 for an explanation of how to read the channel occupation
reports.
Figure 213: Channels within the system
DMC DECT Fundamentals
August 2012
305
System maintenance
Degradation of service
The degradation of service report shows the relation between the number of dropped active
calls and the number of successful calls.
Grade of page failures
The grade of page failures report shows the relation between the number of page failures and
the number of successful calls and messages.
Grade of page retries
The grade of page retries report shows the relation between the number of page retries and
the number of successful calls and messages.
Grade of page rejects
The grade of page rejects report shows the relation between the number of page rejects and
the number of successful calls and messages
Top-down analysis
Importing performance files to a database can be a time-consuming process. The time the
import process consumes depends on the number of files, the number of installed RFPs, the
number of subscribed DNRs, the number of boards, and the performance of the PC. The
following example demonstrates how many performance files can be generated in a single
week.
Example
Company ABC has 10 DMC boards installed on a DECT system. The performance of this
DECT system is measured 10 hours a day for one work week (5 days). The Performance
Collection application on DMC DECT Manager retrieves the upm and epm files every hour.
The Performance Manager retrieves 2 files from each of the 10 boards every hour (20 files
every hour). Therefore, 200 files are collected each day (20 files/hour x 10 hours). This is 1000
performance files each week (200 files/day x 5 days).
Company ABC imports these performance files to a database.
306
DMC DECT Fundamentals
August 2012
Comments? [email protected]
Performance Collection
Top-down analysis explanation
The top-down analysis is a troubleshooting strategy that helps you to more efficiently generate
a performance file database.
Begin the top-down analysis by generating a database that contains only the first and the last
performance data files of the week. Limiting the number of performance data files that are
generated helps you to determine which board, RFP, or PP causes problems during the
week.
You can also limit the number of files imported to the database. Copy the directory structure
that contains all performance files to create the database. Delete the performance files that
are not needed by clicking Start on the Windows taskbar and choosing Search > For Files or
Folders on the taskbar of Windows 2000™. Use the time and date stamps on files to find the
performance files that must be deleted. Press <CRTL + A> to select the files, and press the
Delete key.
If you cannot determine what components of the system cause problems, try generating a new
database with one data file each day. If you still cannot solve the problem, add more detail, but
generate a new database each time. Generating databases with more details (that is, more
performance files) substantially increases the duration of the import process. Always consider
if there is enough value added in generating more details to compensate for the extra time this
takes.
Select the following items for generating a more detailed performance database:
• one board only
• upm files (contain PP information)
• epm files (contain board and RFP information)
• a combination of the above selection criteria
If you cannot verify exactly which board, RFP, or PP causes the problem, import only the data
files that contain the relevant information for your problem. For example, if an RFP on a specific
board causes the problem, import the epm files of only that board (epm files contain board and
RFP counters and timers). You can now efficiently generate a new, detailed database that
contains only the relevant information.
Statistical Performance Data
Table 51: Statistical Performance Data
Counter
Description
1
Indicators, not used
2
Number of page failures
DMC DECT Fundamentals
August 2012
307
System maintenance
Counter
308
Description
3
Number of page retries
4
Number of page requests
5
Number of page rejects
6
Number of voice calls
7
Number of message calls
8
Number of voice calls, dropped in passive state
9
Number of voice calls, dropped in active state
10
Number of message calls, dropped in passive state
11
Number of message calls, dropped in active state
12
Number of hand overs
13
Number of failed hand overs
14
Number of aborted hand overs
15
Number of delayed hand overs
16
Current Circuit Number (0xFF, if none)
DMC DECT Fundamentals
August 2012
Comments? [email protected]
Setting parameters
Setting parameters
Figure 214: DECT System Properties - Parameters tab
Complete the following steps.
Setting parameters
1. Using Windows, login to DMC DECT Manager Select the system that supports the
DECT system, Launch the DECT application. Open the DECT Systems window.
Open the Properties dialog box, and click on the Parameters tab.
Follow the instructions in:
• Logging into the DMC DECT Manager on page 229
• Selecting the PBX that supports DECT on page 230
• Launching the DECT application on page 187
2. Select the parameter.
Select a menu item, and click Apply.
DMC DECT Fundamentals
August 2012
309
System maintenance
Recovering a password
Passwords recovery is needed in several instances:
• If the DECT system password is changed by a customer, the distributor managing the
system can be left without knowledge of the new password.
• The password can be damaged in the DMC DECT Manager database by a disk crash,
• The password can be forgotten.
Passwords cannot be accessed from the DMC DECT Manager.
The DMC DECT Manager provides a mechanism allowing the password to be reset to the
factory password. The password can be changed in the DECT system and the DMC DECT
Manager database, or in the DMC DECT Manager database only.
Figure 215: DECT Systems window, DECT Systems Properties, Change DECT Password
Complete the following steps.
Recovering a password
1. Using Windows, login to DMC DECT Manager. Select the system that supports
DECT. Launch the DECT application. Open the DECT Systems window. Open the
Properties dialog box, and click on the General tab.
310
DMC DECT Fundamentals
August 2012
Comments? [email protected]
Recovering a password
Follow the instructions in:
• Logging into the DMC DECT Manager on page 229
• Selecting the PBX that supports DECT on page 230
• Launching the DECT application on page 187
2. Select password change.
Click on Change Password.
3. Change to the factory default password.
Note:
The default is case-sensitive.
Type Arsenal in the New password box.
4. Confirm the password.
Type Arsenal in the Confirm new password box.
5. Set up for a password change on the DECT system.
Remove the DMC8 Relay card, and reinsert the DMC8 Relay card.
6. Connect to the DECT system within five minutes.
From the Applications menu click Connect or the (green) icon:
DMC DECT Fundamentals
August 2012
311
System maintenance
312
DMC DECT Fundamentals
August 2012
Comments? [email protected]
Chapter 8: Changing the DMC8 jumper
setting after DECT system
upgrade to Release 5.0
During the upgrade from CS 1000M Cabinet using Release 4.5 SSC to CS 1000E Cabinet running Release
5.0 equipped with a DECT system, the DMC TNs listed in the DMC DECT Manager application show up
correctly only by modifying the jumper settings of DMC8.
Changing the DMC8 jumper setting
The following procedure outlines how to change the jumper setting of DMC8 cards.
1. Complete the upgrade from SSC to CPPM system
2. Disable all DMC8 cards
3. Unplug each DMC8 and change the JUMPER setting of J2
4. Install J2 jumper straps on the DMC8 and the DMC8-Es for the system type. Use
strap A B for IPE shelf, and for IPMG - the CPPM call server with IPMG is considered
a large system
DMC DECT Fundamentals
August 2012
313
Changing the DMC8 jumper setting after DECT system upgrade to Release 5.0
5. Plug in all DMC8 cards (at this time the DECT system could stop working. The
DMC8 LED is flashing green and RFP also.
6. Start the TM DECT application
7. Delete the site in TM DECT
8. Create the site in TM DECT
9. Connect to your DECT system
10. Select Update DECT Manager for PARI number and level parameters
314
DMC DECT Fundamentals
August 2012
Comments? [email protected]
Connecting a DECT system to DMC DECT Manager using remote modems and Windows 2000
11. Go to application board and do a synchronization from all DMC
12. Synchronize to all DMC
Connecting a DECT system to DMC DECT Manager using
remote modems and Windows 2000
Cable setup
It is possible to manage a DECT system remotely with the DMC DECT Manager manager
using two modems connected to the Public Switched Telephone Network (PSTN). This works
for SNMP DECT systems with a DMC8 or DMC4 relay card. Figure 216: DMC8 relay card
connection to a remote DMC DECT Manager server on page 316 shows the DMC8 relay card
connected to a remote DMC DECT Manager server.
DMC DECT Fundamentals
August 2012
315
Changing the DMC8 jumper setting after DECT system upgrade to Release 5.0
Figure 216: DMC8 relay card connection to a remote DMC DECT Manager server
DECT relay board to remote modem
Refer to Table 52: NTCW12AA cable to MDF connections on page 316 when connecting the
NTCW12AA cable to the MDF.
Table 52: NTCW12AA cable to MDF connections
DMC Relay card
MDF connection
Cable colour
DB-25 connector
pin number
Signal designator
T1
Gray
8
V.24DCD
R2
Yellow
4
V.24RTS
T3
Blue
2
V.24TXD
R3
Red
3
V.24RXD
T4
Pink
7
V.24GND
Note:
The BIX tip and ring connections shown in Table 52: NTCW12AA cable to MDF
connections on page 316 correspond to standard BIX designation. The first pair is labeled
T0 and R0. See Communication Server 1000M and Meridian 1: Large System Installation
and Commissioning (NN43021-310) for more information.
316
DMC DECT Fundamentals
August 2012
Comments? [email protected]
Connecting a DECT system to DMC DECT Manager using remote modems and Windows 2000
Configuring NetBEUI Protocol
You must first install NetBEUI Protocol if it is not already installed on the DMC DECT Manager
Server PC.
Figure 217: Networking tab of the Local Area Connection Properties
Complete the steps in Configuring NetBEUI Protocol on page 317 to configure NetBEUI
Protocol:
Configuring NetBEUI Protocol
1. Open the Network and Dial-up Connections dialog box.
Select My Network Places, right-click it, and select Properties.
2. Open the Properties dialog box for Local Area Connection.
Select Local Area Connection, right-click it, and select Properties.
DMC DECT Fundamentals
August 2012
317
Changing the DMC8 jumper setting after DECT system upgrade to Release 5.0
If the NetBEUI Interface Service is already installed, it appears in the Local Area
Connection Properties dialog box (see Figure 217: Networking tab of the Local Area
Connection Properties on page 317).
If NetBEUI Protocol does not appear in the Local Area Connection Properties dialog
box, continue with Steps 3 – 6.
3. Click the Install button.
4. Open the Select Network Protocol dialog box.
Select Protocol in the Select Network Component Type dialog box, and click Add.
5. Add NetBEUI Protocol.
Select NetBEUI Protocol, and click OK.
The PC must be rebooted after installing NetBEUI Protocol.
Configuring a dial-up network on the DMC DECT Manager server
Complete the steps in Configuring a dial-up network on page 318 to configure a dial-up
network:
Configuring a dial-up network
1. Click the Start button on the PC taskbar.
2. Select Settings.
3. Select Control Panel.
4. Double-click Network and Dial-up Connections.
5. Double-click Make New Connection.
6. Click Next.
7. Select the network connection type.
Select the Connect directly to another computer radio button, and click Next.
8. Identify your computer as a Guest machine.
Select the Guest radio button, and click Next.
9. Select the device to make the connection.
Select Communications Port (COM x) from the Select a device: drop-down list, and
click Next.
10. Identify the connection availability.
Select the For all users radio button, and click Next.
11. Identify the network connection.
Enter a name for this connection, and click Finish.
318
DMC DECT Fundamentals
August 2012
Comments? [email protected]
Connecting a DECT system to DMC DECT Manager using remote modems and Windows 2000
Setting the properties of the new connection
Complete the steps in Configuring connection properties on page 319 to set the properties of
the new connection:
Configuring connection properties
1. Click the Properties button.
2. Click the General tab.
3. Select Communications Port (COM x) from the Select a device: drop-down list.
4. Click the Configure button.
5. Choose 38400 from the Maximum speed (bps) drop-down list.
6. Verify the modem configuration settings.
Ensure that all the Hardware features check boxes are clear, and click OK.
7. Click the Security tab.
8. Select the Security options.
Click Typical and choose Allow unsecured password in the Security options.
9. Click the Networking tab.
10. Select the dial-up server type.
Select PPP: Windows 95/98/NT4/2000, Internet
11. Configure settings for the dial-up server.
Click Settings, select the three check boxes in the PPP settings window, and click
OK.
12. Click Internet Protocol (TCP/IP) and Client for Microsoft Networks.
13. Open the Properties dialog box for Internet Protocol.
Highlight Internet Protocol (TCP/IP) and click Properties.
14. Select the Use the following IP address radio button.
15. Set the IP address.
Enter an IP address for this connection, and click OK.
Note:
The IP address must be unique and in the same range as the IP address of the
DECT system. This becomes the Client IP address.
16. Click OK.
DMC DECT Fundamentals
August 2012
319
Changing the DMC8 jumper setting after DECT system upgrade to Release 5.0
Modem setup
Install the local modem on the PC, then configure the modem.
Modem requirements
The modem requirements are:
• 56 Kbits/s
• Baud rate 38 400 Kbits/s fixed.
When using a US Robotics modem, use factory defaults.
Connect the modem to the required COM port on the PC using a standard DB-25 to DB-9
cable.
Configuring the local modem
1. Click the Start button on the PC taskbar.
2. Select Settings.
3. Select Control panel.
4. Double-click Phone and Modems Options.
5. Click the Modems tab.
6. Click the Add button.
7. Follow the Wizard.
Setting the modems to factory defaults
Connect to the local modem using Hyper Terminal. See Figure 218: Local modem connected
using Hyper Terminal on page 321. Set the remote modem to the factory defaults.
320
DMC DECT Fundamentals
August 2012
Comments? [email protected]
Connecting a DECT system to DMC DECT Manager using remote modems and Windows 2000
Figure 218: Local modem connected using Hyper Terminal
Use the initialisation commands in Table 53: Initialisation commands on page 321 to configure
the modems.
Table 53: Initialisation commands
Initialisation commands
Meaning
US Robotics:
AT
AT&F
Set to factory default
AT&W0
Write setting into non-volatile memory 0
ATY0
At power up, start modem with settings
in non-volatile memory 0
Dynalink modem:
AT
AT&F
Set to factory default
AT&K0
Flow control disabled
AT&W0
Write setting into non-volatile memory 0
ATY0
At power up, start modem with settings
in non-volatile memory 0
Adding a new DECT system to DMC DECT Manager
Before adding the DECT system to DMC DECT Manager, the DECT relay card must be added
to the network.
DMC DECT Fundamentals
August 2012
321
Changing the DMC8 jumper setting after DECT system upgrade to Release 5.0
Note:
When connecting to the DMC8 relay board using modems, jumpers J6, J7, J8, and J9 must
be strapped for V.24 on the DMC.
Open the DMC DECT Manager System window. Complete the steps in Adding a new DECT
system on page 322.
Adding a new DECT system
1. Click File.
2. Click Add.
3. Click the General tab.
4. Identify the DECT system name.
Enter a DECT System Name, and click the Apply button.
5. Click the Communication tab.
6. Enter the IP Address of the DECT relay board.
7. Click Serial.
8. Click the Details button.
9. Enter the DMC DECT Manager Server IP Interface.
This is the IP address entered as the Client IP address in Configuring connection
properties on page 319, Step 15.
10. Choose the COM Port to which the local modem is connected.
11. Enter the Phone Number of the remote modem.
12. Click OK.
13. Enter values in the Access Right Identification and Parameters tabs according to
normal operating procedures.
14. Click the Alarm tab.
15. Define the DMC DECT Manager Server IP Interface IP address.
Enter the DMC DECT Manager Server IP Interface IP address in the Upstream
Manager IP addressfield.
16. Click the Apply button
17. Click the OK button.
The DECT system is now added to DMC DECT Manager. All the DMC DECT
Manager features and functions continue to operate normally.
Note:
The modem connection can slow the completion time for some operations.
322
DMC DECT Fundamentals
August 2012
Comments? [email protected]
Connecting a DECT system to DMC DECT Manager using remote modems and Windows 2000
Changing an existing DECT system on DMC DECT Manager from
an Ethernet connection to a modem connection
It is possible to manage a DECT system, which was previously managed using an Ethernet
connection, using modems.
To change an Ethernet connection to a modem connection, you must first install the modem
(see Cable setup on page 315 and DECT relay board to remote modem on page 316), and
complete all the steps in Configuring NetBEUI Protocol on page 317. Then complete the steps
in Changing an Ethernet connection to a modem connection on page 323.
Note:
When connecting to the DECT relay board using modems, jumpers J6, J7, J8, and J9 must
be strapped for V.24 on the DMC.
Complete the following steps to change an Ethernet connection to a modem connection:
Changing an Ethernet connection to a modem connection
1. Select the DECT system that you want to change from an Ethernet connection to a
modem connection.
Open the DMC DECT Manager System window, and select the DECT system to be
changed.
2. Select File > Properties.
Select File on the toolbar, and select Properties from the File menu. The Properties
window opens.
3. Click the Communication tab.
4. Select the Serial radio button.
5. Click the Details button.
6. Enter the DMC DECT Manager Server IP Interface.
This is the IP address entered as the Client IP address in Configuring connection
properties on page 319, Step 15.
7. Choose the COM port to which the local modem is connected.
8. Enter the Phone Number of the remote modem.
9. Click OK.
10. Enter values in the Access Right Identification and Parameters tabs according to
normal operating procedures.
11. Click the Alarm tab.
12. Enter the DMC DECT Manager Server IP Interface IP address in the Upstream
Manager IP addresstext box.
DMC DECT Fundamentals
August 2012
323
Changing the DMC8 jumper setting after DECT system upgrade to Release 5.0
13. Click the Apply button.
14. Click OK.
It is now possible to manage the DECT system using the modem connection. All
the DMC DECT Manager features and functions continue to operate normally.
Note:
The modem connection can slow the completion time for some operations.
324
DMC DECT Fundamentals
August 2012
Comments? [email protected]
Chapter 9: Adding a DMC8 to a non-SNMP
DECT system
It is possible to add DMC8 cards to a DECT system that previously contained only DMC4 cards. The
system becomes an SNMP system. Therefore, DMC DECT Manager is used for management.
Note:
If the DMC8 is not new, ensure that the card has no subscriptions, or PARI/SARI, and has a known IP
address. (Default IP address is 192.168.1.1.)
Note:
Avaya recommends that you avoid having the relay card (DMC8) as the lowest card in the system.
Additional DMC8 cards can be positioned in lower slots.
Important:
It is very important that all the DMC4 cards in the system have the latest non-SNMP firmware
(45000405) before adding a DMC8 to a non-SNMP DECT system.
Adding a DMC8
1. Connect the DMC8 to the DMC DECT Manager.
Caution:
Do not connect the faceplate connectors between the DMC4 and DMC8 at this
time.
2. Create a new DECT system.
Use the DMC DECT Manager standard procedure to create a new DECT system.
Note:
The DMC8 is the only board visible on DMC DECT Manager at this time.
DMC DECT Fundamentals
August 2012
325
Adding a DMC8 to a non-SNMP DECT system
Caution:
Ensure that the System Parameters on the DMC8 are the same as the existing
DECT system. The System Parameters on the DMC8 become the System
Parameters for the complete system.
3. Upload the DMC4 SNMP software (45100xxx).
4. Replace the terminators in their new location.
5. Connect the faceplate connectors.
Note:
DMC4 cards can reboot at this point — this is normal. The DMC8 continues to
be the only board visible on DMC DECT Manager until the SNMP firmware is
activated on all DMC4 cards.
6. Activate the DMC4 SNMP firmware.
Note:
If you receive system notifications on DMC DECT Manager (this can occur
because the DMC4 cards are rebooting), disconnect from the DECT system and
close down DMC DECT Manager. Reconnect to the DECT system and activate
the firmware again.
Note:
During activation, DMC DECT Manager loses the connection to the DECT
system. After activation is complete and the boards reboot a number of times,
the green LEDs become solid (stop flashing). Reconnect DMC DECT Manager
to the DECT system. You can now see all the DMC4 cards on the DECT
system.
7. Synchronize all boards.
When prompted to synchronize, select all boards and synchronize from DMC. The
DECT system is now upgraded.
Caution:
The DMC8 can reboot frequently if there is not at least one handset subscribed
to the system.
326
DMC DECT Fundamentals
August 2012
Comments? [email protected]
Chapter 10: DMC8 debug port
Overview
The ability to monitor messages on the DMC8 card is an important aid to resolving problems
on DECT. Monitoring messages is an important part of the Serviceability program for DECT.
Use the information in this Appendix to identify how far messages are travelling, and where
they are getting lost in the system.
For example, an investigation of a DMC card lockup problem shows that messages are leaving
the PBX through LD 77, coming into the DMC card through the DS30 monitor, and being sent
to the Cordless Controller Unit (CCU) through the IPC monitor. It is verified that there is a
problem on the CCU because there are no responses from the CCU, although the "Hello
messaging" is ok.
DMC card
The DMC is divided into the following sections:
• CCU section that is primarily derived from the existing Philips DAS CCC hardware
• Backplane Conversion Unit (BCU) section that connects to the CCU
The BCU section of the DMC includes software to connect the Philips system to the PBX
backplane. It effectively makes the CCU look like an Intelligent Peripheral card to the system.
In fact, the DMC emulates an analogue line card with 32 handsets attached.
The CCU (Philips part) is connected to the BCU (Avaya part) through a 2Mbit EuroISDN link.
Figure 219: DECT interface on page 328 shows the components of the DECT interface. For
the purposes of this Appendix, the BCU is the key component. For preliminary investigations,
the DS30 monitor and Inter Processor Communications (IPC) monitor are the most important
points to monitor from the DMC card.
DMC DECT Fundamentals
August 2012
327
DMC8 debug port
Figure 219: DECT interface
Items to monitor
The DS30 driver and IPC driver tasks are the most informative for preliminary investigation.
They track message passing through the debug task. The DS30 driver and IPC driver tasks
provide detail on:
• Messages received and sent through the DS30 driver task from/to the PBX, and from/to
the BCU software.
• Messages received and sent through the IPC driver task from/to the BCU software, and
from/to the EuroISDN link (inter processor link).
Monitor port physical connection
The DMC8 debug port connections allow the DMC8 to be connected as Data Communications
Equipment (DCE) to a COM port of a PC (the Data Terminal Equipment [DTE]).
DMC8 debug port
The debug port of the DMC 8 is connected directly from the MDF BIX block.
328
DMC DECT Fundamentals
August 2012
Comments? [email protected]
Monitor port physical connection
Figure 220: DMC8 debug port connections
Connecting a modem
Figure 220: DMC8 debug port connections on page 329 shows the DMC connected to a PC
as DCE. To connect to a modem, the DMC has to act as DTE (because the modem is DCE).
This is achieved in one of two ways:
1. Cross the TX and RX of the connections shown in Figure 220: DMC8 debug port
connections on page 329 (that is, swap pins 2 and 3 of the DB-9 cable).
2. Use a modem eliminator (null modem).
Before connecting to the DMC, the modem must be configured as follows using Hyper Terminal
or similar (19200 baud):
1. ats0=1: s0 (zero) = 1, which enables auto answer after one ringing cycle.
2. at&d0: DTR override; the modem ignores DTR.
3. at&w0: Save settings.
Figure 221: 3COM US Robotics modem settings on page 330 is an example of the settings
from a 3COM US Robotics modem. The most important settings are highlighted in bold.
DMC DECT Fundamentals
August 2012
329
DMC8 debug port
Figure 221: 3COM US Robotics modem settings
Terminal configuration
Whether connected to the DMC directly, or through modems, terminal configuration is the
following:
• 19200 baud
• 8 bits
• no parity
• 1 stop bit UART
Successful connection
When you have successfully connected to the DMC, press d or m to display the main debug
menu.
330
DMC DECT Fundamentals
August 2012
Comments? [email protected]
Information collection
Figure 222: BCU Main Debug Menu
Information collection
Record the following information (see Switching on DS30 and IPC monitors on page 331) with
a capture file using Hyper terminal or equivalent before you start monitoring.
Switching on DS30 and IPC monitors
1. Press m or d to open the main menu. See Figure 223: BCU main menu on
page 332.
DMC DECT Fundamentals
August 2012
331
DMC8 debug port
Figure 223: BCU main menu
2. Press 3 from the main menu.
The Driver Debug Menu displays. See Figure 224: Current debug settings on
page 332.
Figure 224: Current debug settings
332
DMC DECT Fundamentals
August 2012
Comments? [email protected]
Messages on an idle system
3. Press 0 (zero) to display the current debug settings.
4. Press 3 and 4 to switch on the monitors. See Figure 225: Current Driver Debug Flag
Settings menu on page 333.
Figure 225: Current Driver Debug Flag Settings menu
5. Press 0 (zero) to display the debug settings again. See Figure 226: DS30 and IPC
monitors ON on page 333.
Figure 226: DS30 and IPC monitors ON
Messages on an idle system
IPC interface
After switching on the monitors, it is normal to see ping/pong (Hello messaging) messages on
the IPC monitor between the BCU and CCU.
Hello messaging is used to detect errors on the BCU to CCU communication interface. The
BCU and CCU are not synchronized with one another. They send Hello messages
asynchronously, and there is no acknowledge. On receipt of a Hello message, the receiving
unit resets the timer for the receipt of the next Hello message. On sending a Hello message,
DMC DECT Fundamentals
August 2012
333
DMC8 debug port
the sending unit resets the timer for sending the next Hello message. If the timeout for receiving
a Hello message is exceeded, the receiving unit resets the DMC.
Table 54: Timeout values for Hello messaging on page 334 shows the timeout values.
Table 54: Timeout values for Hello messaging
Item
Time-out duration
Timeout for sending new Hello
15 seconds for BCU
16 seconds for CCU
Timeout for receiving a Hello message
40 seconds
The timeout values for sending differ for the BCU and the CCU to create an asynchronous
exchange of the Hello messages.
DS30 interface
Audit messages come from the PBX interface every few minutes for audit purposes. You can
also view the audit messages using the SSD monitor on the PBX through LD 77.
Message examples
Figure 227: Error message example on page 335 shows typical messages that can be seen
during call processing on the DS30 and IPC link. This type of monitoring can impact call
processing on a busy site because all 32 channels are monitored together.
334
DMC DECT Fundamentals
August 2012
Comments? [email protected]
Message examples
Figure 227: Error message example
DMC DECT Fundamentals
August 2012
335
DMC8 debug port
336
DMC DECT Fundamentals
August 2012
Comments? [email protected]
Chapter 11: Performance Collection file
samples
Equipment Performance Collection file sample
<?xml version="1.0"?> <file> <header> <systeminfo PARI="44446666"/> <boardinfo
boardnumber="24"/> <package package_origId="45100105"/> </header> <data>
<boardstat> <dateandtime>2001,1,12,18,17,37,0</dateandtime>
<counters>0,0,0,0,0,0,0,0,0,0,0,0,0,0,0,0,0,0,0,0</counters> </boardstat> <rfpinfo> <rfpstat
rfp="1"> <dateandtime>2001,1,24,19,50,9,0</dateandtime>
<counters>1,0,0,0,8,420,0,1,1,0,0,0,0,0,0,0,0,0,0,0,0,0,0,1,0,0,0,0,0,0</counters> </rfpstat>
<rfpstat rfp="2"> <dateandtime>2001,1,24,19,50,13,0</dateandtime>
<counters>1,0,0,0,8,420,0,1,1,0,0,0,0,0,0,0,0,0,0,0,0,0,0,1,0,0,0,0,0,0</counters> </rfpstat>
<rfpstat rfp="3"> <dateandtime>2001,1,24,19,50,13,0</dateandtime>
<counters>0,0,0,0,0,0,0,0,0,0,0,0,0,0,0,0,0,0,0,0,0,0,0,0,0,0,0,0,0,0</counters> </rfpstat>
<rfpstat rfp="4"> <dateandtime>2001,1,24,19,50,19,0</dateandtime>
<counters>0,0,0,0,0,0,0,0,0,0,0,0,0,0,0,0,0,0,0,0,0,0,0,0,0,0,0,0,0,0</counters> </rfpstat> </
rfpinfo> <rfpchanocc> <rfpchocc rfp="1"> <dateandtime>2001,1,12,18,17,37,0</
dateandtime> <choc>0,0,0,0,0,0,0,0,0,0,0,0,0</choc> </rfpchocc> <rfpchocc rfp="2">
<dateandtime>2001,1,12,18,17,37,0</dateandtime> <choc>0,0,0,0,0,0,0,0,0,0,0,0,0</choc>
</rfpchocc> <rfpchocc rfp="3"> <dateandtime>2001,1,24,19,50,6,0</dateandtime>
<choc>0,0,0,0,0,0,0,0,0,0,0,0,0</choc> </rfpchocc> <rfpchocc rfp="4">
<dateandtime>2001,1,24,19,50,6,0</dateandtime> <choc>0,0,0,0,0,0,0,0,0,0,0,0,0</choc>
</rfpchocc> </rfpchanocc> <bschanocc> <bchanocc> <dateandtime>2001,1,24,19,50,6,0</
dateandtime> <choc>0,0,0,0,0,0,0,0,0,0,0,0,0,0,0,0,0,0,0,0,0,0,0,0,0,0,0,0,0,0,0,0,434</
choc> </bchanocc> <schanocc> <dateandtime>2001,1,24,19,50,6,0</dateandtime>
<choc>0,0,0,0,0,0,0,0,0,0,0,0,0,0,0,0,0,0,0,0,0,0,0,0,0,0,0,0,0,0,0,0,434</choc> </
schanocc> </bschanocc> </data> </file>
User Performance Collection file sample
<?xml version="1.0"?> <file> <header> <systeminfo PARI="44446666"/> <boardinfo
boardnumber="24"/> <package package_origId="45100105"/> </header> <data> <ppstat
RecNum="2"> <dateandtime>2001,1,12,18,17,37,0</dateandtime>
DMC DECT Fundamentals
August 2012
337
Performance Collection file samples
<ipui>40110000E5A97B7F84</ipui> <dnr>20801</dnr>
<counters>0,0,0,0,0,0,0,0,0,0,0,0,0,0,0,255</counters> </ppstat> </data> </file>
338
DMC DECT Fundamentals
August 2012
Comments? [email protected]
Index
insert servicable .................................................278
LED status ..........................................................273
remove ...............................................................275
remove faulty ......................................................277
restore subscription data ....................................279
reuse ..................................................................281
A
Alarm ........................................................................268
code ...................................................................268
Arsenal .....................................................................264
B
Base station ...............................................273, 281–283
cancel mute alarms ............................................282
disconnect ..........................................................283
LED status ..........................................................273
mute alarms .......................................................281
re-install ..............................................................283
remove and re-install ..........................................281
Board Configuration Mismatch .................................179
C
Change ...............................................252–255, 257–260
date ....................................................................259
IP address on MDECT System DMC8 Relay card 255
IP address on the DMC DECT Manager ............254
MDECT System name .......................................253
parameters .........................................................260
PARI ...................................................................257
passwords ..........................................................252
SARI ...................................................................257
time ....................................................................259
Upstream manager IP address ..........................258
Connecting to an DECT system ...............................179
Connection to an MDECT system ............................231
D
default password ......................................................264
Delete .......................................................................233
MDECT Systems ................................................233
disconnecting or unable to connect ..........................264
disconnecting problem ..............................................264
DMC DECT Manager .................................................29
DMC DECT Manager data .......................................246
DMC8 .................................................273, 275–279, 281
add to an MDECT system ..................................279
backup configuration ..........................................276
insert ..................................................................275
DMC DECT Fundamentals
F
features ......................................................................30
Common Services ................................................30
Firmware ...................................................................284
upload and activation .........................................284
Firmware upload .......................................................286
failure recovery ...................................................286
I
Internet Explorer, unable to connect .........................264
K
Keep ..................................................................261, 262
non-operational base stations ............................262
non-operational DMC8 from DMC DECT Manager
...............................................................261
L
lost passwords ..........................................................252
M
maintenance bypass cable .......................................277
Meridian 1 .................................................................158
O
Open .........................................................................231
Boards window ...................................................231
RFP window .......................................................231
Subscriptions window .........................................231
Option 11C .................................................................14
Order Tool ...................................................................43
August 2012
339
P
RSSI .........................................................................287
current data ........................................................287
Parameter mismatch ................................................179
parameters ...............................................................309
PARI or SARI mismatch ............................................179
Password recovery ...................................................310
password, default .....................................................264
Permanent connection to an MDECT system ..........232
provision ............................................................248, 249
remote DMC8 customer has DECT Manager .... 248
remote DMC8 no customer DECT Manager ......249
S
R
Radio Fixed Part Configuration Mismatch ................179
Radio Fixed Part Settings Mismatch ........................179
rebooting ...................................................................264
Remote Access Service .............................................30
description ............................................................30
remove ..............................................................261, 262
non-operational base stations from DMC DECT
Manager ................................................262
non-operational DMC8 from DMC DECT Manager
...............................................................261
reset to the factory password ...................................310
Resolve a subscription configuration mismatch .......263
340
DMC DECT Fundamentals
subscription .........................237–241, 243, 244, 250, 251
copy ....................................................................238
disable ................................................................237
export .................................................................243
find .....................................................................240
force disable .......................................................244
import .................................................................241
move ..................................................................239
remote customer has DECT Manager ...............251
remote customer no DECT Manager .................250
Subscription Configuration Mismatch .......................179
synchronization .........................................................179
when DMC DECT Manager connects ................179
when you connect ..............................................179
Synchronization ........................................................179
when connecting to an MDECT System ............179
U
unable to connect .....................................................264
Update ......................................................................246
MDECT System data .........................................246
Upstream Manager IP Address Mismatch ................179
August 2012