1
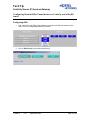
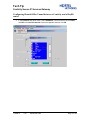
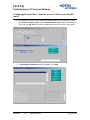
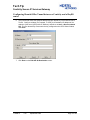
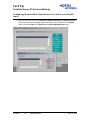
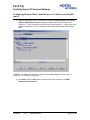
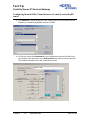
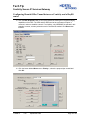
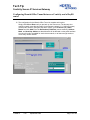
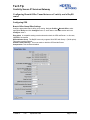
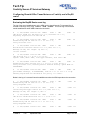
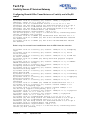
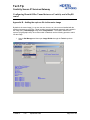
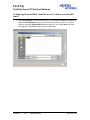
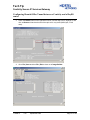
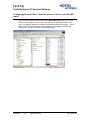
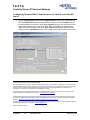
Tech Tip
Contivity Secure IP Services Gateway
Configuring Branch Office Tunnel between a Contivity and a BayRS
router
Contents
Contents .......................................................................................................................................... 1
Overview.......................................................................................................................................... 1
Sample Configuration ...................................................................................................................... 1
Setup ........................................................................................................................................... 1
Configuring ARN ......................................................................................................................... 2
Configuring CES........................................................................................................................ 11
Branch Office Group IPSec Settings .................................................................................... 11
Branch Office Connection Configuration .............................................................................. 12
Reviewing the BayRS Router event log .................................................................................... 14
Reviewing the Contivity event log ............................................................................................. 15
Router Troubleshooting Tips..................................................................................................... 17
Router Scripts ....................................................................................................................... 17
Interpreting Log Messages on the Router ............................................................................ 18
Contivity troubleshooting tips .................................................................................................... 21
Interpreting Log Messages on the Contivity ......................................................................... 21
Appendix A – Setting the NPK on the BayRS router..................................................................... 23
Appendix B – Adding the capi.exe file to the router image ........................................................... 25
Overview
This technical tip illustrates a sample branch office tunnel configuration between Contivity Secure
IP Services Gateway and BayRS router.
Sample Configuration
Setup
In this sample configuration, a Contivity 1010 running V04_85.160 code and an ARN running
15.5.0.0 code were used in the following configuration:
3.1.1.2
10.1.1.2
2.1.1.2
10.1.1.1
10.1.1.0/24
CES
ARN
2.1.1.0/24
3.1.1.0/24
3.1.1.1
2.1.1.1
CES – code version V04_85.160, Private IP 3.1.1.2, Mgmt IP 3.1.1.254, Public IP 10.1.1.2
ARN – code version V15.5.0.0, Private IP 2.1.1.2, Public IP 10.1.1.1
TT040916
1.00
September 2004
Page: 1 of 29
Tech Tip
Contivity Secure IP Services Gateway
Configuring Branch Office Tunnel between a Contivity and a BayRS
router
Configuring ARN
1. First, both IPSec and IKE must be loaded on the public side Ethernet interface of the
ARN. Click on corresponding Ethernet connector:
2. Click on Edit Circuit in the window that pops up:
TT040916
1.00
September 2004
Page: 2 of 29
Tech Tip
Contivity Secure IP Services Gateway
Configuring Branch Office Tunnel between a Contivity and a BayRS
router
3. In the Protocols drop down menu, select Add/Delete. Check the boxes next to IPSEC
and IKE on the Select Protocols window that appears and then click OK:
TT040916
1.00
September 2004
Page: 3 of 29
Tech Tip
Contivity Secure IP Services Gateway
Configuring Branch Office Tunnel between a Contivity and a BayRS
router
4. Click Done to exit out of the next screen that appears. Next, from the drop down menus
go to Protocols | Edit IP | IKE. Enter the Node Protection Key (NPK) configured on the
router and click OK. Note: The NPK is configured from the secure shell in the console.
5. The Edit IKE SA Destination screen will appear. Click Add:
TT040916
1.00
September 2004
Page: 4 of 29
Tech Tip
Contivity Secure IP Services Gateway
Configuring Branch Office Tunnel between a Contivity and a BayRS
router
6. This process will define the endpoint address and pre-shared key for the Branch Office
Tunnel. Configure a Name (For example, To CES), the Destination IP address of the
endpoint of the tunnel (CES public IP address), and either an Ascii or Hex Pre-shared
Key. This Pre-shared Key must match the key configured on the CES. When finished,
click Done:
7. Click Done on the Edit IKE SA Destination screen.
TT040916
1.00
September 2004
Page: 5 of 29
Tech Tip
Contivity Secure IP Services Gateway
Configuring Branch Office Tunnel between a Contivity and a BayRS
router
8. From the drop down menu go to Protocols | Edit IP | IP Security | Outbound Policies.
First we need to make a template to define the IPSec policy, so click on the Template
button, and then Create on the IPSec Policy Template Management screen:
TT040916
1.00
September 2004
Page: 6 of 29
Tech Tip
Contivity Secure IP Services Gateway
Configuring Branch Office Tunnel between a Contivity and a BayRS
router
9. Using the drop-down menus, create a policy containing Action->Protect, and Criteria>Source & Destination IP address ranges corresponding to the Local (ARN local
network, 2.1.1.0/24 in this case) and Remote (CES local network, 3.1.1.0/24 in this case)
networks respectively. This is an example of what the template should look like when
done:
** NOTE ** It is important to include the network and broadcast addresses in the range, i.e.
x.x.x.0 and x.x.x.255 for a 24 bit subnet.
10. Click Done, and then Done again on the previous screen to return to the IPSec
Outbound Policies screen.
TT040916
1.00
September 2004
Page: 7 of 29
Tech Tip
Contivity Secure IP Services Gateway
Configuring Branch Office Tunnel between a Contivity and a BayRS
router
11. Click Add Policy. Supply the policy a name, making sure the correct interface and the
template just created are highlighted, and then click OK:
12. On the next screen click Automated SA, which indicates the tunnel will use IKE for the
key exchange. Click the button next to SA Destination and select the entry for the CES.
This endpoint was defined in the IKE configuration process:
TT040916
1.00
September 2004
Page: 8 of 29
Tech Tip
Contivity Secure IP Services Gateway
Configuring Branch Office Tunnel between a Contivity and a BayRS
router
13. Click the New Proposal button to set up a proposal list defining the encryption/integrity
capabilities of the CES. The CES and the ARN need to have at least one option in
common in order to establish a tunnel. For simplicity, only 3DES/MD5 is selected in this
example, however, as many selections can be checked as needed. Click Done when
finished:
14. Click the button labeled None next to Priority 1, select the proposal just created and
click OK:
TT040916
1.00
September 2004
Page: 9 of 29
Tech Tip
Contivity Secure IP Services Gateway
Configuring Branch Office Tunnel between a Contivity and a BayRS
router
15. The configuration for the Branch Office Tunnel is complete at this point.
Simply click OK and Done until you are back on the front screen. The last step is to
configure a static route directing traffic for the Remote network (3.1.1.0/24 in this case)
out the public interface. Using the drop down menus, go to Protocols | IP | Static
Routes and click Add. Enter the Destination IP Address (remote network), Address
Mask, and Next Hop Address so that this traffic will be directed out the public interface.
An entry will need to be added for each remote network, or at least enough entries to
cover every remote network:
TT040916
1.00
September 2004
Page: 10 of 29
Tech Tip
Contivity Secure IP Services Gateway
Configuring Branch Office Tunnel between a Contivity and a BayRS
router
Configuring CES
Branch Office Group IPSec Settings
Configure appropriate branch office group setting. Navigate ProfilesÆBranch Office, select
appropriate Group and click Configure next to it, scroll down to the IPSec section and click
Configure under it.
Encryption: A compatible setting must be selected on both the CES and Router. In this case,
3DES/MD5 is checked.
Diffie-Hellman Group: The BayRS router only supports 56-bit DES with Group 1 (768 bit prime).
This option must be selected.
Perfect Forward Secrecy: This must match on both the CES and the Router
Compression: This should be disabled
TT040916
1.00
September 2004
Page: 11 of 29
Tech Tip
Contivity Secure IP Services Gateway
Configuring Branch Office Tunnel between a Contivity and a BayRS
router
Branch Office Connection Configuration
Configure branch office tunnel, navigate ProfilesÆBranch Office, select the configured in
previous step Group and click Add.
Local Ip Address: This is the IP address of the CES public interface (10.1.1.2 in this case)
Remote Ip Address: This is the IP address of the ARN public interface (10.1.1.1)
Pre-Shared Key: Must match on both the CES and router. Both sides must use either Text
(Ascii) or Hex and have the same Key configured.
Local & Remote Networks: Local network – CES private network (3.1.1.0/24 in this case),
Remote network (ARN private network, 2.1.1.0/24 in this case).
TT040916
1.00
September 2004
Page: 12 of 29
Tech Tip
Contivity Secure IP Services Gateway
Configuring Branch Office Tunnel between a Contivity and a BayRS
router
Continuation of the Branch Tunnel Connection Configuration screen:
TT040916
1.00
September 2004
Page: 13 of 29
Tech Tip
Contivity Secure IP Services Gateway
Configuring Branch Office Tunnel between a Contivity and a BayRS
router
Reviewing the BayRS Router event log
The log of the tunnel establishment on the ARN can be viewed from the TI (command line of
console or telnet) by using “log –ffwdit –eIKE –eIPSEC”. This is the log of a successful
tunnel establishment when ARN initiates the connection:
#
1: 09/13/2004 15:51:21.257 TRACE
SLOT 1 IKE
IKE SA not found for IKE peer 10.1.1.2, interface 10.1.1.1,
beginning negotiation for new IKE SA
Code:
35
#
2: 09/13/2004 15:51:21.258 INFO
SLOT
Establishing IKE SA from 10.1.1.1 to 10.1.1.2,
using initiator role.
Code:
20
1
IKE
#
3: 09/13/2004 15:51:23.632 INFO
SLOT 1 IKE
Notification received: Source 10.1.1.2, Dest 10.1.1.1,
Message ID 0x0, SPI length: 16, SPI: 0,
Initial Contact
Code: 115
#
4: 09/13/2004 15:51:23.642 INFO
SLOT 1 IKE
Code:
IKE SA from 10.1.1.1 to 10.1.1.2 is up.
Cipher: 3DES, Hash: SHA1, Life Type: Minutes, Life Time: 480
21
#
5: 09/13/2004 15:51:23.643 INFO
SLOT 1 IKE
Code: 27
Establishing IPsec SA from 10.1.1.1 to 10.1.1.2 for policy 1
using initiator role, without perfect forward secrecy. Quick Mode ID
0x820be868.
#
6: 09/13/2004 15:51:23.818 INFO
SLOT 1 IKE
Code: 28
Quick Mode exchange, ID 0x820be868, from 10.1.1.1 to 10.1.1.2 is up.
Sending negotiated SA information for policy 1 to IPsec.
Below is the log of a successful tunnel establishment when the ARN responds to the connection:
#
1: 09/13/2004 15:59:16.715 INFO
SLOT
Establishing IKE SA from 10.1.1.1 to 10.1.1.2,
using responder role.
1
IKE
Code:
20
#
2: 09/13/2004 15:59:16.733 INFO
SLOT 1 IKE
Invalid Payload Type: Source 10.1.1.2, Dest 10.1.1.1,
Message ID 0x0, SPI length: 0, SPI: 0
Code: 117
#
3: 09/13/2004 15:59:16.735 INFO
SLOT 1
IKE SA not established from 10.1.1.1 to 10.1.1.2
IKE
Code:
22
#
4: 09/13/2004 15:59:16.739 INFO
SLOT
Establishing IKE SA from 10.1.1.1 to 10.1.1.2,
using responder role.
1
IKE
Code:
20
#
1
IKE
Code: 115
5: 09/13/2004 15:59:17.873
TT040916
1.00
September 2004
INFO
SLOT
Page: 14 of 29
Tech Tip
Contivity Secure IP Services Gateway
Configuring Branch Office Tunnel between a Contivity and a BayRS
router
Notification received: Source 10.1.1.2, Dest 10.1.1.1,
Message ID 0x0, SPI length: 16, SPI: 0,
Initial Contact
#
6: 09/13/2004 15:59:17.907 INFO
SLOT 1 IKE
IKE SA from 10.1.1.1 to 10.1.1.2 is up.
Cipher: DES, Hash: SHA1, Life Type: Minutes, Life Time: 480
Code:
21
#
7: 09/13/2004 15:59:18.021 INFO
SLOT 1 IKE
Code: 27
Establishing IPsec SA from 10.1.1.1 to 10.1.1.2
using responder role, without perfect forward secrecy. Quick Mode ID
0x3f4a938e.
#
8: 09/13/2004 15:59:18.170 INFO
SLOT 1 IKE
Code: 28
Quick Mode exchange, ID 0x3f4a938e, from 10.1.1.1 to 10.1.1.2 is up.
Sending negotiated SA information for policy 1 to IPsec.
Reviewing the Contivity event log
The log of the Contivity can be viewed from the GUI through Status Æ Event Log.
Below is a log of a successful tunnel establishment when the Contivity initiates the tunnel:
09/16/2004 14:48:48 0 Branch Office [01] IPSEC branch office connection
initiated to rem[2.1.1.0-255.255.255.0]@[10.1.1.1] loc[3.1.1.0255.255.255.0]
09/16/2004 14:48:48 0 Security [11] Session: IPSEC[10.1.1.1] attempting
login
09/16/2004 14:48:48 0 Security [01] Session: IPSEC[10.1.1.1] has no
active sessions
09/16/2004 14:48:48 0 Security [01] Session: IPSEC[10.1.1.1] To ARN has
no active accounts
09/16/2004 14:48:49 0 Security [01] Session: IPSEC[10.1.1.1]:13 SHAREDSECRET authenticate attempt...
09/16/2004 14:48:49 0 Security [01] Session: IPSEC[10.1.1.1]:13
attempting authentication using LOCAL
09/16/2004 14:48:49 0 Security [11] Session: IPSEC[10.1.1.1]:13
authenticated using LOCAL
09/16/2004 14:48:49 0 Security [11] Session: IPSEC[10.1.1.1]:13 bound to
group /Base/To ARN
09/16/2004 14:48:49 0 Security [01] Session: IPSEC[10.1.1.1]:13 Building
group filter permit all
09/16/2004 14:48:49 0 Security [01] Session: IPSEC[10.1.1.1]:13 Applying
group filter permit all
09/16/2004 14:48:49 0 Security [11] Session: IPSEC[10.1.1.1]:13
authorized
09/16/2004 14:48:49 0 Security [11] Session: network IPSEC[2.1.1.0255.255.255.0] attempting login
09/16/2004 14:48:49 0 Security [11] Session: network IPSEC[2.1.1.0255.255.255.0] logged in from gateway [10.1.1.1]
09/16/2004 14:48:49 0 ISAKMP [02] ISAKMP SA established with 10.1.1.1
09/16/2004 14:48:49 0 Security [12] Session: IPSEC[10.1.1.1]:13 physical
addresses: remote 10.1.1.1 local 10.1.1.2
TT040916
1.00
September 2004
Page: 15 of 29
Tech Tip
Contivity Secure IP Services Gateway
Configuring Branch Office Tunnel between a Contivity and a BayRS
router
09/16/2004 14:48:49 0 Security [12] Session: IPSEC[-]:14 physical
addresses: remote 10.1.1.1 local 10.1.1.2
09/16/2004 14:48:49 0 Outbound ESP from 10.1.1.2 to 10.1.1.1 SPI
0xc0523930 [03] ESP encap session SPI 0x303952c0 bound to s/w on cpu 0
09/16/2004 14:48:49 0 Inbound ESP from 10.1.1.1 to 10.1.1.2 SPI
0x00140fa3 [03] ESP decap session SPI 0xa30f1400 bound to s/w on cpu 0
09/16/2004 14:48:49 0 Branch Office [00] 4f5eb08
BranchOfficeCtxtCls::RegisterTunnel: rem[2.1.1.0255.255.255.0]@[10.1.1.1] loc[3.1.1.0-255.255.255.0] overwriting tunnel
context [ffffffff] with [6ea7a30]
09/16/2004 14:48:49 0 ISAKMP [03] Established IPsec SAs with 10.1.1.1:
09/16/2004 14:48:49 0 ISAKMP [03] ESP 56-bit DES-CBC-HMAC-MD5 outbound
SPI 0xc0523930
09/16/2004 14:48:49 0 ISAKMP [03] ESP 56-bit DES-CBC-HMAC-MD5 inbound
SPI 0x140fa3
Below is a log of a successful tunnel establishment when the ARN initiates the connection:
09/16/2004 14:45:35 0 Security [11] Session: IPSEC[10.1.1.1] attempting
login
09/16/2004 14:45:35 0 Security [01] Session: IPSEC[10.1.1.1] has no
active sessions
09/16/2004 14:45:35 0 Security [01] Session: IPSEC[10.1.1.1] To ARN has
no active accounts
09/16/2004 14:45:35 0 ISAKMP [02] Oakley Main Mode proposal accepted
from 10.1.1.1
09/16/2004 14:45:37 0 Security [01] Session: IPSEC[10.1.1.1]:11 SHAREDSECRET authenticate attempt...
09/16/2004 14:45:37 0 Security [01] Session: IPSEC[10.1.1.1]:11
attempting authentication using LOCAL
09/16/2004 14:45:37 0 Security [11] Session: IPSEC[10.1.1.1]:11
authenticated using LOCAL
09/16/2004 14:45:37 0 Security [11] Session: IPSEC[10.1.1.1]:11 bound to
group /Base/To ARN
09/16/2004 14:45:37 0 Security [01] Session: IPSEC[10.1.1.1]:11 Building
group filter permit all
09/16/2004 14:45:37 0 Security [01] Session: IPSEC[10.1.1.1]:11 Applying
group filter permit all
09/16/2004 14:45:37 0 Security [11] Session: IPSEC[10.1.1.1]:11
authorized
09/16/2004 14:45:37 0 ISAKMP [02] ISAKMP SA established with 10.1.1.1
09/16/2004 14:45:37 0 Security [11] Session: network IPSEC[2.1.1.0255.255.255.0] attempting login
09/16/2004 14:45:37 0 Security [11] Session: network IPSEC[2.1.1.0255.255.255.0] logged in from gateway [10.1.1.1]
09/16/2004 14:45:37 0 Security [12] Session: IPSEC[10.1.1.1]:11 physical
addresses: remote 10.1.1.1 local 10.1.1.2
09/16/2004 14:45:37 0 Security [12] Session: IPSEC[-]:12 physical
addresses: remote 10.1.1.1 local 10.1.1.2
09/16/2004 14:45:37 0 Outbound ESP from 10.1.1.2 to 10.1.1.1 SPI
0x57fa39fd [03] ESP encap session SPI 0xfd39fa57 bound to s/w on cpu 0
09/16/2004 14:45:37 0 Inbound ESP from 10.1.1.1 to 10.1.1.2 SPI
0x00206994 [03] ESP decap session SPI 0x94692000 bound to s/w on cpu 0
09/16/2004 14:45:37 0 Branch Office [00] 4f5eb08
BranchOfficeCtxtCls::RegisterTunnel: rem[2.1.1.0255.255.255.0]@[10.1.1.1] loc[3.1.1.0-255.255.255.0] overwriting tunnel
context [0] with [4f51290]
TT040916
1.00
September 2004
Page: 16 of 29
Tech Tip
Contivity Secure IP Services Gateway
Configuring Branch Office Tunnel between a Contivity and a BayRS
router
09/16/2004 14:45:37 0 ISAKMP [03] Established IPsec SAs with 10.1.1.1:
09/16/2004 14:45:37 0 ISAKMP [03] ESP 56-bit DES-CBC-HMAC-MD5 outbound
SPI 0x57fa39fd
09/16/2004 14:45:37 0 ISAKMP [03] ESP 56-bit DES-CBC-HMAC-MD5 inbound
SPI 0x206994
Router Troubleshooting Tips
Router Scripts
Load the show.bat and ipsec.bat script files on to the router flash card for quick
troubleshooting and configuration information. The following are some useful troubleshooting
commands for the Router
The show ipsec esp sa command– gives a listing of IPSec tunnels that have been established.
For example,
$ show ipsec esp sa
IPSEC ESP SA Table Information
--------------------------Cipher Integrity
State
Src
Dest
SPI
Alg
------ --------- --------- -------------
Alg
-------
Mode
-----
No Manual SAs established.
Up
Up
10.1.1.1
10.1.1.2
10.1.1.2
10.1.1.1
369140
2015837327
3DES
3DES
HMAC MD5
HMAC MD5
Tunnel
Tunnel
2 Automated SA(s) established.
TT040916
1.00
September 2004
Page: 17 of 29
Tech Tip
Contivity Secure IP Services Gateway
Configuring Branch Office Tunnel between a Contivity and a BayRS
router
The show ipsec policy command – gives a listing of all IPSec policies, and proposals configured
within each. For example,
$ show ipsec policy
IPSEC Policy Table Information
-----------------------------Policy
Number
-----1
Proposal
Number
-------1
Transform
Cipher Integrity
Number
Type Alg
Alg
--------- ---- ------ --------1
ESP 3DES
MD5
The show ipsec selectors out command– gives a list of all interfaces and the policies
configured on each.
$ show ipsec selectors out
IPSEC Outbound Selector Table Information
----------------------------------------Pol Policy
Cct.
Interface
Mode
State
Matches Num Name
------ --------------- -------- ------- ------- --- --------------2
10.1.1.1
Enabled Up
23
1 Tunnel to CES
Interpreting Log Messages on the Router
#
9: 09/14/2004 08:17:57.900 INFO
SLOT 1 IPSEC
Code: 124
IPSec received inbound SA request. No proposal/attribute chosen.
Last validation mismatch : Received mismatching cipher algorithm.
Policy number: 1
Rcv proposal: 1, Our proposal: 1.
Rcv transform: 1, Our transform: 1.
This message generally indicates that there is no compatible encryption setting configured
between the Router and the IPSec peer. The proposal list containing the encryption capabilities
for the SA was defined in step 11 of the “Configuring ARN” section of this guide. Verify both ends
have compatible settings configured, otherwise they won’t be able to negotiate the SA.
TT040916
1.00
September 2004
Page: 18 of 29
Tech Tip
Contivity Secure IP Services Gateway
Configuring Branch Office Tunnel between a Contivity and a BayRS
router
#
4: 09/14/2004 08:27:19.287 WARNING SLOT 1 IKE
Cookies did not match properly for IKE peer 10.1.1.2,
interface 10.1.1.1
Code:
9
This message generally indicates an incompatibility in the Diffie-Hellman settings. The BayRS
router uses Diffie-Hellman Group: 56-bit DES with Group 1 (768-bit prime) and there is no way to
change it. Check the IPSec peer and verify that the SA is configured for Diffie-Hellman Group 1.
#
3: 09/14/2004 08:53:17.549 INFO
SLOT
Invalid Flags: Source 10.1.1.2, Dest 10.1.1.1
Message ID 0x0, SPI length: 0, SPI: 0
1
IKE
Code: 124
#
2: 09/14/2004 08:54:22.108 INFO
SLOT 1 IKE
Invalid Payload Type: Source 10.1.1.2, Dest 10.1.1.1,
Message ID 0x0, SPI length: 0, SPI: 0
Code: 117
Both these messages are generally an indication of a mismatch of the Pre-Shared Key on both
sides of the connection. Depending on whether the ARN was the initiator or the responder of this
particular SA, the message will be different. The Pre-Shared Key for the ARN was configured in
step 6 of the “Configuring ARN” section of this guide, and in the Profiles ÆBranch Office
ÆConnections section of the Contivity GUI.
#
16: 09/14/2004 08:58:31.927 INFO
SLOT 1 IKE
99
Notification received: Source 10.1.1.2, Dest 10.1.1.1,
Message ID 0x3c441a39, SPI length: 4, SPI: 3240933836,
Invalid ID Information
Code:
#
2: 09/14/2004 08:59:59.469 INFO
SLOT 1 IPSEC
Code: 122
IPSec received inbound SA request. Start/end destination address
does not match descriptor start/end source address.
Policy number: 1.
ID payload start/end dest address: 2.1.1.0-2.1.1.255
Descriptor start/end source address: 2.1.1.0-2.1.1.20
These messages generally indicate a mismatch in the Local/Remote network pairs on both sides
of the connection. The Local/Remote network pairs for the ARN were configured as a
Template/Policy in steps 7, 8, and 9 of the “Configuring ARN” section of this guide, and in the
Profiles ÆBranch Office ÆConnections section of the Contivity GUI.
TT040916
1.00
September 2004
Page: 19 of 29
Tech Tip
Contivity Secure IP Services Gateway
Configuring Branch Office Tunnel between a Contivity and a BayRS
router
#
3: 09/14/2004 08:59:59.485 INFO
SLOT 1 IKE
No Proposal Chosen: Source 10.1.1.2, Dest 10.1.1.1
Message ID 0xd962094b, SPI length: 4, SPI: 12600
Code: 130
The No Proposal Chosen message is a generic message that usually directly follows one of the
log messages noted above. Sometimes though, usually when the router initiates a connection
and it fails, only this message will appear in the log. It generally indicates some type of
configuration mismatch, so you may have to just double-check everything. An alternative
troubleshooting tactic would be to do a test initiating the SA from the other end, which generally
results in more descriptive messages in the log.
#
1: 09/15/2004 15:53:47.662 WARNING SLOT 1 IPSEC
Code: 10
No Cryptographic API (capi.exe) in this image. IPSec cannot proceed.
interface: 10.1.1.1, circuit: 2, code: 1
#
2: 09/15/2004 15:53:49.267 WARNING SLOT 1 IKE
Code:
No Cryptographic API (capi.exe) in this image. IKE cannot proceed,
code: 15
4
In order to run IPSec a valid capi.exe must be installed in the image. Both these messages
indicates that the file is not installed. Refer to Appendix B for instructions on how to install the
capi.exe file.
#
5: 09/13/2004 11:56:22.437 WARNING SLOT 1 IPSEC
Code: 17
All IPsec traffic on slot 1 will be dropped since validation of the NPK
hash has failed. Please synchronize config with NPK and enable/disable
IPSEC on affected interfaces
This message indicates that the NPK on the router does not match the NPK of the config. This
will occasionally happen when booting from a different configuration, changing your NPK, or
starting from scratch. In order to correct this problem, you need to get into the secure shell
through the console. Follow these steps:
1. Enter the Secure Shell with the ksession command
$ ksession
Please enter password:
Entering Secure Shell Session.
2. Use the ktranslate command followed by the NPK, save the config, and then exit the
Secure Shell
SSHELL> ktranslate 0x1234567812345678
SSHELL> save config config
TT040916
1.00
September 2004
Page: 20 of 29
Tech Tip
Contivity Secure IP Services Gateway
Configuring Branch Office Tunnel between a Contivity and a BayRS
router
SSHELL> kexit
Exiting Secure Shell session.
3. Bounce IPSec with the follow commands
$ s wfIpsecBase.2.0 2;commit
$ s wfIpsecBase.2.0 1;commit
$
Contivity troubleshooting tips
Interpreting Log Messages on the Contivity
09/16/2004 15:09:40 0 ISAKMP [13] Diffie-Hellman group mismatch for
10.1.1.1 - terminating connection attempt
This message indicates a mismatch in the Diffie-Hellman configuration. The Diffie-Hellman Group
is configurable on the Contivity through the GUI under ProfilesÆBranch Office ÆIPSec Group
Configuration.
09/16/2004 15:22:58 0 tIsakmp [34] Failed Remote Network Login:
Username=: Date/Time=09/16/2004 15:22:58
This message generally indicates a mismatch in the Local/Remote network pairs between the
Contivity and the Router. These are configurable through ProfilesÆBranch
OfficeÆConnections
09/16/2004 15:17:39 0 tIsakmp [34] Failed Login Attempt:
Username=10.1.1.1: Date/Time=09/16/2004 15:17:39
The “Failed Login Attempt” message generally indicates a mismatch in the Pre-Shared Key or
possibly a mismatch in the Local/Remote network pairs. The Pre-Shared Key and the
Local/Remote networks are configurable on the Contivity through the GUI under
ProfilesÆBranch OfficeÆConnections.
TT040916
1.00
September 2004
Page: 21 of 29
Tech Tip
Contivity Secure IP Services Gateway
Configuring Branch Office Tunnel between a Contivity and a BayRS
router
09/16/2004 15:12:49 0 ISAKMP [13] Error notification (No proposal
chosen) received from 10.1.1.1
09/16/2004 15:02:21 0 ISAKMP [13] No proposal chosen in message from
10.1.1.1
These “No proposal chosen” messages are generic and usually precede or follow one of the
more descriptive log messages noted above. It generally indicates IPSec configuration mismatch
such as Encryption level and Diffie-Hellman group, so you may have to just double-check IPSec
settings. An alternative troubleshooting tactic would be to do a test initiating the SA from the
Router, which generally results in more descriptive messages in the log.
TT040916
1.00
September 2004
Page: 22 of 29
Tech Tip
Contivity Secure IP Services Gateway
Configuring Branch Office Tunnel between a Contivity and a BayRS
router
Appendix A – Setting the NPK on the BayRS router
Firstly, if it hasn’t been done already, a password for the Secure Shell must be created. If you
don’t have one configured and you try to enter the Secure Shell, you will receive an error
message as such:
$ ksession
Must set secure shell password
To change the Secure Shell password use the kpassword command and follow the instructions,
as such:
$ kpassword
Changing password for Secure Shell
Old password:
New Password: ********
Retype new password: ********
Secure Shell password changed.
Once the password is established, enter the Secure Shell using the ksession command.
$ ksession
Please enter password:
Entering Secure Shell Session.
SSHELL>
TT040916
1.00
September 2004
Page: 23 of 29
Tech Tip
Contivity Secure IP Services Gateway
Configuring Branch Office Tunnel between a Contivity and a BayRS
router
Firstly, you need to create a random number seed. Use the kseed command and follow the
instructions, as follows.
SSHELL> kseed
To initialize the seed for the cryptographic random number generator,
please now enter a series of characters which you would consider to be
'random.' As you enter them,
dots '.' will be displayed to indicate progress. If your string is not
'random' enough, questions '?' will be displayed. In that case, modify
the pattern you are entering. When enough data is input, you will be
prompted to stop (near 3 lines of input)...
.... .... .... .... ....
.... .... .... .... ....
.... .... .... ..
All done, thank you!
SSHELL>
Now, you can set the NPK using the kset npk command, as follows. The NPK is a 16 digit
hexadecimal number.
SSHELL> kset npk 0x1234567812345678
SSHELL> kexit
Now, save the configuration and exit the Secure Shell using kexit
SSHELL> save config config
SSHELL> kexit
Exiting Secure Shell session.
TT040916
1.00
September 2004
Page: 24 of 29
Tech Tip
Contivity Secure IP Services Gateway
Configuring Branch Office Tunnel between a Contivity and a BayRS
router
Appendix B – Adding the capi.exe file to the router image
By default, the router image (i.e. arn.exe, asn.exe, bn.exe, etc.) do not come installed with the
modules necessary to run IPSec. These modules must be purchased separately and installed in
the image using a Site Manager utility called “Image Builder”. The module needed is the
capi.exe (Cryptographic API). Once this module is obtained, use the following process to add it
into the image.
1. Launch Site Manager and then open Image Builder through the Tools drop-down
menu.
TT040916
1.00
September 2004
Page: 25 of 29
Tech Tip
Contivity Secure IP Services Gateway
Configuring Branch Office Tunnel between a Contivity and a BayRS
router
2. Once Image Builder is opened for the first time, it will create a ‘builder.dir’ subdirectory
within your Site Manager directory. Move the image file (arn.exe, bn.exe, etc.) to this
directory. When the Image Builder application opens up, go to File | Open and locate
the image file. Click Open to open up the selected image.
TT040916
1.00
September 2004
Page: 26 of 29
Tech Tip
Contivity Secure IP Services Gateway
Configuring Branch Office Tunnel between a Contivity and a BayRS
router
3. Check the Details button on the right-hand column, find the capi.exe file, highlight it, and
click << Remove. Note that the size of the capi.exe is very small (2039 bytes, in this
case).
4. Go to File | Save and then File | Exit to close out of Image Builder.
TT040916
1.00
September 2004
Page: 27 of 29
Tech Tip
Contivity Secure IP Services Gateway
Configuring Branch Office Tunnel between a Contivity and a BayRS
router
5. There are now 2 addition subdirectories in the /WF/builder.dir directory. One for the
version of your image (15.5.0.0, in this case), and one for the platform (ARN, in this
case). The platform subdirectory contains all the modules found in the image. Find the
“dummy” capi.exe (the one that is roughly 2000 bytes) and replace it with the real
capi.exe file. The real one should be considerably larger.
TT040916
1.00
September 2004
Page: 28 of 29
Tech Tip
Contivity Secure IP Services Gateway
Configuring Branch Office Tunnel between a Contivity and a BayRS
router
6. Reenter Image Builder through Tools | Image Builder and open up the original image
file in the builder.dir directory, the same way as in step 2. Check the Details button on
the left-hand side of the screen, and highlight capi.exe. Note the size of this file is much
larger than the dummy file (In this case, about 82K). Click Add >> to install the real
capi.exe file into the image. Once done, Save and Exit image builder and retrieve the
image file from the builder.dir directory. This image is now ready to load onto the router.
Copyright © 2005 Nortel Networks Limited - All Rights Reserved. Nortel, Nortel Networks, the Nortel logo, Globemark, and
Contivity are trademarks of Nortel Networks Limited.
The information in this document is subject to change without notice. The statements, configurations, technical data, and
recommendations in this document are believed to be accurate and reliable, but are presented without express or implied
warranty. Users must take full responsibility for their applications of any products specified in this document. The
information in this document is proprietary to Nortel Networks Limited.
To access more technical documentation, search our knowledge base, or open a service request online, please visit
Nortel Networks Technical Support on the web at: http://www.nortel.com/support
If after following this guide you are still having problems, please ensure you have carried out the steps exactly as in this
document. If problems still persist, please contact Nortel Networks Technical Support (contact information is available
online at: http://www.nortel.com/cgi-bin/comments/comments.cgi?key=techsupport_cu).
We welcome you comments and suggestions on the quality and usefulness of this document. If you would like to leave a
feedback please send your comments to: [email protected]
Author: Christopher Costa
TT040916
1.00
September 2004
Page: 29 of 29