1
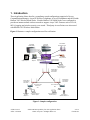
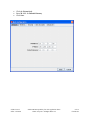
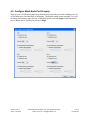
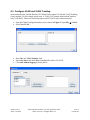
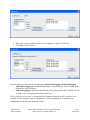
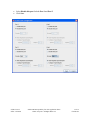
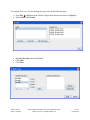
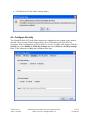
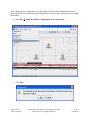
Avaya Solution & Interoperability Test Lab
Application Notes for Configuring Firetide HotPort 3103
Wireless Mesh Nodes to Support Avaya VoIP
Communication via a Wireless Mesh Network – Issue 1.0
Abstract
These Application Notes describe a compliance-tested configuration comprised of Avaya
Communication Manager, Avaya Wireless Telephones, Avaya IP Softphones, and Firetide
HotPort 3103 Wireless Mesh Nodes. The Firetide HotPort 3103 Wireless Mesh Nodes can
provide a meshed wireless network to support access points from multiple vendors, and
provide instant network reachability in the environment where the wired network
infrastructure is not available. Testing was conducted via the DeveloperConnection Program at
the Avaya Solution and Interoperability Test Lab.
SZ; Reviewed:
SPOC 1/24/2006
Solution & Interoperability Test Lab Application Notes
©2006 Avaya Inc. All Rights Reserved.
1 of 19
Firetide.doc
1. Introduction
These Application Notes describe a compliance-tested configuration comprised of Avaya
Communication Manager, Avaya IP Wireless Telephones, Avaya IP Softphones and the Firetide
HotPort 3103 Wireless Mesh Nodes. Firetide HotPort 3103 Mesh Nodes were configured to
provide an instant meshed wireless network to support Avaya VoIP. Features such as VLAN,
802.1Q tagging and wireless security were tested. Third party Access Points were also tested
with HotPort 3103 Wireless Mesh Nodes.
Figure 1 illustrates a sample configuration used for verification.
Avaya G650
Media gateway
Cisco RADIUS
DHCP/TFTP Server
Avaya 8710
Media Server
Avaya Voice
Priority Processor
Avaya 6408
Digital Telephone
Avaya 4620 IP Extrteme Networks
Telephone
Alpine 3804 Switch
Extreme Networks
Summit 48si Switch
Avaya IP Softphone-3
Wireless Laptop 3
Firetide HotPort
3103 Wireless
Mesh Node 3
Firetide HotPort
3103 Wireless
Mesh Node 2
Firetide HotPort
3103 Wireless
Mesh Node 1
Cisco Aironet 1200
Access Point
AP-1
Avaya 3616 IP
Wireless
Telephone -1
Avaya IP Softphone - 1
Wireless Laptop 1
3Com Access Point
AP-2
Avaya IP Softphone -2
Wireless Laptop 2
Avaya 3616 IP
Wireless Telephone - 2
Figure 1: Sample configuration.
SZ; Reviewed:
SPOC 1/24/2006
Solution & Interoperability Test Lab Application Notes
©2006 Avaya Inc. All Rights Reserved.
2 of 19
Firetide.doc
2. Equipment and Software Validated
The following equipment and software/firmware were used for the sample configuration
provided:
Device Description
Avaya S8710 Media Server with Avaya G650
Media Gateway
Avaya Voice Priority Processor
Avaya 4620 IP Telephones
Avaya 3616 IP Wireless Telephones
Avaya IP Softphone
Firetide HotPort 3103 Wireless Mesh Nodes
Cisco Aironet 1200 (AP1)
3Com AP (AP2)
Extreme Networks Alpine 3804 Switch
Extreme Networks Summit 48si Switch
Cisco RADIUS/DHCP/TFTP Server
Version
Avaya Communication
Manager 3.0 (Load 340.3)
R168.112
R2.2.3
096.040
RV 5.2.4.20
V2.7.0 (build 3619)
IOS 12.2(15) XR2
V2.03.13
V7.2.0 (Build 25)
V6.2.2 (Build 68)
R3.2(2) Build 5
3. Configure Avaya Communication Manager
This section describes the steps for configuring Avaya Communication Manager. Use the add
station 38000 command from the System Access Terminal (SAT) to add an available extension.
In this case, extension 38000 is used for Avaya IP Wireless Telephone 1 as shown below.
•
•
•
•
•
Enter 4606 in Type field for IP wireless 3616 telephone.
Enter IP in Port field.
Enter IP Wireless Telephone 1 in Name field (optional).
Enter N in IP SoftPhone field.
Leave default for other fields.
add station 38000
Page
1 of
3
STATION
Extension:
Type:
Port:
Name:
38000
4606
IP
IP Wireless Telephone 1
STATION OPTIONS
Loss Group: 19
Speakerphone:
Display Language:
Survivable GK Node Name:
Survivable COR:
Survivable Trunk Dest?
•
2-way
english
Lock Messages? n
Security Code: *
Coverage Path 1:
Coverage Path 2:
Hunt-to Station:
BCC:
TN:
COR:
COS:
0
1
1
1
Personalized Ringing Pattern: 1
Message Lamp Ext: 38000
Mute Button Enabled? y
internal
y
Media Complex Ext:
IP SoftPhone? N
Enter enhanced in the Multimedia Mode field.
SZ; Reviewed:
SPOC 1/24/2006
Solution & Interoperability Test Lab Application Notes
©2006 Avaya Inc. All Rights Reserved.
3 of 19
Firetide.doc
•
•
Enter y in the Direct IP-IP Audio connections and IP Audio Hairpinning fields.
Retain defaults for other fields.
add station 38000
Page
2 of
3
STATION
FEATURE OPTIONS
LWC Reception:
LWC Activation?
LWC Log External Calls?
none
CDR Privacy?
Redirect Notification?
Per Button Ring Control?
Bridged Call Alerting?
Active Station Ringing:
spe
y
n
Auto Select Any Idle Appearance? n
Coverage Msg Retrieval? y
Auto Answer:
n
y
n
n
single
Data Restriction?
Idle Appearance Preference?
Bridged Idle Line Preference?
Restrict Last Appearance?
Conf/Trans on Primary Appearance?
H.320 Conversion? n
Service Link Mode: as-needed
Multimedia Mode: enhanced
MWI Served User Type:
AUDIX Name:
Emergency Location Ext: 38000
n
n
n
y
n
Per Station CPN - Send Calling Number?
Audible Message Waiting?
Display Client Redirection?
Select Last Used Appearance?
Coverage After Forwarding?
Multimedia Early Answer?
Direct IP-IP Audio Connections?
Always Use? n
n
n
n
s
n
Y
IP Audio Hairpinning? y
Leave default for all fields.
add station 38000
Page
3 of
3
STATION
SITE DATA
Room:
Jack:
Cable:
Floor:
Building:
ABBREVIATED DIALING
List1:
Headset?
Speaker?
Mounting:
Cord Length:
Set Color:
List2:
BUTTON ASSIGNMENTS
1: call-appr
2: call-appr
3: call-appr
n
n
d
0
List3:
4:
5:
6
Use the same procedure to add additional stations.
SZ; Reviewed:
SPOC 1/24/2006
Solution & Interoperability Test Lab Application Notes
©2006 Avaya Inc. All Rights Reserved.
4 of 19
Firetide.doc
4. Configure Firetide HotPort 3103 Wireless Mesh Nodes
With an auto discovery protocol, the Firetide HotPort 3103 Wireless Mesh Nodes can find each
other and establish a meshed wireless network automatically. The configuration executed in one
node can be pushed to all other nodes in the meshed network. The Mesh Nodes support VLAN,
802.1Q tagging, as well as Wired Equivalent Privacy (WEP) and Advanced Encryption Standard
(AES) security. Quality of Service (QoS) for VoIP is not supported in the current release.
The Firetide HotView application is used to configure the Mesh Nodes. Configure a PC with an
IP address in the same subnet as a Mesh Node. Make sure that the PC can ping the Mesh Node
before launching the application. Follow the steps below to configure the Mesh Nodes.
4.1. Assign IP Address and Default Gateway
To manage the wireless meshed network, a management IP address is required to assign to the
system. Assume that an IP address of 20.1.1.40 has been assigned. Launch the Firetide HotView
application and enter the following information in the proper fields as shown below. Click Login
when done.
SZ; Reviewed:
SPOC 1/24/2006
Solution & Interoperability Test Lab Application Notes
©2006 Avaya Inc. All Rights Reserved.
5 of 19
Firetide.doc
The meshed network is shown below. All three Mesh Nodes are linked together via a fully
meshed topology. In order to easily identify each Mesh Node, users can rename by right click on
the Mesh Node icon and select Rename HotPort to assign a new name. In this case, all three
Mesh Nodes are renamed as shown in the picture below.
SZ; Reviewed:
SPOC 1/24/2006
Solution & Interoperability Test Lab Application Notes
©2006 Avaya Inc. All Rights Reserved.
6 of 19
Firetide.doc
Follow the steps below to assign a default gateway to each node.
Click File
Configure Mesh.
Figure 2: Global Configuration Menu for Mesh Network
SZ; Reviewed:
SPOC 1/24/2006
Solution & Interoperability Test Lab Application Notes
©2006 Avaya Inc. All Rights Reserved.
7 of 19
Firetide.doc
Click the Network tab.
Enter 20.1.1.1 for Default Gateway.
Click Save.
SZ; Reviewed:
SPOC 1/24/2006
Solution & Interoperability Test Lab Application Notes
©2006 Avaya Inc. All Rights Reserved.
8 of 19
Firetide.doc
4.2. Configure Mesh Node Port Property
There are four 10/100 switch ports on each Mesh Node and each port can be configured as a 10
or 100 Mbps port with either half or full duplex. The default setting is auto-negotiate. To verify
or change port settings, right click one of the Mesh Nodes icon from Figure 2 and choose the
port as shown below. Set the port priority to High.
SZ; Reviewed:
SPOC 1/24/2006
Solution & Interoperability Test Lab Application Notes
©2006 Avaya Inc. All Rights Reserved.
9 of 19
Firetide.doc
4.3. Configure VLAN and VLAN Trunking
As mentioned before, Firetide HotPort 3103 Mesh Nodes support VLAN and VLAN Trunking
(Carry multiple VLAN in single switch port). A VLAN 20 is created in these Mesh Nodes to
carry VoIP traffic. Follow the following steps to add VLAN 20 in the meshed network.
From the Global Configuration Menu screen shown in Figure 2, Open File
Select New VLAN.
VLANs.
Enter 20 in the VLAN Number field.
Select fire-tide-1 and check Port 1 and Port 2 to add to VLAN 20.
Click Add without tagging as shown below.
SZ; Reviewed:
SPOC 1/24/2006
Solution & Interoperability Test Lab Application Notes
©2006 Avaya Inc. All Rights Reserved.
10 of 19
Firetide.doc
Repeat the same procedure for fire-tide-2 to add ports 1 and 2 to VLAN 20.
Click Save as shown below.
Note the differences between the configurations add without tagging and add with tagging.
Add without tagging means that the Mesh Nodes will not alter the VLAN settings as the
packets leave the switch port.
Add with tagging means that the Mesh Nodes will tag the packet with VLAN ID, VLAN
20 in this case, as the packet leaves the switch port.
Port 3 of the device fire-tide-3 is connected to the Extreme Networks switch. In order to carry
multiple VLANs, this port must be configured as a VLAN trunking port to match the port
configuration on the Extreme Networks switch.
SZ; Reviewed:
SPOC 1/24/2006
Solution & Interoperability Test Lab Application Notes
©2006 Avaya Inc. All Rights Reserved.
11 of 19
Firetide.doc
Due to the hardware limitations on the Mesh Nodes, port 1 and port 2 must be disabled in order
for ports 3 and 4 to be used as trunking ports. Follow the steps below to configure VLAN
trunking.
Right click the fire-tide-3 icon and select Port Configuration.
SZ; Reviewed:
SPOC 1/24/2006
Solution & Interoperability Test Lab Application Notes
©2006 Avaya Inc. All Rights Reserved.
12 of 19
Firetide.doc
Select Disable this port for both Port 1 and Port 2.
Click Save.
SZ; Reviewed:
SPOC 1/24/2006
Solution & Interoperability Test Lab Application Notes
©2006 Avaya Inc. All Rights Reserved.
13 of 19
Firetide.doc
To configure Port 3 as a VLAN trunking port, proceed with the following steps.
Open File VLANs from the Global Configuration Menu screen shown in Figure 2.
Select Edit VLAN Trunks.
Highlight fire-tide-3 and check Port 3.
Click Add.
Click Save.
SZ; Reviewed:
SPOC 1/24/2006
Solution & Interoperability Test Lab Application Notes
©2006 Avaya Inc. All Rights Reserved.
14 of 19
Firetide.doc
Click Yes from VLAN Trunk warning display.
4.4. Configure Security
The Firetide HotPort 3103 Mesh Nodes support two standard security settings in the meshed
network. These security features support up to 104-bit WEP and up to 256-bit AES key
encryption. In this configuration, a 128-bit AES key is used. To enable AES settings, click the
Security tab, select Disable for WEP Key Settings and select 128-bit for AES Key Settings.
Enter 32 hex characters for Key and click Save when done.
SZ; Reviewed:
SPOC 1/24/2006
Solution & Interoperability Test Lab Application Notes
©2006 Avaya Inc. All Rights Reserved.
15 of 19
Firetide.doc
After completing the configuration on a single Mesh Node, the same configuration must be
pushed out to the entire meshed network to update other nodes. Follow the steps below to update
other nodes.
Open File
Apply Mesh Wide Configuration to the entire mesh.
Click OK.
SZ; Reviewed:
SPOC 1/24/2006
Solution & Interoperability Test Lab Application Notes
©2006 Avaya Inc. All Rights Reserved.
16 of 19
Firetide.doc
For Cisco Aironet 1200 and 3Com Access Point configuration, refer to the Application Notes
listed in Section 9.
5. The Interoperability Compliance Testing
The interoperability compliance testing focused on verifying that Firetide HotPort 3103 Mesh
Nodes support Avaya VoIP in a wireless meshed network.
5.1. General Test Approach
The general approach was to place calls among Avaya IP Wireless Telephones through the
meshed network and verify successful call completion. The main objectives were to verify that:
•
•
•
•
•
•
Mesh Nodes can automatically form a mesh network in wireless environment.
Mesh Nodes support access points from multiple vendors and support the 802.11 a/b/g
standard.
Mesh Nodes support Avaya VoIP endpoints such as IP Softphones and IP Wireless
Telephones in a wireless environment.
Mesh Nodes support security such as WEP and AES.
Mesh Nodes work with third party switches and support VLAN and 802.1Q tagging.
The wireless mesh network supports Layer 2 roaming between access points.
5.2. Test Results
The test objectives of Section 5.1 were verified and all features were tested with satisfactory
result.
6. Verification Steps
The following steps may be used to verify the configuration:
•
•
•
•
•
•
•
•
From the HotView application, verify that all three Mesh Nodes discovered each other
and formed a mesh.
Ping the Avaya S8710 Media Server from wireless laptop 1 and verify that the wireless
mesh network is able to provide connectivity to the wired network.
Power up Avaya IP Wireless Telephones and verify that all Wireless Telephones can
register with Avaya Communication Manager.
Launch IP Softphone from the wireless laptop and verify that the IP Softphone can
register with Avaya Communication Manager.
Make a call between IP Wireless Telephone 1 and IP Wireless Telephone 2. Verify that
the call is established.
While the call is up, place a conference call to the Avaya 4620 IP Telephone on the wired
network. Verify all three parties are in the conference call.
Move the IP Wireless Telephone-1 into the range of the other access point. Verify that
the call stays up.
Enable AES security on all Mesh Nodes and verify that all traffic is encrypted.
SZ; Reviewed:
SPOC 1/24/2006
Solution & Interoperability Test Lab Application Notes
©2006 Avaya Inc. All Rights Reserved.
17 of 19
Firetide.doc
7. Support
For technical support on the Firetide products, consult the support pages at
http://www.firetide.com or contact Firetide customer support at:
•
•
Phone: 408-399-7771
E-mail: [email protected]
8. Conclusion
These Application Notes describe a compliance-tested configuration comprised of Avaya
Communication Manager, Avaya Wireless VoIP products (IP Wireless Telephones and IP
Softphones) and the Firetide HotPort 3103 Mesh Nodes. The Firetide HotPort 3103 Mesh Nodes
can provide Ethernet service to indoor location over a self-forming wireless mesh backbone. It
can provide up to 25 Mbps throughput for high-bandwidth real time application such as Voice
over IP in a wireless environment.
9. Additional References
Use the URL
http://www.firetide.com/index.cfm?section=download316&contentID=316&siteID=1
to access these documents.
[1] HotView User Guide (Version 2.x).
[2] HotPort 3100 Series User Guide.
Use the URL http://www.avaya.com/gcm/master-usa/en-us/pillars/iptelephony/index.htm to
access these Application Notes.
[3] Application Notes for Configuring 3Com Wireless LAN Access Point 8750 to
Support Avaya Communication Manager, Avaya IP Wireless Telephones and Avaya
IP Softphone - Issue 1.0.
[4] Configuring Cisco Aironet 1200 Access Point to Support Avaya Communication
Manager, Avaya Wireless IP Telephones and Avaya IP Softphone - Issue 1.0.
[5] Application Notes for Configuring Netgear ProSafe Wireless Access Point WG302
to Support Avaya Communication Manager, Avaya IP Wireless Telephone and
Avaya IP Softphone – Issue 1.0.
SZ; Reviewed:
SPOC 1/24/2006
Solution & Interoperability Test Lab Application Notes
©2006 Avaya Inc. All Rights Reserved.
18 of 19
Firetide.doc
©2006 Avaya Inc. All Rights Reserved.
Avaya and the Avaya Logo are trademarks of Avaya Inc. All trademarks identified by ® and ™
are registered trademarks or trademarks, respectively, of Avaya Inc. All other trademarks are the
property of their respective owners. The information provided in these Application Notes is
subject to change without notice. The configurations, technical data, and recommendations
provided in these Application Notes are believed to be accurate and dependable, but are
presented without express or implied warranty. Users are responsible for their application of any
products specified in these Application Notes.
Please e-mail any questions or comments pertaining to these Application Notes along with the
full title name and filename, located in the lower right corner, directly to the Avaya
DeveloperConnection Program at [email protected].
SZ; Reviewed:
SPOC 1/24/2006
Solution & Interoperability Test Lab Application Notes
©2006 Avaya Inc. All Rights Reserved.
19 of 19
Firetide.doc