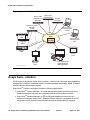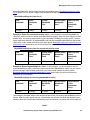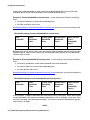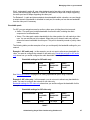
1
Administering Avaya Video
Conferencing Solution
Advanced Topics
04-603308
Issue 2.1
Release 6.0.1 ServicePack
April 15, 2011
© 2010 Avaya Inc.
All Rights Reserved.
Notice
While reasonable efforts have been made to ensure that the information in this
document is complete and accurate at the time of printing, Avaya assumes no
liability for any errors. Avaya reserves the right to make changes and
corrections to the information in this document without the obligation to notify
any person or organization of such changes.
Documentation disclaimer
Avaya shall not be responsible for any modifications, additions, or deletions to
the original published version of this documentation unless such modifications,
additions, or deletions were performed by Avaya.
End User agree to indemnify and hold harmless Avaya, Avaya's agents,
servants and employees against all claims, lawsuits, demands and judgments
arising out of, or in connection with, subsequent modifications, additions or
deletions to this documentation, to the extent made by End User.
Link disclaimer
Avaya is not responsible for the contents or reliability of any linked Websites
referenced within this site or documentation(s) provided by Avaya. Avaya is not
responsible for the accuracy of any information, statement or content provided
on these sites and does not necessarily endorse the products, services, or
information described or offered within them. Avaya does not guarantee that
these links will work all the time and has no control over the availability of the
linked pages.
Warranty
Avaya provides a limited warranty on this product. Refer to your sales
agreement to establish the terms of the limited warranty. In addition, Avaya’s
standard warranty language, as well as information regarding support for this
product, while under warranty, is available to Avaya customers and other
parties through the Avaya Support Website: http://www.avaya.com/support.
Please note that if you acquired the product from an authorized Avaya reseller
outside of the United States and Canada, the warranty is provided to you by the
said Avaya reseller and not by Avaya.
Licenses
The software license terms available on the Avaya Website,
http://support.avaya.com/licenseinfo/ are applicable to anyone who downloads,
uses and/or installs Avaya software, purchased from Avaya Inc., any Avaya
affiliate, or an authorized Avaya reseller (as applicable) under a commercial
agreement with Avaya or an authorized Avaya reseller. Unless otherwise
agreed to by Avaya in writing, Avaya does not extend this license if the
software was obtained from anyone other than Avaya, an Avaya affiliate or an
Avaya authorized reseller, and Avaya reserves the right to take legal action
against you and anyone else using or selling the software without a license. By
installing, downloading or using the software, or authorizing others to do so,
you, on behalf of yourself and the entity for whom you are installing,
downloading or using the software (hereinafter referred to interchangeably as
“you” and “end user”), agree to these terms and conditions and create a
binding contract between you and Avaya Inc. Or the applicable Avaya affiliate
(“Avaya”).
Avaya grants End User a license within the scope of the license types
described below. The applicable number of licenses and units of capacity for
which the license is granted will be one (1), unless a different number of
licenses or units of capacity is specified in the Documentation or other
materials available to End User. “Designated Processor” means a single
stand-alone computing device. “Server” means a Designated Processor that
hosts a software application to be accessed by multiple users. “Software”
means the computer programs in object code, originally licensed by Avaya and
ultimately utilized by End User, whether as stand-alone products or
pre-installed on Hardware. “Hardware” means the standard hardware originally
sold by Avaya and ultimately utilized by End User.
License types
•
Designated System(s) License (DS):
End User may install and use each copy of the Software on only
one Designated Processor, unless a different number of
Designated Processors is indicated in the Documentation or other
materials available to End User. Avaya may require the Designated
Processor(s) to be identified by type, serial number, feature key,
location or other specific designation, or to be provided by End
User to Avaya through electronic means established by Avaya
specifically for this purpose.
•
Concurrent User License (CU):
End User may install and use the Software on multiple Designated
Processors or one or more Servers, so long as only the licensed
number of Units are accessing and using the Software at any given
time. A “Unit” means the unit on which Avaya, at its sole discretion,
bases the pricing of its licenses and can be, without limitation, an
agent, port or user, an e-mail or voice mail account in the name of a
person or corporate function (e.g., webmaster or helpdesk), or a
directory entry in the administrative database utilized by the
•
•
Software that permits one user to interface with the Software. Units
may be linked to a specific, identified Server.
Named User License (NU):
End User may: (i) install and use the Software on a single
Designated Processor or Server per authorized Named User
(defined below); or (ii) install and use the Software on a Server so
long as only authorized Named Users access and use the
Software. “Named User” means a user or device that has been
expressly authorized by Avaya to access and use the Software. At
Avaya's sole discretion, a “Named User” may be, without limitation,
designated by name, corporate function (for example, webmaster
or helpdesk), an e-mail or voice mail account in the name of a
person or corporate function, or a directory entry in the
administrative database utilized by the Software that permits one
user to interface with the Software.
Shrinkwrap License (SR):
Customer may install and use the Software in accordance with the
terms and conditions of the applicable license agreements, such as
“shrinkwrap” or “clickthrough” license accompanying or applicable
to the Software (“Shrinkwrap License”). (See Third-party
Components for more information).
Copyright
Except where expressly stated otherwise, no use should be made of materials
on this site, the Documentation(s) and Product(s) provided by Avaya. All
content on this site, the documentation(s) and the product(s) provided by
Avaya including the selection, arrangement and design of the content is owned
either by Avaya or its licensors and is protected by copyright and other
intellectual property laws including the sui generis rights relating to the
protection of databases. You may not modify, copy, reproduce, republish,
upload, post, transmit or distribute in any way any content, in whole or in part,
including any code and software. Unauthorized reproduction, transmission,
dissemination, storage, and or use without the express written consent of
Avaya can be a criminal, as well as a civil, offense under the applicable law.
Third Party Components
Certain software programs or portions thereof included in the Product may
contain software distributed under third party agreements (“Third Party
Components”), which may contain terms that expand or limit rights to use
certain portions of the Product (“Third Party Terms”). Information regarding
distributed Linux OS source code (for those Products that have distributed the
Linux OS source code), and identifying the copyright holders of the Third Party
Components and the Third Party Terms that apply to them is available on the
Avaya Support Website: http://support.avaya.com/Copyright.
Preventing toll fraud
“Toll fraud” is the unauthorized use of your telecommunications system by an
unauthorized party (for example, a person who is not a corporate employee,
agent, subcontractor, or is not working on your company's behalf). Be aware
that there can be a risk of toll fraud associated with your system and that, if toll
fraud occurs, it can result in substantial additional charges for your
telecommunications services.
Avaya fraud intervention
If you suspect that you are being victimized by toll fraud and you need technical
assistance or support, call Technical Service Center Toll Fraud Intervention
Hotline at +1-800-643-2353 for the United States and Canada. For additional
support telephone numbers, see the Avaya Support Website:
http://www.support.avaya.com/.
Suspected security vulnerabilities with Avaya products should be reported to
Avaya by sending mail to:[email protected].
Trademarks
Avaya® and Avaya Aura™ are trademarks of Avaya Inc.
The trademarks, logos and service marks (“Marks”) displayed in this site, the
documentation(s) and product(s) provided by Avaya are the registered or
unregistered Marks of Avaya, its affiliates, or other third parties. Users are not
permitted to use such Marks without prior written consent from Avaya or such
third party which may own the Mark. Nothing contained in this site, the
documentation(s) and product(s) should be construed as granting, by
implication, estoppel, or otherwise, any license or right in and to the Marks
without the express written permission of Avaya or the applicable third party.
All non-Avaya trademarks are the property of their respective owners.
Linux® is the registered trademark of Linus Torvalds in the U.S.and other
countries.
Downloading documents
For the most current versions of documentation, see the Avaya Support
Website: http://www.avaya.com/support.
Contact Avaya Support
Avaya provides a telephone number for you to use to report problems or to ask
questions about your product. The support telephone number is
1-800-242-2121 in the United States. For additional support telephone
numbers, see the Avaya Website: http://www.avaya.com/support.
Contents
Chapter 1: Avaya Video Conferencing Solution . . . . . . . . . . . . . .
9
AVCS configurations . . . . . . . . . . . . .
H.323-only video solution . . . . . . . . .
SIP-only video solution . . . . . . . . . .
Combined H.323 and SIP video solution .
.
.
.
.
.
.
.
.
.
.
.
.
.
.
.
.
.
.
.
.
.
.
.
.
.
.
.
.
.
.
.
.
.
.
.
.
.
.
.
.
.
.
.
.
.
.
.
.
.
.
.
.
.
.
.
.
.
.
.
.
.
.
.
.
.
.
.
.
.
.
.
.
.
.
.
.
.
.
.
.
10
10
11
12
Avaya AuraTM solution . . . . . . . . . .
What’s new in release 6.0 . . . . . . .
Avaya Aura™ Conferencing . . . . .
Avaya Aura™ Conferencing Manager
.
.
.
.
.
.
.
.
.
.
.
.
.
.
.
.
.
.
.
.
.
.
.
.
.
.
.
.
.
.
.
.
.
.
.
.
.
.
.
.
.
.
.
.
.
.
.
.
.
.
.
.
.
.
.
.
.
.
.
.
.
.
.
.
.
.
.
.
.
.
.
.
.
.
.
.
.
.
.
.
14
15
15
16
AVCS 6.0.1 “Service Pack” Requirements . . . . . . . . . . . . . . . . . . . . . .
16
Further information . . . . . . . . . . . . . . . . . . . . . . . . . . . . . . . . . .
17
Chapter 2: Design and deployment . . . . . . . . . . . . . . . . . . . .
19
Managing video on your network.
Quality of Service . . . . . . .
User classification . . . . . . .
Bandwidth management . . .
.
.
.
.
.
.
.
.
.
.
.
.
.
.
.
.
.
.
.
.
.
.
.
.
.
.
.
.
.
.
.
.
.
.
.
.
.
.
.
.
.
.
.
.
.
.
.
.
.
.
.
.
.
.
.
.
.
.
.
.
.
.
.
.
.
.
.
.
.
.
.
.
19
20
20
20
Administration . . . . . . . . . . . . . . . . . . . . . . . . . . . . . . . . . . . . .
Setting up locations . . . . . . . . . . . . . . . . . . . . . . . . . . . . . . . .
Setting up bandwidth pools . . . . . . . . . . . . . . . . . . . . . . . . . . . .
32
32
34
Call Admission Control . . . . . . . . . . . . . . . . . . . . . . . . . . . . . . . .
Overview . . . . . . . . . . . . . . . . . . . . . . . . . . . . . . . . . . . . . .
Administering Call Administration Control . . . . . . . . . . . . . . . . . . .
Provisioning Session Manager and Communication Manager CAC together .
37
37
37
38
Network and solution requirements . . . . . . . . . . . . .
Design and deploy a multimedia QoS policy. . . . . . .
Selecting a default enterprise maximum call rate. . . .
Allow reasonable inter-PBX network connectivity rates.
.
.
.
.
40
40
40
41
Feature Interactions and Limitations . . . . . . . . . . . . . . . . . . . . . . . . .
43
Chapter 3: Administering Conferencing and Bridges. . . . . . . . . . .
45
.
.
.
.
.
.
.
.
.
.
.
.
.
.
.
.
.
.
.
.
.
.
.
.
.
.
.
.
.
.
.
.
.
.
.
.
.
.
.
.
.
.
.
.
.
.
.
.
.
.
.
.
.
.
.
.
.
.
.
.
.
.
.
.
.
.
.
.
.
.
.
.
.
.
.
.
.
.
.
.
.
.
.
.
®
Configuring the Avaya Aura Conferencing 6.0 Standard Edition . . . . . . . . .
45
Configuring Avaya Aura® Conferencing . . . . . . . . . . . . . . . . . . . . . . .
54
Configuring Avaya Aura® Conferencing . . . . . . . . . . . . . . . . . . . . . . .
55
Administering Avaya Aura® Communication Manager for video endpoints . . .
Communication Manager Global Administration . . . . . . . . . . . . . . . .
59
59
Administering and setting up video SIP endpoints . . . . . . . . . . . . . . . . .
Administering Avaya 1000 series video endpoints using SAT . . . . . . . . .
Administering Avaya 1000 series video endpoints using System Manager . .
63
67
68
Avaya Video Conferencing Solutions 6.0.1 Service Pack
Issue 2.1
April 15, 2011
7
Contents
Administering Avaya 1000 series and Avaya one-X® Communicator video endpoints and
users using System Manager . . . . . . . . . . . . . . . . . . . . . . . . . .
69
Avaya A175 Desktop Video Device . . . . . . . . . . . . . . . . . . . . . . . .
71
Administering and setting up video H.323 endpoints . . . . . . . . . . . . . . . .
74
Configuring a Direct Routing Gatekeeper . . . . . . . . . . . . . . . . . . . .
74
Configuring Video Trunks between two Communication Manager Systems .
79
®
Avaya one-X Communicator . . . . . . . . . . . . . . . . . . . . . . . . . . .
81
Configuring Polycom VSX/HDX Series Video Conferencing Systems and V500/V700 Video
Calling Systems . . . . . . . . . . . . . . . . . . . . . . . . . . . . . . . . .
82
Configuring a Polycom RMX Series Video Conferencing Bridge Platform . .
84
Configuring Polycom MGC Series Video Conferencing Systems . . . . . . .
86
Configuring stations to support a Tandberg MXP . . . . . . . . . . . . . . . .
87
Configuring Polycom VBP-E . . . . . . . . . . . . . . . . . . . . . . . . . . .
88
Chapter 4: Administering video endpoints . . . . . . . . . . . . . . . .
Administering video SIP endpoints . . . . . . . . . . . . .
Adding an audio call to Avaya 1010/20/30 video endpoints
Avaya Virtual Link . . . . . . . . . . . . . . . . . . . . . . .
Avaya one-X® communicator . . . . . . . . . . . . . . . . .
Configuring Avaya A175 Desktop Video Device . . . . . . .
.
.
.
.
.
.
.
.
.
.
.
.
.
.
.
.
.
.
.
.
.
.
.
.
.
.
.
.
.
.
.
.
.
.
.
.
.
.
.
.
.
.
.
.
.
.
.
.
.
.
89
89
90
90
91
96
Administering H.323 video endpoints . . . . . . . . . . . . . . . . . . . . . . . .
99
Configuring Polycom VSX/HDX Endpoints: . . . . . . . . . . . . . . . . . . .
99
Configuring the Polycom RMX System . . . . . . . . . . . . . . . . . . . . .
100
Configuring Polycom RMX H.323/SIP to H.320 Support – Incoming/outgoing ISDN Calls
101
Configuring Polycom VBP-E Support – Incoming/Outgoing External Video Calls103
Configuring the Polycom MGC series . . . . . . . . . . . . . . . . . . . . . .
105
Configuring the Tandberg MXP endpoint . . . . . . . . . . . . . . . . . . . .
106
8 Administering Avaya Video Conferencing Solution 6.0.1
Issue 2.1
April 15, 2011
Chapter 1: Avaya Video Conferencing Solution
The Avaya Video Conferencing Solution (AVCS) enhances and extends the use of Avaya
Aura™ Communication Manager, Avaya Aura™ Session Manager, and Avaya Aura™ System
Manager as a SIP-based platform for video communications. Communication Manager,
Release 6.0.x, is an H.323-to-SIP and a SIP-to-SIP video signaling gateway that supports
single and mixed protocol video deployments.
The key video components of AVCS are:
●
Gatekeepers provide call admission control and bandwidth management for all SIP and
H.323 video calls and video telephony features. Communication Manager and Session
Manager serve that role within AVCS. The Polycom CMA is supported only in a
neighbored gatekeeper configuration that uses CMA to provide the H.323 call control for
all H.323-to-SIP video calls.
●
Video Border Proxy combines the function of a gatekeeper with a gateway to proxy SIP
and H.323 video calls. The video border proxy currently supported is the Polycom VBP-E
series for H.323 video calls. The Polycom VBP-E series is supported only when the VBP-E
is trunked to the Polycom CMA and the CMA is neighbored to Communication Manager
configured as an Evolution server with an Avaya H.248 gateway, such as the Avaya G430
Branch Gateway.
●
Gateways provide SIP-to-H.323 video interworking. Communication Manager configured
as an Evolution server with an Avaya H.248 gateway, such as the Avaya G430 Branch
Gateway, serves that role. The Polycom RMX is supported when configured as an
H.323-to-H.320 gateway. It provides interoperability with video endpoints on public ISDN
communication services.
●
Conferencing bridges, aka Multimedia Conferencing Units (MCU), support content
sharing between video endpoints. The Avaya 1040 and 1050 video endpoints provide that
functionality. They have embedded 4- and 6/8-port MCUs, respectively. The Polycom
RMX-series HD MCU is also supported.
●
Conferencing scheduling and endpoint management applications manage and
monitor video endpoints. Avaya Video Conferencing Manager manages and monitors the
Avaya 1000-series endpoints on Session Manager. The Polycom CMA manages and
monitors Polycom video endpoints.
●
Endpoints are the desktop and conference room devices that deliver audio and video.
Within AVCS, several video endpoints register directly with Session Manager: the Avaya
1000-series, Avaya one-X® Communicator, and Polycom HDX series. The Polycom HDX
H.323 and BSX H.323-series register to Communication Manager configured as an
evolution server with an Avaya H.248 branch gateway. Additional supported H.323
endpoints include the Tandberg MXP.
Administering Avaya Video Conferencing Solution 6.0.1
Issue 2.1
April 15, 2011 9
Avaya Video Conferencing Solution
AVCS configurations
AVCS supports three configurations: H.323-only video solution, SIP-only video solution, and a
combined H.323 and SIP video solution.
H.323-only video solution
The H.323-only solution consists of the following components:
●
Communication Manager as gatekeeper
●
Polycom CMA as gatekeeper
●
Polycom RMX gateway
●
Polycom VPB-E video border proxy
●
Polycom, Tandberg, and Avaya H.323 endpoints
In this solution, the H.323 devices connect through Communication Manager configured as an
evolution server. The Polycom RMX gateway is registered through either Communication
Manager or the Polycom CMA gatekeeper but not both. The Polycom VBP-E session border
controller connects through both Communication Manager and the Polycom RMX. H.323-only
video solution on page 11 illustrates this configuration.
Polycom RMX registered through Communication Manager means:
●
it can host ad hoc video conferences
●
it dials out using E.164 alias dialing.
Polycom RMX registered through Polycom CMA means:
●
it dials out using IP addresses
●
it supports encryption to the devices registered to the Polycom CMA.
This configuration represents what was available for video conferencing in the past.
10 Avaya Video Conferencing Solutions 6.0.1 Service Pack
Issue 2.1
April 15, 2011
AVCS configurations
Figure 1: H.323-only video solution
HDX
Polycom
VBP-E
Tandberg MXP
Polycom
RMX
Communication
Manager as
Evolution Server
Polycom
CMA
Avaya One-X
Communicator
Polycom
HDX
cycmh323 LAO 111610
SIP-only video solution
The SIP-only solution consists of the following components:
●
Session Manager as core gatekeeper for SIP endpoints
●
System Manager to manage Session Manager
●
Communication Manager as gatekeeper for SIP endpoints
●
Polycom RMX gateway
●
Avaya Video Conferencing Manager for scheduling and managing Avaya endpoints
●
Avaya Aura Conferencing for hosting audio and video conferences
●
Polycom and Avaya SIP endpoints.
In this solution, only SIP devices are supported, and they all connect through Session Manager,
the Avaya Aura™ core. In this configuration, Communication Manager is configured as either a
feature server (SIP only) or an evolution server (SIP and H.323). SIP-only video solution on
page 12 illustrates this configuration.
This configuration represents what is currently available for video conferencing in a SIP-only
solution.
Administering Avaya Video Conferencing Solution 6.0.1
Issue 2.1
April 15,
Avaya Video Conferencing Solution
Figure 2: SIP-only video solution
TM
Avaya Aura
Conferencing
Polycom
RMX
Avaya Video
Conferencing
Manager
TM
Avaya Aura
Core
Session
Manager
System
Manager
Polycom
HDX
Communications
Manager
as FS or ES
Avaya
A175
Avaya One-X
Communicator
Avaya 1000-series
(1010/1020 and
1030/104/1050)
cycmasip LAO 111610
Combined H.323 and SIP video solution
The combined H.323 and SIP solution consists of the following components:
●
Session Manager as gatekeeper for SIP endpoints
●
System Manager to manage Session Manager
●
Communication Manager as gatekeeper for SIP and H.323 endpoints
●
Polycom RMX gateway
●
Polycom CMA as gatekeeper and scheduler for Polycom H.323 endpoints
●
Polycom VPB-E for H.323 endpoints
●
Avaya Video Conferencing Manager for scheduling and managing Avaya endpoints
●
Avaya Aura Conferencing for hosting audio and video conferences
12 Avaya Video Conferencing Solutions 6.0.1 Service Pack
Issue 2.1
April 15, 2011
AVCS configurations
●
Polycom, Tandberg, and Avaya SIP and H.323 endpoints.
This solution allows multivendor video devices to operate with Avaya video devices. In this
configuration, both H.323 and SIP devices connect through Session Manager, and
Communication Manager must be configured as an evolution server. As with the H.323-only
configuration, the Polycom RMX gateway connects through either Communication Manager or
the Polycom CMA gatekeeper but not both. However, for Release 6.1, the Polycom RMX
gateway connects to both Communication Manager and the Polycom CMA gatekeeper.
Combined H.323 and SIP video solution on page 14 illustrates this configuration.
Polycom RMX registered through Communication Manager means:
●
it can host ad hoc video conferences
●
it dials out using E.164 alias dialing.
Polycom RMX registered through Polycom CMA means:
●
it dials out using IP addresses or E.164 aliases
●
it supports encryption to the devices registered to the Polycom CMA.
This configuration represents what is currently available for video conferencing in a combined
H.323 and SIP solution.
Administering Avaya Video Conferencing Solution 6.0.1
Issue 2.1
April 15,
Avaya Video Conferencing Solution
Figure 3: Combined H.323 and SIP video solution
TM
Avaya Aura
Avaya Video Conferencing
Conferencing
Manager
System
Manager
Communications
Manager
as ES
Avaya One-X
Communicator
(H.323)
TM
Avaya Aura
Core
Session
Manager
Polycom
CMA
Polycom
VBP-E
6.1
y
onl
Avaya One-X
Communicator
(SIP)
ly
rR
e fo
.1
Tru
e
u
Tr
r
fo
on
R6
Polycom
RMX
Avaya
A175
Polycom
HDX
cycmcomb LAO 111610
Avaya 1000-series
(1010/1020 and
1030/104/1050)
Avaya AuraTM solution
AVCS is part of the greater Avaya AuraTM solution. It delivers rich voice and video capabilities
and provides a resilient, distributed network for media gateways and analog, digital, IP-based,
and SIP-based communication devices.
Avaya AuraTM solution components include the following applications:
●
●
Avaya AuraTM System Manager—a central management system that delivers a set of
shared management services and a common console across multiple products.
Avaya AuraTM Session Manager—a SIP routing and integration tool and the core
component within the Avaya Aura™ Enterprise Edition solution. It integrates all the SIP
and some non-SIP devices across the entire enterprise network within a company.
14 Avaya Video Conferencing Solutions 6.0.1 Service Pack
Issue 2.1
April 15, 2011
Avaya AuraTM solution
●
●
●
●
Avaya AuraTM Communication Manager administered as a feature server—provides
Communication Manager features to SIP endpoints only.
Avaya AuraTM Communication Manager administered as an evolution server—provides
Communication Manager features to both SIP and non-SIP endpoints.
Avaya AuraTM Presence—a service that conveys a person's ability and willingness to
communicate across a set of services, such as telephony and instant messaging.
SIP or H.323 video endpoints—the desktop and conference room devices that deliver
audio and video.
What’s new in release 6.0
Avaya AuraTM is enhanced by new capabilities for video communications:
●
New Communication Manager scalability to administer 18,000 video-capable IP endpoints,
10,666 concurrent H.323 video calls and 2000 concurrent SIP video calls
●
Enhanced SIP-to-H.323 video gateway capability in Communication Manager configured
as an evolution server
●
Support for the Avaya 1000-series SIP video conferencing endpoints
●
Expanded video management to include a new video conference scheduling and endpoint
management capability for Avaya 1000-series video conferencing endpoints accessible
from System Manager, called Avaya Video Conferencing Manager
●
●
Support for Avaya one-X® Communicator 6.0 as a SIP video endpoint
Support for Polycom H.323 video deployments on Polycom CMA configurations as well as
on Communication Manager configured as an evolution server.
Avaya Aura™ Conferencing
Avaya Aura™ Conferencing provides CIF video conferencing with voice-activated switching
that supports up to 16 video endpoints in a conference call that includes up to 300 audio users.
Avaya Aura™ Conferencing is a fully integrated audio and data conferencing solution that
consists of a number of components that provide booking engines, account management
utilities, data sharing functionality, billing outputs, directory server integration capabilities, and
audio management for all calls.
Conferencing is available in either a Standard Edition or Enterprise Edition. The Standard
Edition of Conferencing suits smaller deployments with the media server and the application
server residing on a single server. The Enterprise Edition of Conferencing suits larger, more
complex deployments, such as those with multiple application servers, a global distribution of
servers, and redundancy requirements. The Enterprise Edition of Conferencing also supports
Administering Avaya Video Conferencing Solution 6.0.1
Issue 2.1
April 15,
Avaya Video Conferencing Solution
additional functionality, such as self registration for conferences, reseller and wholesaler users,
and video conference calls.
Avaya Aura™ Conferencing Manager
Avaya Aura™ Video Conferencing Manager is a comprehensive management software solution
for network administrators who manage video and voice communications systems in an IP
environment. With Avaya Video Conferencing Manager, network administrators can do the
following:
●
Monitor and manage multivendor video and voice communications devices across the
entire enterprise from a web browser.
●
Manage and automate video and voice call scheduling.
●
Generate reports for tracking inventory and analyzing device utilization and performance.
AVCS 6.0.1 “Service Pack” Requirements
Before you begin administering the AVCS components, ensure that the following tasks are
completed:
●
Avaya Aura™ Communication Manager 6.0.1 is installed and functional.
●
Avaya Aura™ System Manager 6.1 is installed and functional.
●
Avaya Aura™ Session Manager 6.1 is installed and functional.
●
For Avaya 1010/1020, upgrade firmware to AV_PP1_4_7_3_14.cmg.
●
For Avaya 1030/1040/1050, upgrade firmware to AV_RM1_4_7_3_14.cmg.
●
Avaya Video Conferencing Manager 5.1.0(2) is installed and functional.
●
Avaya Virtual Link 1.0.0.4 is installed and functional.
●
Polycom RMX is equipped with MPM cards - 5.0.2; MPM+ or MPX cards - 7.0.2.
Note:
Installing video features on the endpoints requires Session Manager to be
configured. For instructions, see Administering Avaya Aura™ Session Manager
(03-603324).
Note:
●
The SIP or H.323 endpoints are installed and functional.
●
All Avaya Aura™ components and endpoints are connected to the network and able to
communicate with each other.
16 Avaya Video Conferencing Solutions 6.0.1 Service Pack
Issue 2.1
April 15, 2011
Further information
●
A network readiness test or network assessment was performed to ensure your network is
capable of supporting bandwidth demands of video over IP. Avaya recommends
implementing quality of service (QoS) across your network.
●
Avaya licensing keys for RMX and HDX systems are installed.
Also, ensure that administrators are familiar with
●
System Manager domains, SIP entities, entity links, locations, routing, and dial patterns.
●
Administering Communication Manager, domains on Signaling Group, IP Network
Regions, AAR/ARS routing, and endpoint interfaces.
Further information
For more information on the Avaya Video Conferencing Solution, Communication Manager,
Session Manager, and System Manager, see the product documentation on http://
support.avaya.com.
Useful documents include:
●
Administering Network Connectivity for Avaya Aura™ Communication Manager
(555-233-504)
●
Administering Avaya Aura™ Session Manager (03-603324)
Administering Avaya Video Conferencing Solution 6.0.1
Issue 2.1
April 15,
Avaya Video Conferencing Solution
18 Avaya Video Conferencing Solutions 6.0.1 Service Pack
Issue 2.1
April 15, 2011
Chapter 2: Design and deployment
The chapter provides information that helps you design and deploy the Avaya Video
Conferencing Solution. It covers managing your bandwidth to allow the quality of service
needed to optimize video and the administration on Communication Manager and System
Manager.
Note:
For the latest firmware video compatibility matrix, go to Avaya Support
http://avaya.com/support and search for Firmware Video Compatibility Matrix.
Note:
Managing video on your network
The first step is to perform a network assessment to ensure that your network can support the
high-bandwidth demands of video over the network. Also, if not already implemented, consider
implementing Quality of Service (QoS) across your network. See Quality of Service on page 20.
The next step is to determine how you want to manage video on your network. Audio and video
endpoints and high definition and standard definition video use different amounts of bandwidth.
Also, your enterprise may be spread out geographically. Grouping your bandwidth by
geographic location, audio versus video endpoints, and SIP versus H.323 video endpoint is a
logical method to guarantee enough bandwidth for video. For H.323 endpoints, you may want to
group by type of user: normal versus priority.
Within the Avaya Aura® solution, Communication Manager manages the bandwidth for H.323
video endpoints, and Session Manager manages the bandwidth for SIP video endpoints.
Some specific recommendations:
●
For H.323 endpoints, use Network Regions within Communication Manager to create
bandwidth pools for your endpoints, for example priority users versus normal users for
H.323 endpoints only
●
For SIP endpoints, use Locations within System Manager to group your endpoints.
The following data provides typical network bandwidth requirements for Avaya video
conferencing systems. Requirements for other systems may differ.
●
Video bandwidth needed per call:
- For the Avaya 1010 and 1020 models:
●
1 Mbps for 720p/30fps
- For the Avaya 1030, 1040, and 1050 models:
●
768 kbps for 720p/30fps
DRAFT
Administering Avaya Video Conferencing Solutions 6.1
19
Design and deployment
●
1.1 Mbps for 720p/60fps
●
1.7 Mbps for 1080p/30fps
●
For content (that is, PC input) add ~1.0 Mbps (1040 and 1050 models only)
●
For wideband audio add 80 kbps (includes overhead)
Quality of Service
Quality of Service (QOS) is the ability to provide different priority to different users and voice or
data flows or to guarantee a certain level of performance to a data flow. It is not widely used for
audio-only networks but is critical as multimedia is more widely deployed.
You can assign a QoS tag from the video endpoint itself or from a central control, such as
Communication Manager. If no QoS tag is assigned, the network uses its best effort to get the
video to its destination.
User classification
Users can be classified as either normal or priority users with most users falling into the normal
category. If you want some users to be priority users, then
●
Set up a priority class of service (CoS) group.
●
Assign priority IP video to that priority CoS group.
●
When you set up an endpoint for a priority user, assign the user to that priority CoS group.
●
Assign a higher maximum call bit rate for priority IP multimedia.
For users of H.323 endpoints, you can set up separate bandwidth pool within a network region
for priority video users.
Bandwidth management
Bandwidth management is partitioning your enterprises total bandwidth to ensure that you have
enough bandwidth to support video. Partitioning total bandwidth generally starts by separating
calls first by a logical location, generally geographical, second by type of call: audio-only or
multimedia, and third, for H.323 endpoints, by type of user: normal or priority. Keep in mind that
these bandwidth allocations are for voice traffic only and are separate from the data traffic.
To partition bandwidth by geographical location, you use two methods: Network Regions for
H.323 endpoints and Locations for SIP endpoints. Network Regions are administered through
Communication Manager, and Locations are administered through System Manager.
DRAFT
20 Administering Avaya Video Conferencing Solutions 6.1
Managing video on your network
For procedures for assigning bandwidths for SIP endpoints using Locations, see Setting up
locations on page 32. For procedures for assigning bandwidths for H.323 endpoints using
Network Regions, see Setting up bandwidth pools on page 34.
This section addresses the additional partitioning methods organized by the type endpoints
used in a typical enterprise: H.323 only, SIP only, or a combination of H.323 and SIP.
H.323-only endpoints
When the enterprise uses only H.323 endpoints, bandwidth is divided up first by geographical
location and then by audio or video. Video can be further divided up by normal or priority user.
Bandwidth allocation for SIP-only solution, Release 6.0 on page 26 shows one example of
bandwidth allocation between two geographical areas, H.323 endpoint types, and type of user.
Figure 4: Bandwidth allocation for H.323-only solution
Site 1
Site 2
Audio Pool
Normal Video Pool
Priority Video Pool
Audio Pool
NR 1
50 Mbps
NR 100
50 Mbps
Virtual NR
NR 2
Normal Video Pool
Priority Video Pool
WAN Cloud
cycmnrh3 LAO 111710
This enterprise has 100 Mbps of total bandwidth available.
Site 1, designated Network Region 1, uses multimedia endpoints within conference rooms and
on desksets within the executive suite. NR1 is allocated 50 Mbps.
Site 2, designated Network Region 2, uses mostly multimedia endpoints within conference
rooms and on desksets within the executive suites. They also use some multimedia desksets
throughout the building and audio endpoints as well. NR2 is also allocated 50 Mbps.
In both Network Regions, the 50 Mbps bandwidth is divided into 3 pools: audio, normal video,
and priority video. One example would be to allocate 20% for normal video calls and 40% for
priority video calls. The remaining 40% would be used for audio calls. For information on
classifying users see User classification on page 20.
Video users
For H.323 video endpoints, users may be placed in separate normal or priority video pools.
Video endpoints for normal users may or may not get video, depending on the available
bandwidth. Video endpoints for priority users are allocated more bandwidth, so they are likely to
receive video. By allocating a larger maximum bandwidth per call, endpoints for priority users
DRAFT
Administering Avaya Video Conferencing Solutions 6.1
21
Design and deployment
receive and deliver better quality and more reliable video during calls. However, they might not
receive video on incoming calls received from video endpoints for normal users because
●
No bandwidth is available
●
No normal bandwidth is available even though priority bandwidth is available. The call is
made by a normal video endpoint, and this endpoint did not have access to the priority
bandwidth.
Bandwidth pools
For H.323, you can categorize users by audio-only, normal video, and priority video users,
dividing them into three pools:
●
Audio—The audio pool contains bandwidth for all audio calls, including the audio
component of multimedia calls.
●
Normal video—The normal video pool contains bandwidth for the video portion of a call
made by a normal (nonpriority) video user. You can set this pool to be shared. When this
pool is shared, audio-only calls are allowed to borrow bandwidth from this pool.
●
Priority video—The priority video pool contains bandwidth that is dedicated to priority video
users only. Audio calls and normal video users are not allowed to borrow bandwidth from
this pool. However, if all of the priority video pool bandwidth is currently in use, priority
video users can borrow bandwidth from the normal video pool, if available.
The following tables provide examples of how you might specify the bandwidth settings for your
network. See Setting up bandwidth pools on page 34 for how to administer these pools through
Network Regions.
Example 1: Audio only - In this example, you do not want to allocate any bandwidth for video.
You want to configure the network to use audio. Bandwidth settings for audio only shows how
you would configure the bandwidth groups for this example.
Bandwidth settings for audio only
Total
Bandwidth
Audio
Bandwidth
Pool
Priority Video
Bandwidth v
Normal Video
Bandwidth
Pool
Share Normal
Video
Bandwidth
Pool?
50 Mbps
50 Mbps
0 Mbps
0 Mbps
No
Example 2: Video for all - In this example, your network has enough bandwidth to support
video for all users simultaneously. Because all of your users can get as much bandwidth as they
need, there is no need to specify priority users. Only one group of bandwidth is shared by audio
DRAFT
22 Administering Avaya Video Conferencing Solutions 6.1
Managing video on your network
and multimedia calls. Audio comes from the normal video group. Bandwidth settings for video
for all shows how you would configure the bandwidth for this example.
Bandwidth settings for video for all
Total
Bandwidth
Audio
Bandwidth
Pool
Priority
Bandwidth
Pool
Normal Video
Bandwidth
Pool
Share Normal
Video
Bandwidth
Pool?
50 Mbps
0 Mbps
0 Mbps
50 Mbps
Yes
Example 3: Video for normal and priority users - In this example, you have bandwidth for
video only, and you want to reserve some bandwidth for priority users. All voice calls are routed
another way. You want to reserve half of your bandwidth (25 Mbps) for priority users. If priority
users need more than 50% of the bandwidth, they use the available bandwidth from the normal
video group. Audio comes from the normal video group. Bandwidth settings for video for normal
and priority users shows how you would configure the bandwidth for this example.
Bandwidth settings for video for normal and priority users
Total
Bandwidth
Audio
Bandwidth
Pools
Priority Video
Bandwidth
Pools
Normal Video
Bandwidth
Pools
Share Normal
Video
Bandwidth
Pool?
50 Mbps
0 Mbps
25 Mbps
25 Mbps
No
Example 4: Reserving bandwidth for video - In this example, you do not want to use too
much bandwidth on audio. You want to reserve most of the bandwidth for video, but you want to
allow a few audio calls to keep costs down. You have a small number of priority users.
Bandwidth settings for reserving bandwidth for video shows how you would configure the
bandwidth for this example.
Bandwidth settings for reserving bandwidth for video
Total
Bandwidth
Audio
Bandwidth
Pool
Priority Video
Bandwidth
Pool
Normal Video
Bandwidth
Pool
Share Normal
Video
Bandwidth
Pool?
50 Mbps
15 Mbps
10 Mbps
25 Mbps
No
The settings in the table allows a few audio calls and one or two priority calls depending on the
bit rate. After the audio group runs out of bandwidth, the calls are forced to take another route
since the since the normal video bandwidth group is not shared. If a priority call occurs when all
DRAFT
Administering Avaya Video Conferencing Solutions 6.1
23
Design and deployment
of the priority video bandwidth is used, it uses any available bandwidth in the normal video
bandwidth group before using bandwidth from the audio bandwidth group.
Example 5: Shared bandwidth for normal users - In this example, the following conditions
exist:
●
You want to share the normal video bandwidth group.
●
You have no priority video users.
Bandwidth settings for shared bandwidth for normal users shows how you would configure the
bandwidth for this example.
Bandwidth settings for shared bandwidth for normal users
Total
Bandwidth
Audio
Bandwidth
Pools
Priority Video
Bandwidth
Pools
Normal Video
Bandwidth
Pools
Share Normal
Video
Bandwidth
Pool?
50 Mbps
15 Mbps
0 Mbps
35 Mbps
Yes
Because there are no priority video users, the normal video bandwidth group is the entire video
bandwidth group. With no priority users and the bandwidth being shared, all of the bandwidth
could be used as audio.
Example 6: Shared bandwidth with priority users - In this example, the following conditions
exist:
●
You want to guarantee a certain audio bandwidth and video bandwidth.
●
You want to share the normal video bandwidth group.
●
You have priority video users.
Bandwidth settings for shared bandwidth with priority users shows how you would configure the
bandwidth for this example.
Bandwidth settings for shared bandwidth with priority users
Total
Bandwidth
Audio
Bandwidth
Pools
Priority Video
Bandwidth
Pools
Normal Video
Bandwidth
Pools
Share Normal
Video
Bandwidth
Pools?
50 Mbps
15 Mbps
10 Mbps
25 Mbps
Yes
In this example, 10 Mbps of bandwidth are reserved for priority video users. Audio users cannot
use this bandwidth. The maximum available bandwidth for audio is 40 Mbps. (In this case, there
would be no normal video bandwidth available.) The maximum available bandwidth for priority
video users is 10 Mbps.
DRAFT
24 Administering Avaya Video Conferencing Solutions 6.1
Managing video on your network
See Setting up bandwidth pools on page 34 for setting up bandwidth pools using Network
Regions.
SIP-only endpoints
When the enterprise uses only SIP endpoints, bandwidth is divided up first by geographical
location and then by audio or video. There are slight differences between Release 6.0 and 6.1
on how bandwidth is partitioned. If on Release 6.0, the video and audio pools cannot share
bandwidth. Whatever bandwidth that’s assigned to those pools stays in those pools. If on
Release 6.1, the bandwidth within the audio and video pools are shared.
For Avaya Aura®, Release 6.0, locations do not share bandwidth, so Avaya offers the following
interim options:
●
Conservative option (if audio is mission-critical):
- Assign enough bandwidth for maximum concurrent audio calls to video locations.
- Assign the remaining bandwidth to video.
●
Aggressive option:
- Make the sum of the bandwidth assigned to audio and video locations equal the actual
available bandwidth. If a burst of audio and video calls occurs, however, users will see
degraded quality.
To determine how much bandwidth to allocate for each pool, you need to know the average
bandwidth per call within the enterprise. Use the following formula to calculate it:
Y = AC + BD
where A = percentage of audio calls, B = percentage of video calls, C = average bandwidth
used by audio calls, and D = average bandwidth used by video calls. For example, if A = 80%, B
= 20%, C = 83 kbps (based on G.711-mu codec), D = 768 kbps (based on average screen
resolution) then
(0.80 x 83) + (0.20 x 768) = 220 kbps.
Bandwidth allocation for SIP-only solution, Release 6.0 on page 26 shows one example of
bandwidth allocation between two geographical areas and SIP endpoint types.
DRAFT
Administering Avaya Video Conferencing Solutions 6.1
25
Design and deployment
Figure 5: Bandwidth allocation for SIP-only solution, Release 6.0
Site 1
Site 2
Audio Pool
Loc B
bps
Audio Pool
Loc A
100 Mbps
WAN
25 Mbps
5M
20
(Audio)
Video Pool
Mb
ps
Loc B
(Video)
cycmlsub LAO 111910
This enterprise has 125 Mbps of bandwidth available.
Site 1, designated Location A, uses audio-only endpoints and is allocated 100 Mbps.
Site 2, designated Location B, uses video desksets, a few video units in small conference
rooms, and several audio endpoints. Location B is allocated 25 Mbps with 5 Mbps supporting
the audio pool and 20 Mbps supporting the video pool.
Bandwidth allocation for SIP-only solution, Release 6.1 on page 26 shows one example of
bandwidth allocation between two geographical areas and SIP endpoint types.
Figure 6: Bandwidth allocation for SIP-only solution, Release 6.1
Site 1
Site 2
Audio Pool
Audio Pool
Video Pool
Loc A
100 Mbps
WAN
25 Mbps
Video Pool
Loc B
cycmlsip LAO 111610
This enterprise has 125 Mbps of bandwidth available.
Site 1, designated Location A, uses video endpoints within conference rooms and on desksets
within the executive suite, and several audio endpoints. Location A is allocated 100 Mbps with
25 Mbps supporting the audio pool and 75 Mbps supporting the video pool.
DRAFT
26 Administering Avaya Video Conferencing Solutions 6.1
Managing video on your network
Site 2, designated Location B, uses video desksets and a few video units in small conference
rooms, and several audio endpoints. Location B is allocated 25 Mbps with 5 Mbps supporting
the audio pool and 20 Mbps supporting the video pool.
For Release 6.1, audio and video endpoints share bandwidth within a location, so even though
a certain amount of bandwidth is allocated to each pool, the audio pool can borrow bandwidth
from the video pool if necessary.
Bandwidth pools
For SIP, you can categorize users by audio or video users, dividing them into two pools:
●
Audio—The audio pool contains bandwidth for all audio calls, including the audio
component of multimedia calls.
●
Video—The video pool contains bandwidth for the video portion of a call made by a video
user. You can set this pool to be shared. When this pool is shared, audio-only calls are
allowed to borrow bandwidth from this pool. This pool is shared by normal or priority video
users.
The following tables provide examples of how you could specify the bandwidth settings for your
network.
Example 1: SIP audio only - In this example, you do not want to allocate any bandwidth for
video. You want to configure the network to use audio only. Bandwidth settings for SIP audio
only shows how you would configure the audio bandwidth for a single location.
Bandwidth settings for SIP audio only
Total Bandwidth
Audio
Bandwidth
Pool
Video
Bandwidth
Pool
Share
Bandwidth
Pools?
25 Mbps
25 Mbps
0 Mbps
no
See Setting up locations on page 32 for setting up bandwidth pools using Locations.
Example 2: SIP video only - In this example, you do not want to allocate any bandwidth for
audio. You want to configure the network to use video only.
Bandwidth settings for SIP video only shows how you would configure the bandwidth for this
example.
Bandwidth settings for SIP video only
Total Bandwidth
Audio
Bandwidth
Pool
Video
Bandwidth
Pool
Share
Bandwidth
Pools?
100 Mbps
0 Mbps
100 Mbps
no
DRAFT
Administering Avaya Video Conferencing Solutions 6.1
27
Design and deployment
See Setting up locations on page 32 for setting up bandwidth pools using Locations.
Example 3: SIP audio and video - In this example, you want to allocate bandwidth for audio
and video with most of the bandwidth going toward video.
Bandwidth settings for SIP audio and video pools shows how you would configure the
bandwidth for a single location.
Bandwidth settings for SIP audio and video pools
Total Bandwidth
Audio
Bandwidth
Pool
Video
Bandwidth
Pool
Share
Bandwidth
Pools?
100 Mbps
20 Mbps
80 Mbps
yes
See Setting up locations on page 32 for setting up bandwidth pools using Locations.
Combination H.323 and SIP endpoints
When the enterprise uses both H.323 and SIP endpoints, bandwidth is divided up by
geographical location and then by H.323 and SIP endpoints. Within the Network Region, H.323
endpoints may be divided further by type of user.
You use the same formula as in SIP-only endpoints on page 25 to calculate the average
bandwidth per call within your enterprise for the SIP endpoints.
Bandwidth allocation for combined solution on page 28 shows one example of bandwidth
allocation between two geographical areas, two endpoint types, and type of user.
Figure 7: Bandwidth allocation for combined solution
Site 1
Site 2
Audio Pool
Video Pool
Loc A
Network Pipe from
Site 1
Total BW: 150
100 Mbps
Network Pipe from
Site 2
Total BW: 75
Loc CM
25 Mbps
Audio Pool
Video Pool
Loc B
Virtual Location
Audio Pool
Normal Video Pool
Priority Video Pool
50 Mbps
NR 1
NR 100
Virtual NR
WAN Cloud
Audio Pool
50 Mbps
NR 2
Normal Video Pool
Priority Video Pool
cycmlocc LAO 111710
This enterprise has 225 Mbps of bandwidth available with 125 Mbps available for SIP endpoints
and 100 Mbps available for H.323 endpoints.
DRAFT
28 Administering Avaya Video Conferencing Solutions 6.1
Managing video on your network
Site 1, designated Location A and Network Region 1, uses mostly SIP and some H.323 video
endpoints within conference rooms and on desksets within the executive suites. They also use
some SIP and H.323 video desksets throughout the building and audio endpoints as well.
Location A is allocated 100 Mbps for the SIP endpoints, and Network Region 1 is allocated 50
Mbps for the H.323 endpoints.
Site 2, designated Location B and Network Region 2, uses mostly H.323 video and some SIP
endpoints within offices. Location B is allocated 25 Mbps for the SIP endpoints, and Network
Region 2 is allocated 50 Mbps for the H.323 endpoints.
In both Network Regions, the 50 Mbps bandwidth is divided into 3 pools: audio, normal video,
and priority video. One example would be to allocate 20% for audio calls, 50% for normal video
calls, and 30% for priority video calls. For information on classifying users see User
classification on page 20.
When calling between locations and network regions, the bandwidth used is counted against
the terminating endpoint. For example, if you are calling from an H.323 endpoint in Location A to
a SIP endpoint in Location B, the bandwidth used is counted against the bandwidth pool
managed by Session Manager. If you are calling from a SIP endpoint in Location A to an H.323
endpoint in Location B, the bandwidth used is counted against the bandwidth pool managed by
Communication Manager.
Bandwidth pools
Bandwidth for H.323 is managed through Communication Manager using Network Regions,
and bandwidth for SIP is managed through Session Manager using Locations. Network
Regions and Locations must have a 1-to-1 mapping. This mapping presents some limitations:
●
Communication Manager supports no more than 250 Network Regions, but Session
Manager supports thousands of Locations.
●
Session Manager maps IP addresses to Locations; Communication Manager maps IP
addresses to Network Regions. These mappings must be synchronized manually.
●
As part of Communication Manager administration, the SIP trunk to Communication
Manager must be placed within a dummy Network Region for which no bandwidth limits
are set.
Because Locations and Network Regions cover the same physical links, the bandwidth limits of
the links must be divided between Session Manager bandwidth and Communication Manager
bandwidth and within an enterprise possibly among many Communication Managers. The
appropriate division depends on expected call traffic breakdown.
When setting up bandwidth pools, you set them up the same as you do for H.323-only and
SIP-only endpoints.
The following tables provide examples of how you could specify the bandwidth settings for your
network.
DRAFT
Administering Avaya Video Conferencing Solutions 6.1
29
Design and deployment
Example 1: Audio only for combination H.323 and SIP - In this example, your network has
enough bandwidth to support audio only in one location. The SIP audio endpoints cannot share
bandwidth with the H.323 audio endpoints.
Calls made within a single location (intralocation calls) are counted against the total allocated
bandwidth for the location.
Bandwidth settings for audio only for both H.323 and SIP shows how you would configure the
bandwidth for a single location.
Bandwidth settings for audio only for both H.323 and SIP
Total
Bandwidth
SIP Audio
Bandwidth
Pool
SIP Video
Bandwidth
Pool
H.323 Audio
Bandwidth
Pool
H.323 Audio
Bandwidth
Pool
75 Mbps
25 Mbps
0 Mbps
50 Mbps
0 Mbps
See Setting up bandwidth pools on page 34 for setting up bandwidth pools using Network
Regions. See Setting up locations on page 32 for setting up bandwidth pools using Locations.
Example 2: Video only for combination H.323 and SIP - In this example, your network has
enough bandwidth to support video only in one location. The SIP video endpoints are allocated
100 Mbps, and the H.323 video endpoints are allocated 50 Mbps. The H.323 video endpoints
are further divided by normal and priority users. The SIP video endpoints cannot share
bandwidth with the H.323 video endpoints.
Calls made within a single location (intralocation calls) are counted against the total allocated
bandwidth for the location.
Bandwidth settings for video only for both H.323 and SIP shows how you would configure the
bandwidth for a single location.
Bandwidth settings for video only for both H.323 and SIP
Total
Bandwidth
SIP Audio
Bandwidth
Pool
SIP Video
Bandwidth
Pool
H.323
Audio
Bandwidth
Pool
H.323 Normal
Video
Bandwidth
Pool
H.323 Priority
Video
Bandwidth
Pool
150 Mbps
0 Mbps
100 Mbps
0 Mbps
30 Mbps
20
See Setting up bandwidth pools on page 34 for setting up bandwidth pools using Network
Regions. See Setting up locations on page 32 for setting up bandwidth pools using Locations.
Example 3: Audio and video for combination H.323 and SIP - In this example, your network
has enough bandwidth to support both audio and video in one location. The SIP endpoints are
allocated 100 Mbps, and the H.323 endpoints are allocated 50 Mbps. The H.323 video
DRAFT
30 Administering Avaya Video Conferencing Solutions 6.1
Managing video on your network
endpoints are further divided by normal and priority users. The SIP endpoints cannot share
bandwidth with the H.323 endpoints.
Calls made within a single location (intralocation calls) are counted against the total allocated
bandwidth for the location.
Bandwidth settings for audio and video for both H.323 and SIP shows how you would configure
the bandwidth for a single location.
Bandwidth settings for audio and video for both H.323 and SIP
Total
Bandwidth
SIP Audio
Bandwidth
Pool
SIP Video
Bandwidth
Pool
H.323
Audio
Bandwidth
Pool
H.323 Normal
Video
Bandwidth
Pool
H.323 Priority
Video
Bandwidth
Pool
150 Mbps
25 Mbps
75 Mbps
20 Mbps
20 Mbps
10 Mbps
See Setting up bandwidth pools on page 34 for setting up bandwidth pools using Network
Regions. See Setting up locations on page 32 for setting up bandwidth pools using Locations.
DRAFT
Administering Avaya Video Conferencing Solutions 6.1
31
Design and deployment
Administration
The following tasks provide procedures for setting up Locations within System Manager and
administering Network Regions within Communication Manager.
Setting up locations
To set up locations within System Manager:
1. Log into the System Manager Web console.
2. Under Elements, select Routing.
3. Click Routing > Locations.
4. Click New to view the Location Details page.
5. Enter the location name in the Name field.
6. Enter notes about the location, if required.
7. In the Overall Managed Bandwidth section, fill in the Managed Bandwidth Units and
Total Bandwidths fields for the location.
8. in the Per-Call Bandwidth Parameters section, fill in all of the fields.
9. Click Add under Location Pattern to add a location pattern.
10. Enter an IP address pattern to match.
11. Enter notes about the location pattern, if required.
12. Continue clicking Add until all the required Location Pattern matching patterns have been
configured.
13. Click Commit to save the settings.
Location Details field descriptions
Use this page to set up and configure locations.
General section
Name
Description
Name
Name of the location.
Notes
Notes about the location.
DRAFT
32 Administering Avaya Video Conferencing Solutions 6.1
Administration
Overall Managed Bandwidth section
Name
Description
Managed Bandwidth
Units
Specifies the bandwidth unit for Overall Managed Bandwidth
values.
Total Bandwidth
The total bandwidth available for use by any calls between this
location and other locations. Any attempt to exceed this limit
results in calls being alternate routed or denied. If no value is
specified, the bandwidth limit is infinite.
Multimedia Bandwidth
The bandwidth available for use by multimedia calls between this
location and other locations. This is a subset of the Total
Bandwidth value. Any attempt to exceed this limit results in calls
being alternate routed or denied. If no value is specified, the use of
the limit defined for Total Bandwidth depends on the value of Audio
Calls Can Take Multimedia Bandwidth. If selected, Total Bandwidth
can be used for any call type. If not selected, Total Bandwidth can
be used only for audio calls.
Audio Calls Can Take
Multimedia Bandwidth
Specifies the use of multimedia call bandwidth for audio calls. If
this check box is selected, the bandwidth reserved for multimedia
calls may also be used for audio calls. If not, this bandwidth may
only be used for multimedia calls
Per-Call Bandwidth Parameters section
Name
Description
Maximum Multimedia
Bandwidth
(Intra-Location)
The maximum bandwidth allowed for a single multimedia call
within this location. Calls requesting more bandwidth than this
value are modified to use less bandwidth. The range is 0–15,360
Kbps. The default value is 1000 Kbps.
Maximum Multimedia
Bandwidth
(Inter-Location)
The maximum bandwidth allowed for the multimedia portion of a
multimedia call between this location and another location. Calls
requesting more bandwidth than this value are modified to use less
bandwidth. The range is 0–15,360 Kbps. The default value is 1000
Kbps.
DRAFT
Administering Avaya Video Conferencing Solutions 6.1
33
Design and deployment
Name
Description
Minimum Multimedia
Bandwidth
The minimum bandwidth specified per multimedia media stream
that Session Manager uses while reducing the bandwidth request
for a call to or from this location to enforce any bandwidth
restriction. If a bandwidth restriction requires Session Manager to
reduce a media stream below this level, the stream is removed
from the call, possibly resulting in the entire call being blocked.
Media requests for bandwidth beneath this minimum will not be
blocked; this is solely a restriction on Session Manager’s ability to
modify requests. The range is 64–15,360 Kbps. The default value
is 64 Kbps.
Default Audio
Bandwidth
The audio bandwidth assumed to be used by a call originating in
this location that does not explicitly specify its bandwidth needs
using the Session Description Protocol (SDP). Such calls are
assumed to be of audio type only. The range is 0–15,360 Kbps.
The default value is 80 Kbps.
Setting up bandwidth pools
Use the Network Regions screen to setup normal and priority bandwidth pools.:
1. Enter change ip-network-region n, where n is the number assigned to IP network
region.
2. Go to the Inter Network Region Connection Management screen
3. Set the following parameters:
●
codec set:
●
direct WAN:
●
Units:
●
Total:
●
Video Norm:
●
Video Prio:
●
Shr:
4. Repeat this procedure for each IP network region where you want to set up normal and
priority bandwidth pools.
DRAFT
34 Administering Avaya Video Conferencing Solutions 6.1
Administration
Network Regions field descriptions
codec-set
Valid Entry
Usage
1 to 7
pstn blank
The codec set used between two regions. This field
cannot be blank if this route through two regions is
being used by some nonadjacent pair of regions. If
the two regions are not connected at all, this field
should be blank.
direct-WAN
Indicates whether the two regions (source and destination) are directly connected by a WAN
link. The default value is enabled if a codec-set is administered.
WAN-BW-limits (Units)
Valid Entry
Usage
Calls
Dynamic
kbps
Mbps
blank for No Limit
The unit of measure corresponding to the value
entered for bandwidth limitation. Bandwidth should be
limited by the number of connections, bandwidth in
kbps, Mbps, or left blank. Default is blank.
WAN-BW-limits (Total)
The bandwidth limits for direct WAN links. Values for this field can be entered in the number of
connections,
Valid Entry
Usage
1 to 9999
For units in Kbits
1 to 65
For units in Mbits
blank
If no limits. This is the default setting.
DRAFT
Administering Avaya Video Conferencing Solutions 6.1
35
Design and deployment
Video (Norm)
The amount of bandwidth to allocate for the normal video pool to each IP network region.
Valid Entry
Usage
0 to 9999
For units in Kbits
0 to 65
For units in Mbits
blank
If no allocation. This is the default setting.
Video (Prio)
The amount of bandwidth to allocate for the priority video pool to each IP network region.
Valid Entry
Usage
0 to 9999
For units in Kbits
0 to 65
For units in Mbits
blank
If no allocation. This is the default setting.
Video (Shr)
Specifies whether audio calls can share bandwidth with the normal video pool for each link
between IP network regions.
DRAFT
36 Administering Avaya Video Conferencing Solutions 6.1
Call Admission Control
Call Admission Control
Overview
Audio and multimedia calls require high bandwidth and low latency for best user experience.
Call Admission Control (CAC), also known as Bandwidth Management, provides an efficient
means to prevent degradation of quality by limiting the number of concurrent calls over limited
bandwidth links. CAC enables in sustaining the network load imposed by the media traffic over
the IP network.
Administering Call Administration Control
Session Manager allows bandwidth management for a given location by administering the
following details in the Location Details page:
1. Specify managed bandwidth usage for the location in the Overall Managed Bandwidth
section.
2. Specify average bandwidth per call for the location in the Per-Call Bandwidth Parameters
section.
Based on the location level settings as mentioned above, Session Manager provides the
following set of CAC functionality using Session Description Protocol (SDP):
1. Recognizes different types of calls categorized either as audio or multimedia. Multimedia
includes video and other forms of non-audio media sent by endpoints as part of a session.
2. Provisions a second, lesser limit on the bandwidth usage permitted for a location. This
second limit applies only to multimedia calls (Multimedia Bandwidth) and prevents such
calls from consuming too large a percentage of the available bandwidth of a location (Total
Bandwidth).
3. If the Total Bandwidth is left “BLANK” then Session Manager does not perform CAC for calls
in the Location.
4. Allows audio and multimedia bandwidth sharing at a location by selecting the option Audio
Calls Can Take Video Bandwidth.
●
If selected, then Session Manager considers only the Total Bandwidth when deciding
whether a new audio call can proceed.
●
If not selected, then Session Manager considers the Total Bandwidth minus the
Multimedia Bandwidth when deciding whether a new audio call can proceed.
DRAFT
Administering Avaya Video Conferencing Solutions 6.1
37
Design and deployment
5. Specifies per-call bandwidth limits (as specified in Per-Call Bandwidth Parameters section),
restricting the size of individual multimedia calls. Session Manager alters the SDP provided
by call parties by enforcing the bandwidth limits as follows:
●
Determines how much bandwidth to be reserved for each call and counts the
determined value against the provisioned limit.
●
If the multimedia bandwidth is beyond what is provisioned (Maximum Multimedia
Bandwidth (Intra-Location) or Maximum Multimedia Bandwidth (Inter-Location)),
Session Manager can reduce the multimedia bandwidth as low as the administered
multimedia minimum (Minimum Multimedia Bandwidth) limit. In such cases, users
experience a reduction in media (usually video) quality. Otherwise, calls are either
alternate-routed or denied when limit enforcement cannot be achieved by quality
reduction. Audio call quality is not modified by Session Manager.
●
If Session Manager cannot allow the multimedia minimum (Minimum Multimedia
Bandwidth), then multimedia streams are removed from the call by setting their ports
to zero, which results in denying the multimedia portion of the call
SDP functionality can be enabled by clearing the Global Settings option Ignore SDP for Call
Admission Control in the Session Manager Administration page. This setting changes the CAC
mode from “Ignore SDP” (as in Session Manager 6.0) to “Use SDP” (as in Session Manager
6.1). This setting takes effect at cluster level in the core and hence all the Session Manager
instances are affected accordingly.
See Administering Avaya Aura® Session Manager for understanding the location based
configuration changes required in the earlier versions of Session Manager.
Provisioning Session Manager and Communication Manager CAC
together
For simultaneous use of Session Manager and Communication Manager CAC, following
configurations should be done:
1. Create 1-to-1 mapping of Session Manager Locations to Communication Manager Network
Regions, because Communication Manager uses Network Regions for CAC. This is limited
by the fact that Communication Manager supports no more than 250 Network Regions,
while Session Manager supports thousands of Locations.
2. As Session Manager maps IP addresses to Locations, Communication Manager maps IP
addresses to Network Regions. These mappings must be synchronized manually.
3. As part of Communication Manager administration, the SIP trunk to Communication
Manager must be placed within a dummy Network Region for which no CAC limits are set.
This enables the following changes:
DRAFT
38 Administering Avaya Video Conferencing Solutions 6.1
Call Admission Control
Note:
●
Calls terminated to non-SIP destinations (H.323 phones, non-SIP trunks) are counted
by Communication Manager CAC for the appropriate Network Regions.
●
All calls terminated to SIP destinations (SIP phones, SIP trunks on Session Manager)
are counted by Session Manager CAC for the appropriate Locations.
●
SIP trunks on Communication Manager that do not route to Session Manager (not a
recommended configuration) are counted by Communication Manager.
Note:
Communication Manager performs CAC in terms of bandwidth limits between two
specific Network Regions, while Session Manager performs CAC as per limits
covering all traffic into or out of a Location, regardless of the far-end location.
DRAFT
Administering Avaya Video Conferencing Solutions 6.1
39
Design and deployment
Network and solution requirements
This section provides a list of requirements for optimizing video within your network.
Design and deploy a multimedia QoS policy.
The Avaya one-X® Communicator, the AVCS 1000-series video endpoints, the Avaya A175
Desktop Video Device, and all Polycom conferencing devices support QoS for video. For more
information, see the checklist in section 11.0 of the white paper from Polycom Global Services
titled Supporting Real-time Traffic: Preparing Your IP Network for Video Conferencing.
The following checklist can be used to determine how well your network is prepared for a voice
and video implementation.
●
Identify real-time bandwidth demand by link.
●
Identify data bandwidth demand by link (utilization).
●
Assess available bandwidth by link, and upgrade as necessary.
●
Determine enterprise QoS classification approach.
●
Determine enterprise QoS technology for the networks (LAN).
●
Determine enterprise QoS technology for the WAN and select WAN vendors.
●
Verify WAN support for enterprise QoS approach through testing.
●
Deploy QoS in all portions of the network supporting real-time traffic.
●
Verify network support of real-time traffic with synthetic testing.
●
Implement a bandwidth management methodology.
●
Implement real-time network monitoring capability.
●
Create, negotiate, and sign an enterprise SLA.
Selecting a default enterprise maximum call rate.
Avaya recommends an initial deployment rate of 384 kbps. Keep in mind the following caveats:
●
20% allocation for IP protocol overheads
●
High-definition room systems support call rates of 4 Mbps.
For procedures to set the call rate for normal and priority users, see
DRAFT
40 Administering Avaya Video Conferencing Solutions 6.1
Network and solution requirements
Note:
Note:
Enter change ip-codec-set and enable the Allow Direct IP Multimedia field. In
Communication Manager 6.0.x, there are two options: normal users and priority
users.
Allow reasonable inter-PBX network connectivity rates.
Avaya recommends that inter-PBX network connectivity be less than 150 ms end-to-end
one-way delay and less than 1% packet loss at all times. Otherwise, expect slower call
establishment. Compared with audio-only calls, multimedia calls have a greater number of
round-trip signaling messages by a factor of 5.
DRAFT
Administering Avaya Video Conferencing Solutions 6.1
41
Design and deployment
Allow reasonable VPN connection rates.
Avaya recommends that for Avaya one-X® Communicator the VPN connection rates have a
less than 150-ms one-way delay to Communication Manager, a packet loss less than 1%, and
jitter less than 20 ms. The Avaya one-X® Communicator does not support automatic bit rate
downgrades on packet loss feedback, nor does it perform ping tests for video assessment. The
user must reduce call rate and re-attempt the call to achieve the best video experience for the
network conditions. In worst-case conditions, users may experience video disablement by
Communication Manager for the call duration due to excessive video update requests.
Account for video call scenarios that cross more than three
Communication Manager systems.
Note:
Note:
A limitation of the solution is that shuffling to direct-ip is blocked for
Communication Manager systems that are pushing tandem trunk-to-trunk
multimedia calls. Hairpinning is allowed.
Administer additional trunks to minimize the use of tandem Communication Manager systems,
thereby reducing video-update latency. Avoid the use of slow CPU servers in tandem
scenarios, since video signaling across many Communication Manager systems is
exponentially more expensive than audio-only calls.
DRAFT
42 Administering Avaya Video Conferencing Solutions 6.1
Feature Interactions and Limitations
Feature Interactions and Limitations
This section provides a list of possible interactions and limitations to consider.
Call Recording, Whisper Page, or Service Observing is used on video calls.
In this situation, expect audio-only calls unless the ad-hoc video conferencing feature is
enabled. Each of these features counts as an audio-only participant in the call. See related
issues below.
Video endpoints are involved in conference calls, and ad-hoc video
conferencing is not enabled.
Conference calls refer to calls with more than two participants. The limitation described here
may not include calls to auxiliary devices over trunks; for example, using dedicated video
conferencing devices.
In this situation, expect audio-only calls even when only two of the endpoints are video
endpoints. To prevent this, enable ad-hoc video conferencing. There may be benefits to
enabling ad-hoc video conferencing without any ad-hoc video conference bridges. For more
information, see the related question below.
More than two video endpoints are involved in calls, and insufficient ad-hoc
video conferencing ports are available.
In this situation, expect audio-only calls. If there are no video ad-hoc video conferencing ports
available, you only receive video if there are exactly two video parties on the call. If there are
more than two video parties, no one receives video because no good rule exists for deciding
which two parties should have it. If you have exactly two video-enabled parties, you can have as
many audio-only parties as fit and you still get video.
Keep in mind that
●
A call over a video-enabled trunk counts as a video party even if it is to an audio-only
endpoint.
●
A call over a non-video-enabled trunk counts as a nonvideo party even if it is to a video
endpoint. This includes calls routed via IGAR and may include failover trunks.
●
A video-enabled endpoint with a nonvideo endpoint registered to it, such as a
shared-control endpoint with the video IPSP logged out, does not count as a video
endpoint.
●
A video endpoint with video stopped or muted still counts as a video endpoint.
●
If you have video and you add a video-enabled party, you lose video.
DRAFT
Administering Avaya Video Conferencing Solutions 6.1
43
Design and deployment
●
If you drop all but two of your video-enabled parties, video returns.
No Bandwidth is available
When all the available bandwidth has been used up by the endpoints on existing calls, the
Avaya 1000 series video endpoints display a message No Bandwidth.
Transfer to MGC/RMX is being used for ad-hoc video conferencing.
In this situation, avoid scenarios where a user attempts to transfer to a meeting room where
tandem Communication Manager systems link the user to the Polycom MGC/RMX. Multiple
Communication Manager shuffling (if allowed) may legitimately block the transfer. A
reattempted transfer should succeed.
Deployment of ad-hoc video conferencing with Polycom RMXs must be
distributed.
If customers with a network of PBXs trunked together wants to deploy ad-hoc video
conferencing with Polycom RMXs in the future, they should distribute them.
In this situation, ad-hoc video conferencing requires at least one Polycom RMX per active
Communication Manager system to support future ad-hoc video conferencing via the
Conference button.
Additional media resources are allocated for Communication Manager
systems used for tandem multimedia calls.
In a typical hub-and-spoke arrangement of Communication Manager systems, the core PABX
doing the tandem calls between remote PABX systems requires additional media resources
because shuffling to direct-ip is blocked for multimedia calls. If you do not add media resources,
expect higher use of media resources on tandem Communication Manager systems.
DRAFT
44 Administering Avaya Video Conferencing Solutions 6.1
Chapter 3: Administering Conferencing and Bridges
This section of the guide explains how to set up Conferencing and Bridges.
This section explains the administration of the following:
1. Configuring the S6800 bridge
2. Configuring Avaya Aura® Conferencing
Configuring the Avaya Aura® Conferencing 6.0 Standard
Edition
In this section, you will:
1. Configure Conferencing for TLS or TCP so it will be able to communicate with
Communication Manager.
2. Configure the non-Ad-hoc video conferencing parameters for the Conferencing.
3. Configure the call branding digits that you will use to dial into the Conferencing.
4. Configure the dial outs for the Conferencing.
5. Configure Conferencing for Radisys CMS 6000.
6. Configure the Ad-hoc video conferencing parameters on the Conferencing.
7. Schedule conferences on Conferencing to ensure correct operation.
Note:
Note:
You must log into the Conferencing using ssh with craft and su to sroot. All
configuration changes except cbutil require a system reboot for the changes to
take effect.
To configure the Conferencing:
1. Using a text editor, open the file /usr/ipcb/config/system.cfg, and make sure the following
parameters are configured:
●
MyListener
●
respContact
●
MaxChannelCount
Administering Avaya Video Conferencing Solution 6.0.1
Issue 2.1
April 15,
Administering Conferencing and Bridges
●
MaxVideoChannelsAllowed
The following is an example of a TLS configuration:
# ip address of the server
IPAddress=xxx.xxx.xxx.xxx
#request we will be listening to
#TLS
MyListener=sip:[email protected]:5061;transport=tls
#TLS
respContact=<sip:[email protected]:5061;transport=tls>
#Audio port licensing depends on customer
MaxChannelCount=750
# video port licensing depends on customer
MaxVideoChannelsAllowed=125
The following is an example of a TCP configuration:
# ip address of the server
IPAddress=xxx.xxx.xxx.xxx
#request we will be listening to
MyListener=sip:[email protected]:5060;transport=tcp
#if this setting is populated will Overwrite the contact field in responses
respContact=<sip:[email protected]:5060;transport=tcp>
#Audio port licensing depends on customer
MaxChannelCount=750
# video port licensing depends on customer
MaxVideoChannelsAllowed=125
2. Using a text editor, open the file /usr/ipcb/config/mediaServerInterface.cfg, and make
sure the following parameters are configured:
●
EnableVideoSupport
Valid entries are 0 (off) and 1 (on). The default is 0.
●
VideoSI
This parameter sets the switching interval. Valid entries are 1 through 10 seconds. The
default is 2.
46 Administering Avaya Video Conferencing Solution 6.0.1
Issue 2.1
April 15, 2011
Configuring the Avaya Aura® Conferencing 6.0 Standard Edition
●
VideoSpeakersees
Valid entries are current and previous. The default is previous.
●
VideoSize
Valid entries are CIF and QCIF. The default is CIF.
●
VideoBandwidth
Valid entries are 128, 192, 256, 384, 512, and 768 Kbit/s. The default is 384 Kbits/s.
●
VideoMPI
This parameter sets the minimum picture interval. Valid entries are 1 through 32. The
default is 4. (VideoMPI=1 equals 30 fps.)
The following is an example of the mediaServerInterface.cfg settings:
#Audio recording server
NFSServerIPAddress=xxx.xxx.xxx.xxx
MediaServerIP_1=xxx.xxx.xxx.xxx
MediaServerName_1=mpc2
MediaServerInterfaceSipListenPort_1=5050
# Video Params
# Set EnableVideoSupport to’1’ to enable video support and’0’ to disable
EnableVideoSupport=1
VideoSI=2
VideoSpeakersees=previous
VideoSize=CIF
VideoBandwidth=384
VideoMPI=4
3. At the command prompt, enter cbutil add, to add the call branding digits that you use to
dial into the bridge. You can configure:
●
SCAN to prompt the user for conference codes.
Administering Avaya Video Conferencing Solution 6.0.1
Issue 2.1
April 15, 2011 47
Administering Conferencing and Bridges
●
DIRECT to go directly into a pre-configured conference.
Example:
cbutil add 24049 0 301 1 n DIRECT -1 Adhoc in Avaya
DNIS
Grp
----------
Msg
PS
CP
Function
Line Name
Company Name
-------- -------
-----
------
--------------
---------------
--------------------
24047
0
247
1
N
SCAN
Schedule
Avaya
24049
0
301
1
N
DIRECT
Adhoc
Avaya
4. Using a text editor, open the file /usr/ipcb/config/telnumToURI.tab to configure the dial
outs for the Conferencing. Your dial outs are configured on the bridge in /usr/ipcb/config/
telnumToURI.tab. See the following example:
TelnumPattern
TelnumConversion
comment
*
"<sip:$1@<proxyipaddress>:5061;transport=tls>"
SES Proxy
40???
"<sip:$1<C-LAN_address>:5061;transport=tls>"
ACM
5. Using a text editor, open the file /usr/ipcb/config/processTable.cfg to configure
Conferencing for Radisys CMS600. The convMS process implements the Radisys CMS600
media server interface. See the following figure for an example of the processTable.cfg file.
6. Perform the following steps to configure the Ad-hoc video conferencing parameters on the
Conferencing:
a. On Avaya Aura® conferencing, configure the following values in the file usr/ipcb/config/
system.cfg:
●
AdhocConferenceURIPattern
●
AdhocMinPortsAvailable
●
AdhocDefaultConferenceSize
●
RAINotificationInterval
●
RAIHighThreshold
●
RAILowThreshold
●
MaxRAISubscribers
48 Administering Avaya Video Conferencing Solution 6.0.1
Issue 2.1
April 15, 2011
Configuring the Avaya Aura® Conferencing 6.0 Standard Edition
The following is an example of the system.cfg settings:
#Adhoc conference parameters
#AdhocConferenceURIPattern=<sip:AdhocDirect$1@$2>
AdhocConferenceURIPattern=<sip:A$1@$2:5061;transport=tls>
AdhocMinPortsAvailable=20
AdhocDefaultConferenceSize=6
#RAI configuration fields
# the interval in seconds at which an RAI notification is sent
# (default 60s, min 1s, max 300s)
RAINotificationInterval=60
# the upper threshold in percentage of total ports at which an
# "AlmostOutOfResources=TRUE" notification is sent
# (default 90%)
RAIHighThreshold=90
# the lower threshold in percentage of total ports at which an
# "AlmostOutOfResources=FALSE" notification is sent
# (only to clear a previous "AlmostOutOfResources=TRUE" notification)
# (default 75%)
RAILowThreshold=75
# the maximum number of RAI subscribers allowed
# (default 10 subscribers, min 0, max 10)
maxRAISubscribers=10
b. On Conferencing, configure the following values in the file usr/ipcb/config/
conferenceProfiles.cfg. See the following figure for an example of the
conferenceProfiles.cfg file.
Administering Avaya Video Conferencing Solution 6.0.1
Issue 2.1
April 15, 2011 49
Administering Conferencing and Bridges
Example of ConferenceProfiles.cfg
Note:
Note:
The factory settings 1005 and 1006 should be the same on the Communication
Manager system (Priority Factory number=1005, Standard Factory
number=1006).
c. On Conferencing, from sroot go to dcbmaint 116, select System Maintenance main
menu > Administration menu > Conference Scheduler, and set the following
parameters:
●
Automatic Security Codes : 7
●
On-Demand Pct (%): as per customer requirement. (This is a percentage of all ports
used for on-demand and Ad-hoc conferences.)
See the following figure for an example of the Configure Conference Scheduler settings.
50 Administering Avaya Video Conferencing Solution 6.0.1
Issue 2.1
April 15, 2011
Configuring the Avaya Aura® Conferencing 6.0 Standard Edition
Example of Configure Conference Scheduler Settings
d. On Conferencing, configure the file usr/ipcb/config/UriToTelnum.tab for DNIS. This
DNIS entry is used for creating an Ad-hoc conference. 24049 is DNIS for Ad-hoc. The
same DNIS has to be in cbutil as DIRECT (Refer to the cbuilt section).See the following
figure for an example of the UriToTelnum.tab file.
Administering Avaya Video Conferencing Solution 6.0.1
Issue 2.1
April 15, 2011 51
Administering Conferencing and Bridges
Example of UriToTelnum.tab File
7. Schedule conferences on On Conferencing
Configuring Resources On-Demand
To enable FLEX conferences:
a. Connect via ssh to the bridge.
b. At the command prompt, enter featcfg +flex
c. At the command prompt, enter dcbmaint 115
d. Select Administration Menu > Configure Scheduler
e. Use the Page Down key to go to the second page.
f. Set On-Demand Pct (%) as per user requirement (for example, 50).
52 Administering Avaya Video Conferencing Solution 6.0.1
Issue 2.1
April 15, 2011
Configuring the Avaya Aura® Conferencing 6.0 Standard Edition
Scheduling Conferences
There are two methods to schedule a conference on the bridge
●
Method 1
a. Connect via ssh to the bridge.
b. At the command prompt, enter dcbsched 116.
c. Select Schedule Conference.
d. Schedule your conference.
e. When finished, press the Esc key.
●
Method 2
Install the BridgeTalk application, which is a GUI scheduler that enables you to see your
active conferences easily. If you are going to use BridgeTalk, you must first configure a
sign-in on the bridge.
a. Connect via ssh to the On Conferencing.
b. At the command prompt, enter dcbmaint 115.
c. Navigate to Administration Menu > Sign-In Management, and create a sign-in.
d. When finished, press the Esc key.
e. Navigate to View > Conference Scheduler from the toolbar to access the
Conference Scheduler. In order for you to perform any operator tasks (such as record/
playback, conference listen, and accessing lines from Enter or Help Queues), you
must establish an audio path.
f. Navigate to Line > Audio Path from the BridgeTalk toolbar.
g. Enter the number for the Operator phone to which you want to dial out. This phone
must be configured on the bridge in the file /usr/ipcb/config/telnum/ToURI.cfg
similar to the following example:
TelnumPattern
TelnumConversion
comment
40???
<sip:$1<C-LAN_address>:5061;transport=tls>" ACM
In this example, you would dial 2020 from BridgeTalk to establish this Avaya IP phone an
the Operator audio path.
Administering Avaya Video Conferencing Solution 6.0.1
Issue 2.1
April 15, 2011 53
Administering Conferencing and Bridges
Configuring Avaya Aura® Conferencing
You must have administrator permission to edit the configuration and reboot the system for the
changes to take effect.
To configure the Avaya Aura® Conferencing:
1. Navigate to Configuration > Slot Configuration > Configure Video
2. From the Slot number for the card drop-down list box, select the MPC slot.
3. Set the following parameters in the Configure Video dialog box:
●
Video MTU to 1492.
●
Video Maximum Desired Bandwidth to 768.
●
Enable the SIP-INFO check box in Video I-Frame Request Method(s).
4. In the Configure Video Codec List dialog box, set the following parameters for Entry #1:
●
Codec: H.263
●
Picture Size: CIF
●
MPI: 1
5. In the Configure Resource Allocation dialog box, set Video Resource Allocation
(percentage) to 50. When resources are set to 50 percent, and the MPC contains 50 ports,
25 ports are set for video, and 25 ports are set for audio.
Example:
1 MPC = 750 callers
50% video on MPC = 125 (Maximum video allowed per MPC = 250 > 128 bit rate)
Total audio callers can use: 375 - 125 = 250
54 Administering Avaya Video Conferencing Solution 6.0.1
Issue 2.1
April 15, 2011
Configuring Avaya Aura® Conferencing
Configuring Avaya Aura® Conferencing
This section describes how to configure Conferencing.
Checklist
When setting up an Avaya Aura® Conferencing, you will need to know the following information:
●
the IP codec sets you want to use
●
the IP network regions you want use
●
the Priority Factory Number and the Standard Factory Number to use in the
Communication Manager system and the Conferencing.
Pre-requisites
Before configuring an Avaya Aura® Conferencing, keep in mind the following information:
●
For more information on the Avaya Aura® Conferencing, refer to the Avaya Aura®
Conferencing Installation Guide. This document is available on support.avaya.com.
●
Ad-hoc supports six audio callers per conference.
●
Schedule supports 16 video callers per Avaya Aura® Conferencing scheduled conference.
●
Each 6800 bridge can support up to 2000 video ports
●
Each conference can support up to 16 video participant.
●
●
The Avaya Aura® Conferencing audio conferencing server supports video from version 6.0
onwards. For more information on the manual configuration process, see Adding a SIP
Trunk Group for the Conferencing on page 57.
The configuration process is the same Whether you configure a single instance of
Communication Manager or multiple instances of Communication Manager with the Avaya
Aura® Conferencing video solution.
The video capacity for each Convedia MPC varies depending on bit rate, picture size, and
frame rate. See the following table.
Table 1: Video Capacity
●
Total Bit Rate
Picture SIze
(MPI)
Audio Codec
# Ports per
MPC
Resource
Allocation for
Video (%)
768 Kbit/s
CIF:1
G.711
45
91
384 Kbit/s
CIF:2
G.711
90
75
128 Kbit/s
QCIF:4
G.711
250
75
Administering Avaya Video Conferencing Solution 6.0.1
Issue 2.1
April 15, 2011 55
Administering Conferencing and Bridges
Verify Licensing
Maximum Administered Ad-hoc Video Conferencing Ports. The maximum number of
Ad-hoc video conferencing ports allowed is the number of video ports available for Ad-hoc use
on the MCU(s). For example, if you have three MCUs, and each MCU has 16 ports available for
Ad-hoc use, the maximum number of Ad-hoc video conferencing ports allowed is 48.
In this example, the system can have:
●
a maximum of 40 video-enabled Avaya IP Softphones. Currently, 13 video-capable
Avaya IP Softphones are being used.
●
a maximum of 217 administered Ad-hoc video conferencing ports. Currently, 100 Ad-hoc
video conferencing ports are being used.
You must verify that the Communication Manager system is licensed for video endpoints,
Ad-hoc video conferencing ports, and multimedia IP SIP trunking.
To verify licensing, enter display system-parameters customer-options on SAT and
verify the following parameters:
●
Maximum Video Capable IP Softphones : This number is provided by the license file.
Note:
To provide video softphone capability, you must have at least this number of IP
Softphone licenses. MAXIMUM IP REGISTRATIONS BY PRODUCT ID screen
displays the number of IP Softphone licenses you have.
Note:
●
Multimedia IP SIP Trunking : Y
Configuring IP Network Regions
You must place the Conferencing system in a dedicated network region and ensure that all
other network regions have direct connectivity to the Conferencing system’s network region.
To configure the IP network regions, enter change ip-network-region n (where n is the
chosen IP network region) on SAT and set the following parameters:
●
Authoritative Domain : for IP network regions that contain SIP endpoints/MCUs
●
Intra-region IP-IP Direct Audio : Y
●
Inter-region IP-IP Direct Audio : Y
Note:
Shuffling is recommended. However, you can set shuffling to no, and video calls
will work properly.
Note:
On the IP Network Region screen, set the following parameters
●
H.323 SECURITY PROFILES 1 : any-auth
●
codec set : appropriate codec set you defined
56 Administering Avaya Video Conferencing Solution 6.0.1
Issue 2.1
April 15, 2011
Configuring Avaya Aura® Conferencing
●
Units : NoLimit for each destination IP network region. You can set unlimited bandwidth or
use the bandwidth management option by restricting the bandwidth.
Repeat this procedure for each IP network region that will be used for video in this system.
Adding an Entry in the IP Node Names for the Conferencing System
Enter change node-names ip on SAT and set the following parameters:
●
Name : a name for the Conferencing system
●
IP Address : the IP address of the Conferencing Application server
Adding a Signaling Group for the Conferencing System
To add a signaling group for the Conferencing system, enter add signaling-group n (where
n is the chosen signaling group) on SAT and set the following parameters:
●
Group Type : SIP
●
Transport Method : tls /tcp
●
IP Video : Y
●
Priority Video : as appropriate.
●
Near-end Node Name : enter PROCR or the name of the C-LAN board.
●
Near-end Listen Port : 5061 or 5060
●
Far-end Node Name : name you entered for the Conferencing.
●
Far-end Listen Port : 5061 or 5060.
●
Far-end Network Region : network region you specified for the Conferencing.
●
Session Establishment Timer (min) : 120
●
DTMP over IP : rtp-payload
●
Enable Layer 3 Test : N
●
Direct IP-IP Audio Connected : Y
Adding a SIP Trunk Group for the Conferencing
Enter add trunk-group n (where n is the chosen trunk group) on SAT and set the following
parameters:
●
Group Type : SIP
●
Group Name : name of the Conferencing
●
COR : appropriate entry
●
Direction : two-way.
Administering Avaya Video Conferencing Solution 6.0.1
Issue 2.1
April 15, 2011 57
Administering Conferencing and Bridges
●
Outgoing Display :Y to display caller ID (from the Station screen)
●
Service Type : tie
●
Signaling Group : signaling group you created for the Conferencing.
●
Number of Members : appropriate entry
58 Administering Avaya Video Conferencing Solution 6.0.1
Issue 2.1
April 15, 2011
Administering Avaya Aura® Communication Manager for
video endpoints
This section of the guide explains the procedure to administer Communication Manager for all
video endpoints.
Communication Manager Global Administration
1. On SAT, enter change system-parameters customer-options, and set the following
parameters:
Maximum Video Capable H.323 Stations : 1x the number of single point Polycom VSX
systems.
Maximum Video Capable IP Softphones : equal to the number of video softphones.
Maximum Administered Ad-hoc Video Conferencing Ports : based on the number of
RMX systems and the maximum port count capability for the RMX systems.
2. On SAT, enter change system-parameters customer-options and set the
following parameters:
Enhanced Conferencing : Y
IP Trunks : Y
IP Stations : Y
ISDN-BRI Trunks : Y
ISDN-PRI : Y
Multimedia Call Handling (Basic) : N
Multimedia Call Handling (Enhanced) : N
3. On SAT, enter change ip-network-region and set the following parameters:
Intra-region IP-IP Direct Audio : Y
Inter-region IP-IP Direct Audio : Y
Note:
Note:
For network regions containing third-party gatekeepers, these values must be set
to No for direct audio because shuffling may not be supported by all third-party
endpoints.
Administering Avaya Video Conferencing Solution 6.0.1
Issue 2.1
April 15, 2011
59
Note:
Note:
The actual settings in this page and find out the customer’s reasons/requirements
for these options to be disabled. Video endpoints do not need to be shuffled to
resume video. Third-party endpoints will support basic call setup only.
4. On the IP Network Region screen, ensure all regions used by video endpoints are
configured correctly.
H.323 SECURITY PROFILES must contain any-auth for Polycom VSX/HDX series devices
to authenticate. challenge is used by Avaya IP Softphone & Avaya one-X® Communicator.
pin-eke is used by Polycom VSX/HDX series devices. any-auth encompasses both
challenge and pin-eke.
5. Configure the IP Codec Set screen.
Review all codec-sets used across the enterprise including the codec-sets used by media
processors, trunks, and stations as well as inter-region codec sets. Has the enterprise
selected a single version of G.711 across all Communication Manager servers globally?
Note:
Note:
Simplify the codec-set administration by selecting one variant of G.711 across the
entire network of Communication Manager servers. A single variant can be used
globally. Otherwise expect codec mismatch errors and call drops between
Communication Manager servers. Multimedia signaling uses H.245, which is
more sensitive to codec administration than audio-only repeat-fast start signaling.
6. Ensure the intra-region audio administration correct on the IP Codec Set screen.
Review all IP codec-sets used across the enterprise including the IP codec-sets used by
media processors, IP trunks, and IP stations. Wide-band codecs (for example, SIREN
series, G.722.1 series, and G.722-64k) should appear first and are supported for shuffled
Polycom VSX calls only across a single Communication Manager. G.711 should appear
next. Then follow with G.729/G.729A codec, etc.
7. Ensure the inter-region audio administration is correct on the IP Codec Set screen.
Review all codec-sets used across the enterprise including the codec-sets used by media
processors, IP trunks, and IP stations. If there are no bandwidth issues, re-use the codec
set also in use for intra-region. If there are bandwidth issues, specify a low bandwidth codec
first followed by one G.711 codec. If there are severe bandwidth issues, customers can
choose to leave out G.711 and also ensure video is disabled.
8. Ensure the audio administration for Polycom VSXs correct on the IP Codec Set screen.
Review all codec-sets used across the enterprise including the codec-sets used by media
processors, trunks, and stations. If codec-sets used for stations include G.729, then a new
network-region and codec must be defined for use by Polycom VSXs. VSX stations do not
support G.729 but do support G.729A.
Note:
Note:
Media encryption is not supported by VSX stations.
9. Ensure the video administration correct on the IP Codec Set screen.
60 Administering Avaya Video Conferencing Solution 6.0.1
Issue 2.1
April 15, 2011
Administering Avaya Aura® Communication Manager for video endpoints
Review page 2 of all the codec-sets to be used by video stations and video trunks. Ensure
Allow Direct-IP Multimedia is set to yes. Also ensure Maximum Call Rate for Direct-IP
Multimedia set appropriately considering the codec-set is used for inter-region where there are
bandwidth issues.?
10. Ensure Inter Region Video Bandwidth Management on the IP Network Region screen is
used across WAN links. Ensure appropriate video total bandwidth limits on the IP Network
Region screen are set correctly.
Note:
Note:
Expect low-quality video if the entry is not appropriate. Avaya recommends
replacement of CAC via trunk-member counting with cumulative bandwidth
management. Note that unlike audio, Avaya Communication Manger’s bandwidth
management feature does not take into account the variable video headers.
Allow 20% overheads. Best practice recommends video applications should
consume no more than 35% of the total WAN bandwidth.
11. On SAT, enter change station n (where n is the station number) and set the following
parameters:
●
IP Video : Y
●
IP Video Softphone : Y
●
Direct IP-IP Audio Connections : Y
12. On SAT, enter change signaling group n (where n is the group number)
administration is appropriate for video support. Review the signaling groups used between
Communication Managers, to Polycom MGCs/RMXs, and to SE200s. Set the following
parameters:
●
IP Video : Y
●
Direct IP-IP Audio Connections : Y
●
Calls Share IP Signaling Connection : No, though this setting may be Yes between
Communication Manager servers.
13. Ensure the network-region value in the Signaling Group screen corresponds to an IP
Codec Set that supports video.
14. Also ensure the DSCP tagging provisioning is correct.
Ensure that DSCP parameters are provisioned for the network region to which endpoints
are registered. For Communication Manager Release 4.0: Polycom VSX 8.5.3 onwards and
Polycom MGC 8.0.1 onwards will automatically obtain DSCP parameters as configured in
the network region. All other endpoints should have DSCP parameters set manually to the
same values to which Communication Manager is set.
15. Ensure the network region of the Avaya IP Softphone is the same as the IP set. On SAT,
enter change ip-network-map and set the Avaya IP Softphone to be mapped to the
same network region as the IP set.
Administering Avaya Video Conferencing Solution 6.0.1
Issue 2.1
April 15, 2011
61
Note:
Note:
For shared control when using video, the only option supported is via the server.
Do not try using the via the phone (CTI) option. This is not supported, so expect
undefined results. When using shared control with video, the network region used
for Avaya IP Softphone must match the network region used by the IP set.
16. Ensure that Ad-hoc Video Conferencing is set to y for each class of user with Ad-hoc
Video Conferencing privileges. On SAT, enter change station n (where n is the station
number) and set COS for the appropriate users.
62 Administering Avaya Video Conferencing Solution 6.0.1
Issue 2.1
April 15, 2011
Administering and setting up video SIP endpoints
Administering and setting up video SIP endpoints
Global Administration
1. On SAT, enter display system-parameters customer-options and verify the
following parameters:
Note:
●
ISDN PRI :Y
●
IP Trunks : Y
Note:
You must log off and log back in to effect changes to System Parameters
Customer-Options screen.
2. On the System Parameters Customer-Options screen, navigate to and ensure the
Maximum Administered SIP Trunks field has a value that ranges between 0 and 800.
3. On the ip node names screen, Ensure all fields have values that are appropriate for your
network.
4. On SAT, enter change ip-network-map and enter the IP address and the host name
for the administered server on your network in the corresponding fields.
On the ip-network region screen to assign an IP network region for the SIP trunk. To administer
this correctly on theip-network region screen, the Network Region field on the ip-interface proc
screen needs to be the same as the Authoritative Domain below.
●
Authoritative Domain : enter the SIP domain name for which this network region
applies.
●
Intra-region IP-IP Direct Audio : Y
●
Inter-region IP-IP Direct Audio : Y
5. On the Media Gateway screen, ensure the value for Network Region is the same as the
Network Region for the SIP authoritative domain.
6. On the IP Codec Set screen, ensure you have the right media compression for your SIP
endpoint types and other constraints.
Administering call routing
Before you can make SIP calls from endpoints that are connected to Communication Manager,
administer call routing properly in Communication Manager.
1. On the Feature Access Code screen set either the ARS Access code fields, or the AAR
Access code fields or both. To enable these fields, make sure that on page 5 of the System
Parameters Customer Options screen, Private Networking is set to Y.
Administering Avaya Video Conferencing Solution 6.0.1
Issue 2.1
April 15, 2011
63
2. On the ARS Digit Analysis Table screen, ensure that dialed strings of digits are interpreted
correctly and the resulting calls are routed appropriately using the SIP trunks.
Note:
Note:
You may not access a SIP trunk with a dialed TAC. If you use Avaya Distributed
Office, you must administer this screen to use AAR. Avaya Distributed Office
does not use ARS.
3. On the Dial Plan Analysis screen, translating the digits dialed by users, the summary of your
dial plan must be available for reference.
4. On the Route Pattern screen, ensure the Secure SIP field is set to the default value of N for
routing through a public network. You can set secure sip to Y only if you have a secure
connection between the public SIP network and the server you are routing to. Choose a
route pattern. Fill in the correct trunk, FRL, and number of digits to insert and delete. This
task can be performed using either AAR or ARS. The most frequent case would be for ARS.
5. On SAT, enter change numbering - public/unknown numbering table and assign
public unknown numbering data. Make an entry here for the trunk that you use in your route
pattern.
6. On SAT, enter change location, enter the appropriate Proxy Selection Route Pattern in
the field corresponding to each location employing a SIP proxy server.
Administering SIP signaling and trunks
Use these steps to set up SIP trunks on Communication Manager.
1. On SAT, enter change signaling group n (where n is the group number)and set the
following parameters:
●
Group Type : SIP. The system displays a screen for SIP groups.
●
Transport Method : TLS
●
Near-end Node Name : name of the IP interface at the near (local) end of the SIP
trunk signaling group. Its value would be PROCR or C-LAN.
●
Far-end Node Name , enter the name of the node that you administered as the SIP
proxy server in Step 5 of Administering call routing.
●
Near-End Listen Port : enter the recommended TLS port value of 5061.
●
Far-end Listen Port : enter the recommended TLS port value of 5061.
●
Far-end Network Region, if you want the SIP proxy server that you administered in
Step 5 of Administering call routing to use the codec set and/or parameters specified
for an IP network region to be different from that of the LAN IP interface, then enter the
region of the SIP proxy.
●
For Far-end Domain, enter the IP address that represents your SIP Domain. For
example, to route SIP calls within your enterprise, enter the domain assigned to your
64 Administering Avaya Video Conferencing Solution 6.0.1
Issue 2.1
April 15, 2011
Administering and setting up video SIP endpoints
proxy edge server. For external SIP calling, the domain name could be that of your
SIP service provider.
●
DTMF over IP : rtp-payload.
●
SIP Session Establishment Timer : Avaya recommends 3 minutes.
●
Enable Layer 3 Test : optional. The default is n. The value n uses the ping test and
does not use the OPTIONS test. Enter Y to use the OPTIONS test instead of a ping.
2. On SAT, enter change system paramters features and set the following parameters:
●
DID/Tie/ISDN/SIP Intercept Treatment : attd.
●
Trunk-to-Trunk Transfer : restricted. This is to avert toll fraud.
3. On SAT, enter change trunk group and set the following parameters:
Note:
Note:
●
Group Type : SIP. The screen displays fields that pertain to for SIP groups. Entering
SIP also affects the fields that are presented on other administrative screens
discussed later.
●
call detail recording : Y/N depending on requirement in the CDR Reports field.
Note:
Very large numbers of CDR reports may be generated by SIP calls.
●
Signaling Group : number of the SIP signaling groups that you previously
administered.
●
Number of Members : a value of 0 through 255 for the number of SIP trunks that
belongs to this group. Group Member Assignments are automatically completed and
populated on the Trunk Group page and on any subsequent pages that are necessary,
based on the values that are entered on the Trunk Group screen. Group members
cannot be administered individually. All members of each administered group share
the same characteristics.
Note:
The total number of all SIP trunks that are specified for all groups must be less
than or equal to the value in the Maximum Administered SIP Trunks field on the
System-Parameters Customer Options screen.
Repeat the preceding steps for each SIP trunk group to be assigned, up to the server’s
trunk-number limit.
●
Group Type : SIP. Administer the other fields on this screen in accordance with the
system requirements.
●
Numbering Format : based on the users requirement, Public, Private, unk-pvt, or
Unknown. Administer the other fields on this screen as appropriate for your system.
Administering Avaya Video Conferencing Solution 6.0.1
Issue 2.1
April 15, 2011
65
Administering SIP stations
This procedure explains the procedure to set up stations on Communication Manager.
1. On SAT, enter add station n and set the following parameters:
●
Type : 46n / 96n, where n is the number of your station type. For example, if you use 46n
as the Type, the system generates minor alarms for these stations. You may ignore these
alarms. However, if the Type is set to any of the DCP phone types, such as 6400 or 8400,
undesirable interactions with the TTI and other features may occur. Avaya recommends
only 46n station type, such has 4620SIP or 4620SIPCC, even if you have a 96n phone.
2. Enter change off pbx-telephone-set and set the following parameters:
●
Configuration Set Description to SIP phone.
3. Enter change off-pbx station mapping and add station mapping data for SIP
endpoints.
SIP Limitations
●
In a mixed H.323/SIP environment, ensure all H.323 bridges accessible to SIP video users
are not MGCs. If they are, SIP video users will not receive video when dialing into an
H.323 MGC. Upgrading to the Polycom RMX bridge will enable video for SIP users.
●
Ensure all route patterns containing SIP video trunks do not rely on the multimedia bearer
capability being set. Multimedia bearer capability is not set for SIP video calls. As a result,
SIP video calls will route as audio only.
●
Ensure the signaling groups at either end of the SIP trunk have priority video enabled if
desired priority bandwidth is desired. Separate sub-domain names may be used to
separate priority and normal users. SIP has no means to signal a priority video call over a
trunk. A system that receives a call on a priority trunk will always be allocated bandwidth
from the priority pool.
●
Ensure all non-Avaya SIP video enpoints have DevConnect certification. Communication
Manager places specific requirements on SIP endpoints to ensure seamless inter-working
between SIP/H.323 with full access to enterprise features. Avaya recommends that users
of uncertified SIP video equipment disable video on the device when calling into the Avaya
video telephony solution.
●
SRTP media encryption is not supported simultaneously with SIP video. Video is disabled
for any calls that require audio encryption. If video is required without security, then ensure
that users are assigned a codec-set without SRTP media encryption using
ip-network-region segmentation
66 Administering Avaya Video Conferencing Solution 6.0.1
Issue 2.1
April 15, 2011
Administering and setting up video SIP endpoints
Administering Avaya 1000 series video endpoints using SAT
This section describes the procedure to administer the Avaya 1000 series video endpoints
using SAT.
1. On the Communication Manager SAT screen, enter change system parameters
customer-options and set the following settings:
●
Multimedia IP SIP Trunking : Y
2. Enter change signaling-group n and set parameters as mentioned below:
●
IP Video : Y
●
Direct IP-IP Audio connections: Y
●
Initial IP-IP Direct Media : Y
3. Note the values of the Near-end Node Name and Far-end Network Region.
4. If the Near-end Node Name is set to PROCR, the listed value is used. If the Near-end
Node Name is set to C-LAN, enter list ip-interface n (where n is the slot location
for C-Lan circuit pack) to find the correct C-LAN and make a note of the slot value. These
values are used to determine the IP Codec Set.
5. On the Communication Manager SAT screen, enter display ip-interface n and note
the value of the Network Region.
6. Enter change-ip-network-region and move to the Inter Network Region Connection
Management page. Ensure the dst rgn number aligns with the Far-end Network Region .
Make note of the codec set number.
7. Enter change ip-codec-set n, where n is the codec set number used by the SIP
signalling group. Add or change the appropriate audio codecs as required. Set the following
Multimedia parameters:
Note:
●
Allow Direct-IP Multimedia : Y
●
Maximum Call Rate for Direct-IP Multimedia : 1024 Kbits
Note:
These values are examples only. 1024 allows for 720p High Definition. Higher
resolutions require more bandwidth.
●
Note:
Maximum Call Rate for Priority Direct-IP Multimedia : 2048 Kbits.
Note:
Ensure the list of audio codecs on the first page includes at least one of the audio
codecs supported by the video endpoint, such as G.722 or G.711.
Administering Avaya Video Conferencing Solution 6.0.1
Issue 2.1
April 15, 2011
67
Administering Avaya 1000 series video endpoints using System
Manager
This section describes the procedure to administer the Avaya 1000 series video endpoints
using System Manager.
1. To enable Multimedia IP SIP Trunking feature on Communication Manager System
Management Interface, log in to the Communication Manager System Management
Interface. Click Licensing > Administration and then navigate to the Feature
Administration page. Here, ensure the Multimedia IP SIP Trunking feature is set to YES.
2. To enable Multimedia IP SIP Trunking feature on the System Manager interface, click
Elements > Feature Management > Parameters > System Parameters - Customer
Options. Click the arrow icon next to the Select Device(s) from Communication Manager
List. From this list, select the appropriate Communication Manager, and then click Show
List.
3. On the same page, select the radio button in the first column and click View. Now, click
Next Page and ensure the feature Multimedia IP SIP Trunking is set to Y.
4. To enable video for the SIP signaling group, on System Manager, click Elements >
Feature Management > Network - Signaling Groups. On the Signaling Groups page,
click the arrow icon next to the Select Device(s) from Communication Manager List. From
the Communication Manager list, select the appropriate Communication Manager, and click
Show List. Select the appropriate Signaling Group Number and click edit to set
parameters as mentioned below:
●
IP Video : Y
●
Direct IP-IP Audio connections : Y
●
Initial IP-IP Direct Media : Y
5. To identify the ip-codec-set, note the values of the Near-end Node Name and Far-end
Network Region. If the Near-end Node Name is set to PROCR, the listed value is used. If
the Near-end Node Name is set to C-LAN, enter list ip-interface-n (where n is the
slot location for C-Lan circuit pack) to find the correct C-LAN and make a note of the slot
value. These values are used to determine the IP Codec Set.
68 Administering Avaya Video Conferencing Solution 6.0.1
Issue 2.1
April 15, 2011
Administering and setting up video SIP endpoints
Administering Avaya 1000 series and Avaya one-X®
Communicator video endpoints and users using System Manager
This section describes how to use System Manager to create an endpoint template and how to
add users using these templates.
Creating a template for Avaya 1000 series and one-X® Communicator video
endpoints and users using System Manager
1. To create a custom template for any SIP endpoint on System Manager, click Elements >
Templates > Endpoint, select Communication Manager 6.0 on the Endpoint Templates
page and click New. Set the following parameters:
●
Set Type : 9630SIP, an alias for the 1000 series endpoints
●
Template Name : Avaya recommends naming the template according to its AV10x0
type and Communication Manager release, such as AV1010_CM_6_0.
●
COR : 1
●
COS : 1 or an appropriate cos group for priority video calling and bit-rate management
●
SIP trunk : AAR or specific SIP trunk used between System Manager and
Communication Manager
2. Select the IP video check box.
3. To enable the Call Appearance feature, click Button Assignment, and set the main
buttons for each endpoint to call appr as follows:
Note:
●
Avaya 1010 : 1
●
Avaya 1020 : 1
●
Avaya 1030 : 1
●
Avaya 1040 : 3
●
Avaya one-X® Communicator : 3
●
Avaya 1050 : 7
Note:
The call appearances must be set to the maximum limit permitted for each
endpoint.
4. Select the IP SoftPhone check box for Avaya one-X® Communicator. When you select this
check box, the title of the check box changes to IP Video SoftPhone.
5. Click Commit, and repeat this step for each endpoint.
Administering Avaya Video Conferencing Solution 6.0.1
Issue 2.1
April 15, 2011
69
Adding users to Avaya 1000 series and one-X® Communicator video
endpoints and users using System Manager
6. To create a New User Profile on System Manager, on the interface, click Users > Manage
Users and then on New to open the New User Profile page. Fill in the following fields:
●
Last Name
●
First Name
●
Login Name : Example: ext@sip domain
●
Authentication Type : Basic
●
SMGR Login Password
●
Shared Communication Profile Password : Corresponds to the authorization
password for the series 1000 video endpoints and the password for one-X®
Communicator.
7. To assign an address to the user, on the New User Profile page, click the Communication
Profile drop-down arrow and under Communication Address click New. Set the following
parameters:
●
Type : Avaya SIP
●
Fully Qualified Address : ext@sip domain, which must match the Login Name in
step 1
8. To enable Session Manager Profile, Select the check box corresponding to Session
Manager profile and set the following parameters:
●
Primary Session Manager : Appropriate option
●
Secondary Session Manager : None
●
Origination Application Sequence : Appropriate Communication Manager Server
●
Terminating Application Sequence : Appropriate Communication Manager Server
●
Survivability Server : None
●
Home Location : Appropriate option
9. To create an Endpoint Profile, Communication Profile > New User Profile, check the box
corresponding to Endpoint Profile. Select the appropriate Communication Manager
system and set the following parameters:
●
Extension : same as ext from step 2
●
Template : Avaya recommends naming the template according to its AV10x0 type and
Communication Manager release, such as AV1010_CM_6_0.
●
Port : IP
10. Click Commit.
70 Administering Avaya Video Conferencing Solution 6.0.1
Issue 2.1
April 15, 2011
Administering and setting up video SIP endpoints
Avaya A175 Desktop Video Device
This section of the guide explains how to set up and administer the Avaya A175.
Pre-requisites
1. Know your telephone number.
2. Know the password for your telephone number.
3. Be connected to a network.
4. Know your Facebook login and password if you want to access Facebook from the Avaya
A175 Desktop Video Device.
5. Know your Microsoft Exchange login and password on your company's email server if you
want to access your Exchange account from the Avaya A175 Desktop Video Device.
6. Know your Gmail login and password if you want to access your Gmail account from the
Avaya A175 Desktop Video Device.
Administration
1. The Welcome Wizard opens automatically the first time the Avaya A175 Desktop Video
Device is turned on. If it does not, perform the following steps:
●
Click the Applications fan title to display the Applications fan menu.
●
On the Applications fan menu, click Welcome Wizard.
2. Click the language you want to use, and then click the Next.
3. In the Welcome panel, click Next.
4. In the Enter Password box, enter the password you want to use to unlock the Avaya A175
Desktop Video Device. (After a specified interval of inactivity, the Avaya A175 Desktop
Video Device automatically becomes "locked") The password must meet the requirements
specified by your system administrator. The password is case-sensitive and cannot contain
spaces.
Note:
Note:
Your unlock password should comply with your company's security policy.
5. In the Confirm Password box, re-enter your password.
Administering Avaya Video Conferencing Solution 6.0.1
Issue 2.1
April 15, 2011
71
6. In the Enter Security Question box, enter the security question that you want the Avaya
A175 Desktop Video Device to ask you if you forget your unlock password.
7. In the Enter Answer box, enter the answer for your security question, and then click Next.
8. In the Audio panel, adjust the slider to set the ringer volume. Dragging the slider to the left
decreases the ringer volume. Dragging the slider to the right increases the ringer volume.
When finished adjusting the ringer volume, click Next.
9. In the Brightness panel, adjust the slider to set the brightness of the display. Dragging the
slider to the left decreases the brightness. Dragging the slider to the right increases the
brightness. When finished adjusting the brightness, click Next.
10. In the Time + Date panel, click the Use 24 hr Time Format check box if you want to use 24
hour time format.
11. In the Select a date format area, select the date format you want use, and then click Next.
12. If you want to configure the Avaya A175 Desktop Video Device to access your Facebook
account, do the following:
●
Click Add Account.
●
In the Add an account panel, click Facebook.
●
In the Email box, enter the email address associated with your Facebook account.
●
In the Password box, enter the password for this account.
●
Click Login.
By default, the Avaya A175 Desktop Video Device will automatically sync with your Facebook
account. Your Facebook "friends" will appear as contacts in the Avaya A175 Desktop Video
Device. These contacts will be displayed when you view all contacts and Facebook contacts.
Each Facebook contact will also display that contact fs Facebook picture. Also, your posts are
displayed in the History fan. The number of posts is displayed at the top of the screen next to
the Facebook icon.
13. If you want to configure the Avaya A175 Desktop Video Device to access your Microsoft
Exchange account, do the following:
●
Click Add Account.
●
In the Add an Account panel, click Exchange.
●
In the Email address box, enter your Exchange email address (for
example,[email protected].
●
In the Password box, enter the password for this account. Click Next.
●
In the Server settings panel, make sure the correct information is displayed in the
Server box.
●
Ensure the correct setting is displayed for the Use secure connection (SSL) check
box.
●
Ensure the correct setting is displayed for the Accept all SSL certificates check box.
Click Next.
72 Administering Avaya Video Conferencing Solution 6.0.1
Issue 2.1
April 15, 2011
Administering and setting up video SIP endpoints
●
In the Account options panel, verify your settings, and Click Next.
●
If you want to provide a name for this account, enter the name in the Give this account
a name box.
●
In the Your name box, specify how you want your name to be displayed on outgoing
messages from this email account, and then click Next.
By default, the Avaya A175 Desktop Video Device will automatically sync with your Microsoft
Exchange account. Your Exchange contacts will appear as contacts in the Avaya A175 Desktop
Video Device. These contacts will be displayed when you view all contacts and Exchange
contacts.
14. If you want to configure the Avaya A175 Desktop Video Device to access your Gmail
account, do the following:
●
Click Add Account.
●
In the Add an account panel, click Gmail.
●
In the Email address box, enter your Gmail address (for example, [email protected].
●
In the Password box, enter the password for this account.
●
If you want this email account to be your default account (if you configured an
Exchange account), enable the Send email from this account by default check box.
Click Next.
●
In the Server box of the Server settings panel, enter m.google.com.
●
Ensure the Use secure connection (SSL) check box is enabled.
●
Ensure the Accept all SSL certificates check box is enabled. Click Next.
●
In the Account options panel, select the appropriate settings for this account. Click
Next.
●
If you want to provide a name for this account, enter the name in the Give this account
a name box.
●
In the Your name box, specify how you want your name to be displayed on outgoing
messages from this email account, and then click Done.
By default, the Avaya A175 Desktop Video Device will automatically sync with your Gmail
account. Your Gmail contacts will appear as contacts in the Avaya A175 Desktop Video Device.
These contacts will be displayed when you view all contacts and Gmail contacts.
15. When finished adding accounts, click Next in the Add Account panel.
16. In the Enter username box on the Enterprise Login panel, enter your telephone number.
17. In the Password box, enter the password for your telephone number.
18. If you are already logged into Session Manager, the Log out button is displayed. Click Next.
19. If you are not already logged into Session Manager, click Login to log into the server.
20. Click Finish.
Administering Avaya Video Conferencing Solution 6.0.1
Issue 2.1
April 15, 2011
73
Administering and setting up video H.323 endpoints
This section describes the procedure for setting up and administration of H.323 endpoints.
Configuring a Direct Routing Gatekeeper
This section describes how to configure a direct routing gatekeepers such as SE200,
PathNavigator and Polycom CMA.
Prerequisites
Before configuring a direct routing gatekeeper, keep in mind the following information/
recommendations:
●
Communication Manager to direct gatekeeper calls should use an “outbound” route
pattern, ISDN tie trunk group, and H.323 LRQ signaling group.
●
Direct gatekeeper to Communication Manager calls should use a second “incoming” ISDN
tie trunk group and either a single “incoming” H.323 signaling group with far-end
unspecified or many “incoming-per-ept” H.323 signaling groups.
●
Dial plan analysis, UDP, and AAR analysis should route the direct gatekeeper extension
range to the “outbound” trunk group.
●
Direct gatekeeper inter-gatekeeper LRQ administration for extensions managed by
Communication Manager.
Checklist
When setting up these systems, you will need to know the following information:
●
the IP codec sets you want to use
●
the IP network regions you want use
●
the IP address of the IP board for the gatekeeper
Adding an Entry in the IP Node Names for the Gatekeeper
To add an entry in the IP Node Names screen for the gatekeeper enter change node-names
ip and set the following parameters:
●
Name : enter a name for the system.
●
IP Address : enter the IP address of the IP board for the system.
74 Administering Avaya Video Conferencing Solution 6.0.1
Issue 2.1
April 15, 2011
Administering and setting up video H.323 endpoints
On page 2 of the screen, set
●
Allow Direct-IP Multimedia : Y
●
Maximum Call Rate for Direct-IP Multimedia : This setting is the combined audio
and video transmit rate or receive rate for non-priority (normal) video calls. You can
use this setting to limit the amount of bandwidth used for normal video calls. For
example, if you select 384 Kbits, a maximum of 384 Kbits will be used to transmit and
to receive audio/video.
●
Maximum Call Rate for Priority Direct-IP Multimedia : This setting is the combined
audio and video transmit rate or receive rate for priority video calls. You can use this
setting to limit the amount of bandwidth used for priority video calls. For example, if
you select 384 Kbits, a maximum of 384 Kbits will be used to transmit and to receive
audio/video.
To put the gatekeeper in its own network region, enter change ip-network-region n
(where n is the region number) and set the following parameters:
●
Intra-region IP-IP Direct Audio : N
●
Inter-region IP-IP Direct Audio : N
●
Security Procedures 1 : any-auth
●
Video Norm : the amount of bandwidth that you want to allocate for the normal video
pool to each IP network region.
●
Video Prio : the amount of bandwidth that you want to allocate for the priority video
pool to each IP network region.
●
Video Shr : Specify whether the normal video pool can be shared for each link
between IP network regions.
Adding an Outbound Signaling Group for the Gatekeeper
To add an outbound signaling group for the system, enter add signaling-group n (where n
is the chosen signaling group) and set the following parameters:
●
Group Type : H.323
●
IP Video : Y
●
Priority Video: Y, if you want all incoming calls to receive priority video transmissions.
●
Near-end Listen Port : 1719.
●
LRQ Required : N
●
RRQ Required : N
●
Far-end Node Name : the name you entered for the system.
●
Far-end Listen Port : 1719
Administering Avaya Video Conferencing Solution 6.0.1
Issue 2.1
April 15, 2011
75
●
Far-end Network Region : the appropriate IP network region.
●
Direct IP-IP Audio Connections : Y
●
IP Audio Hairpinning : N
Adding an Outbound Trunk Group for the Gatekeeper
To add an outbound trunk group for the system, enter add trunk-group n (where n is the
chosen trunk group) and set the following parameters:
●
Group Type : ISDN
●
Carrier Medium : IP
On page 5 of the Trunk Group screen add members to the trunk group.
Modifying the Outbound Signaling Group
To modify the outbound signaling group for the system, enter change signaling-group n
(where n is the signaling group you added) and set the following parameters:
●
Trunk Group for Channel Selection : the trunk group you just added.
Creating a Route Pattern for the Gatekeeper
To create a route pattern that points to the trunk group, enter change route-pattern n
(where n is the route pattern you want to use) and set the following parameters
●
Grp No : enter the number of the trunk group you created for the system.
Adding an Inbound Signaling Group for the Gatekeeper
To add an inbound signaling group for the system, enter add signaling-group n (where n is
the chosen signaling group) and set the following parameters:
●
Group Type : H.323
●
IP Video : Y
●
Priority Video : Y, if you want all incoming calls to receive priority video transmissions.
●
Near-end Listen Port : 1720
●
LRQ Required : N
76 Administering Avaya Video Conferencing Solution 6.0.1
Issue 2.1
April 15, 2011
Administering and setting up video H.323 endpoints
●
RRQ Required : N
●
Far-end Network Region : the appropriate IP network region
●
Direct IP-IP Audio Connections : Y
●
IP Audio Hairpinning : N
Adding an Inbound Trunk Group for the Gatekeeper
To add an inbound trunk group for the system, enter add trunk-group n (where n is the
chosen trunk group) and set the following parameters:
Group Type : ISDN
Carrier Medium : IP.
Go to page 5 of the Trunk Group screen and add members to the trunk group.
Modifying the Inbound Signaling Group
To modify the signaling group for the system, enter change signaling-group n (where n is
the signaling group you added in Procedure 6) and set the following parameters:
Trunk Group for Channel Selection : the trunk group added above
Adding an H.323 Video Signaling Group
Perform the following steps to add an H.323 video signaling group per endpoint managed by the
direct gatekeeper:
Enter add signaling-group n (where n is the chosen signaling group) and set the
following parameters:
Group Type : H.323.
LRQ Required : Y
RRQ Required : N
For endpoints that do not support third-party pause, place the signaling group in an IP network
region with direct-ip inter-region : disabled.
Modifying the Inbound Trunk Group
Modify the inbound trunk group to include one trunk member per endpoint managed by the
direct gatekeeper.
Administering Avaya Video Conferencing Solution 6.0.1
Issue 2.1
April 15, 2011
77
Example of Gatekeeper Sig Group
display signaling-group 51
SIGNALING Group Number
51
Group Type
h.323
Remote Office
n
Max number of NCA TSC
0
SBS
n
Max number of CA TSC:
0
IP Video
y
Priority Video
y
Trunk Group for NCA TSC
Trunk Group for Channel Selection
51
TSC Supplementary Service Protocol
a
Network Call Transfer
n
T303 Timer(sec)
10
H.245 DTMF Signal Tone Duration(msec)
Near-end Node Name
procr
Far-end Node Name
CMA4000
Near-end Listen Port
1719
Far-end Listen Port
1719
Far-end Network Region
2
LRQ Required
y
Calls Share IP Signaling Connection
n
RRQ Required
n
Media Encryption
n
Bypass If IP Threshold Exceeded
n
H.235 Annex H Required
n
78 Administering Avaya Video Conferencing Solution 6.0.1
Issue 2.1
April 15, 2011
Administering and setting up video H.323 endpoints
DTMF over IP
out-of-band
Direct IP-IP Audio Connections
y
Link Loss Delay Timer(sec)
90
IP Audio Hairpinning
n
Enable Layer 3 Test
n
Interworking Message
PROGress
H.323 Station Outgoing Direct Media
n
DCP/Analog Bearer Capability
3.1kHz
Setp
Configuring Video Trunks between two Communication Manager
Systems
This section describes how to configure video trunks between two Communication Manager
systems.
Checklist
When setting up these video trunks, you will need to know the following information:
●
the IP address of the C-LAN or PC-LAN of the other Communication Manager system
●
the IP network regions you want use
Adding an Entry in the IP Node Names for the Video Trunk
To add an entry in the IP Node Names screen for the video trunk, enter change node-names
ip and set the following parameters:
Name : enter a name for the video trunk.
Corresponding IP Address : enter the IP address of the C-LAN or PC-LAN of the other
Communication Manager system.
Administering Avaya Video Conferencing Solution 6.0.1
Issue 2.1
April 15, 2011
79
Adding a Signaling Group for the Video Trunk
To add a signaling group for the video trunk, enter add signaling-group n (where n is the
chosen signaling group) and set the following parameters:
●
Group Type : H.323
●
IP Video : Y
●
Near-end Listen Port
●
LRQ Required : N
●
Far-end Node Name
●
Far-end Listen Port
●
Far-end Network Region : If you set the maximum bandwidth for video calls in Procedure
3, assign that IP network region calls Share IP Signaling Connection to Y
Note:
You must set this parameter to Y.
Note:
●
Set Direct IP-IP Audio Connections : Y
●
Set IP Audio Hairpinning : Y
Adding a Trunk Group
To add a trunk group, enter add trunk-group n (where n is the chosen trunk group) and set
the following parameters:
●
Group Type : ISDN
●
Carrier Medium : H.323.
Go to page 5 of the Trunk Group screen and add members to the trunk group.
Modifying the Signaling Group
To modify the signaling group video trunk, enter change signaling-group n (where n is
the signaling group you added) and set the following parameters:
●
Trunk Group for Channel Selection : the trunk group you just added.
80 Administering Avaya Video Conferencing Solution 6.0.1
Issue 2.1
April 15, 2011
Administering and setting up video H.323 endpoints
Creating a Route Pattern for the Video Trunk
To create a route pattern that points to the trunk group, enter change route-pattern n
(where n is the route pattern you want to use) and set the following parameters:
●
Grp No : enter the number of the trunk group you created.
Avaya one-X® Communicator
Avaya one-X® Portal integration and video calls feature are installed by default. However, these
are not enabled. You can enable these features by modifying the settings after installation. See
Avaya one-X® Communicator getting started for instructions to download and install the
software.
Configuring a Station Endpoint for Avaya one-X® Communicator with H.323
Avaya one-X® Communicator can use either the H.323 or SIP protocol. When an Installation
Engineer installs Avaya one-X® Communicator, they make the choice between H.323 and SIP.
This section describes how to enable video calls for a desktop user using the H.323 protocol.
Before you begin, it is important to verify that you have valid licenses for Avaya one-X®
Communicator.
Video is an optional feature in Avaya one-X® Communicator. In addition, Users must install
Avaya one-X® Communicator on their PCs before they can handle video calls from their
desktops.
Checklist
When setting up video calls for a desktop, you will need to know the following information:
●
the station number of the desktop user
●
the IP codec sets you want to use
●
the IP network regions you want use
Determining the Maximum Number of Video-Capable Endpoints Supported
To determine the maximum number of video-capable endpoints your voice system supports,
enter display system-parameters customer-options and verify the Maximum Video
Capable IP Softphones. This number is provided by the license file.
Administering Avaya Video Conferencing Solution 6.0.1
Issue 2.1
April 15, 2011
81
Note:
Note:
Avaya one-X® Communicator uses the same pool of video licenses counted by
the Maximum Video Capable IP Softphones parameter. To provide video
softphone capability, you must have at least this number of Avaya one-X®
Communicator licenses. Page 10 of this screen displays the number of Avaya
one-X® Communicator licenses you have.
Setting Up Video Endpoints
Perform this procedure if you want to allow priority video calling.
1. On SAT, enter change cos and set the following parameters:
●
Priority Video Calling : appropriate COS levels.
2. To modify an existing station that uses Avaya one-X® Communicator, enter change
station n (where n is the number of the station you want to modify) and set the following
parameters:
●
IP Softphone : Y
●
IP Video : Y
For this station to make priority video calls, make sure you select a COS level that has Priority
Video Calling enabled. Repeat the above mentioned steps for each video-enabled Avaya
one-X® Communicator endpoint you want to configure.
Configuring Polycom VSX/HDX Series Video Conferencing
Systems and V500/V700 Video Calling Systems
Use this procedure to configure Polycom VSX/HDX series video conferencing systems and
V500 and V700 video calling systems.
Checklist
When setting up these systems, you will need to know the following information:
●
maximum number of VSX/HDX, V500, and V700 systems on your network
●
PIN for each VSX/V500/V700 system. The PIN can consist of a maximum of eight
numeric characters and is defined by the System Administrator.
●
the key code that combines the Avaya option with any other Polycom options.
82 Administering Avaya Video Conferencing Solution 6.0.1
Issue 2.1
April 15, 2011
Administering and setting up video H.323 endpoints
●
whether the VSX/HDX system has the multipoint option or IMCU option. If so, you
must combine the Polycom Software License for this capability with the “Avaya
Option” Polycom Software License to create a single Key Code to input into the unit.
●
IP address of the voice system
●
the IP codec sets you want to use
●
the IP network regions you want use
Configuration Procedures
To configure Polycom VSX/HDX series video conferencing systems and V500/V700 video
calling systems, you must perform the following steps:
1. On SAT, enter display system-parameters customer-options and verify the
Maximum Video Capable Stations. This number is provided by the license file. The
Maximum Video Capable Stations is determined using the following criteria:
●
.Each V500/V700 system is considered to be one station
●
.Each single-point VSX system is considered to be one station
●
Each VSX multipoint system can be three to five stations. Each system supports six
sites in a call, but this includes the caller, so only five stations need to be administered.
●
Each HDX system can be three stations for Multipoint Plus Four (MP-4) and seven
stations for Multipoint Plus Eight (MP-8) for the HDX9004. The basic rule is that for
an N-way multipoint system, N-1 consecutive H.323 stations are required. So, for
example, a HDX9004 with an MP-8 license requires seven H.323 stations with
adjacent extensions, such as 71862 to 71868. The adjacent extensions and a circular
hunt-to-station configuration ensure that the next available extension is accessed with
multiple dial-ins..The HDX9002 only has "Multipoint Plus Four"(MP-4) as an option.
2. Configure the Class of Service. enter change cos and set the following parameters:
●
Priority Video Calling : appropriate COS levels.
3. To add a station, enter add station n and set the following parameters:
Note:
●
Type : H.323.
●
Security Code : pin you will administer for the VSXHDX or V500 system
●
IP Video : Y
Note:
You can create an alias for VSX/HDX stations.
●
Direct IP-IP Audio Connections : Y
●
IP Audio Hairpinning : Y
Administering Avaya Video Conferencing Solution 6.0.1
Issue 2.1
April 15, 2011
83
Note:
Note:
If the VSX system has the multipoint option or IMCU option, enter add station
to add a second station for the Polycom system. The extension number should
be one greater than the station added in the previous step. Set the following
parameters:
●
Type : H.323
●
Security Code : pin you will administer for the VSX/HDX. Ensure the security code is
the same as the previous station. Each station configured for the multipoint device
must use the same security code.
●
IP Video : Y
Repeat step 4 to create the third consecutive station. You can have up to seven stations.
4. Enter change station n (where n is the first station you added for the Polycom system)
to set Hunt-to Station to the second station you added for the Polycom system.
5. Enter change station n (where n is the second station you added for the Polycom
system) to set Hunt-to Station to the third station you added for the Polycom system.
6. Enter change station n (where n is the third station you added for the Polycom system)
to set Hunt-to Station to the first station you added for the Polycom system. All three
stations must be in a circular hunt.
Note:
Note:
If you added more than three stations for the Polycom system, use the station
screen to set Hunt-to Station for each station. All the stations you add must be
in a circular hunt.
Configuring a Polycom RMX Series Video Conferencing Bridge
Platform
This section describes how to configure a Polycom RMX series video conferencing bridge
platform for use with an Avaya server.
Checklist
When setting up these systems, you will need to know the following information:
●
the IP codec sets you want to use
●
the IP network regions you want use
●
the IP address of the IP board for the RMX system
84 Administering Avaya Video Conferencing Solution 6.0.1
Issue 2.1
April 15, 2011
Administering and setting up video H.323 endpoints
●
Note:
the IP address of the C-LAN
Note:
Make sure you have the RMX Installation and Configuration guide available when
you configure the RMX.
Adding an Entry in the IP Node Names for the RMX System
To add an entry in the IP Node Names screen for the RMX system, enter change
node-names ip to access the IP Node Names screen. Set the following parameters:
●
Name : enter a name for the RMX system.
●
IP Address : enter the IP address of the signaling host for the RMX system.
Adding a Two-Way Trunk Group for the RMX System
Enter add trunk-group n (where n is the chosen trunk group) and set the following
parameters.
●
Group Type : ISDN
●
Set Direction : two-way
●
Carrier Medium : H.323
●
Service Type : tie
Adding a Signaling Group for the RMX System
Enter add signaling-group n (where n is the chosen signaling group) and set the
following parameters:
●
Group Type : H.323
●
IP Video : Y
●
Priority Video: Y. If you want all incoming calls to receive priority video transmissions.
●
Trunk Group for Channel Selection : the two-way trunk added above
●
Near-end Node Name: procr / C-LAN, For an S8300 system, you would enter
PROCR. For a port network, enter the name of the C-LAN board.
●
Near-end Listen Port : 1720
●
LRQ Required : N
●
RRQ Required : Y
Administering Avaya Video Conferencing Solution 6.0.1
Issue 2.1
April 15, 2011
85
●
ARQ Required : Y
●
Enable Layer 3 Test : N
●
Far-end Node Name : the name entered for the RMX system.
●
Far-end Listen Port : 1720
●
Far-end Network Region: 1720
●
Calls Share IP Signaling Connection : N
●
Direct IP-IP Audio Connections : Y
●
IP Audio Hairpinning : N
Configuring Polycom MGC Series Video Conferencing Systems
This section describes how to configure a Polycom MGC series video conferencing.The
following procedure.
Configuring IP Network Regions
On SAT, enter change ip-network-region n (where n is the chosen IP network region)
and set the following paramters:
●
Intra-region IP-IP Direct Audio : Y
●
Inter-region IP-IP Direct Audio : Y
●
Security Procedures : any-auth
●
codec set : appropriate entry
●
Video Norm : appropriate bandwidth
●
Video Prio : appropriate bandwidth
●
Video Shr : Y/N, depending on if user wishes to share video pool.
Determining the Maximum Number of Video Conferencing Ports Supported
On the system-parameters customer-options screen verify the following parameters:
●
verify Maximum Administered Ad-hoc Video Conferencing Ports. The maximum
number of Ad-hoc video conferencing ports allowed is the number of video ports
available for Ad-hoc use on the MCU(s). For example, if you have three MCUs, and
each MCU has 16 ports available for Ad-hoc use, the maximum number of Ad-hoc
86 Administering Avaya Video Conferencing Solution 6.0.1
Issue 2.1
April 15, 2011
Administering and setting up video H.323 endpoints
video conferencing ports allowed is 48. This is a license count that Avaya provides
based on your stated needs. Licensing and administration are two different decisions
on port counts.
Configuring Class of Service
Enter change cos and set the following parameters:
●
Ad-hoc Video Conferencing : appropriate COS level
Configuring a Video Bridge
Enter add video-bridge n (where n is the bridge number between 1 to 40, and each video
bridge belongs to an MCU) and set the following parameters:
●
Name : assign the bridge a name
●
Max Ports : equivalent to the number of ports that are available for use
●
Trunk Groups : the administered incoming or outgoing ISDN H.323 or SIP trunk groups
added for the MGC
●
Far End Resource Info : N
●
ID Range : correspond to the actual conference ID numbers of meeting rooms configured
on the MGC
Configuring stations to support a Tandberg MXP
This section describes how to configure stations to support Tandberg MXP series video
conferencing.
On SAT, enter add station n (where n is the extension of an available station) and set the
following parameters:
●
Type : H.323
●
Name : Tandberg MXP
●
Lock messages : N
●
Hunt to station tests : Y
●
COR : 1
●
COS : 1
●
IP video : Y
Administering Avaya Video Conferencing Solution 6.0.1
Issue 2.1
April 15, 2011
87
●
DTMF over IP : in-band
●
Survivable COR : internal
●
Survivable trunk dest : Y
●
Authentication reqd : Y
Configuring Polycom VBP-E
To configure a Polycom VBP-E using Communication Manager complete the following
procedure:
1. On SAT, enter change signalling group n (where n is the group number) and set the
following parameters:
●
IP Video : Y
●
Near end listen port : 1720
●
Far end listen port : 1720
●
LRQ required : N
●
RRQ required : N
2. Enter change trunk group n (where n is the group number) and set the following
parameters :
●
Group type : ISDN
●
Direction : Two Way
3. Enter change ip network region n (where n is the region number) and set the
following parameters:
●
Intra region IP-IP Direct audio : N
●
Inter region IP-IP Direct audio : N
88 Administering Avaya Video Conferencing Solution 6.0.1
Issue 2.1
April 15, 2011
Chapter 4: Administering video endpoints
This section describes the procedure to administer the actual endpoints to enable video
conferencing.
Administering video SIP endpoints
Avaya 1000 series video endpoints
Perform the following steps to configure all AVCS 1000 series video endpoints using the IR
Remote Control. The endpoint GUI may also be used for configuring the endpoint using a web
browser.
1. Log on to the video endpoint. The default password is 1234. Click the blue System Menu
Button on the remote. Select Admin Preferences by using the arrow buttons.
2. Navigate to Network > General, and set the following parameters:
●
DHCP : Disabled. If DHCP is used, ensure the DHCP server is up and then select
DHCP : Enabled
●
IP Address : The IP address assigned to the actual endpoint
●
Subnet Mask : Appropriate entry
●
Default Gateway : Appropriate entry
●
Host Name : Appropriate entry
●
DNS server : Appropriate entry
●
Network Speed : Auto
●
802.1X Authentication : Disabled
3. Under Communications, click SIP, and set the following Parameters:
●
SIP Username : <ext>
●
Authorization Name : Same as SIP Username
●
Authorization Password : Same as the Shared Communication Profile Password
●
SIP registarion : Through Proxy
●
SIP Proxy : Enabled
●
Proxy Hostname : Session Manager FQDN or IP address used for registration. This
is the Session Manager Security Module / SIP Entity IP address or corresponding
FQDN.
DRAFT
Administering Avaya Video Conferencing Solution 6.1
Issue 1
89
Administering video endpoints
●
SIP Registrar : Enabled
●
Registrar Hostname : Same as Proxy Hostname
●
TCP : Enabled
●
TCP signaling port : 5060
4. To confirm or verify if user registration is complete, under Communication click SIP and
ensure the following.
●
Registrar Status : Registered
5. To configure the AVCS 1000 series endpoints using a web browser, enter the IP address of
the endpoint in the address bar and follow the steps as shown above.
Adding an audio call to Avaya 1010/20/30 video endpoints
1. Log on to the video endpoint. The default password is 1234. Click the blue System Menu
Button on the remote. Select Admin Preferences by using the arrow buttons.
2. Navigate to System Menu > Administrator Preferences > Communications > General
and enable Multiway calls.
3. Set Call Appr as shown in Administering call routing on page 63.
Avaya Virtual Link
Avaya VirtualLink allows Avaya 1010/1020 to share IP-based presentation data during a call.
For Installation procedures and system requirements, see Avaya Virtual Link installation Guide.
Note:
Avaya VirtualLink and Avaya 1010/1020 must be in the same LAN, or the
computer running Avaya VirtualLink must be connected to the network through
VPN. Avaya VirtualLink does not process requests through NAT or firewall
traversal.
Note:
Prerequisites
●
Avaya 1010/1020 must be running version 4.7 or later. System software upgrades are
available to licensed users at http://support.avaya.com. Refer to the Avaya 1010/1020
User Guide for upgrade instructions.
DRAFT
90 Administering Avaya Video Conferencing Solution 6.1
Issue 1
●
Avaya VirtualLink requires Adobe AIR 2.0 to communicate with Avaya 1010/1020. Adobe
AIR 2.0 must be installed on the computer that is running Avaya VirtualLink. Browse to
get.adobe.com/air to download the application.
●
You can prepopulate video system entries in Avaya VirtualLink by editing the
EndpointList.xml file that is included with the application. Your video system entries are
copied during installation. With this method, PC users are not required to add systems
individually. For details see, Avaya Virtual Link installation Guide.
Administering Avaya Virtual Link
1. Launch Avaya VirtualLink.
2. Click Add.
3. Enter a system name, IP address, and location, and then click Save.
4. The system name appears in the main window (under the All tab). A system’s status may be
one of the following:
●
Unavailable : The video system is offline.
●
Available : The video system is available to participate in a call.
●
In a Call : The video system is participating in a call.
●
Presenting : The video system is participating in a call and sending or receiving a
presentation.
5. If the status of a system shows In a Call or Presenting, click the video icon to share the
presentation data. A confirmation screen appears on the video system display. Click Yes to
start the presentation.
Avaya one-X® communicator
Clicking the Auto-configure button is one way to configure settings on all the screens or one
screen at a time. For more details on Auto-configure option, see the Avaya one-X®
Communicator Getting Started Guide.
Configuring General Settings manually
If you want to configure the settings manually, perform the following steps:
Phone screen
1. Click Phone on the left pane of the General Settings window. The Phone settings appear on
the right pane of the General Settings window. This pane displays different fields depending
DRAFT
Administering Avaya Video Conferencing Solution 6.1
Issue 1
91
Administering video endpoints
on whether you selected H.323 or SIP protocol during installation. For SIP protocol enter
the following information:
●
Extension : enter your extension on the Avaya server
●
Password : enter your password
2. To specify the IP address of your server, click Add below the Server List field. The Add
Server dialog box appears. Set the following parameters:
●
Proxy Server : enter the IP address of the proxy server.
●
Port : enter the port number of the server. If you do not enter the port number, Avaya
one-X® Communicator uses the default 5061 port. Click OK.
Repeat Steps 1 to 3 for each server address you want to specify.
3. To establish video sharing on Avaya one-X® Communicator, the system administrator must
have configured your extension on the server for video calls to work. If it is configured, make
sure that the Enable Video Calls check box is selected. Set the following parameters:
●
●
Domain : enter the domain of your Avaya Aura® Session Manager.
Failback Policy : click Auto to make Avaya one-X® Communicator automatically
recover after failback. Click Admin if you want Avaya one-X® Communicator to use the
failback policy defined by your system administrator.
●
Registration Policy : click a registration policy to specify how your extension
manages proxies.
●
Mode, Avaya Environment, and Emergency Number fields are read only.
4. To Enable High Definition Video, navigate to Video > Advanced and check the box that
corresponds to H.264.
Audio screen
1. Click Audio on the left pane of the General Settings window and the Audio settings appear
on the right pane of the General Settings window. Select the Basic tab and perform the
following steps:
●
Drag the Playback slider to control the volume for playback.
●
Drag the Record slider to control the volume for the record.
●
Select the Mute ringing for incoming calls check box to turn off the ringing for all
incoming calls.
●
Click the Audio Tuning Wizard button to configure the optimal audio settings for calls.
For more information on setting the audio tuning wizard, see Avaya one-X® Communicator User
Reference on the Avaya Support Web site http://www.avaya.com/support.
2. Select the Advanced tab to control the audio options to adjust to your system’s network
bandwidth. Perform the following steps:
DRAFT
92 Administering Avaya Video Conferencing Solution 6.1
Issue 1
●
Connection Type : click the type of connection for your network.
●
Jitter Buffer : click the size of your Jitter Buffer. Set your Jitter Buffer according to
your network parameters and the packet losses. Avaya recommends you to set this
option to Automatic.
●
Move the Receive Gain slider to set the gain for incoming sound during a call. Avaya
recommends you to set this option to 1.00.
●
Move the Transmit Gain slider to set the gain for outgoing sound during a call. Avaya
recommends you to set this option to 0.35.
●
Move the Jitter Buffer Low Water Mark slider to set the low water mark for the jitter
buffer. Avaya recommends you to set this option to minimum.
●
Select Always use this value check box if you want Avaya one-X® Communicator to
always use the values you have set above.
Dialing Rules screen
1. Click Dialing Rules on the left pane of the General Settings window. The Dialing Rules
settings appear on the right pane of the General Settings window. In the Number to dial to
access an outside line field, enter the digit(s) you must dial to access an outside line. In the
Your country code field, enter the code for your country. In the Your area/city code field,
enter the area code or the city code where your phone server is located. You can enter
multiple codes and separate them with commas. For example, 406, 208. If you enter this
code, Avaya one-X® Communicator treats every call made to a region matching with either
406 or 208 as a local call. Set the following parameters:
●
PBX Main Prefix : enter the main prefix of your PBX
●
Number to dial for long distance calls : enter the digit(s) you must dial to make a
long distance call.
●
Number to dial for international calls field : enter the digit(s) you must dial to make
an international call.
●
Extension length for internal extensions calls : enter the number of digits that
comprise an internal extension. For example, if your internal extensions consist of five
digits, you would enter, any number that consists of five digits or less would be treated
as an internal extension. If your company supports internal extensions of varying
lengths (for example, three-digit, five-digit, and seven-digit extensions), you must
separate these lengths by commas and enter 3, 5, 7.
DRAFT
Administering Avaya Video Conferencing Solution 6.1
Issue 1
93
Administering video endpoints
Note:
Note:
If you specify multiple extension lengths, Avaya one-X® Communicator performs
exact matches. For example, if you specify 3, 5, 7, Avaya one-X® Communicator
treats three-digit numbers, five-digit numbers, and seven-digit numbers as
internal extensions. In this example, if you dial a one-digit, two-digit, or four-digit
number, Avaya one-X® Communicator does not recognize the numbers to be
internal extensions.
●
Length of national phone numbers (including area/city code): enter the number of
digits you must dial (including area/city code) for a call within your country.
●
For countries with multiple phone number lengths : enter all supported phone number
lengths separated by a comma.
2. If you entered an area or city code above, select the Include area/city code when making a
local call check box if you are required to prefix the area or city code while making a local
call. For example, for Lincroft area in the U.S., entering an area code is mandatory.
Therefore, you must select the check box. However, for Basking Ridge area in the U.S.,
entering an area code is not mandatory, and you need not select the check box.
3. If you want Avaya one-X® Communicator to display a confirmation window before it dials a
number, select the Display confirmation window before dialing a number check box. This
ensures that you can check whether the number to be dialed conforms to the dialing rules
you set. If not, you can update the number. Avaya one-X® Communicator then uses the
updated number to make calls.
Public Directory screen
Before you can access a public directory, you need to select the Public Directory check box in
the Desktop Integration window. For this procedure, see Desktop Integration screen.
1. If you want to configure Avaya one-X® Communicator to access a public directory, click
Public Directory on the left pane of the General Settings window. The Public Directory
settings appear on the right pane of the General Settings window. Set the following
parameters:
●
Directory Type : click the type of directory (Active Directory, Domino, or Novell).
●
Directory Name : enter the name for the directory.
●
Server Address : enter the IP address of the server for this directory.
●
User name : if required.
●
Password : if required.
●
Search Root : enter the search root. An example is ou=people,o=company.
●
Server Port : enter the port number. The default is 389.
●
Time out field : enter the timeout interval. The default is 100 seconds.
DRAFT
94 Administering Avaya Video Conferencing Solution 6.1
Issue 1
●
Max Entries : enter the maximum number of matching entries that you want Avaya
one-X® Communicator to display. The default is 50.
Select the Use Active Directory GSS Bind check box, if you want Avaya one-X® Communicator
to use the current user’s login and password to bind with the Active Directory LDAP server.
IM and Presence screen
IM and Presence appears on the left pane only if you selected SIP protocol during this protocol.
Using this window, you can activate the native Avaya one-X® Communicator Instant Messaging
functionality. Click IM and Presence on the left pane of the General Settings window. The
Instant Messaging settings appear on the right pane of the General Settings window. Select the
Enable Instant Messaging service check box and set the following parameters:
●
Server field : enter the IP address of IM and Presence Server.
●
Select the Enable Local Message Archiving check box to store instant messages on
your hard disk drive.
Desktop Integration screen
Using Desktop integration settings, you can specify the directories Avaya one-X®
Communicator searches when you use the Name Look-Up feature and set whether you want to
enable wipe-to-dial feature. Click Desktop Integration on the left pane of the General Settings
window. The Desktop Integration settings appear on the right pane of the General Settings
window. Perform one of the following steps in the Name Look-Up area:
1. Select the Microsoft Outlook Contacts check box if you want Avaya one-X® Communicator
to search contacts from Microsoft Outlook when you use the Name Look-Up feature.
Microsoft Outlook must be installed and running on your computer.
2. Select the IBM Lotus Notes Contacts check box if you want Avaya one- X Communicator to
search contacts from Lotus Notes Address Book when you use the Name Look-Up feature.
Lotus Notes Address Book must be installed and running on your computer.
3. • Select the Public Directory check box if you want Avaya one-X® Communicator to search
contacts in a public directory when you use the Name Look-Up feature. Public Directory
must be configured using the Public Directory settings.
4. Select the Enable wipe-to-dial (clipboard dialing) check box to enable the wipe-to-dial
feature. In any application, if you click a number that can be dialed, you can dial that
number from the Avaya one-X® Communicator icon in the system tray.
DRAFT
Administering Avaya Video Conferencing Solution 6.1
Issue 1
95
Administering video endpoints
Preferences screen
1. Click Preferences on the left pane of the General Settings window. The Preferences
settings appear on the right pane of the General Settings window.
2. Select the Display alerts for incoming calls check box if you want Avaya one-X®
Communicator to display alerts when you receive incoming calls.
3. Select the Automatically login if possible when application restarts check box if you want
Avaya one-X® Communicator to automatically login when the application restarts.
4. Select the Run Avaya one-X® Communicator automatically when you log in to
Windows check box if you want Avaya one-X® Communicator to automatically run Avaya
one-X® Communicator when you log in to your system.
Message Access screen
If you want to set Avaya one-X® Communicator to access your messaging system when you
click the Message Waiting Indicator in the Avaya one-X® Communicator window, perform the
following steps:
1. Click Message Access on the left pane of the General Settings window. The Message
Access settings appear on the right pane of the General Settings window.
2. Select the Enable Message Access check box. Perform one of the following steps:
●
●
●
If you want Avaya one-X® Communicator to dial the access number of the messaging
system, select the Dial this number option. Enter the telephone number you want to
dial to access the messaging system.
If you want Avaya one-X® Communicator to open another application to access the
messaging system, select the Start This Application option. Click Browse to select the
application you want to run.
If you want Avaya one-X® Communicator to open a Web browser and go to the Web
page for the messaging system, select the Open Webpage option. Enter the Web URL
for the messaging system.
Configuring Avaya A175 Desktop Video Device
Use this procedure to configure Avaya A175 using Communication Manager.
1. On SAT, enter change ip-network-region and set the following parameters:
●
RTPC Report Period : Y
●
Authoritative Domain : SIP Domain for solution
DRAFT
96 Administering Avaya Video Conferencing Solution 6.1
Issue 1
2. Enter change off-pbx-station mapping n (where n is the station number of device
being used) and ensure all bridged call items are set to none. None is the default option.
Set the following parameters:
●
Station Extension : appropriate entry
●
Application : appropriate entry
●
Dial Prefix : appropriate entry
●
Phone Number : appropriate entry
●
Trunk Selection :appropriate entry
●
Configuration Set : appropriate entry
●
Call Limit : appropriate entry
3. Enter change system-parameters features and set the following parameters:
●
Music/Tone on hold : Y
4. Enter change dialplan analysis and set the following parameters:
●
Call Type : fac
5. Enter change feature-access-code and set the following parameters:
●
ARS access code : appropriate entry
●
AAR access code : appropriate entry
6. Enter add station n (where n is the extension number) and set the following
parameters:
●
Extension : same extension as the Communication Manager call server extension
administered in Session Manager
●
Station Type : Avaya recommends the format 9640SIP
●
Port : System Populated
●
Coverage Path : appropriate entry
●
COS : appropriate entry
●
COR : appropriate entry
●
Name : The person associated with the Avaya A175. This name should match what is
entered for name in the Avaya SES proxy configuration
●
Message Lamp Ext : Enter the extension of the station you want to track with the
message waiting lamp
DRAFT
Administering Avaya Video Conferencing Solution 6.1
Issue 1
97
Administering video endpoints
On the station screen, ensure the following settings:
Note:
●
Bridged Call Alerting : Y
●
Restrict Last Appearance : N
●
AUDIX Name : the name of the voice messaging system administered for this system
●
Coverage after Forwarding : S, default for system
●
Per Station CPN Send Calling Number : N
●
Button Assignments : 1. Call Appr; 2. Call Appr
Note:
To support certain transfer and conference scenarios, the minimum number of
call-appr buttons should be 3.
DRAFT
98 Administering Avaya Video Conferencing Solution 6.1
Issue 1
Administering H.323 video endpoints
Administering H.323 video endpoints
This section describes administration of video endpoints for H.323 protocol.
Configuring Polycom VSX/HDX Endpoints:
To configure the Polycom system install the Polycom system and connect it to your network.
Upgrade the Polycom system software (if necessary) and using a web browser, access the
Polycom home page for the unit, and select Admin Settings>Network>IP Network and follow the
procedure below:
1. Select the Enable IP H.323 check box.
2. Select the Display H.323 Extension check box.
3. In the H.323 Extension (E.164) box, enter the station number you specified for this system
on the Communication Manager system.
4. From the Use Gatekeeper box, select Specify with PIN.
5. In the Gatekeeper IP Address box, enter the IP address of the C-LAN or PC-LAN followed
by:1719 (to specify the correct port to use).
6. In the Authentication PIN box, enter the security code you entered in Procedure 4.
7. In the Number box in the Gateway area, enter the extension you specified.
8. Select the Enabled PVEC check box.
9. In the Type of Service box in the Quality of Service area, select the appropriate setting. Both
IP Precedence and Diffserv are supported. Contact your Network Administrator for this
information.
10. In the Type of Service Value boxes (Video, Audio, and Far End Camera Control), enter the
QoS values for the IP Network Region settings in which the VSX station belongs.
11. Select the Dynamic Bandwidth check box.
12. From the Maximum Transmit Bandwidth box, select the setting that matches the Maximum
Call Rate for Direct-IP Multimedia setting you specified for the Communication Manager
system.
13. From the Maximum Receive Bandwidth box, select the setting that matches the Maximum
Call Rate for Direct-IP Multimedia setting you specified for the Communication Manager
system.
14. Complete the Firewall and Streaming sections as necessary.
DRAFT
Administering Avaya Video Conferencing Solution 6.1
Issue 1
99
Administering video endpoints
Note:
Note:
Remote control can have its RF band customized if controlling more than one
system. Remote control can also be used to switch display modes by holding
down the power button.
When finished, click the Update button. Repeat Steps 1 through 14 for each Polycom system.
Configuring the Polycom RMX System
1. To configure the Polycom RMX system, install the RMX system and connect it to your
network. Upgrade the Polycom system software (if necessary). Access the Polycom home
page for the unit. From the Setup menu, select the System Parameters tab. Under
MCMS_PARAMETERS_USER, configure the following settings:
●
MCU_DISPLAY_NAME = POLYCOM RMX-2000
●
ENABLE_AUTO_EXTENSION = YES
●
NUMERIC_CONF_ID_LEN = 5
●
CP_REGARD_TO_INCOMING_SETUP_RATE = NO
●
NUMERIC_CONF_ID_MAX_LEN = 8
●
NUMERIC_CONF_ID_MIN_LEN = 4
●
TERMINATE_CONF_AFTER_CHAIR_DROP = NO
●
H323_FREE_VIDEO_RESOURCES = NO
2. Under CS_MODULE_PARAMETERS, add the following information:
●
H245_TUNNELING = YES
3. On the Default IP Server Properties dialog, create and configure a H.323 IP service with the
Communication Manager settings, such as the C-LAN IP address. Ensure that the MCU
prefix and aliases match the dial plan that you configured on CM. Confirm via a status
signaling group that the RMX has registered.
4. On the Default Video Properties dialog, configure the conference profile with the line rate,
codec settings, and the high definition video switching option. Multiple meeting rooms can
use this profile.
5. Create a meeting room to use a test direct dial conference ID.
DRAFT
100 Administering Avaya Video Conferencing Solution 6.1
Issue 1
Administering H.323 video endpoints
Configuring Polycom RMX H.323/SIP to H.320 Support –
Incoming/outgoing ISDN Calls
Provides interoperability with video endpoints on public ISDN communication services.
PRI lines can be direct from the network or routed through the Communication Manager to
share PRI resources. Communication Manager supports T1/E1 lines.
To configure the Polycom RMX system, install the RMX system and connect it to your network.
Upgrade the Polycom system software (if necessary).
1. Access the RMX Management pane and navigate to ISDN/PSTN Service Properties >
Span Definition and set the following parameters:
Note:
●
Framing : For T1 spans, default is SFSFwhile the default for E1 spans, default is
FEBE.
●
Side : User side (default)
Note:
If the PBX is configured on the network side, then the RMX unit must be
configured as the user side, and vice versa, or both must be configured
symmetrically.
●
Line Coding : For T1 spans, default is B8ZS and the default for E1 spans is HDB3.
●
Switch Type : For T1 spans, the default is AT&T 4ESS and EURO ISDN for E1 spans.
Click Next. The Phones dialog is displayed. Click Add.
2. DID can be used for Entry Queues, Conferences, Meeting Rooms or Gateways to H.323 or
SIP endpoints. To assign the DID (ISDN public numbers), navigate to ISDN/PSTN Service
Properties > Phones and set the following parameters:
●
First Number : The first number in the phone number range.
●
Last Number : The last number in the phone number range.
●
MCU CLI : In a dial-in connections, the MCU CLI indicates the MCU’s number dialed
by the participant. In a dial-out connection, indicates the MCU (CLI) number as seen
by the participant.
Click Save.
3. Access the RMX Management pane and navigate to Conference Profile and set the
following parameters:
●
Display Name : name of the chosen conference profile
DRAFT
Administering Avaya Video Conferencing Solution 6.1
Issue 1
101
Administering video endpoints
●
Conference Profile : Select the Profile to be used by the Entry Queue.
●
ID : Enter a unique number identifying this conferencing entity for dial in. Default string
length is 4 digits.
●
Gateway Dial Out Protocols : enable all options, H.323, SIP, H.320, and PSTN.
●
ISDN/PSTN Access : enable by checking the box
●
ISDN/PSTN Service : ISDN/PSTN Service
●
Dial in Number (1) : Leave this field blank to let the system automatically assign a
number from the selected ISDN/PSTN Network Service. To manually define a dial-in
number, enter a required number from the dial-in number range defined for the
selected Network Service.
●
Dial in Number (2) : enter a required number from the dial-in number range defined
for the selected Network Service.
4. In the RMX Management pane, navigate to Meeting Rooms, select the appropriate option
and set the following parameters:
●
Display Name : Displays the name and the icon of the Meeting Room in the RMX
Web Client.
●
Routing Name : The name used by all conferencing devices to connect to
conferences that must be registered with the gatekeeper and SIP Servers.
●
ID : Displays the Meeting Room ID. This number must be communicated to H.323
conference participants to enable them to dial in.
●
Duration : Displays the duration of the Meeting Room in hours using the format
HH:MM (default 01:00).
●
Conference Password : The password to be used by participants to access the
Meeting Room.
●
Chairperson Password : Displays the password to be used by the users to identify
themselves as Chairpersons.
●
Profile : Displays the name of the Profile assigned to the Meeting Room.
Click OK.
For an inbound call, an external user dials RMX ISDN public number (DID) and at the IVR
prompt enters E.164 extension of SIP or H.323 extension.
For an outbound call, Internal user dials ARS routing code followed by the ISDN Number.
DRAFT
102 Administering Avaya Video Conferencing Solution 6.1
Issue 1
Administering H.323 video endpoints
Configuring Polycom VBP-E Support – Incoming/Outgoing
External Video Calls
Video calls coming from or going to a Polycom H.323 endpoint with internet access are
facilitated through the Polycom RMX endpoint as a gateway call to SIP endpoints. In this
manner, calls can achieve HD resolution with an AVCS SIP endpoint. In H.323 RMX can be
bypassed for an HD call between two H.323 endpoints.
To configure the Polycom VBP-E :
1. On the VBP-E administration page, navigate to Configuration Menu > Network. On the
Network page, Set the following parameters:
- LAN Interface Settings
●
IP Address : change the default IP address to one that the VBP-Ehas been assigned
by the network.
●
Subnet Mask : appropriate entry.
- WAN Interface Settings
●
Static IP Address : Check the radio button corresponding to Static IP address.
●
IP Address : appropriate entry
●
Subnet Mask : default gateway must be in this subnet.
- Network Settings
●
Default Gateway : Enter IP address of the upstream (WAN) router.
●
Primary DNS Server : appropriate entry
●
Secondary DNS Server : appropriate entry
2. On the VBP-E administration page, navigate to Configuration Menu > VoIP ALG > H.323.
On the H.323 settings page, set the following parameters:
- Gatekeeper Mode
●
Select the Embedded gatekeeper mode radio button
- LAN/ Subscriber-side Gatekeeper mode settings
●
LAN/ Subscriber-side Gatekeeper address : IP address of the Gatekeeper
DRAFT
Administering Avaya Video Conferencing Solution 6.1
Issue 1
103
Administering video endpoints
3. On the VBP-E administration page, navigate to Configuration Menu > VoIP ALG > H.323
> Neighboring. The Prefix routing table is displayed. To enable prefix routing functionality,
review the following list when completing the featured fields:
●
Action : Indicates whether a prefix routing rule is to be added or edited
●
Prefix : Specifies the prefix pattern to be matched against the dialing string
●
Index : Determines the order in which the rule is scanned in the Prefix and
Gatekeeper Neighboring table. To add a rule between two rules with consecutive
indexes (n and m), use the higher index (m)
●
Strip : Indicates whether the matching prefix is stripped from the dialing string
●
Add : Specifies a string to be pre-pended to the dialing string
●
Neighbor : Determines whether a location request (LRQ) is sent when this prefix
matches. If enabled, the prefix becomes a neighboring statement. If disabled, the
incoming Q.931 Setup is forwarded to the given address without a preceding LRQ.
When the incoming Q.931 Setup is forwarded without a preceding LRQ, this is
sometimes referred to as “prefix-routing”. This field is used for interoperability with
other gatekeepers that may not accept a Setup without a preceding LRQ.
The Polycom VBP-E does not support SIP IP address dialing. The E.164 number is mapped to
the IP address. H.323 endpoints can make IP address dialing using * instead of “.”. This is
called Alias Manipulation.
This feature is useful for endpoints that cannot easily dial ANNEX O user@host methods, most
H.323 system remotes have the * and # symbols on the key pad, and not to many have the @
symbol, for this reason default patterns have been set on the VBP. If a user wishes to dial
[email protected] they can enter the string as 1234#1*1*1*1 and the VBP by default will translate
this string as an ANNEX O method. This feature is commonly used in VBP-E series in
Embedded gatekeeper mode.
To access the H.323 Alias Manipulation page, navigate to VoIP ALG > H.323 > Alias
Manipulation in the Configuration Menu and set the following parameters:
●
Action : Indicates whether a prefix routing rule is to be added or edited
●
Pattern : Specifies the pattern to be matched
●
Index : Determines the order in which the rule is scanned in the Prefix and
Gatekeeper Neighboring table. To add a rule between two rules with consecutive
indexes (n and m), use the higher index (m)
●
Replace : Specifies the string that will replace the matched pattern
DRAFT
104 Administering Avaya Video Conferencing Solution 6.1
Issue 1
Administering H.323 video endpoints
Configuring the Polycom MGC series
To configure a Polycom MGC endpoint:
4. Install the MGC system and connect it to your network. Upgrade the Polycom system
software (if necessary).
5. Access the Polycom home page for the unit, and select MCU Configuration > Network
Services > IP > IP Default > Network Service Properties to create a new H.323 service.
6. On the Settings tab, set the following parameters:
●
Protocol : H323.
●
Subnet Mask : appropriate entry
●
Default Router : appropriate entry
7. On the DNS Settings tab, specify the appropriate DNS servers in the Use DNS Servers
box.
8. On the H323 tab, set the following parameters:
Note:
●
Forwarding check box : unchecked
●
Use Gatekeeper : specify the gatekeeper
●
Preferred Gatekeeper IP Address : enter the C-LAN IP address.
●
Service Mode : enter Pseudo Gatekeeper AVF.
Note:
If Pseudo Gatekeeper AVF does not appear, you do not have the latest software.
You must install the Avaya-enabled Polycom MGC Manager software.
●
Prefix : enter the first digit of the extension numbers range in which the MCU resides.
●
Select the Refresh H.323 Registrations check box, and select a rate that is less than
60 seconds. (Avaya recommens 35 seconds)
9. On the Spans tab, add a new IP Span and set the following parameters:
●
Circuit ID : enter a unique identifier for this new circuit
●
IP Address : enter the IP address of the IP card that will use H.323 signaling
●
H323 Alias 1 : enter an H.323 ID of an alias for the board that Communication
Manager will route calls to this MGC
10. Define the IP1 configuration. In the Circuit ID box on the IP-Network Parameters tab, enter
the unique identifier you specified in Step 6.
11. Create a meeting room in Meeting Rooms and Entry Queues. In the Numeric ID box on the
General tab, enter the dialed digits excluding the prefix defined in the Network Service.
DRAFT
Administering Avaya Video Conferencing Solution 6.1
Issue 1
105
Administering video endpoints
Configuring the Tandberg MXP endpoint
The Tandberg endpoints do not support Dynamic Host Conifguration Protocol (DHCP) Option
242. This option is required in a network if there are Avaya 9600 Series Telephones present and
DHCP is utilized. The workaround is to statically configure the H.323 gatekeeper on the
Tandberg endpoints.
You must configure Tandberg endpoints using the Control Panel Menus or the Command Line
Interface (CLI). If you are configuring the H.323 gatekeeper on the Tandberg endpoints, you
must also use the Control Panel Menus or CLI.
In the example in this guide, DHCP is disabled. Information regarding IP addressing was
entered statically using the Control Panel Menus. Static IP addressing simplifies the assignment
of Tandberg endpoints to the correct IP network region. You can access the Control Panel
Menus as follows:
1. On the Tandberg MXP remote control unit, navigate to Network > LAN Settings > IP
Settings and select Static IP Assignment and enter the IP details in the various fields on
the panel.
Note:
Note:
On this panel, the IP Access Password field refers to the password used to
access the Tandberg endpoint using the CLI. You can change the IP Access
Password here.
2. Log in to the Tandberg MXP using Secure Shell (SSH) or telnet (IP address) and enter the
following commands. These are the necessary configuration parameters to enable MXP to
register to Communication Manager.
●
xConfiguration H323Gatekeeper Avaya Mode : On
●
xConfiguration H323Gatekeeper Avaya AnnexH : On
●
xConfiguration H323Gatekeeper Avaya MultipointCount :4, if multipoint
is 4
●
xconfiguration H323Gatekeeper Avaya Password : security code
3. To apply these changes, request a boot.
DRAFT
106 Administering Avaya Video Conferencing Solution 6.1
Issue 1