1
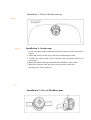
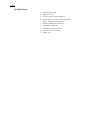
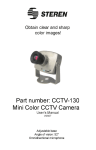
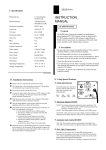
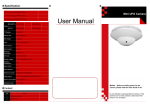
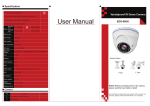
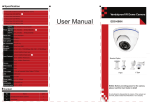
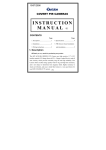
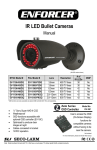
Installation/Owners Manual
Model ROSIBC
Interior Color Camera
F
FEATURES:
High Resolution, 1/3,CCD Color Camera
Adjustable Angle
Optical Control Infrared LED
Infrared LED for Night Vision
Mirror image selectable
Page 2
Congratulations on the purchase of the ROSIBC. This camera is
designed to be mounted inside the vehicle to either view an infant
strapped into a car seat that is buckled in facing the back seat or view the
passengers. The camera can reverse the image by pushing the button on
camera. There are 3 different mounting configurations to choose from.
If you want to adjust the camera to viewing area, please adjust the camera
up or down, left or right following the moving direction sign marked on
the camera shell.
Do not rotate the camera!
Page 3
Installation 1: View of the Suction cup
page 4
page 5
Installation 1: Suction cup
1. Locate and clean suitable mounting location on glass near baby seat side of
vehicle.
2. Attach the camera suction cup to the selected mounting location.
3. Connect the camera cable to the extension cable provided with the rear
view mirror.
4. Route the camera cable up to and under the headliner of the vehicle.
5. Route the extension cable up to the rearview mirror control box
and plug in the 4-pin connector.
.
page 6
Installation 2: View of Headliner pins
Page 7
Installation 2: Headliner pins
1. Remove the suction cup by rotating counter clockwise.
2. Locate suitable mounting location on headliner of vehicle.
3. Insert the mounting pin along opposite sides of camera into the headliner.
Push the mounting pins into the headlines until pin hooks are at mounting
tab. Place the pin hooks of mounting pin on mounting tabs.
3. Connect the camera cable to the extension cable provided
with the rear view mirror.
4. Route the camera cable under the headliner of the vehicle.
5. Route the extension cable up to the rearview mirror control box
and plug in the 4-pin connector.
Page 8
Installation 3: View of the Double side adhesive tape.
Page 9
Installation 3: Double sided adhesive tape.
1. Remove the suction cup by rotating counters clockwise.
2. Locate suitable flat mounting location in vehicle that double-sided tape
will adhere to.
3. Remove one side of the protective paper of both pieces of adhesive tape and
adhere tape to back of camera.
4. Remove remaining protective paper and adhere the camera to the selected
mounting location.
5. Connect the camera cable to the extension cable provided with the rear
view mirror.
6. Route the camera cable up to and under the headliner or side panel of the
vehicle.
7. Route the extension cable up to the rearview mirror control box and plug in
the 4-pin connector.
Page 10
Specifications:
1.
2.
3.
4.
5.
6.
7.
8.
9.
Signal System: NTSC
Voltage: DC 12V
Current: 70mA / 140mA (LED on)
Image Sensor: 1/3 Super CCD Color Sensor
NTSC: 510X492 picture elements
Horizontal Definition: 420 Lines
View Angle: 90 degrees
Minimum Illumination: 0 Lux
Outer Dimension: Ф55X60
Weight: 70 g
© 2005 Audiovox Electronics Corp., 150 Marcus Blvd., Hauppauge, N.Y. 11788
128-7366