1
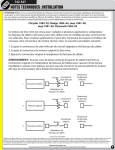
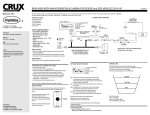
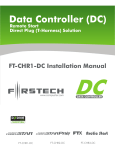
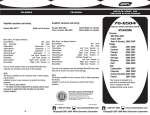
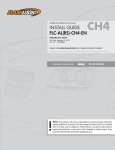
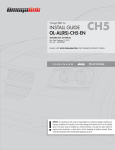
INSTALLATION GUIDE FOR:
CHRYSLER, PLYMOUTH,
& DODGE VEHICLES
MODEL CP-250
Printed in Korea
Form No. 128-4729A
RADIO PREPARATION:
1. Select two of the five mounting tabs provided and match the radio mounting style of the vehicle according to Figures 1 through 3 below.
NOTE: Tab number is stamped on bottom of tab.
2. Attach the mounting tabs to the radio chassis with the two M4 X 5 screws provided.
3. Attach the 14-pin connector harness provided to the radio.
FIG. 1
TAB #2
M4 SCREW
TAB #1
M4 SCREW
FIG. 2
TAB #2
TAB #3
M4 SCREW
M4 SCREW
FIG. 3
M4 SCREW
TAB #5
TAB #4
M4 SCREW
RADIO INSTALLATION:
1. Remove dash panel from vehicle to expose sub-dash.
2. Remove and discard radio dummy panel attached to sub-dash.
NOTE: Do not discard hardware for dummy panel.
3. Pre-wire radio including antenna wire. Attach ring lug on ground wire (black w/white stripe) from radio
harness side and the vehicle side grounding strap to the rear of the radio chassis using the M5 x 8 screw
provided. See Fig. 4 below.
4. Install radio into sub-dash of vehicle using the M6 x 18 self-tapping screws provided.
5. Conduct a brief performance test to verify proper operation.
6. Replace dash panel.
FIG. 4
ANTENNA WIRE
GROUNDING STRAP
M5 x 8
SCREW
RADIO HARNESS
GROUND WIRE
(black w/white stripe)
ADAPTOR HARNESS
(supplied)
M6 x 18
SCREWS